
(Lingerie edition)
 Ooo la la. Bra pics. Belly pics. You’re warned.
Filed under Sewing
A couple of months back, maybe not too much after I announced the impending twinpocalypse, one of the sweetest people on the internet, Gillian of Crafting a Rainbow, offered to make me (and/or impending babies) a present. Being an irredeemable mooch, I naturally eagerly agreed, and then didn’t think much about it. Me Made May came and went, June whizzed by, and my wardrobe shrank slowly, while my energy and motivation to sew replacement pieces ebbed lower.
Well, last week Gillian let me know a package was on its way. How exciting!!
 In the meantime, the latest Sewcialists Mini-Challenge dropped: spin the wheel, get a colour from the Sewcialists logo, and make something in that colour. By Sunday. Anyway, I conveniently (or boringly) spun black. Blue would’ve been more fun, but I have plenty of black fabric, and my machine and serger are both threaded with black from the Myosotis, so there was a lot to be said for it. I was toying with the idea of a black knit dress, not too flashy, maybe in a rayon knit if I could find the energy to dig through the bins, with either a circle or handkerchief skirt. I’m really liking how my knit Vogue 1312 is holding up to the rigors of pregnancy, and something along those lines (but sleeveless, and a simpler skirt) seemed appealing.
 So imagine my excitement when I opened the wee little package (which arrived Friday afternoon) and found a black rayon knit dress with a handkerchief skirt!!!!
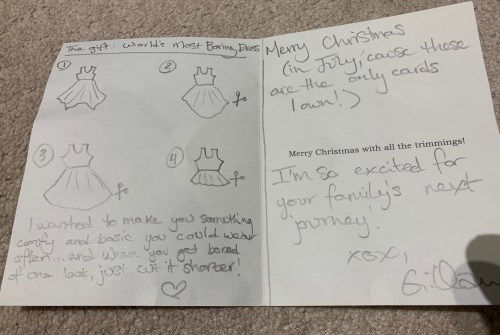 It also came with strict instructions to modify and hack as needed, for fit or boredom.
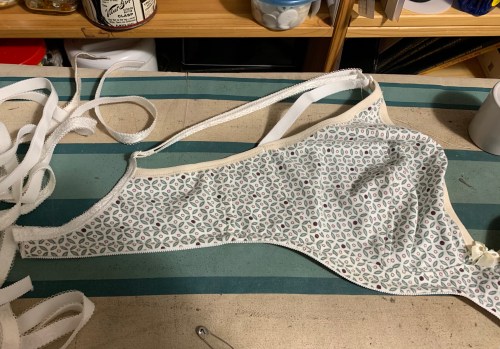
The theory was perfect, the practice a little less so—in the super-stretchy black rayon the bodice was loose, and the weight of the skirt pulled it WAY down, to around where my waist used to be–when it was meant to be more empire-lined. But this also made it perfect for the mini-challenge. I carefully cut off the skirt, took in the side seams, and trimmed an inch off the bodice. While I was at it, I narrowed the binding a wee bit, for a more delicate look and also cleavage (I did not do a good job, I will note. Oh, well.) So in the end I wound up re-sewing every seam but the shoulders, including the awesome tag:
 And I did take a goofy before picture (as per Gilliam’s request), but apparently not in a form that I can find later.
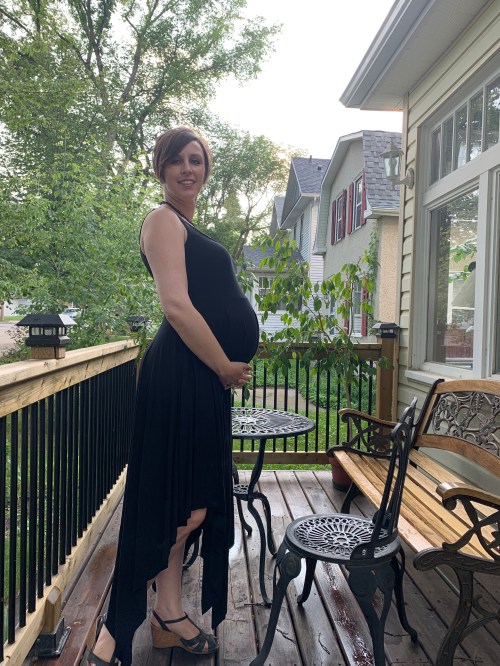
 In any case! Behold the dress! In final (?) form. It is, of course, perfectly comfy and breezy and stretchy while also being suave and possibly even svelte (to the extent that anyone pregnant is svelte).
 I may still have to trim a bit of length off the skirt, as it’s long even in these heels and likely to keep growing. But that’s easily done, and either way I have a fabulous and practical new dress!
Filed under Sewing
 I’m never exactly on the cutting edge of indie patterns, so everyone and their dog has already made the Deer and Doe Myosotis dress, mostly last summer. If it weren’t for all those versions I probably wouldn’t’ve been drawn to it, because it’s a lot of ruffles and a pretty squat, shapeless look on the face of it. But somewhere in the midst of conversations on Instagram last winter with Grace (@wzrdreams) about our shared nineties nostalgia, I realized that this was a really good base for a revisit of my much-beloved nineties babydoll dress. So, I suggested it as the basis for a Periwinkle Sewing class (running in August). We’ll see if anyone actually takes it, but at least I got a cute dress out of it.
 Now, recreating that dress (why did I get rid of it again?) isn’t exactly what I’ve done here, but I am pretty happy with the results.
 I went with the ruffled skirt but not the sleeve ruffle. I cut the size 40, and added ties because I wanted the adjustability they provide in a loose style like this. The only change I made to the pattern was actually to shorten the (already raised) waist just a bit more.
 Partly because I have a short waist at the best of times, partly for that babydoll look, and partly for the big ol’ maternity belly. In hindsight I should’ve probably lengthened the skirt to compensate, but oh well. It’ll be a good length once it doesn’t have to stretch over the twin belly.
 The construction is pretty simple and this is really the easiest take on a shirtdress I’ve run across—and if you’re feeling lazy (which I was since I’m pretty exhausted these days) you can even skip the buttonholes and just sew the buttons on the front through all the placket layers. Although I’m already regretting that as it will limit the nursing-friendliness of the dress, so I’ll probably take the buttons off and put in proper buttonholes at some point. They’re not necessary for putting on and taking off the dress, though.
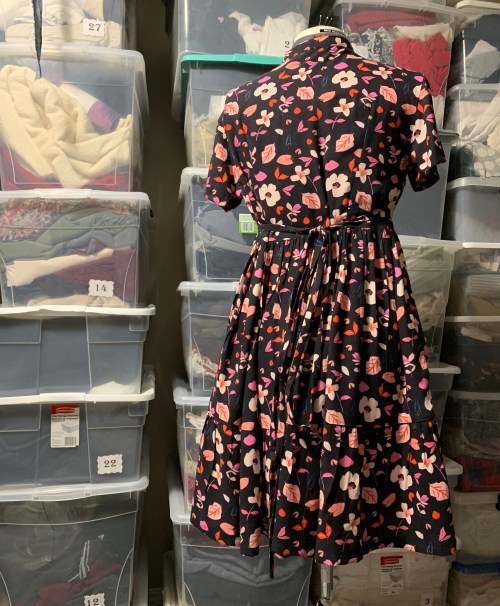
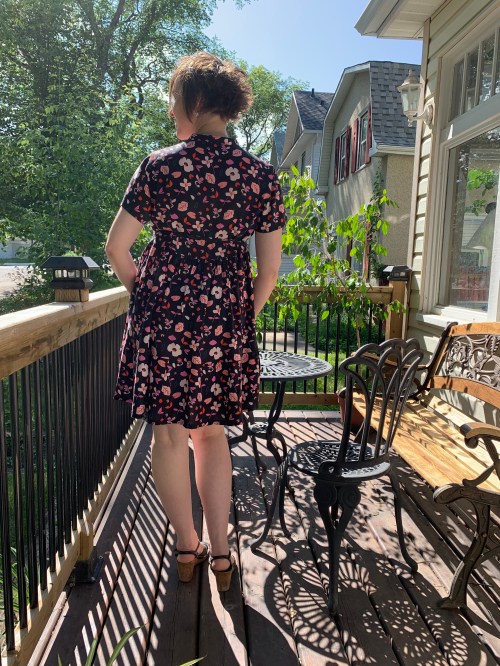 Hmm, pregnancy seems to have deleted my hips. The dress form shows the back view a bit better.
I also love that it has simple inseam pockets included. I’ve been regularly adding them to dresses in my classes, but it’s nice to not have to guess about it.
 My mother found this cute little cast-iron chair and table set at an auction earlier this summer, and my father-in-law repaired and refinished the amazing bench. So now I’m having fun pretending that my front deck is a chic Parisian balcony overlooking a sophisticated French street.
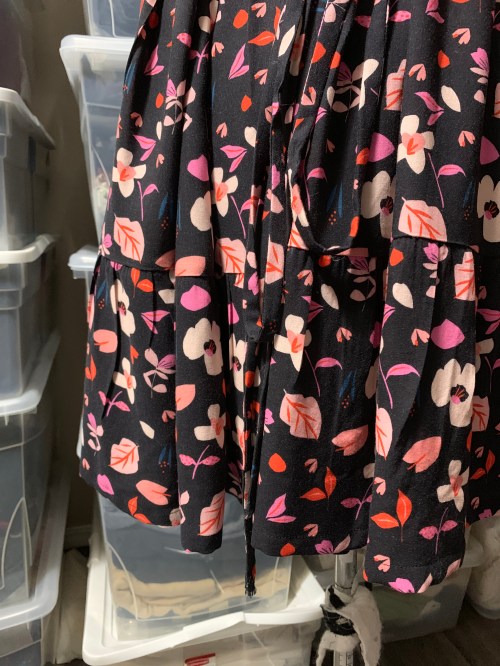 I tried to take some closeups but this print absolutely eats detail, so they don’t look like much. I’m a fan of the “crushed gather” look, so all the gathers got pressed into crinkly minimalism. The amount of fullness in the bottom skirt ruffle is also minimal, which is good. I love how it gives the skirt just a bit of shape.
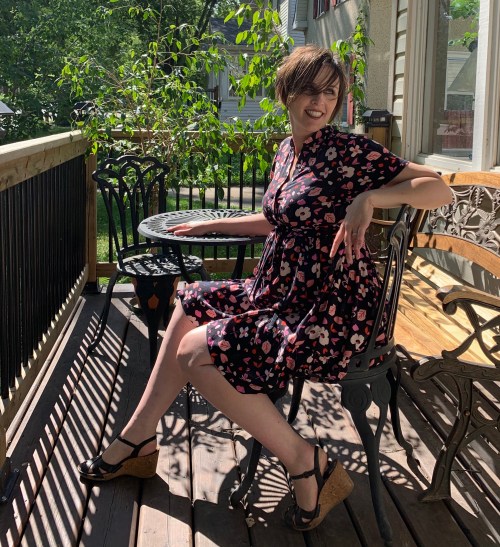 Now I just need some fancy coffee or something to sip while I look cute and sophisticated. Or at least cute.
Filed under Sewing
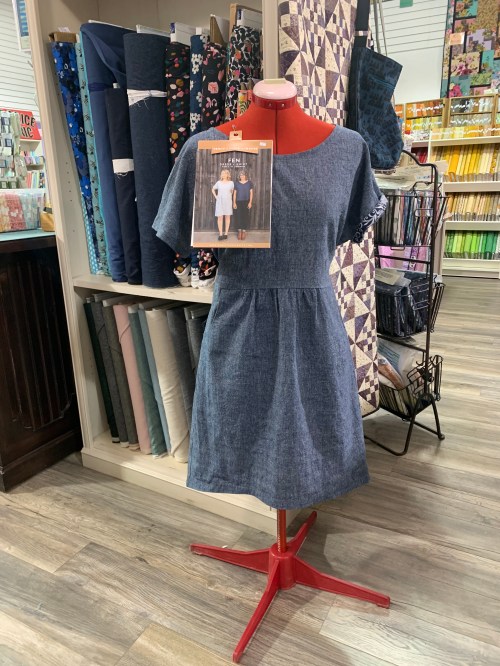 Honestly? I’d never have looked twice at the Fancy Tiger Crafts Fen Dress pattern if Periwinkle Quilting didn’t have it in stock even before I first started teaching there. But things grow on you, and the skirt IS really cute, and I floated it as a possible class for this summer, maybe as an alternative to the Myosotis dress. I was pretty surprised when Patti decided to run both.
 Also, I did not pick it with the expectation of being pregnant this summer. But it does work well for that, too.
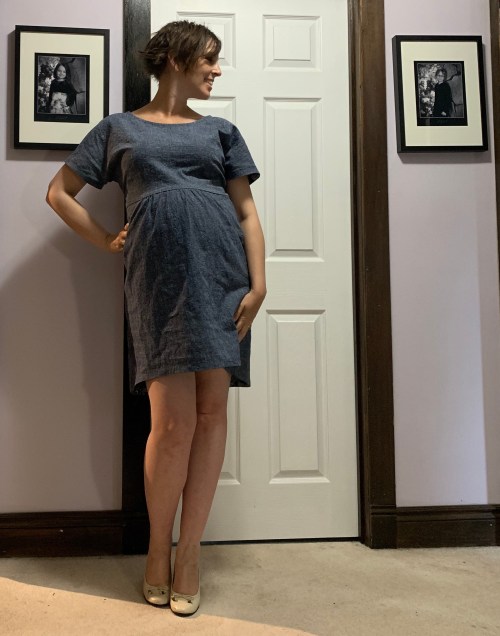
So, fun features of the dress? I love the gently hi-lo hem. It’s probably exaggerated by my belly, but I’d rather that these days than have an even hem that rides up in front. Maybe everyone else in the world is over this trend, but I still like it. It is pretty short though–or maybe that’s just from my belly–but the bias-facing I used only eats up 1/4″ of length for the hem and I wouldn’t want it much shorter.
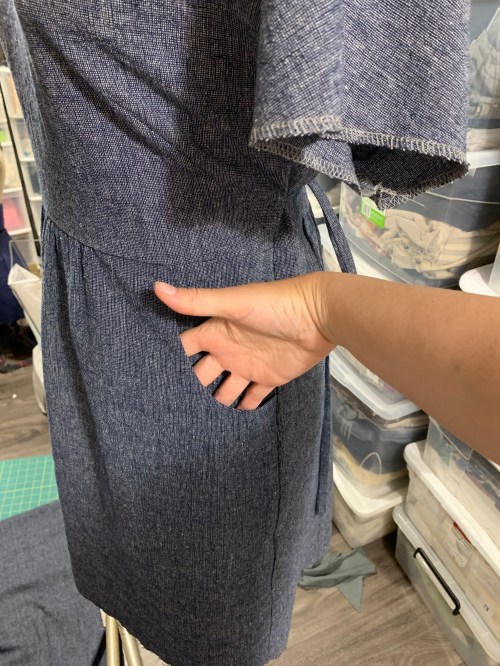 I love the pockets. I’ve been routinely helping my students add pockets to the dresses we make, but it’s especially nice when they’re included already.
 I also like the scoop neckline (which is a little wide because I did not finish it as per the pattern instructions) and the small amount of fabric required. The pattern called for three yards, so I bought three mètres, but I actually had about .8 of a mètre left, plus a long skinny strip on one side that I partially used to make the ties.
I don’t like how huge the sleeves are, and when it’s done being a class sample I might raise the underarm by an inch or so (a pretty common alteration for me for this kind of cut-on sleeve.) in the pattern’s defense they are also longer than they should be since I went with a bias tape finish that only eats up 1/4″ of length. I think I will wear them cuffed up so the bias shows.
 I added ties to the side, for improved adjustability and maternity-friendliness. They definitely help with that, but on the other hand they kind of anchor the dress in place which makes the arm movement a bit restricted, which is one of my pet peeves. It’s not terrible, but to raise your arms over your head the whole dress needs to move up, and it can’t when it’s tied.

Maximum arm lift without the entire dress shifting.
If I were going for a real maternity hack, I would raise the waist seam about an inch, so it sat a little closer to the underbust. And probably go up a size or two in the skirt front, though I also like the gentleness of the gathering.
 My belly is definitely borrowing fabric from the back, making it sit not great across my butt. But, I don’t have to look at that part so I’m not going to sweat it.
 In the end, it was a fun and quick sew and I think it will make for a fun class project. And not such a bad maternity dress, actually.
Filed under Sewing
 In my head, I’m calling this the Into The Woods Dress.
Back last winter, when I first floated the notion of teaching a class for the Sew Over I Rosie Dress, I was envisioning a fun, maybe quirky sundress for myself. However, events occurred and this is not a particularly maternity-friendly style. So, when the time came to do up the sample (class is in July), I thought this woodsy set of coordinates would tickle Syo’s fancy. I think I was right. Or possibly she’s just humouring me.
To fit Syo, I made a size 10 with a small (1″ total) full bust adjustment. On trying it on her, though, I wound up taking the bodice in 1/4″ at each side seam. Given that Syo is still just shy of five foot tall, I made a couple of other adjustments, shaving off about 1/2″ at the bottom of the bodice and hemming the skirt up a full four inches. I shortened the straps a bunch as well.
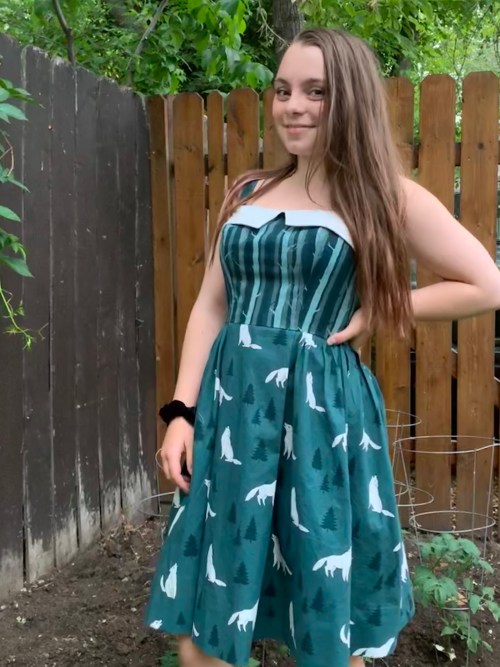 The straps are really wide set on Syo’s frame (which surprised me as I tend to think of her as similar to me in build except shorter); I wound up moving the back straps quite a bit closer to the center, and would’ve moved the front if they weren’t already sewn down and understitched and graded and everything.
 The pattern called for somewhere over 4m of fabric in the narrower width. With a bit of measuring I estimated that about three meters were needed for the skirt alone. However, it turned out the bolt of the wolves and trees print was divided right down the middle into two sections of about 2.6m each. So I took one of them home and resolved to Make It Work. I was fairly sure if I really ran short I could shorten the skirt an inch or two without causing a problem. Which in hindsight I could’ve, but I managed to squeak out all the pieces with only a little fudging, though there was no attempt to refine print placement. It is a pretty fun skirt, though, with subtle shaping and a front panel framed by pleats that’s just begging to be made in a contrast fabric.
 Most of the angst came from the zipper for this project. Last summer I acquired (among other things) a “proper” invisible zipper foot. I’ve always installed them with a regular foot, and I feel most comfortable with that. But I thought I’d try using the proper foot, so I have more experience if any of my students bring one. Heh. My first pass was too far from the zipper teeth; a stripe of black zipper showed. So I adjusted my needle position, but I over-corrected and it was too close. It did up all right on its own, but when I tried to put it on the dress form, the zipper gave and then one half of the slide came right off.
I put the whole bloody thing away for several days at that point.
 When I finally came back to it, I was able to get the zipper back into its track, only to promptly have it burst off again when I tried to put the dress on Syo. So I grumblingly unpicked the near-tooth row of stitching, and it seems to be working now, even if I’m not terribly trusting of it. And there’s that stripe of black in the back. I’m going to live with it. (Though I confess, I haven’t closed up the bodice lining yet, in case I do have to completely replace the zipper. Yeah, not laziness at all…)
In any case this was a fun pattern and project (though maybe a lapped zip would be a better plan). And I’m trying to remember the last time I made Syo an actual dress. Ok, this is why I blog. Are you ready for it?
2011.
I mean, she’s gotten any number of leggings, crop tops, sweaters, and Hallowe’en costumes in the meantime, but not a single dress. So I guess it was time.

Filed under Sewing

In my first two pregnancies I had very little money for specialized maternity clothes, and got by largely on sundresses and gigantic overalls (having summer babies helped). So I never got to try out several popular maternity features—the tall jersey top for jeans and other pants, for one, and this gathered-front style shirt, for another. It seemed like a pretty simple hack, but never having an original garment to examine, I wasn’t sure. But when I read the hack instructions on the Maternity Sewing website’s blog, they were even simpler than I had imagined, and I really wanted to give it a try.
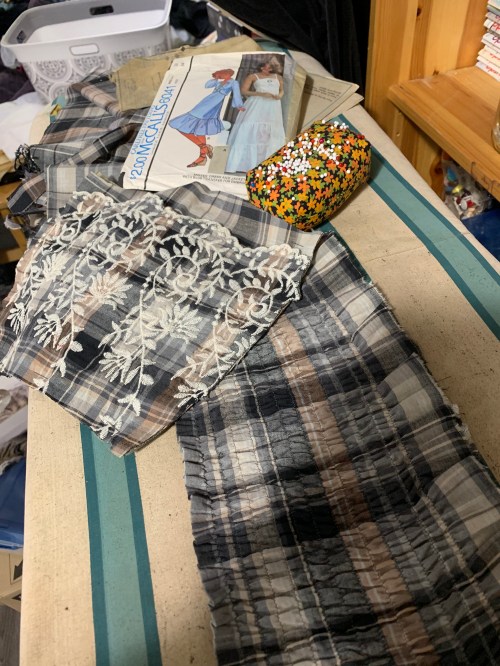
The fabric is a leftover from an old Fabricland project (a Gertie/Butterick B6031 slip) and is allegedly an organic cotton (I say allegedly because the fabric originally arrived labeled as “organic bamboo”, which it obviously was not. We got the correction a few days later but I remain dubious of the supplier’s competence). It’s not very thick, but supremely stretchy and comfy.
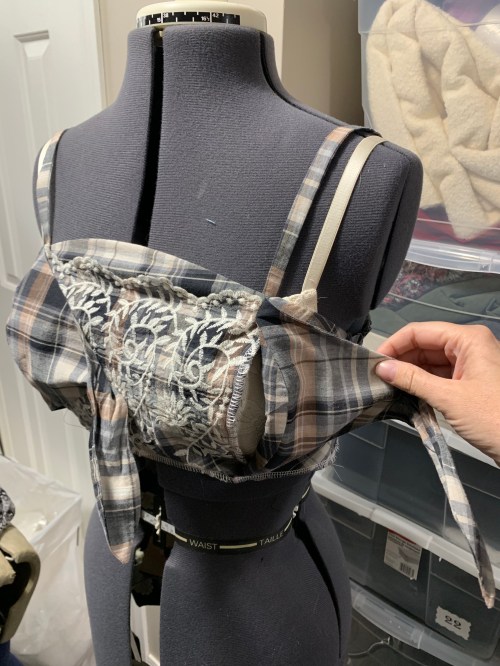
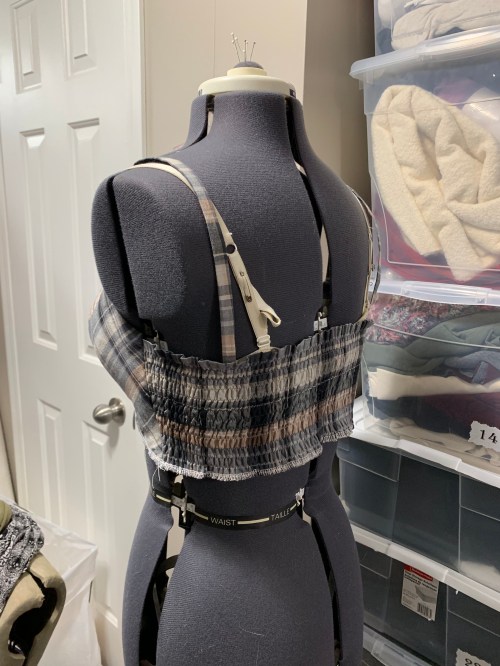
 Well, I managed to stuff up the hack: can you see the chalked line where I was supposed to be removing the waist shaping, but just cut along the original pattern instead? The good news is thanks to the wonderful properties of spandex the resultant tank top works just fine anyway; I also didn’t go up a size or two as per the recommendations. My base was the Tuesday Stitches Tropo Camisole (it just occurred to me that Erin of Tuesday Stitches is one of the founders of Maternity Sewing). I just picked it because this has been my go-to tank top/cami pattern since its release last year. So basically all I did was extend the bottom of the front by five or six inches, and gather that to match the back.
 I did include a simple shelf bra made out of self-fabric. It’s not super supportive (did I mention this is really stretchy fabric?) but in a world where none of my bras currently fit (and I’m not likely to take up jogging or trampoline in the near future) it does the trick. It took a bit of futzing to get the length right, but I’m pretty happy with it now.
 I should confess that it’s not entirely done, and I’ve been wearing it all day anyway. I need to shorten the straps a bit and decide how I want to hem it.
 All in all I’m really happy, though. This was a simple project, a simple modification, and its produced a very comfy, easy-to-wear garment. I don’t know that I need a million of them, but one or two to get me through the summer probably wouldn’t be amiss. I don’t want to create a massive maternity-specific wardrobe that won’t adapt after, but I also don’t want to feel like I’m wearing the same two or three sacks again and again. (See above about my first two maternity wardrobes)
I guess at some point I should try making baby clothes. I’m really not feeling it though.
Filed under Sewing
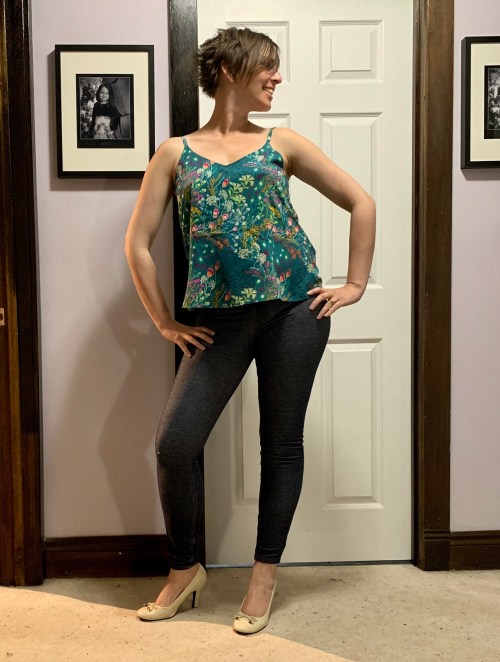
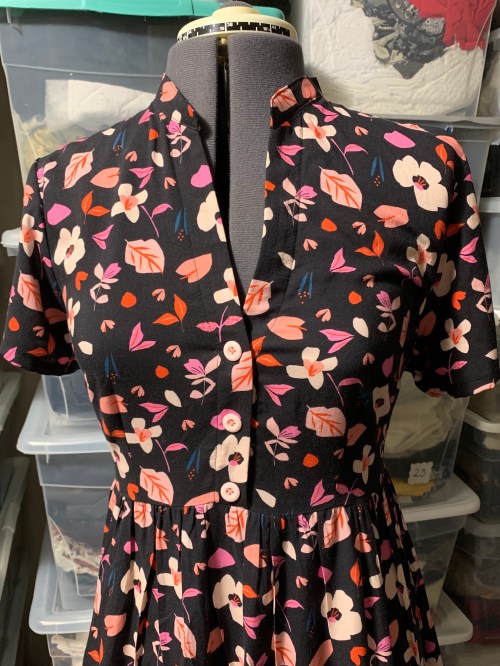
So the Ogden Cami, by True Bias, has to be about as well known as the Grainline Archer, as an indie pattern archetype. It’s simple, elegant, and seems to always look amazing. On the other hand, it’s SO simple, I always figured I had something (probably several somethings) with very similar lines. And I probably do, but I highly doubt they have the subtle bust shaping in the side seams it turns out this pattern has. And the gentle V neckline really is basically perfect.
 Apparently I should’ve pressed a little better, but it’s rayon. It’s going to wrinkle.
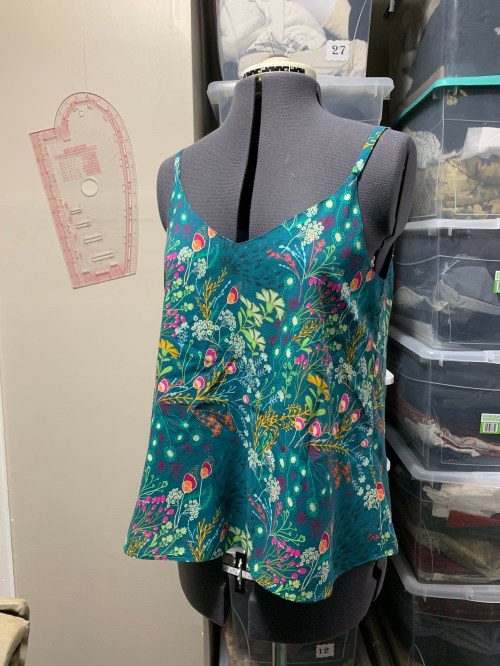
 Can you see my French seam at the side? No? Oh well. They turned out very nice indeed. In fact, the only thing I used the serger for on this make was the bottom of the half-lining.
 I made a straight size 8, which accommodates both my current bust and my current belly surprisingly well. I didn’t even have to shorten the shoulder straps.
 I did experiment with cutting out the pattern with my rotary cutter, basically my first attempt at such a feat. I am not particularly adept at it, so I don’t think I was really any better off than cutting with scissors, but it’s definitely something I’m willing to play around more with, at least for things that are small enough to fit on my cutting mat. I used a ruler to help me cut out the rectangles for the shoulder straps, and that was definitely a win.

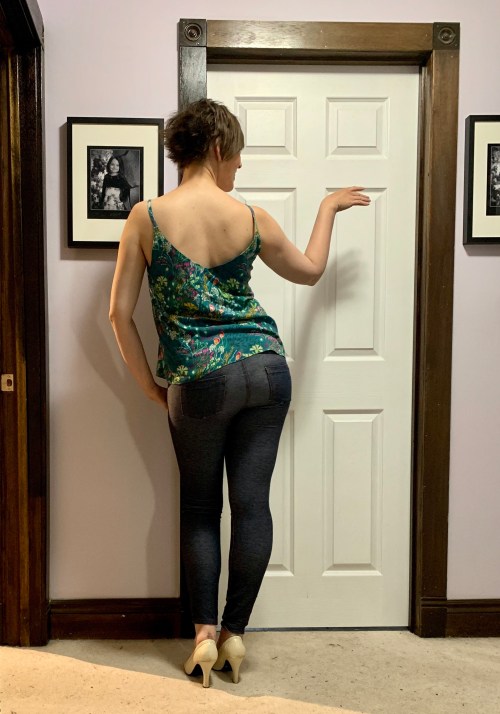
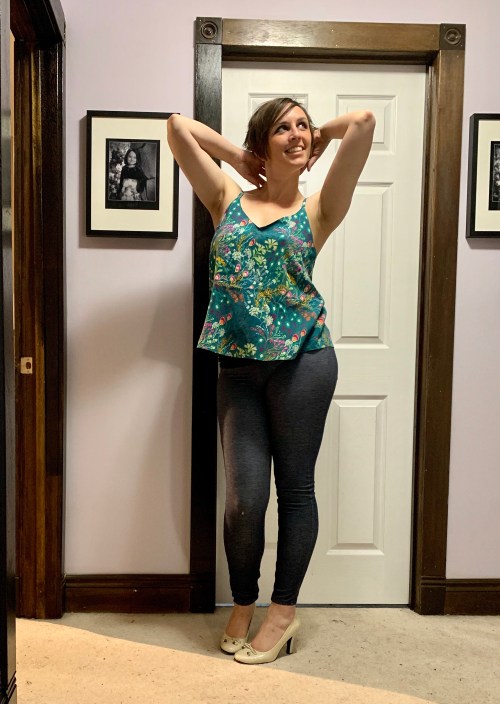
You can barely even see my sixteen-week-pregnant belly!
I can actually see making this again, and even again and again. It’s small and simple enough to make as a gift, and it’s a great way to use a tiny amount of an exquisite fabric. Also simple enough that the annoyance of working with a slippery or shifty fabric doesn’t become totally overwhelming. And while I know some people find the half-lining odd, I like it as a compromise between a full lining, which could be hot and bulky in a summery top, and no lining, which can have show-through issues in some light-weight fabrics.
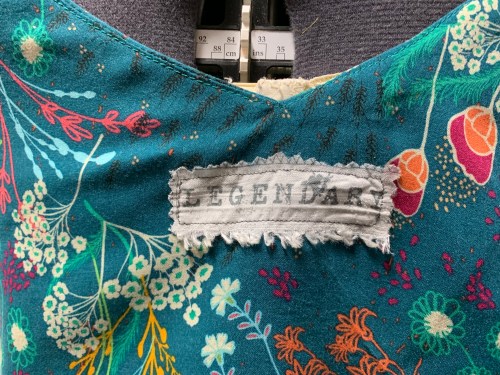 Because it’s virtually impossible to tell the front from the back of this pattern (either in construction or once it’s finished), I hunted along the printed selvedge of this Art Gallery Fabrics rayon for a good chunk, and cut out the bit that said “Legendary” to make a tag. My pinking shears are terrible and kind of made a mess of the edges, but I’m sure after a wash it’ll all be much the same anyway.
 Anyway, I’m definitely charmed by this pattern, and excited to be teaching a class on it this summer. It’s simple enough for a beginner, but also a great opportunity to level up your skills working with fine finishes or a trickier fabric. I’m very tempted to go digging through my seldom-touched “fine fabrics” for the next version….
Filed under Sewing
 I gotta tell ya, there’s a level at which I REALLY enjoy the few moments of life when that isn’t a relevant question. Because quite a few of my favourite styles of clothing, um, make me look pregnant. Even when I’m not. I love empire-waisted dresses, including ones with gathered skirts. So, while pregnant seemed like the perfect chance to indulge that love.
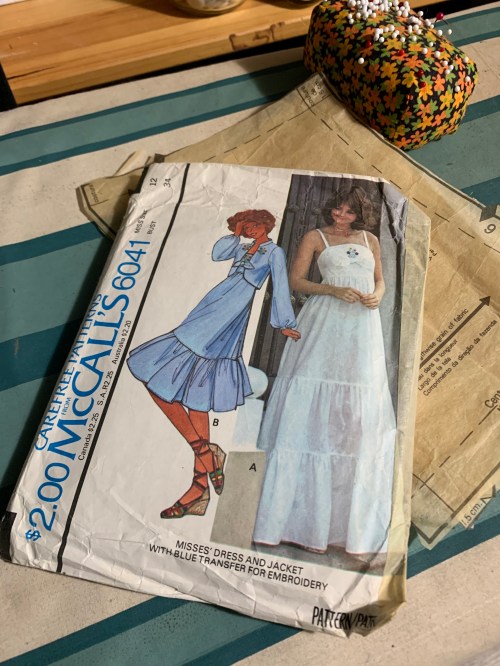 This pattern was a recent donation(among many, many others) from a friend of my mother’s. Thank you, Bernie! We all know I’m a sucker for 70s dresses, and I have a bad case of sundress-on-the-brain, so this was an easy thing to gravitate towards. I have had NO energy for the last several months, but finally just in the last week or so I’ve had a tiny bit of extra jam in the evenings, enough to very, very slowly piece this dress together over the course of the last couple of weeks.
 The pattern is in a size 12, which WAS my size, but is now a good three or four inches small. At its core it’s a simple princess seam empire bodice with a lightly gathered tiered skirt; there are some cute ties across the bust, though I almost skipped them. I made quite a few mods on this first version to be more maternity friendly—I prepped a shirred panel to cut the back piece from, and after some measuring made a small FBA on the front.
 For this particular dress I just used a simple gathered rectangle for the skirt, to take advantage of the border embroidery of my fabric. And it’s probably more full than it needs to be, or would need to be if it weren’t going to be going over twins.

I feel like this is about how big I’ll be by August.
The front hem will certainly go on lifting as the belly expands, but I’m cool with that. It’s a bit long as it is.
 I thought that the front tie provided an opportunity to try out some kind of a nursing access point for the sundress. I never had any nursing-specific clothing with my first two pregnancies, and I did plenty of nursing, so I’m a bit sceptical about the value of such mods, but I thought I’d give it a try, at least.
 I basically just sewed the CF panel separately from the side front panels + ties, and then lapped the pieces and tacked them at top and bottom. If the ties are tied everything stays securely in place, and if you untie, you can fold it back and access the slit. In theory the other side will stay closed, though if it becomes an issue I can see adding some kind of a belt-loop in the middle to keep the non-nursing side in place. As I said, we’ll see. That particular feature isn’t likely to be tested until next summer, anyway.
 So between the FBA and the little bit I added at the side seam and then the stretchy back, I actually had to take in the side seams, an inch at the under-arm tapering to more like 1 cm at the bottom of the bodice (tricky to do because I made the whole thing very clean-finished inside, pretty to look at but not exactly easy to alter, especially when one of your layers is on the bias. It’s not super pretty up close. I’m very curious to make this without the stretchy back at some point just to see how it would compare. The (2 cm) FBA gave a LOT of projection in the boob area, rather more than I currently need, but it’s somewhat adjustable by tightening the ties, so it seems to work. I’m not sure if I’d do it again, though. And my boobs are likely to get bigger before they get smaller again.
 I used my favourite gathering-with-dental-floss method, using a cording foot from a set I bought last summer to keep the dental floss snug in the middle while I zig-zagged over it. This definitely makes it a more foolproof method. I finished the bottom of the bodice and the top of the skirt separately so I can take the skirt off and re-adjust if I want fewer gathers later, though attaching the gathered skirt to the shirred back was kinda hell so I’m not sure I’ll wanna try that again.
 All in all I think it’s a pretty cute experiment. I feel like the proportions might be better if the bodice was slightly longer, but on the other hand since my belly starts right below my boobs, I don’t think that would really work very well right now. So it is what it is; i may try styling with an elastic belt below the bust to see how that looks. But for maternity wear, I think I’m pretty happy with it.
Now if only it would get warm enough to wear it!
Filed under Sewing
 I wanted to teach a basic tee shirt class this summer, and Jalie seemed the obvious choice. Their basic fitted tee pattern, 2805, has a few different cute necklines (even if none is the scoop neck I prefer), and I felt pretty confident that the sizing and drafting would be good. I’m not sure if this sweet floral is really “me,” but it makes for a beautiful sample.
Everything is taking me a really long time to make right now, but this was still a pretty simple, quick sew, aside from how spread out over days the process was. I often just wing my neckband pieces, but I used the Jalie pattern piece here and of course it’s perfect. Neckbands on V-necks need to be a bit more precise, IMO, so a good pattern piece is worth it here.
 Speaking of V necks, I’m pretty happy with how it turned out.
The one thing I would change on the pattern is that the sleeve pattern piece is cut on the fold. I prefer a full sleeve piece, even if it’s symmetrical, so I can cut out the pair all at once (I feel the same way about collar and yoke pieces for shirts). But it’s easy to make that change at the tracing stage.
I did not raise the underarm on this version, as I often don’t need to in Jalie patterns, but I think I would lift it just slightly in the future. There’s a balance in underarm fitting between mobility and wrinkles, but I tend to lean to the mobility side, wrinkles be damned.
 I did the twin needling on the Rocketeer, where I had to relearn the “always test!” lesson again… for only the millionth time. Ah well. After some unpicking and careful testing of stitch length (longer), presser foot pressure (light but not too light or the fabric doesn’t advance well), and tension, I finally got good results. And yes, I used Steam-a-Seam in the hems.

Now does the shirt fit me? Well, I made my current size, which is U grading to V at the waist and hips. And it’s good, or would be good if the bump weren’t bursting forth at a rate that makes me think of those supernatural movie pregnancies where the woman gives birth within the space of days.
But I can definitely do a maternity bump hack on the next one.
Happy sewing!
Filed under Sewing
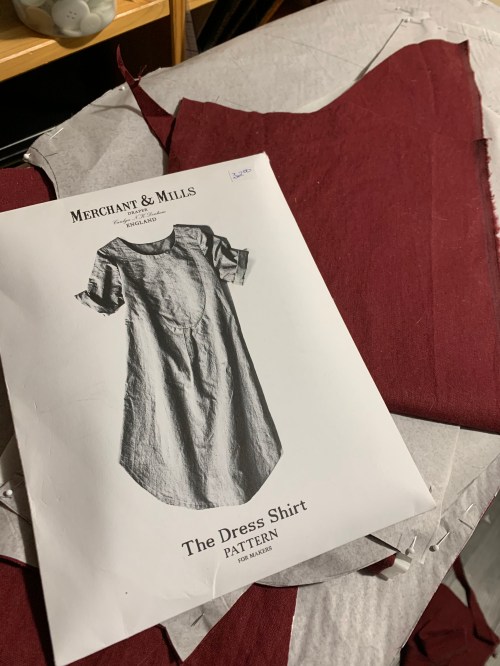 A very eager student asked about a class using this pattern. Curious, I was happy enough to oblige.
 The Dress Shirt is a simple, pared-down take on a shirtdress, and I actually really enjoyed the sewing process, particularly the front bib and how the neckline was finished. Things went a bit awry at the sleeves—my first inclination was to set them in flat, shirt-style, but there’s way too much ease in the sleeve cap for this method—lots of gathers that are difficult to control. So I did the second sleeve in the round, but still didn’t do a great job on the easing. Next time I would pare down the sleeve cap a wee bit.
 On the other hand, the pockets I added worked out fine.
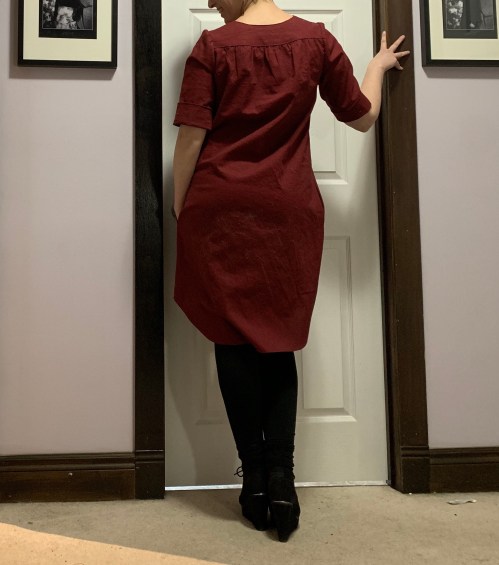 The back view is surprisingly attractive in this picture, at least (these are terrible photos but I had about three minutes to take them in, so it is what it is.)
However, my biggest issue, far and away, is the fit in the shoulders. I did the same size (10) as for the Trapeze Dress last fall, which is technically a size down from my current measurements but a) there’s plenty of ease and b) I don’t think my shoulders have actually changed very much. Plus looking at the model, the pattern seemed to have slightly dropped shoulders, not really what I wanted. But, as it turns out, the shoulder fit has the same restricted movement and tightness across the back as I had in the Trapeze—plus a WAY low armscye.
I did only two of my usual adjustments–when sewing up these class samples I try to stay fairly close to the pattern. I squared the shoulders slightly, and I raised the underarm about 1cm. I did the same on the Trapeze Dress, and I don’t think the underarm height there was a problem. But obviously a bit of a broad-back adjustment is probably in order.
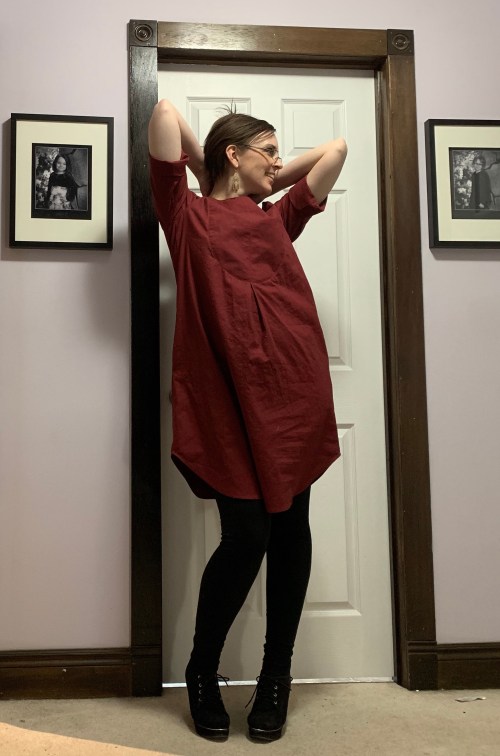
Dress lifts up at least 2-3” when I raise my arms. However, I do like the shorter hen length.
But on this dress, the armscye appears to be dropped by over an inch. I could easily lift it up an inch to an inch and a half before I’m happy with where it falls. For that matter, if I can get the sleeves sewn in a way that’s comfy for me, I’ll probably take 2-3″ off the hem, too. But that’s more personal preference.
There’s not much more to say as it’s a simple make. I really did enjoy the physical sewing of it. I don’t know if it’s the most flattering thing I’ve ever made (better photos might change my mind there), but it was a fun process!
Filed under Sewing
Sewing is what I do when I'm cheating on all my other hobbies...


