Tag Archives: skirt

A Very Victorian Skirt

Not so very long ago Wearing History put out a new “Archive Collection” pattern based on a McCall’s original from around 1900. And, rather impulsively, I bought it.

Equally impulsively, I decided to get it printed in time for my little Christmas break. I didn’t get as much sewing done as I might have liked, after one of the twins brought home yet another virus just in time for Christmas, but I did eventually start on a tester version.

Now, this isn’t exactly a pattern I needed. In particular it’s very similar to the Scroop Fantail skirt I made in September. But I thought a detailed pattern comparison would be fun! So here goes.

See the more intense waist shaping on the Wearing History pattern.

Both patterns are five-gore skirts with smooth fronts and added fullness in the back provided by pleats. Both have narrow straight waistbands and a centre back placket closure. The fullness in front and side panels is almost identical, although the Wearing History pattern is a little more full in the back panel, particularly towards the hem.

The Wearing History pattern differs mainly in three ways: the back placket is cut on, additional shaping for the waist comes from wide side darts, and the shaping of the flare, which is quite straight in the Fantail, and subtly fluted in the Wearing History pattern, narrower through the knees and then flaring slightly more below—though the difference is only a cm or two per pattern piece. There is a lot more shaping from waist to hip in the Wearing History skirt, something I had to increase in my Fantail by grading to a smaller size at the waist.

The grainlines of the patterns also differ, with the Fantail having a more modern style of grainline falling in the middle of the gore while the Wearing History original grainlines are the old fashioned type where they parallel one edge of the gore. However, the Fantail instructions also mention the variability of grainlines in the period, and when I made my version I used “old style” grainlines to get the pattern to fit on my limited yardage.

The side darts, incidentally, are features of my self-drafted 1880s skirts, based on period instructions. It’s neat to see the mix of older features and sharp new skirt shape in this pattern.

I’d rather the under placket didn’t show here, but that requires a larger waistband.

In my version of the Wearing History pattern, I decided to omit the cut on placket and do a sewn on one. This matches the directions I’ve usually read in period sewing manuals. And that whole back seam is on the bias so trying to keep a cut-on placket square just seemed like a nightmare. Instead I did the back placket basically exactly like the Fantail skirt, except for just making it rectangular instead of a fancy angle.

I tweaked the darts quite a bit to get a hip shape I liked, making them longer and a more sinuous shape. I also wound up making them deeper, at least partly because the waist was stretching out in my thick but weirdly soft fabric; I overshot a bit and currently it’s really too small so the back pleats aren’t lining up quite right. If I redo it, I might sub in a different fabric, like a thin cotton, for the waistband. This upholstery fabric is beefy and where all the pleats stack at the centre back my machine completely balked, although not before I had broken three or four needles trying.

Speaking of the fabric, I almost forgot to mention my favourite feature of the whole skirt. Since the pattern has no seam or hem allowances, you add your own. However, when I was laying my fabric out, I had distinctly less than needed for the skirt, and I wound up basically not being able to add hem allowance.

So, since I basically had no hem allowance, I decided to do a faced hem. This is a legit period way to do it, although mine is a pretty simple facing, and they often jazzed them up in period with additional layers of velveteen binding or stiffening or braid. I would have to double-check if bias was appropriate at this point in history; certainly a little earlier they were perfectly happy to cut their facings straight and just ease or pleat the top edge as necessary to have them fit. But I also serged all my seams here, I wasn’t in the mood to be too precious about historical accuracy.

I dove through scraps and eventually settled on the remnant from this dress (man that was a while ago!), a linen/cotton blend that is beefy but still a lot thinner than my main fabric. I evened my remnant into a nice rectangle, cut off the diagonal on one side and sewed it back on the other… then sewed it into the offset tube and cut a truly massive amount of 10-cm-wide continuous bias. So hopefully there’s another skirt worth of it. Probably it would’ve been faster to cut the strips flat with a rotary cutter and then sew them together, but anyway.

I’ll confess, I wasn’t super sure about the skirt when I first made it. The hefty fabric seemed too sculptural and stiff (despite actually being pretty soft). It sat on the dress form for weeks just waiting for that hem (probably a good idea since there was a lot of bias stretch to work out, but still). But this faced hem makes me love it! it’s such a nice finish. I love the facing fabric and how it makes the hem feel. I think a self-fabric hem in this fabric would just have been bulky.

Oh, and the skirt is drafted for a 41” front length (from the waist) which is pretty much perfect for me but probably a little long for many people. The pattern does actually include original instructions for lengthening or shortening at the hem, but if you want to maintain the fluted shape you should probably shorten by overlapping in two places, above and below the knee. In a perfect world, anyway.

I picked my size based on waist size, mainly out of curiosity as to whether I could make that crazy waist-hip variation work, even if it took padding. And I’m not sad I did, although a more rational way to fit the skirt would be to pick the size by your hip size and just adjust the waist. Those side darts give an immense amount of room to play with the fit, four or five inches, at least, and you can always pick a wider seam allowance if you’re worried about having to let out the waist or adjust the shaping there.

All in all, it was a fun exercise! I wouldn’t mind trying it again in a more appropriate fabric. Though I should really get back to the blouses for this kind of period…

3 Comments

Filed under Sewing

A long-awaited skirt

(Photo from November of 2012)

Somewhere around a decade ago, when blogs were shiny and new, a dear online sewing friend sent me a gift of some fabrics she didn’t think she would get to use. It’s perhaps a little embarrassing to admit that I, also, went on to not use them for, y’know, a decade, but anyway. That coating is earmarked for the Next Coat when my grey coat wears out, which is on its way but not quite yet.

And then there was the glorious, sequined, black linen border embroidery. One of those fabrics relegated instantly to the “too good to cut” pile. I’ve fantasized about making it up many times over the years, but kept waiting on the perfect plan, or the perfect moment. Needless to say, such a moment did not arrive. It didn’t help that in addition to being exquisite, there was a scant two yards there. I don’t often think too much on the difference between a yard and my native mètre, but when you’re trying to eke a garment out of only 2, that extra 8” of fabric can make or break.

Anyway. Last spring, when the Leslie Skirt by Wearing History came out, I was blown away. I have a bit of a thing for front buttoning designs, and her sample in linen just ticked all of my boxes. Despite the skirt featuring that most dreaded of features in my wardrobe—waist gathering. But I instantly purchased the pattern, and started going through fabrics I had on hand (and more importantly, in sufficient quantity) to give it a go. And I thought of this long-languishing border embroidery.

But no. On further inspection of the pattern, the gathering was limited to a tiny section at the side of the front. The skirt as a whole is A-line (which is great for me in general), with a very curved hem. Completely unsuitable for a border embroidery. Not to mention, the part where there was only two yards, and the pattern calls for a minimum of 3 1/4.

But, my brain couldn’t leave well enough alone. Especially once another piece of linen-type fabric turned up, a remnant from a shirt I made my husband once, of an almost identical colour, weight, and weave. Enough there to make the waistband/buttoned front piece, preserving all the precious embroidery for the skirt itself. Surely two yards is enough circumference for a skirt hem? Surely?

So I dove in.

The pattern calls for interfacing in the waistband segment, but nothing down the front where the buttonholes are. This seems suspect to me, so I wound up adding strips of knit interfacing down my button bands, while I used a beefy twill fused to armoweft for the waistband interfacing, and added little plastic boning stays in several places to support the raised waistband. It’s possible I went overboard, but I regret nothing. (Except that some of the bones are a tiny bit too long.)

Should have at least one more button, but somehow my brain told me 5 cards x 2 buttons/card=12 buttons. Bad brain.

The waistband and front button panel were all cut according to the pattern, but to make the border embroidery work went pretty far off road. Basically I took the front edge of the skirt pattern, with the curve where it gathers into the waistband, and put that along the cut edges of my fabric, while I used the length of the centre back pattern to get the right “height” at the back fold, and drew a line connecting the two. I think it might be slightly longer in the back, which accommodates booty? Anyway, I cut this and just extended the gaaa an athers all the way around, gathering my fabric to fit. And while I would love it if I had, oh, an extra yard of fullness for that skirt, it’s pretty darn fine just as it is.

I had meant to finish the edge of the border embroidery nicely and trim it around the scallops, but I wound up just folding it under and hemming instead. I think the more structural nature of the folded edge works better with the weight of the front button placket anyway. Or something.

The pattern calls for quite a deep hem, which is great, but it also has the same amount of hem at the bottom of the button placket, which just seems odd. I didn’t trim the excess away, but it does make the bottom of the placket/front panel a bit odd and bulky. We’ll call that vintage pattern oddities.

Anyway! It’s a skirt! It worked! It’s a garment which does challenge me on a few levels. I don’t usually care for anything gathered at my waist, ever. The length is a bit odd, too, although that weird midi length seems to be popular of late. Most notably, it doesn’t have pockets, which may be an issue if I ever try to wear this to work.

I don’t regret overengineering the waistband, and would (will) do it again, as I’d still really like to try a true-to-pattern version of this skirt. The design does put a lot of stress on that second buttonhole, and I’m tempted to add a hook and bar to support the waist there, with the buttons just keeping things closed. You do definitely want to be aware of where you want the pattern to sit and make sure your size works, as you don’t have a lot of room to futz with the button positioning without changing the look of the overlap at the top of the shaped waistband. That being said, I did find it true to size. Also, if you’re shortwaisted like me, it will look a lot different than on the drawing where there appears to be about 4” between the top of the waistband and the bust—for me, there is no such space, and depending on the look you want you might want to adjust for that.

Anyway, it’s made, and fun, and I am so happy to have finally used that fabric!

8 Comments

Filed under Sewing

Happy Homemaker Cosplay

Since the twins were born, a large chunk of my previous wardrobe has been inaccessible—either not fitting any more or not compatible with breastfeeding. (At least one of those will resolve itself… eventually) And I’ve missed it. In particular, the fluffy vintage fifties style dresses and skirts have been almost completely cut out.

Disclaimer: skirt is worn with a moderate crinoline in these photos. A circle skirt is always improved by the addition of a crinoline.

I made two versions of Vogue V8882 as Fabricland projects back in the day, and they remain some of my favourites, or would if I could still wear them (ok, I can usually still get into the plaid version, at least in the morning). There’s something about the circle skirt silhouette, with those additional little tucks fancying it up just the tiniest bit… anyway.

And when I splurged back in August and ordered myself a bunch of linen from Pure Linen Envy, the icy-blue heavier piece obviously wanted to be a skirt or bottom of some kind.

So really, it was a match just waiting to be.

As with my plaid version, I added some length beyond the original pattern, to get that sweeping midi length. I had ordered 3m, which allowed me to add 4.5” to the length, and to preserve as much of that length as possible I did a tiny 1/2” hem, and hand-stitched it, at least in part because my brother had been visiting from Australia the last couple of weeks and it’s much easier to visit while doing handwork. I would’ve done a bias-faced hem if I’d had enough scraps left over, but there was no way, and I was too in love with this scrumptious fabric to introduce a different fabric to the project (although in hindsight I definitely have some lighter weight cottons in an almost identical colour and texture that would’ve worked…)

I made the size 14, and the waistband is comfortably snug—but be sure to check because my waist is SIGNIFICANTLY larger these days than the 28” the size 14 officially lists.

The waistband of the pattern is a simple rectangle, and quite wide. This works ok for me, with my cylindrical torso, but if you have a rib cage that actually tapers to your waist a shaped band would be better. I wanted to make sure this waistband didn’t end up a crumpled mess like the waistband of my Adventure Skirt has, so I added two layers of (admittedly lightweight) armoweft interfacing, and stitched little casings to the inner part of the sides for small plastic bones. I would’ve used hair canvas and steel bones, but I wanted the skirt to be more or less washable. So here’s hoping that my efforts are enough; it’s doing fairly well through the initial couple of wears anyway.

The small hooks and eyes I had lying around definitely aren’t perfect, though, letting the back gape, but if I manage to pick up some proper bar hooks I can add those on later. I’m prone to one of two mistakes with closures like these—either putting the hook too far in so that the edge curls out or, as in this case, putting the hooks right at the edge (so it can’t curl out) but then the eyes/bars underneath show. Oops.

The lapped zipper in the back was the first I’ve done in ages, and would probably have benefited from reviewing the method—it wound up pretty wide, and I had to add a facing piece on the fly. It looks ok, but is definitely more in jeans-fly territory than “delicate vintage style closure.”

Also like my plaid version, I added pockets to the side seams, although these ones are much roomier so I don’t have to fight to get my phone in.

I’ve been guilty of skipping the hanging stage when making circle skirts in the past, but I’m definitely glad I didn’t try with this fabric, as it grew a good couple of inches in some places. I’m not convinced my results are particularly even, but I’m calling it good enough.

In the end, I’m super excited to have another skirt for my fall wardrobe. Though if I’m going to use this for actual homemaker cosplay (aka cooking), I had better make myself an actual apron, too…

2 Comments

Filed under Sewing

Pseudo-Victorian Skirt

Still wandering blithely down the garden path of “how far can we get from mainstream fashion?”

Back in October, maybe, I spent some time fantasy-fall sewing and pulled out several candidate fabrics for fall and winter pieces that would complement what currently passes for my wardrobe. I wanted a skirt that would fill the same role as the Adventure skirt, but for the grey/red/black subset of my wardrobe, and this grey “flannel” got tapped.

First of all, you know those fabrics that you buy and then they’re too precious to use for fear of ruining them? Well, this fabric is basically the exact opposite of that. It was billed as some kind of flannel, which I guess it maybe is, but I would more describe it as a lightly brushed twill suiting, 100% polyester. I bought it quite a few years ago to make a shirt for a Christmas present, and even paid a significant chunk of full price. At the time, I was thinking the poly flannel would be durable. Which, I mean, hopefully it will be. But it’s also so, so nasty. Although it has a nice drape, it frays like crazy, and worst of all does not want to take a press. Anyway, I’m profoundly grateful to have it out of stash, and that I didn’t turn it into a gift.

I didn’t want to freehand the pattern as I did for the Adventure skirt (the fabric alone was going to be annoying enough) so I pulled out an old Burda envelope pattern I had made back in the day. I figured I could modify it a little bit to get the effect I wanted. (Actual pattern options would be the Folkwear Edwardian Walking Skirt, which I should actually have a traced version of somewhere, from when my mom made it for herself back in about 1992, or the Scroop Fantail skirt, which conveniently went on sale shortly after I started this project. But I already knew I loved the shape and length of the Burda pattern). I actually couldn’t even find the original pattern (curse words) but I did find my traced out version. I knew I needed to add at least 3” at the waist, and I was hopeful that adding a bit more fullness thorough the hips would make room for pockets (since my hip expansion hasn’t matched my waist expansion the last few years.)

My pattern changes were simple. I cut the centre front piece a bit back from the fold (probably adding about 1.5” there, and I cut the back piece not on the fold, but extending out to the edge of the fabric so I would have extra fullness for the pleats. I added a more precise 3” to the waist and length, but in hindsight I should’ve added more because the wide underlap I tend to use on the closures of my “Victorian” style skirts needs more overlap than the narrow zipper closure the waistband is designed for. I also cut pocket bags, shaped to attach to the waistband. This nicely keeps the pockets from pulling on the side seams, but in hindsight I should have cut them using the upper part of the side front pattern piece for the shape, as that would’ve been a good size and supported the pocket nicely. Also I didn’t add quite enough length to accommodate the pocket reaching the waistband, so the actual part of the bag below the hand opening is really shallow. Though my phone didn’t fall out at work when I put it there, so they’re functional.

I came incredibly close to underlining the entire skirt in (real cotton) flannel, but didn’t have enough that I was prepared to sacrifice, so I just went with a single modern-style layer. It makes for a swishier skirt anyway.

I spent a LONG time fussing with the pleats to fit them into the waistband, and they’re still not great.

In the pics the rear closure isn’t lying especially flat, but I’m hoping it’s just my pinning because I got impatient and wore this before I made a button hole for the closure so it’s just held on with a big safety pin.

I was hoping for an invisible hem with hand hemming, especially since it required a LOT of easing, but I don’t know that it’s much more invisible than a machine blind hem. Oh well. It’s done now.

It maybe says something about the weird state of my wardrobe right now, but I’m hopeful that this skirt will be a really practical addition.

Unfortunately, I still have about a mètre of the fabric left. I’m tempted to make a matching top, or at least waistcoat, to extend the historybounding look, but we’ll see.

5 Comments

Filed under Sewing

Adventure skirt

This skirt comes from the confluence of a lot of things. I miss my old wardrobe. I’m so sick of living in leggings. I wanted to work with some linen—I’m craving the feel of a crisp natural fiber against my hands. And I guess the Sewcialists’ Zero Waste sewing month (that’s how long sewing this has taken) wormed itself into my subconscious, because even though I’m not usually thrilled with the practice of zero waste sewing, I wanted to try a really low-waste approach to this skirt.

It’s also taken a fuck load of time to complete, one seam (or even half seam) at a time, as the twins are VERY busy these days and we’re all worn out with winter and isolation, so it’s been hard to ask for more alone time to sew when everyone else I can ask is already at their limit, too.

The fabric was a big piece of extra-wide linen from Pure Linen Envy. I had ordered it hoping to make a bed sheet, but the 208cm width wasn’t quite wide enough for a queen size bed, nor is the fairly loose weave really ideal for bedding. But it wasn’t overly expensive for the size, and since it hadn’t really worked for its original purpose, I didn’t mind sacrificing it for something kind of experimental.

I started by calculating out the measurements for a trapezoid skirt. This is the low-waste method where you cut trapezoids in alternating directions, and then flip them around so the narrow ends make the waist and the wide ends give you the skirt’s flare. I could go into how I carefully decided on my number of panels, divided my waist measure by that, and then figured out how wide the bottom could be given that waist… but then my plotting onto the fabric wasn’t terribly precise (not least because my fabric was really wrinkly because have you ever tried to iron 2m wide linen while two toddlers are trying to climb the ironing board?!?) and then the resulting skirt wouldn’t have been quite as full as I wanted. So I cut another set of panels, planning an assortment of pleats to fit the waistband… so really there’s a lot more “than art” in this than science. Which is fine, really.

I had a lot of fun playing with pleat ideas, and then I had the idea to add adjustable pickups, which I’ve wanted to do for a steampunk feel of skirt for a long time. Big patch pockets as well. In my head there were elements of asymmetry as well, but I may have kind of blinked in that staring contest (although due to my rather haphazard cutting and equally haphazard pleating there’s some asymmetry for sure.)

I spent a lot of time faffing about, well, all the details, and in the end it’s fairly simple.

The big patch pockets (which are set way too low to be truly functional but I’m not moving them now) are simple rectangles. I sewed some big, gorgeous, heavy shell buttons on them for decoration, which made them sag awfully, so then I added some tabs with buttonholes.

For the pick ups on the front, I used a 3/4” twill tape (tea dyed to be a little closer to the warm brownish beige of the linen) and some little brass D rings I stocked up on way back in my Fabricland days. And I still have lots more… After mentally planning all kinds of elaborate methods, I just tied some lengths of narrowed twill tape to the top-most D rings. It works.

I very carefully didn’t make the waistband of the skirt too tight, and now I think it’s too loose. I will try just adding a second button, though, so I can adjust it through the day, because I notice that what feels comfortable in the mornings these days can be way too tight as the day wears on. The wonders of getting older, I guess.

Leveling the hem was a bit of a nightmare. I’m not good at leveling hems at the best of times, and my simple trapezoid cutting plan inevitable created long points at the seams and shorter spots at the middle of the panels (and did I mention there were 14 panels?), and it’s probably still not that even, but if you notice you can just keep that to yourself, all right?

At the risk of this post getting way too long, I’ll say a few quick words about the top. It’s from an older Burda magazine, and I made it before to go with another skirt and failed to write about it then. I used it again this time for two reasons: 1) it was the general style I wanted, and 2) the pattern was already traced. Obviously, I’m a bit bigger than last time, so I needed to upsize a bit. I added some with to the side seams, and did a wee bit of an FBA along the princess seam (which didn’t work out terribly well as it doesn’t run over the bust—I should’ve done an FBA using the tiny dart. In the end I was a bit over-generous, and had to take in quite a bit, and it just doesn’t sit as nice as I wish it did. Particularly, I was paranoid about making it too tight, so I may have erred on the side of too loose. I’m also debating adding some boning to the seams to keep it sitting a bit better. Also I didn’t stabilize the curved seam on the sweetheart neckline, which is ok now but we’ll see. I do like the binding finish I added.

The kids have informed me that the whole outfit is “cottagecore”, which I’m going to run with. It’s a lot of fun, especially the swishy skirt.

1 Comment

Filed under Sewing

A further invocation of spring

Mermaid skirt

Since the first one worked so well. Well, it did—the temperatures I’m complaining about right now are a full 20° C warmer than the ones I was complaining about at the beginning of the month. It’s still snowing, however.

This fabric was snatched up in the frenzy of stash-building earlier this month when I discovered Fabricland had actually put some decent knits in their clearance section. Mainly I like the colour, but it also has an interesting sueded surface and a moderate stretch. It seemed a little heavy and so was passed over during the Great Cowl Experiment (which Sigrid’s versions are making me ache to revisit, by the way…), but I thought it would be great for a springy little skirt.

My first thought was a half-circle like Hip Dropped Stitches’ gorgeous one, but I was concerned that the nap running in different directions might end up looking odd (I can’t tell if there is a direction, but if I pretend there isn’t, you know I’ll find out there is when I photograph the skirt.)

My next thought was a mermaid skirt. I’ve been wanting a little, flared, gored skirt since… well, aside from always liking them, Loutracey posted this one lots back in Self-Stitched September, and then Big in Japan copied this one, and then most recently Yoshimi unveiled this gorgeous (red!) version. Yum, yum YUM.

Evolution of a pattern: right, original piece; centre, doubled; left, tripled width.

What flummoxed me for the longest time was a pattern. Obviously a straight gored skirt would be easy to draft (bum-fitting aside), but I wanted something with a graceful curve hugging the hips and then flaring out below. This would take a bit more thought. And of course, going out and buying a pattern would be too easy. Lekala had a couple of versions I considered, but the one had too many panels (a 10-gore skirt, in fact) and looked too long (which is SO weird, because if you look at their artist’s rendering, the skirt comes to below the knee. The pattern piece is only 22″ long, people, and the waistband’s not that wide either. I mean, I know I have long legs, but not that long.), and the other one, while lovely, seemed to have a bit too much flare. I wanted the skirt to bell out, but not be a circle dropped to my hips.  (I can’t believe I just admitted that a skirt can be too full. That’s like saying pants can be… too long. Or that the Blondissima got your hair too blonde).

Skirt closeup, showing waistband

Anyway, when this fabric came along and the idea crystallized, I went back to the Lekala patterns, thinking I could probably make one work. I knew the length I wanted (just above knee), and that I wanted a six-gore skirt with wider CF and CB panels and narrower panels at the sides.

So I revisited the Lekala patterns, and eventually printed off Lekala 5826, mainly because it required less paper. Man was that a tiny pattern piece! Comparatively, anyway.

So, I had the pattern piece for a 10-gore skirt that was designed to fit me (or rather, someone with hips my size but a “normal” waist) at the natural waist. What I wanted was a 6 gore skirt that sat lower on my hips, with wider front and back panels. It was time to get creative.

Some quick measuring informed me that if the pattern piece as is were used to make a 12-gore, rather than a 10-gore, skirt, it would have pretty much exactly the “waist” measurement I was looking for. The length and flare still seemed good—it would be a very short skirt if worn at the true waist. Furthermore, a 12-gore arrangement is much easier to convert to the uneven panels I wanted—I could make the CF and CB panels the width of 3 original gores, and the side panels the width of 2 original gores. Perfect! I checked the amount of stretch on my fabric, to make sure I didn’t need to subtract ease, and got tracing. I used the highly scientific method of tracing the pattern piece, then sliding it over so the waist and hip notches lined up and tracing the other side. Aside from running off my paper and having to piece in a bit at the hem, it worked really well, although I can’t swear there isn’t a bit of flattening along the hem curve on the 3-times-wide panel.

So, I had my pattern. Time to lay it out.

Back view

Blerg. Now I remember the second reason I had hesitated making one of these things—man are they wasteful of fabric! Especially since I couldn’t reverse any of the pieces due to nap-related fears. This little, itty bitty, not-even-knee-length skirt used up my full two metres of fabric, with barely enough left over for the wide, fold-over waistband I wanted. Of course there are plenty of (rather large) scraps… but seriously! I could probably have gotten two shirts out of that thing! As it is, maybe the scraps will be large enough to play with glovemaking… faux-suede sky-blue gloves would be lovely, don’t you think?

Anyway.

It was pretty quick to sew up, although I did inevitably serge the two wide panels together almost right off the bat. I don’t pick out serged seams, so I just cut that seam off. As it turned out (due to that magic of stretch fabric, even when it didn’t seem overly stretchy when tested) the skirt needed a fair bit of taking in anyway so it wasn’t a problem. I took a couple of cm off each seam, and then took the two side seams in another inch or so.

Skirt---spread out

The waistband is a wide rectangle folded over and applied exactly as the neckband in this tutorial.; I determined the length by wrapping the piece around my hips until it seemed like it was a good tightness. This wound up being a smidge smaller than the skirt opening after I’d taken it in, which seems about right. I didn’t have enough clear elastic to include it in the waist seam… we’ll see if I regret that in the future. Since the skirt’s absolutely the same front or back, whereas I am not, it has the potential to ride up in the back, but if I fold the waistband properly I can prevent that. If the problem persists I can always trim it at the front later; I didn’t do a hem, just trimmed the bottom edge smooth by running through my serger without thread.

It actually turned out quite a bit longer than I had thought it would—it’s hovering just below knee length where I was expecting it to be above. I guess that has to do with adding the waistband and where it sits on my hips, and the fact that there’s no need to take up a hem… anyway, I like it very much, although I’m going to have to figure out what it works with other than just tank-tops. It’s lean enough on the bottom that any puff on top—like the puffed sleeves on my JJs or a cowl neck on a shirt—makes me feel top-heavy, so we’ll see. I may have to make a shorter version in the future, though, out of a less drapy fabric to see more of the “mermaid” shape.

I do like the blue with my red shoes!

(But for now, since it is still snowing, I’m going to put my sweater back on!)

23 Comments

Filed under Sewing

Oops…

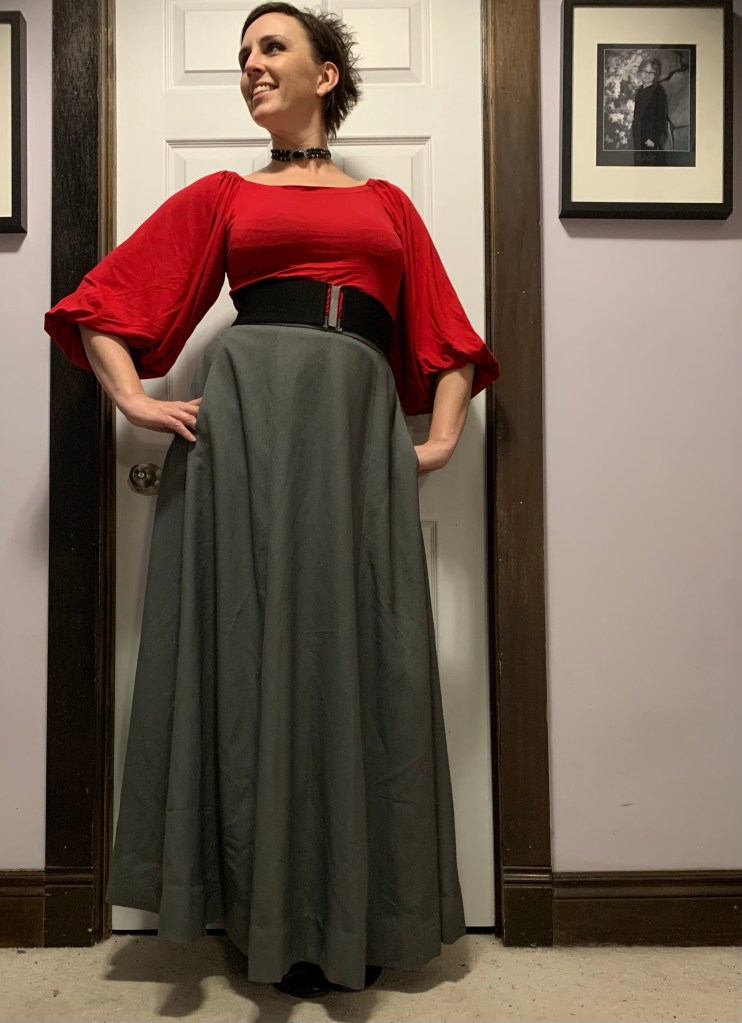
Circle skirt, take two

I did it again.

Yup, despite deadlines and a myriad of other things I should be working on, I finished the corset-waist circle skirt. (Sorry, Liza-Jane… I promise I’ll get to those skinny cargoes soon!)

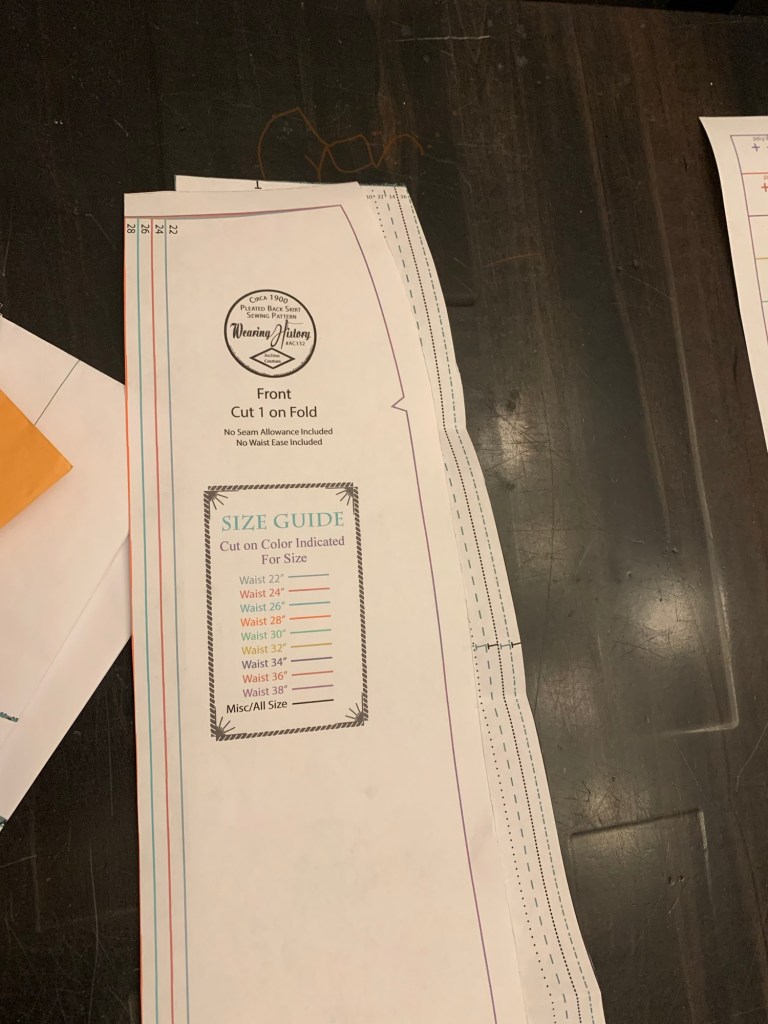
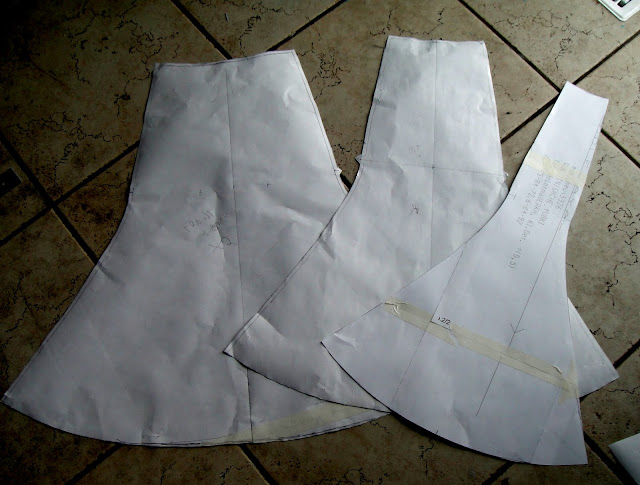
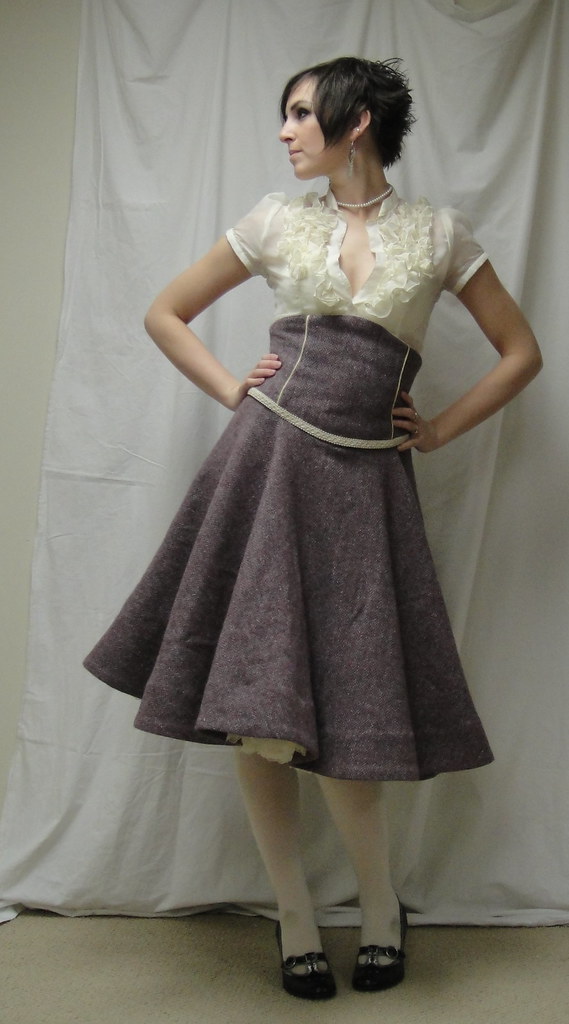
I used the Ceylon midriff pieces as my basis for the “corset” portion, with, obviously, a fair bit of alteration: I put the centre-front on a fold, added a sinuous side-front seam, and completely forgot to allow for overlap in the back, which is now the opening portion. Fortunately, the amount of ease you need in a blouse is considerably more than what works for corset-style waist panels, so there was plenty of room for overlap. I made my lining piece first, out of a sturdy cotton ex-curtain also used here, adjusted the fit on that, and went from there. I added notches to all the tops of pieces, which made it much easier to keep track of how they should go together.
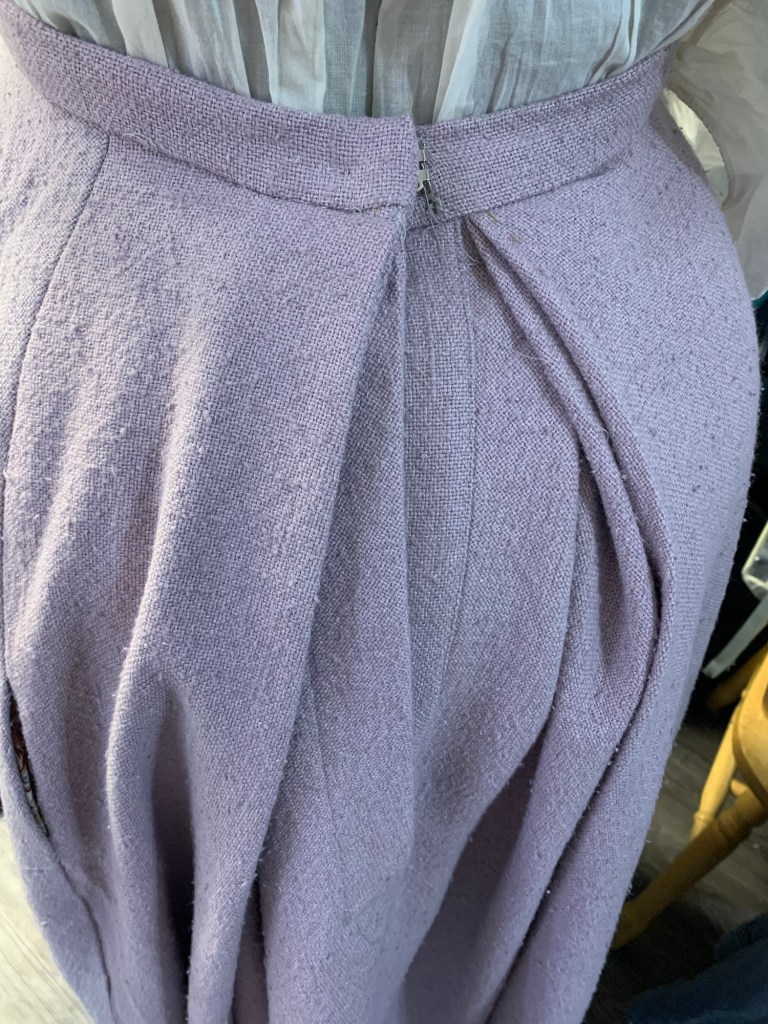
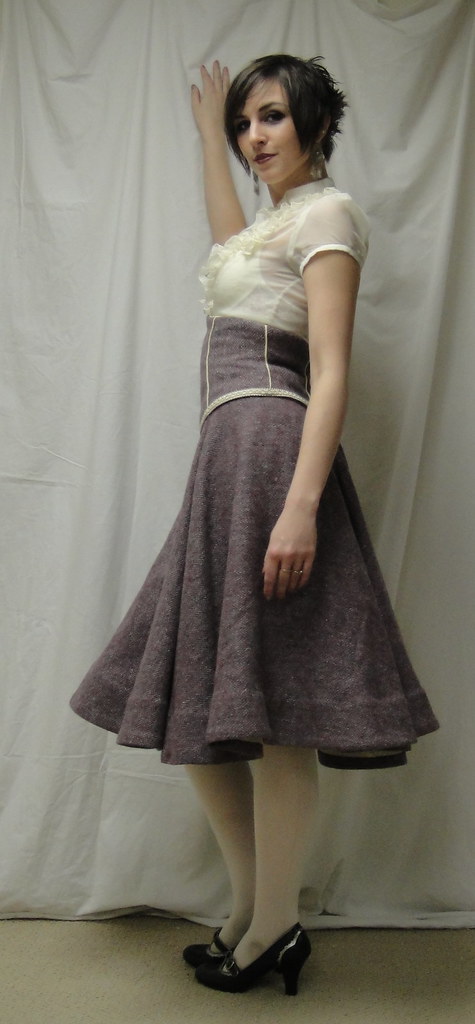
Side view

I piped the seams on the corset portion, using a narrow off-white piping from one of my thrift store scores. Unfortunately, I only had the one packet of this and, although I measured my seams first, apparently I screwed that up royally because I didn’t have enough left for the bottom seam. So I waffled a bit and ended up adding this home-dec trim from my stash. In the past I’ve always stitched this trim on by hand, but I was lazy and machined it this time. I can’t say that I notice a difference, even from up pretty close, except perhaps that my positioning isn’t quite as exact as it might have been.

I mentioned before, I elected to use snaps as the closure here. Time will tell as to the wisdom (or folly) of this decision. Way back when I was sewing the original circle skirt, I had posted a question on PatternReview about how to insert the zipper. I got great answers, but also the suggestion of a snap-placket as a vintage-style alternative. So I determined I would give it a try on my next circle skirt.

Now, I will say, the snap-placket would have worked better in a thinner fabric. This wool is quite heavy, more of a coat weight than a suit weight, and getting even the most heavy-duty snaps through multiple layers of it was a pain in the ass. And a double-fold bias strip of the wool (so that’s like five layers!) is really, really bulky. That being said, I really like the idea, and will try it again in a more summery fabric. On the up-side, because I was using snaps, when I discovered on first try-on that there was way too much ease in the “corset” portion to hold it in place properly, it was easy to run another row of snaps up further in, instead of having to pick out and adjust piped seams or, worse, a zipper.

Snap placket (top portion). I painted the snaps with matching nail polish.

I don’t know that the snaps are ideal for the “corset” style either, though, as due to the small amount of ease they’re under a lot of strain. For now they seem to be holding—they are heavy duty, after all—but I’m not convinced they’ll make it in the long run. We’ll see. Converting it to a laced closure or something at some point would be a pain in the butt, but not impossible, I guess. (Note to self… hang on to some of those scraps in case you need a modesty panel for behind the lacing…)

As I mentioned before, I opted to pass on boning mostly as I’m too lazy/disorganized to procure any (or cable ties, either, as Ms. Slapdash so smartly pointed out). I used hair-canvas interfacing, hand-basted in place, with the “hairs” running vertically in at least some of the pieces (read: the ones where I remembered). This makes the waist nice and firm, but I can see that I might keep a smoother line longer with boning. Again, not impossible to add later if I feel the need…

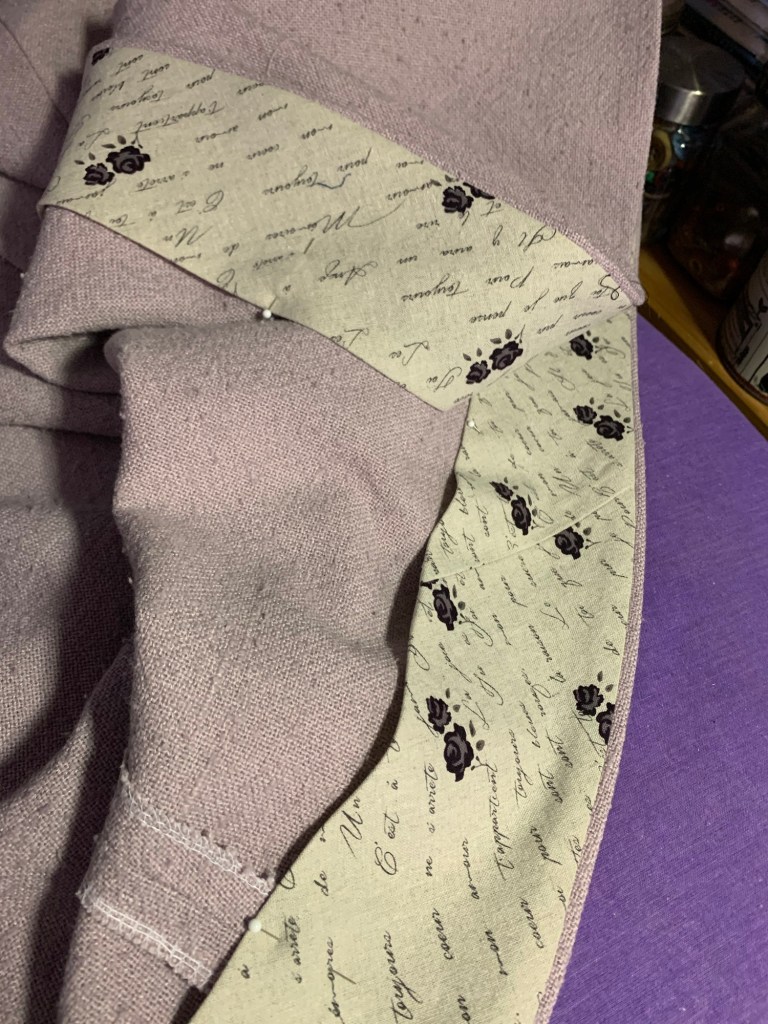
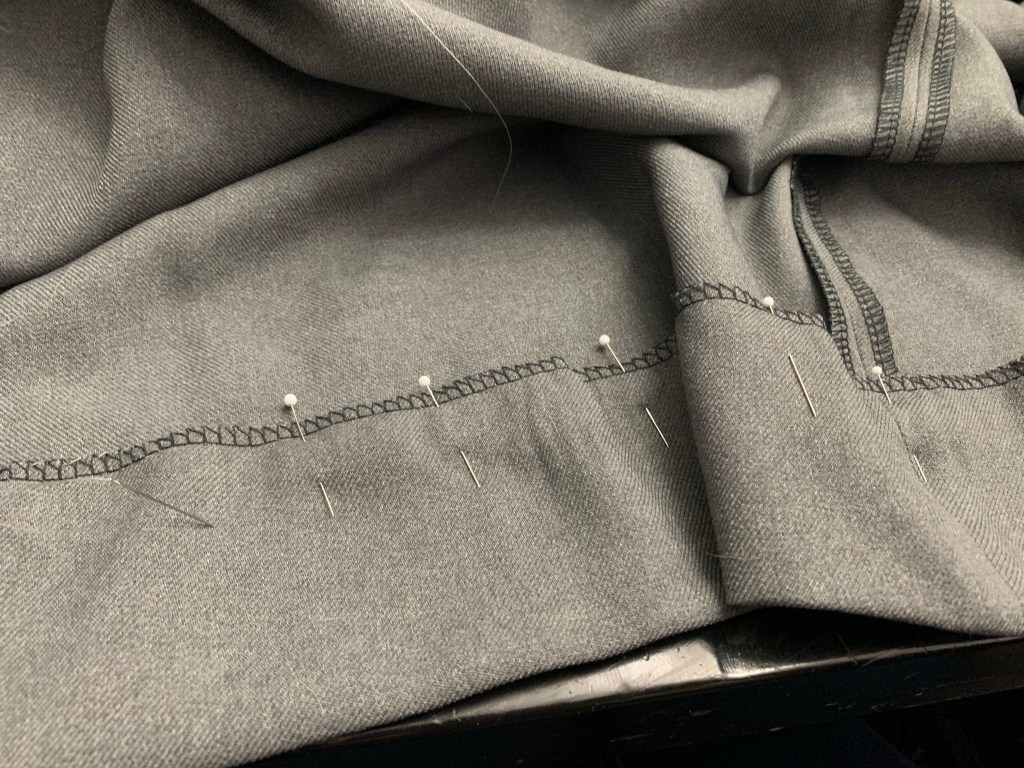
So now we come to the hem. I was quite happy with my experiment with horsehair

Hem interfacing... bound and circled

braid last time, but as I mentioned before it’s a bit tricky to source locally and I’m (again) too impatient/disorganized to order online. Not saying I never will, but not for this project. So, since I still have plenty of hair-canvas kicking around, I decided to give bias interfacing a try. I measured and cut three-inch bias strips of the hair canvas. I will say, cutting bias strips out of hair canvas is much less annoying than out of regular fabric—it’s nice and stable and hardly skids around under your pencil at all. I then sewed the pieces together into a long strip (and managed to only sew two pieces on wrong-way round 😉 ) and ironed to “circle” it—just pulled it into a curve while ironing. The stuff goes incredibly soft under the seam-iron, but firms up again perfectly when it cools, which is mostly nice but can be a little tricky. I then stitched some ready-made bias-tape along the inside edge of the “circle”, stretching the bias as I went. I picked this yellow because it was the only colour I had enough of other than red. I love red, but it wouldn’t really go with this project. Cream would’ve been perfect, but I didn’t have any. (if I had, I would’ve turned it into piping for that last corset seam, anyway). And where else am I going to use six yards of yellow bias tape, anyway? (this is another of those thrift-store “scores”)
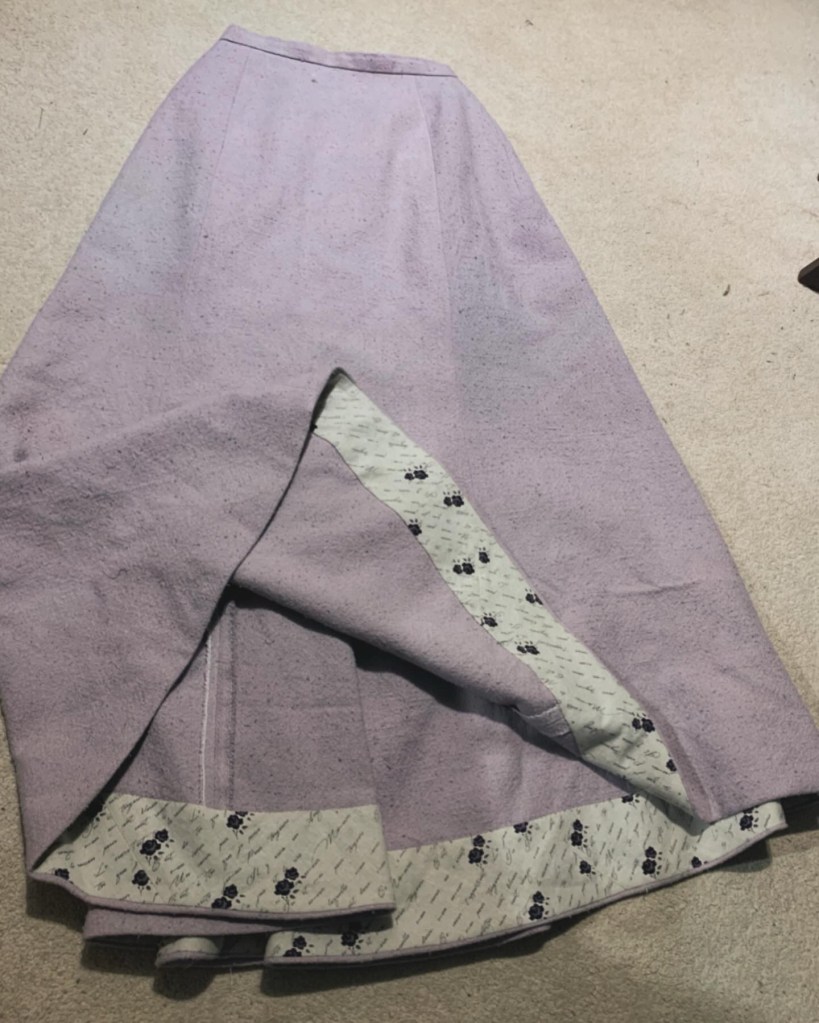
Finished hem

So now I had my interfacing ready, I basically followed the rest of Gertie’s tutorial for applying horsehair braid. The only trick was to make sure to remember to start with the seams in my bias interfacing facing up, so that when flipped to the inside they’d be hidden. Ironing the hem down once it was flipped was in some ways easier than with the horsehair braid—the hair canvas won’t melt under the iron—but in other ways harder, as the hair canvas gets really soft when ironed and I had to be careful that the seam allowances weren’t getting folded and crunched. Still, with a bit of care and pinning, I got it all folded over and steamed so that the upper and lower seams were about the right circumference.

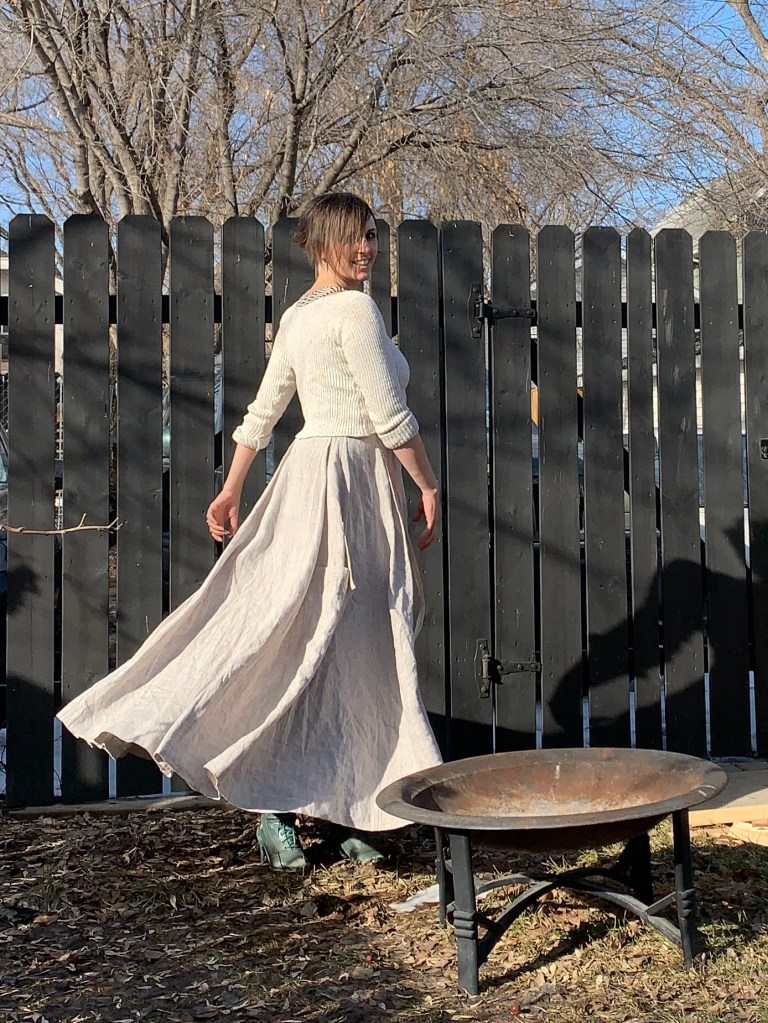
I opted to hand-stitch the hem this time, rather than topstitching, which worked
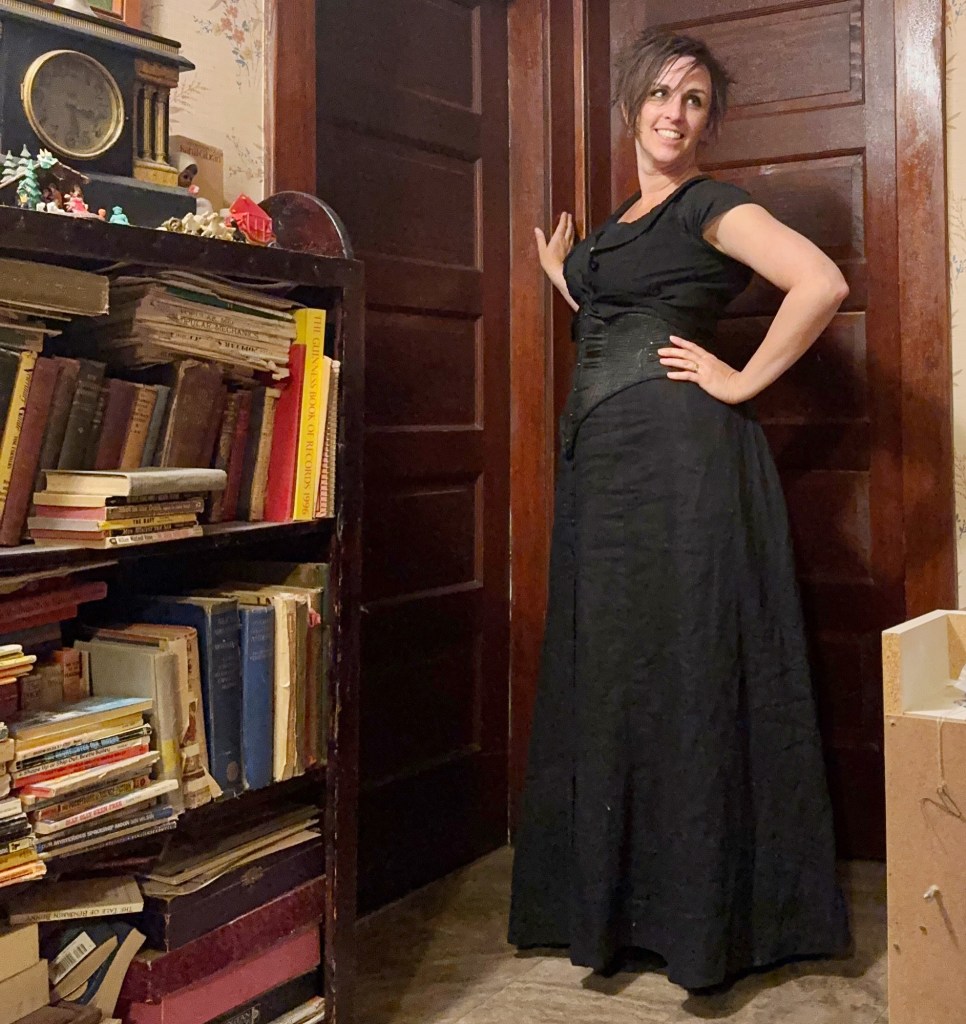
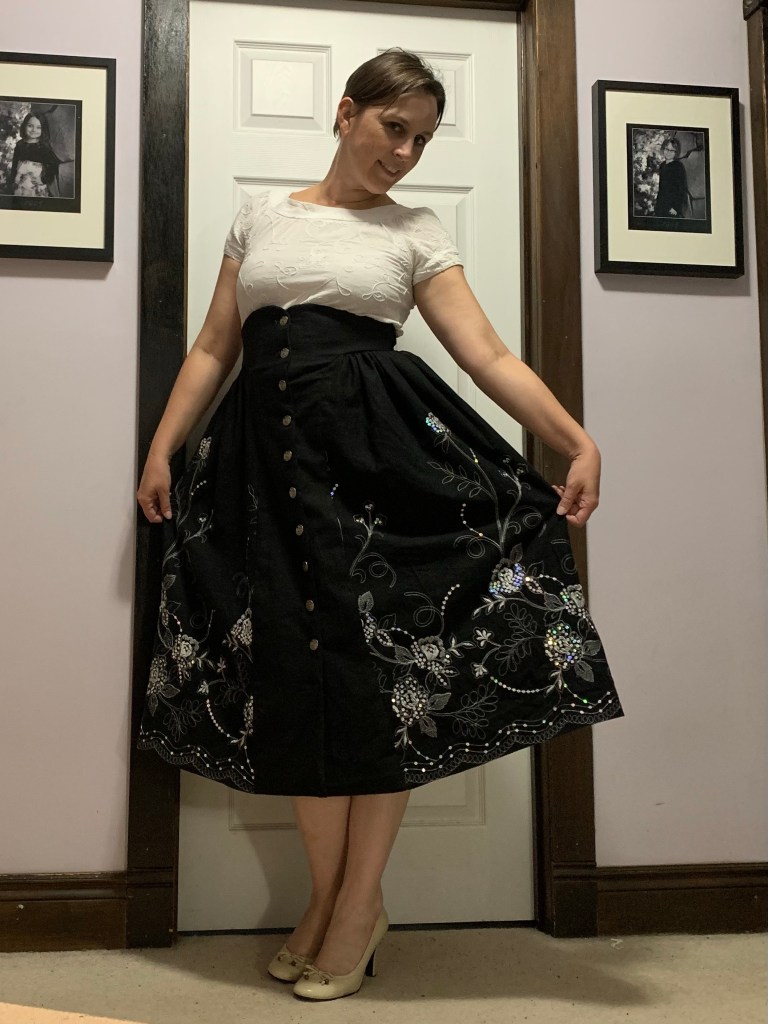
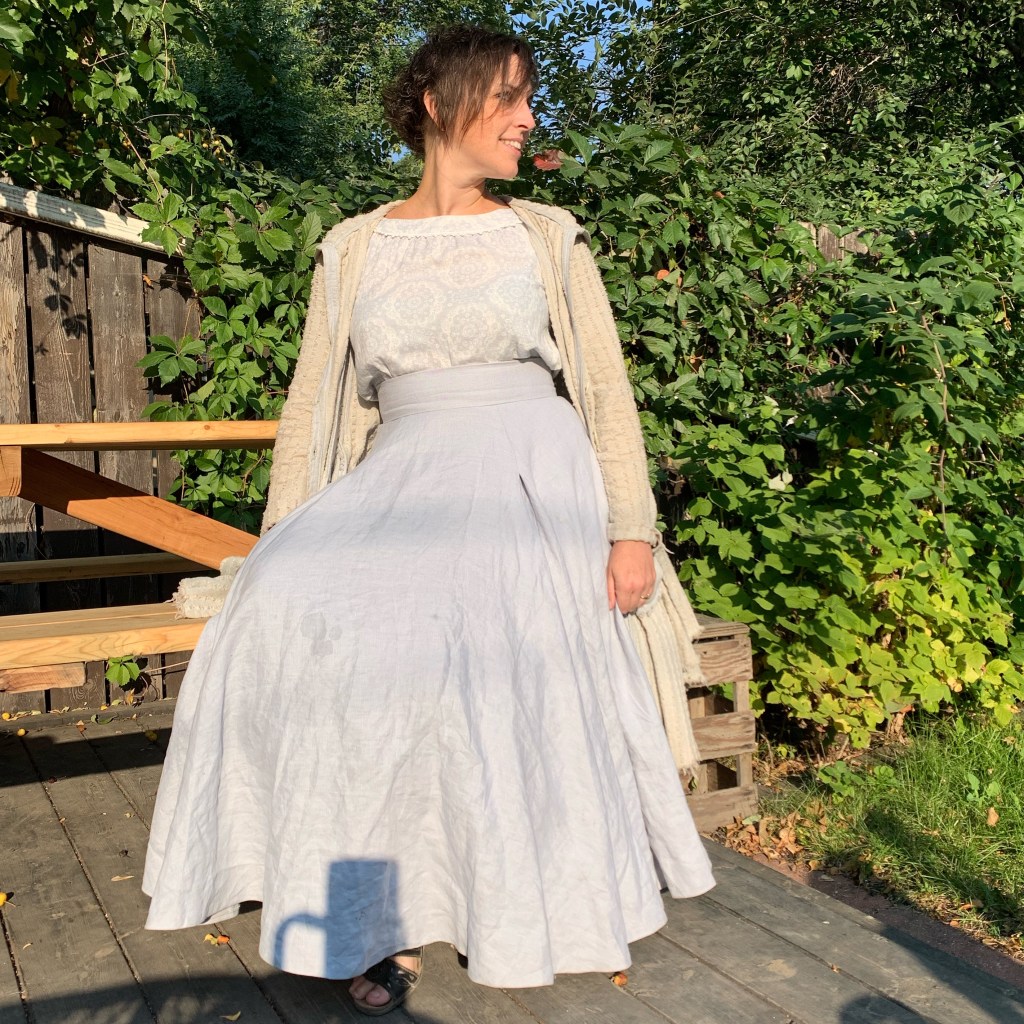
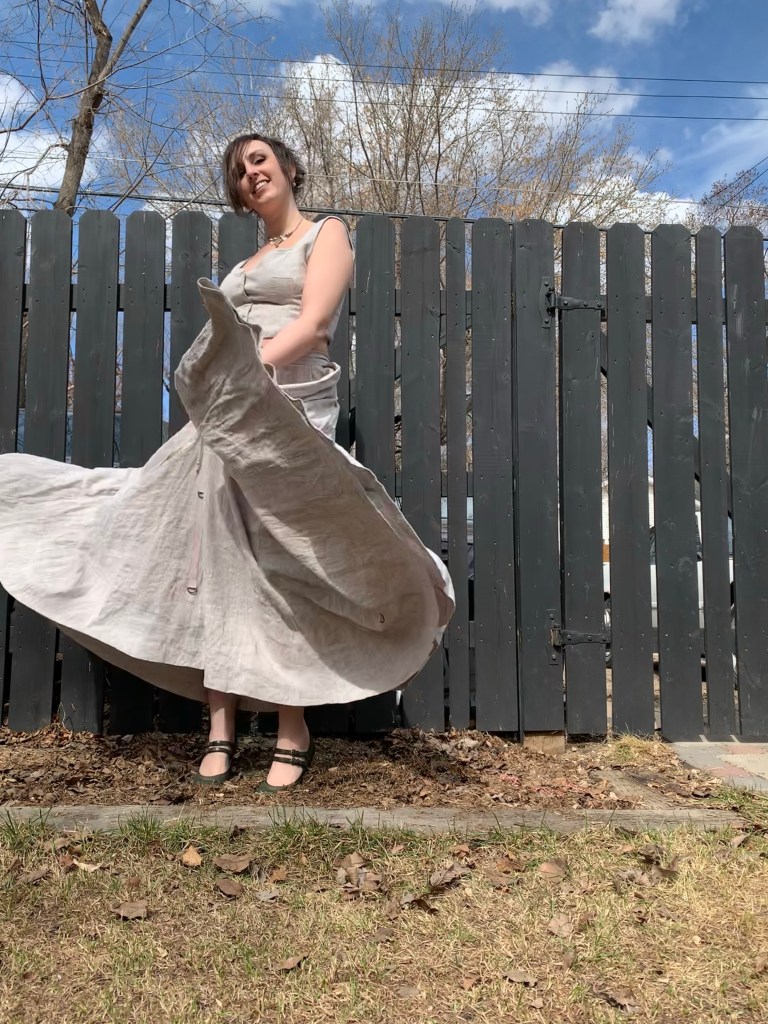
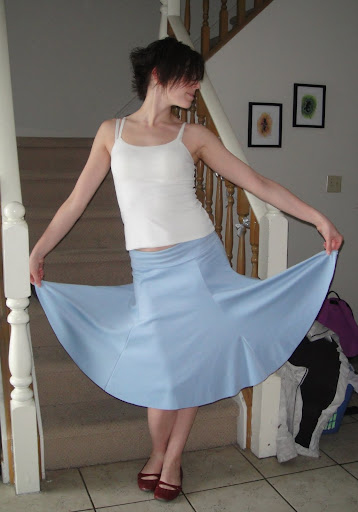
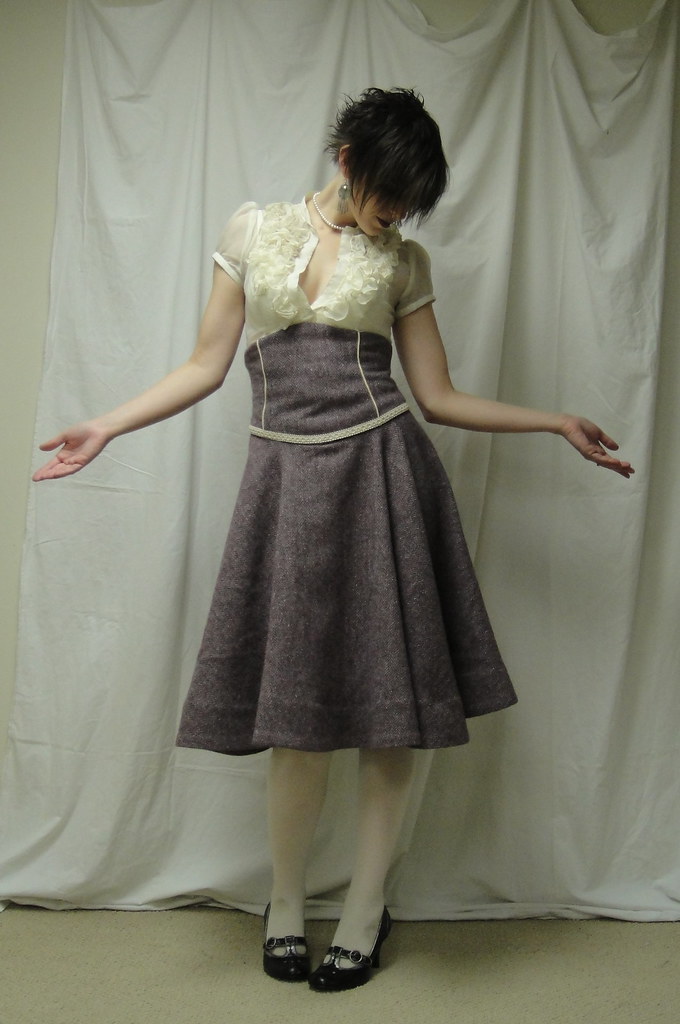
Full skirt!

reasonably well and only took two TV shows. I’m sorely tempted to run a band or three of the same trim from the waist around the edge, but that might be a bit over the top and would take a lot more of the trim than I have kicking around. We’ll see, I suppose. 😉

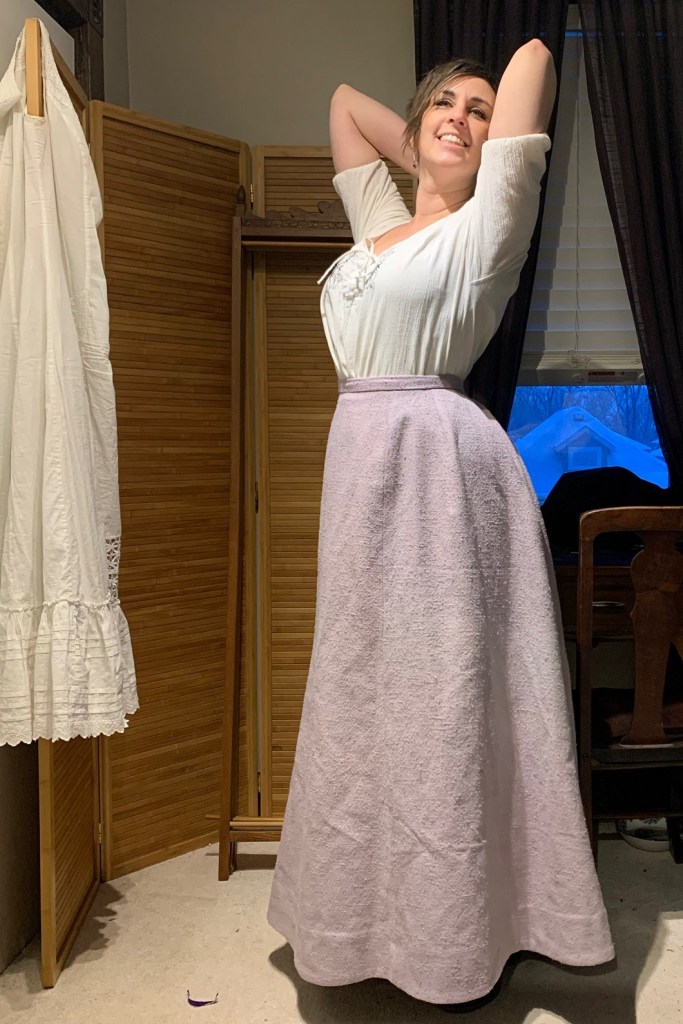
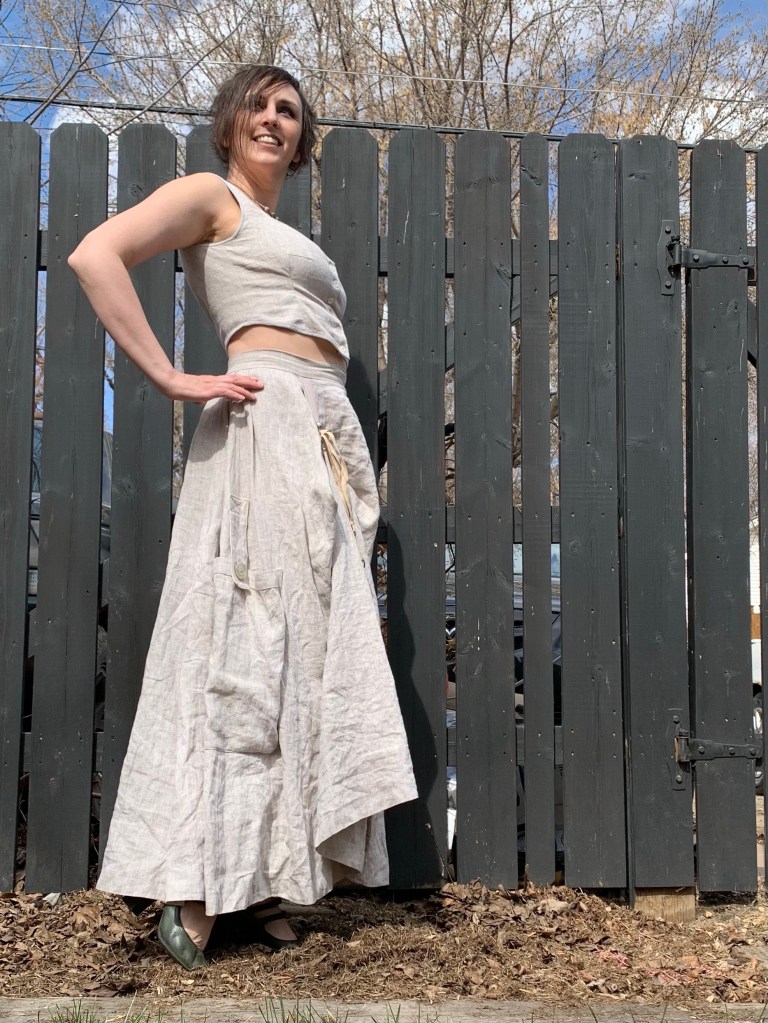
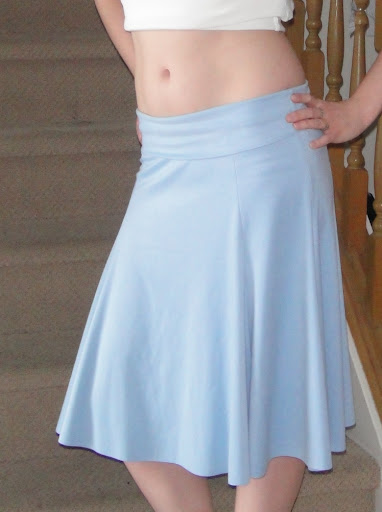
So this project fits with my “spring palette,” which isn’t a formal part of the Colette Spring Palette Challenge, but is in line with a palette that I’ve been playing around with intermittently for a while now. As is demonstrated by the colour scheme of this entire website ;). The main colours are cream or ivory and a muted, dusty blue (sometimes veering towards a pale aqua), but this light, dusty purple fits right in as well. It’s not far off Sunni’s palette of choice, either, although I don’t know that I’ll be incorporating her caterpillar green ;).
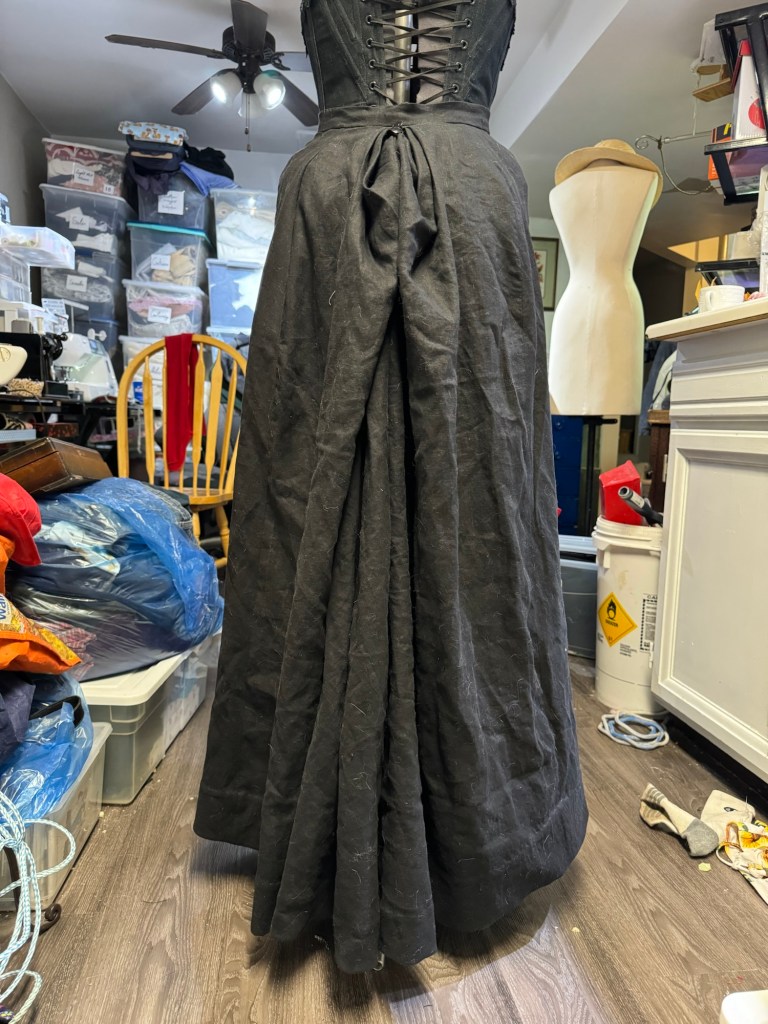
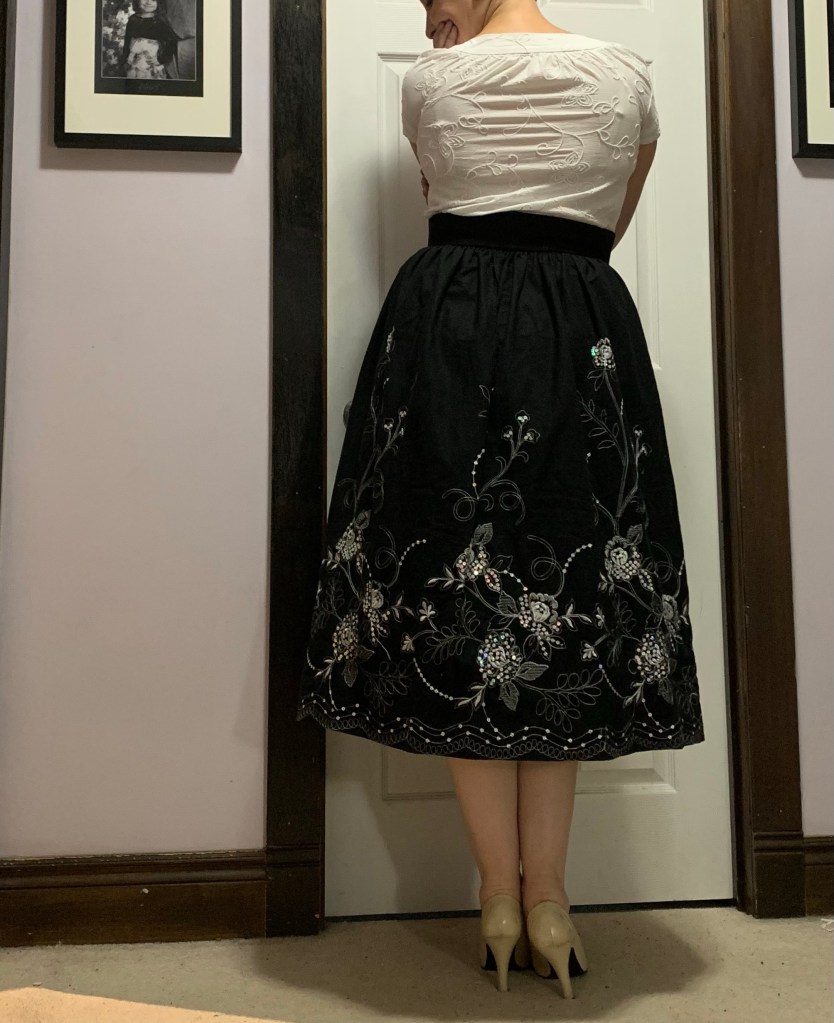
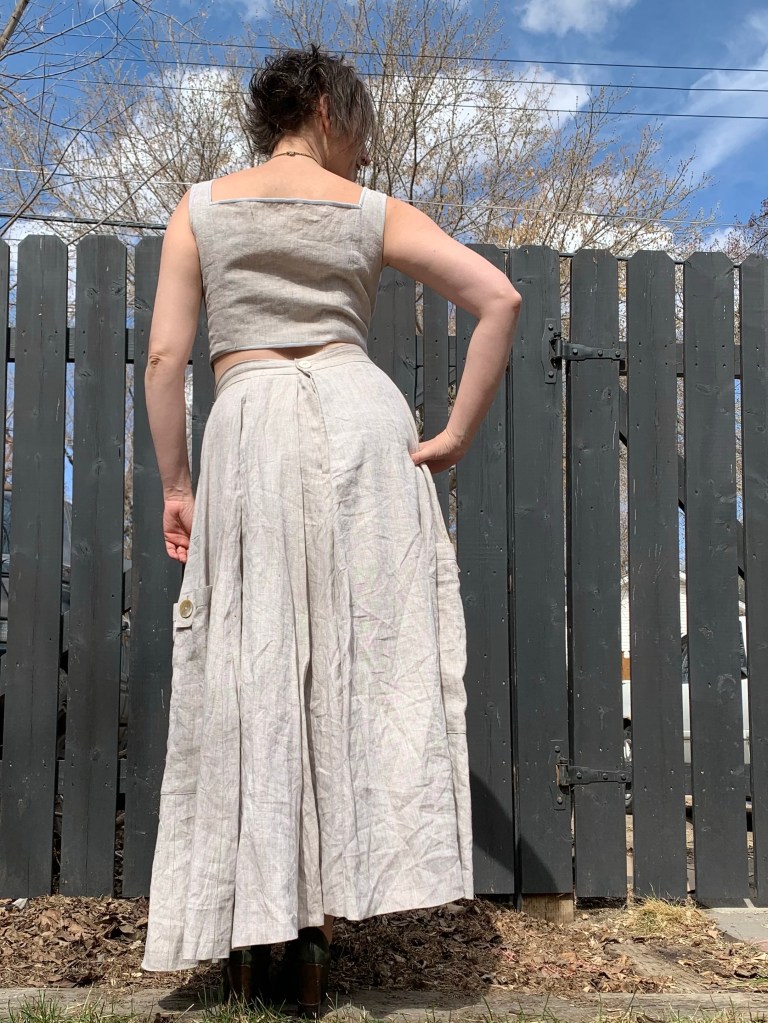
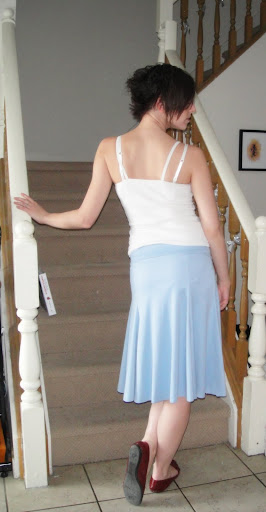
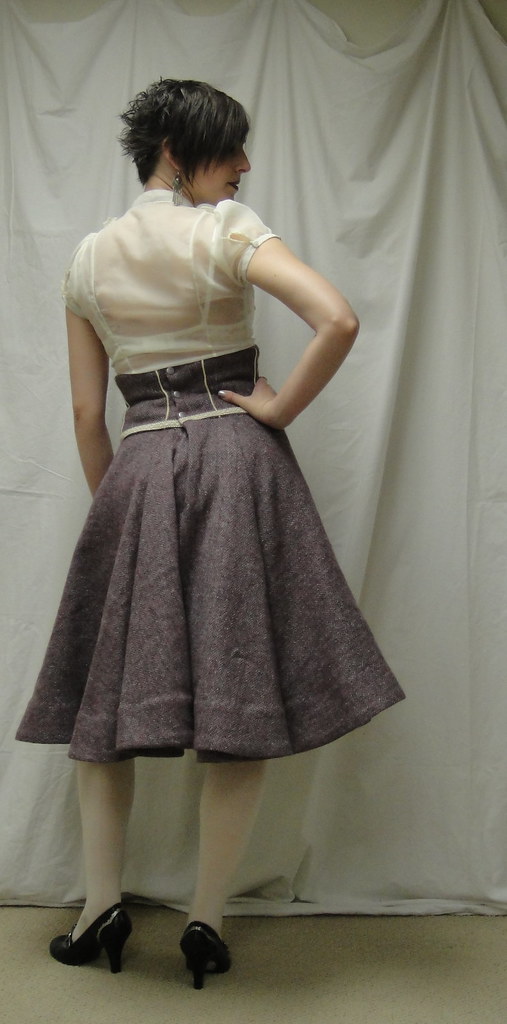
Back view

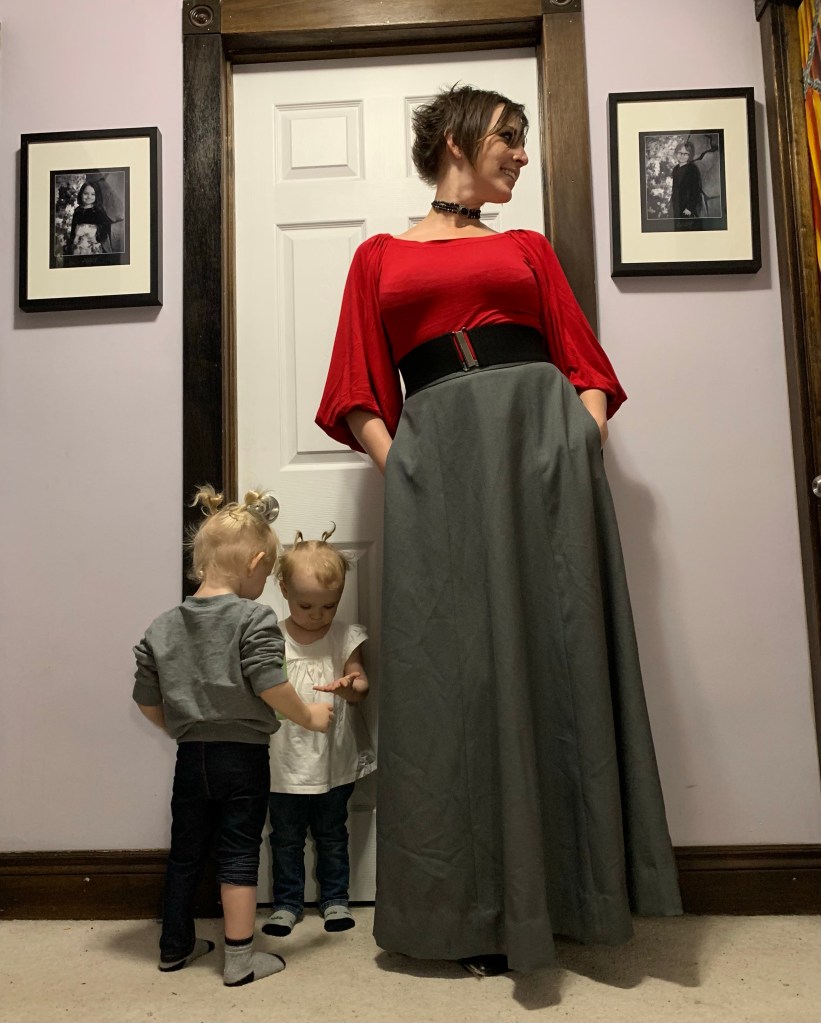
I absolutely love the skirt with this blouse, though I’m thinking I’m a little old for the sheer-blouse-over-bra look. Still, fun for a photo shoot, anyway. I’ve been keeping my eyes open at the thrift store for a perfect pair of ivory shoes to go with this palette, but nothing’s really thrown itself at me yet. Light-colour shoes get banged up and turn drab so quicky, I may need to hunt around new-shoe stores… though I hate to buy new a pair of shoes just for taking photos in… /sigh.

The back closure wound up a bit bunchy, partly because of the incredible thickness of the snap placket in the skirt part, and partly because of the overlap where I readjusted the size (which i why the snaps are closer to the left-hand line of piping, not centred between the two). As I don’t have to look at it, I’m not bothered by it ;).

As to whether heavy wool belongs in a “spring” palette… well, as far as I’m concerned skirts of any kind are spring wear. Heck, anything that isn’t quilted down is spring wear. So there. 😉

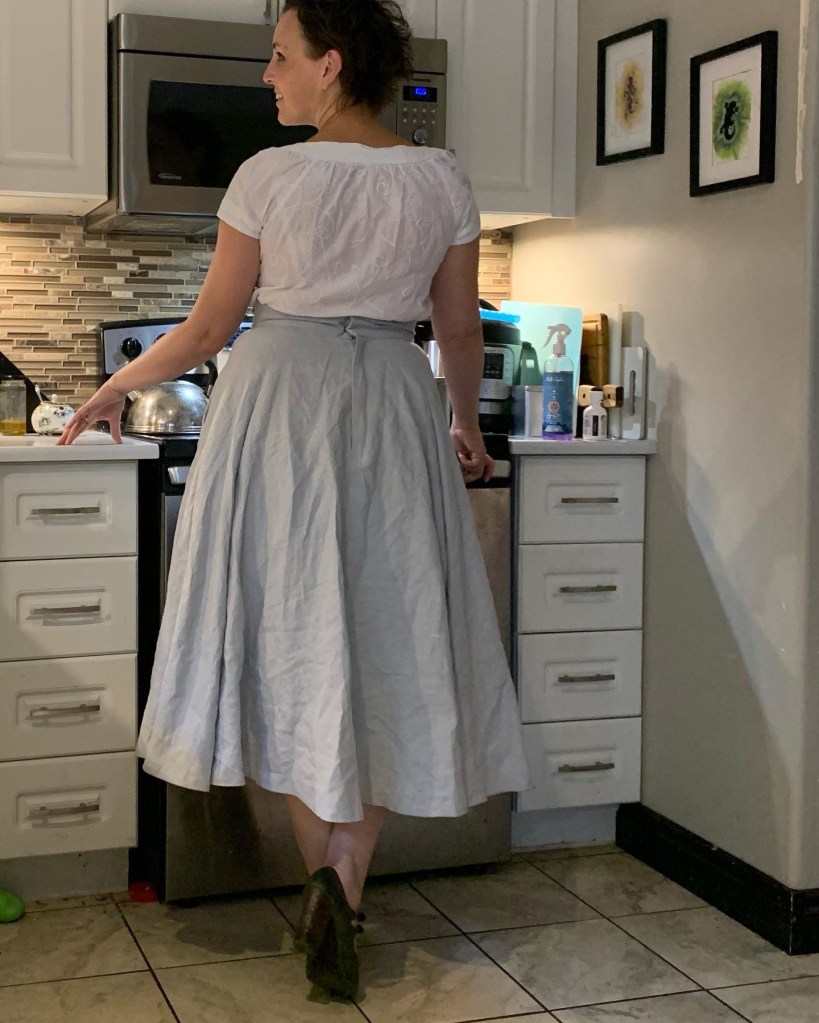
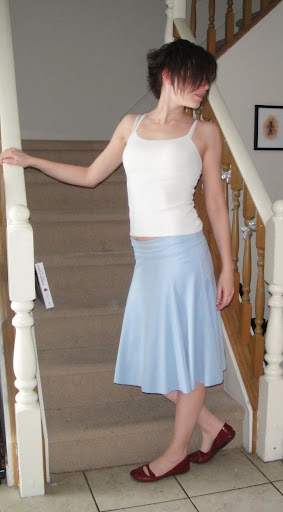
Oh, yes, and since some people like to see what they look like without the fluffy petticoat underneath:


Sans petticoat

Here you go. In this particular (heavy) fabric, with the interfaced hem, it’s actually not a striking difference. I have noticed one thing about wearing the petticoat, however—it makes a skirt much warmer, as its fluffiness fills in that air-space between legs and skirt remarkably effectively. Still not as warm as pants, but much better than a skirt without petticoat.

Next up: probably Syo’s skinny jeans. Poor kid seems to have the virus Tyo had last week, although her symptoms are totally different. Those of you with children, do you ever find that? Even when we had swine flu last year, Tyo and their dad had one distinct set of symptoms, while Syo and I had another. Yet I’m sure it was the same virus—their entire school was decimated for about two weeks. Although it would be nice if I could get the alterations figured out on my sweetie’s shirt this weekend, before he goes away… I could then present him with a completed shirt or two when he gets back. (Yes, I’m going to be single-parenting for a full two weeks! Wish me well… I’ve never had to do this before. Usually it’s me bopping off and leaving him with the kids…). Also I should really make another pair of jeans (or those cargoes 😉 ) before March kicks in…

23 Comments

Filed under Sewing

Frivolity

Fluffy!

There’s room for a little silliness in life, right? (And considering what some of you out there are going through right now, there’s room for a LOT of silliness in my life.)

This petticoat is in clear and present violation of the mission I set myself when I began this blog, which was to create clothing that I would wear on a daily basis.  At the moment, it will join several other cream and lace pieces in the side of my closet that holds the “fun clothes”. Y’know, the old clubwear, goth gear, formal attire, stuff that gets an airing once or twice a year at most. (This doesn’t even count the actual dance costumes, which are all in the basement.) The best I can hope for is that its presence will spur me to create some circle-skirts or things of that nature to wear it with. Once, y’know, it stops being winter. Well, serious winter. Skirts can still be worn in mild winter, but it takes greater fortitude than I possess to wear them in real cold.

So, construction. Erm. I had, y’know, mentioned Sugardale’s tutorial. Which is a great tutorial. I used, well, the part where she uses ribbon to cover and finish her seams.

I started with the same basic measurements she used—22″ finished +2″ SAs=24″ skirt /3 tiers = 8″/tier.

Then I looked at my tulle, which I knew I wanted to be the bottom tier. I had enough for about four 8″ strips, each about 2.5m long, I thought. Which would give me enough for 10m on my bottom tier. It didn’t seem unreasonable as Sugardale suggested 8m for the bottom tier. (A basic tiered skirt for tribal bellydance is a 10-yard skirt, that is, like mine, it has 10 yards/m at the bottom. Yes, I know that a metre is longer than a yard, and the difference adds up to quite a bit once you have 10 of them. Hush, this conversion is the least of my problems. Of the two full-size ones I’ve made, one is about 22 metres at the bottom, the other is probably around 40-some… it is very, very, very, very full)

To start I edged the bottom of the tulle with ribbon and my “new” gathered lace. This took forever. The key to tiered skirts is to always start with the bottom tier—not only is it easier, but you will never have the stamina for that massive tier if you start at the top. Once I had the lace attached, I realized that my tier was more like 14″ than 8″.

So I decided to fold it over and have a double-length for the bottom. Extra fluffy!

Then, I broke out the ruffler foot.

I have mentioned this contraption briefly before, but I don’t know if I’ve ever gone into the full, detailed complexities of my relationship with this particular sewing machine foot.

To begin with, it is, quite simply, the most terrifying foot concoction imaginable. I suspect that those vintage buttonholer attachments are more frightening in their inner workings, but at least they tend to have it all neatly contained within that plastic casing.

Once you figure out how to attach the ruffler foot to your machine, it’s actually relatively simple. The up-and-down motion of the needle drives a sharp bit of metal back and forth, causing fabric threaded through a particular part of the foot to bunch up. How much it bunches per stitch is controlled by a little screw; another little lever adjusts whether the gathering takes place on every stitch, or only once per so many stitches. This means you can technically use the foot for making pleats as well, and control your gathering ratio quite precisely. Fabric tension and stitch length also play a role.

In practice it is… fiddly.

Now, I first wrestled the ruffler foot on my mother’s machine, which, I have

come to realize, is a prince among ruffler feet as well as a prince among machines. With a certain amount of experimentation I determined the settings I wanted, and, based on a foot-long sample, figured I had the ruffle ratio set to 2:1.

When I finished ruffling the first tier of my first tiered skirt, I realized the final ruffle ratio was more like 4:1. As a result several of the nine tiers in that first skirt (never let it be said that I’ve shied away from complex projects!) have no gathering at all. Still, I managed to pull the skirt off and was quite thrilled with it. Here’s a pic in action. And anything beats trying to hand-gather 40m+ of fabric

When I moved away from my hometown, my mother generously bought me my sewing machine as a going-away/Master’s degree present. The one attachment I requested was a ruffler foot to go with it.  As I discovered when I made my second tiered skirt, the differences between a vintage, quality attachment and a cheap modern generic version are subtle but substantial. The metal is just that little bit thinner, the edges sharper (which tends to cut fabric and threads when things get the least bit out of alignment. And something about the vibrations it generates (maybe because they aren’t anchored by the massive weight of my mom’s old machine?) makes things come loose. Like the needle. Or even the whole foot (at the part that screws on to the leg, not the little snap-on part). I’ve never been able to make my ruffler foot do anything other than gathers, and the control on the amount of gathering is rudimentary.

Apparently in tulle, it’s nonexistent. To ward off the machine’s tendency to eat the tulle, I gathered it to a length of ribbon. Once I figured out how to arrange this properly it wasn’t so bad, but for whatever reason the stitch-lengths were minute, and completely insensitive to my twiddling with the set stitch length. So instead of gathering at a nice 2:1-or-thereabouts ratio, it gathered my entire strip of doubled tulle into just over 2m. Not the 4-5m range I was looking for.

D’oh.

I had originally intended to have the top tier be about 2m, attached to an elastic casing of similar size. Obviously not going to work when I need at least one more tier in there.

A completely inadequate attempt to demonstrate this gathering method.

So I made a second doubled tier, in the hopes that it would fill out the second tier a bit above that crazy-full bottom tier, added more lace, and used the zig-zag-over-supplementary-thread method to gather it. This is the absolute best method available (to me) for gathering moderate to large amounts of fabric where you still need a fair bit of control over the ratio. (The ruffler foot is wonderful for doing the gathering for you—evenly—but limits your control. Or my control, anyway.) Note: I don’t have and have never used one of those “gathering feet” so I can’t compare. Maybe it would kick my method’s butt. Anyway, all you do is zig-zag OVERTOP of another thread (I like to use dental-floss), and then afterwards gather up your other thread/floss; the zig-zag acts as a kind of casing. Unfortunately, on this sheer fabric I decided to try using a clear monofilament-type thread for the supplementary thread, since the only dental floss we have right now is the psycho-expensive stuff the kids like and I’m not using that for sewing. While it works fine, it’s too slippery, so the gathers slide around and don’t stay put as well as I’d like. Only exacerbated by my fabric, which for the upper tiers was this godawful poly-chiffon stuff that I scavenged from my step-brother-in-law’s wedding decor summer before last. It’s the same fabric in the ruffly sheer JJ.

I really liked using my smocking-stitch on top of the ribbon when securing the seams. It gives it a nice, lacy texture, as well as finishing everything off nicely.

I’m realizing belatedly that I should’ve gotten more close-ups illustrating the way the tiers are doubled, which is a little nifty, if I do say so myself, but it’s late and this post is already hella-long and I’m too tired to bother right now. Sorry :(. Also, do you note the total lack of my vintage lace on the finished project?!? I didn’t have enough for the hem yet I didn’t want to attach it higher up where it would never, ever show. So now I don’t know what to do. Maybe save it for finishing a skirt lining that would go over the petticoat?

28 Comments

Filed under Sewing

WWSSD? (What Would Selfish Seamstress Do?)

Probably not this.

Gathered skirt

Yes, this is the other piece of “nice” fabric Her Selfishness accidentally included with the poly chiffon and fun-fur. (Don’t you worry… we’re getting to the fun fur.) It is apparently a Vera Wang jaquard. This probably makes it the first “designer” fabric I’ve ever had the privilege of mangling. It’s navy/black, variably shiny, with a pattern of concentric circles. It’s crisp to the point of cardboardy and takes a crease very nicely. It would make an extremely elegant coat, ball-gown (if I had, y’know, more than about 3/4 of a metre), or maybe even a sheath-dress for someone with superior fitting skills.

I made a gathered skirt.

In hindsight, it might have been better pleated. Or perhaps I should’ve paid attention to the 2:1 golden rule of gathering, rather than just taking a double-width panel and

Gathered from the back

gathering it all onto my skirt yoke. If I could’ve made it longer I would have—or rather, I’d have made it about the same length but with a wider hem. I think it needs a little bit more weight at the hem… Or something. Anything to reduce that pouf! The pouf does not help with the natural tendency of such skirts to be longer at the front than the back.

Actually, the pictures look pretty good, about what I was going for, so perhaps it’s just that I need a petticoat or bloomers underneath (Madeleine, anyone?) to reduce the feeling of “my bum is hanging out in space” that I get when wearing this. It certainly doesn’t need a crinoline for volume.

This is, however, another item that is not likely to make it into my regular rotation of clothing, and hence not something I should’ve been working on during my precious Self-Stitched September sewing time. I can only conclude that there was some seriously evil mojo infused into that fabric her Selfishness “gave” me.

Pouf!

Or, y’know, that sometimes you just have to make a pouffy skirt.

I used the yoke from the A-Plus A-Line on Burdastyle (graded from a size 4 at the hip to a size 8 at the waist as I didn’t want it sitting at my natural waist), and just gathered the rectangular panels to it. I made my first attempt at a lapped zipper on the side, which turned out awful. If I really want a nice zipper I should really bite the bullet and do it by hand, but I already did the whole hem by hand last night and I didn’t feel like it.

In Self-Stitched September News, Day 4: Are you sick of JJ’s yet?

Self-Stitched September, Day 4

I know I am! (I’m also sick of my usual poses so you can look forward to some doofy ones. This one is called “Oh Noes! I am being Followed!”)

9 Comments

Filed under Sewing

Kasia—Complete

Kasia---view 1

Well, for better or for worse, it’s done. I am going to need some major help styling this… so far the black JJ (pictured) is the best (though it doesn’t show up well at all in the photos). I’m wondering if it would work well with a

Kasia---view 2

Port Elizabeth top—something blousier. I don’t know. This is a foreign concept to me. Also this skirt craves heels. It demands them. For a girl who lives in ballet flats, this could be problematic. I can rock a pair of platforms if necessary, but those wouldn’t be right, either. And I just can’t imagine wearing these pumps all day. I would cry. Maybe with my big kneehigh boots… I could see spending a whole day post just trying on different wardrobe items with this skirt.

Kasia---view 3

I’m not sure if the red buttons are for keeps; they’re the only big-enough ones I had a set of lying around. I do like the colour, but I wonder if something silvery/blue, more in keeping with the colour scheme of the skirt, would be more flexible.

Sorry for the crummy pics; the indoor light isn’t great and

Kasia---view 4

the neighbour was out in his yard so I felt kinda funny clomping around on the deck in my (loud) heels taking pictures in front of him.

In other news, I bought a remnant of ivory tulle at Fabricland yesterday when I picked up the topstitching thread. So fun! I want to use it with the mass of ivory chiffon left over from my sheer JJ blouse to make a crinoline/full petticoat. Y’know, for all those full-circle fifties skirts in my wardrobe.

Well, if I have the petticoat I might make one, right?

This is assuming, of course, that I can get the tulle away from the seven-year-old.

7 Comments

Filed under Sewing