Tag Archives: Sewaholic Patterns

Odds and ends and bad photographs

While I didn’t accomplish a lot on my summer vacation this year (other than the Jutlands), I did end up tackling a bunch of quick projects, several of which had been sitting for months or years.

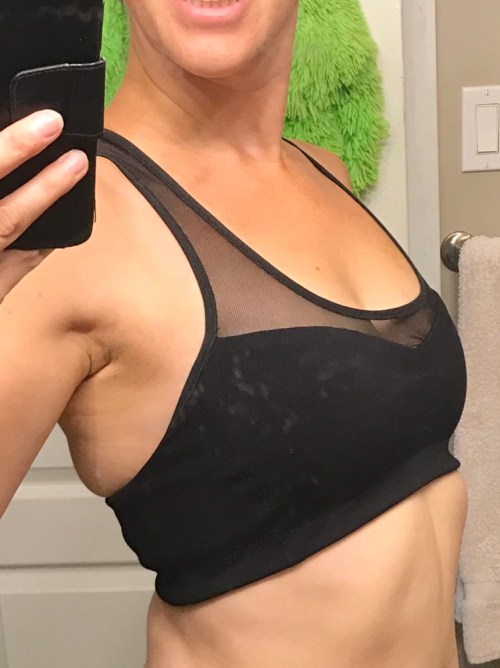
The oldest is this Sewaholic Patterns Dunbar sports bra. I had cut it out pre Christmas… at least two and possibly three Christmases ago. It was meant to be a present for Syo, but I somehow got completely befuddled with all the pieces and it just seemed way too complicated.

This is too bad because when I finally did sew it up it only took about an hour. And it’s using some really nice fabrics—a wicking activewear, some proper power mesh for lining, with a lighter mesh for the sheer part.

The construction was complicated compared to the other sports bras I’ve made, which is not actually complicated in the grand scheme of things. The lining seams and the outer seams don’t line up because the outer layer has the side panels. This is actually nice because you don’t have as much bulk at the seam lines, but it confused the heck out of me (especially picking up the pieces years after cutting out.) I skipped the optional pockets for foam inserts, which made my befuddled brain happy but made me a little disappointed in myself since I had cut the pieces and everything.

The only other tricky bit was figuring out whether the top and bottom edges had seam allowance (they do), which I trimmed off from the top because I wanted to use fold-over elastic.

The soft mesh I used for the sheer part is a bit flimsy, maybe, but the look is perfect. So I’m pretty happy overall. And it’s one less thing sitting in a box! Bonus: in the same shoebox I found our handwritten family recipe book that has been missing for two years. WTF?

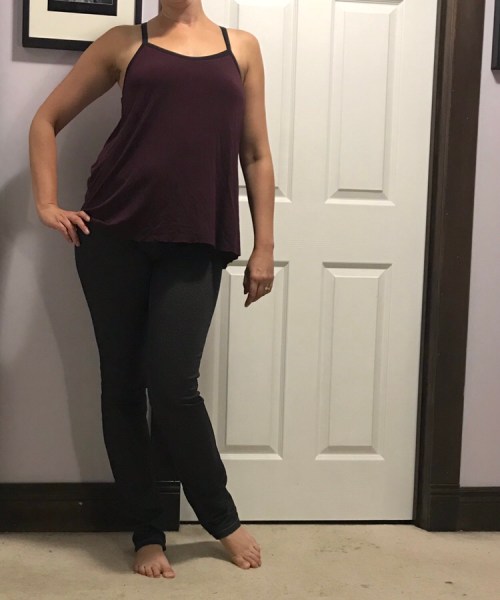
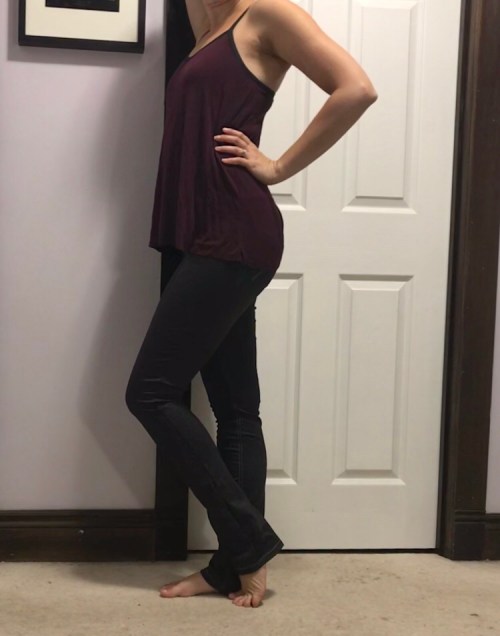
Last fall I had cut out a pair of Eléonore pants from a black denim-print ponte. I had issues with the topstitching and wound up stuffing them in a bag in frustration. Well, I finally put on my big girl pants and took another stab at it. I had to abandon the actual topstitching thread and use a triple straight stitch with regular thread instead. The only problem is that none of my machines will do a long stitch on this setting, which annoys me. But at least it’s done, and you have to look pretty close to notice the difference.

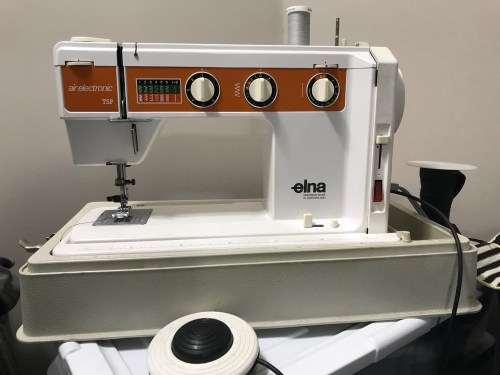
I have been doing all my topstitching lately on an old (80s) Elna a friend gave me. It doesn’t blink at topstitching thread (except with this stretchy fabric) but more importantly it’s got this weird air-bubble foot pedal that gives amazing control—the best I’ve had in a non-computerized machine—and an adjustable speed that goes from painfully slow (perfect for topstitching) to so fast you have to adjust the tension because the thread is getting pulled so quickly (perfect for topstitching with a triple stitch, which seems painfully slow otherwise)

They don’t stay up terribly well; I should probably put belt-loops on.

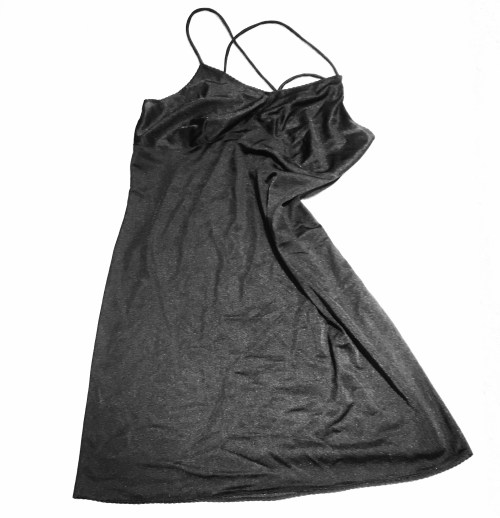
After getting those out of the way, I stumbled upon a remnant of black lingerie knit (nylon tricot) I picked up shortly before the store closed down. I’ve been meaning to make a black slip for a while—basically since I made this one, um, four years ago.

I’ve had this vintage Basic Knits pattern in my drawer of “patterns I’d like to make” for, well, quite a while. And, of course, I went with the version that’s almost identical to the Kwik Sew 717 I made before. Actually because I was lazy and didn’t want to have to trace and cut out two separate cup pieces for the princess seam version.

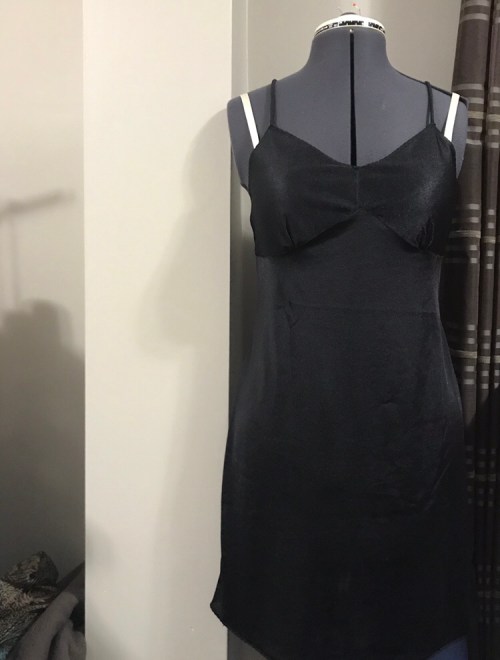
I cut the 36 bust grading to the 38 in the hips, and I took the bust in a tiny bit at the side seams. I could’ve gone another size larger in the hips. I’m not sure how I turned into a pear shape but apparently I have. I think I like the bust shape in the Kwik Sew pattern a little better, but this one will be perfectly functional, and I’ve needed a basic black slip for a long time. Oh, and I shortened the skirt by about 6″, because as drafted it would’ve been well below my knee.

That may have been a bit excessive, as it’s pretty short, but it’s easier to wear a short slip under a long dress than the reverse. Anyway, I’m pretty sure it’ll be a good addition to the wardrobe come slip season… which is getting distressingly close here.

5 Comments

Filed under Sewing

Gabriola the Second

DSC08542I’ll forgive you if you don’t remember Gabriola the first; I couldn’t even remember if I’d blogged about it. Two years, eh? Anyway. I like this version better.

DSC08552A few months ago I made a new corset. But it wasn’t in my usual colour scheme, so I needed some kind of bottom.

A few days ago, I went stash diving for fabric. As I said, it’s not one of my usual colours. Pickings were slim. But at last I settled on this piece of rather drab tie-dye with a subtle embroidered border. It’s from a range of border-embroidered fabrics that were already marked down when I first started at Fabricland, and I picked up the last bits of an embarrassing number of the pieces.  What can I say?

 Fortunately, I had about 4m of this particular one—what with trying to at least roughly match the scalloped border, I needed every bit of fabric.

It was so nice to have the pattern all traced and ready to go. I made a couple of little mods this time around strictly for style purposes. I added a placket at the back and buttons, instead of a zipper.

DSC08544The buttons are all mother of pearl, from the Antique Button Stash—they roughly match, except for the big one at the top.

And I left a slit between the left and centre panels on the front.

It ends really high if you do it that way, by the way. I did plan for this by adding little eyelets and a lacing cord to close it up a bit, which had the added benefit of  gathering it up a little—a benefit because that seam must’ve stretched when I was doing the hemming (despite stay-stitching) because it’s the only part of the skirt that was too long. And you can’t adjust a border embroidery at the bottom.

I cut the embroidered overlays on the hips from the tiny scraps left over, so although I tried to get them mirroring left and right, the front and back are a bit different. On the other hand I managed to get all those points on the lower yokes to line up, which is good because had topstitched those panels with a cross stitch and that shit isn’t coming out.

Using the embroidered hem meant losing the curve along the bottom of the skirt pieces, which was a risk, but I think looks fine in this case, even if the finished hem is a bit angular and jagged.

All in all pretty happy! Not sure if it’ll be truly wearable or just another costume piece, but I sure do like it—considerably more than I thought I would, since the fabric was frankly kinda  boring and ugly.

The colour is not quite spot on for the corset (although it varies since it’s a tie-dye) but I think it’s close enough. If not, I think a bit of a tea bath will fix that, but I’m not going to rush things. I managed to cut a tiny bodice from the scraps, as you can see in the “nice” photos, so I should be able to wear it with that on a slightly more every-day basis than with the corset. I’ll talk about the bodice next, though!

DSC08550

4 Comments

Filed under Sewing

Needing no introduction…

You know what this is.

It should come as a surprise to no one that I’ve made a Sewaholic Cambie. I fell hard for this dress from the moment it landed in my inbox (and it made me very jealous of the pattern testers who got to see it first…) In fact, the only reason it took so long to make up was figuring out whether I wanted to do the full-skirted or A-line version first, and whether I wanted to make it a part of Project Drop Waist or not.

Unsurprisingly, the answer was full and yes.

So, some deets:

The fabric is a navy seersucker from the thrift store, whose purchase I agonized over way back when. (You guys are such enablers, I headed back and got it). I actually had to give in and go buy some poly-cotton broadcloth for the lining, however, which wound up costing rather more than the fashion fabric. /sigh.

Click to enlarge

I used the bodice pieces from Simplicity 3965 to extend the Cambie bodice to hip length, which worked fairly well and even seemed to correct the rear-trending side-seam issue. I also wound up removing a fair bit of length through the bodice above the waist, plus my usual square-shoulder adjustment. I did a muslin but didn’t bother photographing it—sorry. I started with the size 6 (the same size I made for my Lonsdale last summer), though technically my measurements are a bit closer to the size 8; the finished measurements Tasia so thoughtfully includes on the envelope cover seemed to suggest that it would work, however. Initially the muslin seemed perfect through the bust but a bit snug through the waist and hips, so I added a wee bit—however, when I tried on the finished bodice, I wound up taking off what I had added to the hips. I think when you add the weight of the gathered skirt at the hips, the downward pull on the bodice smoothes out a lot of the wrinkles from close-fitting, and also spreads out the shape so it looks kind of boxy if it’s not snug. Or at least, that’s how I have felt about both this dress and the Star Wars dress. Either that or my fashion fabrics have more give than my muslin fabrics, except that in this case both involved broadcloth, and I don’t think bedsheet has a lot more give, either…

Underlining & fusetape

The pattern pieces for this pattern are really curvy—curvy sweetheart neckline, curvy shoulder on the back piece, curvy armscye. All the curves prompted me to do a lot of reinforcing with narrow strips of interfacing. Maybe it was overkill, but it feels nice and sturdy. Once again I underlined the bodice (with some remnants of black cotton voile I had kicking around). Unlike the Star Wars Dress, I did a separate skirt lining.

I used the original length from Tasia’s skirt pattern, but then the waist is dropped, but then the bodice was also shortened—so I think I’m in the realm of maybe an inch longer nape-to-hem than the original pattern, but maybe not. I think I’m a bit taller than Tasia, too. I like the knee length it turned out, anyway. Because I’m too lazy to trace rectangular pattern pieces, I just ripped strips across my fabric the right length. An interesting feature of this pattern is that there’s roughly twice as much skirt in the back as the front. I decided to just use the full width of my fabric (45″ or 115 cm, roughly) for the skirt panels, so there’s one panel gathered across the front and one for each side of the back.

My only issue, at the end of the day, is that with all the bodice shortening, the dropped waist wound up being not quite dropped enough—at least at the centre front. I haven’t attempted to add shaping to the dropped waist in this area (though that is a gorgeous look), kind of as a “keep it simple, stupid” measure—but I think the next time I do this I will, because I really wish I could drop the front waist seam just a little more. It doesn’t quite sag to the sides, but it comes very close. And no, there’s not enough seam allowance left to let it out.

Also my bust darts are still kinda pointy. I stitched them as drafted, basically. I really should spend some more time figuring out how to make a perfect, non-pointy dart.  D’you think if I keep saying that often enough, I’ll actually do something about it?

I did not forget the pockets (hooray!) but I did forget to take a picture using them. Anyway, pockets are, of course, awesome. Also, do follow Tasia’s directions for attaching the front strap/sleeves. I tried to go my own way and it was a disaster. Hooray for seam-rippers.

Hems!

And, as you saw yesterday, I finished the hems with navy hem lace (it matches much better in the non-flash photos, by the way). Just because I could. No fancy horsehair braid or anything this time—the seersucker has plenty of body. And I don’t have enough horsehair braid left from the Star Wars dress.

deflated skirt

Most of the pictures were taken wearing my super fluffy square-dancing petticoat, which definitely notches things up to full fifties-crazy-skirtness. In the theme of honesty in blogging, the above picture is without a petticoat—just the skirt and lining to hold it up. For most everyday wear I’ll probably wear my fluffy petticoat, which, while not as spectacular as the crazy one, is a lot less obnoxious and doesn’t hit both walls at the same time when I go down the basement stairs.

I think my fluffy dress itch *may* have been scratched. It’s just possible—just barely possible—that I can move on to less ridiculous projects now.

Well, maybe. I make no promises.

58 Comments

Filed under Sewing

To Do

Navy seersucker

3.5 m of lace hem tape to go, two more seasons of “The Guild” to watch. Which one will I run out of first?

9 Comments

Filed under Sewing

Squee

Cambie!

Cambie


Tasia loves me, this I know
for the postman tells me so…

I thought these weren’t even shipping until next week. When I got a PayPal notification on Friday that my pattern had shipped, I thought it was probably a glitch.

But no—there it was in the mailbox Monday morning.

Now for the hard questions—which view do I make first? And what fabric?

9 Comments

Filed under Sewing

The Pink Suit

Pink Suit. Also, bad hair. >_<

(as my children so endearingly dubbed it) … is finished.

Right off the bat, I am going to apologize to Lisa. I did not end up incorporating her awesome hood pattern on the Renfrew. Mostly because I couldn’t find one of the  pattern pieces I painstakingly drafted from her instructions when the time was right, and I was too impatient to wait for it to show up. But then, the pink fabric is possibly a bit too thin, anyway. I will definitely try another time, after the pattern piece shows up.

So, shall we start with the bottom?

Jalie 3022

I added 4″ to the leg length in this pattern, as the size R (my hip size) only has a 30.5″ inseam. 34.5″ is a bit excessive, even for me, but frankly I wanted to be safe rather than sorry, and given that 4-way stretch pants sometimes lose length as they stretch, I wanted plenty. As it turned out (at least in this very stretchy fabric), I only needed about two extra inches, but I think I’m going to keep the length in the pattern just in case. I added the length in two sections, 2″ at the lengthen-shorten line on the thigh and 2″ just below the knee. I also did a small full-butt wedge (this  adjustment), based on my kids’ experience. Although as it turns out I probably could’ve skipped that, not so much because I didn’t need a bit of extra height in the back as because the overall rise was considerably too high for me—coming to just below my belly-button. That looks right on my kids; it doesn’t look right on me. Fortunately in a style like this, it’s easy to fix. I lopped off the seam at the bottom of the waistband (I don’t un-pick knits if I can avoid it), and cut a band off the top of the pants-portion, about 1cm from the back increasing to 3 cm at the front. Then re-attached the waistband. PERFECT!

Seam---interior

For seam finishing I went a bit…overboard. I had decided on black topstitching, in the hopes of cutting down the severe sweetness of all that pink. For my seams themselves, I opted to use a simple overedge stitch on my White, which is both stretchy and makes a much straighter seam on the right side than the overedge stitch on the Janome. And then finish the edge on the serger. And then topstitch with what I think of as the Janome’s “Athletic stitch.”

That’s a lot of stitching.

Topstitching

One of my main reasons for using the White for the seam stitch (besides saving me switching my settings constantly) is that it has adjustable pressure on the presser foot, and lightening the presser-foot pressure makes the knit wave up much less than the Janome’s fixed, heavy foot. Which meant that my seams looked really nice right up until I decided to topstitch with the same Janome. At which point they waved up like crazy. Ironing has helped somewhat, and I’m hoping that the laundry will take care of the rest, but if not, I will be warned for the future. Which is too bad, because I really like the look of this topstitching for “athletic” gear.

Jalie 3022 construction---one wide, flat piece.

I was initially a touch puzzled by the instructions, which have you construct the back as usual, then stitch each side of the front to the sides of the back, before finishing the front crotch and then the inseam. Then I realized it was *much* easier to topstitch the outseam before the “tube” was closed by stitching the front crotch. Smart Jalie! And for once I actually followed the instructions, so I got to enjoy the benefits of their braininess. Yay!

I used strips of Steam-a-Seam Lite (2) in the hems of the pants, as has become my modus operandi for knits, and they turned out, well, no wavier than the other topstitched seams. The nice thing about this particular topstitching (as opposed to say, twin-needling) is that it is the same top and bottom, so I could topstitch looking at the inside and make sure I was covering the edges of the hem-fold. Although, since the edge was already fused in place with the Steam-a-Seam, I suppose there wasn’t much I could actually do if the hem was wonky. Still, I felt better. 😉

Pink suit! Seams slightly ripply

On to the top?

Sewaholic’s Renfrew Top.

I used mostly the same construction methods on the shirt, although not nearly so much topstitching (just around the bands.) Once again I followed Tasia’s instructions surprisingly closely (for me), and was glad of it, because I initially sewed the “V” on the neck-band the wrong way—it was making an “A”, not a “V”.  So double-check that bit, because it’s not really obvious from the pattern piece. It turned out pretty well, though, as you saw above.

As so many others have said before me, there’s not really much not to love about this top. Easy fit, cute styling. I do prefer a smaller seam-allowance, especially when setting in the sleeves; the Jalie knits all have 1/4″ seam allowances, which can feel a bit scant—I think 1cm is definitely my fave in almost any situation. The shoulders feel a bit tight (which is odd, considering they’re rather wider than on my knit sloper) but I think this actually has to do with the curve of the armscye on the body, which is much more extreme in this pattern—which also makes the sleeves angle down more, as opposed to the sleeves on my sloper, where they angle more out. Despite the sleeve-caps being virtually identical. Verry Eeenteresting, my friends. (You can see the effect of the downward angle in the photo below, where they bunch up a bit above my shoulders because my arms are out.) This is also one of those differences that I wouldn’t notice in a fabric with a bit more give or a bit less recovery. I will say, if you’re fitting a knit, this is the fabric to do it in—it actually stays the size and shape that you cut it out.

Other than that, it is what it is and what it is is luverly.

Oh, yeah, back view

Altogether, it is a lot of pink. Possibly more than I’m comfortable with. I was hoping the black topstitching would take the edge of the sweetness, but there’s not quite enough of it. I don’t think it will actually stop me wearing these (although maybe not so much together), but if it does become a problem I could always take a whack at producing a lovely sludgy dyed colour as Carolyn is so good at.

The only complaint I have about the pants (aside from the ripply seams) is that the fabric is *borderline* too thin for bottoms. In a dark colour, I might not have noticed it, but, well, we’ll just say I shall have to be careful which underwear I wear with these.

So another view. Note the un-ripply inseam and the ripply topstitching.

I had some photos showing where the waistband ended up after my alteration, but I’m just not quite happy enough with the current  jowly condition of my midsection to throw them up (at least in combination with the other things I don’t like about these photos, like my bad after-work hair and the crappy photo quality of my backup camera).   So you’ll just have to imagine it going from right below my navel to sitting comfortably beneath the belly-flub.*

On your mark...

I wish I could say this sporty suit will inspire me to  take after Winnie, but I fear that a) I hate long-distance running, and b) nothing’s going to change before the end of the summer at the earliest.

But at least I will be comfy while I slob around the house!

Also, now Tyo wants shorts from the leftover fabric. My desire to move on to other projects is at war with my desire to get rid of the remaining half-metre or so of this fabric. Hmm.

*As usual when I whinge about my body, I feel the need to insert a disclaimer: overall, it’s a pretty good body. I am (and have been for the past several years) mistreating it horribly, as health, fitness, and everything else except family and sewing, in fact, are pushed aside in the face of THESIS. And while I haven’t gained a significant amount of weight, I’ve definitely lost muscle tone, and what I do gain goes right to my middle. It’s not horrific—it’s just not what I want to see when I look in the mirror, and not what I would be seeing if I was doing anything other than sit in front of a computer nine hours a day. And I can’t even blame it on having children… 😉

48 Comments

Filed under Sewing

Renfrew vs. Knit Sloper—Round 1

Some of you will remember my battles with Lydia, the $1 download from Burdastyle for a very basic knit pullover. The end of this process was my knit sloper, which, frankly, bears little resemblance to the original pattern.

Although for reference, the basic changes were:

  • going down two sizes to remove ease (Lydia, like Renfrew, was intended to be an easy pullover, which wasn’t actually the look I was going for)
  • petite-alterations to the armscye, sleeve-cap, and above the waist
  • square-shoulder adjustment
  • removing ease from the sleeve-cap
  • my ubiquitous lengthening of the sleeve

Once I had the knit sloper worked out, I traced it out on bristol-board so it’s a) durable and b) easy to trace and then hack.

Now, there is one MAJOR confounding factor for comparing it to other patterns, however. Which is that the sloper has no seam-allowances, while Renfrew and Lydia both have 1.5cm (which is way too much for knits, in my opinion—.6 cm is fine, although for slippery annoying knits I think I do prefer 1cm). So in the following pictures, you need to mentally add 1.5 cm to most of the borders.

So, first up—because this is what most of you may be interested in—Renfrew vs. Lydia. (And please do click through to see the full-size photos, because the details are not so obvious at blog-size. Although the full-size photos are fuzzy as crap, because I am still lacking the charger to my good camera. Sorry.)

Renfrew vs. Lydia

Now, *this* is complicated because I don’t have a pristine print-out of Lydia anymore, and I wasn’t in the mood to produce one just for the purposes of pattern comparison. On the other hand, both these patterns have the same seam allowance. Unfortunately, the bodice pieces are opposite sides, so it’s difficult to superimpose them, especially since this particular copy of Lydia is the one I hacked to make my mother’s (unblogged 😦 ) Christmas present. So pay attention to the lines of the smaller sizes on the Lydia pattern, not the cut outline.

As you can (hopefully) see, Lydia actually has more shaping going on than Renfrew. It’s also a somewhat shorter pattern (remember Renfrew has the band at the bottom to lengthen it). The waist is slightly longer in Lydia, and, most surprisingly, the hips are a little more generous (this is suprising because Sewaholic patterns are supposed to be drafted for pear-shaped women, so I was expecting Renfrew to have more width below the waist).

I should add that the shoulder height and angle in the Lydia you can see has been altered to match my sloper, since my mom and I share a short upper body and square shoulders—the original Lydia was rather longer through the armscye and had a much more sloping shoulder. So Lydia originally would’ve had a shoulder-slope similar to Renfrew, but a rather lower armscye, and a longer, somewhat more shaped, waist. I think the amount of ease each pattern was designed for would’ve been similar.

Sloper vs. Renfrew

Enter my knit sloper. This is when things get a bit wacky.

Like Lydia, you can see that my sloper has more shaping than Renfrew. The waist is slightly higher in my sloper, but not as much as I had thought it might be (I tried to align the bottom of the armscye, remembering that my sloper doesn’t have seam allowances. The armscye in my sloper is shorter, but again, not as much as I had thought it might be. The shoulder slope is hugely different, however. There’s a slight difference in ease (remembering that my Sewaholic size, 6 or 8, is the 4th or 5th line over, while the sloper needs 1.5 cm added to the edge, to be comparable.) I’d say at the bust, the difference in ease is about 4 cm around the whole bust, rather more at the waist and almost no difference at the bottom. There are also some differences in the shoulder-point position and armscye curve, but seeing as 1) my sloper has very narrow shoulders, and 2) I’m really not sure what to make of them, I’ll get back to you about it once it’s made up.

And, for your edification, here’s how the sleeves compare:

Renfrew sleeve vs. Knit Sloper

So I should really have set the knit sloper a little further down, to allow for seam-allowances. Sorry. Anyway. Sleeve cap height is actually fairly similar, however. Renfrew’s sleeves don’t seem to have much (if any) front/back shaping, and there’s no notching to indicate it, anyway. I know lots of knit patterns don’t, it’s not necessary, but I do think you get a slightly better fit when there is some. (You can see I have a little bit of shaping on my sloper—the front is to the left—although for the life of me I can’t remember if that’s original to the Lydia or if I added it as I was messing around.)

The original Lydia length is about where the knit sloper starts flaring out, so that length is very close (remembering that the sloper should be down another 1.5 cm, but on the other hand the Renfrew has the cuff on the end. So Renfrew sleeve is probably functionally longer, for your size, than the Lydia. I think the taper of my sloper is pretty true to the original Lydia sleeve as well, so the Renfrew sleeve also appears to be a little more straight overall. It also doesn’t appear to be drafted with sleeve cap ease, which is great in a knit.

So what does this all mean?

Sloper vs. altered Renfrew

At the end of things, I still wanted to be making Renfrew, not just another version of my knit sloper (but with sleeve-bands). So I opted to keep as much of the Renfrew shape as I could. For size, considering I like a little less ease in my knits (and I *REALLY* liked Seraphinalina’s Renfrews, where she went down a size), I went with the 6.

I “petited” the armscye sightly, by the simple expedient of using the size 4 rather than the size 6 height, and squared the shoulder by going over to the size 2 at the side of the neck. I also shortened above the waist, but by considerably less than the 2″ I removed from the Lonsdale—only about 2 cm, this time. And, because I wanted to keep the same overall length, I actually just “slid” the waist shaping up.

Since I’m making the 3/4 sleeves this time, I didn’t make any length alterations on them—I just adjusted the sleeve-cap height to the size 4 rather than the size 6. And it’s all cut out and ready to go, except that now I want to take a whack at adding Lisa’s hood. Which may not work (and I have enough fabric to make one go at it but not several), but requires a bit more thinking about matching the neckline that I haven’t quite gotten to. Maybe on the weekend…

25 Comments

Filed under Sewing

The Last Gasp of Summer Dress (Part 1)

Lonsdale at last!

Last night, in a fit of madness, I finally cut out the bodice for the Lonsdale dress*. Boo-ya!

So, what’s up with this? Well, I had traced out the bodice pieces in a straight  Sewaholic size 6 back in July (Yes, I’m a tracer. Especially when it comes to almost $20 patterns). Tasia’s size 6 matches my bust measurement, and the waist is only an inch off, which puts it closer to my measurements than any other commercial pattern I’ve run across. Yay! The hip measurements are way, way of—the Sewaholic line caters to the more pear-shaped among us, which I am emphatically not—but that shouldn’t matter for a dress like this. Which is probably why she came out with a dress like this ;).

Anyway, on examining the pieces, I decided to shorten the waist by a LOT. I have a short waist to begin with, and the Pendrell blouse (presumably based on the same measurements) was reported to run long in the waist. Also, there’s the waist-band piece, which will sit below the bodice. Trial and error has taught me that if I must have a waistband on a dress, I’d rather have it start at my waist and extend above. Visual attempts to lengthen my waist don’t seem to help—I get better results with a slightly raised waist. Or I think I do, anyway (think this dress). I took out about 5cm (2″), I’d say. So it will probably end up a bit higher than Tasia intended, but hopefully at a place that looks good on me ;). Remember there’s a 5cm-wide band below the bodice, then the skirt starts.

Closeups

In the photo I had folded up the bottom edge to to approximately where the seam will be. Since you can’t really see my waist well in these pics, I’ll throw in a slightly more inclusive shot:

Distance shot

Unfortunately taking photos at night in my bedroom with the flash and my backup camera doesn’t make for the best photos ever, but you should get the idea.

I should really make a swayback adjustment, though. Note to self.

Pretty instructions!

I have to say, I love Tasia’s instructions! Look at all those gorgeous little diagrams—barely a word, because barely a word is needed. Kinda like Ikea instructions. 🙂

Now to find time to actually work on it…

*Bonus points to the person who sees my big booboo in this photo.

25 Comments

Filed under Sewing