Tag Archives: dress

Tiny Princess Highjackers

Lately, the twins have had a breakthrough realization—Mommy MAKES clothes.

Which means she can make dresses

All dresses must be PRINCESS dresses.

Which means she can make PRINCESS dresses.

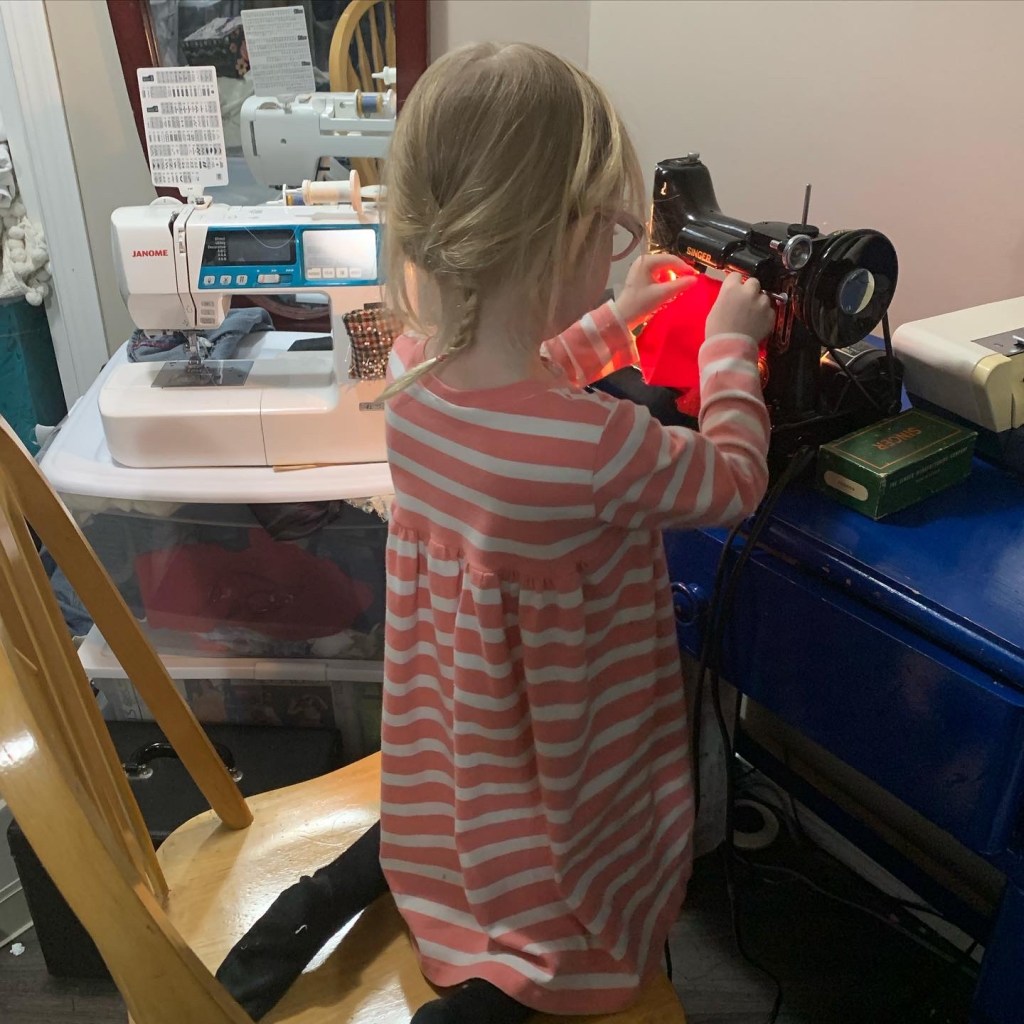
Tris in particular is super keen to sew by herself, diligently selecting a fabric (anything pink… yes, we’re in THAT phase) and shoving it through the under-arm space of the sewing machine in the hopes that it will magically come out the other side a dress. I also need to double check all my machine settings every time I sit down (we won’t go into the time she somehow changed all my server’s tension settings to 0 WHILE I was sewing with it)

Anyway, the result is that instead of a measured progression through my sewing queue, I keep getting side-tracked by adorable and insistent requests to make dresses out of THIS fabric. And they’re so excited it’s difficult to resist, and all of a sudden I’m highjacked.

It doesn’t help that my friend Temperence Swimwear Intimates, gave me a bunch of kid-print knit remnants, that I really need to use promptly lest they linger in stash beyond the twins’ interest in them.

Of course, the twins’ sense of what a suitable amount of fabric for a princess dress is a bit, ah, flexible. There was the day Tris was determined to make herself a pink princess dress out of a single small mitten. I was able to divert her only by digging out some of the fabric for Temperance (and I don’t have a lot of pink fabric at all, by the way…) It was really just scraps I think were supposed to become undies.

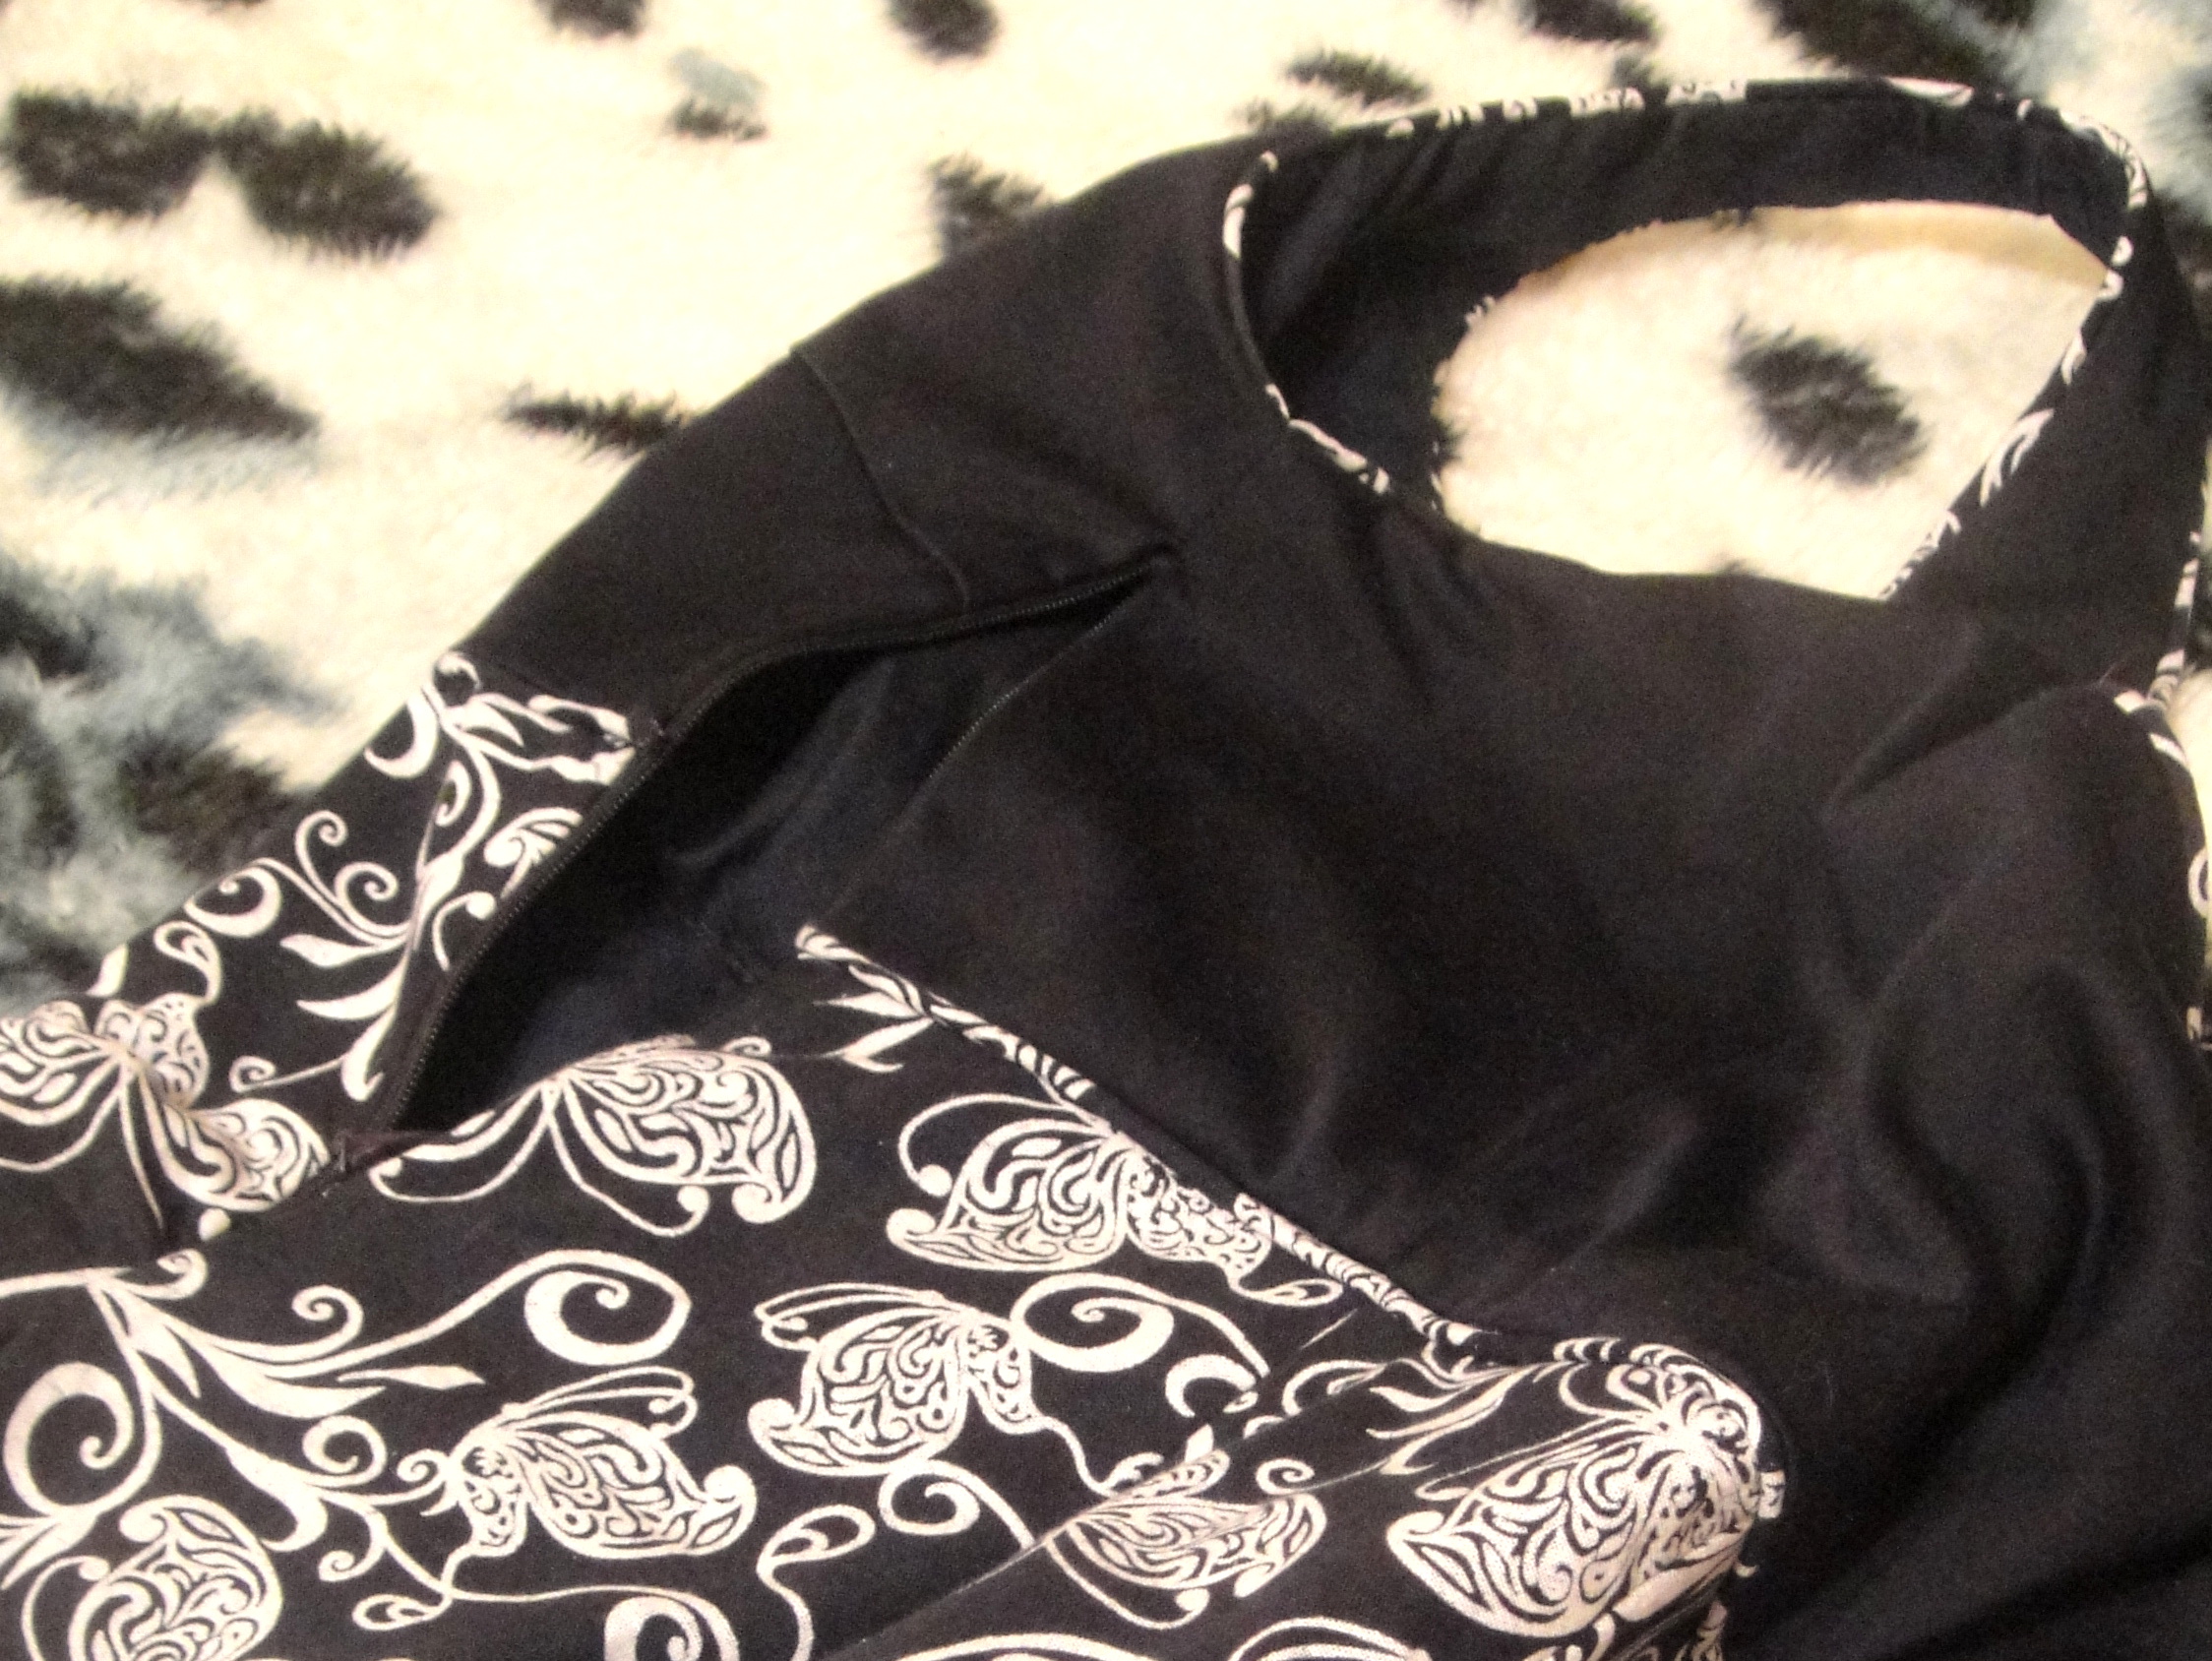
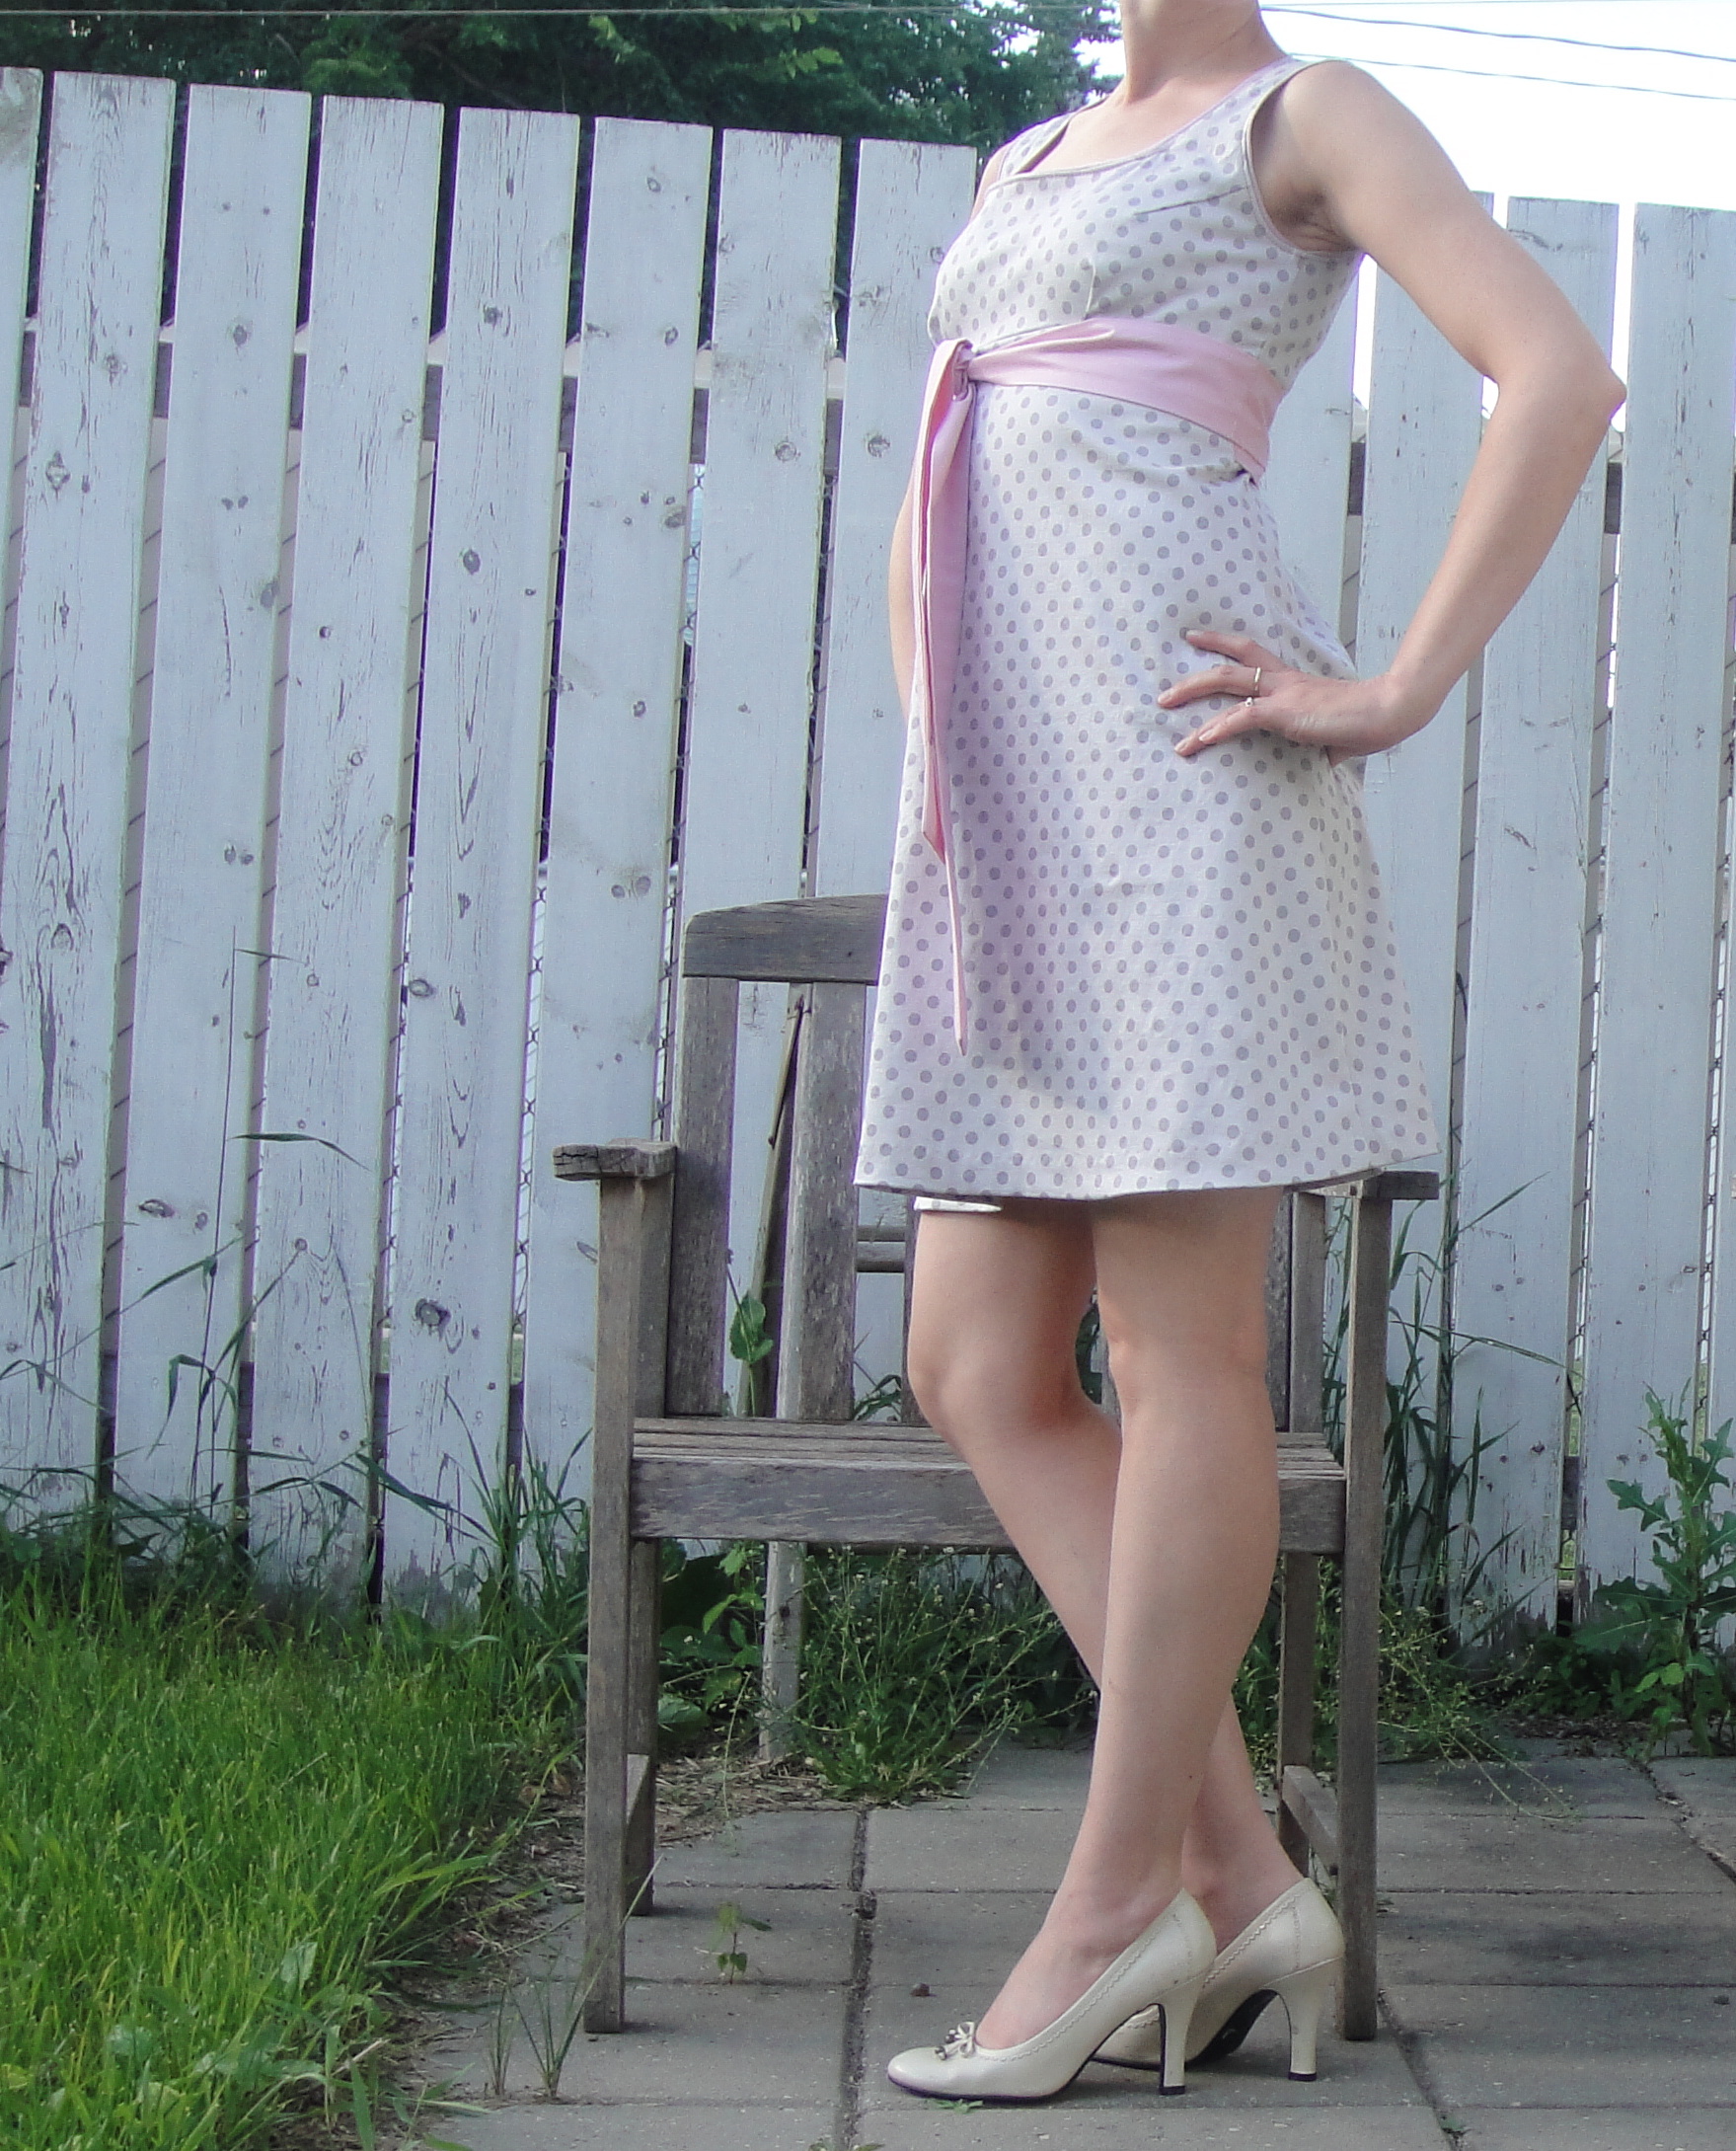
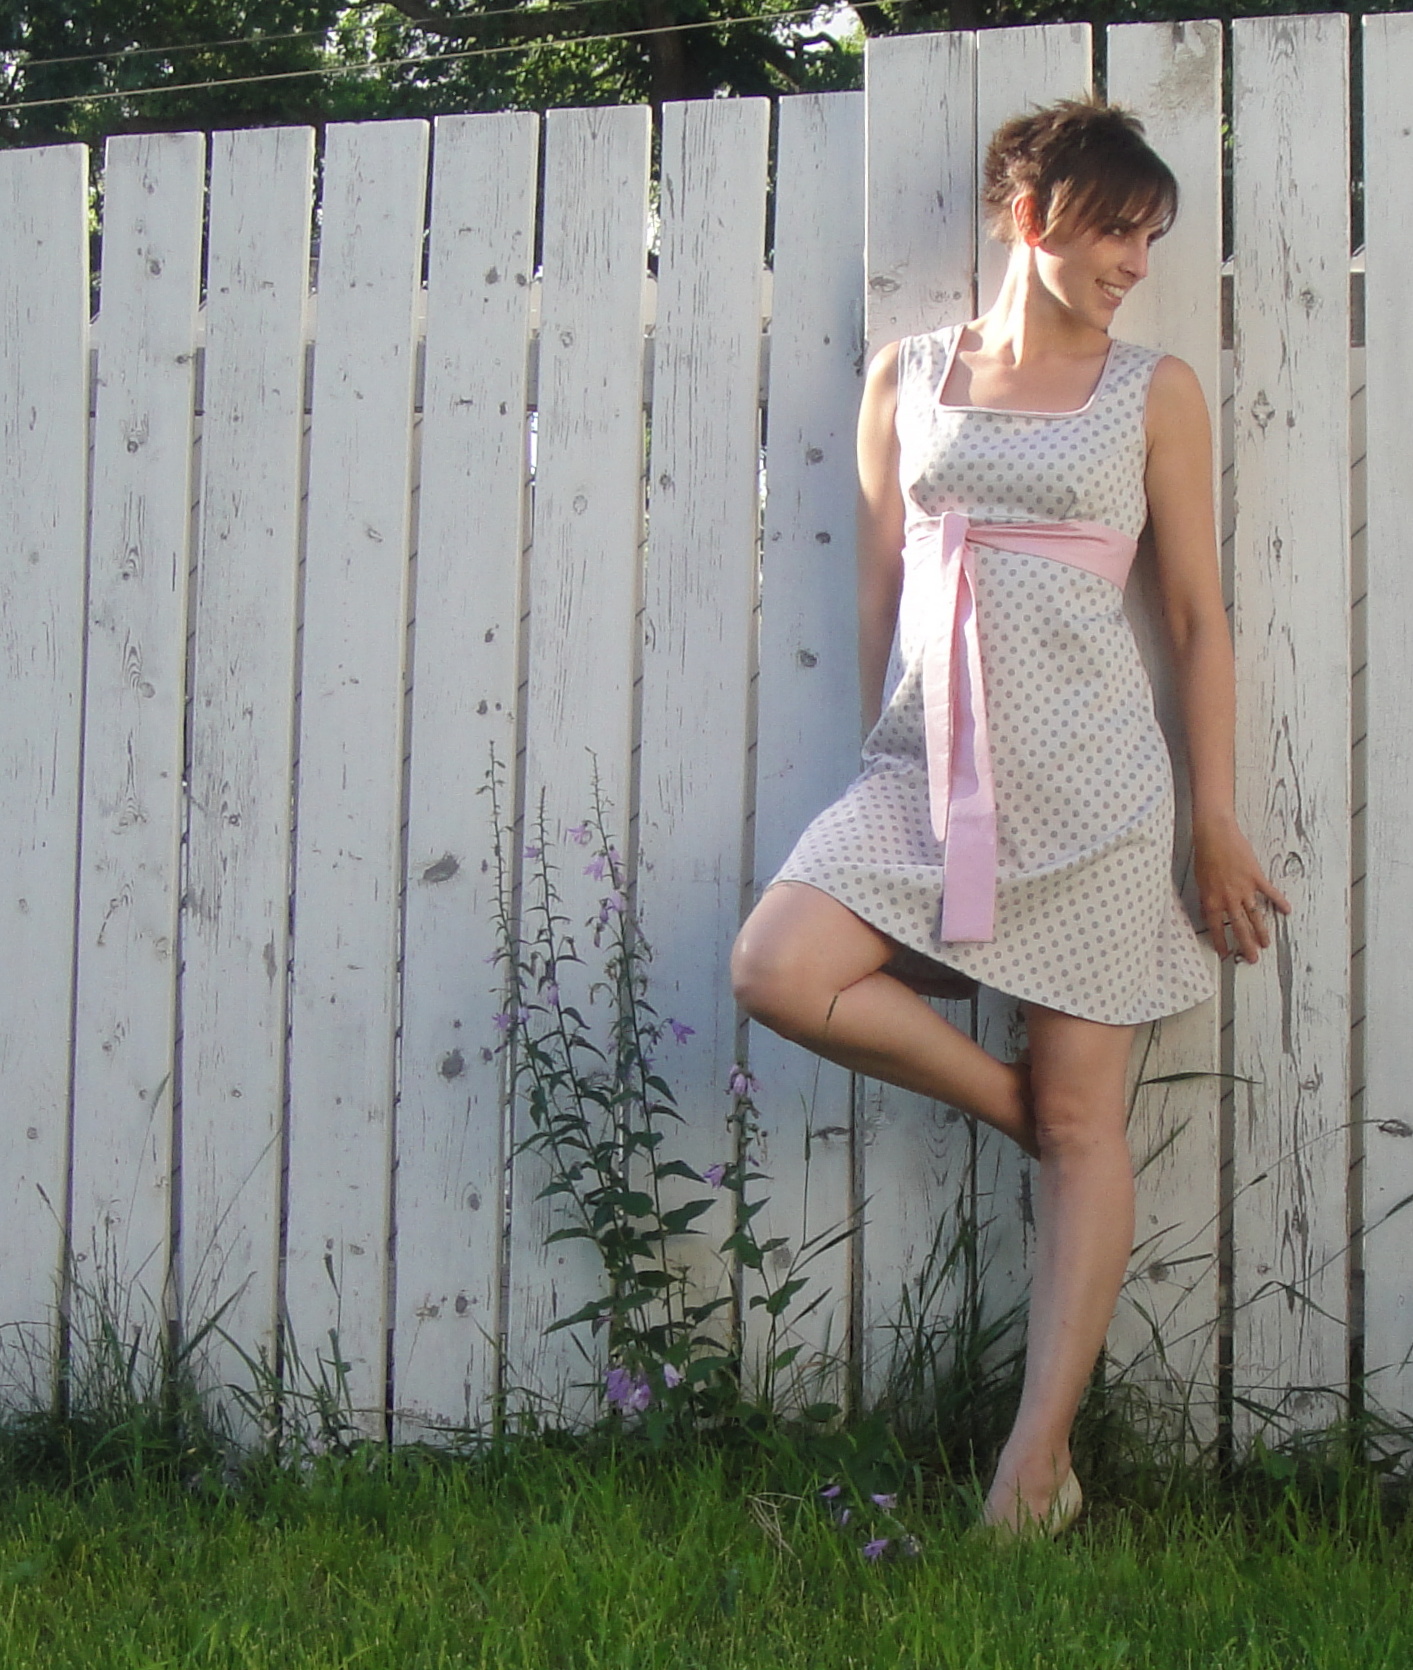
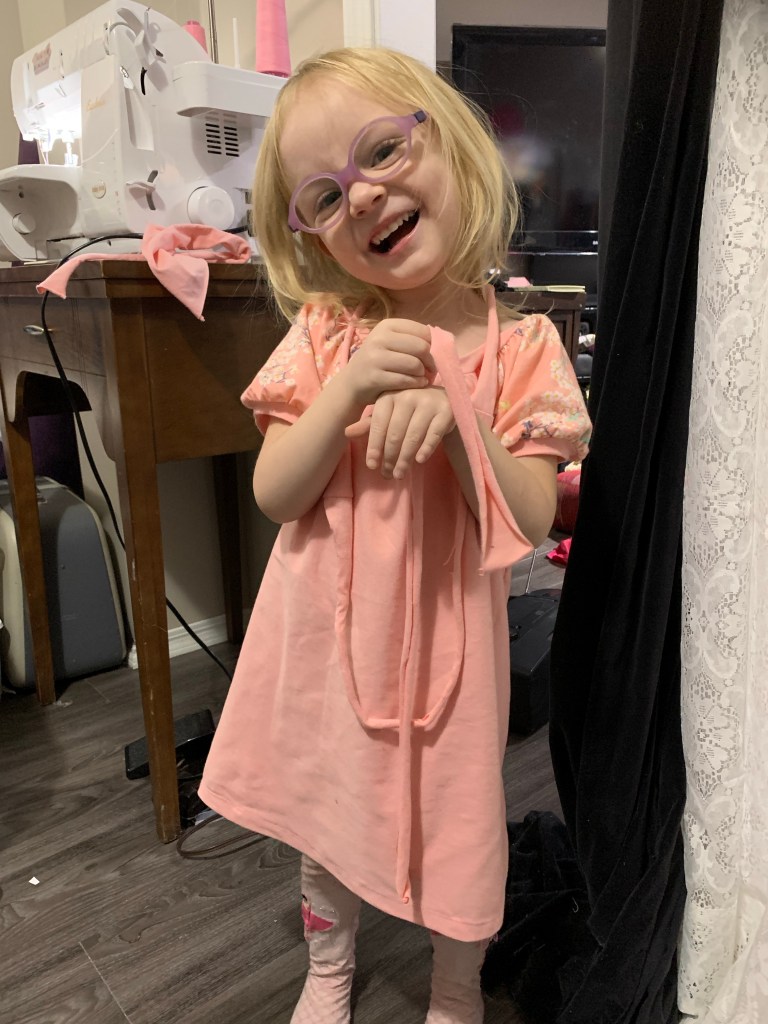
That resulted in the first highjack dress, a revisit of the same pattern I used for the little ghost girl dresses last summer. If this version looks more like a shirt in flat-lay, it’s because I decided to use a band for the neckline and then, instead of gathering the neckline and sewing it to the band, tried to rely on the band’s own recovery for the gathering. It’s a pretty beefy cotton-spandex with great recovery, but even so there are limits. As a result, the neck is pretty large. But she’ll be able to wear it as a shirt until she’s ten or something.

I did irresponsibly dodge my parental obligation to make River a dress next, well, until a couple of days ago when they were digging through the fabric again and she spotted this tool print cotton interlock… of which there was a scant half-mètre or so.

I did, however, also have plenty of plain white interlock, purchased in the days when I was fantasizing about making my husband T-shirts. I figured I could eke it out.

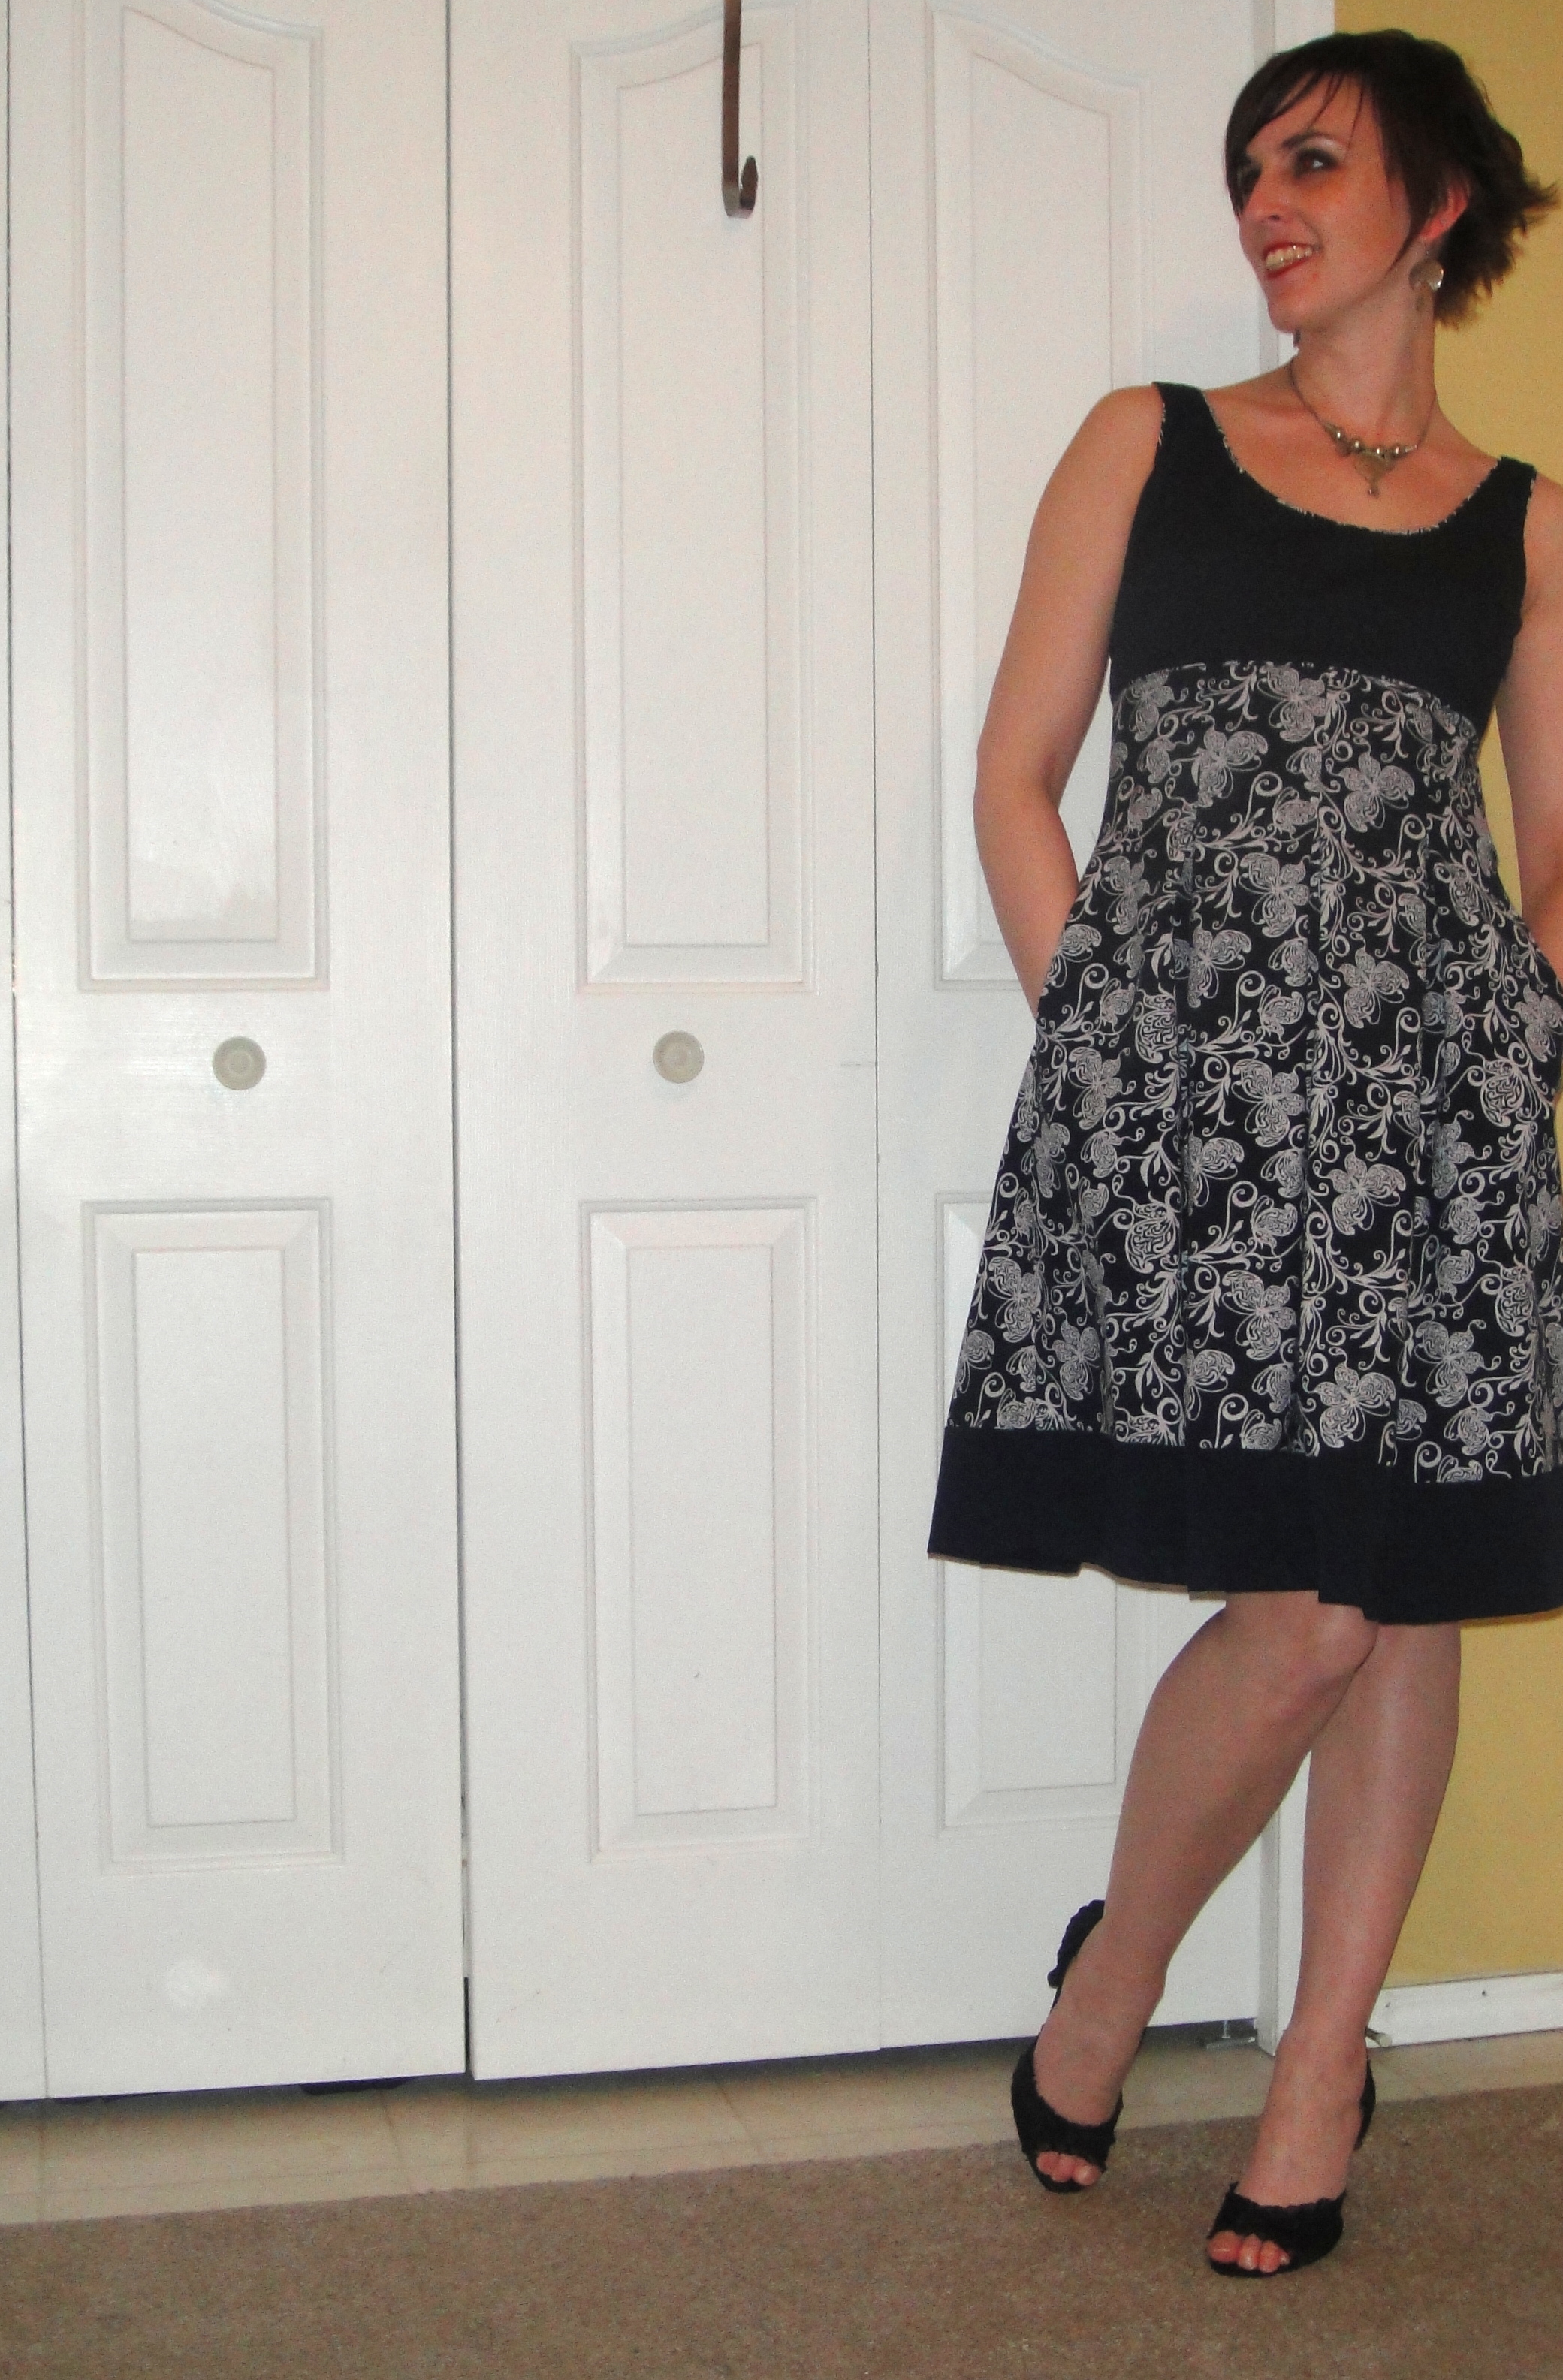
Now, long and long ago I made these cute little dresses for the twins, which are basically just a long-sleeve tee pattern, slightly cropped, with gathered skirt attached. And I really think that’s the best basic style for making a winter-friendly dress for a smallish kid. These are long since outgrown, and frankly were outgrown far too quickly, so I didn’t want to make anything that fit “just right”. My go-to pattern for kids tees is Jalie 2805, but I didn’t really want to use the size I traced out for these tees last year and I was much too lazy to trace a new size, so instead I dig through the mass of un-filed patterns sitting on my basement counter until I settled on the fairly forgettable McCall’s 3315, which stood out only in that it was a single size, 3, and was “for unbonded stretchable knits”.

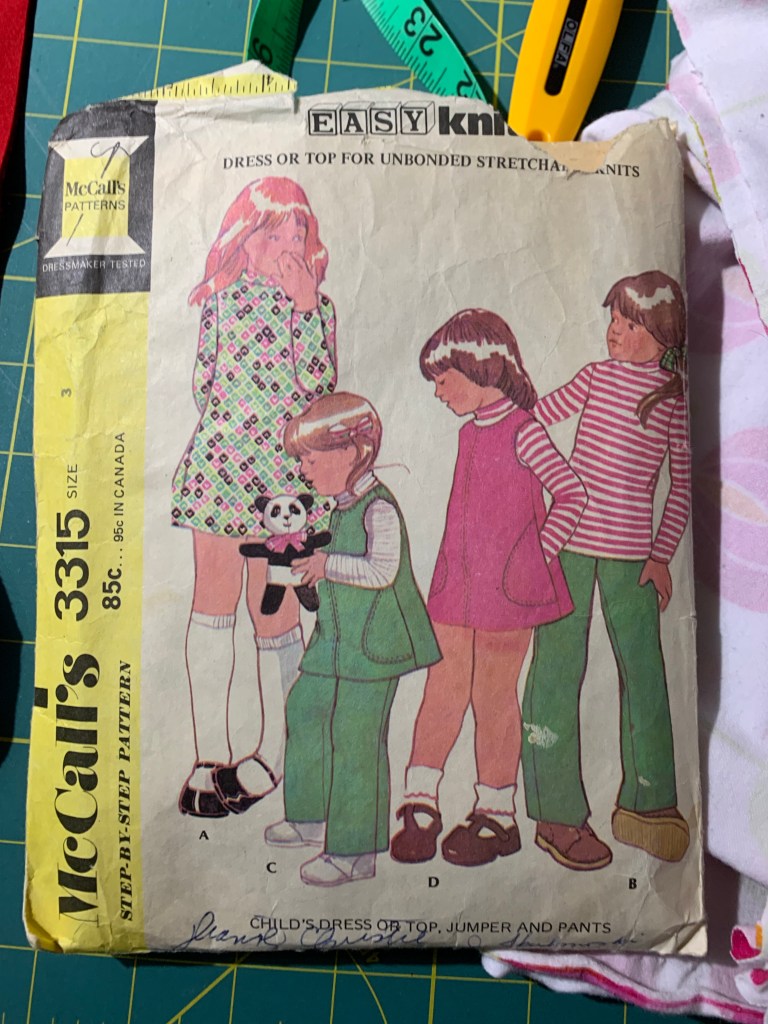
Actually it’s a pretty cute, slightly flared turtleneck dress pattern with a non-knit jumper to go over top, but it’s also an early 70s knit pattern—designed for stuff without too much stretch, and with way too much ease in the sleeve cap. But, I wanted roomy, and a bit of a puffed sleeve cap just adds to the princess cred of the dress, so I went with it, or at least the portion above the waist. Since I didn’t want a turtleneck style, and did want to add a band, I cut the neckline down a good 3/4”. I ended my use of the pattern at the lengthen/shorten line, which created the slightly cropped length I was going for, and omitted the CB seam since no I’m not going to put a zipper in a knit.

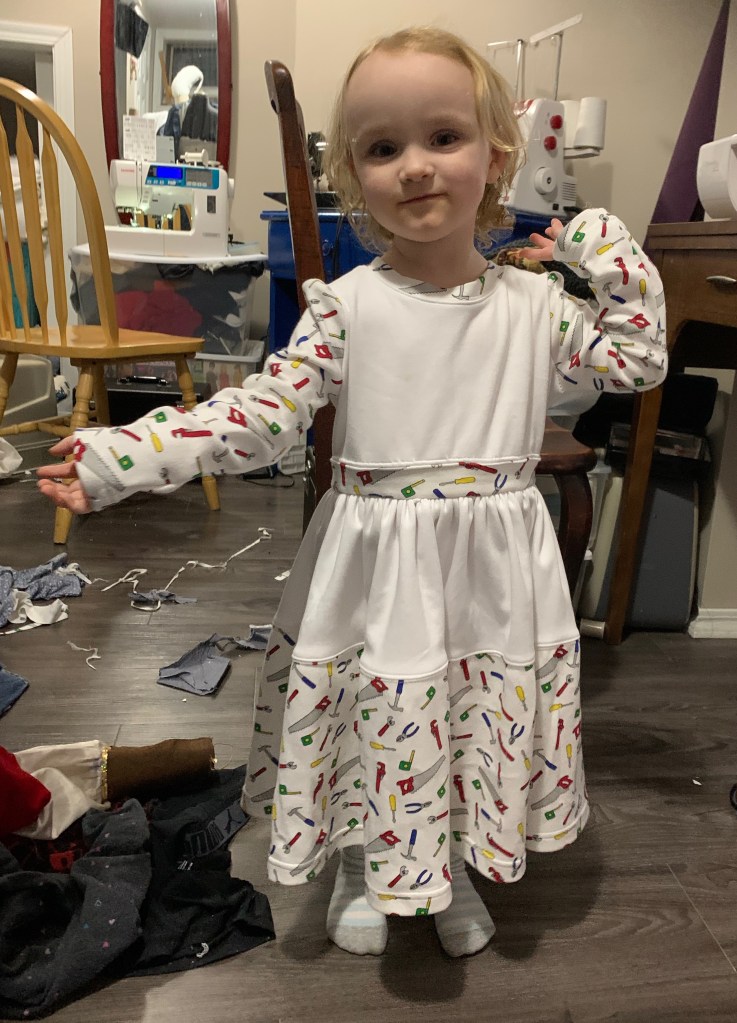
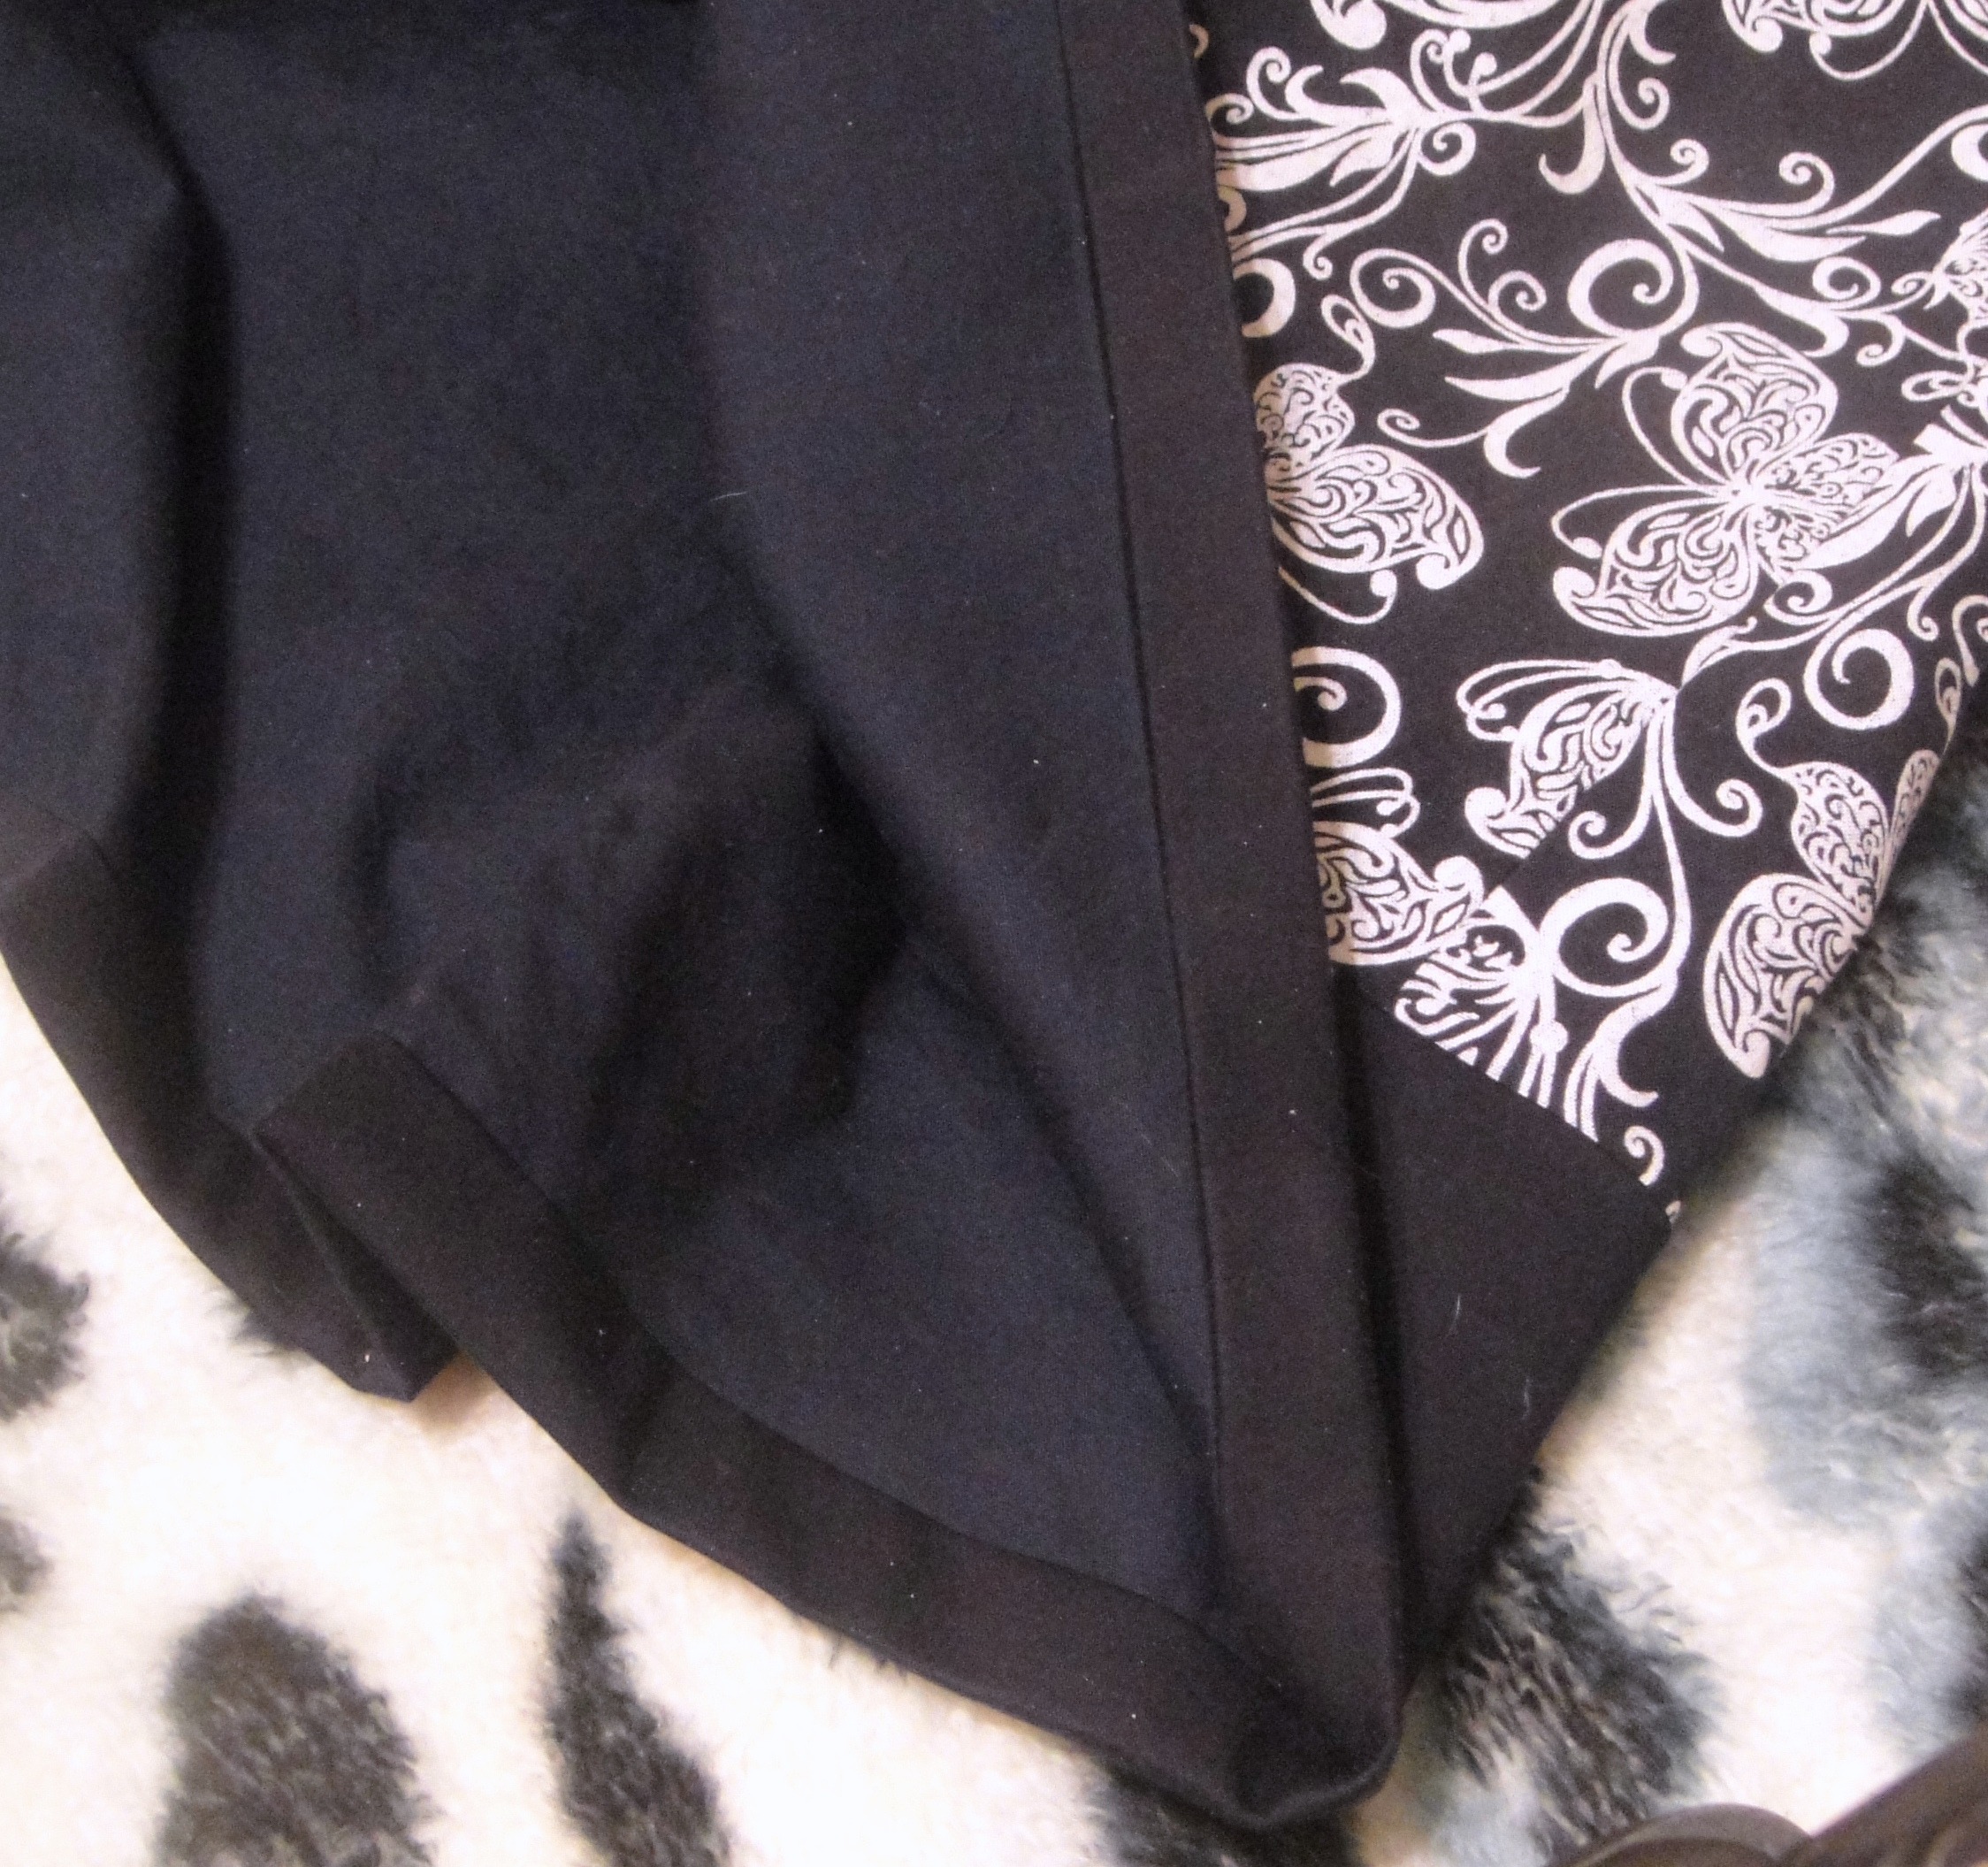
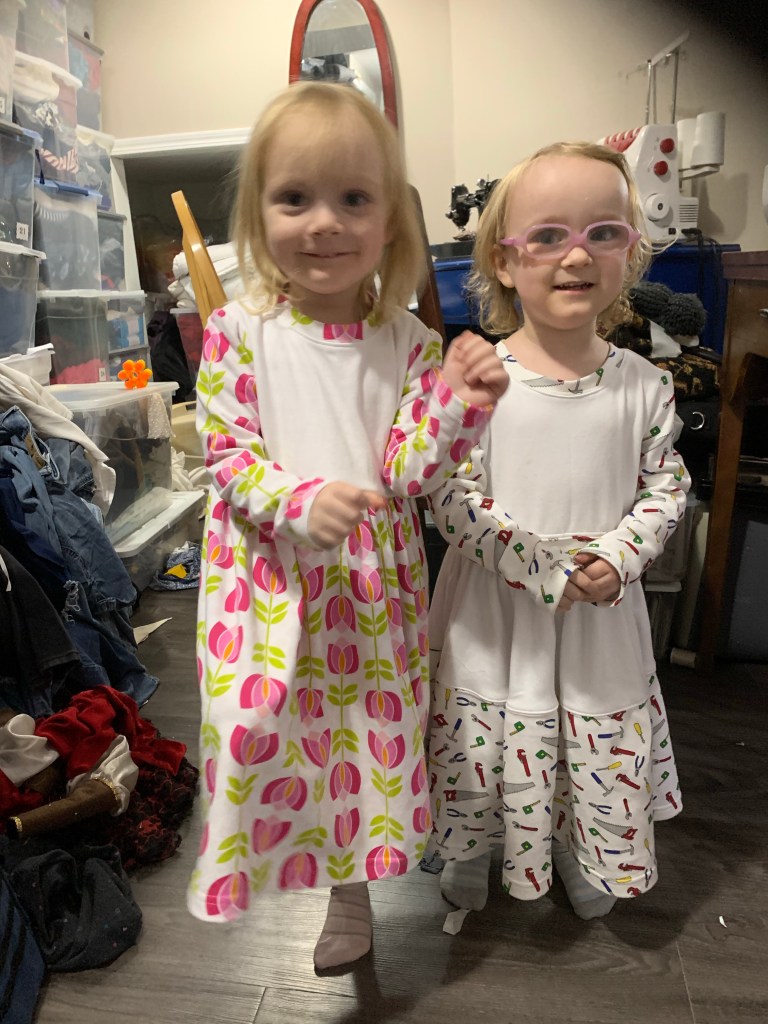
For River’s dress, we had extremely limited print fabric. After I had cut the sleeves, I had wanted to use the remaining print for the square skirt, but it would’ve made a very scant, not very twirly princess skirt. So I cut the piece in two to make a bottom tier, and cut the upper tier out of the white interlock. I added a print “waistband” to the top, too, to break up the white, using a bit more of the stuff I had cut off for the band at the neck. I had been envisioning two gathered tiers, but it turned out that my two lengths of print put together was only slightly longer than the single length I had cut of the white. I could of course have reduced the amount of white in the skirt, but instead I just eased the two together. You can see that it gives a slightly more flared shape to the skirt. The most important part is that it twirls, though. I used a fair bit of coverstitch topstitching to flatten down the extra seams in this dress; this worked well for the tiers of the skirt, but I don’t like how it turned out on the waistband so I will likely rip that out.

I asked them for Princess poses. Apparently this meant standing on one foot.

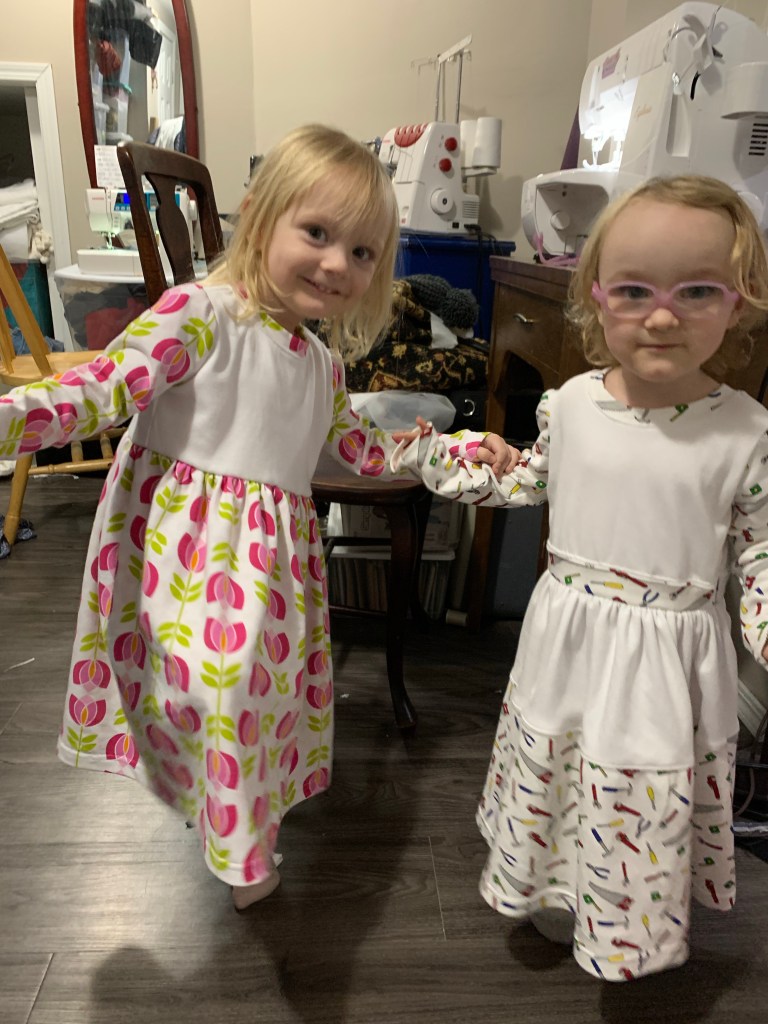
Tris’s second dress was made after (trying to take turns) and under no such fabric limitations as I have a full 2m of this abstract rose print in stash, purchased way back when my nieces were small enough to enjoy it. I’m happy to get to use it on the twins, though this project didn’t come close to using it up. I did want to harmonize with River’s dress, though, so I asked Tris if I could make the bodice white like River’s, and she agreed. Part of me wishes I had done the tiered skirt part as well, but also that adds a butt ton more time to the project and this is cutting into my me-sewing time already, dammit. As it is, Tris’s dress came together in just over an hour thanks to all the machines being already set up (give or take having to check all the settings and occasionally rethreading things, thanks to my very helpful helpers.)

In the end, it was pretty fun to see these come together quickly and how excited the twins were by them. I didn’t really sew when my older girls were in the twirly-dresses stage; I did sew a few twirly dresses for my nieces when they were young, (like this one) but they were done as presents, not collaborations where they got to pick the fabric and “help” with the sewing.

I’m also wondering if this is the end of the era of twinning outfits. Since starting school the twins are much more vocal about their sartorial preferences, and they’re rarely wanting to wear the same thing at the same time. I already mentioned how Tris wants EVERYTHING pink right now. And thank goodness for the plethora of hand-me-down tights they’ve finally grown into because it’s all dresses all the time right now, so their adorable overalls and jeans and flannel shirts are getting less than no love.

Ultimate Princess Level unlocked.

So now I can get back to finishing boning my Victorian bodice. Except, um… I stumbled on this Butterick pattern while looking through the mess. Have you ever seen a more ultimate princess dress??? I’m loathe to give the decade of my birth credit for much, but they could do a princess dress like nobody’s business. Anyway. I’m exhausted just looking at it… but also… can I not? Maybe I’ll just read the instructions…

18 Comments

Filed under Sewing

A dress almost in time for Easter.

Almost an Easter dress

Almost an Easter dress

I made another dress. If we need an excuse, let’s call it an Easter dress, though it wasn’t done in time for Easter, nor was it dress weather.

Butterick 5317

The pattern is Butterick 5317, which is reminiscent in silhouette to the Danielle Dress of yore. Or at least reminiscent of my version of it, which had an extra pleat in the front. Or maybe they’re only reminiscent in my head…  The skirt on this one is more full (more pleats). I must admit, although this style ticks a lot of my boxes—scoop neck! Empire waist! Just-above-knee-length!—the pleats had me a bit worried. That sudden release right at the waist seamed like it would be T-R-O-U-B-L-E. Which wasn’t enough to keep me from tackling this dress ind fairly-stiff cotton sheeting and sateen. Sensible, I am not always.

DSC08170

Side zip (very short… long story) and piping. Did I mention I love piping?

There is no back seam, so I presume the pattern expects you to insert a side zip. You may presume, from my presumption, that I did not actually read the instructions. Probably this would’ve been a good idea, as it probably covered how to insert both the satisfyingly giant pockets and a side zip in the same seam. I know this can be done, but I’ve never done it, and didn’t feel up to the challenge of figuring it out myself. Or the challenge of reading, apparently. So I just made my zip really short, ending above the pocket bag, which is approximately level with the waist. This works because a) my waist is pretty big, and b) my fabrics, even the 100% cotton print, had quite a lot of give.

DSC08174

Hem band. I was kinda surprised this wasn’t doubled. If I hadn’t decided to line the entire skirt, I would definitely double it.

I do love the hem band.

DSC08175

Can you see the pleats here?

I made my usual suite of alterations—shortening both the straps and between underbust and waist. The strap thing may have been unnecessary, as it’s quite high under the arm, and while the waist does sit in a good spot, the “waist” on this dress is defined much more by where you release the pleats than by the slight shaping at the side-seam. Although I do think that slight shaping is quite helpful. After an initial try-on, I lengthened the stitching on all the pleats by about 4 cm, and I like it much better where it is now. I think it contains the poof nicely. I should add before I forget that the straps sit a bit wide, and I don’t have narrow shoulders. VBS chic is a real probability.

DSC08168

I tried to get a shot that showed the pleats, but it was very hard. I guess that’s the goal?

I decided early on I wanted to line the skirt, not just the bodice. Not long after that, I realized that I would have to stitch the pleats in lining and top skirt as one, or languish in bulk forever. (Bulk at the waist is what we are trying to avoid here, peeps.) The way to do it, obviously, was to construct the cylinder of each skirt, sew them together at the hem, fold the lining to the inside, and then add the pleats. I did accomplish this, although there was definitely some head-scratching about the pockets and the zip.

DSC08171

Hem.

I wrangled with myself about doing a swayback alteration, since there is no back seam and no waist-seam; I did in the end shave some off top and bottom at the raised waist seam, and there is very little tendency to wrinkle in the back, so I’ll call it a win, and the under-bust seam is more “level” than it would’ve been without.

DSC08165

Back view, just like the front view.

Did I mention I went down a size? The pattern has a full 2″ of ease at the bust, which isn’t bad but is a touch more than I like for a fitted style. I think my down-sizing was successful in the fabrics I chose, stretch cotton sateen for the bodice and stretch poplin for the lining, but would’ve been uncomfortable in more stable fabrics. I did grade back up to a size 12 at the hips, although I suspect given the volume of the skirt in that area that it didn’t make a lick of difference.

DSC08164

The pockets are large and functional, although somewhat hampered by my decision to sandwich them between the two layers of the skirt.

But those really are some excellent pockets.

I am content.

I am content.

I must admit, I’m kinda curious what the pattern would look like in a softer, flowing fabric; the example on the envelope  is very similar to mine, crisp and rather blocky. Which isn’t necessarily bad, especially with those pleats, but I think it just might be really lovely in a soft satin or something else equally evil to sew with. For now, though, I’ll just be happy if we can get weather that actually allows me to wear it outside!

(Also, I feel like I should add, the dress is navy, not black.  I was attempting to kick my black-and-white-with-occasional-red kick. Probably this is futile, especially when I keep choosing colours that read as black half the time…)

21 Comments

Filed under Sewing

That 70s Dress: Cream & Red edition

Because I am creative with titles.

.20140324-205652.jpg

This isn’t the dress I wanted to make. That is, I figured I would make this other dress: (yes, just exactly like the envelope) but I couldn’t find the pattern. It’s around somewhere. >_<

20140324-205707.jpg

So, fall back. Simplicity 7806 from 1976. Equally cute, and almost as high on the (admittedly rather dusty) “must make” list. The fabric is deep stash, an ivory-coloured stretch suiting bought from a thrift store in my first year of blogging. (I just totally missed my fourth blogiversary last week, by the way.)

20140324-210400.jpg

I think it looks kinda Regency. Which is pretty fun, actually. The pattern is a size 10, a size smaller than I usually make. Since my fabric has a fair bit of stretch (although I didn’t notice until after I had cut it out that there was a lot more stretch lengthwise than widthwise… headdesk), I figured it would be workable. I made my usual bodice-petiting and swayback alterations, and added some extra width on the side-seams of the skirt. I love these 70s A-line skirts, but they need to skim, not cling, and last time I made a size 10 there was, ah, clinging.

Anyway, I got the waist in the right place, but arguably it might’ve been better had I taken less height out of the yoke (which is a single piece that wraps from front to back—now that I’ve made it it’s pretty simple but I was having a hard time visualizing how to alter it beforehand) and more height between bust and waist. Although I think I like where the underbust seam sits, even if it technically is a bit high. It’s hard to say with that curved seam, though—it feels perfect in the middle, high at the sides. But if it were perfect at the sides, it would probably seem too low in the middle? It’s a funny shape, anyway.

20140324-210515.jpg

I paid a bit more attention to fitting the back than I sometimes do; I wound up taking in the back waist by over an inch on each side of the zipper. It clings fairly well, now, and then skims, although the bottoms of those darts could probably use a bit of fussing over. Hard to say—this fabric is heavy on the polyester, and while it presses fairly well, it does love to pucker.

20140324-210530.jpg

I got lazy gave the blind hem stitch on the Rocketeer a try. As with everything on this damn machine, you have to look up the settings—intuitive it is not—but once I figured out the recommended setup it was pretty easy. Although not particularly invisible in this fabric. Except in the places I completely missed the hem. /sigh Wel, it was fast. I love how the manual assures us that the blind stitch is “comparable to hand-finishing.” The hand hem is the gold standard. As it should be. 😉

20140324-210543.jpg

In this photo you can see (maybe) the main fit issue with this dress—pulling across the shoulder. When I saw this my first thought was “I overdid the petiting,” which is certainly possible, but I think actually this is a problem of either a) my size 12 shoulders in a size 10 shoulder-piece, or b) that I didn’t bother with a square shoulder adjustment. I generally try to avoid them in these sort of cap-sleeve styles, especially since I couldn’t really visualize how to do one, but now that I have it finished I think cutting a slash along the shoulder line of the yoke (once I determined where the shoulder line should be) and then adding in a wedge at the outer edge, narrowing to nothing at the neck, would’ve been just what the doctor ordered.

Overall, I’d say this was the perfect fabric for this dress—drapey, with lots of polyester ;). The spandex may not be period, but the pattern does suggest lightweight knits as an option. I used the piping to finish the upper central neckline and back; below you can see my overlocked edges, and the hand-finished interior of the yoke. Overlocking anywhere near the red piping may turn out to have been a really bad idea, as that stuff frays like (words I won’t say on blog). Fray Check was my friend. I didn’t notice the problem so much on the Butterflied dress, where I used the same piping, but then that was more short, straight seams and it all ended up lined anyway. I don’t think I did much grading of seams, which I had to do lots of here.

20140324-210630.jpg

The biggest problem I have is that, being white (ok, ivory), my fabric isn’t, um, quite as opaque as another colour in the same weight would be. I think a white or nude slip is going to be in order before this one leaves the house. Which is too bad, because it really deserves better than headless bathroom selfies. And I will be really pissed with myself if I’ve made another dress I can’t wear, just for lack of proper undergarments.

Of course, now I need more cream stretch suiting, for when that original pattern turns up…

17 Comments

Filed under Sewing

Butterflied

Side view. Spot the tummy poof!

I shouldn’t really have made this dress. In a world where my sewing time is numbered in hours per month, where every precious drop of needle-time needs to count, this was not really the right choice. It’s impractical, non-seasonal, and doesn’t even have charming geeky pop-culture references. Sigh.* When I sewed this last weekend, we were suffering through wind-chills into the -40s. It’ll be weeks, more likely months, before this dress sees action. And I could have been sewing zebra print fleece! But, the choice was made, so let’s try to blog it, shall we?

So, I made Vogue 8916. Why? Well, I think I mostly felt challenged by the sheer butt-ugliness of the envelope photos, frankly. The model looks about as thrilled with the shapeless potato-sac outfits masquerading as Chanel chic as I would be, frankly. And yet, there’s this possibly-really-cute-dress-with-neat-seaming in there at the same time. So I made it. In this really neat abstract-butterfly-wings print whose cuteness almost makes up for its %100 polyester composition and the part where the (slightly glittery) black print melts when you iron it (all over my new-last-summer iron with the spanky extra-slidy sole, I’ll add. The press-cloth was my friend).

I’m almost as over apologizing for bad photos as I am over winter, so, they are what they are, which is grainy and not-very-in-focus. My “good” camera did not do a whole lot better than the iPhone (we tried both)—the culprit is simply inadequate lighting. Which, given my husband’s abhorrence of light in most forms, isn’t likely to change until I can go outside to take photos. In, y’know, a month or three. And I do better with a tripod than a photographer, just because I find it easier to let loose and be goofy. Although Tyo, my photographer, thought I was being plenty goofy enough.

Bodice details

Anyway, so the dress. I like the idea. I like the silhouette. I like the details. I did a decent job on the execution. But there’s a couple of things in the fit that I think are going to, well, irk me.

Front view, with tummy pooch

I haven’t made many straight skirts. Ok, I made one, a long time ago, when I was a baby stitcher, and I’ve only worn it about three times. More because I tend to destroy the back-slit every time I’ve tried to wear it than anything else, but the fact remains. I do have a couple of storebought (hand-me-down) pencil skirts of some kind of stretch fabric that are cute and I wear them a bit now that I have this staid little office job (though they still annoy me when going up and down stairs.) Anyway, the skirt features the very typical-of-straight-skirts front darts.

So I can kinda, if I squint right, see how these darts are right for most people. I mean, I’ve got some tummy pooch, especially the last couple of years (hello, mid-thirties!). But, for the most part, my stomach goes out in a smooth curve, sticking out furthest at my bellybutton, unless I’m carefully sucking things in for, oh, blog photos and whatnot. Anyway, it’s not so much the fit at the tummy that bugs me, as right below. My hips go back, and the skirt does not. Those storebought skirts just kinda suck in in this area—this non-stretch one doesn’t. If I’m standing straight, it’s not bad, but from certain angles it just looks poochy. Which I guess is cute. Also, while the curve of the hip isn’t as off as I was afraid it might be (my hips don’t curve out quite the “normal” amount, or so the vast majority of pencil skirts I’ve ever tried on have informed me) it’s not in quite the right place. It hits much higher than my widest part, like a good three inches higher. So yeah, I guess I’m short in the waist and long in the hips. I guess if I made more high-waisted stuff I would know this by now. This excess width at the high-hip also contributes to the pooch, I think. And then it’s quite snug over the widest part of my hips, which falls in the part where the pegged skirt is starting to taper in toward the hem. /sigh. So note to self—in future, add whatever length you take off above the waist on below the waist. Or maybe some more—I only shortened the bodice by about 1 cm (and yet, it does hit at my waist, at least when I stand straight.), and I think the “widest part of hip” needs to come down at least a couple of inches.

Back view, with blur.

All the back photos came out blurry. Which is too bad, because I really like the back view. My swayback adjustment worked quite nicely, here. I may not need it in things with flared skirts, but I definitely do in something like this.

Piping intersection

I spent a lot of time agonizing over how and where I was going to do the piping. I knew I wanted to highlight the interesting front seams, but just how? In the end, I went for minimal—just the front princess seams, and that under-bust cross-seam. Part of me wishes I’d done the waist, but I don’t like highlighting my natural waist, so I am content with how I did it. I’m a little disappointed that the under-bust seam is only in the front of the bodice, though—if I’d had more time/ambition I would’ve added it to the back and piped all the way around. In the past I’ve usually made my own piping, but this time I tried out this squishy-braided-flexible stuff from the store. I think the shininess works well with the fabric, more than, say, a broadcloth piping would’ve, and it was certainly less fussy than homemade satin bias piping. Anyway, it worked nicely, and I like the look and texture with this fabric. Incidentally, look at my piping intersection there! That was probably the most nerve-wracking moment of sewing the whole thing, so I definitely did a happy dance to the sewing gods when I got it just right. Also, this is the only photo where you can see the more subtle jaquard swirls in the fabric, as well as the black butterfly-wing bits. Cool fabric, no?

Hem, with grosgrain ribbon finish. You can see the underlining above the hem.

Other construction details? I underlined my fashion fabric, which was fairly floppy, with broadcloth. I also used broadcloth for lining, so this is really a fairly substantial-feeling dress. Unfortunately, the broadcloth lining doesn’t work with tights (especially lacy tights) so the photographed combination won’t work in real life. *pout* (I may pull off the skirt lining and replace it with a proper, slippery lining. I think the skirt-fit-issues would bug me less if the dress skimmed more anyway.) I finished the hem with some saddle-stitched grosgrain ribbon (off a spool from the dollar store—man, those don’t have much on them!) I love how easy underlining makes invisible hemming. I’m now officially terrified to wash this dress, though—red piping and red dollar-store ribbon on a white dress? I’d say disaster waiting to happen, wouldn’t you?

Really blurry pic of the bust padding

I added bust padding a la Tasia’s tutorial, much as I did with the picnic dress. Unfortunately, my only pic came out really blurry, but they do the job, which is basically just to add a bit of smoothness and structure to the bustical area if I don’t wear a bra. My bras are all padded in varying amounts, so my “size” without them is, um, a bit smaller. I made a size 12 for this, and it’s a bit roomy in the top, so maybe I really should be making a 10 in the bust for Vogues. I should also have done more stay-stitching or something around the top of the bodice, as it gapes a bit (and that’s after taking a bit off from the top of the princess seams.)

So, overall, I don’t really know about this dress. From some angles it’s great, from others the little things bug me to all hell. I probably do need to bite the bullet and play with the skirt side-seams, and replace the broadcloth skirt lining with a slippery one. In, y’know, a couple of months. On the other hand, I can see myself wearing it to work with a shrug or something to dress it down a bit (and to keep me from freezing!). I don’t have any glam-requiring events in the foreseeable future, so dressing it down will be a necessity. I suspect it’ll all come down to how it feels to wear it—and I won’t know until I try.

In a few months.

Instagram makes everything better.

*I know there are plenty of people who love to sew nothing but the fun and frivolous, preferring to buy (or just ignore) the mundane and everyday. And I get it. But personally, I find it frustrating and disappointing when I can’t wear something I make. Like, right away. Preferably to death.

28 Comments

Filed under Sewing

The Home Alone Dress

What's that?

What’s that?

I have fifty million things I’m supposed to be doing (like, um, sewing a wedding dress!). So what did I do when my husband and kids left me behind while they went to the lake for the weekend?

Why, I made something that was barely on the queue!

Butterick 6890 is cute and has been marinating for a while, but there are plenty of patterns ahead of it in the queue. But when I found myself with a house to myself and the itch to sew something selfish, I did something a bit unusual—I started from the fabric.

20130714-011430.jpg

Butterick 6890

My typical MO is to move from pattern to fabric to project. This is mostly because I have my patterns catalogued electronically and it’s easy to paw through them and pick one, whereas I’ve been far more lax about my fabric. The problem with this approach, of course, is that it’s not an optimal way to use up stash fabric, and tends to result in me just buying more fabric for the new project. Anyway, this wasn’t an option on a precious solo Saturday night.

I had a lot of constraining criteria. I wanted a pattern that was pre-cut, one I could use with minimal alterations, and not have to trace. It had to be a pattern I could ACTUALLY find in the flesh. Once I pulled out this piece of glorious polkadot stretch denim, which I picked up just after Christmas and thoughtfully pre-washed at some point (thank you, past Tanit!,) I had only just over a metre of my chosen fabric, so it had to be a SMALL pattern.

Butterick

Butterick 6890

Butterick 6890 fit the bill in a lot of ways. It was short. It was pre-cut. It’s a Junior Teen size which means I didn’t have to petite the bodice. It was a size 11/12, which has a 32″ bust—a bit small for me, but I was pretty sure the stretch would more than make up for that. I did a small square-shoulders adjustment, and a somewhat bigger swayback adjustment, and got cutting. It became obvious almost immediately that while I can sew up a Junior Petite pattern almost without alterations to the bodice, the Junior Teen size-range is pushing it a bit more. I wound up sewing the shoulder-seams and underbust seam with 1/4″ seam allowances to get as much height as I possibly could. It worked, but barely. I am also, ah, rather bustier than the Junior Teen draft. While this is a nice problem to have for once, I had to add some hasty tucks under the bust (perhaps making proper darts would’ve been better, but I was in a hurry), and correspondingly narrow the front skirt. I also added some more shaping to the back seam, which helped a lot. Oh, and the stretch meant I could leave off the zipper, too!

Back

Back

I still didn’t have enough fabric for the sleeves or facings, and the bodice back includes a good chunk of the selvedge. I considered alternative fabrics for the sleeves, but the only colour I liked enough with the grey, a pale pink, I had barely enough to make the sash ties out of. I really, really wanted to do a piped finish on the neckline and arms anyway. I was SO relieved when a scour of my notions stash turned up the bias tape left over from my Last Sundress of last year (which is totally my fave thing to wear when it’s super hot*, and also the perfect dress to wear to the outdoor pool. ) It was the perfect greyish-pink shade, and even not too different from my sash fabric!

20130715-070837.jpg

Piped finish

I made one major booboo early on—when trying on the bodice I didn’t stabilize the neckline first—oops! So it’s a bit stretched out and tends to gape if I don’t stand perfectly straight, especially after the disaster that was my first attempt at finishing the edge (which involved attempting to bind it with straight-grain fabric pieces from the scraps from the sash.)  But once I found the bias tape and did a REAL piped edge, it worked really well. To get a clean (if not couture) finish, I serged the raw edges of neckline + piping, pressed them to thei nside, and topstitched. Voila!

20130715-070855.jpg

Bias-faced hem, hand-stitched

A topstitched hem would probably have been appropriate for denim, but, well, I was in love with the way the pink bias tape worked with the grey. And I’m kinda in love with bias-faced hems… anyway. this is what my finished hem looks like, with a fun peep of pink on the inside.

Lounging

You can see the underbust tucks in this photo.

I don’t think I can describe how much happier and more relaxed I feel, having accomplished a wee bit of selfish sewing. And I’m so glad I got this finished, even if I did stay up rather past my bedtime to get it done.

Posing

Posing. You can see the neckline gape here.

*Super hot by Canadian standards. Which is low 30s C, so far this year. I know this falls short of truly brutal tropical heat. It’s scrumptious.

23 Comments

Filed under Sewing

Fantasy Sewing—The Pink Dress Edition

The Pink Dress

It’s Pink Week over at the Sew Weekly. Er, that is, the theme is Tickled Pink. Now, I’m not a Sew Weekly participant/contributor. I do occasionally enjoy sewing along when a theme happens to coincide with something in my mental queue, but I’m rarely in touch enough to figure out what theme is when, except as other bloggers happen to mention it. And, obviously, I’m not actually sewing along this time.

Pink Stuff

But this fabric landed in my stash the other week, and while I doubt I’ll sew it up any time soon (barring a sudden onslaught of cocktail parties), it’s just screaming to be made into the ultimate little pink dress. The colour in real life is a pale baby pink, not quite what either image is showing, but maybe closer to the top one. It’s the oddest embroidered poly satin; it’s like it’s backed with a thin knit web that gives the embroidery an almost quilted look from (what I presume is) the right side. The embroidery pattern is paisley. I love paisley. This is yet another example of how I go nuts for texture.

Bodice A

I’m not quite sure what pattern in stash might be suitable for adapting into this. The bodice of view A from Simplicity 5549 might work, but the skirt is too A-line. The skirt from 6750 has more of the right shape, but has more seams than I think I want.

New Look 6750

Or maybe I could adapt the Collette Handbook Pastille Pattern to a sundress-type thing. Hmm.

The rear flounce and little collar-thingy wouldn’t be too difficult to add. I love the look of those rear flouncies, and also it might prevent me from totally destroying the cute pegged skirt when I forget myself and start taking stairs two at a time. Although I’m doubtful I’d have enough fabric to make it from the same fabric. Pink chiffon might be in order.

*shudder*

My drawing kind of implies that the waist slants up a bit in the front, going from true waist at the back to a touch of an empire line in front. It looks cute in the drawing—not sure how that would work in real life.

Thanks for bearing with me on the fantasy sewing. What are you fantasizing about today?

31 Comments

Filed under Sewing

Fantasy Sewing—Spring Dress Edition

I’ve been craving dresses for a couple of months, now. Something pretty that I can put on and not worry about pairing top with bottom. Something that would feel like Spring. So, I went through my folder of pattern pictures, and made a collage of all the ones I kinda-sorta-would-like-to-make.

This was the result:

Round 1

These are the dresses I’d kind of like to make right now—all the patterns in my collection that I’m going “oh, that’s pretty!” over at the moment. Well, not all, as it doesn’t include any magazine patterns, but you get the idea.

Round 2---Finalists

Fortunately, even just throwing this together allowed me to narrow down my focus a bit. From “things I’d like to make” to “Things I’d like to make in the next little while.”

Unfortunately, none of these are really pairing well with the Star Wars sheet in my head… I’m thinking that needs something more full-skirted, to show off the print without too much chopping and dicing.

I think the next phase is going to involve pairing with fabric. The Style pattern (bottom left) seems a bit wintery, so perhaps I should put it off until the fall… on the other hand real sundress weather is a ways off, as well.

Oh, and checking if the patterns are complete. These are all thrift store finds and may contain unpleasant surprises.

… and that’s just the dresses I want to make.

Confession: This post has been sitting in the drafts for a couple of weeks, to the point where a fabric and pattern selection was made, and last night I was finally able to wriggle in to this for a first try-on:

Winner #1, Simplicity 6710

I think I am going to like it, although those gathers below the underbust band/panel thingy are perilously maternity-esque (and I’m not far from looking four months pregnant at the best of times) and will require some taming. I am happy to say that my copious list of fitting alterations seems to have done the trick in that department, at least. My main disappointment is that the 2″ of extra length I added to the tunic, in the hopes of getting a mini-dress, don’t seem like they will be entirely adequate for real-dress wear. So I may have to just wear it with my short-shorts, come summer. Sort of like this.

In case you didn’t recognize it in the crappy iPhone photo, this is the same fabric as the Ruby Blue slip, a dusty-blue polyester crepe. This friggin’ fabric is lucky I like the colour so damn much, because in every other respect it is exactly what I detest in a fibre. It is also not significantly easier to handle when cut on the straight grain, and doesn’t press for shite.

23 Comments

Filed under Sewing

Happy Birthday to me…

Grecian Sundress---Knee-Length Version

I live in a tree
I look like a…

Hmm, never mind that.

Grecian Sundress Front

So, ehm, I have some good news and some bad news. The good news is I have a new dress! The bad news is I underestimated the time it would take me to get the pattern graded—or rather, I significantly underestimated the amount of time I would spend this past weekend traipsing along the creekbed taking photographs of the enormous (insert sarcasm font) fish my family are catching. Given how rare weather like this up here, especially this late in the season, I’m not even going to apologize for it. But anyway.

So, at this exact moment the pattern is still only available in Tanit-size, which is roughly a Burda size 36 or a Big 4 size 10/12. The good news is that this style is REALLY forgiving. There’s plenty of ease, you can adjust the length of the shoulders by adjusting your gathers, and adjust for various bust sizes by altering where you start your shirring.

Either way, you can now find the pattern:

Grecian Sundress Instructions

Grecian Sundress Pattern—US Letter version

Grecian Sundress Pattern—A4 version

And I WILL get it graded, really, really soon.

Grecian Sundress Back

So, what’s there to say about this version of the dress?

The fabric is a print I’ve been eyeing at Fabricland for ages now, but it finally made itself through the marked-down section to the final clearance, which like most things was 50% off this past weekend, so for $2/m I finally bit. It’s a really nice weight for this pattern. I’m not 100% sure the crinkled look was intentional, but I liked it and it also works well with this pattern, so I didn’t go too crazy with the iron. I did do some ironing-down of the pleats, and when I wash it I may even try giving it the  full-out broomstick-skirt treatment, which I think would look fun.

I had been planning on another maxi (gee, surprise?) but it turned out that 3m of 150 cm-wide fabric (all that was left on the bolt) is not enough for the maxi length of this dress. Be warned. I could have made it about tea-length, but decided to go with my just-above-knee cutting line for demonstration purposes. And, y’know, it’s a length I like. I’ve also included a tunic-length cutting line as I feel like this would make an interesting tunic. I’ll get around to that one of these days…

Shirring: cute, not so straight

Incidentally, in the instructions I suggest that you use an elastic tied under the bust to mark the location of your top line of shirring. This way you get it in the exact right place, and it’ll look straight when it’s on you. I did NOT do it this way, just marked the line from the pattern and shirred away, and as a result my shirring does not run in a straight line around my body. Lean from my mistakes! 😉

I feel cute.

This version doesn’t have quite the stepped-out-of-a-marble-sculpture elegance of my first version, but I like it, and it feels light and summery and casual, perfect for throwing on to a barbecue (which is what I did today) or even pulling over a bathing suit at the beach. Which means I’ll get exactly three wears out of it before the weather turns, but hey.

It probably SHOULD have a slip or at least a lining in the lower section (maybe attached at the start of the shirring). Partly because the fabric’s a wee bit sheer (and I don’t think this design would work well with a heavy fabric anyway—too much bulk in the gathered shoulders) and partly because it catches on my butt like nobody’s business. You have no idea how many rear shots it took to get one that isn’t hung up on my backside. Mind you, my swayback doesn’t help.

I had meant to hunt down links to some tutorials on shirring and maybe a narrow hem, but it’s late and I want to get this post up tonight, so I’ll do that in the future (or post your own favourite link in the comments 😉 )

52 Comments

Filed under Sewing

The Mini Minnie Dress

Fyon's Mini Minnie Dress

I firmly maintain that Minnie Mouse has no monopoly on red with white polkadots, any more than Miss Piggie has a monopoly on pink. Nonetheless, this is the thing I have heard second-most-often about this dress, in either of its iterations. Sheesh. Fortunately, the most-often-heard thing has been random, awesome compliments. And despite being first on the list to make the Minnie Mouse crack, my ever-sweet husband has also requested specifically that I wear my version several times, so it must be a winner. Sigh.

This is the version created for my four-year-old niece, who requested it last month, with much batting of eyelashes and many applications of  “Auntie, I love you!” Let’s just say that as long as the cute holds out, she should do well in life. You may have to click through to the full size version to see the polkadots on this one. They are small, but I promise you they are there.

Young Image Summer 2011 patterns

The pattern I used as a base is Y1109 from the Young Image Magazine Summer 2011 issue (third down on the left in the image above). You can browse through the whole magazine here, but it won’t let me link to a specific page; there’s a good view of the dress on p. 19. It had the right general lines, in particular the centre-front bodice panel.

I made the size 104, the smallest for this pattern; my niece is 106 cm tall, although her bust and hips were a little narrower than the 104 called for. Still, I’m glad I used the 104 rather than a smaller size (had one been available)—the amount of ease is fine but definitely not excessive.

Naturally I couldn’t just make it up as is. So this is not really a fair review of the pattern or the magazine, although I did use all of the pattern pieces provided. The instructions are, well, distinctly translated, and in so many languages it can be a bit tricky to figure out where the information you want is; it’s mostly segregated by language, but not entirely. Also, the pattern pages are only marked in two languages, neither of them English (my guess is Dutch and German, but I confess I didn’t actually pay attention), so be prepared to do some translating. That being said, they’re not nearly so over-crowded as Burda pages and each pattern has its own colour, so that part was not bad at all.

Dress back

The pattern calls for a rear zipper in the bodice (not extending into the skirt as far as I can tell), but I opted for buttons, instead. You do have to add seam allowances. They may tell you that somewhere, but if so I didn’t find it. I just figured that all the European pattern magazines (maybe European patterns in general?) don’t have seam allowances, and an examination of the size/shape of the pieces will confirm that.  If I’d been less pressed for time I would’ve read up a bit more on how much to add for a centre button placket, but I was in a hurry, so I winged it. It’s not exactly ideal. I should probably have drafted facings or used a self-lining (which I think is what the pattern calls for), but I didn’t. And I’m balls at understitching, so my white cotton lining peeks out a fair bit. Ah, well. I also put the straps on the wrong side, I’m pretty sure they are supposed to angle with the shoulders, not puff up the way they do, but they look cute anyway.

Underskirt for dress for niece.

The skirt in the pattern has a slightly-gathered, shaped upper portion and a ruffled lower portion. In the photo (page nineteen of the magazine, again, but I can’t do a direct link and I don’t have the physical magazine with me to photograph), the dress has quite a deep ruffle on the lower part of the skirt; it looks much shorter on the technical illustration, which I found rather confusing. There’s no pattern piece for this, which is fine as it’s just a rectangle, but I couldn’t find the information on how deep it should be, either, just how wide it should be at the different sizes. My original dress had a simple dirndl skirt, so I did that for my niece’s version, too, but I used the pattern-piece provided, plus a lower ruffle tier, for the underskirt. I was winging it for the length at that point—I did a quick comparison with some dresses from Tyo’s closet that I thought were in the right ballpark length—overshot, and wound up hacking about four inches off the top of the underskirt. Ah, well. It all gathers to the waist, anyway ;). For extra flouff, I gathered some tulle onto the underskirt. I should’ve used more. I also couldn’t use my favourite gathering technique, the zig-zag over a supplementary thread, as my zig-zagger was frozen at this point (she’s in the shop as we speak), so that was a wee bit annoying. Yes, I used the gathering foot, but getting the precise length was not happening so I wound up hand-basting and gathering it that way anyway. *headdesk*.

Dress

Instead of little ruffles on the centre front panel, I made an altered, double-length version of the CF piece to create the ruching. Gather it to the side-front pieces, construct bodice as usual.

Buttons closeup

I was a little concerned about the button-placket not extending into the skirt. After all, even on rectangular little children, you want to be able to open it a little below the waist, right? So after some cogitation, I decided to add in an extra-wide continuous lap placket at the centre back to finish off the button placket. Of course, for these to work properly you really have to fold the outer edge of the placket to the inside, which I completely forgot to do. So it’s a bit wonky in that area. Fortunately it’s pretty much hidden in the gathers, anyway. And cute ladybug buttons make up for all manner of flaws.

I have been having some fun being the sewing fairy, I must admit. I have been refusing to sew for my adult relations (well, unless they come to visit me for fittings, which, considering we live 600 km away, is a bit of a deterrent), but this summer I dared to hand down a couple of pieces. My stylish sister-in-law had greatly admired this sundress last year when I wore it, and after thinking about it, I decided to give it to her. I still like it a lot, but it feels like a lounging-by-the-lake (or in the back yard) kind of dress, something she does a lot more of than I (which is not to say she is lazy, quite the opposite, but she is currently at home with small children in a house with no AC, rather than spending her days in an overly-cooled lab like I do). Rather more recently, I made a tunic cloning a RTW one that I absolutely love. I liked the clone, too, but it was a bit too short through the body. So with some trepidation, I handed it over to my going-on-fourteen-year-old-niece. I am absolutely terrified of trying to sew something for anyone in this age-set without their direct input, but figured it had a better chance of working for her than for me and was reasonably stylish reasonably recently, and she steals lots of clothes from my stylish sister-in-law (I should perhaps clarify that my stylish sister-in-law is the mother of the four-year-old who received the Minnie dress, but NOT of the fourteen-year-old), who I feel pretty comfortable about guessing styles for. Anyway, she claims she likes it and as she’s only 5′ 1″, the length issue is rather less on her. So we’ll see. I still need to make the longer version…

Oona, this one's for you

Before I left on vacation, I did bring home one more piece of thrift store fabric: this crazy border-print. There’s only about a metre, but it’s very wide. Whatever it gets made into will obviously be dedicated to Oona of the Carnival Stash.

Whew! I must now return to hanging out with my in-laws, soaking up the sun, and wrangling somewhat obscene numbers of small children. Gotta love vacation…

21 Comments

Filed under Sewing

Sometimes you just have to walk away.

Hmm

McCall's 3415

I have a feeling this dress is going to spend a little while in the Magic Closet.* You know when you reach that point when you’ve unpicked a seam so many times the whole thing just starts to look mashed and no matter how well you re-stitch it it’s still going to be a bit wonky? Yeah. I’m there.

That being said, I think once I’ve had a little bit of space I’ll quite like this dress. We just need a bit of time.

Front view

So, after all y’all’s** sage advice last week, I put on my big girl panties and unpicked the skirt (yes, removing zipper in the process), and made Alterations.

Specifically, I lopped 15 cm (about 6″) off the top, re-cutting using the top of the pattern but blending out to a wider width quite quickly (maybe a little too quickly…). In my paranoia over having enough ease I actually made the skirt a bit wider even at the top, electing to ease that in.

Side view

This fabric doesn’t ease so well, did I mention? Well, I mean, it does—there’s no pleats in the seam—but it sure shows the puckers. Not even going to go into how many times it took me to get the zipper straight and smooth and matching up, either. On the up side, I did get it smooth and relatively straight (and relatively invisible!) eventually, so I shan’t whine too much. And I did a slightly better job stitching on the bodice lining on the inside this time, although with all the grading and clipping and fraying from being unpicked so many times it still doesn’t look peachy. But I think I have the theory down, anyway.

Back view

There are still some issues with how the back hangs—I think somewhere in my alterations the grain got a bit skewed—but at least it’s not straining over my hips and making my belly look like a stuffed sausage anymore. (It actually looks way better in this pic than when I’m just standing straight.  I miss the pockets, though. I wonder how much more work it would be to put them back in, now there’s enough ease for them… (walk away, Tanit, walk away…)

Hem facing

Having removed six inches in length, I didn’t really want to lose much more in the hem, so I put back the hem lace I’d been planning to use and dug out a package of teal hem-tape from one of my thrift-store scores that’s probably been in its package since about the time this pattern was new. I actually really like using a bias facing in curved hems like this. It works a bit better if you “circle” it first—iron it while stretching it into a curve.

Hem facing

Plus after thirty-odd years in the package it really needed to be ironed. Fortunately the skirt is quite narrow, as it was only a 1.85m package, and I had to discard about eight inches at one end where the tape that held the end in place all those years had turned yellow and marked up the fabric. I had just enough. The hem facing is a fair bit darker than the rest of the dress, but I think it’s a fun flash of colour. And it gives me the feel of a full, yummy 2.5″ hem without losing more than about 2 cm in length.

Having said all that, I have to admit something.

Halter styles are something I have a problem with. Meaning, I like them. I love the exposed back, I love how they look on other people and on pattern illustrations. But somehow when I see them on myself, I always feel line-backer-ish. Like they just emphasize the breadth of my shoulders. I keep making them because I really like the idea. And I keep thinking that next time, it’ll look “right.” There probably should be a name for this kind of stylistic insanity. On the other hand, I am actually liking the photos a lot better than I like the reflection in the mirror, so perhaps its one of those things where my brain exaggerates what I’m seeing beyond all reason.

Anyway, I’m hoping that some time in the Magic Closet will help me forget about most of my issues with the dress. Although the halter one’s probably there to stay. Next up: jackets in summertime. Unless the Lonsdale pattern arrives, anyway ;).

*You know. Where self-made pieces go to wait out the period while you forget all the stupid mistakes and messes you made.

**I don’t actually talk like this, but it sure is fun to write sometimes. Also my town is infected with cowboys at the moment, so it would be surprising if I didn’t have at least a few symptoms.

34 Comments

Filed under Sewing