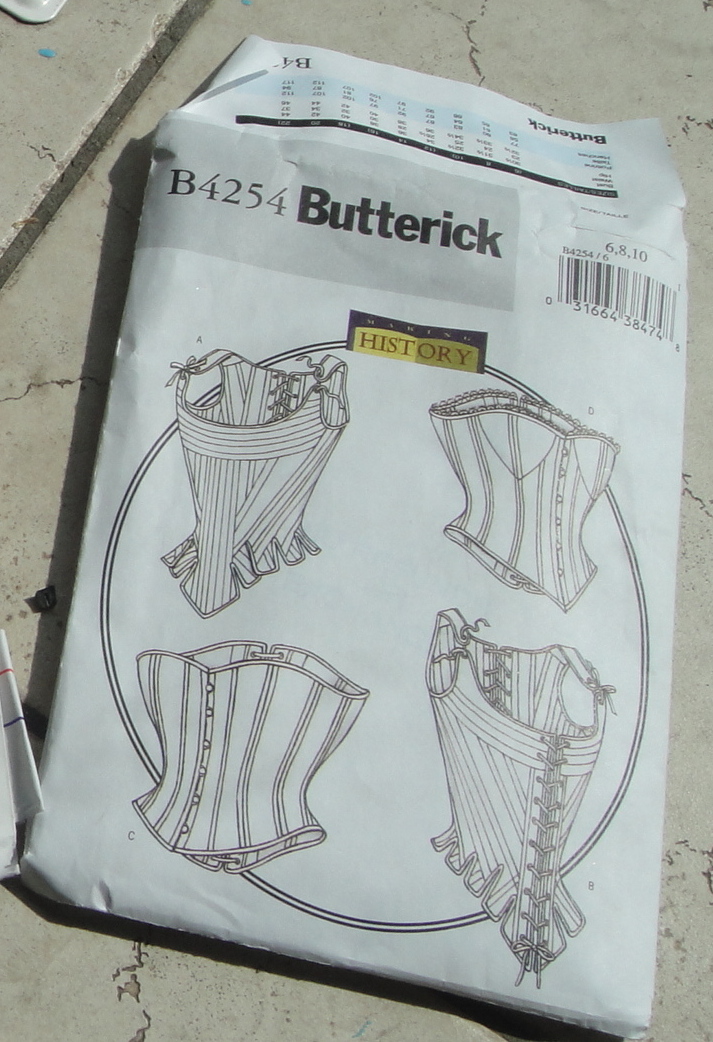
Tag Archives: fitting

Premature Corseting

Butterick 4254

Butterick 4254

Despite a number of itty bitty things like, oh, not having ANY actual corset supplies (except eyelets, I do have eyelets), guess what I did when Osiris’s best buddy dragged him out of the house today, leaving me alone for HOURS?*) I make a mockup of Butterick 4254. After I deflated the mound of empty boxes that was occupying most of my charming new sewing dungeon space, and got the one machine that I have over here set up.  I have traced out View C, which is about as simple as it could get.

Before even starting, though, there were a couple of things I wanted to do. First was shorten the pattern above the waist. I took a 2 cm tuck across all of the pieces. The grainlines on some of them are really weird. Any experienced corset makers reading—should the grain lines go up and down relative to the piece, or relative to the corset overall? Shouldn’t those things be more or less the same thing? I confused. Anyway, for the mockups I went with the grain as drafted.

I read all the reviews on PR. Some (who appeared to be the more serious corset-wearers) found that the pattern lacked compression (i.e. it’s drafted at zero ease, not with negative ease at the waist. So the size 10 (the largest size in my envelope, and a size smaller than I normally make) has a 25″ waist, as drafted. Me being me, this is plenty of compression. I was a little less sure about the bust and hip, but willing to go with it. Several people said they found the corset short, and since I had just shortened it further, I figured I would extend it by a couple of cm all around the back.

I did not make one of my staple adjustments—a swayback adjustment. I did, however, add a bit of extra width at the high back hip.

And I made a mockup. As per the suggestions in Linda Sparks’ “The Basics of Corset Building,” I added a 2″ panel to the back where the lacing will be. Since I haven’t got a busk (see above about having no actual corset supplies), I subtracted the seam allowances and cut the front on the fold.

I’m torn on the whole busk thing. On the one hand, that’s a lot of money and effort and waiting (I would have to order online) for my first corset. On the other hand, I’m aiming for that Victorian corset look and as far as I can tell, they were all about the busks. Anyone with actual historical-fashion expertise (as opposed to my rather lazy google-fu), please correct me if I’m wrong. And yes, I’m aiming for at least superficially historical here. Why? Well, basically my mother’s been involved with a local small museum volunteer type thing for yonks, and there’s a possibility we could maybe develop a “pioneer sewing” program-type component and, well, I’m having visions of everything from treadle-sewing workshops to steampunk picnics when (if) summer ever comes, so yeah, I’m feeling historically oriented with this project. Vaguely, anyway.

Version 1

Version 1.0

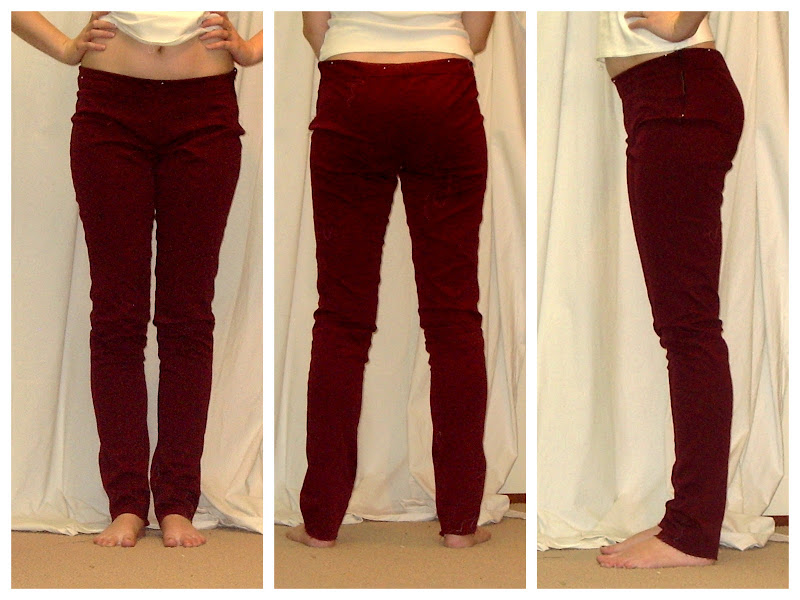
Anyway, about that mockup. Will you ever forgive me for these horrible dirty-bathroom-mirror fitting photos? I may never forgive myself. Especially the back photos, which I took with the reverse camera on the iPhone, which has crappy resolution and no flash. Anyway, so, bust fit seems ok (recall that since the top and bottom of the corset are bound, there’s no seam allowances to fold under there). Waist fit as well—it’s tighter, but it’s supposed to be, right? It’s just below the waist everything goes, um… yikes. Ok, so obviously my hips are not appropriately Victoriany. But the biggest thing, really, is that weird length thing from front to back. The corset, from the illo,  is supposed to arc up over the hips, and down in front and back. Well, I have the back bit just fine, but the front? WTF? So, obviously I will be lengthening the bottom of the front. Like, a couple of inches.

Anyway, I took in the loose wobbly bits below the waist, probably a total of about four inches.

And then I stitched down my seam-allowances to make boning channels. Except I have no boning (not even zip ties) to put in them.
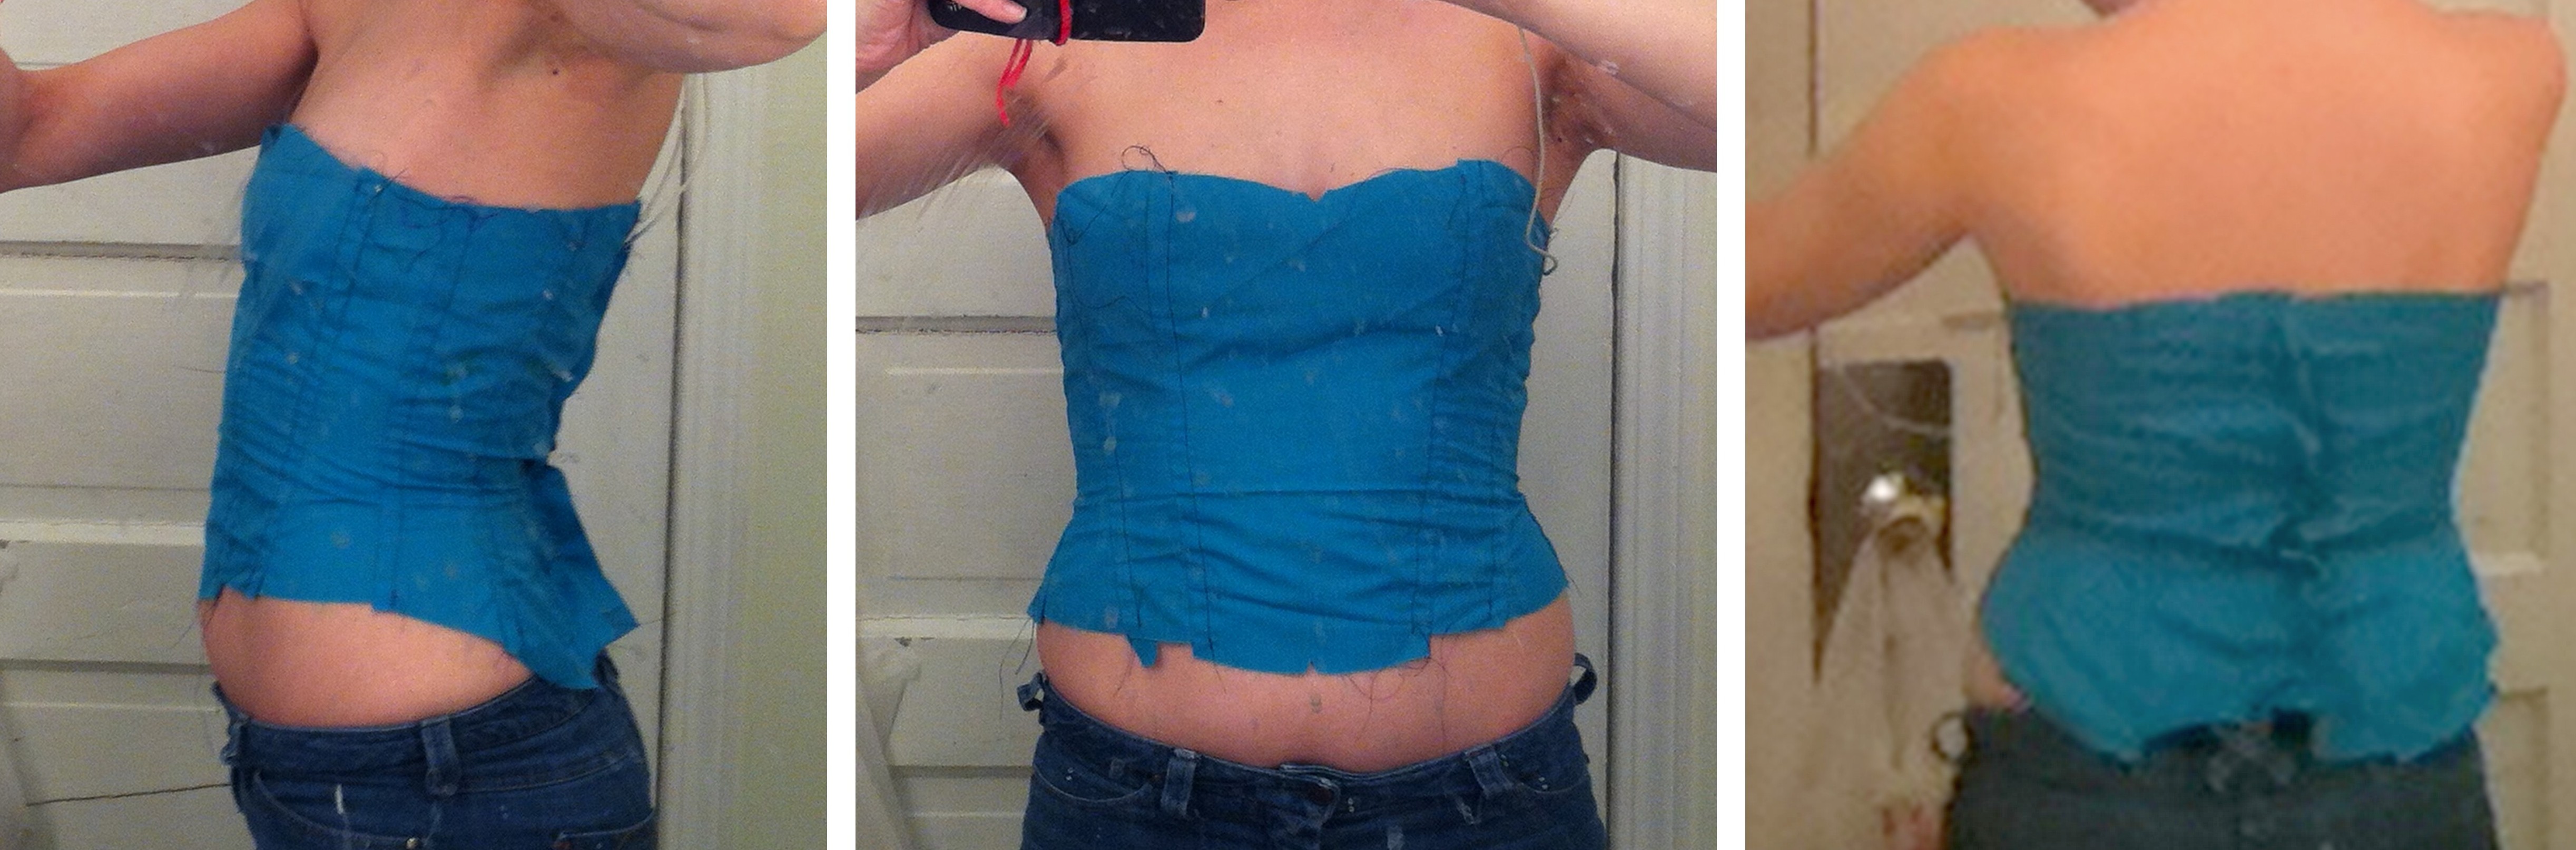
Version 1.2

Version 1.1

Nonetheless, I think the results are MUCH better (OK, not trying it on with seam allowances out probably looks better, too. It’s just much easier to make the adjustments with seam allowances out.) I think the fit over my hips at the side is spot on. I’m a little more worried about the back—it’s doing its usual sway-back wrinkle, assisted, no doubt, by shoddy pinning. Will the boning smooth it out, though? Or should a corset be “fixing” my little posture problem, anyway? For that matter, how appropriate *is* fitting a corset? I mean, isn’t the point of a period silhouette that it squishes you into ITS shape, not the other way around? Thoughts?

The altered pattern

The altered pattern

Anyway, here are my pattern alterations, to the extent that you can see them in the dappled daylight on the kitchen floor. I guess I could’ve moved them to a better spot on the floor, but that would’ve required, y’know, forethought. The red outlines my post-fitting changes, both where I slimmed the hips and my length extension in the front (on the right). I suppose I should really do a second mock up to test that length alteration, but I’d really like to plunge ahead and cut my real fabric. Not that I have proper coutil or anything, either, mind you.

*Just for the record, I love my husband. I love spending time with my husband. I love that he wants to spend lots of time with me. But right now, he’s getting a lot more alone time during the day, while I’m spending my day surrounded by and interacting with people, and while my introvert/extrovert ratio is pretty close to even, the fact that I’ve had NO ALONE TIME EVER for seven or eight months is starting to take a toll and I’m really wishing to just have time to do my things. Like sew.

29 Comments

Filed under Sewing

Spreading the bug.

Teehee

I have a lovely friend here in town who is creative, crafty, and has one of those unique figures  that makes buying clothes off the rack an experience that ranges from frustrating to soul-destroyingly brutal. She is well-rounded,  busty, and very, very petite. Needless to say, it was glaringly obvious to me that she needed to start sewing.

Of course, persuading her (a busy puppy-mom with nowhere near enough hours in the day already) of this took a bit more work. In fact, it wasn’t until a month or so ago that I finally managed to get her to pick a thing to make, and we began the adventure of fitting her.

Booyeah

As I mentioned before, the pattern she picked was New Look 6789. This had lots of things going for it, from our perspective. Aside from being intensely cute to start with, it has princess seams, no waist seam (a feature she’s about as fond of as I am, with even better reason), and broad, bra-friendly straps.

The main downside is that the pattern only goes up to a size 16, and we really should’ve been starting with an 18, even before the FBA.

I started with measurements. Full bust, high bust, and back waist. To give you a small sense of what we were dealing with—standard Misses sizes are drafted with a back length of 16″ or so. Mine is around 15″, resulting in my standard, moderate petite alteration to the bodice.

My friend’s is 13″. If she’s standing tall.

What followed was not an elegant sequence of well-practiced fitting. Rather, it involved a lot of measurement, followed by pattern alteration, followed by trying on, followed by further tweaking, and that’s without going into all the stitching and unpicking and swearing. My friend did, far and away, the bulk of the work herself, while I directed. This worked pretty well for me, and hopefully for her.

Having determined based on measurements, roughly what we needed to add to the pattern, both all around and for FBA purposes, I put my slave labour friend to work tracing out her pattern. We added width. And I did a Y-type Full Bust Adjustment a la Debbie Cook, except with less precision.

Now, my dear friend, having picked an excellent pattern, had decided on a very cute, black with white polkadots knit for the fabric. Yes, you are absolutely right, this is a pattern for a woven. Ahem. Never one to be dissuaded, I figured that making it in a knit should make it possible to omit the zipper, so away we went. To start off, after she’d block fused a portion of fabric, we cut out the top yokes and straps, and did some quick test-fitting with these. All seemed well, so I set her to cutting out the rest of it. Which was not block-fused. Which was not fun in this fabric. Nor was it the kind of stuff that liked to be sewn. But she soldiered on, hampered mainly by the fact that our days off during a week don’t coincide, and she lives on the far side of the city (which is the better part of an hour’s drive even when traffic isn’t ridiculous). Obviously, it’s not perfect—some spots the angles are a little off, and in particular there’s some issues with the vertical seams where I should’ve had her use a stretchier stitch, and hemming the lining nearly drove her over the edge—but the fit, the fit.

Rear fit

I don’t think I can explain to you how triumphant I feel over this dress. It’s not perfect, by any means, but it’s leaps and bounds above anything off the rack.

It fits her bust.

It fits her back.

We could probably have shortened the waist even more (I wasn’t sure how much should come out below the armpit, as opposed to above it, which was easy to adjust with the straps.), but it’s much better than storebought.

With a little bit of princess-seam tweaking, we seem to have achieved skimming fit. Woot, woot!

Rawr!

So, bear with me while I wax philosophical here a moment. I’m a big fan of body acceptance. A fan of finding what’s beautiful about yourself, whatever your size or shape may be, and running with that.

And watching my friend go through the fitting process has been illuminating on so many levels—the physical challenge of fitting a body so different from mine, sure, but also the body-negativity she struggles with, having a body that not only isn’t the model ideal, but doesn’t even seem to be in the same universe, as dictated by the clothes on the rack. Like most of us, she knows what works for her and what doesn’t, but—like most non-stitchers—she doesn’t quite know the difference between what doesn’t work because it’s not flattering for her shape, and what doesn’t work because she’s never tried on a version that actually fit. (I have a similar problem with tailored shirts, frankly). And she’s still trying to digest that it’s not a problem with her—it’s a problem with the clothes, and the system that only caters to shapes within a certain standard deviation of average.

I hope she does absorb it. I hope she learns to tell the difference between a bad fit and a bad body. And I hope (maybe a little selfishly), that she’ll keep on sewing, even if it doesn’t become a major obsession hobby, and will have at least a few things that make the body that she has look as beautiful as it actually is.

And I think that she looks like a bombshell in this dress. 😀

53 Comments

Filed under Sewing

Next Size Up II

Jeans. She has them.

Tyo’s replacement capris are finished. Or is that Bermudas? My shorts terminology is lacking. Can I blame being Canadian? The Patrones magazine calls them “pirata,” which I think is totally awesome.

They are pretty standard jeans-styled capris, with a few additional details.

Rear view

Funky, asymmetrical pockets are part of the original pattern (I left off the flaps this time. Not even for lack of fabric—I made them, but didn’t put them on. I don’t really like their shape.) I should’ve piped the pocket edges, although getting the piping crisp around all those corners would not have been fun. As it is, you can barely see the pockets are there. Hmm. I do like the piped yoke—I should’ve piped the waistband, too.

I had better not dwell on the missed piping opportunities. That way lies madness. I added one of those weird, pointless straps between back pocket and side-seam, at Tyo’s request.

I’m too cool.

And then managed to photograph her only from the other side.

Luv

Damn she is cool.

I love who I am.

Oh, wait, I’m supposed to be discussing construction, not just posting pictures of my cool kid.

Inside front—pockets, fly construction, buttonhole elastic, bound-edge waistband.

My fly interiors are not generally things of great beauty, and this one isn’t, either, although it’s one of my better ones. I won’t get into how many needles I broke as soon as I started trying to do zig-zags—bar tacks, buttonholes, attaching the belt loops. There was much howling and unpcking. I HATE unpicking bar-tacks. It got better when I ran out of topstitching thread and just used regular blue thread. I may do that for all bar tacks/dense zig-zags in the future. The buttonhole elastics emerge from gaps in the seams where I had to piece the waistband.

Drawstrings

I added buttonholes on the outside before stitching the hems, to run the drawstrings (aka shoelaces) through. Back when I made the first pair of camo capris, I bought a metre or so of narrow black twill-tape for the drawstrings. I couldn’t find it when I finished that project, so wound up using shoe-laces instead. It’s kicked around on and off since then, (notably being used in this project) but again today I couldn’t find it. I did, however, find more shoelaces. (And I can never, ever find shoelaces when my shoes need them…)

Front closeup

Can you see that I screwed up the cutting played with the grain on the front pockets? No? Maybe just as well.

Pattern alterations.

Remember my pattern alterations?

Back view

Ok, here’s how they wound up looking. (If you can see through the print, which you probably can’t.) Rear rise is good—not any too high, could probably have gone a little higher, but coverage is maintained even when she squats down. Yay! Yoke curve-in is good but could’ve been more extreme—there’s still plenty of extra ease at the waistband that isn’t there at the hips. There is still some slight wedgification happening—not enough to be uncomfortable (yet) but I can tell that the crotch curve is not perfect for her. Presumably scooping is in order? I’m really not sufficiently enamoured of this pattern to bother, but Tyo may be, in which case I’ll keep it in mind if we end up at Pair #3.

Whew!

Ok, I’m done. And apologies to Claire for not doing a full-camo photo shoot with the vest. We snapped these pictures in about five minutes just before bedtime.

26 Comments

Filed under Sewing

Project Drop Waist

Oh, no—more toile photos!

So, it’s no secret that I have Issues with waistbands that sit at my waist. Above the waist is great, below the waist is fine, but waistbands that sit right at my waist—these are problematic.  Especially if there’s going to be any kind of waist emphasis (like a belt), blousing above the waist, or gathering below. I always end up feeling cut in half, emphasizing both the width of my waist (2-3 sizes larger than the rest of me) and the shortness of my upper body.

Unfortunately for me, this describes roughly 90% of the dress patterns out there, and (even worse) a large percentage of the ones I’m dyingtomakerightnowdammit!

Now, I successfully made a dirndl-skirt sundress last summer by adding a dropped waist to a formerly straight-waisted pattern. And, despite being a fairly extreme example of stunt dressing, it was one of my favourite things to wear last summer. But a) this was a princess-seam pattern, and b) I used a shirred back, which allowed me to really fudge the fitting.

So, it appears, the sensible thing to do would be figure out a bodice template—a block, if you will—that I can morph onto these waist-length patterns to drop the waist slightly. Most of the ones I’m concerned with have a simple gathered or pleated skirt, which won’t be much affected by the addition of a few extra inches (and I’d probably be adding inches to the waist anyway).

When I was musing about this the other day (nothing like beating a topic to death 😉 ) I was thinking I would just try adding on to a pattern I already had—Simplicity 3965, say. Lauriana (one of the more fabulous pattern-drafters out there) sagely commented that perhaps it would be less trouble start with a longer bodice, perhaps a hip-length sloper drafted to my own measurements.

Now, obviously she was right, but my (vast and growing) pattern collection is a bit short on such a basic, at least with the length, fit, and dart positioning I wanted. I was, however, reminded of the fact that I had drafted a “fitted dress block” from the book Metric Pattern Cutting for Women’s Wear, by Winnifred Aldritch, a few months ago, which had languished un-tested on my hard-drive (I like to mess around with pattern drafting in Inkscape, usually when I am supposed to be doing something else). Partly because Aldritch was a bit vague, or at least confusing, on the issue of waist-shaping.

Anyway, with Simplicity 3965 giving me an idea of how much waist-shaping was required (at least above the waist), I set out on an odyssey. There was printing; tracing; tissue-fitting (on me and my dubious duct-tape double). Sway-back adjustments were made. I have confronted the horror of the shaped dart.

Self-drafted bodice

All for… this. /sigh.

Well, perfection has not been achieved, but I think I might be getting into the right ball-park. The shape (and breadth) of the rear darts is truly terrifying, but they are at least approaching doing the job (although it looks from the photos that the back is still a smidge tight—overall the bodice is quite comfortable. I’m not quite sure what to make of the side-wrinkles in the front, exccept that perhaps a bit more bust-shaping is in order. Additionally, the bust-dart is still about 1 cm high, and the side-seam falls a bit towards the back. I might moosh a teeny dart out of the front armscye to bring that in (or play with the shoulder slope some more).

Anyway, despite the imperfections (which are considerably more evident in the photos than in the mirror… not sure if that means it’s actually better in real life or worse than I had thought) I figured I had reached a point where I was ready to try using it on another pattern. I.E. Simplicity 3965.

Premature? Possibly, especially since I was thoroughly befuddled how to relate the narrow back dart of Simplicity 3965 to my wide, angled, and oddly-shaped one on the self-drafted bodice. But I had limited time to sew this past weekend and I have fantasies of wearing this dress for May Long (which is next weekend—yeah, probably not going to happen).

Simplicity 3965 (modified)

So I matched up the waistline, and attempted to add the shaping of the self-drafted bodice on to the Simplicity bodice. This worked fairly well for the front, not so well for the back. My self-drafted back piece is very wide, but then a lot of the width is taken in by the dart. The Simplicity bodice back is much narrower, with a correspondingly narrower dart. I can’t help but think that a narrower pattern overall would be preferable, but obviously the swayback alterations didn’t transfer with their full force. Alternatively, letting out the hips a bit more might be helpful. Part of what’s hanging me up is that “high back hip” which I still haven’t really learned to fit.

Also, in this one you can see the lovely sunburn I acquired on Mother’s Day.  This is what happens when I sit back and let other people organize the day’s expedition… my mother’s day brunch turned into a two-hour wander on a new segment of riverbank, with nary a squirt of sunscreen to be seen, on the first really summery day we’ve had so far.

I’m hoping that one more muslin will be sufficient—sewing these up is quick, but annoying, and I’m running out of crappy zippers. 🙂

21 Comments

Filed under Sewing

Simplicity 3965—The Toile

Peace out, dude.

I tend to use “muslin”, because that’s what the Reader’s Digest Complete Guide to Sewing uses and that was my first sewing text, but I really do prefer “toile”. It’s shorter, for one thing, and doesn’t sound like I’m macerating someone’s religion in the pursuit of better fitting clothes.

Anyway, I made up a quick toile for the bodice of Simplicity 3965. I have decided I need to get my butt moving on this project so I can have it done before the Cambie dress pattern comes out later this month, because when that happens it is totally going to be All Cambie All The Time. Well, probably not, but I will wish it was. And, since I had the excellent example of Tasia’s muslin, I was actually good and thread-traced all my seam allowances and darts and EVERYTHING!

Ok, so, I got a bit ahead of myself, there.

To start with, the pattern ElleC sent me is an old-school size 12, that is for a 32″ bust and 25″ waist. The first is slightly smaller than mine (OK, let’s face it, since this past Christmas it’s a full 2″ smaller, 3″ if I want to wear a bra, which I generally do with wovens.) Having compared the pattern pieces to my body, it actually seemed like the length was going to be all right, and a little bit of pattern measuring suggested that there might almost be enough ease for the bust. The waist, of course, was laughable. Hilarious, really. “Vintage” figure, I do not have. Snerk.

So for the muslin, I added 1 cm to the side-seams of each piece, for a total increase around the body of 4 cm (just under 2″).  And then I cut out and stitched up with, as mentioned above, traced seam-lines and everything.

I took proper fitting photos but the combination of a weird camera angle, bad light, and the total lack of makeup and hair makes me unwilling to post the rest of them, sorry. Only the goofy one was entertaining enough to make up for the weird angle, and even then you’re not getting the face. So you’ll have to take me on my word that the fit seemed pretty good overall. The bust was just about perfect, darts pointed where they should, the shoulders etc. look good, but the waist obviously needs a bit more (more) room. At least if I want to, y’know, eat or breathe or anything like that.A small swayback adjustment (raising the rear waist seam in the middle by about 1 cm) will be in order, and a couple more cm ease at the waist, and I think I’ll call it good. Which means I’ve made almost none of my usual adjustments to this pattern. Interesting. (I’ll note that Tasia had to lengthen the waist on hers by a good inch.)

Of course, now I have to face the next stage—the waistline. As I’ve said before, I have a short waist and rectangular figure, and something about this combination tends to make gathered, dirndl-type skirts that begin right at the waist, well, a bad idea. Dropping the waist-seam a few inches gives me the look of a longer body and puts the added bulk of the gathers at my hips—which can always use a boost—rather than at my waist, which doesn’t need any added bulk ever, thanks.

However, for a fitted bodice like this, that also requires a lot more work. For the polkadot sundress, I kind of freehanded the front and fudged the back with a shirred panel. I would have to be a lot more precise for this project. Figuring out the hip curve. Fitting the bottom half of my swayback (without a waist seam). How to continue the shaping of the front darts.

Waistline Placement

Part of me is saying “go for it!”—if I figure this out, I’ll have a basic fitted (albeit sleeveless) bodice I can use to adapt the zillions of waist-seamed dresses that are flooding my fantasy sewing these days. Part of me is saying “Give the gathered-waist look another try. You never know, it might be ok this time. Maybe the problem’s mostly in your head. Everyone else likes those gathered skirts!”  On the other hand, looking at my little croquis there (which I traced right off the image at the beginning of the post) I know which one I prefer…


35 Comments

Filed under Sewing

Frock Coat Defrocked

Coat---PROGRESS!

Just in case you’ve forgotten (I nearly have), this is the coat where I try to turn this pattern:

Lekala 6066

into this:

Christopher Walken in The Prophecy

I made two muslins, and extensive alterations—more for freedom of movement than fit per se.

And I would’ve sworn that the best things about both muslins was that the shoulders FIT.

Well, I tried the shell on Osiris and the shoulders are huge. I honestly couldn’t tell you anything else about the fit, I couldn’t see past the massive, sloppy shoulders.

Yes, the shoulder-pads were in place.

I’m not quite sure what’s going on. There is a lot of room in the back (as per his demand), but that’s not the issue. It’s like the shoulder point has expanded. Which it shouldn’t be able to, right? I’m hoping some re-adjustment of the pads/sleeve headers will help the issue. The armscye also seems low, where I swear the opposite was going on in the muslin. This may be a difference between firm sheet and soft (ish) wool (ish)?

Shoulder not-so-easing

The easing of the back to front shoulder also didn’t go super-duper well. Too much to ease, not enough wool content in the fabric, and I couldn’t find my tailor’s ham. (Also, way-overexposed photo to show detail)

I’m also wondering if I should be attempting to create a more tailored structure. I’ve been following Sherry’s RTW sewalong, which is lightly-structured but not really Tailored-with-a-capital-T. Neither was the inspiration garment for this project, of course, but I’m wondering if that’s some of the look that’s missing. Hard to say, hard to say. Maybe a little bit late at this point, too, unless I want to pull the whole thing apart and add a fully tailored front (it’s not like I have a shortage of hair canvas…)

Grum. It doesn’t help that I’m not allowed to take fit photos, and he’s not exactly keen on standing around while I attempt to note down every little wrinkle.

But he does like it. Or says he does.

On to construction and confusion.

Sleeve vent

Sherry has one lovely post on sewing a sleeve vent, which she helpfully links to from her sewalong. And I obediently followed her directions for adding a mitred corner to the sleeve pattern.

Mitred sleeve vent

For both the upper and under-sleeve.

For future reference, you only want the mitre on the upper sleeve (the top portion of the vent). The under sleeve needs a regular corner to underlap beneath the top side of the vent.

So, unless I wanted my vents open, I either had to re-cut the under-sleeve (which I doubt I have fabric for) or get creative.

Creativity. See the little seam?

I got creative. I pieced in a little snippet of left-over block-fused fabric. You can see just a little bit of the seam. It’s a bit bulky, but it’s going to be invisible once the buttons are stitched on anyway, right?

*headdesk*

Next up—figuring out how to line a vent. Ideally without resorting to massive hand-stitching, although I must admit soothing, mindless hand-stitching does seem a bit more attractive than brain-busting RTW-style sitching tricks, right now. Hmm. Maybe I’ll insert the whole damn lining by hand. If not, I’m thinking this book should cover it.

Lining resource

If I can get a good fit, anyway.

Also, I forgot pockets.

That’s probably unforgiveable, isn’t it?

29 Comments

Filed under Sewing

A ruby in blue

Creek Springtime

I didn’t get a lot of time to sew this past weekend. We spent much of the weekend at the creek, checking out the changes winter has wrought (not to mention the changes between Saturday and Sunday!). But I did, in snatches here and there, get started on my (long awaited) Ruby Slip.

Lace

After searching high or low, I was singularly disappointed in the lace available to me. (I thought this would probably be the case, but I hadn’t done a truly intensive lace-hunt before, so I was hoping that perhaps I had just overlooked some fabulous finds.)

Cute Slip Pose

Apparently, not so. For the record, I carried a bolt of silk charmeuse around Fabricland for some time, looking for lace worthy of it, but how can you possibly sew a silk & lace slip when the only lace available is scratchy, crappy polyester?*

So, in the end, I went with some 4″ wide stretch lace from this thrift store lace bundle, (this pattern is not recommended for stretch lace, nor for such narrow lace) and for the skirt, decided to sacrifice some of a beautifully-coloured (if not so beautiful-feeling) polyester crepe, snared at a thrift store back home last spring. It’s probably not any good for an actual slip, but, well, it looks nice and has the right drape.

Em. So, this is my first time sewing with lace (other than as a trim), and my first time sewing with crepe, and my first time sewing something cut on the bias.

I’ll start with the sewing bits. As I mentioned, my lace was a wee bit too narrow. Fortunately, Sherry on the sewalong linked to this post on piecing your lace if it’s just slightly too narrow. Which is what I did. It’s a bit trickier on stretch lace, which wants to, well, stretch out on you, but by backing everything with tissue-paper (my new favourite trick; just like what Steph does in this post) I got it to work quite well, especially on the White. Unfortunately, something went kfzzzt in the foot-pedal halfway through and I had to switch to my modern zig-zag machine, the Janome. Funny, the Janome has better stitches overall, but I really like how the White handles delicate (and stretchy) fabric with its adjustable presser-foot pressure and semi-drop-able feed dogs. As I understand it replacing foot pedals is dead easy, so I’m not panicking quite yet. For a thrift-store gamble that didn’t initially impress me, I’ve actually gotten quite attached to it, so I hope I can resurrect it without too much trouble.

ANYWAY, so I squeezed the bodice out, and while the join isn’t invisible, it’s subtle enough that I don’t even notice it any more (did you? it’s on the side-front bodice piece. 🙂 )

I had a hard time matching the notches on the skirt, although it’s hard to say if that has more to do with my sloppy cutting (I am better than I used to be, but that’s a relative improvement and I usually avoid slinky fabrics like the plague 😉 ) or with the weirdness of bias. The side-seams are a bit woobly, mostly where I narrowed the seams (at the top) and then tapered back to the original seam.

Fit photos.

I cut the size 8, which according to the sizing chart should’ve been a bit snug in the chest but spot-on in the hips; I figured my ill-advised stretch lace would probably make up for the difference. As it turns out, it’s snug/fine in the bust, and a bit too tight in the hips. If there is a next time, I will cut a 10. I made a small swayback adjustment (shaved of 1cm from the CB of the bodice, and 1 cm from the CB of the skirt, curving to nothing at the side-seams), but there’s still quite a bit of pooling/puddling above my bottom—which I think would be be fine if the skirt were wider. Look at that backwards-slanting side-seam.  And this is after I released the side-seams as much as I could…

Random Creek Shot, for interest.

The appropriate thing to do, of course, would be to unpick it all, and slice off and re-shape the top as I did for this dress last summer. (I’m not too fussy about the length.) I’m not sure if I have the oomph, though as the seams are already serged and topstitched. We’ll see where my mojo is at in a day or two, because I am really not liking the back view. I’m glad I took the modeled photos, though (even if they required photoshop de-niplifying) because it really brings home the back-tightness issue. And now I can see that the  front of the skirt is definitely hanging lower than the back, something that wasn’t obvious when it was hanging on my dressform. Yes, the dubious duct-tape double got some use, although again, her usefulness appears to have been limited. I think in this case because the direction she hangs naturally isn’t quite the direction I stand in. I think the width in the front is fine, it’s just the back which is too narrow.

Anyway, that was a lot more than I was expecting to write about something that’s not even finished yet (and really requires some re-working). At least the bodice (which I had sort of thought would be the worrisome bit) is pretty much perfect.

So, fix the damn skirt, Tanit, and then you can obsess over bows and other pretty finishing details…

And, just because she’s wearing jeans I made her, I’ll leave you with a picture of Tyo re-arranging rocks at the creek.

Rock work

*Disclaimer: there is, in fact, a very high-end bridal fabrics store in town, which I have not scoped out. I have no doubt they have all the lace and silks I could possibly want. However, they are a) located downtown, where I never go, and b) would no doubt break the bank, so would probably not be the best choice for a first trial of the pattern anyway.

40 Comments

Filed under Sewing

In which I obsess some more over Square Shoulders

JJ Blouse Shoulder

Emily of Calico Stretch expressed some curiosity about the square-shoulder alteration in this post. A quick google search turned up plenty of tutorials, but none that actually square the shoulder the way I do.

Which may very well mean that I’m doing it wrong, but I figured I’d throw it out there, anyway.

If you look at the photo above, the need for a square-shoulder alteration doesn’t really jump out at you. I certainly never noticed. But see how high the collar sits at the back of my neck? The fabric is firm enough that it just pushes the collar up, but as soon as I move around it starts bunching and folding back there. I don’t always need it, which is confusing, but when I do, it’s a big (if subtle) improvement.

I tend to square the shoulder by dropping the mid-line—shortening the centre. This is much easier to show than describe, so here’s a quick diagram. The dashed lines represent where I would slash and overlap a pattern, although frequently I just try to incorporate it while I’m tracing off a pattern.

Square Shoulder Adjustment

Most of the other methods I’ve run across have you raise the outer edge of the shoulder, rather than dropping the inner edge (eg. Debbie Cook’s excellent little diagram).

So how did I start doing it backwards?

Well, it all goes back to Sherry’s fascinating sway-back analysis. Because while I managed to ignore my square shoulders for years,  the annoying lower-back puddling of *every* piece of clothing I have ever owned had always irked me. Anyway, Sherry does an excellent job exploring the ramifications of the sway-back adjustment (not to mention other fit issues that can lead to “sway back” puddling, of which I have at least two), and ends up, in the case of patterns lacking a waist or centre-back seam, basically adjusting the shoulder to shorten the centre back.

My very firstest Lydia, showing the weird tuck it developed above my shoulder. Some of this was armscye issues, but a lot was the slope of the pattern's shoulder seam. Note how the oogliness extends behind the neck. This shirt was one of my few instant wadders*. I gave it to the kids, who promptly "refashioned" it into shreds small enough that I could trash them without too much guilt.

I started out trying this alteration on my knit sloper, and was startled to find that, while it did reduce the swayback puddling a bit, the single biggest effect was to remove the little bulge of extra fabric I always tend to get behind my neck. I had always thought that the solution to this would be to drop the rear neckline (which is what this alteration does), but I had never related that to squaring the shoulders.

I think part of the reason this method works so well for me is I have a short upper body to begin with.  The last thing I want to do is increase the distance between armpit and waist, which is what the other method—raising the armscye on the side—would do. Obviously you could then compensate by shortening, but that would be two operations rather than just one. (Frankly, I usually shorten on top of the square shoulder, so I’m not actually saving myself time).

Of course, now that I’ve re-read Emily’s actual question, she was asking more about the armscye differences.

Knit sloper (black); Renfrew (red dashed line)

So here’s another diagram, showing (some of) the differences between the two patterns; I ignored the differences in armscye height and waist position/shaping. You can see that, for the same shape of sleeve-cap (which was almost identical between the two patterns), the Renfrew (red dashes) requires less height but more width towards the lower part of the sleeve cap. It would also produce a sleeve that angles down a bit more.

Please note that I am not criticizing Renfrew here—I have no idea which is “better”, if either. I’m just mentioning differences, which may or may not affect things like fit, range of movement, and wrinkling. For example, the downward-sloping sleeve has a somewhat more restricted range of motion than a more outward-pointing sleeve (not a big deal in a knit), but tends to have fewer wrinkles under the arm when the arm is lowered. I’m not even sure how or why the armscye curve on my knit sloper wound up being so shallow.

I’d love to hear anyone else’s thoughts about shoulder alterations and sleeve cap/armscye shaping. I’m no kind of expert—just noting my observations. 🙂

*It often takes me a while—weeks to months—to figure out if an article of clothing is a success or not. Many things I am initially thrilled with end up not being worn, or being worn but not liked, due to some minor quirk of sewing, fit, or styling that I just don’t appreciate right off the bat. I had no such issue with this one: it was awful from the get-go. It (and the four other versions it took me to get the pattern wearable) are the reason I went so hog-wild doing knit pattern comparisons.

33 Comments

Filed under Sewing

Renfrew vs. Knit Sloper—Round 1

Some of you will remember my battles with Lydia, the $1 download from Burdastyle for a very basic knit pullover. The end of this process was my knit sloper, which, frankly, bears little resemblance to the original pattern.

Although for reference, the basic changes were:

  • going down two sizes to remove ease (Lydia, like Renfrew, was intended to be an easy pullover, which wasn’t actually the look I was going for)
  • petite-alterations to the armscye, sleeve-cap, and above the waist
  • square-shoulder adjustment
  • removing ease from the sleeve-cap
  • my ubiquitous lengthening of the sleeve

Once I had the knit sloper worked out, I traced it out on bristol-board so it’s a) durable and b) easy to trace and then hack.

Now, there is one MAJOR confounding factor for comparing it to other patterns, however. Which is that the sloper has no seam-allowances, while Renfrew and Lydia both have 1.5cm (which is way too much for knits, in my opinion—.6 cm is fine, although for slippery annoying knits I think I do prefer 1cm). So in the following pictures, you need to mentally add 1.5 cm to most of the borders.

So, first up—because this is what most of you may be interested in—Renfrew vs. Lydia. (And please do click through to see the full-size photos, because the details are not so obvious at blog-size. Although the full-size photos are fuzzy as crap, because I am still lacking the charger to my good camera. Sorry.)

Renfrew vs. Lydia

Now, *this* is complicated because I don’t have a pristine print-out of Lydia anymore, and I wasn’t in the mood to produce one just for the purposes of pattern comparison. On the other hand, both these patterns have the same seam allowance. Unfortunately, the bodice pieces are opposite sides, so it’s difficult to superimpose them, especially since this particular copy of Lydia is the one I hacked to make my mother’s (unblogged 😦 ) Christmas present. So pay attention to the lines of the smaller sizes on the Lydia pattern, not the cut outline.

As you can (hopefully) see, Lydia actually has more shaping going on than Renfrew. It’s also a somewhat shorter pattern (remember Renfrew has the band at the bottom to lengthen it). The waist is slightly longer in Lydia, and, most surprisingly, the hips are a little more generous (this is suprising because Sewaholic patterns are supposed to be drafted for pear-shaped women, so I was expecting Renfrew to have more width below the waist).

I should add that the shoulder height and angle in the Lydia you can see has been altered to match my sloper, since my mom and I share a short upper body and square shoulders—the original Lydia was rather longer through the armscye and had a much more sloping shoulder. So Lydia originally would’ve had a shoulder-slope similar to Renfrew, but a rather lower armscye, and a longer, somewhat more shaped, waist. I think the amount of ease each pattern was designed for would’ve been similar.

Sloper vs. Renfrew

Enter my knit sloper. This is when things get a bit wacky.

Like Lydia, you can see that my sloper has more shaping than Renfrew. The waist is slightly higher in my sloper, but not as much as I had thought it might be (I tried to align the bottom of the armscye, remembering that my sloper doesn’t have seam allowances. The armscye in my sloper is shorter, but again, not as much as I had thought it might be. The shoulder slope is hugely different, however. There’s a slight difference in ease (remembering that my Sewaholic size, 6 or 8, is the 4th or 5th line over, while the sloper needs 1.5 cm added to the edge, to be comparable.) I’d say at the bust, the difference in ease is about 4 cm around the whole bust, rather more at the waist and almost no difference at the bottom. There are also some differences in the shoulder-point position and armscye curve, but seeing as 1) my sloper has very narrow shoulders, and 2) I’m really not sure what to make of them, I’ll get back to you about it once it’s made up.

And, for your edification, here’s how the sleeves compare:

Renfrew sleeve vs. Knit Sloper

So I should really have set the knit sloper a little further down, to allow for seam-allowances. Sorry. Anyway. Sleeve cap height is actually fairly similar, however. Renfrew’s sleeves don’t seem to have much (if any) front/back shaping, and there’s no notching to indicate it, anyway. I know lots of knit patterns don’t, it’s not necessary, but I do think you get a slightly better fit when there is some. (You can see I have a little bit of shaping on my sloper—the front is to the left—although for the life of me I can’t remember if that’s original to the Lydia or if I added it as I was messing around.)

The original Lydia length is about where the knit sloper starts flaring out, so that length is very close (remembering that the sloper should be down another 1.5 cm, but on the other hand the Renfrew has the cuff on the end. So Renfrew sleeve is probably functionally longer, for your size, than the Lydia. I think the taper of my sloper is pretty true to the original Lydia sleeve as well, so the Renfrew sleeve also appears to be a little more straight overall. It also doesn’t appear to be drafted with sleeve cap ease, which is great in a knit.

So what does this all mean?

Sloper vs. altered Renfrew

At the end of things, I still wanted to be making Renfrew, not just another version of my knit sloper (but with sleeve-bands). So I opted to keep as much of the Renfrew shape as I could. For size, considering I like a little less ease in my knits (and I *REALLY* liked Seraphinalina’s Renfrews, where she went down a size), I went with the 6.

I “petited” the armscye sightly, by the simple expedient of using the size 4 rather than the size 6 height, and squared the shoulder by going over to the size 2 at the side of the neck. I also shortened above the waist, but by considerably less than the 2″ I removed from the Lonsdale—only about 2 cm, this time. And, because I wanted to keep the same overall length, I actually just “slid” the waist shaping up.

Since I’m making the 3/4 sleeves this time, I didn’t make any length alterations on them—I just adjusted the sleeve-cap height to the size 4 rather than the size 6. And it’s all cut out and ready to go, except that now I want to take a whack at adding Lisa’s hood. Which may not work (and I have enough fabric to make one go at it but not several), but requires a bit more thinking about matching the neckline that I haven’t quite gotten to. Maybe on the weekend…

25 Comments

Filed under Sewing

Red Leaf Clover (Round two)

Clover---round two

Grum.

So. Still not the best photography, but at least it’s not the iPhone. I lightened the crap out of things to make the wrinkles etc. show better.

So, at this point I have lowered the rise in the front 5cm, tapering to 2.5 at the hip and zilch at the centre back. And this time (yay!) the zipper held out long enough to take some actual photos.

So at this point I’m seeing two major problems, aside from generalized looseness:

1) wrinkles at side-seam along hip. Several of you in the last post (thanks so much, everyone!) attributed this to excess hip curve, and you’re probably right. On the left side the zipper has forced this extra length into a single large fold at the bottom of the zipper, on the right side it’s more distributed.

2) bagginess at front crotch. I obviously need to research this. These aren’t strain wrinkles—it’s more like there’s just too much fabric here.

Minor problems include

3) dip at CB still there. If I lower the sides more, this may help, but really a bit of extra height in the back will be a must for next time.

4) wrinkles and looseness along legs. There’s some width that can be taken out here, I think.

Next up, I did what I should’ve done before I ever cut, and dug out my pattern for the Burdastyle Ellen Pants. This is the one that created the Businesswoman Pants, and while the fit isn’t totally perfect, it’s hella better than this pair, at least so far. The only reason I didn’t before, aside from laziness, was that the Ellen isn’t drafted for stretch fabric, so I wasn’t sure how precisely comparable they would be.

Crotch Curve Comparison:

Ellen vs. Clover

So this was the REALLY interesting part. I overlaid the two patterns. The solid paper is the Ellen pants (cut to a size 34 rather than my usual 36 as they run large). The tissue is my tracing of the Clover (size 2 grading to size 4 at the waist).

The biggest single difference is the rise in the front. It’s more than an inch higher at the centre front, and substantial. The rear rise is almost identical—a smidge lower at CB, a cm higher at the sideseam. There’s a slightly greater curve to the hip in the clover. The back piece is slightly wider in the Clover, but then the front piece is slightly narrower, so I think the overall width is very similar (and Ellen is non-stretch!). The spookiest thing is that the diference in rise doesn’t even out at the side seam—the rear side-seam is higher, when the crotch curves are lined up, than the side on the front, which means that there’s some odd shifting of how the halves are going to fit together. That’s boggling my brain, I tell you.

The crotch curves are almost identical, up to and including the much longer rear than front curve. This is the bit that really threw me for a loop, because I was expecting there to be a significant difference, not just a few mm at the back of the rear crotch curve. Now maybe having the front fly on the Ellen masks certain things, or maybe it’s just that they’re in non-stretch fabrics, but I never saw anything in any of my Ellens like the folds I have in the Clover.

There are a few other differences—the Clover legs are much narrwer, especially as you go down, than the straight-legged Ellens. But on the whole—scary close.

So I think I’m going to cry Uncle, seam rip the entire kaboodle, and recut following the Ellen pattern at the top. And then maybe consider taking in the side-seams until the stretch factor is properly accounted for.

And this, Ladies and Gentlemen, is why I’ve stuck with the same two pants patterns this whole time…

31 Comments

Filed under Sewing