A long-awaited shirt (Also, GRASS! NO SNOW!!!!)
A long time ago, I made Tyo a shirt. And she loved it very much, but since I had made it in a pattern a couple of sizes too small, it was outgrown pretty much instantly. A replacement was mandated, but despite my best intentions, I allowed myself to be distracted with frilly dresses and fleece pants and other frivolities for, well, nearly two years at this point. I think it was Gertie’s pattern that put Tyo over the edge, though. Anyway, she marched down to the savage pit of despair that is my basement “sewing area,” dug through the chaotic array of teetering, half-unpacked boxes*, and emerged, victorious, with this fabric, which she had picked out, long ago, for a replacement shirt.

Burda 04/13, pattern #120
The next question was, of course, the pattern. What she REALLY wanted was an enlarged version of the original pattern. It being a Lekala, this is theoretically not that hard, but I wasn’t quite prepared mentally to figure it out. She’s also been wanting a tie-front shirt, too, which seemed like a more seasonal option, anyway. So I decided I’d use this tie-front pattern from the April Burda, which I picked up a few weeks back, thinking particularly of this pattern for Tyo. Of course, while Tyo (who is nearly thirteen) is now overlapping into the lower end of women’s sizes (when did THAT happen?), this particular pattern only goes down to a 36, and really she needs a 34. And even then, about five cm less of body length. Fortunately, in the foggy recesses of my brain I remembered something about the Selfish Seamstress’s long-ago tutorial on grading down nested sizes. Actually, this wasn’t nearly as difficult as I had thought it would be. I suspect taking the time to highlight my closest line on the pattern sheet helped. Then I added seam allowances, which was basically adding back the width I had just removed, by the way. OK, I know there’s more to it, but just sayin’. For my final trick (such a good mother I am), I removed the five cm in extra length, half from the armscye area and half from the torso above the waist. I even walked my seamlines afterwards to check that they were good. I NEVER do that.
Then, I spent a slightly ridiculous amount of time pinning the major match-points on this wiggly, gauzy plaid. Seriously, I think cutting separate layers would have taken less time. It would’ve been worth it, though… except that I then proceeded to cut out both front and back with absolutely no regard for matching the sideseams. So all was basically for naught. DURRRRRR. This is why we don’t sew (cut out) late at night. *headdesk*

Sleeve
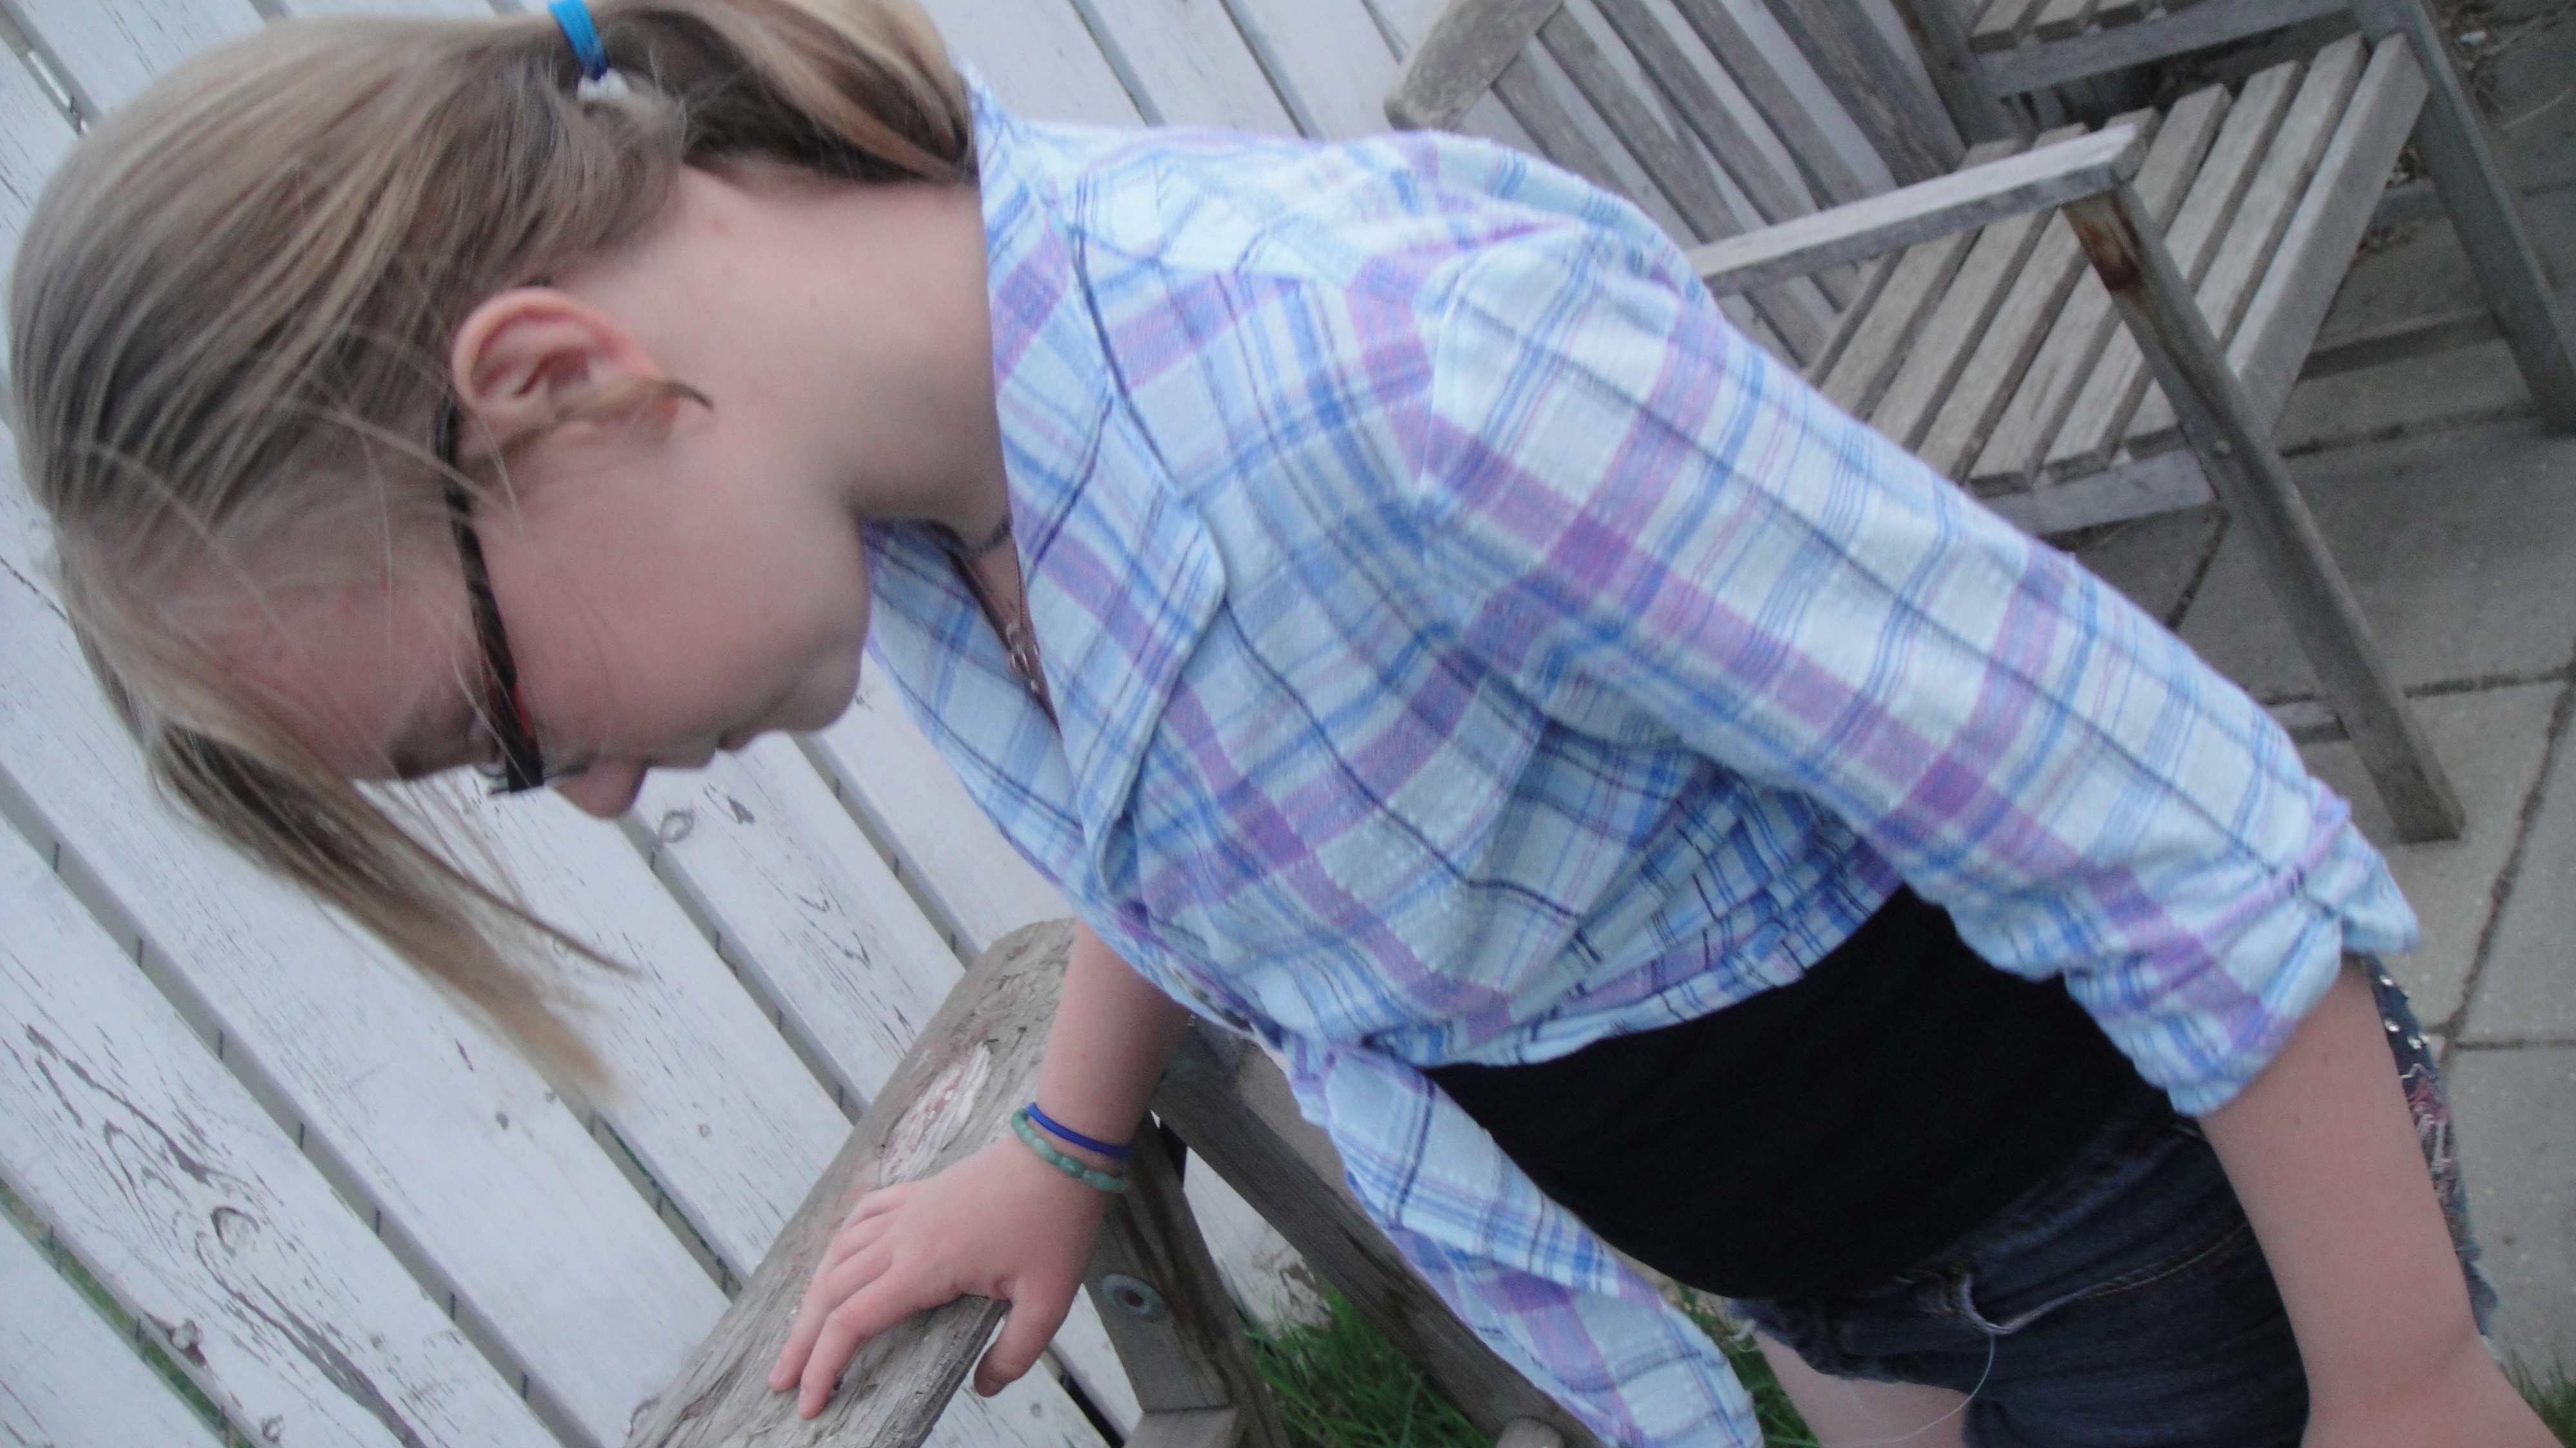
I opted to at least try to match the sleeve in the front armscye. /sigh.

Closeup, with funny look. Funny looks are mandatory, it appears, these days.
I actually think this is a ridiculously cute little shirt. I love the simple collar (even if I couldn’t make heads or tails of Burda’s instructions for sewing it, and consequently winged it and made a bit of a hash.) I love the one button above the tie, and the gathered elastic on the sleeves (even though Tyo has warned me she will probably just roll them up.) The fit is pretty decent. The shoulders are a wee bit wide (and I did measure her shoulder width!) but perhaps that’s how it’s meant to be. I can’t quite tell if the waist length ended up right since the tie kinda scrunches everything up, but I guess that means it doesn’t matter, anyway. Despite being spongy and shifty, this is a really lovely fabric to work with. Also, yes, I was too impatient to wait until I had a real button on, so she has it pinned with her Mockingjay pin.

She’s a cool kid.
The one thing that could’ve been a bit disastrous was the long, diagonal front edge of the ties, which is a hot ripply mess just waiting to happen. Fortunately for me, this fabric was fairly amenable to being steamed back into shape, and fortunately for anyone else who tries this pattern, once they’re tied I think it doesn’t matter too much. I mentioned I made a hash of the collar (well, mostly the finish on the inside.) I also managed to snip through the outer fabric when finishing this seam, so there’s an interesting little “detail patch” in one shoulder that I forgot to photograph for you. It’s totally cute and intentional-looking. Right? Right. We’ll go with that. In an attempt to neaten up my nasty collar-innards, I stitched a white flat-fold bias tape along the shoulder/back neck seam, which worked out reasonably well, and makes for some nice stabilization in that area for this spongy fabric. My seam-finishes are nothing to write home about, serged with a bit of topstitching… except that they are, because I haven’t been able to serge anything this lightweight in aeons without wanting to tear my hair out. I came up with a stop-gap solution for my serger’s overly aggressive needle thread tension—I wrapped some sturdy buttonhole thread in between the tension discs and cut it off short. The extra thread holds the discs open just enough that they have something resembling a normal tension for the actual serger thread. Hooray! Yes, I know this is not an Approved Solution (TM), and it will probably explode without warning into a Tangle of Overlock DOOOOOOM without warning. But it’s working and I really don’t have the money to get my serger serviced AGAIN (especially since the last servicing totally failed to correct this problem and may actually have exacerbated it.)

One final face
And I think that’s all I have to say, except that this is actually only the second Burda magazine pattern I’ve sewn, ever. And I’d be totally tempted to make myself one, except that there’s no way it would look as good on me as it does on her. I would like to figure out that collar, though.
Oh, and she wants another—in red. That’s my girl. 🙂
*I have a high tolerance for functioning around mess. This is particularly unfortunate for my neat-freak husband.

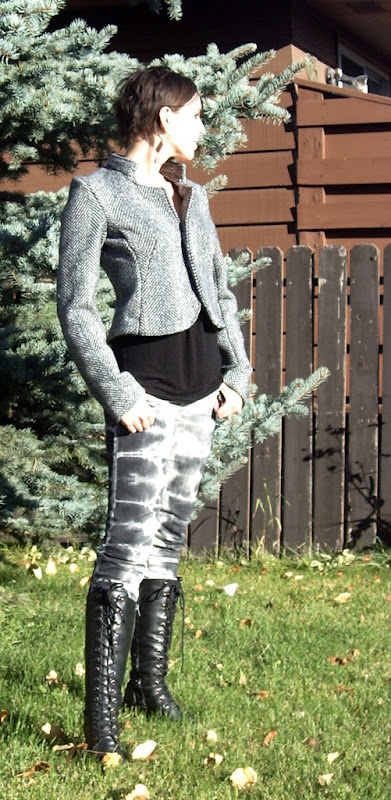
 If you read any of my posts from January, you probably noticed me whining about this jacket in the background. Well, it’s done! And you can read the full whinge over on The Sewcialists website, as part of their February “Sew Menswear for Everyone” theme month!
 Hey, a girl can dream. I can also wear it swanning around the house (as I did the day I wrote this). I’m getting to like this crop-top-with-high-waist thing. (It only took me what, three years, to wrap my head around it? Bear with me, I’m well past the prime age for adopting new styles.)
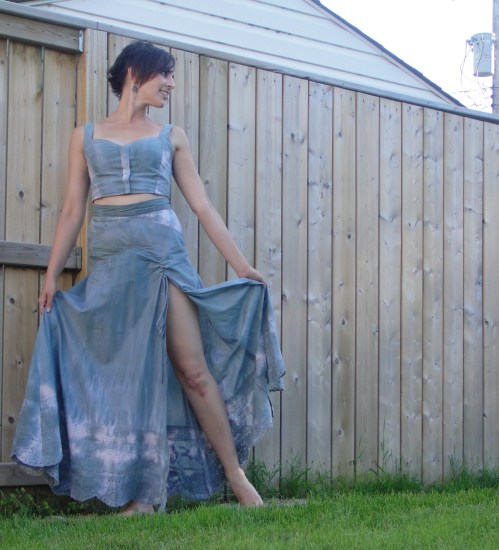 The way I cut the skirt with the embroidered border meant that there was an abundance of small-ish, weird shaped scraps that I was fairly confident could be turned into some kind of bustier or bodice. And after a bit of waffling, I settled on
  I had hoped to cut the centre front panels from the last “large” scrap of the embroidery, but alas it was too small—I had to settle for just making that the lower portion of the side fronts.
 This left the front rather boring, so I ended up hand-stitching a little embroidered bit in place over the closure.
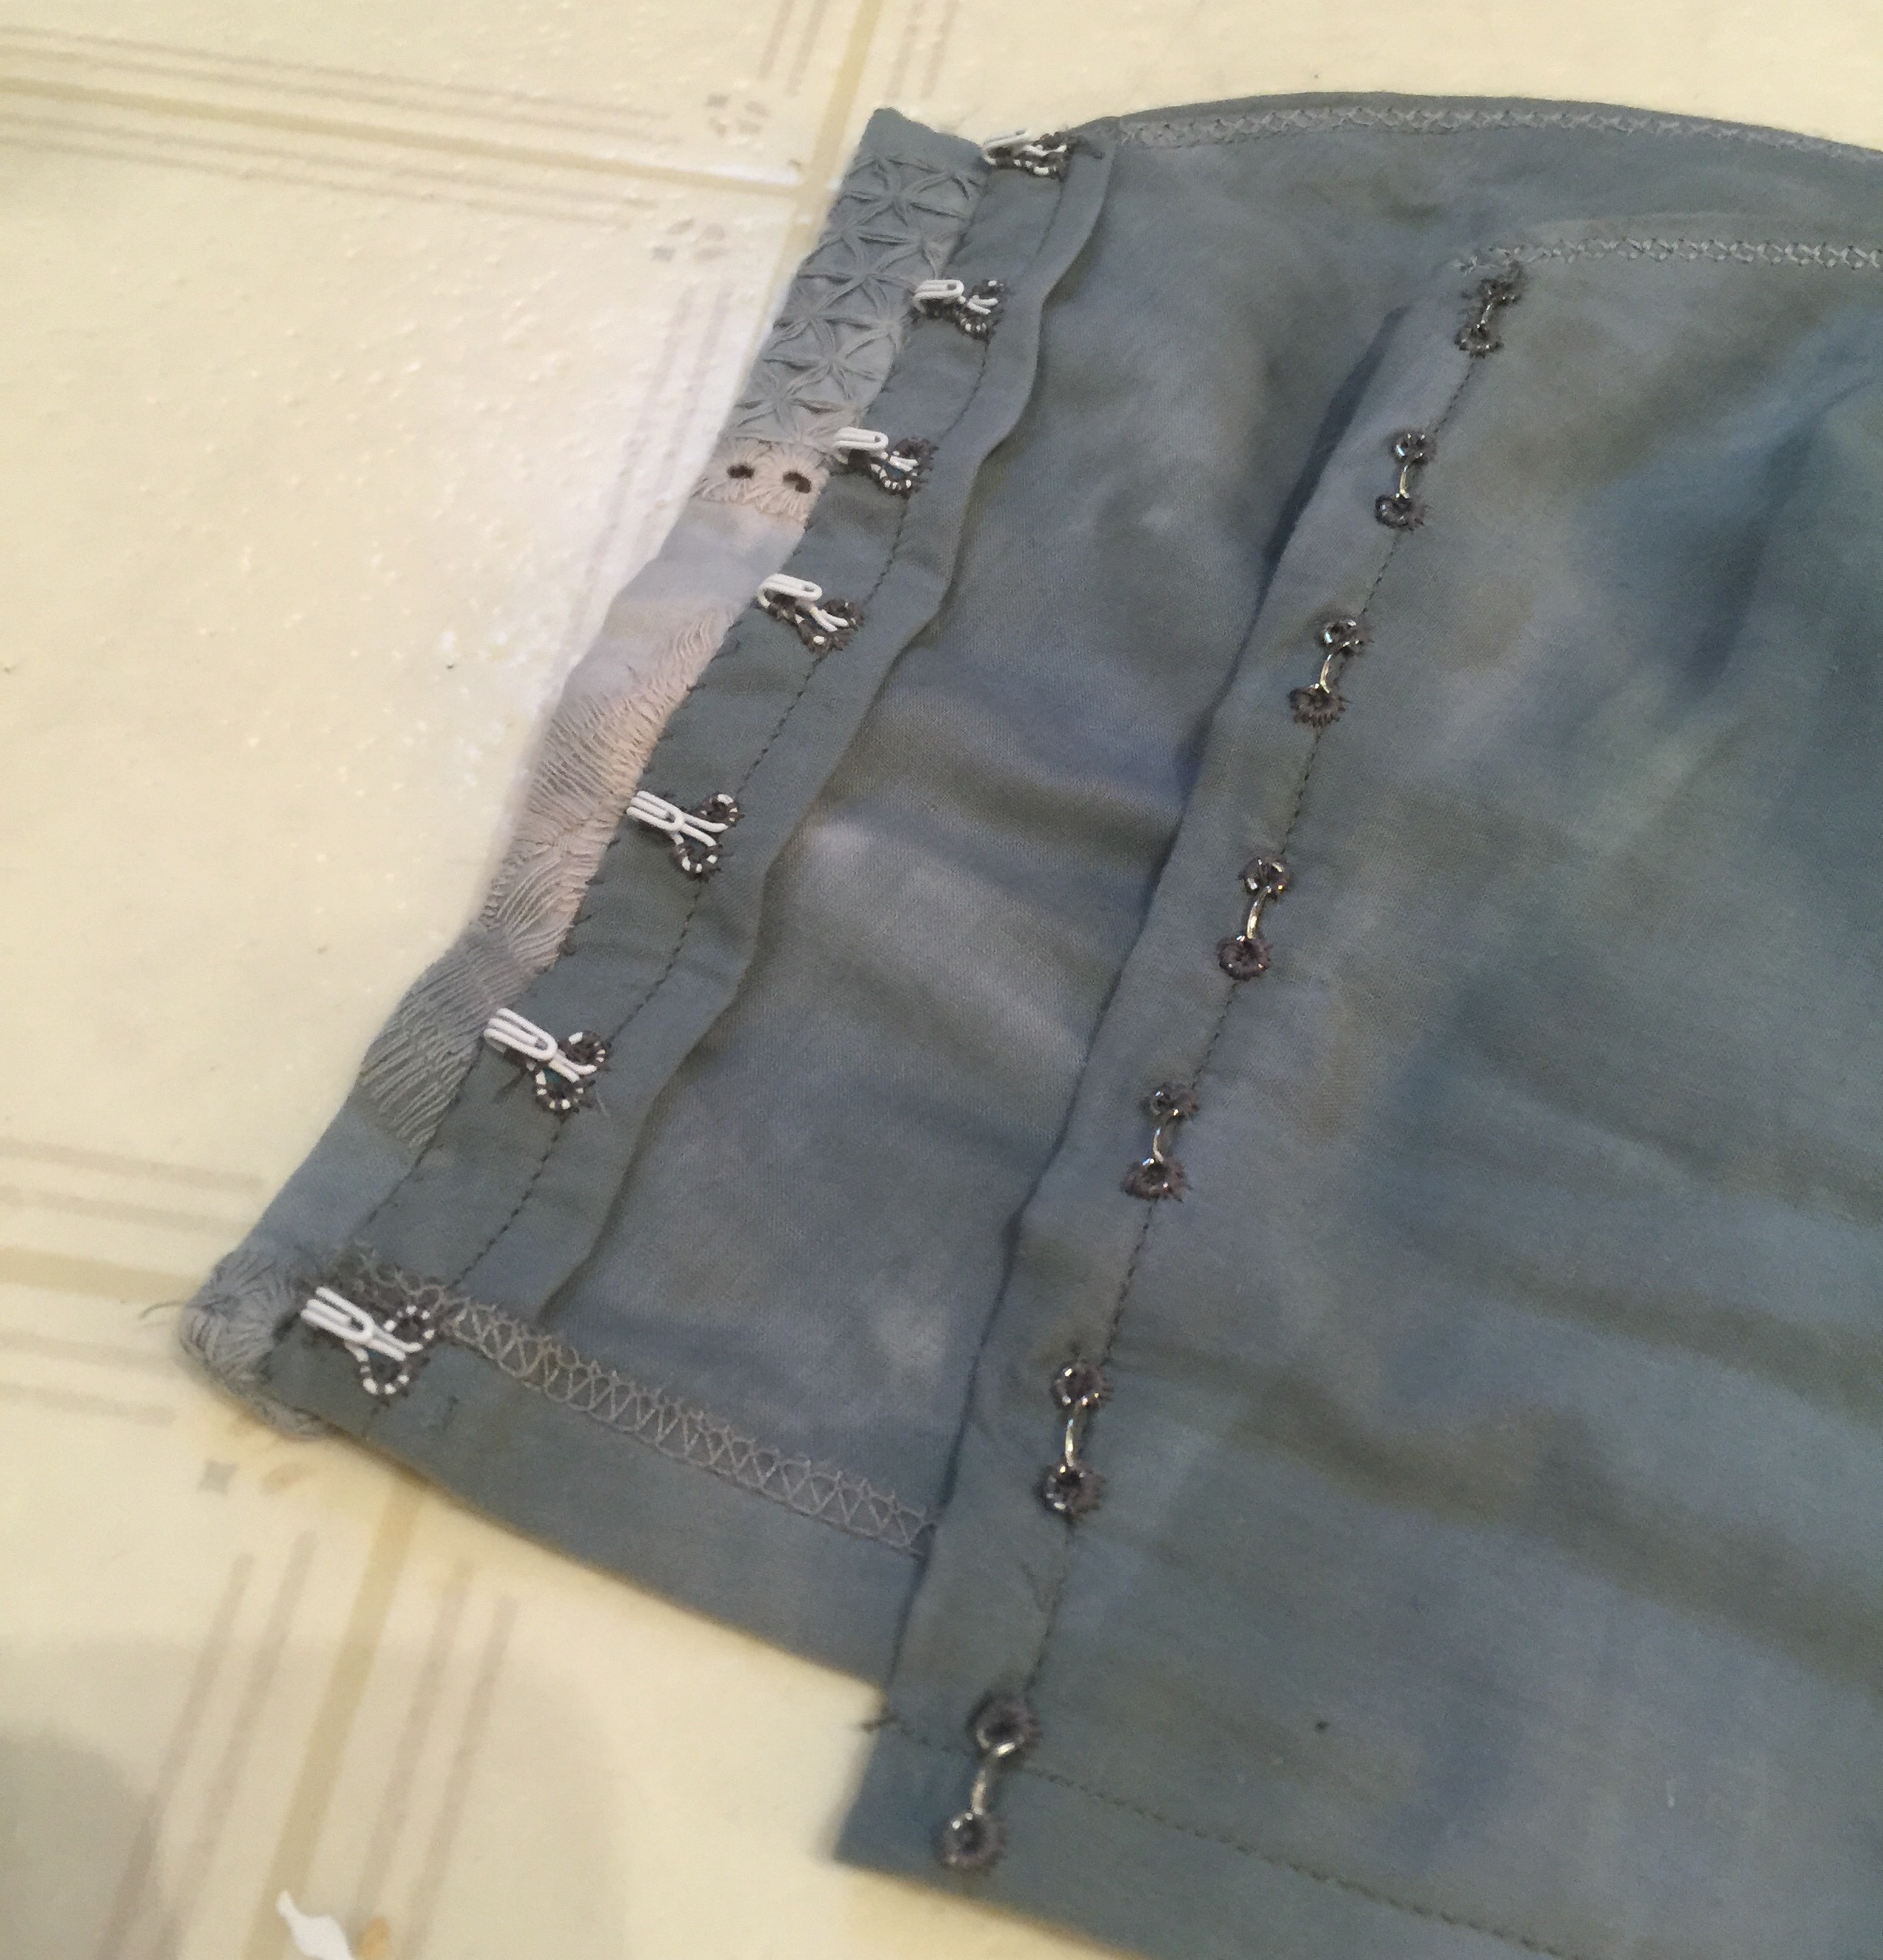
 I had a lot of fun with the construction; everything is clean-finished inside and out except the bottom hem. I wish I could describe all the inside-folding-burrito shapes I got this thing into, but words fail me.
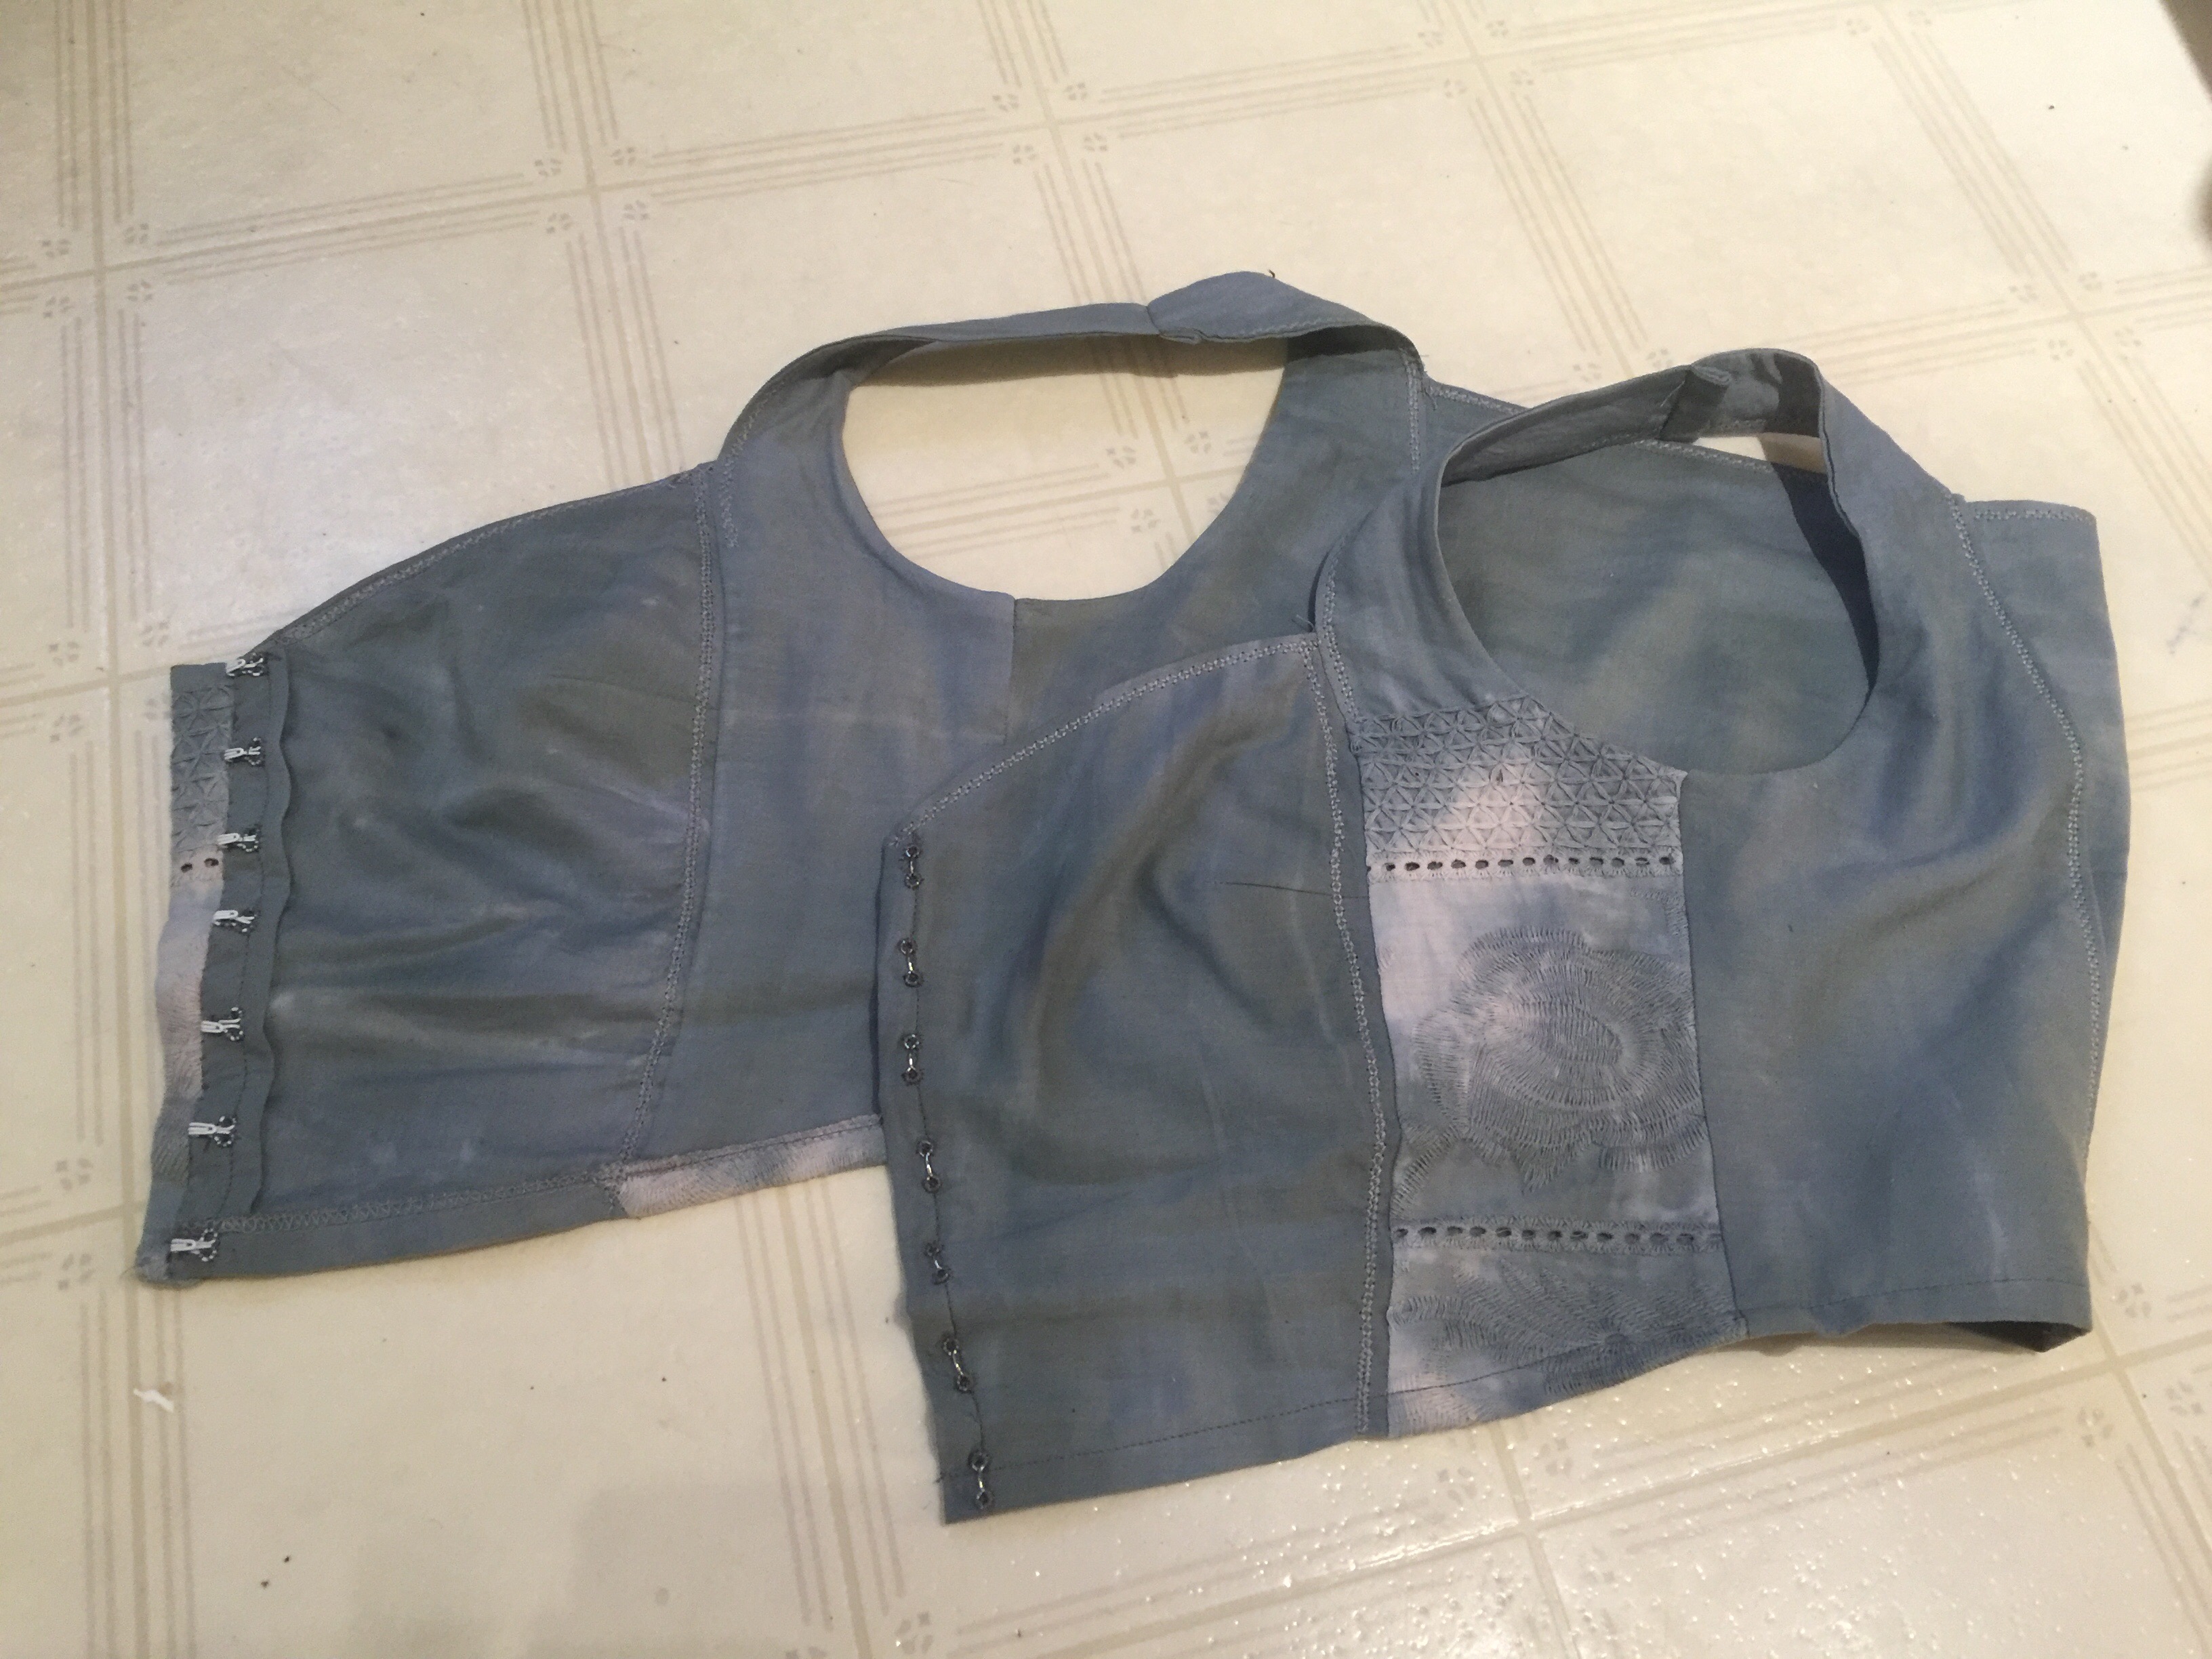
 I initially skipped my usual petite alterations (not sure why), but then I wound up taking in the shoulders and cutting off a good 1/2″ from the bottom (more like 1″ at the back), so I probably wound up in much the same place. Ah, well.
 Once it was all done, it still remained a little boring, so I added more machine cross-stitch.
 The whole outfit feels wild and wood-witchy and mysterious to me, which I am enjoying immensely. (And if you don’t think so, well, feel free to keep it to yourself. I’m having fun here 😉 ) Now if only I could be taking photos in an ancient oak grove, maybe with a few standing stones kicking around for ambiance…