Tag Archives: a coat for Tyo

The Russian Princess Coat

The Russian Princess Coat

Girl in a red coat

Full Disclosure Edition

Seems to me like a Russian Princess coat, anyway. Or Madeline, as celkalee said.

Walking

The coat was finished, and not a moment too soon (actually a little late), as winter arrived on Monday with about six inches of snow (and another six on Tuesday, and again Wednesday and Thursday. Friday and today have been snow-light; more is forecast for tomorrow). Also, of course, providing the perfect backdrop for this coat. Snow and spruce trees for the win.

Even after four coats, I still haven’t really got that “facing/hem” thing figured out. I know there’s a way to make it happen really neatly (I’ve read two or three different sets of instructions on it, even), but somehow my pieces never quite line up and I end up fudging and hand-stitching to make it work. Ah, well. If some future couturier in distant decades dissects this coat, they’ll find plenty of other construction quirks to puzzle over (like, oh, how I padstitched the collar after sewing it… yeah, yeah.

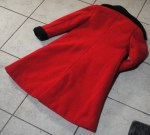
Vent being pulled wonky by ining

The only bit I’m really not happy with (other than the sleeves still being uncomfortably tight) is the rear vent. I used the Cupcake Goddess’s instructions and while the basic principal is sound, I can’t figure out how to do it without creating and offset in the lining so you have a seam allowance (or making the cut-out side shorter). This, added to the difference in the length of the lining vs. the length of the back, meant that my vent-extensions lined up really poorly, and while they lie flat when worn, the lining is a bit short and makes the coat hike up if anything goes off of plum. Also the whole thing requires a degree of precision I find difficult to achieve at the best of times, much less when wrestling five pounds of wool coat around my sewing machine.
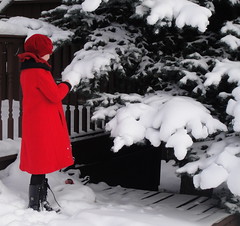
The rear view

All in all the pattern went together fairly well. My only serious objection with it is the narroweness of the sleeves. I added 2cm in sleeve width after the second muslin, but they are still really snug—it makes an attractively slim line, but not a comfortable coat, and it’s pretty impossible for Tyo to put a sweater under it at the moment. Thanks everyone for their suggestions on this problem, by the way… I’ll probably be tackling it in the next week or so. Or, y’know, tomorrow if I’m a good mom.

Next up: jeans and a stab at Lekala patterns!

Click to go to slideshow!

25 Comments

Filed under Sewing

Frustration…

A finished coat... missing only one ten-year-old girl

… is a finished garment and no good photos to show it off. Nature has graced us with the perfect backdrop for the coat (six or eight inches of snow in the last two days), but by the time the buttons were on this evening the light was gone, so pictures will have to wait until tomorrow at the earliest. However, since I’m dying to show off just a little bit, here’s some flat shots and details, not that most of my details are worth ogling ;).

I’ll do a full write up with the last of my construction woes when I get some decent pictures… by which time I’m sure you’ll be as sick of this thing as I am (if you aren’t already 😉 )

And now the big question: will she actually be able to wear it “for everyday” or will this become the dreaded fancy coat? It’s supposed to be -21C here tomorrow (about five below zero F… somehow that sounds warmer 😉 ), which will be a big test for my winter coat, as well.

16 Comments

Filed under Sewing

A sneaky peak

at the progress from the weekend.

Coat, left; lining, right

The sleeves are attached (and still dangerously narrow 😦 ); the lining and facing is sewn (this is the first time I’ve done a lining with a facing at the back of the neck. It was not particularly difficult. I drafted fold-over cuffs for the end of the sleeve… we’ll see how those go on; I used the same idea as the ones for Syo’s coat.

I did some thing to the roll of the collar that I will describe as pad-stitching’s bastard cousin, which did succeed in giving it some shape (at least so far), and only shows a little.

Tyo picked out some silver metal buttons. They’re lovely, although silver buttons really wasn’t what I was envisioning for this coat. She likes them, though.

Label!

But most importantly, I remembered to sew the label to the neck facing already, so I don’t have to hand-stitch it on at the end! 🙂

10 Comments

Filed under Sewing

It seemed like a good idea at the time, or, an assortment of idiosyncratic construction decisions


Catchstitched interlining

I guess I really am a sucker for hand-sewing. If only because I catch much less flack from the family if I’m hand-sewing in the living-room with the rest of them all evening, instead of lurking in the kitchen with my sewing machine.


Warning: what follows is not a description of how one SHOULD make a coat. I am not particularly convinced that all (any) of the construction details I am about to report actually improve the resulting coat in any way, and several of them may have serious unforeseen drawbacks. I accept this. 😉

Friday I got the rest of the coat—lining and interlining—cut out. Hooray! I could not find any more of my space suit interlining at the fabric store, so I had to settle for some (much cheaper) non-foil-backed stuff. I had just enough left from making my coat to cut the two back pieces from the foil-backed stuff, which I figure should be fine since the fronts are double-breasted anyway.

I trimmed the seam-allowances from the interlining. Then, for reasons I am no longer totally clear on, I decided

Underlining

that rather than floating free between shell and lining, it should be sandwiched between shell and interlining. I promptly proceeded to catchstitch the back pieces in place, so they wouldn’t shift despite not being caught in the seams.

Then I said “bugger that,” and skipped the catch-stitching step for the front and side-front pieces. My occasional inability to keep the interlining out of the seams should hold them in place, not like they have anywhere to go.

This fabric is a dream to sew with. It’s squishy, easy to ease, and you can catch stitches on the underside beautifully without worry of them showing on the right side of the fabric. Mmm. I also love my flannel underlining.

1cm seam-allowances may be awesome on jeans, but they’re tricky on a coat. Allowing for turn of cloth, once you go to press the seam open, there’s very little allowance at all. I proceeded to stitch all the seam-allowances open after pressing (hence the marathon of hand-stitching and why my fingers are still sore.)

BUT, LOOK!!!

Tyo refused to brush her hair for the photos, hence her headless state. Also she was making faces.

OMG, is that a coat?

She has POCKETS!

Well, almost.

Yay, smooth back!

For interest’s sake, I re-took Tyo’s measurements (rather than relying on my last set from oh, back in the summer) and compared them to the m-sewing sizing charts. The results may highlight some of the fitting issues we had.

Hips: 81 cm. Her hips are a size 12.

Waist: 58. Her waist is a size 8.

Bust: 63 cm. Her chest is, ah, a size 6.

The coat I made is about a size 11, for measurements bust: 73cm, waist: 63cm, hip: 79cm.  I still think the coat is cut a bit snug for my liking (I added significantly more than 2cm to the ease in the hips), but the disproportion between shoulders and hips is all Tyo.  If Sewaholic Patterns ever puts out a children’s line, Tyo can be their first customer.

Next: assemble sleeves, sew lining, decide whether to add another layer of interlining (this time where the interlining *actually* belongs) as the non-foil stuff is kinda thin, and try to avoid doing any more hand-stitching until at least tonight.

PS. This post would’ve been up Saturday morning, but my camera cable evaporated sometime Friday evening. Despite a thorough house-clean Saturday (my Dad was in town and came to dinner), it has not resurfaced. However, fortunately for me, the card reader decided to read the camera memory stick today—Sony uses an odd format and 90% of the time the computer doesn’t recognize it… but once in a while it does. So, you get a post! Yay for random computer cooperation!


7 Comments

Filed under Sewing

Poppies

Red and black, two of my favourite colours. Speaking of which, the buttonholes have been bound.

Buttonholes on the coat. Poking the "organza" squares through.

Then, I tack them down (after judicious ironing) in the back.

Buttonhole frames tacked open

Gertie suggests using silk organza that matches your fashion fabric. I have no organza (as far as I know), and I’ve never sewed with silk in my life. I also didn’t have anything light and crisp in red. So I used this off-white (chiffon? I really suck at the names for these floaty fabrics, as I tend to avoid them like the plague. But I salvaged a crapload of this stuff after a wedding last summer. It’s gone to make the sheer JJ, and the rest will someday become a tiered petticoat.) I suspect silk organza would be a lot stronger, and maybe a more firm weave?

Don't they look nice from the front?

You can see a tiny bit of the chiffon from the front. I made extra sure when sewing on the strips that none of this showed through.

The basted strips in position

As you can see, my strips are kinda massive. (They’re also interfaced, and I added an extra layer of white interfacing to the inside of the front mostly so I could see my markings better.) I am debating whether to trim them down or leave them that way—if anyone has strong opinions I’d love to hear them.

And stitched in place by hand.

Don’t they look lovely? I will leave them basted for now (at least until we go buy buttons). Now all I have to do is get the facings to line up. Oh, and did you notice my lovely iron-mark on the front of the fabric? *headdesk* Mostly I remember not to do this. Mostly.

Anyway, back to the poppies. Are we all marking Remembrance Day today? I am lucky enough not to have any family members involved with wars of any kinds (even my grandfathers sat out WWII). I’m also not organized enough to get to any of the various ceremonies they have around. So consider this my little moment of silence.


In Flanders Fields

By: Lieutenant Colonel John McCrae, MD (1872-1918), Canadian Army

In Flanders Fields the poppies blow
Between the crosses row on row,
That mark our place; and in the sky
The larks, still bravely singing, fly
Scarce heard amid the guns below.
We are the Dead. Short days ago
We lived, felt dawn, saw sunset glow,
Loved and were loved, and now we lie,
In Flanders fields.
Take up our quarrel with the foe:
To you from failing hands we throw
The torch; be yours to hold it high.
If ye break faith with us who die
We shall not sleep, though poppies grow
In Flanders fields.

Lest we forget.

14 Comments

Filed under Sewing

How many ways to bind a buttonhole?

Tyo’s coat is going to have bound buttonholes. There’s only four, surely I can manage that, right? I know the Lady Grey was supposed to be my gentle entry into the world of bound buttonholes, but, frankly, Tyo needs a winter coat more than I need a gorgeous-but-semi-practical-between-seasons jacket right now.

The plan was to make the lips of the buttonholes out of the lining fabric (a sturdy flannel-backed satin) rather than out of the bulky, soft, and flexible fashion fabric. This plan lasted until I actually did some trials, of which I’ll be speaking of shortly. But first… there remains the issue of METHOD.

There is a plethora of bound-buttonhole tutorials out there; I will list only a few

  • Gertie’s
  • Sherry’s
  • Two on Burdastyle, this one which is most like the one in my Reader’s Digest Complete Guide to Sewing, and this one, which is more like (but not exactly like) Sherry’s.
  • Patty the Snug Bug recently reviewed Gertie’s technique and another one from her own sewing books, which is basically the same idea I used for my single welt pockets, but with a welt on each side.
  • No doubt there’s any number of other ones—that’s just what I remember seeing off the top of my head. If you have a favourite (or one of your own), please chime in! 🙂

A lot of VERY bad bound buttonholes

So, this afternoon, I sat down and experimented.

Now, as we all know, bound buttonholes, like welt pockets, are all about precision. Precision is one of those things I, ah, struggle with in sewing. I’m getting better, mind you—my cut pieces of fabric now almost always resemble the pattern they were cut with, I’m much better about getting my grain right, and I press as I sew quite religiously (which gets me a lot of exercise since I sew in the kitchen and press in the basement).

So you will not be entirely surprised to see that exhibit A, to the left, is, well, less than impressive. In part, the satin just wasn’t really working for me—it highlights the flaws, as it were, a little too crisply. (The satin for the final ones would have been the same fabric in black, but I have a ton of scraps left over from my winter coat lining, so I was using some of those. I did manage to achieve passable results with Sherry’s method, but still not to the point where I would be willing to put it in a finished garment (top centre in red wool, bottom left in silver satin). The slippery, fray-y nature of the satin didn’t help, either. Similarly with Gertie’s method. None of the others are even worth talking about (for this fabric and my current skills ;)… there are many sewists out there far more talented and precise than I!)

I had a bit more luck with using the fashion-fabric itself for the lips. It’s a bit more forgiving of my flaws. I was worried that it would be REALLY BULKY. It is. But, it looks softer. However, Sherry’s method is extra-bulky,  so it didn’t work so well with this method, either (centre top… which still looks better than any of the satin-bound ones, I suppose)). Gertie’s, however, did… with the caveat that it’s almost entirely hand-sewn. Only the initial rectangle was sewn by machine (bottom right two buttonholes, one in red, one in black).

This is pretty much par for the course for me. Precision=hand-sewing. I don’t really mind hand-sewing, fortunately (after hand-beading bellydance accessories, anything else is a piece of cake). Still, it would be nice someday to be able to be precise and speedy. Like, say, Sherry ;).

Ah, well. I showed Tyo the buttonholes and she likes the black contrast lips, so I expect we’ll go that route.

7 Comments

Filed under Sewing

Almost progress.

Holy off-grain fabric, Batman.

Left margin is folded on-grain.

Very glad I took the time to thread-trace along a rib. Presumably this stuff was knit in the round and then sliced. I really wish they’d just leave it in the round. So many more options that way.

Thread-tracing along a rib of the knit to find the grain.

I also took the lining pieces and compared them to the shell pattern pieces to see which adjustments I needed to make to them. The coat body lining was pretty easy, but the sleeves were weird. I have always been under the impression that lining pieces should be, if anything, a tiny bit smaller around than the shell pieces, since they go inside—turn of cloth and all that. With the exception of the back pleat, I know. Well, the sleeve lining pieces were wider. Or at least, they were until I added the 1 cm width to each sleeve piece. Now they’re pretty much (I would say) bang on. Am I missing something? Are they just oddly drafted?

And here’s another question for those of you who actually know what you’re doing! The under-collar (separate pattern piece) is drafted to be cut in two pieces, with a seam down the middle. Now, it was my understanding that you do that when cutting the under-collar on the bias (the grain-line shown is straight). So I was thinking about cutting it on the bias anyway. But then I remembered that my fabric is a knit, which doesn’t need bias to stretch/drape nicely. So maybe it doesn’t matter. So—can anyone enlighten me on exactly WHY one cuts the undercollar on the bias, and whether one would bother in a knit, and if one didn’t bother, would there be any point to cutting the under-collar in two pieces, or should I just cut it on the fold?

Tomorrow: Cutting, interfacing, and how much couture does one kids’ coat need?

12 Comments

Filed under Sewing

Dear Tyo, I foresee…

… a lifetime of narrow-shoulder, wide-hip alterations. You’d better learn to sew.

Girls' Coat muslin I

I may have mentioned before that my sweet little Tyo has the build of all the women in her Dad’s family (and diametrically opposed to the women in mine, I’ll add): she is an incipient pear. Narrow shoulders and BOOTY. This has been apparent since she was, oh, two, but it’s only getting worse as the years go by. Let’s just say I could picture rap videos in her future. And a lot of quality time with the shotgun in her Dad’s.

So, I have to say, the muslin for the coat went together like a dream. The pattern is (surprisingly?) sophisticated, with separate lining pieces for everything. The overall shape looks good, all the seams (that I tested) match up beautifully; the sleeve-cap is drafted with a beautifully small amount of ease, just enough to curve it nicely without giving it any tendency at all to pucker (admittedly, the wonderful old flannel sheet I was using for the muslin was a dream to sew, too, so that didn’t hurt)

Side view

And, as you can see, it’s just a wee bit too small. Everywhere except in the shoulders, which are perfect. (The sleeves are long enough only because I lengthened those pattern pieces BEFORE cutting it out, as I could see they were going to be too short. Unfortunately paper-printout doesn’t lend itself to tissue fitting.)

Now, I can’t be 100% sure this is a problem with the original sizing, as it’s entirely possible my crude efforts at tiling let to some re-sizing of the printout and there’s no handy-dandy scale square to allow me to be sure (actually, according to the tiling program my printout is .01 feet smaller… which I didn’t think could throw it off by this amount, but anyway). But the fact remains that there is definitely not enough ease in the pattern AS I PRINTED IT OUT. Well, there would be if it were a dress. For a coat… not so much.

If it were just the skirt pieces that were the problem, I would just spread them. In fact, before I got the sleeves on, when

Rear view... split to let the side-seams hang straight. >_<

she first tried on the body and it became obvious that the skirt of the jacket didn’t have enough ease for her lovely bottom, I was all set to slash and spread the skirt of the back pieces, just enough to give her a couple of extra inches in the derriere region. But with the sleeves in place, it became evident that some extra ease was required there, as well.

So I’m torn, folks. What’s the best way to proceed? Re-print in a larger size? Slash-and-spread to widen sleeves, armscye, and the lower part of the coat, preserving the fit in the shoulder?

There’s only one part of the pattern that has confused me a little. Along the front princess seam there are two

Front pattern piece: princess seam with ?vent

expansions (places where the seam allowance goes from about 1 cm to 4 cm. The top one is for the placement of the pocket, but below that the seam allowance returns to normal for about an inch, and then widens again I’m not sure what’s meant to go there, as it doesn’t appear to be any different from the rest of the seam on the illustration (or the limited instructions available on m-sewing.)

It does resemble nothing so much as a vent or pleat, though I’ve never seen one in this precise location on a coat. What do you think? Ignore? Make as a vent or pleat? I should add that the lining doesn’t have an opening here and the seam between the CF facing and the lining does not coincide with this princess seam, either. So maybe that eliminates the vent option but still allows the pleat? I dunno. Anyway, if anyone has any suggestions or revelations, I’d love to hear them. Or I can just ignore it ;).

Probably I should go up a size, right? Bigger is always better with kids. (D’oh!)

7 Comments

Filed under Sewing