Tag Archives: jeans

The jeans I didn’t want to make

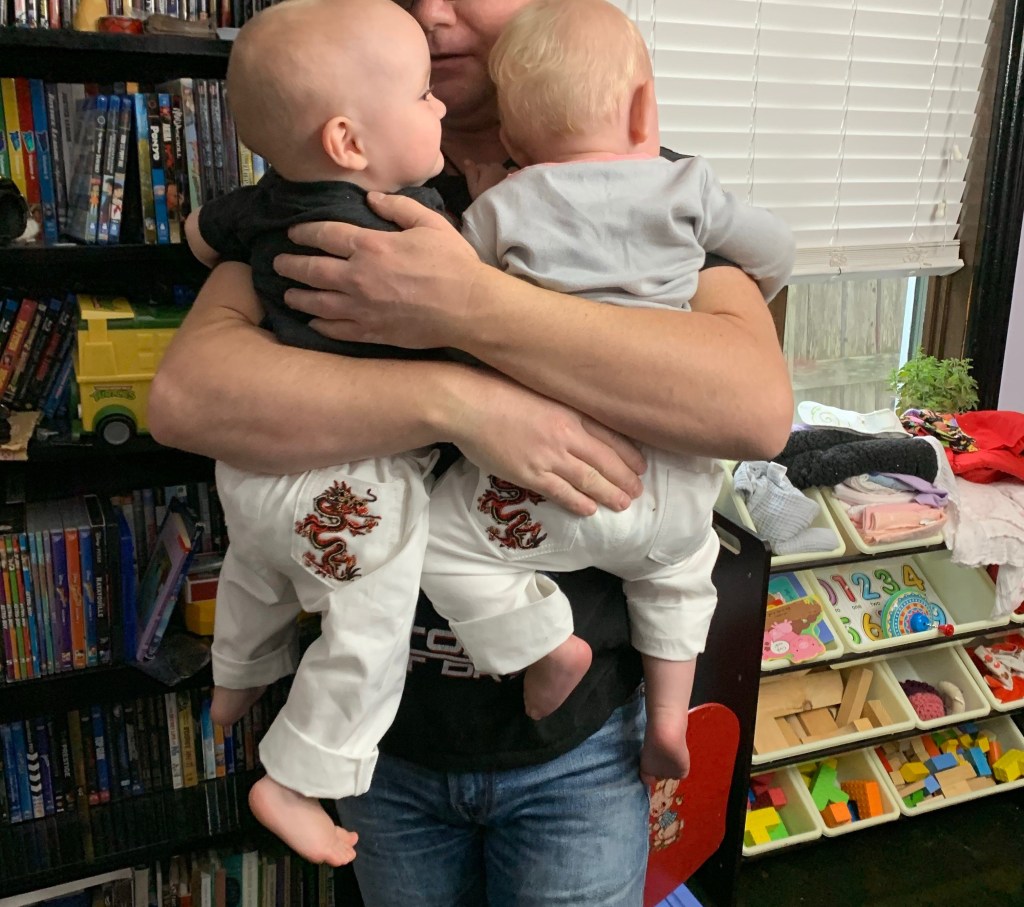
Unlike the subject of my last post, jeans are arguably something I need, um, pretty badly. I have technically three me-made pairs still in rotation, but two of those have been out for mending most of the last year, and the remaining workhorse pair is of a fairly thin super-stretchy denim that’s rapidly approaching widespread systems failure. And at both of the perpetually-mending pairs are getting snug.

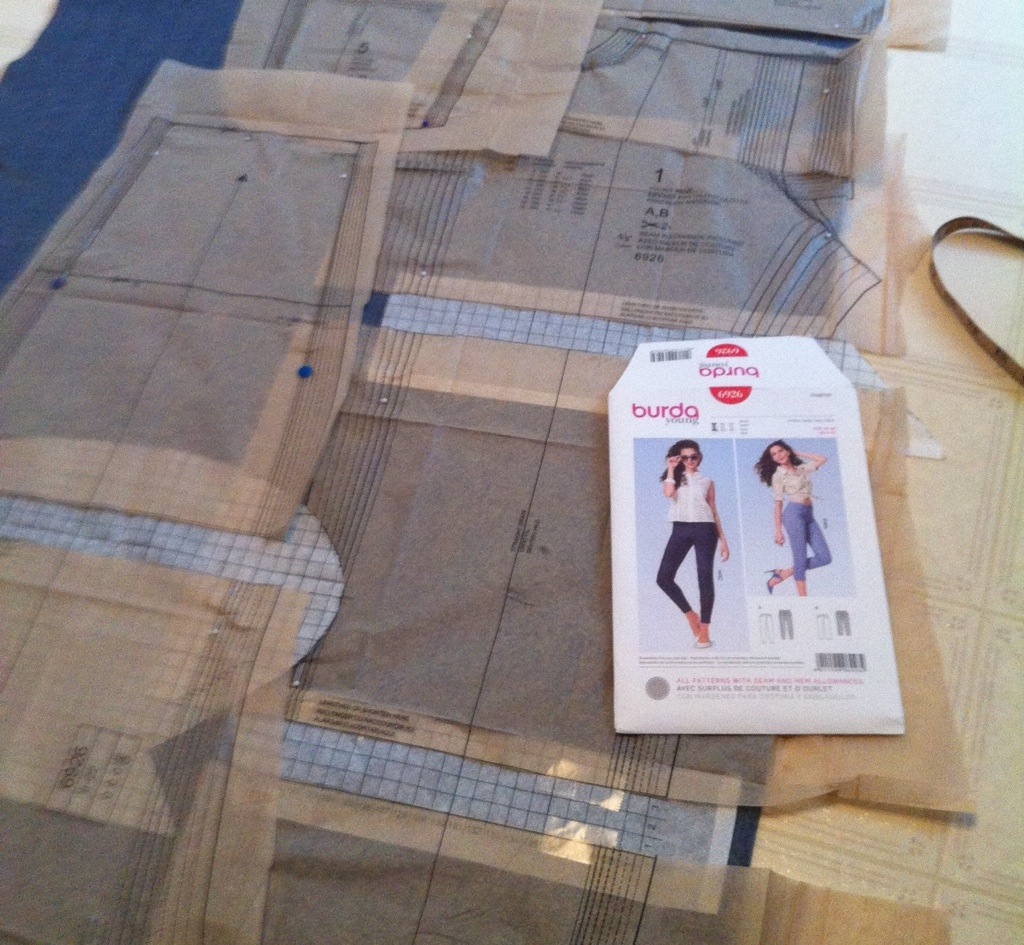
Now, two of those pairs are Closet Core Ginger jeans (the high-waisted, skinny version). But I was pretty sure it was time to up-size my pattern (and pretty sure I had mislaid some if not all of the pieces of my old printout anyway). So I dutifully got it reprinted… but then thought, why not make up the other view?

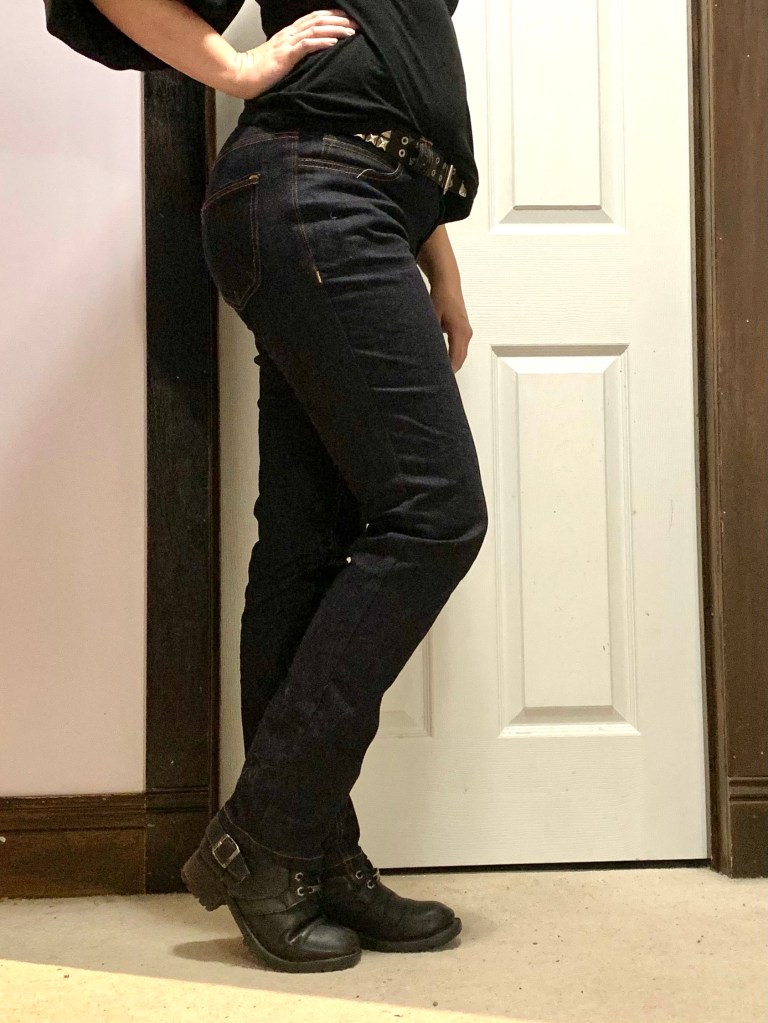
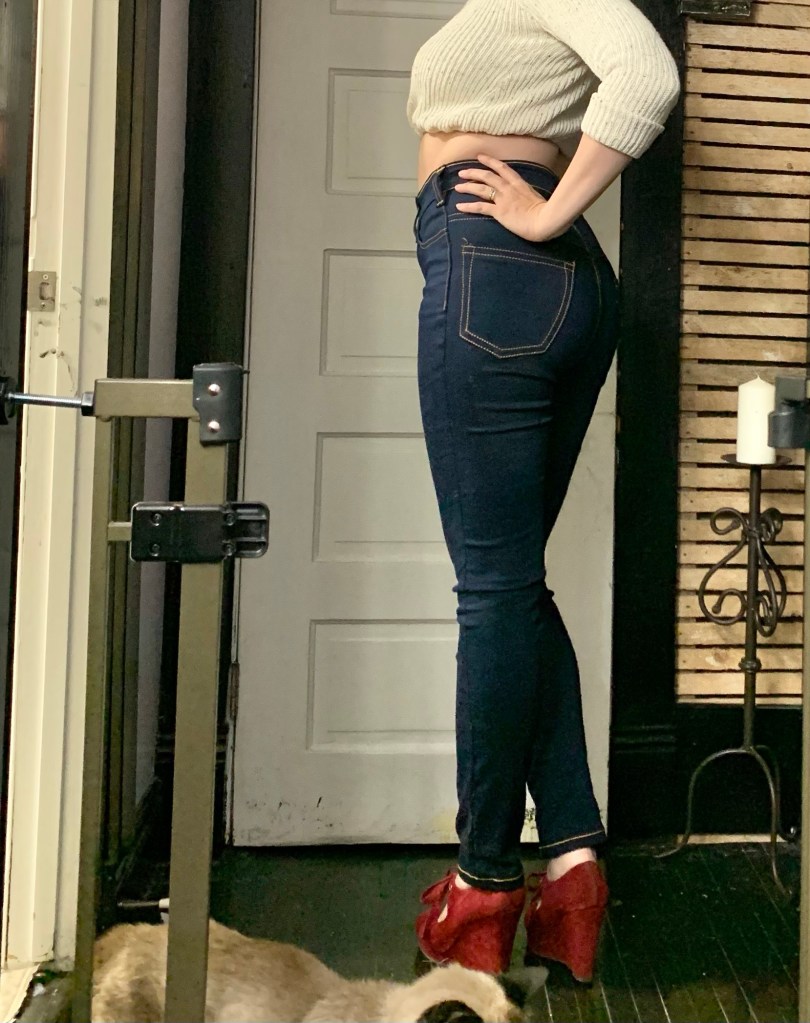
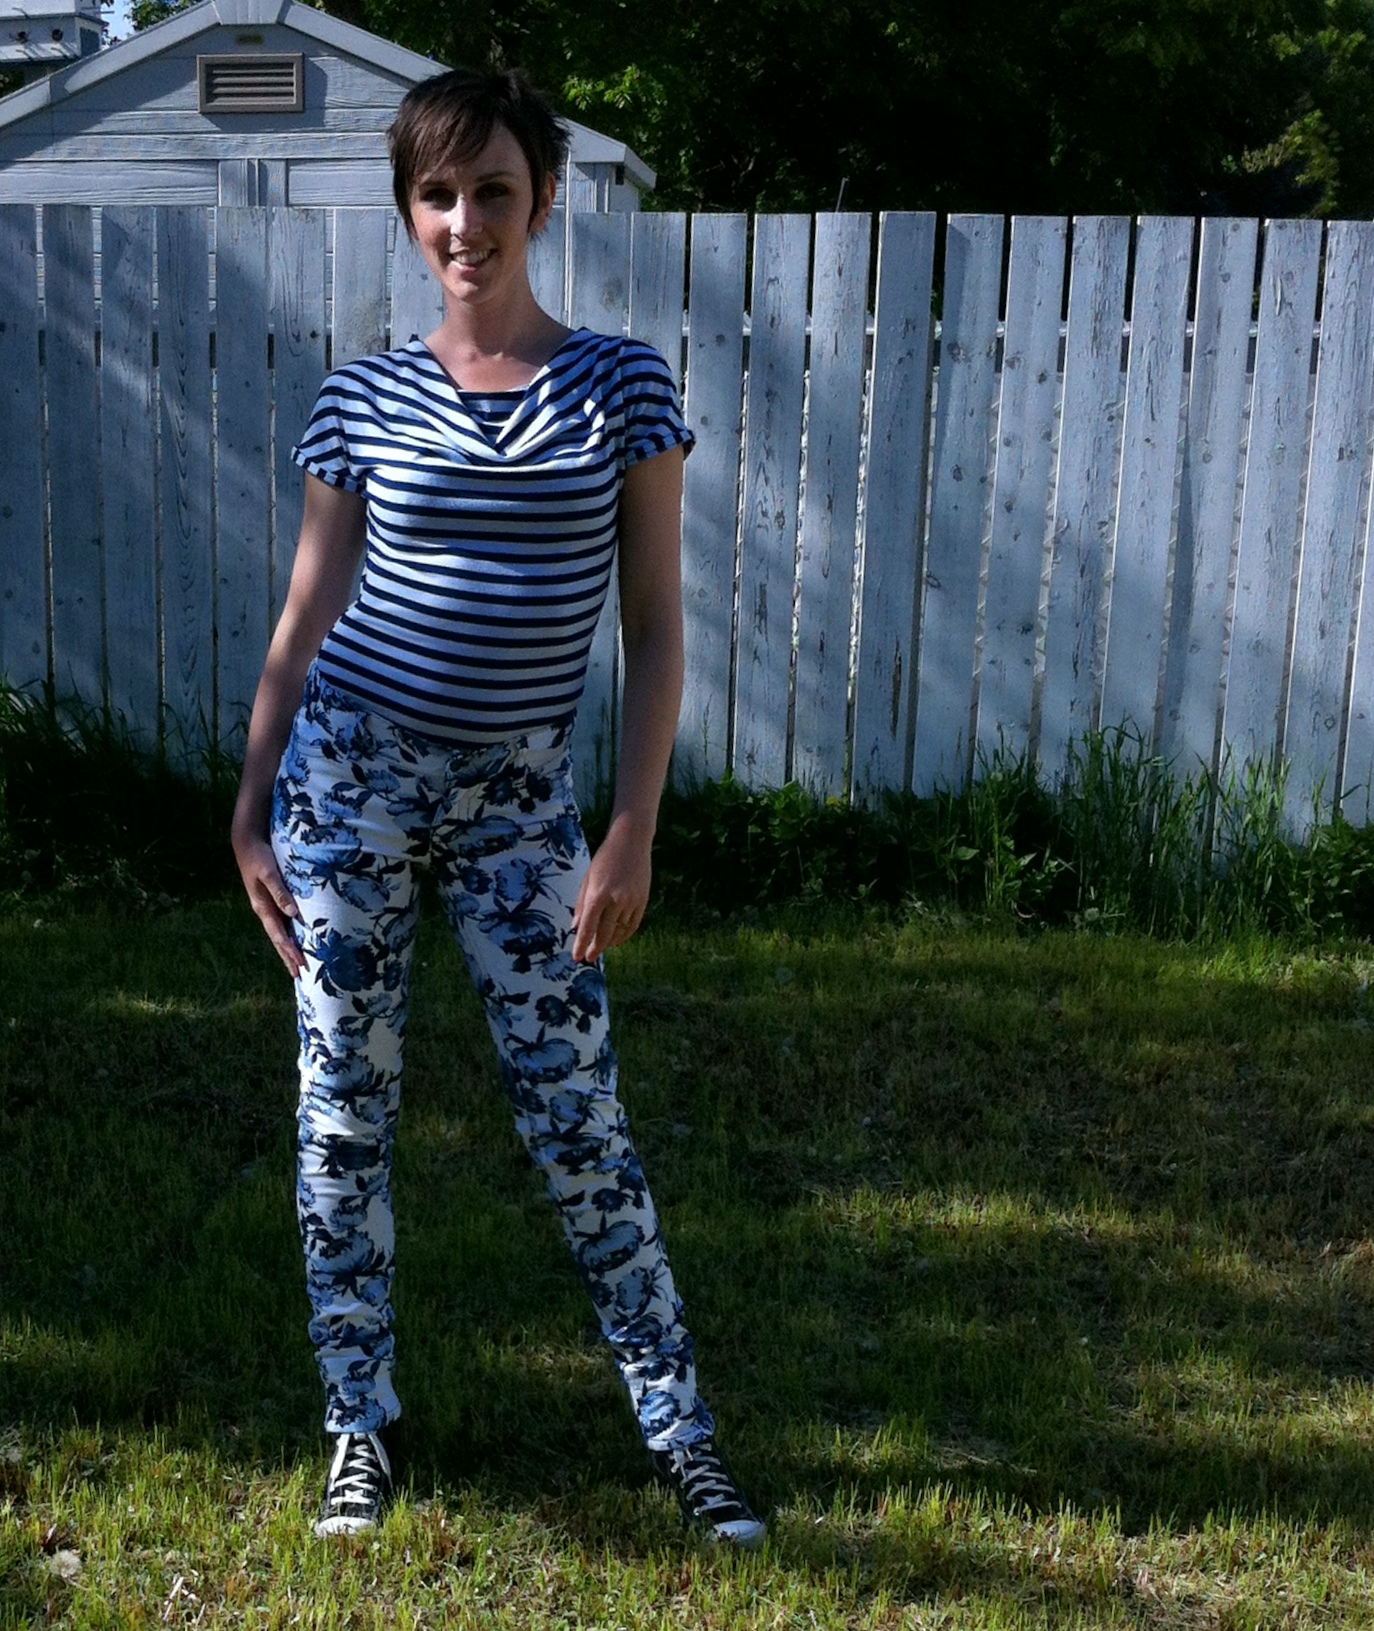
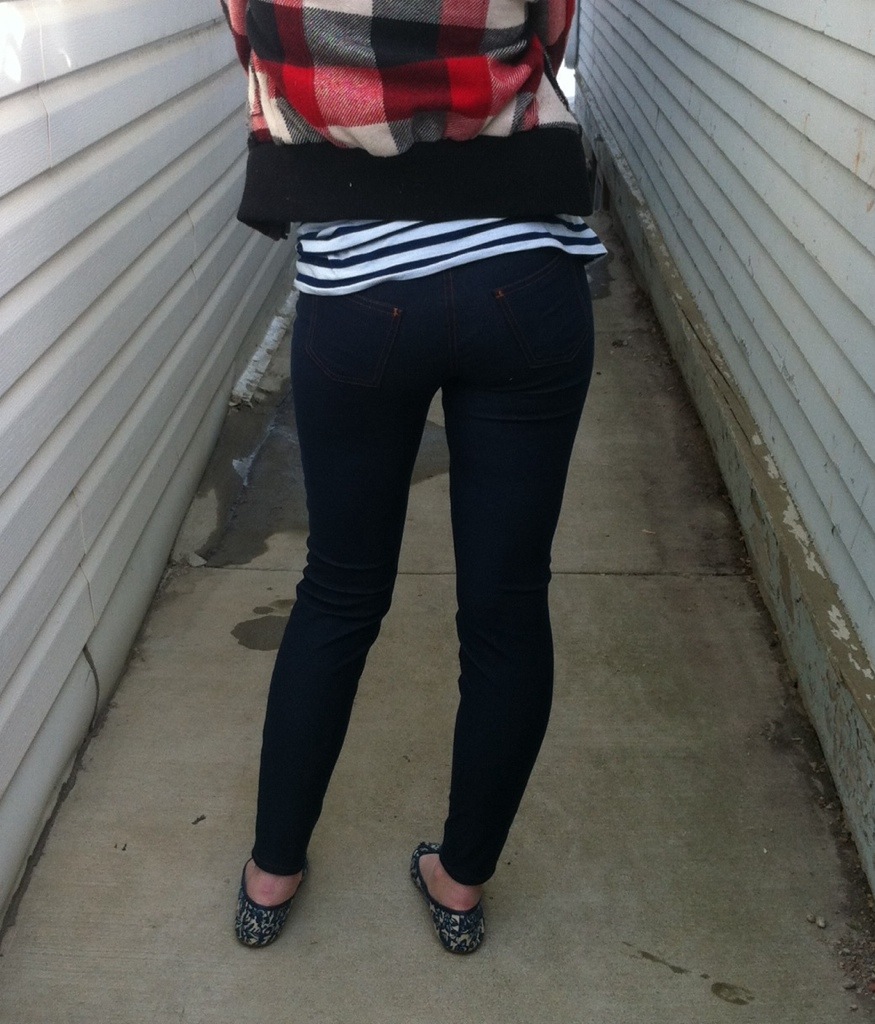
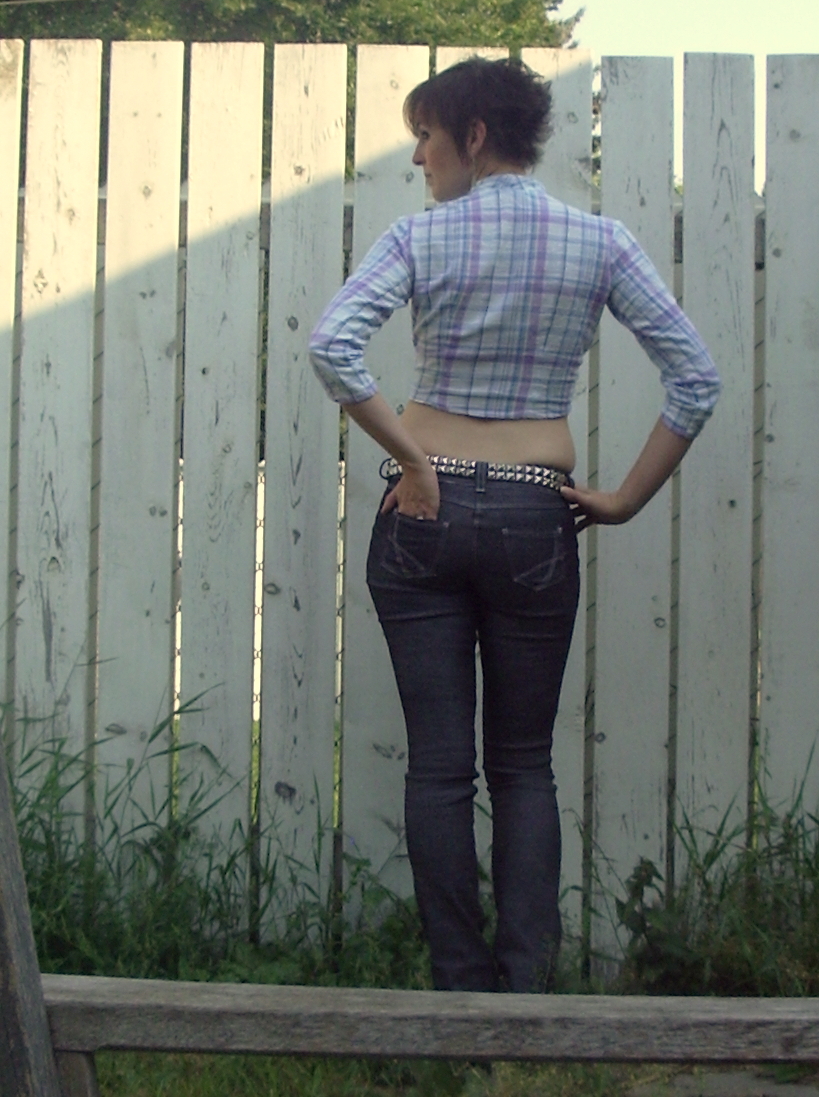
Back when I bought the Ginger Jeans pattern (not long after it first came out, if I recall correctly), view A was exactly what I was looking for in a pair of jeans—low-rise waist, stovepipe leg. But by that point I had already modded the snot out of Jalie 2908 to get that fit that I wanted, so I just kept on using that pattern. When I did finally try out the Gingers, it was to test out the high-waisted view… which worked fairly well, but both versions were made in extra-super-stretchy fabric (which really minimizes fit issues, at least), and the high waist, while more fashionably appropriate these days, doesn’t give me that nipped-in, round-butt look that makes them so cute on other people. I just look like I go straight up from hip to waist, like a cylinder.

Now, the biggest factor in my cooling relationship with denim has been that as my body has changed over the last ten (and especially last three) years, I haven’t been able to find a style that makes me feel cute the way they used to. I have too much muffin-top these days for the low rise (which is terribly passé, too, don’t you know), high rise just makes me look like a box… oh, and mid-rise, on my body shape, just rides down to sit in the “low rise” position. Much easier to just find a cute dress or skirt.

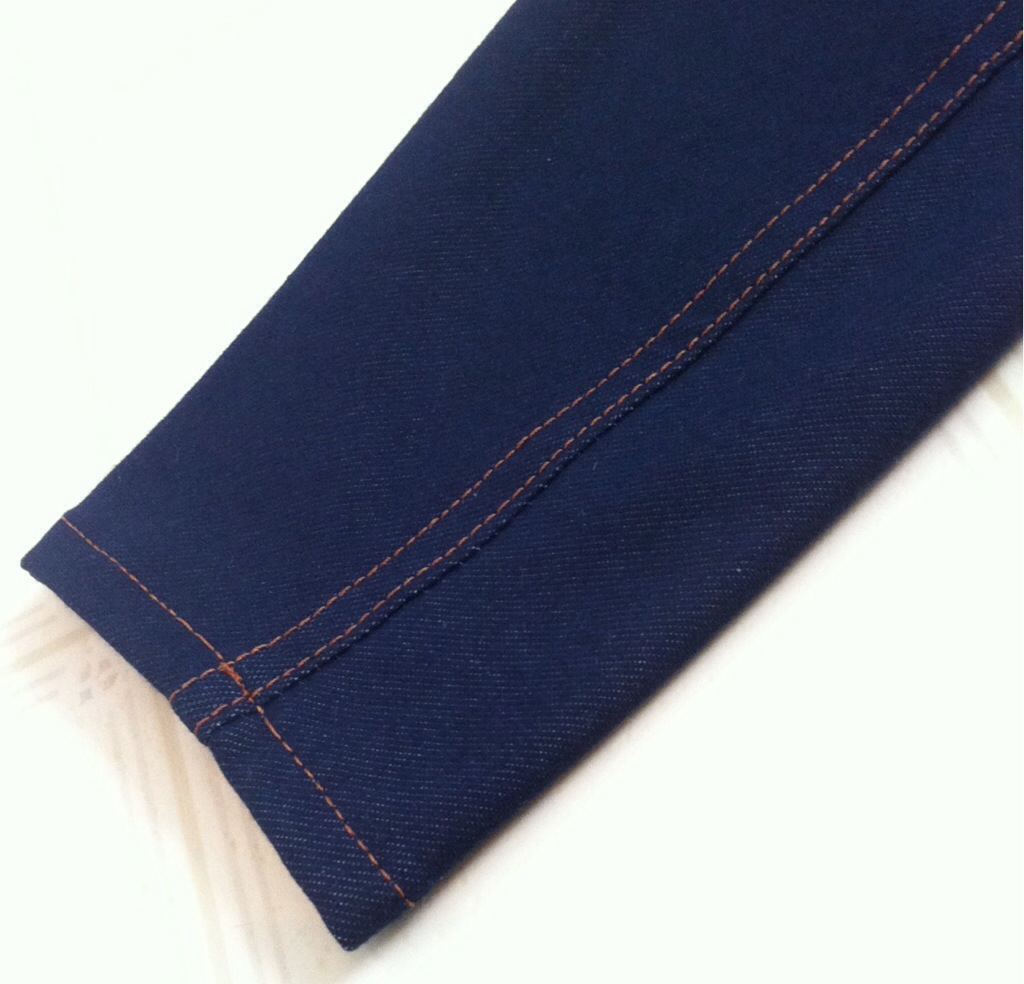
Anyway, I decided, since I wasn’t really excited about ANY style of jeans, to go back to my old standby. Low-rise; at least it can be covered by shirts, and the stovepipe legs seem like they would go well with the modern looser jeans aesthetic. (Also, as low rises go, I’d call this one pretty moderate, which is what I suspected. The fly zip is at least 4” long!)

So I put on my big girl pants, re-measured myself, didn’t quite faint at the pattern size that number put me into, and then went to work.

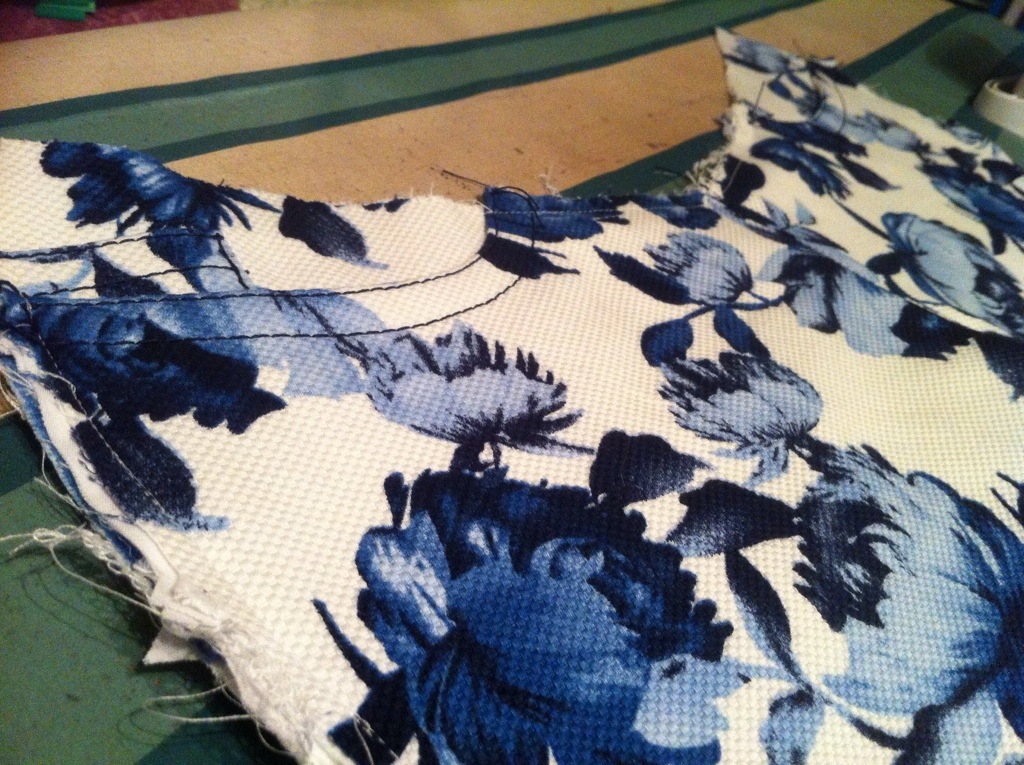
A dig through my stash turned up this piece of really nice stretch denim, already pre-washed. Sturdy (about 10oz at a guess), but very stretchy. I BELIEVE it’s the Cone Mills denim I got from Closet Core as a jeans kit ages ago. Perhaps it wasn’t wise to cut into it for a project I was, frankly, kind of dreading, but there it is. It also wasn’t doing me any good sitting in stash, and it promised to be pleasant to work with even if I wasn’t thrilled with the results.

I made three pre-emptive changes to the pattern: lengthened the leg by 1” (to go from a 32” inseam to a 33” inseam), raising the back rise height by about 1”, and taking some tucks in the shaped waistband to make it more strongly curved, particularly in the back portion, where I tend to be most curvy. It’s still not as curvy as the modified one I used before, but it seems to work. These are most of my “standard” fit alterations, but I didn’t make them on my previous Gingers (except for the leg length anyway) because of the high waist and the extremely stretchy denim I was using.

I also took the time to cut out all the leg pieces in a single layer. I’ve ignored this advice countless times, and almost always had one twisting leg on my jeans, and just endured it as the price of laziness. It’s early days yet, but I’d say they do, in fact, twist very little, at least.

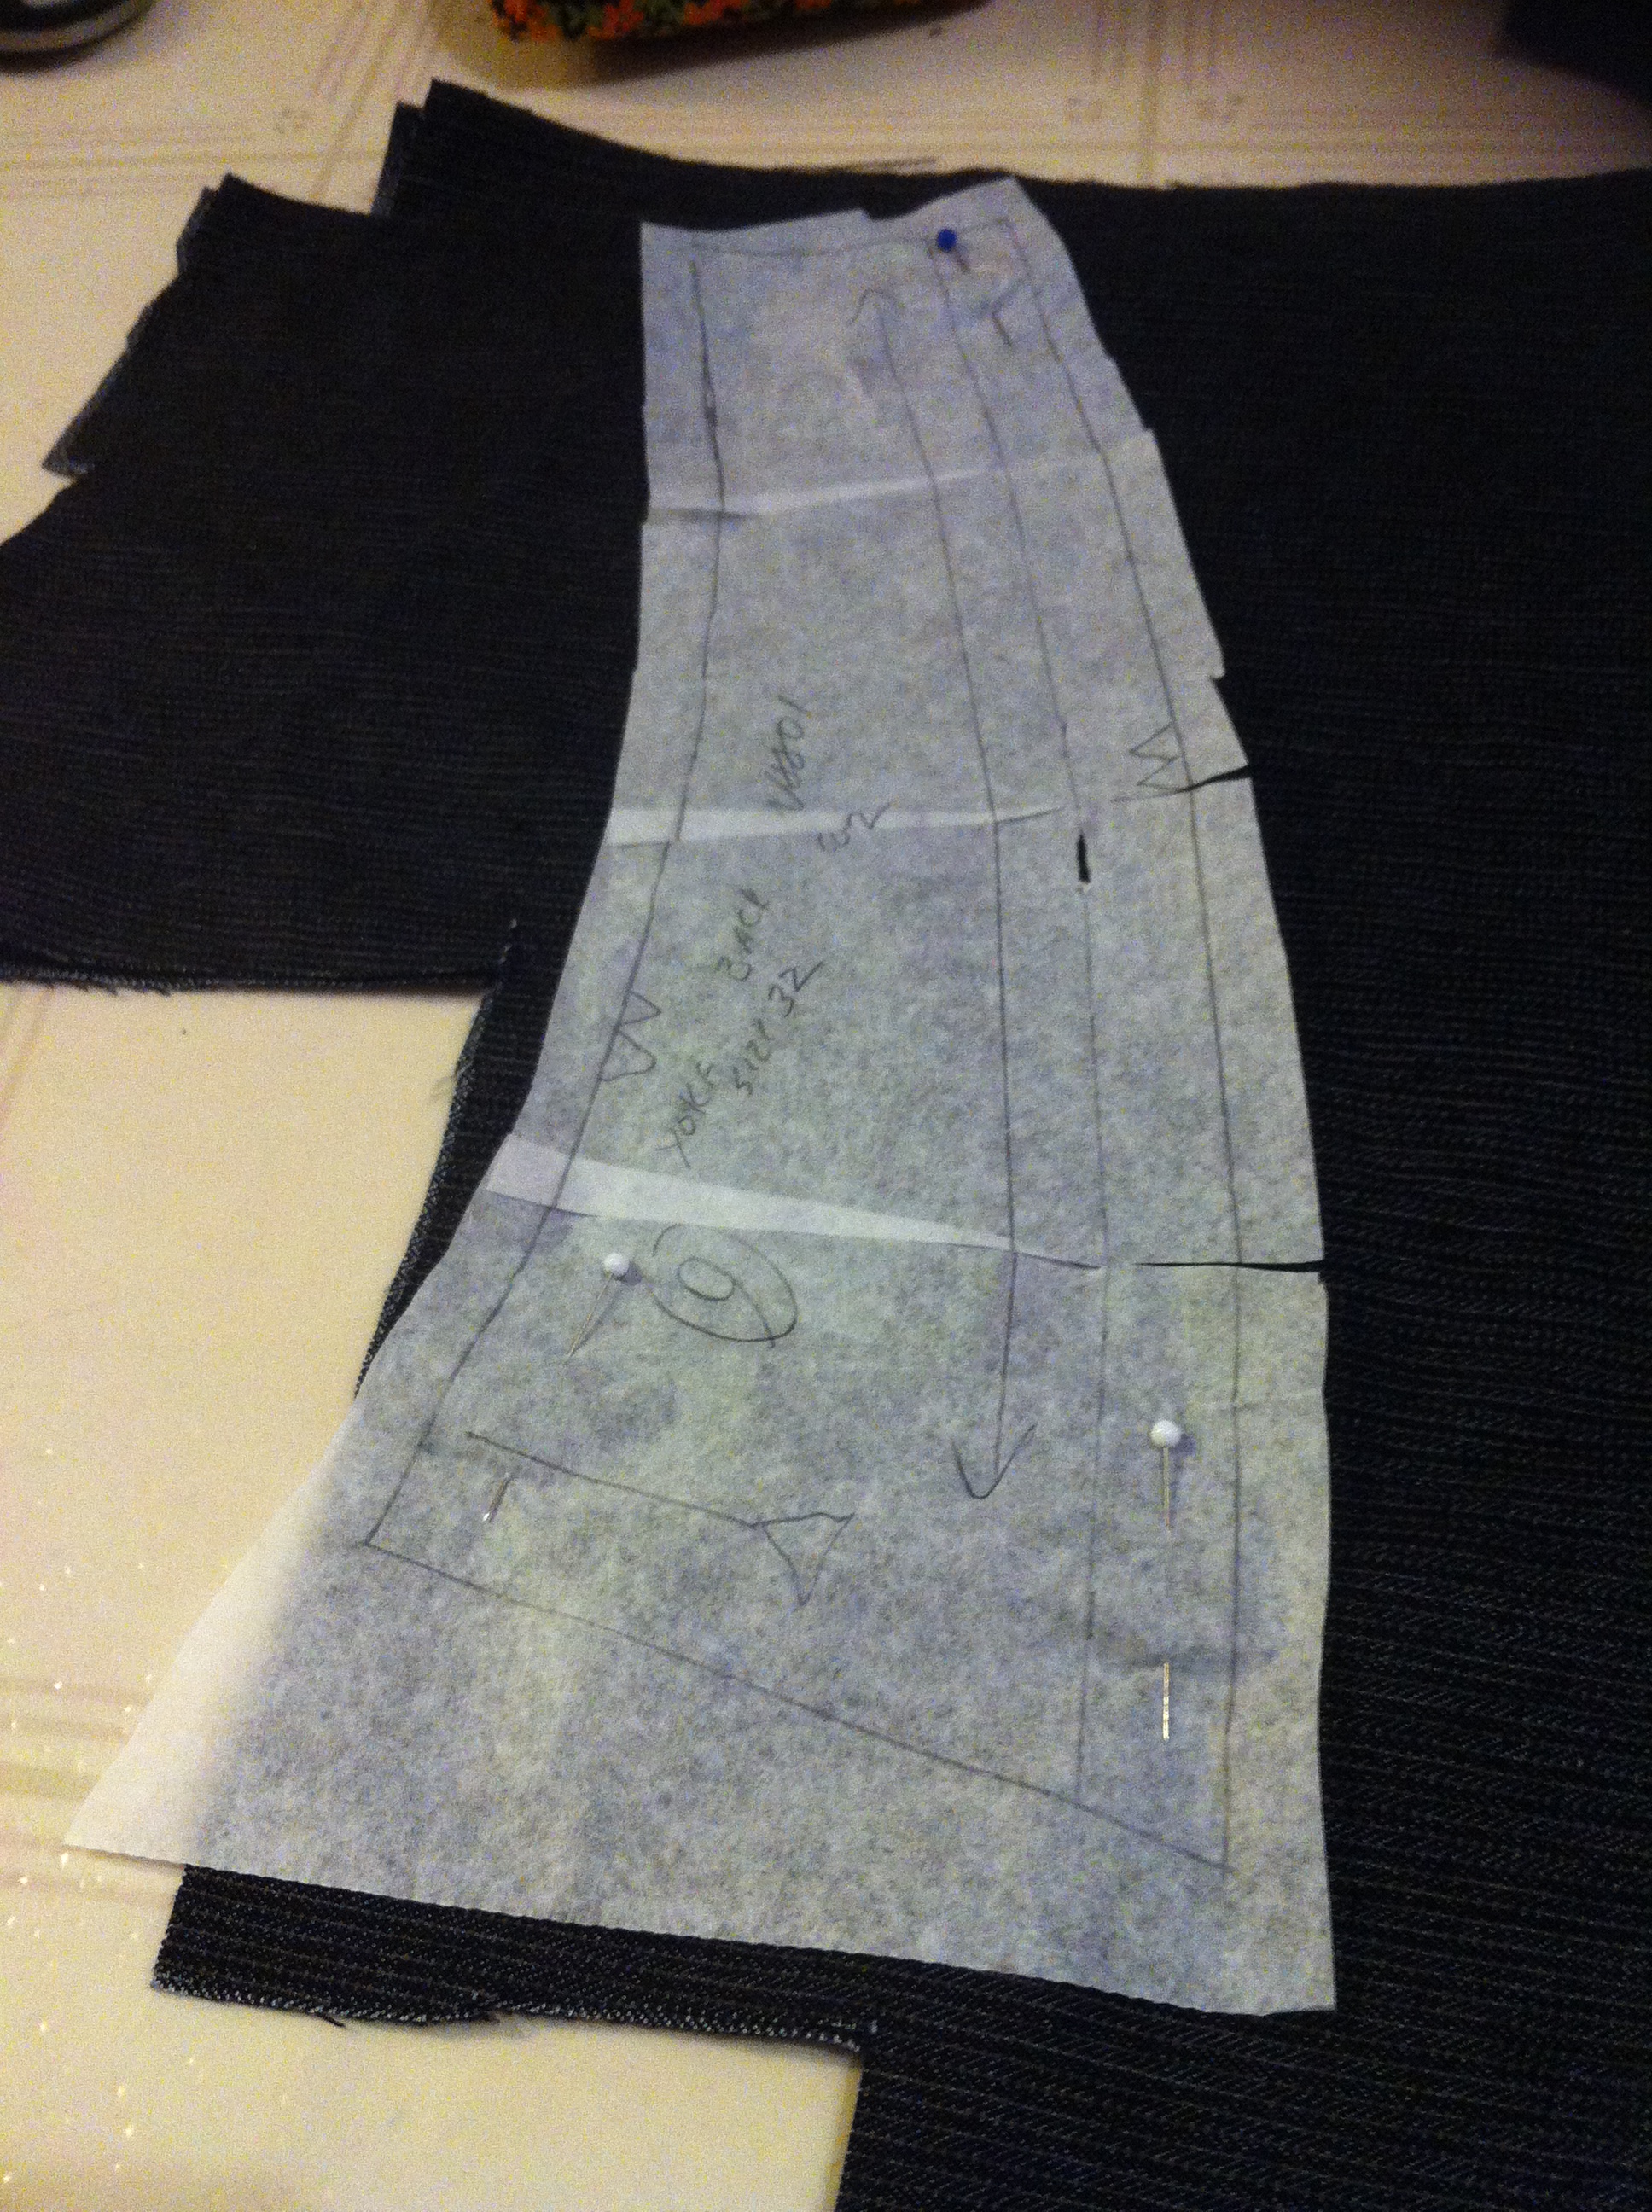
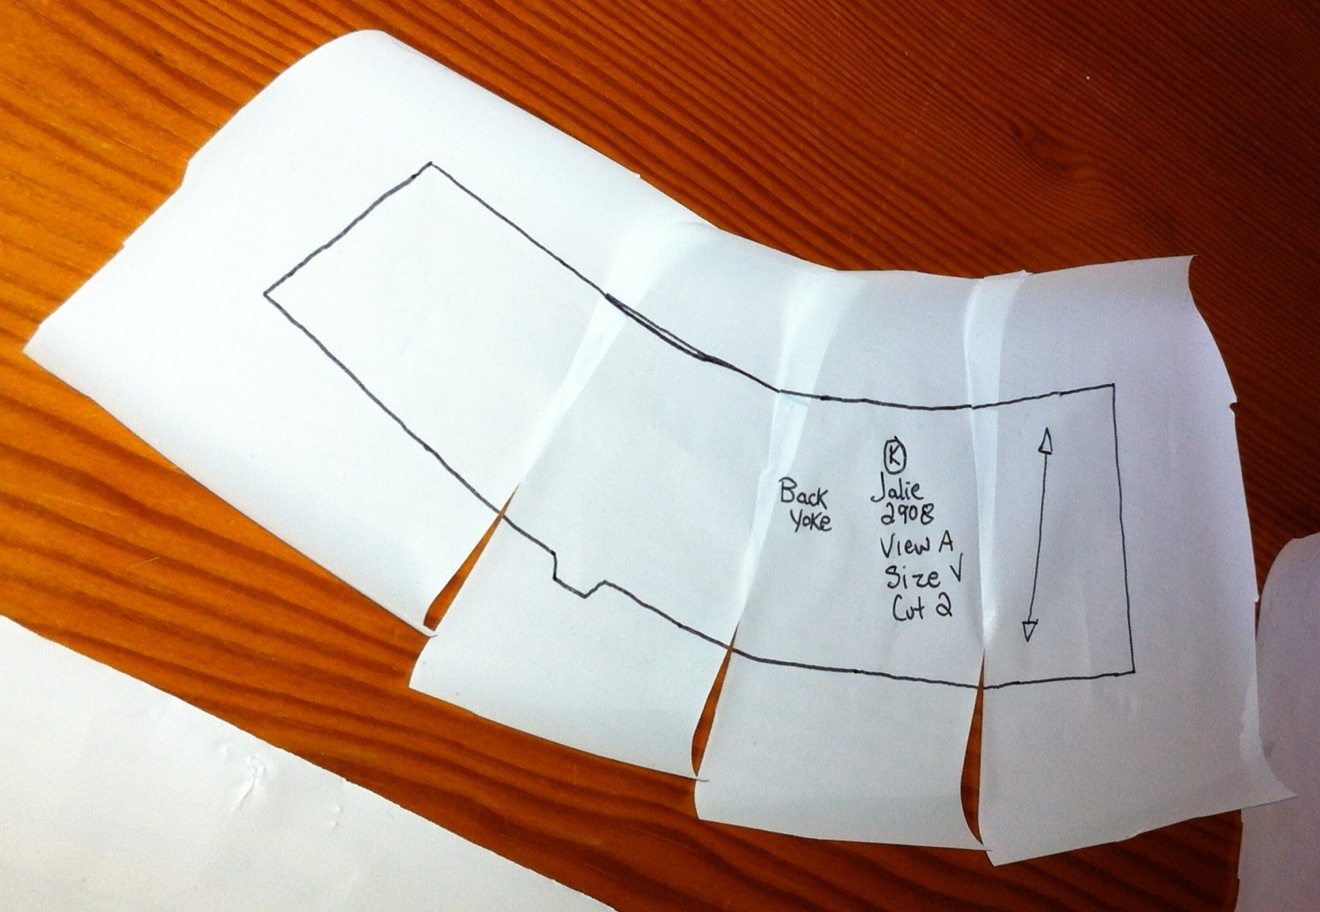
I followed the pattern instructions to fully baste it together to try on, and I’m glad I did as it let me make some major changes to the crotch curve: mainly, I needed a MUCH curvier front crotch to avoid camel-toe (also an issue in my high-waisted versions, but less intense because of the super-stretchy fabrics), and I took in the CB seam about 1” at the waistband, tapering to nothing at the bottom of the curve. If I do another version, I would curve the yoke as well by adding some little darts like so:

Man I miss having the time to make helpful diagrams like this for my blog posts.

Which is exactly the same thing I did, extensively, to the yoke of my Jalie Jeans pattern, actually. So it’s nice when things are consistent. I might add a bit more height to the back rise, as well—but maybe through the yoke since I’ve already added 1” to the lower piece. I could’ve recut the yokes but I just decided to ease them in to the waistband, which also works.

Basting first let me make these tweaks, which was great. It’s not hard to tweak the side-seams at the end of jeans construction, but at that point you’ve got two rows of topstitching in the crotch and inseams and those are not going anywhere.

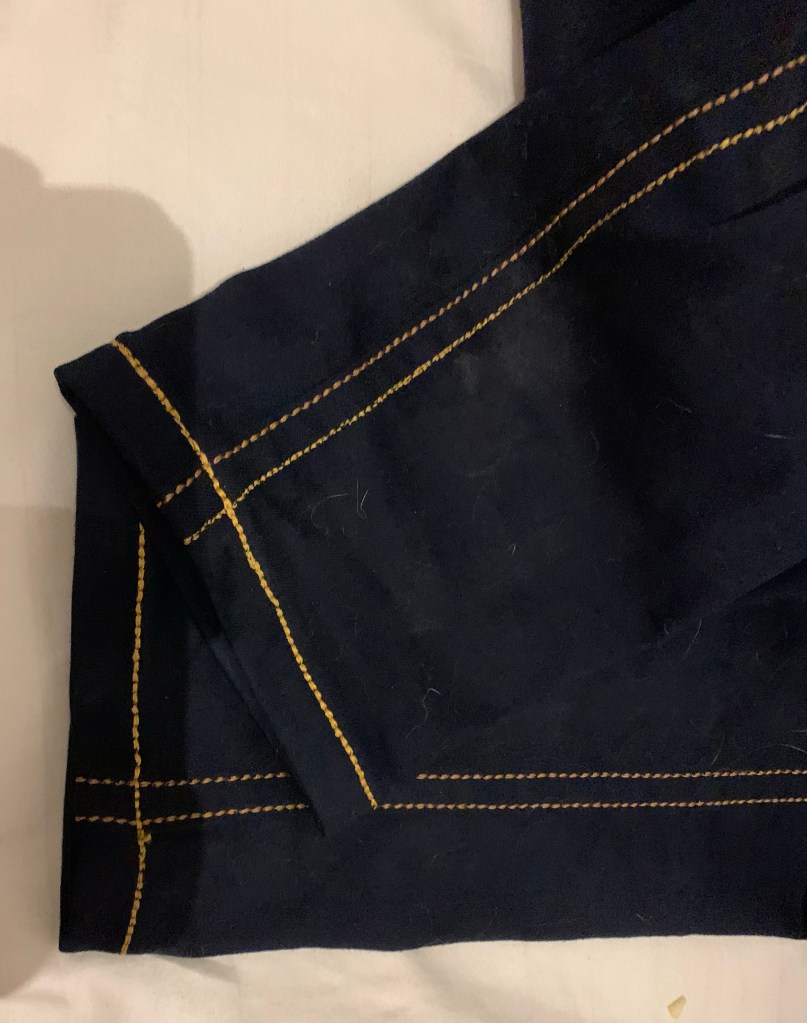
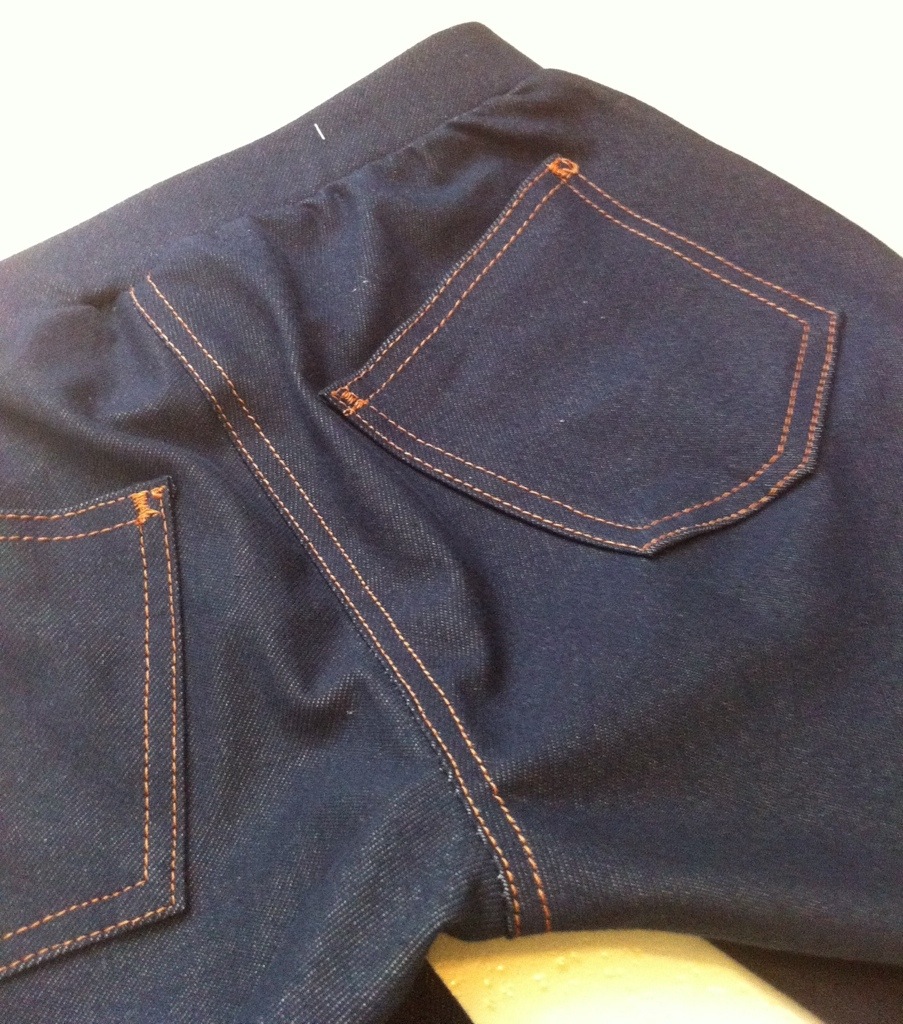
Construction wise, I did most of the sewing on my mom’s Featherweight machine (long story, but the short of it is that her machine is at my house and mine is not. This was not on purpose). I got it into my head to try doing the topstitching on my coverstitch, which was a mixed bag. It was nice to do long straight sections with the twin needles, but it’s hard to go slow and I didn’t like the lack of reverse. So I did the pockets, fly, and waistband topstitching on the Featherweight as well. I did a not-terrible job of matching my stitch length, but there are definitely some subtle differences. It also made for a LOT of rethreading, especially since I only had two spools of topstitching thread (this was just Guterman extra-strong, I didn’t want to complicate things by using actual topstitching thread) so one of them had to keep going back and forth between the coverstitch and the Featherweight. I only broke out my modern Janome (which needs a spa day BADLY) for the bar tacks and buttonhole at the very end. For that part I used a coordinating regular thread, though it’s not quite a perfect match so maybe I should’ve gone for a contrast.

I actually liked the pockets better pre-bar tack.

I sewed the side-seams with a fairly generous seam allowance, and wound up taking them in 1/4” more after that—and I’m fighting the urge to take them in more, telling myself we’re going for a slouchy boyfriend aesthetic as opposed to the sprayed-on-skinny look I’ve been pursuing since I got my first pair of stretch denim jeans in 2000.

I did interface the waistband, but I used a knit interfacing. So a belt is definitely a necessity for wearing with them.

And… I don’t know if I feel cute in them, but the process was pretty satisfying especially considering what a tragic mess the last pair I did was, and I did wear them for basically a week straight after finishing. I didn’t feel rushed because I wasn’t super excited for the end product, so I guess that was a win? I was also stupidly sick while making these, so they got worked on in five to fifteen minute bursts between lying down while the twins watched obscene amounts of questionable kids YouTube programming.

I do think I could’ve taken in the hip and thigh another 1/4” or so on each side, but I don’t know if I will now that they’re completed. I do, however, think that I’ll wear the snot out of them—my casual wardrobe hasn’t been strong in the last ten years, but it’s particularly terrible right now.

16 Comments

Filed under Sewing

Cold mess jeans

I’d call these jeans a hot mess, but they took way too long for that.

Sometime last year, amidst a tentative return to sewing when the twins started napping a little more reliably, I started work on a second pair of Closet Core Patterns Ginger Jeans. I need jeans pretty badly; while I did get back into my last few pairs after having the twins, they were on their last legs already. I’ve been a bit, ah, ambivalent about jeans for a few years now, mainly because the body I have to put in them has changed over the last ten years, as has the prevailing fashion, and I’m not sure how I feel about either fact.

But anyway, another pair of Ginger Jeans felt fairly safe stylistically. My last pair (which just need a new button, except the twins have managed to lose all of my jeans buttons somehow?) weren’t perfect but I was pretty comfortable with a few tweaks they’d be… as good as they could be. My pocket placement is a lot better this time, although they’re still too far out from the CB seam, at least they aren’t too low.

The fabric I picked is a Robert Kaufman extra-stretchy denim from Periwinkle Quilting, which is VERY, very stretchy. The fabric I used last time was also very stretchy, so it seemed like a good choice especially given my measurements have changed and there was no way in hell I was reprinting my pattern.

Anyway, I got them cut out, and then promptly ran into issues with the topstitching. This denim is so stretchy that not only was I worried about topstitching breaking (not so much the topstitching thread itself but the regular thread on the underside), but in my last version one of the issues was the yoke seam and pocket tops making dents in my backside because they didn’t stretch as much as the rest. Not the prettiest look. So after a bunch of testing on several machines, I settled on a triple straight stitch on my Elna machine. This gives a great heavy look, and it’s very stretchy, as long as everything works perfectly—but it’s also easy to mess up. Oh, and at this point I’d already done the front pocket and fly assembly (which are all stabilized by the pocket bags etc.) with a regular straight stitch topstitching. So now the back topstitching wouldn’t match the front, but I figured that was better than tight lines and broken stitches.

Anyway, I started plugging away at construction last summer, arguably the heyday of my post-twin sewing (I wasn’t back at work yet and I was getting to do at least a few minutes of sewing almost every day at nap time)… and then halfway through topstitching the inseam I ran out of topstitching thread. (Because the triple straight stitch is a huge thread hog)

In the old days this would’ve been a negligible issue. In a covid-lockdown world where I no longer work at a fabric store and have twin babies I don’t like to take shopping, it took weeks to get to a store and pick up some more, only to misremember the colour number and get the OTHER shade of gold topstitching thread. And then months to get back again to correct that. It was October by the time I had the right thread (which still isn’t perfectly right because of dye lots, but it’ll do), and I was back at work and very short on time. I did manage to sew up the side-seams and get them fitted sometime around Christmas, but there were other projects that took priority and then the whole jeans vanished, somewhere in the drifts of chaos as the twins disassembled ever increasing portions of our basement.

Anyway, when the Sewcialists’ final theme month was announced as All Butts Welcome, it seemed like the perfect prod to get me to finish the jeans. And they did turn up, after a few weeks of incremental tidying (in an area I swear I’d searched several times before). So I plunged back in. Except.

After the long hiatus, a lot of the details were fuzzy to me. I forgot that I was topstitching on the Elna. I grabbed the wrong colour topstitching thread. Triple straight stitch is almost impossible to pick out, people, especially when sewn on my Janome, which for some reason will only stitch that particular stitch at the default 2.2mm length—which is why I was using the Elna, not that I remembered that until after I had topstitched the waistband. Can I call it a design feature?

An extra line of not-very-straight topstitching is a legit design detail, right?

Then I realized that I had forgotten I ran out of topstitching thread partway through topstitching the inseam. So one inseam had only one line of topstitching, while the other side had two. I wasn’t prepared to roll with this, so I got the Elna set up. The stitch was perfect on my test, but for whatever reason, as I painstakingly stitched up the inside of the already-sewn leg tube, the backward-forward motion of the triple stitch was off, and because you can’t see much of what you’re stitching, I couldn’t see how bad it was until I got it done. It’s pretty bad. But it’s just half an inseam, right? It went on to topstitch the hems perfectly. The back and forward of this stitch can be affected by you pulling on the fabric, which is hard not to do when stitching up the inside of a tube, but I swear I was very conscious and careful of this. Anyway. I’m not currently willing to try it again.

Can you spot the wonky line of topstitching? I mean, of course you can but it’s less obvious in this photo than I thought it would be, actually.

As a final insult, I ran out of the gold regular thread I use for bar-tacks halfway through doing the belt loops. (Doing bar tacks in topstitching thread on home sewing machines is asking for it, I have learned painfully over the years.) Fortunately a scrounge through the thread drawer turned up some old thread from my Grandma’s stash in the right colour. Mostly I try not to use the old thread for construction as I don’t trust it’s strength, but for bar tacks on belt loops that won’t likely be used, it should be ok.

No, wait, maybe the final insult was discovering that the twins have managed to lose all my little jars of jeans buttons (I have quite a few, but they’ve been systematically emptying the drawers of my sewing desk for months and I have no idea where I put most of the contents. I miss my storage space.) Or maybe it was the half-ass attempt at a keyhole button hole that my Janome managed to put out, but I have low expectations for jeans buttonholes so I wasn’t too traumatized at that point. Although looking at the pictures, I realized I made the buttonhole too far from the end of the waistband, which allows the end to flip up and stick out a bit. I’m thinking a hook and eye or two might be called for, since I’m not moving button or button hole at this point.

At any rate, it was a pretty sweet triumph to finally put them on, and then be able to take some quick pictures right away.

I’m still not really sold on high-rise jeans on my body—I don’t have a teeny waist and I feel like they just make me look rectangular. My squishier mid-section has made my old low-rise stand-by less appealing, and mid-rise falls right in the middle of my “squishiness”, which is either uncomfortable and just squishes extra width up to my waist, or if it’s loose enough not to squish, just rolls down to the hip dip at my low-rise level. On the other hand, I’m not the sort to tuck a shirt into jeans, and I’m not likely to wear a crop-top like this out of the house. So maybe it really doesn’t matter anyway. Anyway, I’ve worn them and I will continue wearing them, and they feel pretty good on although a little too stretchy. But I may give in and buy my next pair of jeans, because I really don’t have the brain power for this kind of project right now.

3 Comments

Filed under Sewing

Ridiculousness

If you think Tris looks unhappy here you should see the other pics…

If you’ve been following along, you may have noticed a trend of impractical white baby wear on this page that experienced parents like us should be wise enough to avoid. What can I say? Having two more babies just as the first two are almost grown wasn’t exactly practical either.

Anyway, my husband bought a white baby jean jacket the other day, but there were no white jeans at the store to go with it. So obviously I had to make some.

I also skipped the snaps on the inseam.

Fortunately, my hoarder tendencies come in handy in the sewing department. I’ve had this vintage pattern (I actually have gathered a collection for the whole family, women’s, men’s, and several children’s sizes) for a while. My mother, in fact, recognized the pattern line and told me she’d made me a pair of little jeans from them back in the day. A little bit of digging turned up a lightweight white twill (poly-cotton, I’m pretty sure) and white topstitching thread.

Anyway, the pattern claimed to be a size 1, however between the twins being rather shrimpy and patterns tending to fit large I figured they would be roomy. But if you’re going to sew ridiculous white baby jeans, you can at least make them with room to grow, right?

The pattern, as one might expect for baby jeans, is a bit stripped down. The fly is just for show and there’s no back yoke at all. The front pockets are real but have no lining—the cut-out curve is hemmed and the back portion is just top stitched in place.

This is the only white 1” elastic I had, and it’s salvaged off something else. There was just enough.

There’s a few other bulk-reducing points that I appreciated in a baby pattern. The waistband (only present in the front half) is cut on the selvedge so the inside doesn’t need to be folded under. The elastic is applied to the inside of the back, not folded into a casing. And finally, the “jeans stitch” the instructions recommend has you trim one seam allowance, overlock the other, and topstitch down. I was surprised at how much bulk this cut down, too. Usually I just overlock both edges together and stitch down, and I like the bulk in regular sized jeans, but for baby jeans anything that reduces bulk is awesome.

They close with snaps at the side-seams, a bit of a rudimentary closure where the top couple of inches of side seam are just left open. I doubt any closure is really necessary, given the elastic across the back waist, but I went with it as I figured if they were too big I could easily add another set of snaps to adjust them. Which I had to. Although I’ll already have to replace at least one. Oops.

My favourite touch, though, is the little dragon patches I added to the back pockets. The iron-on patches have been kicking around the stash for years, originally for Tyo and her bestie to put on their jackets but since that hasn’t happened I don’t feel bad yoinking them. I did iron them in place, but I trust that about as far as I can throw my husband, so I also spent my Saturday painfully hand-stitching down the edges. Hand-stitching through fusible guck sucks, by the way, and it’s hard to use a thimble when you can only get about three stitches done at a time before a baby face plants on you.

I had a lot of fun making these, impractical and oversized as they may be. The topstitching was fun, and white on white is forgiving. And the little dragons add a dash of personality. I was pretty dubious about the waistband construction the whole way (to be honest I really didn’t understand what they were going for until the very end) but I’m not mad at it, though I might not bother with the side openings if I did it again. But it’s definitely time to get back to my own jeans. These darn baby projects just like to sneak themselves in there!

5 Comments

Filed under Sewing

Gingerly, jeans

I massively enjoyed following the #nofearjeansmonth and #nofearnewjeans hashtags that Closet Case Patterns coined for February. I like to think of myself as one of the “first generation of internet jeans sexists”, having made my first pair as part of a Pattern Review hosted sewalong in the spring of 2010. Jeans were a staple of my wardrobe at the time, and being able to make my own revolutionized my mindset. Also, they were fun to sew. I even wrote posts full of helpful tips.

But in the last eight years, something changed. Partly, as I transitioned from grad school to the workforce, I got to indulge my love for stunt dressing more. This has always been a recurrent theme in my life, but it went particularly well with working at a fabric store, and even my eventual “grown up job” was a good venue for overdressing. I just wasn’t wearing jeans, except in my downtime, and there isn’t much downtime when you’re working two jobs.

But something else was going on in the background, too. Those jeans I had loved just weren’t working for me any more. Partly I gained a little weight, but even the ones that fit weren’t making me feel sexy any more. As I crept further and further past the thirty mark, as my skin elasticity changed… what I wanted in my jeans was changing.

Some of it is undoubtedly the cultural zeitgeist. Low-rise jeans, always controversial, had had their day. But I’ve never been a slavish follower of fashion and I’m not quick to change when something works for me. But my low-rise jeans were no longer working.

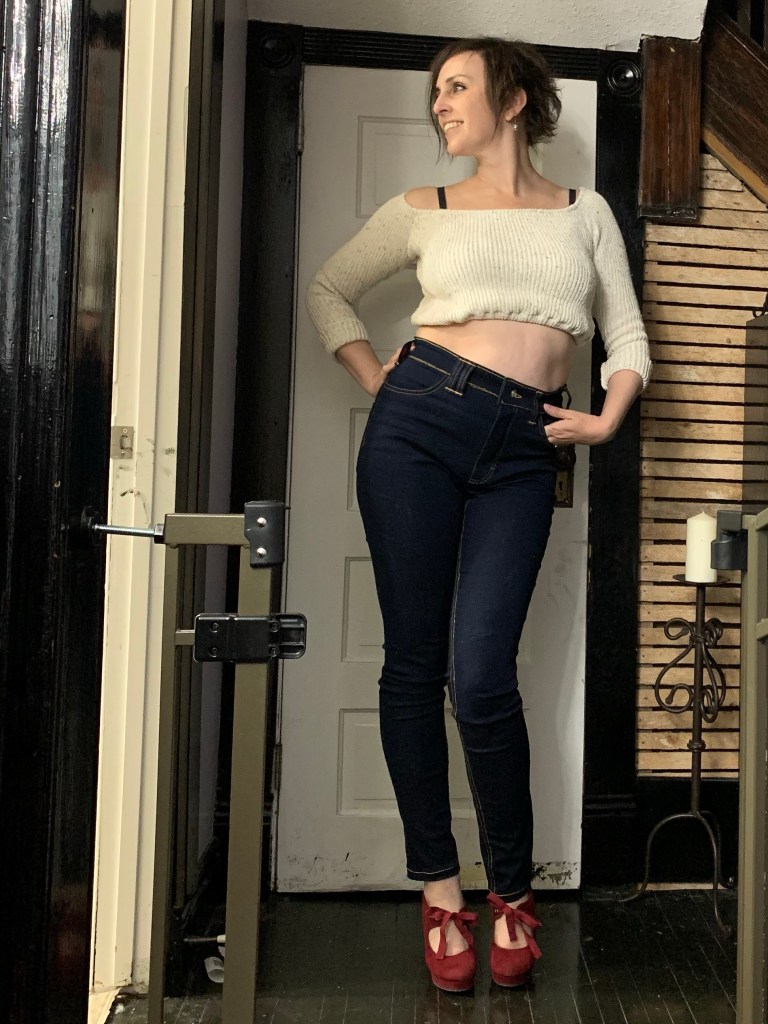
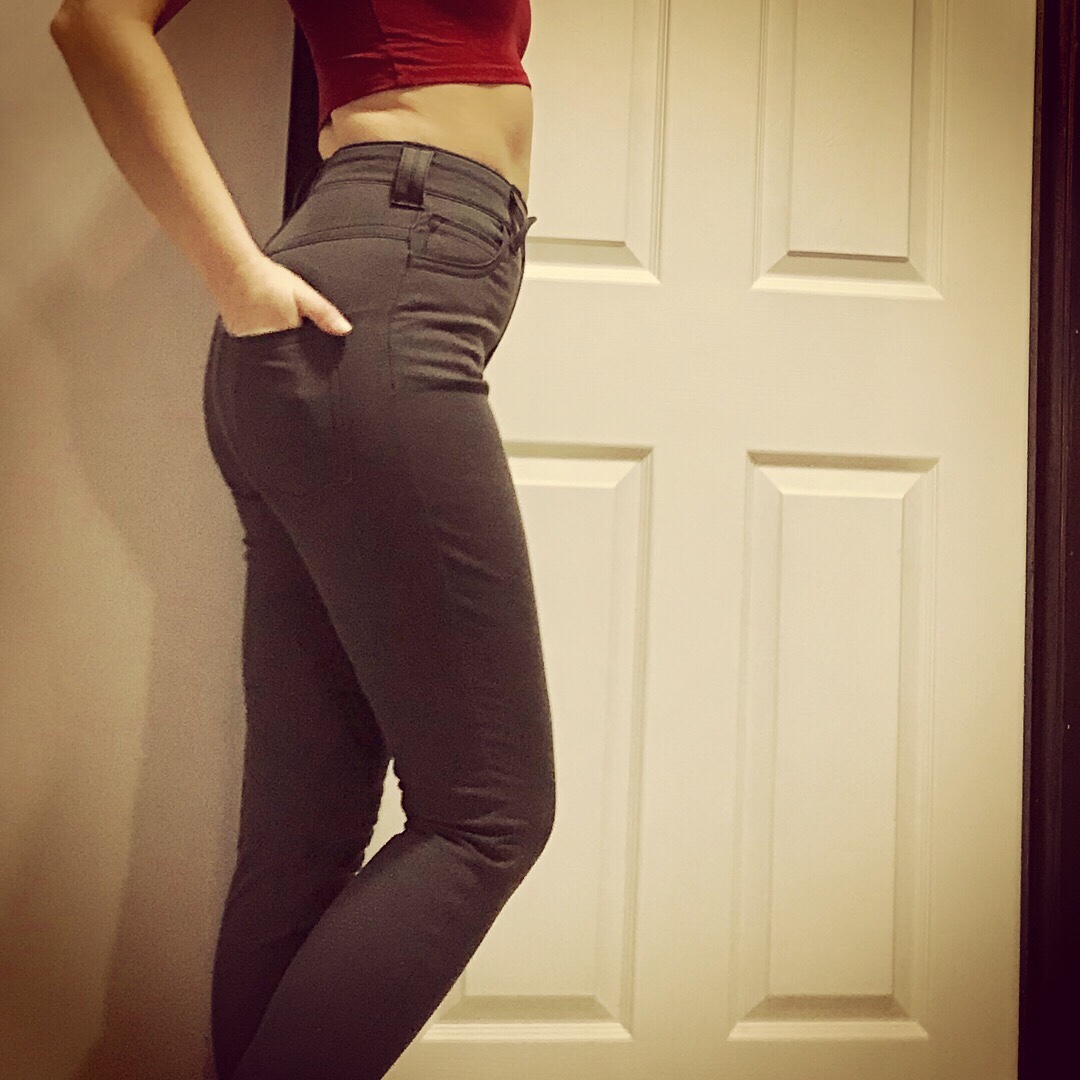
Enter the high-rise Ginger jeans. I’m not convinced these are working for me, either, but I’m branching out, testing. Seeking.

Compared to the changes I made to my Jalie 2908 pattern to get it to the style I wanted, the Ginger Jeans are a much better starting point. Actually the other view (low rise, straight leg) is why I originally bought the pattern when it first came out—it nailed exactly what I had modded my Jalie 2908 into. Of course, it was much easier just carrying on with my modded version than tackling a new pattern, so I didn’t. Until I was finally ready to try something different.

For this high-rise, skinny version, I made minimal changes. I added a wee bit of height to the back (possibly unnecessary), and angled the rear seam a bit more. I also had to take in the side seams, a LOT, but this is a very, very stretchy denim.

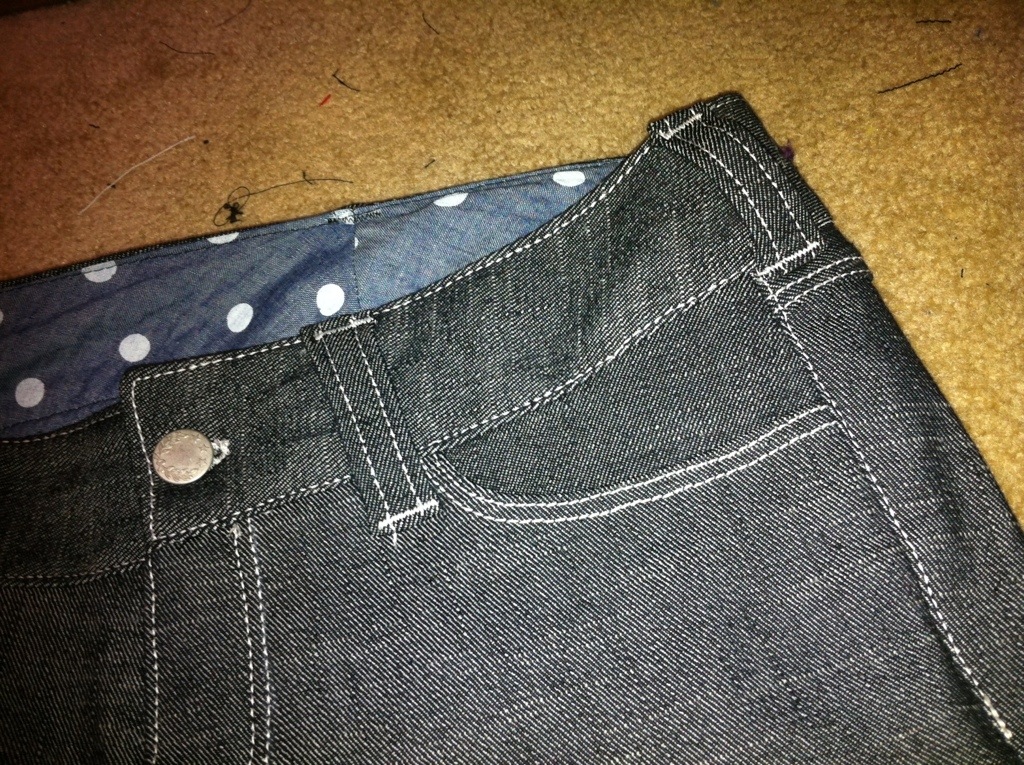
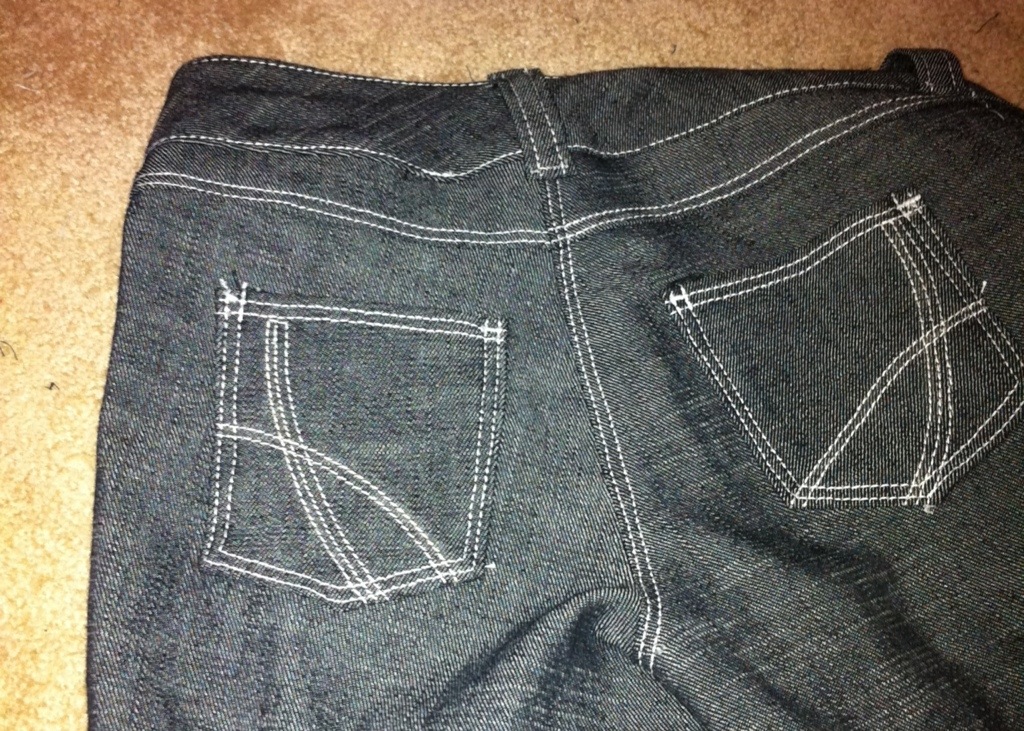
I did my pocket placement more or less as the pattern directed (I think) and I’m not super happy with it. They should be slightly higher and much closer together. (The closer-together part has a lot to do with the extra-stretchy denim, though)

This denim was a mystery fabric, so while I like the weight and stretchiness, I don’t trust it. But I think it cost me $4.00/m, which made it perfect for a wearable muslin.

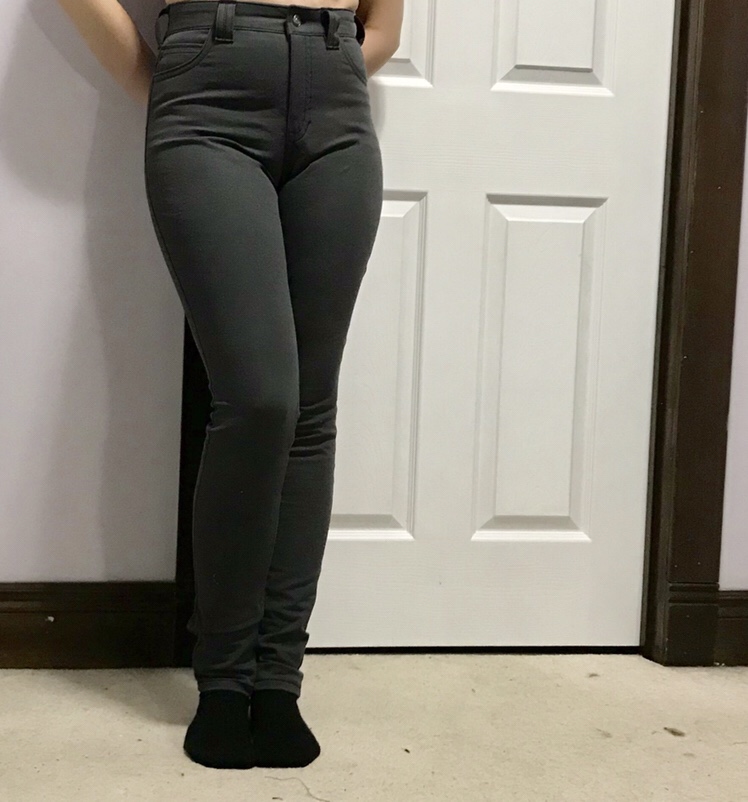
To make sure the waistband didn’t gape, I actually eased the back yoke onto a smaller portion of the waistband. This worked pretty well. I also interfaced only the front half of the waistband—I’ve gone back and forth on this over the years, as it’s kind of a trade off between comfort and stability. I’m pretty happy with the half-and-half, at least at this early stage.

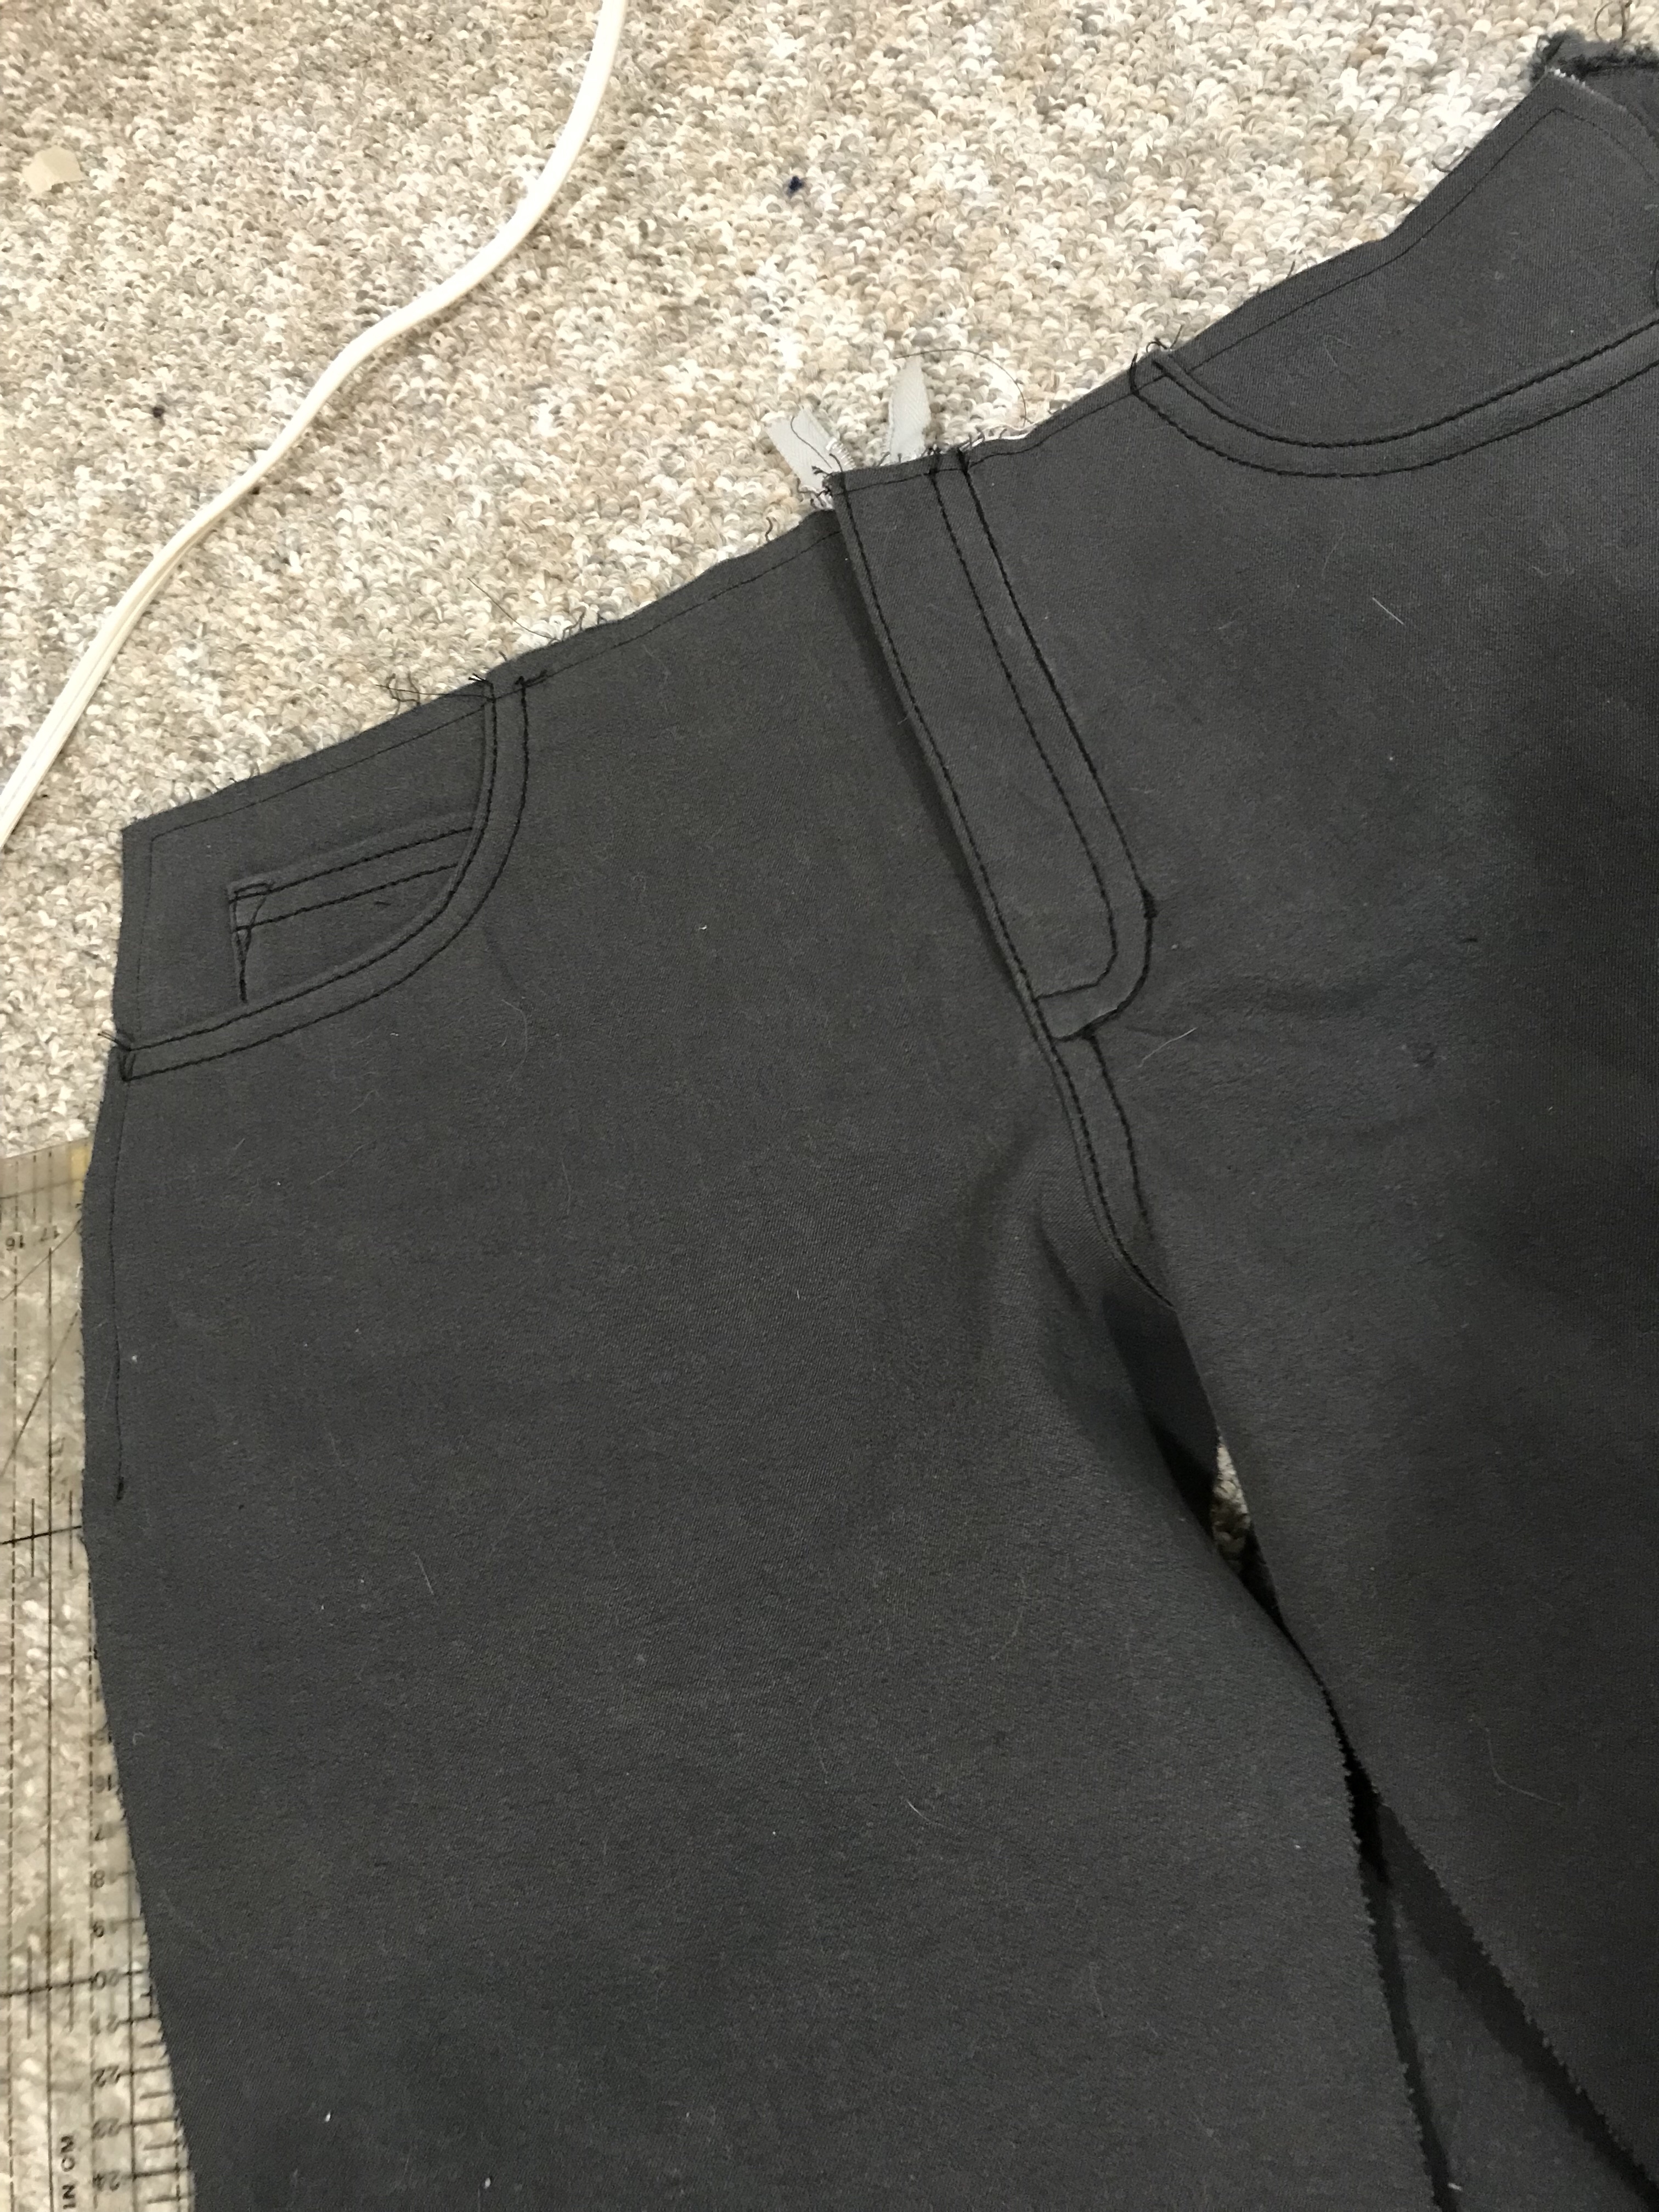
I topstitched on my new-to-me Elna, but I chose to use two extra-strong threads in the needle, and it was kind of a nightmare. Lots of snarling and refusing to penetrate, not to mention skipping stitched at corners and things like that. Eventually I gave up and dropped to one thread, and just topstitched twice all around the waistband and hems. The effect is better than I would’ve gotten with the two threads. So, next time, we won’t do that. I’ve also been experimenting with using Coats’ newish Eloflex thread in the bobbin—it’s stretchy, so hopefully less likely to snap in high-stretch areas than regular thread in the bobbin. I’m hoping, anyway. We shall see.

The Ginger pattern suggest you add a bit of interfacing at the top of the pockets to keep them firm. I gave it a try, but at least in this super-stretchy denim I’m not a fan—the less stretchy pocket rim makes a dent across your butt. (Though having worn them a few times since the photos were taken, I think they’ve stretched out a bit.)

So does the yoke seam. This is partly because the denim is so stretchy, while the seam is stable, and I think the position of the yoke line (the yoke is pretty tall on this pattern) emphasizes it. According to @wzrdreams on Instagram, who is a pattern smarty-pants, cutting the yoke on the cross-grain can help with this and I am totally going to try that next time. Though this particular denim has lengthwise stretch too, so it might not have helped so much. Anyway, wearable muslin.

The only real fit change I would make next time is scooping out the front crotch curve a bit—it’s a tiny bit camel-toey on me.

They’ve relaxed a bit after a day of wearing and I think that’s helped the fit, which is good. And they’re already letting me experiment with some wardrobe pieces I haven’t been getting much use of lately—mainly shorter tops—so that’s exciting. And the weird charcoal colour goes with some other things in the wardrobe which gives me some new colour combos to play with. So, I think good? I think?
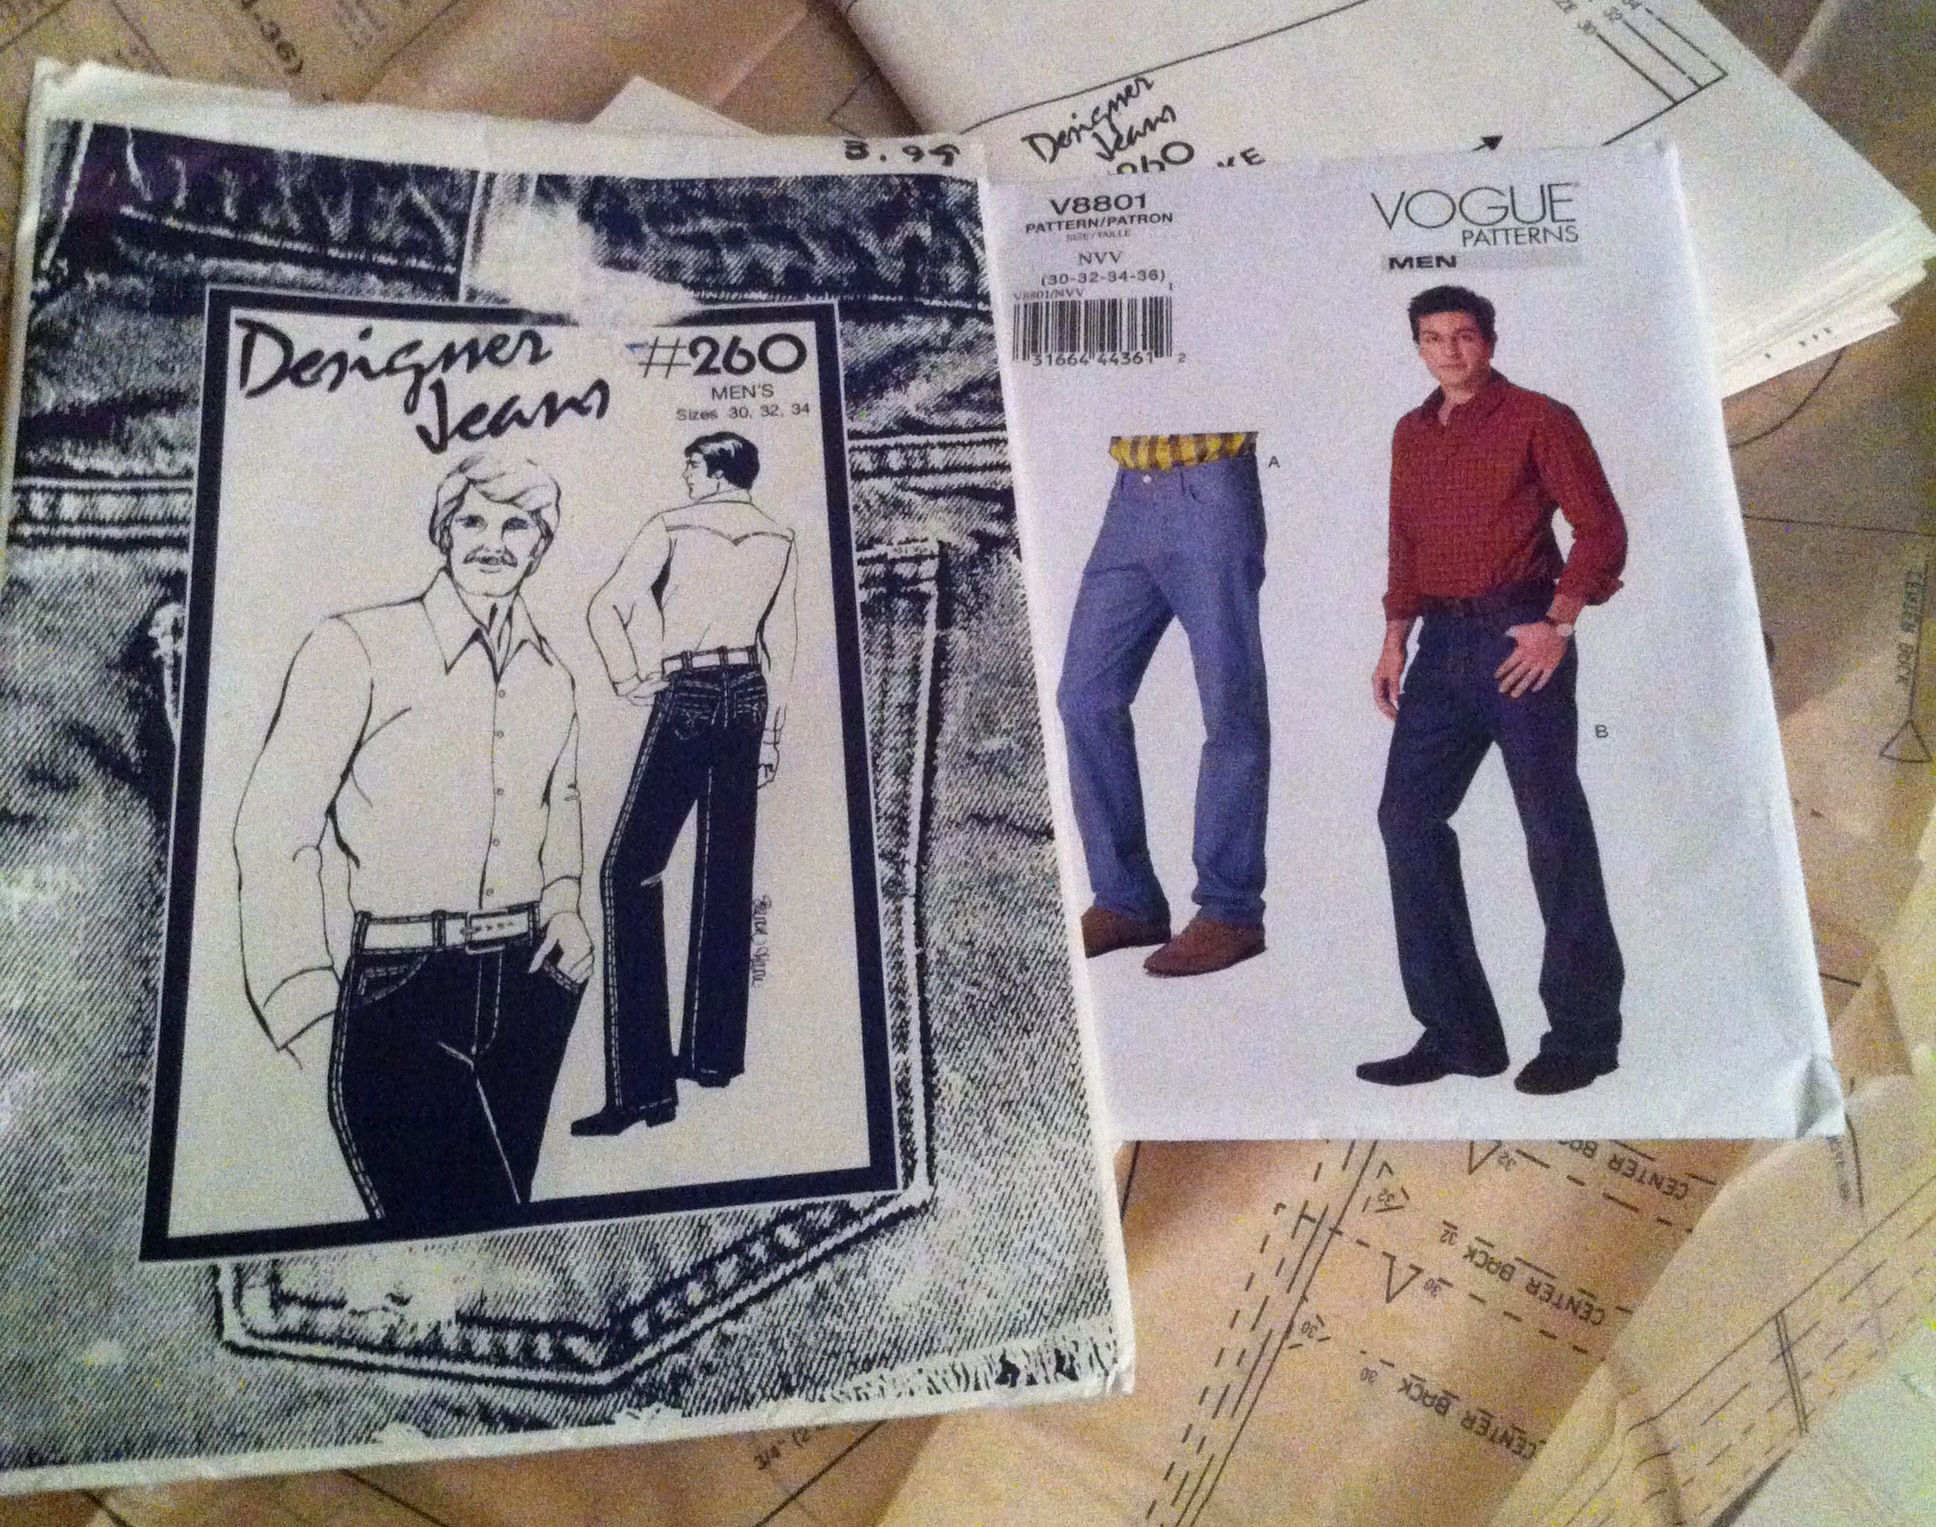
11 Comments

Filed under Sewing

V8801—men’s jeans

Men's Jeans

Men’s Jeans

I’ve been wanting and not wanting to sew jeans for Osiris for YEARS. For all the usual reasons: he is picky and has some specific fitting issues. Frankly, making shirts for him hasn’t been hard—as long as the sleeves are long enough and he gets the details he likes, he’s pretty much happy. But jeans—now that’s all about fit. Scary, scary fit.

So, let’s start with his main requests: slim/tapered legs (but they can’t be too tight) and a rise that isn’t too low. Fit issues will be leg length (easy) and his curvy-for-a-dude butt. (potentially horrifying. The fitting challenge, not the butt itself. I quite like that bit.)

I have a couple of patterns I’d like to try, starting with Vogue 8801. I’m kinda hesitant since what is out there for reviews are fairly mixed. (Everything from too tight to too loose to right on, but some concerns about the pocket placement and yoke proportions seem more consistent.) I was pleasantly surprised my husband’s 32″ waist and 37″ hips were within the same size range—but then he’s a little “chunky” right now, which makes him a lot easier to fit. (When he’s not “chunky” he has a 28″ waist, try finding men’s pants in that size. 😉 )

I also compared the Vogue pattern to an old indie pattern* I have that looks like it stepped right out of the rodeo. And was pleasantly surprised that they were very similar in overall size and rise. The Vogue seems to have a narrower front, but wider back pieces, and the angle of the legs is a bit different.

Curved yoke piece.

Curved yoke piece.

I made (perhaps unwisely) a few preemptive fitting adjustments. These are the same curvy-butt adjustments I make for Tyo (and to a lesser extent myself): increased height at CB with a wedge, and curving in the top of the back yoke. This may throw off the waist size, but we’ll cross that bridge when we come to it. Happily the waistband has a CB seam which should help with tweaking the rear fit.

At Osiris’s request, I’m using stretch denim. He’s had some health issues the last few years that contribute to a lot of weight fluctuation and variable bloating, so stretch denim has become his friend. The denim I’m using for the “muslin” pair is just barely stretchy , but the one I am hoping to make the “good” pair out of is both beefier and stretchier. (Frankly, it is taking every bit of my willpower not to make it into something for me… I totally downloaded the Ginger jeans pattern a few weeks ago… 😉 )

Fabric. And pocket lining.

Fabric. And pocket lining.

Another thing I’m curious but ambivalent about is the shaped waistband in this pattern. I mean, I’m all about that in my own jeans, but I wear them low, where curvature is needed—not at all where Osiris wears them. And they’re supposed to be interfaced (I even bought waistband interfacing, which of course won’t work with the contour band). If I do interface, I’m thinking I’ll go with a knit fusible, to get some extra heft but keep the stretch Osiris is loopin

Anyway, wish me luck!


*Designer Jeans #260, from Sharon Marie Studios, which appear to have been published out of Edmonton, Alberta, in the late 70s and early 80s. I have actually collected the entire family—men’s, women’s, baby, and a couple different size range of children’s jeans. My mom squealed when I showed them to her—apparently she made me a pair of jeans with one of the kids’ patterns when I was small.

9 Comments

Filed under Sewing

Attack of the blue roses

Blue. Rose. Pique.

There are few prints that make me as weak in the knees as blue florals. I talk myself out of buying them all the time. (I should perhaps note that most of the ones I haven’t talked myself out of buying, I also haven’t sewn up yet. I think this is the first blue floral that has made it onto the blog.) I’ve also been loving the wild print jeans that have been on trend. Actually, maybe that trend is past now? Oh, well.

So, since I actually had an entire weekend free last week (enough time to tackle a serious project), well, I finally succumbed to this blue rose stretch pique that has been taunting me at my local Fabricland for a couple of months now.

I’ve never used (heard of) pique before, but the waffly texture is neat and the weight and stretch seemed about right for jeans, although the stretch was on the low side of what I like. Being rather paranoid of white jeans (I have to be very careful underwear wise with this pair, for example), I wanted to line, or rather underline, them. Fortunately for me, there was also stretch cotton poplin available at Fabricland (not always the case)—so away I went.

So, it’s been a while since I sewed jeans. And there’s been a reason for that. Namely, that the Jalie 2908 pattern I traced off years ago now, and have used for every single pair of jeans I have made for me ever (OK, except one.), was getting pretty tattered. It had also always had some issues—notches that didn’t line up, alteration after alteration, some of them to fix previous alteration mistakes (all of which were my fault, I hasten to add, not Jalie’s). And, in a coup de grace, I had cut it intentionally small, for fabrics with c. 25% stretch. This fabric was in the 10% stretch range, tops—so I figured it was high time to trace off a new version that would work for low-stretch fabrics. And this time, I wanted it to be durable.

Freshly-traced pattern

So, I shelled out four whole bucks for a couple of metres of “Trace-A-Pattern,” which is basically a wide, non-fusible non-woven medium-ish weight interfacing. I did have to re-create my personal alterations, which I did rather differently this time, although the goal was the same; the first time I did a lot of switching between sizes at different lines; this time, I traced “my” size and just altered that. I made six changes:

  1. lower front rise only, c. 1″ (this “simple” change actually involved changing five pattern-pieces, making it the most annoying one to actually do.)
  2. raise rear rise, c. 1 cm
  3. shave off 5mm at front crotch
  4. curve in yoke by c. 3 cm.
  5. add 5″ of length, distributed both above and below the knee
  6. instead of the flares, make the legs go straight below the knee.

I also use a curved waistband, self-drafted with no particular method, but I didn’t actually redo that piece.

Underlining

I cut pretty much everything (except the waistband… we’ll get back to that) out of both the pique and the poplin, slapped the two together and treated them as one. Which made for a nice, beefy fabric, and the poplin is a lot smoother against the skin than the pique would have been. So I call that a win. (Oh, I was also completely Instagram-happy while sewing these so the construction process is remarkably well-documented. Well, sorta.)

Rear view

Rear view

So, pockets. In my previous pattern, I used a really tiny, child-sized pocket, in the theory that small pockets make your butt look bigger. (Yes, this is a goal in my world.) But, I thought a bit bigger wouldn’t hurt. I still cut a couple of sizes smaller than my “official” size. I didn’t try to print-match their position on the butt, but I did cut them out singly, trying to get one nice, big flower sorta-semi-centred on the pocket. Since I was lining everything, I figured I’d take the opportunity to to try making my pockets lined patches, so I didn’t have to fuss with folding the edges under evenly or making a template.

Lined patch pockets

Lined patch pockets

Seems very simple in theory, right? Stitch wrong sides together, leave a little gap, turn. Except, I knew I didn’t want the lining to show on the outside. So, trim the lining a little smaller, plus a good bit shorter so the 1.5 cm seam allowance at the top of of the pocket will be folded over. And, then you go to sew it and you have to ease the pique to the lining and oh, crap, those didn’t line up and what was my seam allowance again? And, let’s just say it was a nerve-wracking ten minutes until I got them turned right-side-in and realized they were, pretty well, still symmetrical and the same size. Whew. So in the end I’m actually really happy with how they turned out.

Turned pockets

Turned pockets

pockets

Back detail

Back detail

I had a lot of fun topstitching these on my Pfaff. I usually use my Featherweight, but it’s been living at my sister-in-law’s since last fall sometime, which is tragic but really useful on the rare occasions we do manage to get together to sew over there. (I don’t invite people to come sew at my house, the setup is kinda ridiculous. There’s machines in the computer room, one in the living room, cutting must be done on the kitchen floor, and the ironing board generally lives in the basement, although I did bring it up to the kitchen for this project, once I had the cutting-out done.) Anyway—I use a minimum of three machines when I’m making jeans, one for construction, one for topstitching, and the serger for finishing.

Topstitching

Topstitching the waistband

Normally I follow Peter’s advice and use a straight-stitch foot for topstitching. But, the Pfaff has this really cool edge-stitching blade that just slips in onto the presser foot, and its regular zig-zag presser foot has a really great shape:

Pfaff presser foot

It all comes down to the shape of the toes: the inner sides go straight front and back, which means you can follow a line of stitching right up them, as I’m doing in the photo above. My biggest problem in topstitching is usually “falling off” the edge of the seam, usually due to small variations in how tightly I’m holding the fabric. Using the stitch-in-the-ditch attachment, with the needle set off-centre, made it really easy to stay “on track” during that first edge-stitching pass. Of course, the fabric was lovely to handle, too, but then most denims are.

Front detail

I went for quite a wide spread between the lines, rather than my usual 1/4.” I really like it, although I did occasionally “fall off” the seam allowance, since this pattern only has 1 cm seam allowances. I did three lines of topstitching on the top of the pockets (because it looked cool) and on the belt-loops; I’d like to say I did it on the belt loops to echo the design detail on the pockets, but actually my edge-stitching wasn’t catching the edge of the folded-under fabric, leaving me with floppy serged edges on the underside of the belt loops. I really like the three lines, though. I may do that always.

Fit?

Fit?

Fitting is the eternal question, especially since in jeans you can’t try on until you’re pretty far along in the process, and I was re-vamping my pattern. And with stretch jeans so much comes down to the individual fabric and construction. I was pretty worried about whether this pique would have enough stretch. On the other hand, on the waistband of the last jeans I made, I intentionally made the waistband non-stretchy, but I didn’t stretch the pants beneath when putting the waistband on, so the waistband is kinda uncomfortably tight. (though it stays up without a belt, which is nice.) This time, I think I went too far the other way—I didn’t do any stabilizing to the waistband, though I did cut it with a back seam, so that the front portion would be on the cross-grain. This = maximum stretch. As a result the jeans are very comfy, but will need a belt to stay up. Which means I’ll have to find a belt that works with them—all of mine are pretty scruffy-looking. I may end up moving the button over some more, too—as it is the stretchiness allows the the fly to gape a bit.

There’s no gaping at the back, but I feel like I could still add a bit more height; it still seems like there’s just a little bit of a dip at the middle back.

Mini-flares

Mini-flares

As I said, I traced my pattern with legs straight below the knee, but what I actually wanted (which I tweaked in the cut fabric) was a bit of a skinny taper with a mini-flare at the bottom. Also slouchy ankle wrinkles. I always envy other people’s slouchy ankle wrinkles, but when I’m making skinnies for myself I keep cutting them off to the “proper” height, = no slouchy ankle wrinkles.) It took some serious self-control not to do that here, too, especially as when I first tried them on the legs were too wide and the mini-flare didn’t really show at all. Once I got it taken in along the outseam, from just above knee to the ankle, though, life got much better. And I *think* I quite enjoy the slouchy-ankle-slipping-over-my-shoes look, although I’ll get back to you after they’ve been worn out and about more.

Happy.

Happy.

All in all, I’m going to call these a success, although they were bloody hard to photograph for everything but the fine details. The trick is going to be wearing them—I think I like them with a white top, but I don’t have that many options. I’m not loving it with the navy stripes in the photo above, although the colours are ok.

Styling?

Styling?

Still, they were a fun experiment.

19 Comments

Filed under Sewing

This is going to be way too much fun.

20140607-230159-82919136.jpg

9 Comments

June 7, 2014 · 11:00 pm

The Jeggings That Could Not Be Photographed

20140316-165001.jpg

Ok, actually some of the close ups turned out really nice. But anything like a full body shot (or half body, since it’s a lazy Sunday and neither hair nor makeup happened) ? Black blob. Sorry.

20140316-165012.jpg

So the pattern is Burda 6926—JEGGINGS. I wanted jeggings to go with my scrunchy top. I can’t quite articulate why, since I’ve lived thirty-mumble years already without jeggings and gotten by quite well (arguably I need another pair or three of REAL jeans, but I’m not sure these will really fill that slot)… but anyway. The fabric and the pattern both hit me at just the right time.

20140316-165029.jpg
So, let’s start with fit. I could tell from the photo (or guessed from the photo) that the front rise was going to be excessively high, but I figured I like a bit more coverage in the back so I’ll leave that. I cut the front pattern piece along the lengthen/shorten line and hinged it down, pretty much as far as I could without obliterating the fly. You can see the wedge taken out towards the top of the picture above. This is not really the best way to make this alteration, but I was feeling too lazy to attempt to do it “properly”, which would involve tracing the front with the pocket-yoke in place, adjusting the rise, and then removing the pocket-yoke again and adding all those seam allowances. I figured this would get me into the right ballpark. I also measured the inseam (going for the longer version), which was around 29″ (actually probably a bit less since I don’t think I subtracted hem). Now, leggings don’t need as much inseam as regular pants, and skinnies don’t need as much as flares if they’re stopping at the ankle (though I will admit that I love that excess-fabric-scrunched-up-at-the-ankle look Tyo always gets, with the same kind of envy that I once had for people who got to walk on the backs of their flares). But 29″ is not quite flood-pants length, plus these are contoured both above and below the knee. So I added 3cm at each lengthen-shorten line, coming to a total of 6 cm, just over 2″. 31″ is in the right ballpark for me, at least for leggings.

20140316-165208.jpg

I should mention before I get ahead of myself, there are no front pockets in these jeggings. There is a separate pocket yoke piece, which you just sew to the front and topstitch down. A little silly, but it gives you the look. It would be easy enough to add pockets to them, but I think the outline of the bags would probably show through.

In the picture above, you can see a blue chalked line running and inch or so below the waist. When I got to try-on stage, I had good (barely) coverage in the back—a bit of a dip there, actually—a little high in the front, and REALLY high at the sides. Which is a really weird look, by the way. I put them on, pinned the elastic around my hips where I wanted the waistband to be, and chalked out my changes. Unfortunately, this cut off most of my “pockets”. Not a practical problem for this pair, but not quite the visual I’d been hoping for.

20140316-165106.jpg
As you can see, not much pocket. I didn’t do much topstitching on the waistband, nor did I add a decorative button as the pattern suggested. Really, this bit isn’t going to fool anyone—nor, frankly, is it likely to be seen at all since I’m well past my crop-tops phase. /sigh.

I do think I did pretty well on the topstitching—topstitching a fly is extra easy when there’s no actual zipper underneath to work around!

20140316-165126.jpg

Although, I completely failed at getting my topstitching to go the right way front-to-back. Fortunately, no one else should ever be looking at my crotch like this.

20140316-165052.jpg

Which brings us to the back. There is no yoke, which I guess is fine for jeggings? It certainly speeds up the sewing. It made positioning the pockets a little odd, though (what, you say I could’ve used the pocket placement from the pattern? Heresy!)

20140316-165139.jpg

I quite like the size of the pockets, though. I opted for plain, mostly since I don’t trust the straight topstitching to hold up over time on this stretchy fabric.

Speaking of which, I determined on testing that my fabric had about 25% stretch crosswise and 50% lengthwise. Weird! So I cut them on the cross-grain, to get maximum stretch going around me. Then I wound up having to take in the jeans at the side-seams by a good 1/2″ (so a total of 2″ around) each. So maybe 25% stretch would’ve been fine. Anyway, 25% stretch is well within the capacity of normal stretch-denims, so you could maybe even try this pattern with regular denim, not just a denim knit like this. Although I feel like the waistband would be a bit weird. I dunno.

20140316-165149.jpg

This is the better of the two hems. 😉 Nearly perfect! I was trying to do the construction on my Grandma’s machine and the topstitching on my White, since a) Grandma’s machine already had a bobbin wound in the right thread, and b) last time I did topstitching on Grandma’s machine, it pitched fits and had terrible tension issues (I also didn’t have a topstitching needle, which doubtless contributed to the problem. This time, I have a whole package). Well, the White wasn’t too in love with the topstitching, either, so finally when I was fighting with the last hem I switched over to Grandma’s machine and it was—well, not exactly a breeze, but about a jillion times better. And no tension issues. So maybe it was all in the needle.

20140316-165258.jpg

Anyway, weirdnesses aside, I think they will serve. (See, we even tried outdoor photos! Also, do you see that wet pavement? Spring is coming! And, yes, the house next door is ridiculously close to ours.

26 Comments

Filed under Sewing

Jeans at last.

Jeans!

Jeans!

I’ve needed new jeans for a while. Like, a really long while. The last pair was these skinnies, a year and a half ago. Which, I’ll add, wound up twisting annoyingly in the one leg, so I don’t wear them much. I think I definitely need to embrace the single-layer cutting for jeans. /sigh.

Jeans

Jeans

There’s not much to say about these. It’s the same pattern as ever, the same techniques, even the same frickin’ pockets. I’ll repeat the detail shots from the last post just for the sake of completeness. I did spend some time tweaking my contour waistband pattern, which began life as the waistband from the Burdastyle Ellen pants (which are no longer free, WTF?) but has since gone through several iterations. This version is wide, curved in the back and straight(er) in the front, and doesn’t gape over my butt even a little bit. More importantly, it didn’t gape over Stylish’s butt, which I am really frickin’ proud of, but I guess that’s another post (assuming I can pin her down for blog photos. These non-bloggers, /sigh.)


Front details

Front details

I used this polkadot (?)chambray for the pocket lining and inside waistband. It’s nice, but a bit lighter than I’d like for this purpose, I think, even interfaced. The waistband is fairly wide, and it ended up being a bit floppy, even with my adding a CB seam so the front could be on the grain. Also, I should’ve added two buttons for the width, not just the one. Hopefully we’ll get around to the rivets sooner rather than later.

Back details

Back details

I did not put a whole lot of work or thought into the pocket design. Just something simple I could copy fairly easily. I was busy overseeing Stylish’s pair.

Back view

Back view

Oh, yeah, and I’ve recently discovered the one up-side of having a child large enough to steal your clothes. You can steal hers back.

Side view

Side view

And, while I normally wouldn’t show this much tummy these days (never mind on the internet), Osiris’s reaction to this ensemble was, shall we say, sufficiently positive that I’m gonna put it out there anyway.

Ma butt

Ma butt


Hmph. Done.

Hmph. Done.

Of course, just as I finished these, summer’s last gasp really set in and we’ve had nothing but hot, sunny days completely unsuited to jeans. Ah, well. Winter’s just around the corner and I’ll have plenty of chance to wear them soon enough…

19 Comments

Filed under Sewing

Pantsclub

20130825-231453.jpg

Our little sweatshop

I worked it out the other day and realized it’s been like a year and a half since I made myself a pair of jeans. Say what? I know! Crazy! And, the best of the remaining pairs (or at least, the newest) recently developed a run, or whatever you’d like to call it, in the butt just beside the CB seam—you know, when denim wears so the threads one way are gone but the threads the other way are still there. Anyway, I darned it up on my Grandma’s Rocketeer, which is about all I can really do on it since neither cams, accessories, nor bobbins have appeared.* but the fact remains that it’s well past time for a new pair or two.

So I cornered my Stylish sister-in-law and we picked a date for a sewing day—after months of not being able to—and when I asked her if there was anything she wanted to make For Her (as opposed to the kids or husband), her first thought was capri-length jeans. Perfect!

Not really a beginner project, you say? Pah, I say! We shall charge ahead! Especially since I just scored some lovely denim at 70% off… What could go wrong?

20130825-231347.jpg

The topstitcher

Don’t answer that.

Anyway, we set up our little sweatshop in Stylish’s basement. I brought over the elderly serger (which has decided it won’t cut at the moment. Yes, I’m sure the blades are dull as all get up, but the damn thing was slicing everything just fine right up until two weeks ago. WTF?) and my featherweight, for the topstitching. The three-machine, two-sewists setup worked quite well, as I could usually manage to be working on a different machine.

20130825-231300.jpg

Yoke alterations

So, over the weekend we spent all our spare time tracing, cutting, and sewing a couple of pairs of jeans. The pattern, of course, is Jalie 2908. I really need to re-trace and revamp my version of the pattern, and come up with a less stretch-intensive version, but for this one I resorted to just chalking in a bit more ease (and length) where I needed it. Again.

20130825-231313.jpg

Rear rise alteration

For Stylish, I had her trace off her hip size, and then added the usual suite of alterations I do for Tyo in Jalie patterns—adding to the rear rise with a wedge at CB and curving in the rear yoke. I’ve been working on my contour waistband pattern, too, and I think I may have perfected it—or at least, it appears to work for both my butt AND Stylish’s, which is a friggin’ miracle if you ask me.

20130825-231426.jpg

The waistband in question

(Note—all images are of my jeans. Why? Because while I was standing around taking pictures, Stylish was actually working on hers. 😉

20130825-231417.jpg

Front waistband. Looking pretty good when not on me.

Confession—between when I first banged off this post and publishing, we managed to pretty much finish. My pair is OK, although I made the waistband non-stretch which means it’s really tight. I like the non-stretch waistband but I need to make some pattern modifications (i.e., more ease) in the upper hip if I’m going to use one. Stylish’s pair is pretty good IMO, in her opinion not so good—one of the legs twists a bit and the fly does a curious list to one side. I’m not sure what’s up with either, frankly, since we both did the exact same thing. I just wish I could get her to appreciate the miracle that is the fact that it doesn’t gape at the back and is only mildly wrinkly under her butt. Also, I don’t think she is adequately awed by the fact that that fly (which she sewed entirely on her own, albeit with me going “ok, sew this part now. Now sew this.” is her FIRST ZIPPER. FIRST ZIPPER EVER, peeps.

20130825-231409.jpg

The whole shebang (with chihuahua)

Actual photos to follow at some point, but for now, have a floor pic with a chihuahua, MPB style. My Crafty sister-in-law came over one evening, too, and finished a blouse she had started way back in the winter—so I will have to make her dress up and get photos done of that, too. In my copious spare time…

*not strictly true. There is actually a cam in the machine, for making, based on its markings, a diamond pattern zigzag. I have managed to get it to produce great straight stitches, narrow zigzag stitches, and a variety of “decorative” variations that don’t look like much. I will definitely be consulting the manual linked to by my helpful readers! Intuitive, this machine ain’t. I’ve come to the conclusion that I like my sewing machines the way I like my computer programs—while I appreciate a good manual, I’d much rather just sit down and bash at it and see what I can figure out. For that matter, I think that’s my approach to a good chunk of life…

10 Comments

Filed under Sewing