Tag Archives: pants

Lengths of the Pantses

Patternmaking for Fashion Design

Curiosity over the actual definition (if there is such a thing) of the names for the various pants lengths after the piratas*/capris post led me to do some book-type sleuthing.

Here’s one picture, from Patternmaking for Fashion Design by Helen Joseph-Armstrong. According to it, we are all wrong and “capris” are the length only one inch above the ankle bone (which I would’ve called pedal-pushers or flood pants or clam-diggers, if pressed). Her pedal pushers and “toreador” length I would both have called capris. Apparently Bermudas are quite a bit shorter than I’d thought, only about 3/4 of the way down the thigh. Maybe I’m mixing them up with men’s board shorts. Probably this says something about the imprecision of everyday word usage, regional variation, and just my own failure to pay attention. Of course, I wouldn’t be surprised if there’s no actual standardized terminology. I don’t think there’s an International Code of Fashion Nomenclature that will bar your style from sale if it isn’t labeled appropriately.

What do you think? Any other “official” length designations out there I should be aware of? I’m a little torn on issues like this. On the one hand, who the frick cares? On the other hand, I spend most of my professional life dealing with extremely technical terminology, and I really appreciate the precision it allows. If there is an agreed upon standard, I’d like to at least know what it is so that if I screw it up, it’s on purpose.

Ooo, oo, I know what Tyo’s pants are!

Moi, circa 1983. Jeez I loved this outfit. I am pretty sure my mom made it.

They’re knickers!!!!

Ok, I’ll stick with capris. Or piratas.

*the Patrones magazine is in Spanish, from Spain. Given the differences in clothing terminology between England and North America, I’m not going to assume that the terminology Patrones uses is common to Spanish-speakers worldwide, either.

Advertisement

42 Comments

Filed under Sewing

Red Leaf Clover (Round two)

Clover---round two

Grum.

So. Still not the best photography, but at least it’s not the iPhone. I lightened the crap out of things to make the wrinkles etc. show better.

So, at this point I have lowered the rise in the front 5cm, tapering to 2.5 at the hip and zilch at the centre back. And this time (yay!) the zipper held out long enough to take some actual photos.

So at this point I’m seeing two major problems, aside from generalized looseness:

1) wrinkles at side-seam along hip. Several of you in the last post (thanks so much, everyone!) attributed this to excess hip curve, and you’re probably right. On the left side the zipper has forced this extra length into a single large fold at the bottom of the zipper, on the right side it’s more distributed.

2) bagginess at front crotch. I obviously need to research this. These aren’t strain wrinkles—it’s more like there’s just too much fabric here.

Minor problems include

3) dip at CB still there. If I lower the sides more, this may help, but really a bit of extra height in the back will be a must for next time.

4) wrinkles and looseness along legs. There’s some width that can be taken out here, I think.

Next up, I did what I should’ve done before I ever cut, and dug out my pattern for the Burdastyle Ellen Pants. This is the one that created the Businesswoman Pants, and while the fit isn’t totally perfect, it’s hella better than this pair, at least so far. The only reason I didn’t before, aside from laziness, was that the Ellen isn’t drafted for stretch fabric, so I wasn’t sure how precisely comparable they would be.

Crotch Curve Comparison:

Ellen vs. Clover

So this was the REALLY interesting part. I overlaid the two patterns. The solid paper is the Ellen pants (cut to a size 34 rather than my usual 36 as they run large). The tissue is my tracing of the Clover (size 2 grading to size 4 at the waist).

The biggest single difference is the rise in the front. It’s more than an inch higher at the centre front, and substantial. The rear rise is almost identical—a smidge lower at CB, a cm higher at the sideseam. There’s a slightly greater curve to the hip in the clover. The back piece is slightly wider in the Clover, but then the front piece is slightly narrower, so I think the overall width is very similar (and Ellen is non-stretch!). The spookiest thing is that the diference in rise doesn’t even out at the side seam—the rear side-seam is higher, when the crotch curves are lined up, than the side on the front, which means that there’s some odd shifting of how the halves are going to fit together. That’s boggling my brain, I tell you.

The crotch curves are almost identical, up to and including the much longer rear than front curve. This is the bit that really threw me for a loop, because I was expecting there to be a significant difference, not just a few mm at the back of the rear crotch curve. Now maybe having the front fly on the Ellen masks certain things, or maybe it’s just that they’re in non-stretch fabrics, but I never saw anything in any of my Ellens like the folds I have in the Clover.

There are a few other differences—the Clover legs are much narrwer, especially as you go down, than the straight-legged Ellens. But on the whole—scary close.

So I think I’m going to cry Uncle, seam rip the entire kaboodle, and recut following the Ellen pattern at the top. And then maybe consider taking in the side-seams until the stretch factor is properly accounted for.

And this, Ladies and Gentlemen, is why I’ve stuck with the same two pants patterns this whole time…

31 Comments

Filed under Sewing

Red-Leaf Clover

Colette Clover pants. You can see from the wrinkles that the waistband at the side isn't pulled as high as it can go.

Or, possibly the worst-photographed post ever.

Did I mention my camera charger didn’t come home with me after the holidays? So yeah, the last few posts have been iPhone photos. Painful, I know. I’m working to get the back-up camera functional again (battery issues, but at least it uses standard AA batteries), but as of this moment you get iPhone photos.

So, after making little jeans for everyone short in the family (or at least that’s what it feels like…), I was in the mood for some new pants myself. And frankly, I’m a little bored of Jalie 2908, although I do have fabric for another pair for myself planned.

So I pulled out this red stretch (?twill? Sometimes it looks like twill, other times not.)

After much hemming and hawing, I cut out the size 2, which is my actual hip size, grading to a size 4 (which is not quite my actual waist size) at the waist. The long view finished inseam is listed at 27″, designed to fall just above the ankle. Dear readers, 27″ is a longish capri length on me.  Since it’s winter and my desire to make a pair of pants that would look funny with socks is at absolute zero, I decided to lengthen them to a more normal, scrunch-around-the-ankle, skinny length. I added 6″ (15 cm.) I had some misgivings about the rise, which some people have reported as a bit high (and we all know I’m a low-rise kind of girl), but figured I would keep it as-is for now, as that’s something which can be tweaked after the pattern’s cut. The crotch-length was a little disconcerting, as the horizontal leg of the back L seemed really long, but the horizontal leg of the front L was really short, so I hoped it would even out. It’s different from most of the other crotch-curves I’ve seen, so I was kind of curious to try.

Clover crotch-curves

And then I took a deep, deep breath, and I cut into my precious* red twill.

It is my intention for these, eventually, to be a sort of wearable muslin. Uncharacteristically for me, I basted them together just to check the fit—I’m planning on completely re-stitching everything once I have them fitting how I like.

I didn’t get any full-length pictures. The legs are pretty much fine—skinny, long enough. I may take in the outseams above the knees about .5 cm on each side—enough to bring me down, basically, to a size 0; I think this fabric has a bit more stretch than the pattern may have been planned for (I wish it had a stretch guide, or at least listed %stretch rather than %Lycra.  % Lycra is not very useful at all in predicting how much a fabric stretches, in my experience.) Alternatively, I may just like my pants tighter than was originally meant. Which is probable, too.

Anyway. The rise in the back is good, although it does that dip-down thing at the middle of the back. I would not want it any lower, that’s for sure.

Front view. You can just barely see that my belly-button is immediately above the waistband.

The rise in the front is a full 5cm (almost 2″) higher than I’d like. The pin in the front shows where I’d like the bottom of the waistband to fall in order to get the rise right.

The size of the waistband seems good as long as I don’t interface all stretch out of the waistband. (Though I suppose this will be different once I change the rise, anyway.) There is not much gaping at the CB, which is a common problem for me, so that’s good.

Unfortunately, the crappy zipper I threw in self-destructed within about 30 seconds of me putting the pants on, so I’m frantically pinching the one hip together in the pictures.

The front crotch seems a bit odd, I think because the curve is so shallow, but I’m hesitant to mess with it at this point. Maybe later. If any of you know what these wrinkles mean (left side of the photo, the right side is being pulled off by the issues with the zipper) please let me know! 😉

Anyway, I think I’ll be able to make some quite nice pants out of these, once I have them tweaked a bit. But some tweaking is definitely required.

And unpicking. And, y’know, reading the actual instructions.

*in the sense that I have been looking for a fabric like this for ages, not in the sense that it was expensive—it was definitely not.

49 Comments

Filed under Sewing

To Do, To Don’t, and What do I know?

The latest jeans

So after my great Skinny Cargoes affair, Claire of Sew Incidentally asked if I would consider putting together a do’s and don’ts post for jeans. Since I’m such a master at them, and all that.

Erm.

So, aside from the fact that she must be confusing me with some other blogger, I thought I’d give it a shot. Especially as I decided to crank out one last pair of denim to get me through Me-Made March.

Now, it didn’t take me long after deciding to “take my sewing to the next level” last spring, to decide that I wanted to tackle jeans. Yeah, I’d successfully managed to make my first blouse, what horrors could denim possibly hold?

This was spurred on by a number of factors. The biggest one was probably stumbling on the Jeans sewalong thread and summary thread on Pattern Review. I read literally every post of that 85-page thread. The idea of making my own jeans really appealed to me. First of all, I live in my jeans. Second of all, I’m picky about my jeans and how they fit. Third of all, I have pretty darn long legs. All of those factors combined means that I have spent a LOT of money over the years on jeans. Buffalo. Guess. Rarely under $100 for a pair. You get the idea. And always with that terror—will the fit I like go out of style? Will they be long enough? Even if they seem to fit when I try them on, will I wear them for a day and realize that they’re too short and too loose? Will I tear through the “artfully worn” knee within the first half-hour of putting them on (that pair was Guess, I returned them)? Speaking of which, when is that pre-tattered look going to go out of style? It was in style when I was in high-school (mid nineties). It was in style five years ago when the hubby and I went to NYC (and shopped at Gap. I know, we should be shot.) And it was EVERYWHERE last time I was tying to buy commercial jeans, which was one year ago. I haven’t really looked since, maybe it’s gone away?

Despite the wonky stitching on the pockets (I suck at free-motion embroidery), these are probably still my favourite self-made jeans.

Now, I have a very clear list of things I’m looking for in my jeans. As far as I’m concerned, stretch-denim is the greatest invention of the 20th century (ok, after the birth-control pill). I like them low-rise, with a very fitted leg. I’m flexible on the degree of flare, although for preference I’ll go with what I tend to call a “stovepipe” leg, which is fitted in the thigh but absolutely straight below the knee; I’ve only ever once found this style in RTW.

If your list is different (as it doubtless is—few people are as fond of I am of the low rise, for perfectly good reason), some of my methods won’t apply, especially if you’re not looking for snug-fitted stretch-denim. (What, not everyone wants their jeans to look like they were sprayed on?!?) But I do hope you’ll be able to glean some nuggets from the dross, or at least be encouraged to tackle your own.

Incidentally, based on the PR thread, I used the Jalie 2908 pattern, with an assortment of modifications to make it suit my taste that are mostly detailed here. I like this pattern, but then I’ve only ever sewn two pants patterns, the Jalie one and the Burdastyle Ellen pant. Both were pretty painless, doubtless due to my minimal curvatures in this area. So I wouldn’t consider my endorsement to be the be-all-end-all in this area.

Anyway, without further ado,

DO:

  1. pay attention to the % stretch, not the % lycra; expect to resize slightly depending on the individual stretch of your fabric.
  2. buy enough fabric for two pairs of jeans—the first one can be a hopefully-wearable muslin, and you’ll know what to expect from the remaining fabric stretch-wise.
  3. wash and dry your fabric on hot at least once; then let it sit or hang (“relax”) for at least a day or two, as the heat can bunch up the lycra fibres, creating fabric that will stretch too much after wearing.
  4. My foot for topstitching. Not necessarily the best, just the best from my limited selection.

  5. do figure out which sewing-machine foot works best for topstitching. A lot of people prefer a straight-stitch foot as the sides are narrower and you can see right up to the needle. I don’t have one, but I find my rolled hem foot (of all things) works the best. An edgestitch or possibly even blind-hem foot are also good options.
  6. play around with your topstitching options. There’s jeans

    I wrap my topstitching thread around the bobbin-winding doohicky to increase the tension (AKA cheat)

    thread, topstitching thread (really heavy), upholstry thread, or even regular thread in a stretch straight stitch (triple stitch) if your machine does it. You will probably need to raise your top tension if you’re topstitching with a heavy thread, and may even need to cheat.
  7. be prepared to baby your machine over the thick parts (at least if you, like me, have a wussy modern machine. Sometimes I need to just turn the hand-wheel for several stitches. Or hammer the crap out of the seams (preferably with a rubber mallet. I use a regular hammer or even my rock hammer and if I’m not careful the edges will cut the fabric)
  8. construct the front first, then the back. Have another pair of jeans around for reference. Attach the pockets after sewing the two sides of the back together, and centre them relative to the topstitching, rather than the true CB.
  9. If you’re doing anything other than the simplest of pocket-embroidery, you will want to stabilize the pockets, either with wash-away or tear-away stabilizer or even interfacing. I recommend the removable stabilizer, though; permanent interfacing interferes with the pocket’s ability to stretch and causes butt-flattening. (Ask me how I know 😉 ). Use a cardboard template to press your pockets’ seam-allowance under. Speaking of pockets, I use a size-K pocket on my size-Q pants. My derriere is compact, and I don’t like the bottom of the pockets to go below my actual bottom. YMMV.
  10. Look up your favourite fly-insertion method EVERY SINGLE TIME. My

    What passes for a successful fly around here.

    favourite is Debbie Cook’s; a lot of other people recommend Sandra Betzina’s video. (I have a hard time following video instructions, for some reason.) Also take a long, hard look at some RTW flies while you’re doing it. It will help. Oh, and interface the fly, too. (The fly isn’t actually hard. It’s just really easy to do the wrong way around, which is mildly annoying. The topstitching is a bit tricky, too, but you can manage.)

  11. once you have your jeans stitched up the side, before applying the waistband, do put them on and wear them around the house a bit (preferably for a few hours). This will give you an impression of how much the denim will relax with wear. You may also want to do a trial wash (serge the top edge first) at this stage, as washing and drying are another wild-card for stretch fit.

DON’T:

  1. be afraid. You can totally do this. Denim is heavy, but lovely to sew.
  2. use a pattern or fabric you don’t like. Remember that *perfect* pair of jeans you’ve been mourning since the day went to that great warehouse in the sky? Those are the ones you’re trying to re-create. You won’t, of course, but with any luck you’ll make it into the right ballpark.
  3. cut your waistband on the bias. I use a contour waistband on mine, stabilized with a light-weight interfacing. If I had to go with a straight waistband, I’d cut it on the lengthwise grain, to reduce stretch. My RTW jeans often have about 50% stretch in the fabric, but only about 10% stretch in the waistband (how do they do it?)
  4. sew over the bottom of the zipper when you’re topstitching your fly. Instant recipe for broken needles flying into eyes.
  5. add or remove length at the hem. Unless your jeans are drafted perfectly straight, there’s shaping between hip and knee, and knee and ankle; you need to measure your length to the knee and add (or remove) both above and below to keep the proportions right.
  6. add a wedge to the side back rather than the centre back because you weren’t paying attention. (yes, I did this once.)
  7. if you’re making skinnies, don’t narrow the leg so much you can’t get your foot through (unless you’re adding zippers!)
  8. freak out about wrinkles below your butt. These are not trousers that are supposed to fall straight down from the widest point. There will be wrinkles.
  9. try to finesse the slightly-too-tight waistband fit by putting your button too far over. You’ll just end up with a gapy fly.
  10. feel self-conscious about your wonky-topstitching, or those almost-invisible darts in the yoke. No one is looking. Seriously, they aren’t.

I extend my pocket-linings all the way to the front fly. This interfaces the fly while stabilizing (i.e. slimming) the front, and is super-easy to draft.

I have to admit I feel a bit bad about these lists. They’re tailored so specifically to my “jeans ideal”, which I know is not everyone’s cup of tea. I don’t have much to say about fitting—other than curving the back yoke and taking in the outseams a little bit, and of course the inevitable length adjustment, I haven’t done any (stretch-denim is fairly forgiving). Certainly no messing around with crotch-curves as the intrepid Patty does on a regular basis these days. While I’ve made a crapload of adjustments to the pattern, the majority have been for style or personal preference (pocket linings that reach all the way to the fly to interface it, contour waistband, smaller pockets, etc.)

Coming up with the top 10 was hard (as you can see since so many of them are actually two or three suggestions!). There’s lots of other little points that I could’ve thrown in there.  I didn’t even mention the buttonhole, which has been my waterloo. Mostly, I resort to doing them by hand—not too bad since there’s only one—but on this most recent pair I eased up on the waistband interfacing and was able to work it by machine. My machine can’t do a nice keyhole shape, sadly, but no one else is going to notice anyway.

New skinnies---rear

And I still haven’t really showed you photos of the new pair! So I’ll be quick: this is my first “truly skinny” pair of jeans (the other ones all have stovepipe legs). I made them to replace this pair of RTW jeans that are beginning to bite the dust, and are verboten this month anyway. As you can see (You might have to click through to the full-size photo), I included the same cute little top-stitched dart on the lower leg as in Syo’s pair.

As I doodled out my pocket detail, I

A subtly naughty pocket

realized I’d created an homage to Mary-Nanna’s white knicker jeans (and Steph’s tribute… and of course this alleged Japanese fashion trend which I’m happy to learn is indeed a hoax. I thought it was a bit fishy when I first saw the pictures a few years back, but you never can tell with the Japanese. 😉 ) Mine is a bit subtle, but those of you in the know… well, now you know! ;). If I ever find some white stretch denim, I promise I’ll do full out undies-pockets. The nice thing about making my own skinnies is I can keep the calf-width where I like it and just narrow below; so many skinnies are made for those toothpick-legged adolescents with no calves.

New skinnies, front view

Beyond that there’s not too much to say about them. I used much the same procedure to narrow the bottoms as I did with the skinny cargoes (except I only had two seams to work with, not four). I kept the full length this time, to get that “legwarmer” bunchy look around the ankle that I crave so badly (yes, I like my pants and my sleeves to look extra long. It’s such a rarity for me). Since there’s no zippers in this pair, I had better hope they don’t shrink at all in the wash or I may not get my feet through them next time ;).

So, this is officially my first pair of truly skinny (self-made) jeans… and I hear that apparently the bootleg cut is coming back. If it ever actually left. /sigh. I’m so non-trendy. Oh, wait. That’s a good thing.

I still think I like the stovepipe leg the best, though…

Oh, and this would be my first outfit for Me-Made March. Not terribly innovative, I know, but it’s far too cold out right now for the frillies and the pretties. Hopefully that will change over the course of the month…

34 Comments

Filed under Sewing

Finishing Ellen

Ellen Pants, with button and belt-loops

I pretty much finished the Businesswoman Pants back in October, shortly before I embarked on the coat for Tyo. And I was pretty happy, but after a day of wearing them two things were obvious. First, the little metal pants-hook and bar I had sewed were not in any way, shape, or form sturdy enough to keep these pants up (in fact, by the end of the day the metal bar was a twisted remnant of its former self). Second, the lack of belt-loops was driving me nuts, because they kept sliding down (increasing the strain on the hook and bar). I don’t know if this is a side-effect of the dropped waist or the slippery lining or just the generally rectangular shape of my hips, but it was still annoying.

Anyway, it was clear that the pants needed a button and belt-loops. And today,

Rear, with belt-loops

while I waited for my laptop to defrag and otherwise soothe its booboos (it’s been cranky lately), I decided to tackle these minor finishes. So I made a button hole (successfully, by machine!!!! … on the third try. Fortunately this wool is highly forgiving of needle-holes), and cut, interfaced, ironed, and topstitched (as subtly as possible) the belt loops. I didn’t want to topstitch the belt-loops in place, either, so that took a bit more thinking. You can do this without too much trouble, I think, if you apply the belt-loops while you’re constructing the waistband, but once it’s done it takes a bit more finagling.

I ended up sewing the bottom ends, folding them up and over to the inside of the waistband, and hand-stitching there. Me and my hand-stitching, I know. Also, figuring out how to distribute your belt loops when none of your seams line up is a pain in the ass.

Fancy button

I was going to attach one of my usual jeans buttons, but (perhaps fortunately) I couldn’t find the little doohickey for hammering them on, so I went through my buttons and found this black plastic shank button with a rather battered “jewel,” that arrived in a small and generally unremarkable baggie of buttons from the thrift store a few weeks back. I’m not convinced that the plastic shank will be tough enough either, but it’s not as if it’s an overly precious button. But it’s cute, and where else am I going to use a rather tacky plastic-gemstone unique button? It will get scratched up and hidden by belts, but it’s already rather battered, so whatever :).

I’m not convinced that I totally love these pants—my hips definitely benefit from the pocket and yoke detail on jeans—but they’re warm (which sounds really good right now) and will definitely come in handy when, y’know, I don’t want to look like a total schlub.

8 Comments

Filed under Sewing

The Business Woman Pants


The Business Woman (AKA Ellen) Pants


Well, I wanted grown-up pants, and it appears that’s what I’ve got. Tyo took one look and said “Mom, you look like a business woman!” Syo concurs.

I’m going to choose to take that as a compliment, I guess ;).

Whether that’ll feel too weird to leave the house in, is yet to be determined, I suppose.


They feel deliciously warm. The wool on the inside of the waistband is a tad scratchy (perhaps this would’ve been a perfect opportunity to face with a different fabric… say, more of my lovely Kasha. Hindsight and all that…) but I think it’ll be fine; I’m not super-sensitive. With the lining, they feel very, very substantial… perfect for winter. We’ll see how the un-lined bottom of the legs interact with the knee-high socks I often wear in the winter.


You will note how smashing they look with my grey blazer. Mmm. I’ve had this blazer since high school. It fits perfectly, has just the right amount of structure, and almost never gets worn because…

you guessed it. The sleeves are too short. *headdesk*

I have an ongoing plan to add black corduroy cuffs, at such time as I come into possession of some black corduroy of the right wale-thickness.

Anyway, although it pains me, here’s a couple of more “fitting” shots. You can see that the pockets are still gaping, showing the lining. However, it’s pretty even on each side, so maybe I could pretend that’s a design feature?


Rear view. A touch tight.


You can see that the waistband is a little, ah, snug. I suspect this is a case of me curving less than the pattern does, especially since I had to take the back in for a swayback a bit (though it seems worse in these pants than in the first pair for some reason). More curve in the back, less in the sides. The pants themselves are actually quite loose through the seat/hips. And I’m not sure what it is, but once again I was unable to match up the seam-lines on the waistband with the seamlines on the pants and have the waistband match for length the rest of the pants. I don’t know if it’s because of the pants stretching (I would expect this of the soft wool but not the firm lining) or the fly somehow not being square in the front (though I tried very hard to make sure it was) or even the fly shield throwing things off (it’s an addition not in the original pattern, as far as I can tell). So basically what I’m saying is the waistband is a bust, but provided it can be covered the pants will be fine.


Front view


Here’s from the front. Again, snug waistband=some distortion at the front closure, though the fly isn’t gaping in this version (yay interfacing 🙂 ). The wrinkles at the hips go away if my feet are together as they should’ve been for taking a fitting photo. Did I ever mention how much I loathe fitting photos? ;). Also, I love this shirt, but pouffy sleeves + sleek pants =linebacker look. Holy cow.

Not much more to say. I’ll try wearing them tomorrow, see how they feel. And how they go with my regular boots! Because I gotta tell ya, the heels are gorgeous but not going to happen. Just not.

I have a feeling this will be my last outdoor photo-shoot of the year, which sucks mostly because our indoor light is not great. But man, it was chilly. I don’t have Elaine’s fortitude to take outdoor pics all winter!


So stylish! (?)


23 Comments

Filed under Sewing

Picky zippy

Inadequate zipperosity.

I don’t have a nice grey metal zipper. Why do I give a flying fig about the colour of the zipper in these pants? I don’t know, but I want one that’s metal, either grey or black, and I don’t have one. The one metal zip I do have kicking around was purchased for my Jalie jeans and isn’t quite long enough. Grr. If I had thought about this I could’ve popped by the Sewing World by the train station on my way home from work today, because while they don’t have much that’s of use to me, they do have zippers (and needles… I need a new twin needle, too… my old one finally died, though it lasted much longer than any of its predecessors.)

While I’m wishing, I’d like some pinking shears too.

Anyway, as you can see, I have not made significant progress on the pants.

7 Comments

Filed under Sewing

Welt!

Pocket, that is. Although, a raised, stinging mark on the flesh might not be too far off, either.

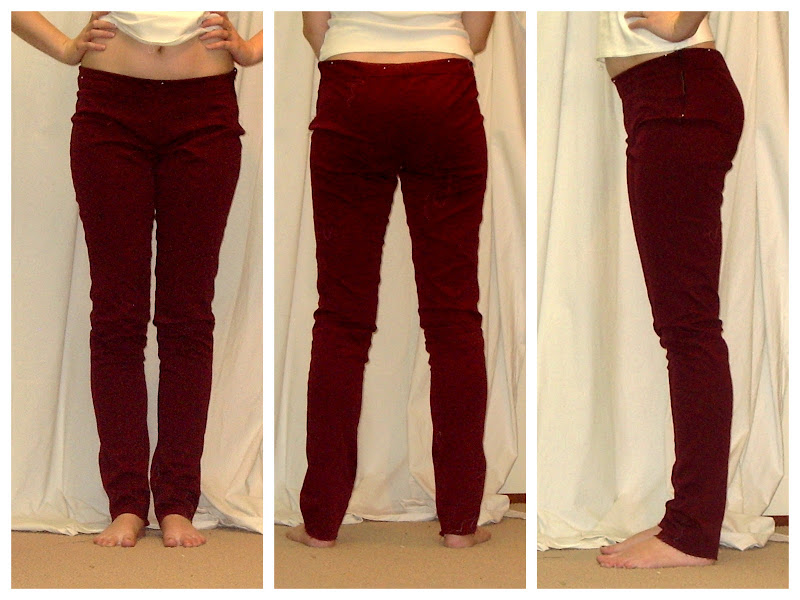
Yesterday, I took the plunge and cut another set of Ellen pants from my grey pinstripe wool. There’s actually quite a bit of this fabric—the pants only used about half—so doubtless there’s a blazer in my future.

The pattern comes with instructions to line the front piece to the knee (underline, actually, if you read the instructions). I did want to line, as I’m a bit hesitant about having wool trousers to begin with, never mind against my legs. So I cut out lining pieces front and back out of some of the leftover lining from my coat. Yes, these are going to be winter trousers. (Somehow the term “trousers” seems much more natural when I’m not talking about casual attire.) If any of you have any advice for how to line trousers with a fly, I’d love to hear it. My usual tutorial for installing a fly is Debbie Cook’s, but that, of course, doesn’t involve any kind of lining, and the only advice I could find in my Reader’s Digest Complete Guide to Sewing (my one and only sewing tome) was to construct separately and slipstitch around the zipper; nor did a quick google yield anything more specific. Maybe I’m over-thinking it, but I have this sinking feeling that I’m going to end up with a bulky mess right at the front of my otherwise-sleek trousers.

Someday I should really invest in a good book on tailoring. And in pinking shears.

Welt pockets---testing, testing, 1...2...

Anyway, I decided I wanted welt pockets on the rear. Now, I have always thoroughly avoided welt-anything to date (including the related technique, bound buttonholes). Not out of dislike, but out of pure chicken-shit-edness. There are any number of excellent tutorials on making welt pockets out there, which I have read over at various times. My tome has a description as well. Most recently, Gigi went over the process briefly, so that was the one I turned to, though it’s not particularly in-depth. Two admonitions stuck out in my mind: practice and precision.

Neither are my forte. Especially when it comes to sewing.

Nevertheless, I dutifully sorted through my scraps and started ironing and interfacing etc. After the first test welt, I decided to interface future welts. It looks fine, but it feels more sturdy with the interfacing, a little less likely to sag and expose the pocket lining.

Note: this is not intended to be a tutorial. I pretty much still suck at this. This is mostly intended to remind me of what I did (and maybe what not to do next time).

Drawing the future-welt box on the interfacing on the wrong side of the fabric was easy. Figuring out the relationship between the box-size and the welt (especially depth) took a little more mental gymnastics. I eventually settled on a welt that was 2cm wide (including a .5 cm seam allowance) and a box that was 7mm on either side of the line (the line being about 1mm wide, it all added up to 1.5 cm, the same width as my welt. Oh, good!

Welt pinned in place on right side of fabric, pointing down.

Next, how do you orient this? The whole thing gets flipped through and around, which is quite dizzying to my little, spatially-challenged brain. So, to start, your folded welt goes on the outside, pointing DOWN away from where the pocket will be. Its seam line goes along the bottom edge of the box, the raw bottom edge of the welt (currently pointing up) goes roughly along the middle of the welt. Well, technically 2mm off, in my example, but what’s a mm or 2 between friends?

(And dear lord, imperial people, I can understand inches in the macro range—I use them myself, to my shame—but how on earth do you wrap your minds around measurements like “5/32” of an inch? Mind-boggling! Give me my millimetres any day.)

I pushed pins through the fabric to locate the corners of my box on the right side, pinned the welt in place, and then basted it in for my sanity’s sake. Next the pocket lining goes on TOP of this (yes, on the right side of the fabric!) I used a single piece for my samples but two pieces sewn together for my actual pants. The single piece was a better idea. Probably there’s a different way to do it if you’re going to use two pieces, but what ever. Position the pocket lining over the welt on the right side of the fabric, facing down. I got this right the first time (unlike the welt…I had to rip off my first one)

Stitch around your box from the wrong side, so you can see your lines. Be achingly, brutally, precise.

Did I mention that I am lacking in precision?

People suggest counting your stitches along the short sides. I tried. Usually it took 7, sometimes 6, once only 5. This had less to do with my boxes being uneven than me not letting the fabric feed through evenly.

Blurry pictures of cutting through the welt.

Then… you cut. I love my little dissection scissors as they’re sharp, pointed, and tiny, but I think I need a new pair to keep dedicated for sewing. My husband has been using these to trim his hair and they’re not as sharp as they used to be :P.

The trick is to clip right into the corners, without clipping through your stitches. I did pretty well on the practice welts, actually, but not quite as well on the real thing; I blame it partly on my heavier lining fabric, and partly on being nervous about clipping my stitches.

Tucking everything through.

Once your box is snipped open (cut on an angle into the corners, making little triangles at each short end), you flip the whole shebang—that prolapse of pocketing and weltishness blighting the right side of your fabric—through to the inside, where it properly belongs. The edges of the welt itself show, which flummoxed me a bit when I first did it. For the next one I trimmed the edges on an angle (as you can see in the image above of the welt pinned in place), which seemed to make for less bulk at the bottom corners when flipping through. I have not seen this in other tutorials, and it may very well be a bad idea in the long run).

Sewing the "little triangles" down to the pocketing after pushing everything through.

Once you have it tucked through, you iron everything in place; Tug on those little side triangles and then stitch them down. This is supposed to make sure the welt lies flat and the hole’s edges are nice and rectangular. Sewing it down wasn’t actually as tricky as I had feared (I’m still scared of the button-hole-sized equivalent, though)

Stitch around the edges of your pocket bag, and voila! You have a welt pocket!

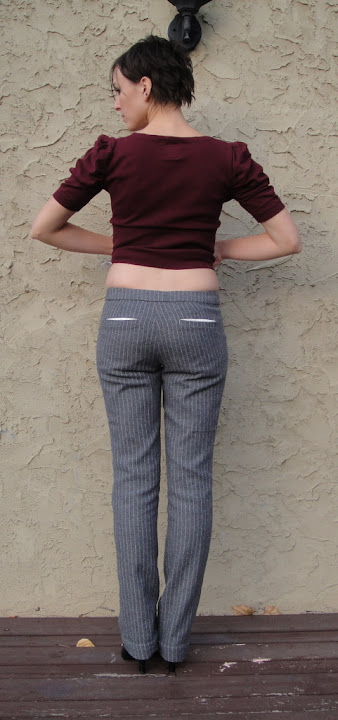
The real thing. Not... so perfect.

Well, in theory. I still have some issues getting the welt perfectly flat at the corners, not having it gaping, and other niceties. Precision, precision. I actually did slightly better on my second practice welt than on the pants themselves. /sigh. That being said, I think I’m more irritated with my inability to match the stripes properly (I tried! I REALLY DID!) than with the welts themselves. I may end up putting a small button in to keep them from sagging, as the shiny silver lining REALLY shows.

Also, it’s snowing again. Although seeing as it’s the end of October, I need to stop whining about that. At least it’s not sticking yet. 🙂

10 Comments

Filed under Sewing

Home (and speaking of pants…)

My back yard, Friday. There was actually quite a bit more snow an hour later, but I didn't take a second picture.

Well, I made it back, just in time for two inches of snow Friday.  /joy.

I did not, sadly, get to do any fabulous fabric (or button) shopping in Pittsburgh. We did walk up the Strip district once, and I

Pittsburgh. Note the complete and total absence of snow.

spotted at least one neat-looking fabric store along with several other interesting looking shops, but it was ten o’clock on a Tuesday night, so there was no awesome fabric-shopping for me. I did score a few books I really wanted, but I suspect “Major Transitions in Tetrapod Evolution” really isn’t your cup of tea, so I’ll spare you the review ;).

Ellen, v. 1

Yesterday, rather spontaneously and with my typical lack of forethought, I decided to tackle pants. Pants which are neither jeans nor stretch.

I started with the Burdastyle Ellen pattern. Compared to, say, the JJ, there are remarkably few versions of this on Burdastyle, but it seemed to fit the general bill of “pants that are not jeans and not stretch”: no yoke,  rear darts, a slightly higher (though still lowish) rise, and a close-fitting but straight, rather than skinny, leg. And Burda usually has a good reputation when it comes to pants drafts. I actually use a modified version of the Ellen waistband for my jeans, so that wasn’t a complete guess, either.

The main charm of these pants are the cute little patch-pockets with the unusually shaped flaps, which I conspicuously failed to include in my pair, mostly because it’s hard to spend that much time on details of a pair of pants you’re not even sure will fit.

For the sake of full disclosure I’ll reveal that this is another attempt to pretend that I am, all measurements to the contrary, a

Ellen pants, front

Burda size 34. This time because several people on Burdastyle had mentioned that the pattern seemed much roomier in real life than it looked on the model. This seemed a little too snug through the hips when I tried it on, so I let it out a bit at the side seams (below the waistband), but then it was too loose, so I took it in again. The waistband is snug, but that extra overlap you see beyond the fly shouldn’t actually be there, so if it weren’t I think the sizing would be basically perfect. (I’m not quite sure how it worked out that way, either, since the waistband is in four pieces that match to the side and back seams, and I only had the overlap on one side of the front. Probably something to do with my sewing of the fly). I also added an inch to the length (it seemed ok, but better safe than sorry, right?), which probably wasn’t strictly necessary but did allow me to put a nice, wide hem on the bottom. I did a small swayback adjustment to the waistband, which is deliciously easy when you have a centre-back seam.

Ellen pants, back

Overall I’m passably happy with the attempt.  The fabric I used (an ex-curtain) is, on second thought, a little thin for bottoms, and it seems to bag out a bit; these pictures were taken after a few hours of wear and the knees are distinctly pouchy. In my haste I neglected to interface the fly region (actually, I neglected to read the instructions completely…), so the gaping there is entirely my own fault. The fly installation is not my best, but certainly not my worst yet; once again I followed Debbie Cook’s tutorial. I really like hers for some reason (though I use pins instead of the wonder-tape), though I wish it covered the fly shield. I always forget that part and then it ends up being a bit fiddly and weird.

So that was my weekend’s sewing. I have a feeling my days of daily sewing posts are going to be on the wane for a bit… I don’t even want to think about the amount of work I have to do this month (how did it get to be almost Halowe’en?!?), and November is NaNoWriMo and then it’ll be Christmas… Hopefully once or twice a week will be enough? (Y’know, when I actually have something to talk about? 😉 )

Now, to decide whether to bother putting the patch pockets on the pants…

22 Comments

Filed under Sewing

Les pantalons


The Ultimate Jeans?


Pants.

Or trousers, for those of you for whom the word “pants” conjures up visions of underthings. “Trousers” just seems like something my grandmother wears—probably polyester with  an elastic waist and permanent-press creases. Ah, the delights of our diverging language. (Side question—d’you think all this internet business will help bring the vernacular slang of the far-flung contingents of English speakers a little closer into alignment? For example, if it weren’t for the internet I might not know that a vest is also a waistcoat or a gilet, OR that it is also a tank-top or a camisole. Likewise the pants as trousers or pants as panties.)

Anyway… some of you have been around to witness the supposed triumphs of my great Jeans Quest. It hasn’t been completely easy, but it hasn’t been as brutally hard as many of the  pants-fitting struggles I’ve read about. I’ve followed the basic mantra, “when in doubt, take it in,” and mostly done alright. You have no idea the feeling of freedom and lightness this brings to me. It means that I can now, for the first time, have the perfect pair of jeans (barring my own technical limitations) on demand. All I need is some good, sturdy stretch denim. Buffalo Jeans, Silver, Pepe, Guess—all you expensive jeans companies that discontinue my favorite styles, or don’t make your inseams quite long enough, or just decide that this year EVERYTHING is going to come with holes in—can go jump in a lake. I’ll make my own jeans, thank you very much.

This is awesome.

But, it has awakened a thought in me. You see, in this world, having conquered the Denim, it occurs to me that there is something else out there. Yes, something that is…

Pants that aren’t jeans.


Pants that aren't jeans...


I know, I have a hard time wrapping my head around this as well. I have owned a few pairs over the years—the leather ones from the vintage store I bought in high school that never really fit (being high-waisted and made for someone with a 24″ waist… not something I had even when I was 17). The army surplus cargo pants, of course, which were my uniform for a while (they went with the shaved head and red plaid jacket…). The mens’ vinyl pants with the lacing all the way up the side… they are fun, but obviously for a very specific usage. Then there was that plain black pair of trousers I bought for that job interview back when I was finishing my Master’s. I didn’t like them, but I didn’t want to wear jeans to the interview, and felt a skirt (my usual go-to when denim is not quite stylish enough) would be too fussy and girly for a preperator’s position interview. This is a job that involves banging up rocks, not answering phones and typing up reports. I should note that the five or so people in the panel interviewing me were all wearing jeans ;). Anyway, I didn’t like them when I bought them, and never wore them again. But there is still that non-jean pants-shaped hole in my wardrobe. And now that I am sewing, perhaps I should be moving to address it.

But I’m still confused. What should pants that aren’t jeans look like? What colours are good? What fabrics? What kind of pockets? I’m a big fan of the patch pockets on jeans because my rather under-sized bottom needs all the ornament it can get. But I have a feeling these wouldn’t look right on… trousers. So what, then? Flap pockets? Welt pockets?

Then there’s the leg. I’m a big fan of tight and skinny in jeans—or at least, not flared. But this is also a very young look, and presumably not what I’m looking for in Grown-Up Pants. So what, then? Straight from thigh down? A subtle boot cut? These things run round and round in my head. And once I start moving away from the skinnies, I start to contemplate…

Pants that aren’t stretch.

I know, it boggles my mind, too. Discovering stretch denim, like low-rise jeans, was a major revolution in my life.


Pants that aren't stretch


My first pair of really awesome, low-rise, stretch-denim jeans (which I think I didn’t get until after Tyo was born, actually) was the moment when I went “Aha! This is my pant. THIS is the item of clothing I have been looking for since I was fourteen!”

But there are a few pairs of pants that aren’t stretch that have crept into my wardrobe over the years. The army cargos, of course, though I now only wear those for fieldwork. Most particularly, there’s a pair of “pseudo army pants,”—ultra-girlified low-rise camo pants with asymmetrical mini cargo-pockets, lots of studs, and a huge embroidery of snakes, skulls, and an eagle on one leg. The’re awesome, in a totally-casual, not-at-all-grown-up way… but the point is that they fit perfectly (and snugly!) in the hip/butt, and then extend seamlessly into a nice wide-leg pant. And they’re still comfy. If I had a fit like that in a less, ah, statement piece, it could really be versatile. As it is, I wear them about four times a year.

All this is without stepping into the slippery territory of “rise”. I abandoned high-rise jeans as soon as I could, partly because they never fit my figure (I have a big waist relative to my tiny bottom/no hips), and partly because at that point in my life it was pretty much my mission to show off as much abdomen as the weather would allow. Fashion and age have pushed me away from the crop-top, bare-belly look, but I’ve clung to the low-rise. They look right. They feel right. I just can’t let go of that long-ago “aha” moment. Sewing may let me fit high-rise pants to my own (lack of) shape, but it can’t remove my obsession with waist-rolls or the fact that I don’t have that teeny-tiny cinched-in waist. I know plenty of people have their own hate-on for the low rise, with plenty of good reason. I’ll just say that for me, with my body, it works. Will I explore beyond it? maybe I will. We’ll see. I gotta tell you it scares the pants of me.

Also, I need to find some red stretch twill. I saw some awesome red pants on TV the other night—red jeans with white lacing on the inside thighs. SO fun. I’ve been thinking I need red pants… (not in that practical ‘this would be a really useful addition to my wardrobe’ kind of way. More in the OMG that’s so awesome and fun kind of way.)

So what do you think? What are you looking for in the perfect pair of pants? How do you step it up a notch beyond jeans? What on earth should pants that aren’t jeans look like?

30 Comments

Filed under Sewing