Tag Archives: Epona’s Wedding

How to Sew A Wedding Dress

Dresses

OK, so I’m kinda tempted to answer that in one word. “Don’t.” Which is not actually how I’m feeling, but close enough that it seems pretty hilarious. I might not be entirely sane at the moment, though, so probably best to disregard that.

So, right now, there’s so much to say I don’t even know where to begin.

Butterick 3441

The pattern, as you know, was Butterick 3441, a pattern lurking in that vapid no man’s land between contemporary and vintage, complete with really awkward pattern photo. It had most of the features the bride wanted, however, barring a few minor tweaks—more so than anything else we looked at. We settled on the pattern back in the winter, made up a practice dress in the spring, and then dawdled over ordering the fabric until pretty much the last possible second. Such is life. Did I mention the bride (Epona) got pregnant a few months after we’d picked the pattern? Which kind of killed my inclination to finish early, anyway.

Yaaaaah! Scary!

Yaaaaah! Scary!

So, the pattern itself is pretty basic. Epona was not into a fussy, restrictive dress. She did want a lace overlay over the skirt, and lacing in the back. The lacing seemed like a REALLY good idea after the pregnancy happened. And I was both excited and terrified when I managed to talk her into using REAL silk and PRECIOUS lace. Yikes.

So, I don’t know how much to go into fitting details. Epona is not tall and she is rather curvy. I was pretty sure a small full-bust adjustment would be in order, and absolutely certain that some serious shortening was required. I was correct on both counts, although I still wonder if a larger FBA might’ve been helpful. I still can’t quite figure out where the underbust seam of this pattern is supposed to fall—it seems like it isn’t meant to come all the way in under the bust. At least, it didn’t on Epona, and it didn’t on Stylish either (since Stylish’s Maid of Honour dress was made from the same pattern, albeit in a different size.) Weird. Anyway, I kind of wish I had split Epona’s larger post-FBA dart into two smaller darts, but, well, that idea scared me even more than shaping one big dart, although maybe it shouldn’t’ve.

Wedding Dress Trial #1

Wedding Dress Trial #1. With train. Pretty little train.

I wanted to cut the skirt on the bias, too, which led to some more playing around with the pattern, and trying to figure out how to make it accommodate a six-months-pregnant belly gracefully. After we had determined that she could wriggle into and out of the practice dress without the zipper, I decided to omit it from the final dress, since I learned from Thread Cult that zippers in bias-cut garments are generally asking for trouble. Though in this particular style, I think it wouldn’t’ve been a big issue since the zipper would be hidden behind lacing and lace draping. Anyway, I left it out.

The fashion fabric was a delicate (very expensive) silk charmeuse ordered locally; I ordered silk habotai and organza from Dharma Trading for the lining and interfacing. I hadn’t originally been planning to interface the bodice—the pattern called for it, but I certainly didn’t see the need on the practice dress. When it arrived, the silk charmeuse was both thinner and softer than its polyester cousin—and when the lace arrived, heavy with all that beading, I knew interfacing was going to be a thing.

In an attempt to organize my thoughts coherently, have a heading:

Cutting:

Cutting layers

Cutting layers

I used tissue paper layered above and below the fabric to help stabilize it when I cut everything out. This worked fairly well, although I then proceeded to layer both fashion fabric, lining, and silk organza interfacing and cut all at once. This wasn’t hard—even layered, these are ridiculously thin fabrics—but may have led to less-than-optimal grain placement on some pieces. On the other hand, once everything was basted together it seemed to keep the proper shape just fine.

Cutting shapes

Cutting shapes

On the practice dress I used almost exactly three metres of 150cm wide fabric. The silk was only 140 cm, and sold in yards. I was figuring 3.5 yards would do it, but the fabric store lady talked Epona into ordering four. Which turned out to be just about exactly right, so Fabric Store Lady 1, Tanit-Isis 0. I had only ordered three yards of the lining, however, which turned out to be not enough to cut the skirt on the bias even without the small train. Oopsie. So the lining skirt was on grain. Again, with the lace overlay in place, I don’t think it made much of a difference to how the dress looked or moved, but oh well.

Bodice construction:

Hand-basting with silk thread.  Mmmm, yummy silk thread.

Hand-basting with silk thread. Mmmm, yummy silk thread.

I didn’t start out planning to go all couture on the bodice, but sometimes these things happen. First, since I had to add the organza interfacing (which added the perfect amount of body to the bodice, and yes, that sentence does make me snicker), I was hand-basting like crazy. While I was at it, I added some on-grain and selvedge stabilizing strips of organza around most of the edges on the back pieces, where the lace would weigh most heavily. It took forever, (ok, most of a day) and I do not regret any of it.

Seam-allowance casing and boning piece

Seam-allowance casing and boning piece

Although Epona didn’t really want any boning, the combination of heavy lace and halter dress and corset-style lacing scared the pants off of me, so I added some light-weight, zip-tie boning along the sides and side-back seams of the bodice (where the lacing loops inserted.) I just added a second row of stitching in the seam allowance (fortunately I thought of this before I went and graded my seam allowances) to make the casing. I cut the zip ties to the right length, cut the ends rounded, and then smoothed by melting in a lighter flame. I may have been a little overzealous in the smoothing department, hence the brownish ends. Oh, well. So far, anyway, no harm has come to the dress.) I don’t think Epona would even have noticed the little bones if I hadn’t mentioned them, and while I can’t be absolutely sure they helped, I’m sure they didn’t hurt.

Making continuous silk bias tape. Mmmm, silk bias tape.

Making continuous silk bias tape. Mmmm, silk bias tape.

I knew from the practice dress that I wanted to pipe the upper edges of the bodice, but I had decided I wanted a silver piping rather than just the white on white. I had silver chiffon left over from the skirt overlay for the Maid of Honour’s dress, but experimentation determined that it needed a solid silk under-layer to look really good.

White silk bias tape and polyester chiffon bias tape. A match made in hell.

White silk bias tape and polyester chiffon bias tape. A match made in hell.

Yes, I layered poly chiffon bias tape over silk charmeuse bias tape to make my piping. Did you know you could do that? I didn’t, either. I started (after make shitloads of bias tape… I always make way too much) by stitching the two layers together about one seam-allowance away from one edge. Once this was done, I wrapped the two stitched layers around my piping core (a slender wool yarn in this case) and basted them into place. This was not without a few ripply mishaps, but once all was in place it looked pretty darn fine. I lived dangerously and applied the piping by machine, no hand basting! CRAZY!

Bodice, constructed.

Bodice, constructed. Oh, yeah, I added hanger loops. I hate hanger loops, but they were absolutely necessary in this case.

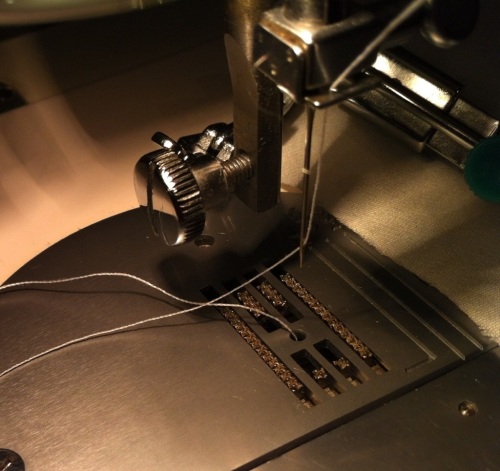
I also hand-basted the darts and the loops for the back lacing. Did I mention I was using SILK THREAD for all of this? Aside from the fact that it’s like five dollars for a teeny little 100m spool, man that stuff is dreamy. It’s so soft. My White machine didn’t like sewing with it (the tension would go intermittently weird) but the Featherweight didn’t even blink. Yay, Featherweight. And the silk thread was very nice for hand-basting.

You can see the bust weirdness on Stylish’s dress here. (on the left), which is cut from the same pattern as the wedding dress.

The main thing I’m NOT satisfied with about this dress (and don’t tell the bride because I don’t think she noticed) is the darts. Maybe it’s the way I was trying to shape them, but they seem a little baggy and draggy and angled funny on this pattern. I dunno. Me and the darts, we have never really gotten along so well, y’know? Gimme a good ol’ princess seam any day. The problem was the same for both Epona and Stylish, who have very different busts, so I’m inclined to blame it on the pattern…

The Dress

Skirt

After the cray-cray that was the bodice, the skirt was almost an afterthought. I used French seams. They work okay. I still wish they were narrower, but they may actually have approached the actual seam allowance width, which I always feel is pretty hit-or-miss with French seams. I didn’t have any problems with puckering along the seams, possibly because of the silk thread (another episode of Thread Cult, the guest mentioned that polyester thread can sometimes cause puckering because it has a certain amount of elasticity, something which gives it extra strength but can make really light-weight fabrics pull up on themselves. I did not sample a poly seam to compare, but anyway. This was my observation—the silk thread worked really well. Well, on the Featherweight.

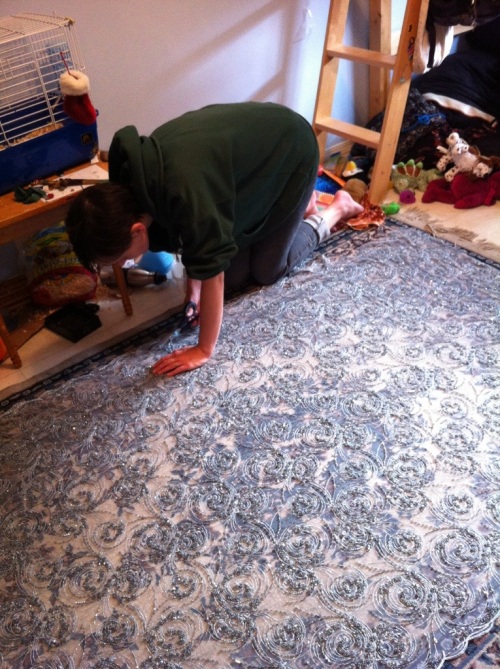
Lace. Cutting. Yikes.

Lace. Cutting. Yikes.

Lace

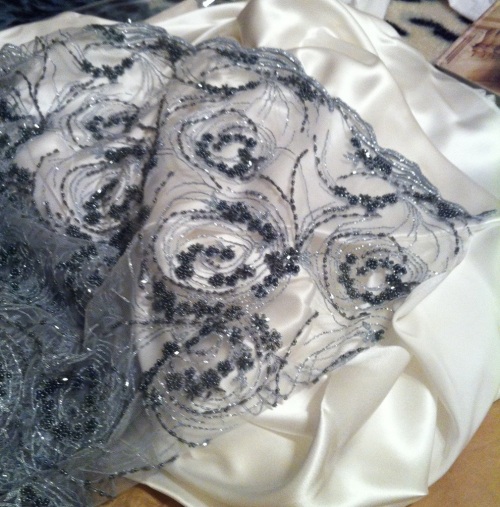
And then there was the lace. I spent a full day, basically, on the lace. My goal was to cut it as little as possible. But one thing I did have to do, was cut the scalloped edging off of one edge and piece it on to the cut ends, to form the edges of the front opening in the overlay. The length of the overlay at the front was decided by how much scallop I had to piece in there. Because of the heavy beading on the lace, there was no chance of machine stitching any of this. Hand stitching it was—up one side, down the other, knotting frequently, and then trimming the mesh close against the stitchings so nothing was flopping around.

Can you see where the pieced part still needs to be stitched down?

Lace corner, one edge pieces, waiting to be trimmed.

Actually, working with the lace was much less nerve-wracking than working with the satin—knots and sloppy stitches all disappear into the texture of the lace and nothing showed once the edges were trimmed. I think it looks pretty darn good, if I do say so myself. I didn’t want to do a back-seam in the lace, so elected to just let the excess drape down the back of the dress. I think it worked, anyway, although the weight of the lace completely collapsed the delicate train that looked so sweet in the practice dress. So the final dress had no train. C’est la vie.

Lace.

Lace.

And did I mention that my iron died at 10:30 at night the day before the wedding, just as I was pressing the hem? Which I hand-rolled, by the way. That was a lot of hand-rolled hem. I was able to borrow an iron the next day out at the farm, and really the creases from travelling  (the garment bag wasn’t quite as long as the dress) were worse than the un-pressed hem, but anyway. As inevitable mishaps go, this is a pretty minor one, except that now have no iron.

And now, random bridal photos.

The bride’s entrance.

Yes, she rode in on a horse. It was That Kind of wedding. Don’t get me started on the music at the dance.

Back view

You can kinda see the draping at the back of the lace, where I refused to cut the damn stuff any more than I absolutely had to.

Front view.

This is probably the best view of the dress as a whole. You can’t see where I hand-pieced in the scalloped edge all along the front “slit” of the lace. Neither could Epona, even when I pointed it out to her. Also, I haven’t talked about the sash, which was ridiculously simple compared to the rest of the dress, but I really, really love how it brings the dress, and the whole wedding party together, frankly.

The wedding footwear.

Ok, I don’t know that you can see much here, but it’s a great picture anyway.

The whole shebang. Well, the part of it that I was responsible for, anyway.

I did NOT sew the flower-girl dresses, modeled by Fyon and the Waif, who you’ve met previously. Their mother, my Stylish sister-in-law, is the maid of honour (closest to the bride). I will talk more about the bridesmaid’s dresses later, because this is already an insanely epic post—they’re not nearly as involved as the wedding dress, mind you.

I’ve mostly stuck to photos of the bride here, but you can see more of the wedding photos (mostly taken by my Crafty sister-in-law—yeah, we were keeping it in the family) on my Flickr set. I can’t wait to see the official photos, though.

Resources used:
Bridal Couture (Susan Khalje)
Couture Sewing Techniques (Claire Schaeffer)
Fabric Savvy and More Fabric Savvy (Sandra Betzina)
Sewing for Special Occasions (Singer Sewing Reference Library)

35 Comments

Filed under Sewing

Can’t Blog

Wedding will eat me.

I am sewing madly—hopefully I remember some of what I’ve done when I have time to blog about it.

20130725-232358.jpg

20130725-232427.jpg

20130725-232446.jpg

20130725-232504.jpg

20130725-232522.jpg

W-day is Saturday.

22 Comments

Filed under Sewing

Close enough to taste

20130710-222226.jpg

The dress for Epona’s maid of honour (AKA my Stylish sister-in-law) is at the finishing touches. A bit of hemming and hand-stitching and a lot of pressing remain, but the all-important try-on stage has been reached.

Yeah, that’s obviously not Stylish modeling it for these crappy bathroom mirror pics. That’s just me. We are roughly the same size on the top half—I think my shoulders are broader, and her waist is narrower, but neither of those are really issues in this dress. There’s a bit more ease in the skirt than I can fill out, of course. I still think it looks pretty good, better in real life than in the pics. Much better than my attempted pre-zip try on. What is it about a zipper that just pulls everything together?

20130710-222236.jpg

Thank you everyone who weighed in on the chiffon hems the other day—you inspired me to wind up some bobbins and give a proper serger rolled hem a try. It worked like a charm, allowing for the usual sampling. Aside from the part where I realized the grey thread I was using wasn’t actually the grey I bought to match the fabric, but another, rather lighter, one that had been kicking around from some other project. Oopsie. I’m still debating on the beaded trim… it’s gorgeous, but really heavy compared to the chiffon.

Of course, once I finish this, the real terror begins. The lace for the wedding dress (which will be an overlay over the skirt, much like the chiffon in the maid of honour’s dress) has arrived. Can you say “Ulp?” It’s heavy, luxe, and beaded all to hell. I am terrified.

20130710-222247.jpg

13 Comments

Filed under Sewing

Enough for a night.

20130707-225003.jpg

I really wanted to have this dress done today. That was my plan. But we went for breakfast at my dads’, then washed the car, then had a quick visit with friends passing through town, then I had to clean the kitchen before I could cut on the floor (so much for #sewdontclean) and, having just picked out ANOTHER seam, I think it’s time to call bedtime. I can do the rest tomorrow, if I have to.

20130707-225046.jpg

In case you’re confused, this will be the maid of honour’s dress for Epona’s wedding—AKA Stylish’s dress. The pattern is Butterick 3441, the same base as we’re using for the wedding dress, but with considerably fewer modifications—really just adding a chiffon overlay to the skirt.

I don’t know if you’ve noticed, but I’m a bit of a wuss when it comes to fabric selection. I like cottons. Denim. Wool. Fabrics that are satisfying, fun, and easy to work with. Satin is always out of my comfort zone, although I think it’s a sign of some kind of improvement that it’s not totally making me want to throw my machine out the window.

The chiffon, on the other hand….

20130707-225020.jpg

argh. And yes, I know there are eight million things I could be doing (like starching the crap out of it, or dipping it in gelatin) to make it easier to deal with and I just can’t be bothered, which is, of course, counterproductive. Anyway. I don’t even want to go into how much chiffon-hem-sampling I’ve done today. I should probably do it on the serger, but I don’t have any matching serger thread. I’ll keep it in mind if I decide I really can’t stand my regular baby hems, though. They’re pretty bad. If I do end up using this beaded trim to cover them, I won’t care, but if it’s too heavy (it is too heavy, but I think I might like that, plus it’s SO luxe) they’re really not adequate at this particular moment if there’s any chance someone might actually see them. Argh.

The piping, at least, went in well, with much less puckering than in the wedding-dress trial.

20130707-225035.jpg

And I’m quite happy with how my little loop for the back-of-neck button turned out. I’m really liking making skinny bias tubes in satin. They turn so nicely.

This is what Tyo was doing when I finally threw in the towel. At 10:00 pm she was frustrated that we wouldn’t let her go out and ride her bike, so she went out in the back yard to “do something productive,” aka paint.

20130707-225057.jpg

Have I mentioned I love summer?

10 Comments

Filed under Sewing

Dresses

20130630-212326.jpg

This is the pattern Epona and I eventually settled on for the majority of the bridesmaid’s dresses. It wasn’t our original choice, but it had two features I liked: first, it’s an in-print, inexpensive New Look pattern, so it was easy to pick up multiple copies for the multiple sizes, and secondly it’s a knit, which eased my other-person-fitting-stress quite a bit.

I started out with my own version, fortunately, because it’s a dog’s breakfast of rushed construction, mistakes, and pure stupidity (like the hole I snipped right in the back while trimming seams.) I remain not-a-fan of Big4 knit patterns (does New Look count as Big 4? It seems to be a subset of Simplicity, but then so does Burda which I know isn’t entirely so…), not least because I started with a size 10 and still had to take almost an inch off on each side. I modified the construction for the other three dresses so that the side-seams are sewn in one fell swoop, which will make adjusting the fit a whole lot easier, I hope. I sue got a lot better at sewing that V-neck. I also narrowed the ties and made the scoop around under the arm deeper, as this area seemed bulky in my version. For the bustier girls, I added a bit of clear elastic at the seam where it runs along the side-bust, in case of gaping, and a bit of an “FBA” at the bottom of the front bodice curve—hopefully that won’t turn out a complete disaster. I also raised the deeply-plunging neckline a wee bit, y’know, for those strange people who like to wear bras. Hopefully, I raised it enough/not too much.

20130630-212314.jpg

And pretty dresses all in a row.

I won’t say it’s my favourite dress ever—let’s be frank, I love halters on other people but never really like them on myself. (I always feel top-heavy. Which seems odd considering I don’t mind puffed sleeves. Perhaps I need to try a halter style with a big poofy fifties dirndl skirt)

But it’s progress, which is awesome, because my time frame is getting freakin’ tight here.  There’s still the maid of honour’s dress. (And the four yards of SILK CHARMEUSE is eyeballing me from its little bag)

They will have hot pink sashes held on with sparkly brooches, to complete the wedding colours, but my HOPE is that I’ve created simple little black dresses that will be re-wearable. I really, really hope. *fingers crossed*

In other news, I’m using Gutermann serger thread for the first time ever, since my Fabricland was completely out of the cheap Coats & Clark stuff I usually use (in black). Yikes was it expensive (fortunately for me, Epona was paying and it WAS a half-price sale). I’ll let you know if, y’know, choirs of angels break out singing or anything. It does seem less linty, maybe. I’m a bit of a thread snob when it comes to my regular sewing, but I’ve always been of the “use any cheap crap for the serger” mindset. We’ll see.

12 Comments

Filed under Sewing

Not dead.

Life.

Life.

Although that might be easier. Er, not. Quite.

Refugee serger camped out on the computerdesk. #sewdontclean

Refugee serger camped out on the computerdesk. #sewdontclean

To start with the good news, the serger survived her little bath. I left it a week, silica gel-packs stuffed inside (although it occurred to me later that the key part is probably the motor, which is actually mounted on the back, not inside where the gel packs were. I tried to get the cover off the motor but the bolts holding it on were not cooperative and I didn’t want to strip them. So I waited.) Anyway, when I finally dared to start it up a day or two ago, after cleaning and oiling (although I really don’t think the water touched anything that actually moved…), she was fine. Aside from her recurring tension problems, anyway. (I continue playing with the bit of extra thread wrapped around the  needle-thread tension disc.) The White (which is my main sewing machine right now despite being a little temperamental) has some rust on the foot pedal I don’t think was there before, but everything is working.

Wedding Dress Trial #1

Wedding Dress Trial #1

Which is good because I have a month to finish Epona’s wedding dress and five bridesmaid dresses. Holy fucking cow. And work is likely to be at least somewhat insane during that time, too. On the up side, the wedding dress itself is pretty simple (the practice version took two days to sew up, obviously I’d like a bit more time with the real thing) and I could’ve had the first of the bridesmaids dresses finished last night if I hadn’t kept stopping to watch bits of “Oz the Great and Powerful” with the kids and hubs.

Bridesmaid dress bodice... in progress

Bridesmaid dress bodice… in progress.

Which kids are done school now. so no peaceful days of working at home, unless I can manage to bribe my MIL to take them to the lake for a week or something.

Wedding dress back. I'm kinda stoked about how the lacing turned out.

Practice wedding dress back. I’m kinda stoked about how the lacing turned out.

Speaking of the children, it has now been over a decade since I was last pregnant. Happy birthday, Syo!

Syo is now ten.

Syo is now ten.

And I have a late birthday dress cut out for the Waif, but unlikely to be sewn up until the wedding is done. DAMN.

Waif's birthday dress.

Waif’s birthday dress.

Waif just turned five. It is a size 3 pattern. I added an inch of length to the bodice, but it will probably still be too wide. Going for the middle view, of course.

And as a result, I’m spending all my “free time” ogling corset forums and adding and removing things from my fantasy cart at Farthingales.

How’s your summer going, stitchers?

15 Comments

Filed under Sewing

Sampling

Charmeuse! The Horror!

Yesterday, I cut. Tonight, I am sampling. Cut what? Sampling what? Poly charmeuse for the test run of what shall, Sewing Gods willing, be the wedding dress for a friend. I’ll call her Epona since I can’t find an Egyptian deity that really suits. Anyway, in case you care, some years ago Epona and I were bridesmaids at my Stylish sister-in-law’s wedding (I was actually a last-minute sub in, which is a whole ‘nother long story). So I was pretty amused a few weeks ago when Epona asked me if I would be one of her bridesmaids, again as a rather late replacement. All we need to do now is for me to have a wedding and get Stylish and Epona to be (last minute, replacement) bridesmaids, and we’d have a perfect symmetry.* Since this seems unlikely (although I did spy a GORGEOUS vintage wedding dress at the thrift store last weekend that would, possibly, be worth having a wedding for.) We’ll get to the bridesmaid’s dresses, anyway. At  the moment, I’m much more worried about the wedding dress. The final dress will be in SILK. SILK, people.

Butterick 3441

Really, as first wedding dresses go, this one is pretty training-wheels. I mean, Cation just made a freakin’ corseted Victorian evening gown for her bestie’s wedding. All I’ve been asked to provide is a slightly-amped up version of Butterick 3441, View E. This pattern was an early thrift store score that I probably wouldn’t even glance at if I pawed over it today, but Epona wanted a halter-style dress and a perusal of the current Big 4 offerings didn’t turn up anything she liked better. All I’ve done was mirror the front piece so it could be cut on the bias more easily, (did I mention I suggested cutting the skirt on the bias?) and add a bit of a train on the back. Ok, actually, I just lengthened the skirt on view “G”, which already has a train-thing going. I have a sneaking suspicion this will not work, but we’ll see when I can actually try it on her.

20130527-220103.jpg

The machine of choice

I have decided, after much considering, to use my White for this project, despite it needing a bit of a motor overhaul in the worst possible way. The main reason for this is this low setting on the feed dogs, which I am told is useful for slippery, silky fabrics. Like, oh, silk charmeuse.

20130527-220202.jpg

Adjustable feed-dog height

Despite being a zig-zagger, it also came with a straight-stitch needleplate, which is recommended for sewing with fabrics like charmeuse because it is harder for the machine to pull the fabric down into the bobbin.  Some people suggest that it also produces a better straight stitch than the zig-zag needle plate. I’m not going to re-unscrew everything to test it out, sorry.

20130527-220152.jpg

Straight stitch needle-plate.

Anyway, having set up the machine and selected my needle (very small, very sharp. You may now begin laying bets on how long before I break this one. I swear I am a champion needle-breaker.), I started playing around with bias seam finishes. French seams are, of course, recommended for charmeuse, and they are pretty, but a little bulky. This poly stuff does not press well at all. (Note to self: pick up some iron sole-plate cleaner before you even THINK about pressing silk… self’s iron is disgusting.)

20130527-220138.jpg

Seam-finish testing.

I have three different seam-finishes here, two French seams and one stitched and serged. The French seams are obviously prettier, but they are both a little more bulky. (One has the first pass sewn with the serger in an attempt to make a very narrow French seam. It’s not really significantly narrower, though it was pleasantly fast and didn’t need to be trimmed afterward. The stitch & serge one also has less puckering, although some of the stuff I’ve been reading has suggested that silk won’t be quite as evil for puckering as the polyester is? Hey, a girl can hope.

I’m not going to go into the details of the cutting techniques since it was, frankly, rather traumatic, but I’m definitely going to sandwich the final silk between layers of tissue. I didn’t want to use any of the spray-and-wash-out methods (spray starch, gelatin) since the final silk won’t really be washable.

I’m trying to decide if I should try and hunt down a walking-foot, as I’ve heard they’re helpful for these slippery fabrics, too. I did notice in my sample seams a slight tendency to creep and ripple along the French seaming, which I can correct with some attention, but this was only a foot or so of seam; the dress skirt will be much longer than that. I’ve ogled the one for my Janome several times, it’s not terribly expensive, and I’m hopeful it would fit on the White (which has the same low shank attachment and bobbin-style as the Janome).

Anyway, if all goes well, I will be fitting a bride in this by the end of the week, and I will have learned to love, or hate, polyester charmeuse.

*I feel a little awkward in my wording, here. You see, I am married, but I never had a wedding. Which by some people’s standards may mean we’re not actually married, to which I say, go jump in a lake. “Dating” stopped being an appropriate word for my relationship with my husband, oh, sometime prior to the birth of our first child.

25 Comments

Filed under Sewing