Tag Archives: top

The Procrastination Tee

Steph

I’m supposed to be sewing my husband’s christmas coat this weekend. It’s amazing what you can do when you’re procrastinating…

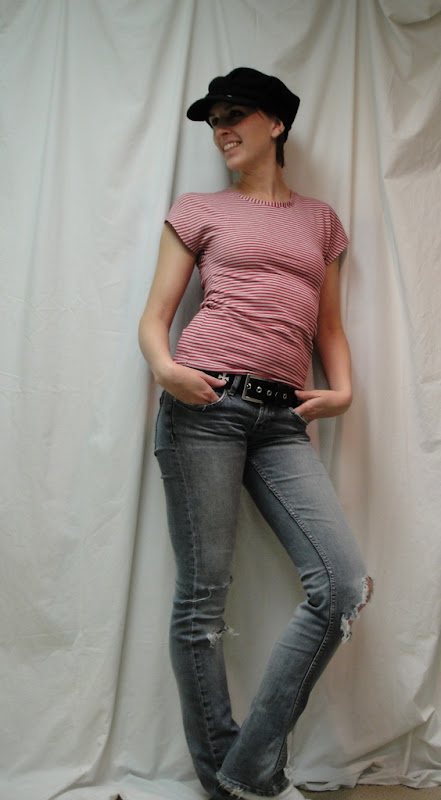
This is not, obviously, the Bird on a Wire fabric. Seeing as Spoonflower knits are like $27/m, I figured a wearable muslin was in order. This stripey stuff (formerly seen in the Where’s Waldo shirt) was like $3/m. That works.

Pattern: lengthened

I made only one change to Steph’s pattern (which I have to admit, after the Zoe coat fitting and the hack ‘n slash I’ve been doing on the Lekala pattern for my husband, was a BIG relief): I added a crapload of length to the bottom. Steph drafted for 3″ below the waist… 3″ below my waist is still an inch or two above my pants. Those of you who don’t wear your pants indecently low won’t have this issue. 😉 I also smoothed the curve of the back piece in the hip region—I have no idea if it’s better this way, I just liked the look.

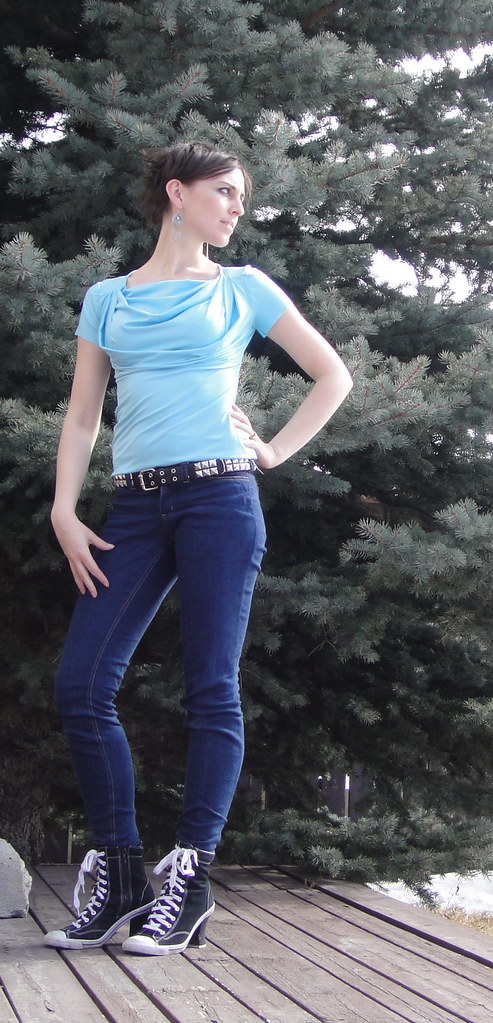
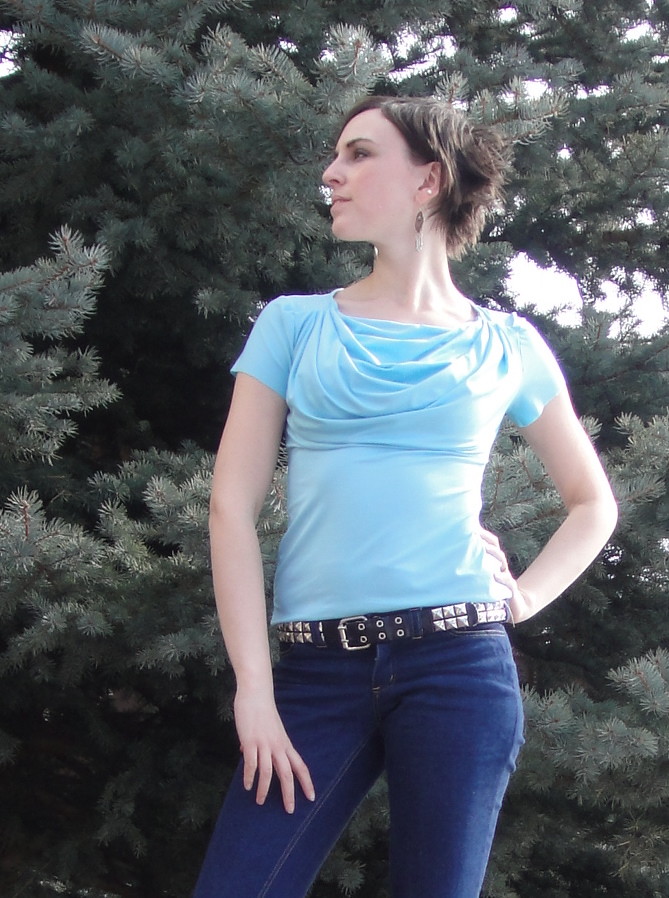
So, fit? The shoulders fit. Perfectly. Like a dream. OMG. For the record, I did not once supply Steph with my shoulder measurement.
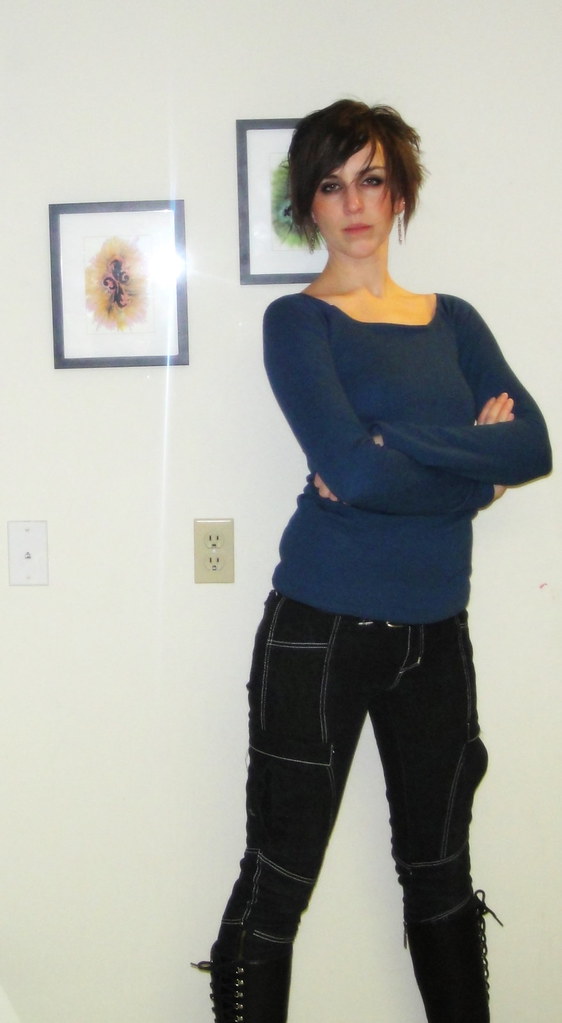
Back view

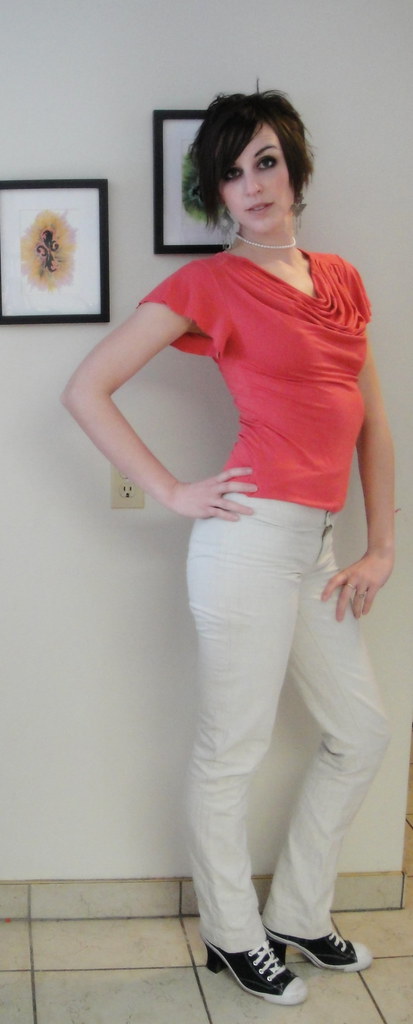
In fact, the fit of the whole thing is pretty fabulous. As promised, it’s snug through the bust with a teensy bit of ease in the midriff, just enough to not feel like a stuffed sausage, without feeling odd about the difference between the bust-ease and the waist-ease. Now, just for the record, I made the 35|| size, that’s 35″ bust, rectangular shape. Steph recommends it for those with 8″ or less difference between bust and waist.

Cool Cat

Also for the record, I myself have a 33″ bust and  a 5″ difference with my waist on a good day. /sigh. This is not a very stretchy fabric, but if you’re an actual 35″-bust you probably want to make sure you use a fabric with at least a modest amount of give. There’s a fairly significant amount of negative ease at the bust, which is actually the narrowest point on the pattern. Bonus for me, it meant I didn’t need to adjust the waist shaping for my short waist!

I think the only thing I’ll change next time is lowering the neck-scoop a little more. Like an inch or two. It’s a bit high for my taste, and maybe a bit higher than in the version Steph drafted for herself. My neck-binding is standing up a bit, but I think that has everything to do with the fabric not stretching enough to make a nice, flat binding.

All inall? Good job, Steph! And thank you :).

(Oh, and sorry for the hat, I had an afternoon shower and no way was I doing my hair again…)

Should you for some reason require more random photos of me goofing around in a stripey T-shirt, they can be found here. I tried to embed the slideshow, but WordPress does not seem to want to play nice with Picasa.

ETA: The pattern is, of course, the Bird on a Wire Tee by Steph of 3 Hours Past the Edge of the World. I’ve linked it before but obviously I should include it in the main post here!

30 Comments

Filed under Sewing

Blue shirt

La Blue Shirt

Lekala 5672 strikes again.

No sooner had I destroyed half of this blue-striped fabric making a failed cowl-neck last spring, I knew it really had wanted to be this raglan top all along. I’ve lost track, at this point, of how many times I’ve made this pattern, nor is there really anything left to say—it’s my go-to for this style, though I still haven’t made it successfully with the kind of gathered bust in the original picture. Some of you may, more recently, recall that I made the exact same shirt in the red version of the fabric I bought at the same time, my Where’s Waldo shirt. Sometimes, you just meet the perfect marriage of fabric and pattern. This fabric wants to be close-fitted knit tees. Although I’m sorta hoping there’s enough of the red left to take a stab at Lisa’s Awesome Folded Mini-Skirt tutorial, sometime when I have enough brainpower to try anything creative (obviously that was not this weekend. In my defense, half of it was spent visiting my step-father-in-law in the hospital, as he just had a major back surgery).

Despite the absolute simplicity of this pattern, I still managed to stitch the sleeves in wrong-side out, and have to rip sleeve seams on one side due to accidentally stitching armscye to neck-portion of the sleeve not once, not twice, but three times. You can tell I like this fabric, because I generally don’t rip stretch stitches. I made this one, as with most of the knits I’ve been stitching lately, on my Janome rather than my serger. Although the serger’s much faster, I find the seams aren’t very strong, and tend to rip out and show the thread on the outside. Presumably this is a tension problem (although possibly a 3-thread-serger problem), but I think it’s one beyond my ability to fix, so for a garment like this that’s fairly fitted, it’s just better to suck it up and take the time to use the regular machine. The serger’s still great for seam-finishing, mind you.

I actually have a remarkable number of self-stitched long-sleeve knit tees at this point, but it seems like I can always use more. This sewing thing was worth it for the long sleeves alone.

There’s a wee bit of the blue-striped fabric left, if I’m good I’ll make something like this one for one of the girls. It’s a circular knit with a fairly wide width, which means I can get a long-sleeved shirt like this out of maybe half a metre of fabric. I love circle-cut knits—the cutting layouts are super-economical and it’s so much easier to get them folded on “grain”. Double win.

All of which is way more yakking than this shirt deserves. Warm. Comfy. TNT pattern. Done.

27 Comments

Filed under Sewing

Not an impressive day

Expectation, I suppose, is the problem.

I started today with great expectations. The hubs was working (poor him) so all I had to do was get the house recovered from its weekday-chaos state and then I could sew. The kids had friends over all day, which contributes somewhat to the chaos but a lot more to the “me being left alone”, so everything was great. I had cut and started sewing up the muslin for hubs’ frock/Matrix coat yesterday, so I finished that up pretty quickly.

And then, I was at a loss.

I tend to sew with a bit of a one-track mind—start project, finish project, next project. I don’t multitask well at the best of times. And usually this works fairly well. But my brain was oozing COAT, and I couldn’t do any more on the coat until hubs came home and deigned to try it on—which could take days.

Fingers twitching, I moved to another project occupying the sewing table, a shirred-bodice dress for Syo using up the last of the fabric from my niece’s Mini-Minnie dress. A little more mindless than I was looking for, but not as exhausting as pulling out, say, a blazer pattern and starting a muslin for me.

Enjoy this picture. This is as good as it gets.

Unfortunately, it was finished in fairly short order.

Flailing, I pulled out fabrics and put them down. Dug through the scrap bin. Hunted for elastics, considering making undies. Eventually pulled out my knit-tee sloper and started to mess around. I’d like to make a cowl-dress like Oona’s. I even have some gorgous red jersey. Oona used Ichigogirl’s cowl-dress pattern, which I’ve made before as a shirt and found a bit too deep-necked for me. I wanted something with a wider, shallower drape. So I traced out my sloper and played around with slashing and spreading.

Cowl neck

I am thinking that slashing and spreading is a REALLY BAD method of getting a cowl that drapes the way you want. I would be better off draping the cowl part on the dummy and somehow merging that with my sloper. Or something. Because I keep coming up with some pretty “meh” cowls… and when I do knock it out of the ballpark, it’s pretty darn accidental.

It’s not awful, but it’s not quite what I was going for, either.

Raglan sleeve (with bust gather)

Determined to salvage something from this particular fabric, I pulled out the raglan-sleeve top. Boring, but dependable, and despite the insanely good weather (high of 29C today!!!!) I will be wanting long sleeves very much, very soon. In this fabric, there was plenty of stretch to experiment with bust-gathering.

Back view

I think it will be OK after I take a couple of inches off each side. This is the same pattern a the Where’s Waldo shirt, of course, but that fabric had very little stretch, while this stuff grows while you look at it.

And then the hubs got home and it was time to make pizza (why did I decide to use the oven on an actual hot day?)

Shoes make everything better?

At least I found some cute shoes at the thrift store yesterday (a small consolation considering the entire pattern section has been purged. There wasn’t any good fabric, either.)

I guess three pretty-much-finished objects is pretty good for one day (even if they’re all ridiculously simple pieces). I guess I was expecting to have something I was excited about, though.

Those darned expectations…

17 Comments

Filed under Sewing

California dreaming…

New tunic!

… on such a winter’s day…

Ok, not really winter. It was raining (again), which in these parts denotes NOT winter about as strongly as anything. Yay, liquid water!

But definitely not as summery as I’d like.

Still, I continue to sew hopefully, so today I plugged away with my gauze 70s tunic, trying not to mutter about how much I prefer nice, heavy coating fabrics. Cotton gauze and voile don’t rate too high on the scale of difficult fabrics, but you have to be so careful about the finishing, especially in white. Things I usually ignore, like how evenly I grade my seam allowances or whether my tail threads are getting eaten by the feed-dogs, stick out like a sore thumb.

McCall's 3838

Now, I was aiming for view C, the left-most on the pattern envelope. Since it was a sleeveless (essentially), un-fitted pattern (and I don’t know how McCall’s patterns fit me yet anyway), I omitted my usual swayback and petiting alterations. Instead, I opted for a square shoulder alteration, which I’ve been pondering on my last few tops.

Front view

And I’m quite happy with the results, although I should probably have lowered the neckline the same 1.5 cm I lowered the centre edge of the shoulders. I did that for the back neckline, but didn’t think to do it for the front. If I make this view again (which isn’t certain, as there’s lots of options) I’ll lower the whole neckline at least an inch, anyway.

After some consultation with mommy dearest, I did some seam-finishing experimentation and settled on the lazy stitcher’s French seams, which is where you serge the edge on your first pass, then press and encase the serged edge within the French seam for the second pass. Basically it adds the serger thread, but saves you the trimming stage. I pretty much blow at trimming seams evenly, so this let me get a much narrower French seam than otherwise, so despite the extra thread I end up with less bulk. Although my serger, despite being serviced just at Christmas, has tension issues when dealing with light-weight fabrics; there doesn’t seem to be any middle ground between ultra-loose and loopy and too-tight-and-ruffling. I’ve discovered that if I leave extra-long tails I can usually work the thread in so the thing lies evenly afterwards, but it’s a bit of a pain nonetheless.

Back view

Yes, it’s time for a new serger. One with all the bells and whistles.

Anyway.

I was really, really scared of the sweetheart neckline. Mostly because I felt the fabrics were too light to interface or reinforce, other than stay-stitching. So I stay-stitched, and handled as little (and as carefully) as I could. It did wind out a smidge stretched out, but… decent. And mostly symmetrical, my other fear. Although I used the lining as my facing for the neckline, for the armscyes I bound with bias-tape made out of the voile, and pressed to the inside. I used my machine’s lone decorative topstitch (OK, the only one I like) to topstitch around the neck and the armscyes. Patty is making me very jealous with her decorative topstitching.

Aside from the shoulder alteration, the only other change I made was to add 13 cm (aka 5 inches, but I’m trying to be a good metric girl these days. The search for a metric gridded ruler continues, and I am consciously teaching my kids to sew in metric.), to the hem, bringing it from a blouse length to a tunic length. Somehow when I was thinking about this pattern, the outfit I conceived of was this tunic-almost-dress worn over cutoffs you almost can’t see are there. Voila. Although maybe for the full illusion I should’ve made the top a couple of inches longer still.

Side view

I’m quite satisfied with the fit—none of that bunching up behind my neck that I often get, so I presume the square-shoulder thing did its work. Other than that there’s not much to fit or not fit ;). Side-bust darts might improve the shape a bit, but aren’t actually necessary.

View C has a self-sash stitched in place at the centre front, and I even cut one out, but then I couldn’t resist trying it with my Japonesque fabric sash, and I love it, so I’m going to leave it changeable for now. We’ll see how it stays in place when I ever get a chance to actually wear it.

But all in all, super happy fun!

There’s a bit of the inevitable pregnant pouf that is going to accompany pretty much any take on this style, but this is a look I’m resigned to, as it’s pretty much my natural figure anyway.

This is “officially” my second piece for the Summer Essentials Sewalong. Now, excuse me while I go fantasize about hot, hot sun…*

*I think I should apologize about the amount I whine about the weather. I’m not sure if it’s human nature or a Canadian specialty, or just that I’m a wimp (I am a major weather wimp, especially about the cold). The weather we are getting right now is a kajillion times better than what I was complaining about in, say, March. So really I should STFU.

32 Comments

Filed under Sewing

Cowl Finale

Cowlneck the fourth

Well, for the moment. Like Steph, I think I’m done with this project. I’ve made four knit cowly tops this week, all but one of which are wearable. (And I have hopes of salvaging the fourth, possibly by stitching down the folds or something…)

This one was supposed to be the ultimate. And, to be honest, I think it looks kick-ass in the pictures. That is pretty much what I was going for.

The devil, as always, is in the details.

The biggest one, I think, is the most inevitable—the large cowl which permits those lovely underbust folds doesn’t, in fact, stay in place particularly well; any time I raise my arms or lean over, it comes untucked, creating a front that just looks, well, poofy. I have a feeling the original top would’ve had the same problem unless (as I half-suspect) the “underbust” folds in the photo are created by tugging down on the cowl, rather than falling naturally that way—in which case in the shirt as worn they wouldn’t even be there at all…

Completely my fault, on the other hand, are the hole I

A bit of a closer look

accidentally snipped in the front neckline while trimming the binding, the cowl facing that doesn’t fall nicely to the inside (I sewed it down a hair or two wrong on the inside), and the fact that the sleeves are sewed on with the wrong side of the fabric facing out. Fortunately the last is virtually undetectable—anyone looking that close is going to be much more struck by my wonky stitching. /sigh. I was trying to take my time with this last version, but I think my subconscious was against me.

For those of you who’ve been thoroughly confused with what I’ve been doing (and who’ve stuck with me despite it 😉 ) I made up a quick little diagram of the steps I took. The tricky part, again, is the details—how long and wide of a drape, how much to curl back the front pattern piece.

Pattern alteration---click image to see full size

And I think that’s enough of messing with cowls for, well, at least a couple of weeks…

After all, Sherry’s tailoring sewalong begins in just a few weeks, and I need to have a pattern of some kind ready for that. I think I’m going to try to create my own based on the Built By Wendy jacket book (which Ali just did a great overview of). I’m thinking princess-seamed bodice, empire waist with A-line below, thigh-length, maybe an inverted box pleat or two in the skirt portion… still haven’t decided on a collar or single- or double-breasted… anyway, I’m sure I’ll have a post on that in a day or two, anyway. But I will still have to muslin etc., and decide if I can make the sleeves two piece etc.

So much to sew, so little time… 😉

23 Comments

Filed under Sewing

A qualified “meh”

Anthropologie knockoff v. 3

For this third iteration (see 1 and 2), I didn’t change much from the last; re-narrowed the neckline a wee bit, and lengthened the cowl portion so there would be more drape higher up.

This fabric is meh. The colour is drab,  it’s very, very thin, and worst of all it has very poor recovery; to get it to fit like anything other than a sack I took both sideseams in by over an inch. But it’s got great drape and cost about $1.50/m, which is about as good as it gets, at least around here.

For those of you who are insanely interested in the exact alterations, I think I’ve “curled back” the side seams/armscye too much. I needed to do it a bit more than in my first iteration to get the cowling to drape a little deeper, but not as much as I did. As usual, I overshot. I think there’s a sweet-spot somewhere between my pattern the first time and this iteration; mostly it looks good except that there’s some oddness in the folding of the pleats at the armpit; basically the first pleat is turning into a dart, which isn’t what I want. Solution? probably rotate the armscye back by the amount of that dart, and make up for the extra distance in cowl height.

Like my accessory?

Which sounds like gibberish typed out, but will hopefully remind me of what I’m trying to do… so I apologize to the rest of you for my opacity.

The other upside—this colour goes really well with my corset-waist circle skirt, which almost nothing else in my wardrobe does, and the corset-waist covers up the somewhat-more-meh lower portions of the top. Yay!

For honesty’s sake, I’ll include a shot of what I was wearing earlier in the day before I “finished” (for that unhemmed, threads hanging everwhere, value of finished)  the top. See? Not a good combo.

Previous outfit.

16 Comments

Filed under Sewing

Temptation!

Curses. Just as I’m grappling with the fact that I really need to decrease the sewing-to-grad-school ratio in my life, I get not one, but two tantalizing sewalongs dangled in my face.

Peter, as you know (since everyone and their chihuahua reads MPB) has pencilled in a jeans sewalong for May. Now, obviously I’m in no need of more jeans for me—I have no less than five functional me-made pairs, plus the RTW, which I think is more pants than I’ve had at any one time since I was 12—but it would be an excellent place to tackle the terrifying prospect of sewing jeans for my husband. The only thing more frightening than the prospect of sewing jeans for him is the prospect of jeans shopping for him… well, that and the fact that it’s very, very hard to get him to model anything I make him…

And then, as if that weren’t enough, Sherry comes along offering a RTW tailoring

New book!

sewalong! Just days after I splurged and bought Coats and Jackets by Wendy. And washed the 5 m of off-white wool I found at VV ages ago… So now I’m sitting here doodling sketches of empire-waisted spring coats. So much inspiration… so hard to choose!

All this is in between madly running over alterations to the knock-off cowl pattern. Fortunately, when knocking off a $90 shirt, you can justify an awful lot of iterations of $3/yard jersey.

For the next version, I sacrificed some of my striped

Muslin #2... not as awesome as #1

knit (visible on the right here), as I was too impatient to wait for the weekend when I can get to Fabricland (which is allegedly having an awesome sale). This was a bad idea, as it doesn’t have the stretch and drape of the pink fabric. I’m not 100% convinced it’s wearable, although it’s not awful, but worse is that because the drape isn’t right I can’t really compare it to the first version. So I’m not going to dwell too terribly much on the results except to say that next time I’ll add back a bit of the width I took off the shoulders, to give me more room for deeper pleats.

Much happier with my first version… sigh…

Speaking of which, guess what I wore today?

Me-Made March, day 11

Fluttery cowl-neck
Ellen pants

Apparently my spring-like outfits have in fact brought on spring… and these white pants are now very, very muddy. 🙂

15 Comments

Filed under Sewing

It’s possible I may have overdone it…

Anthropologie original

This is all Steph’s fault. She tempted me. First by posting this luscious Anthropologie shirt on her blog, then by showing off her version of it.

Well, mostly. There was also this thin, drapey coral knit showing up in the clearance section at my local Fabricland. And the cardboard, no seam-allowance version of of my knit TNT that I made up over the weekend, which makes tracing out and altering the pattern a cinch.

Hmm. Maybe a little too much pleating? Also, I don't think my shoulders are always this lopsided.

I haven’t quite replicated the original (I think I may have overdone it a bit, however). But I think I am pretty close to how they shaped the pattern, requiring just a bit of tweaking on the exact length, width, and pleating of the drape.

I started by attempting to drape the pattern on my duct-tape double (wearing one of my Lydia tops so I could pin to it; this also helps since my DTD doesn’t really have all of my features. Like, oh, armpits). This wasn’t super helpful, since I wasn’t prepared to hack up all my precious $3 fabric for pattern pieces, but it did give me some broad parameters for the width of drape and length of pleated pieces I was looking for.

My pattern alterations

There was a lot of debate on Steph’s post about whether this kind of drape, combined with the fitted lower bodice, could be achieved without seaming. I, too, was sceptical. At this  point, I am going to officially change sides and say that it can, at least in a 4-way stretch knit.  Although the result creates some interesting grainlines.

Knockoff shirt

I started my slashes below the armscye, about on the level of my bust; I suspect that this is still a bit high, the original shirt looks like the drape begins a bit lower, on the level of the underbust (you wouln’t want it to go any lower than that, though, or you’d lose the fitted look of the bodice). I used wedge spreading for the bottom part, and used the draping as a reference to give me the depth of the drape (pink line) and the length to be pleated (blue line). The green line shows the piece of the upper front I transferred to the back of the pattern (there’s no shoulder seam, just the dropped seam you see in the front.

Back view.

Obviously I still haven’t quite nailed it—I think I have a bit too much fabric in the pleats (or perhaps my fabric’s just heavier), and the Anthropologie shirt’s pleats are arranged a little more thoughtfully than mine where they’re sewn to the shirt. I also need to remind myself that the anthropologie dummy in the photo has a much longer torso than I do… if I were to try on the same size shirt, I’m pretty sure the draping would begin about at my waist, and not give me that lovely shelf-bust illusion.

For those who are interested in the technicalities, here’s a quick closeup of the inside of the pleats:

Cowl pleating at front shoulder

You can see the inch-or-so facing folded over from the outside (on the left of the picture; the armscye seam is to the right. I stabilized the pleated seam with clear elastic, and sewed it on my regular machine for greater control (and ability to sew over the pins. Very slowly and carefully, I’ll add.). You can also see that I arranged my pleats regularly (each pleat was 2″)… the original has them clustered towards the neckline edge, and I’m not sure how deep and how many of them there are; it seems like they might be fewer, and deeper towards the armscye.

Flutter sleeve

I also drafted my first flutter sleeve; I’m not convinced this is the best look for this particular top; as a small-busted girl cowl necks work well for me, but this one is so bulky it visually moves me into large-bust territory, at which point my broad shoulders become something to be minimized, not enhanced with flutteries. So I think in future versions (can I really justify multiples of

Another view, just for kicks.

these?) I would stick with a narrow sleeve. I love flutter sleeves in general, though, so I’m sure I’ll use it in the future.

Incidentally, those bust-framing folds (in my shirt and in the original) are created by puling parts of the drape down below the bust. This works well enough for posing (especially on a cloth-covered dummy) but I suspect won’t really stay put in the general course of life.

Still, what a lot of fun! And a bit reassuring after my last attempted-cowl fiasco. You can see that it’s not finished—serger threads hanging everywhere—but I really wanted to just show it off. I’ll neaten it up later, and if the weather improves, I may even get to wear it for MMM!

Me-Made March Update:

Me-Made March, day 9

I’m thinking of this outfit as an invocation of spring. (Actually, it’s supposed to get above freezing here today. Hooray!)

JJ blouse
very plain tank-top
Ellen pants

Ok, now I’m going to go put on my sweater… and socks. 😦

41 Comments

Filed under Sewing

Using up the Blue

Blue raglan-sleeve top. See below for the reason I look so irate.

After the stegosaurus shirt, I had just under 90 cm (one yard) of fabric left. Possibly I should’ve made it into something for one of the kids, since it’s a bit of a distinctive colour, but for whatever reason, I was determined to get one more long-sleeved shirt for me out of it. Wiggle as I might, I couldn’t quite get the Pattern Formerly Known as Lydia onto the available amount of fabric. I didn’t want to cop out and go with short sleeves, as this is a warm, wintry knit.

Fortunately, Lekala patterns came to my rescue once again; the raglan top pattern that I made before just fit, helped out by the fact that the pattern pieces are full-width, not to be cut on the fold. This was annoying when it was eating up all my printer paper, but with careful jiggling I was able to get it all in place.

So, I have another raglan top. As this is a much more stable knit (though without any redeeming factors like cotton, as far as I can tell), it fits considerably more, ah, sleekly, than the white version. Thus far I haven’t bothered with the ruching on the front; I kinda like the round neck (though it is pretty similar to the stegosaurus neckline, isn’t it?). We’ll see how boring I find the top after wearing it today.

Aww... no back ruffle. Plenty of wrinkles, though, as usual...

Really nothing to say about the construction. I did the seams all on the serger, which is really easy for the raglan construction, and twin-needled the sleeve and bottom hems. The top edge is just folded under around a narrow clear elastic and twin-needled as well. I have a Schmetz twin needle right now and I can’t tell if it’s just in my head but it really seems to me like the Schmetz needles (especially the twins) break a lot less readily than the Klasse (the other brand I have ready access to…) Oh, and you may have noticed you’re getting a glimpse of something other than my usual, draped-sheet photo background. This is the brightest corner of my kitchen (at least at 8:00 in the morning), and you are being “treated” to it because my darling children trashed the basement yesterday and my sheet is now in a limp little pile on the carpet, buried under an avalanche of… not even toys. Just stuff. Urg. I love my children. I love my children. I love my children. I…

Versatile Blogger Award

oh, yes, and before I forget, the amazing Magda passed on this “Versatile Blogger” award to me, and then the equally mind-blowing Oona Baloona did as well. And I want to thank them both very much, but I think I’m running out of interesting things to reveal, so I’m going to bail on spreading the meme and just point y’all to my previous exposees: Stylish Blogger and Beautiful Blogger.

8 Comments

Filed under Sewing

The Stegosaurus Ruffle strikes again.

Blue long-sleeve top

Nothing like a me-made month to get me off the fluffies and back on track making practical clothing. Today’s version being rather more successful than yesterday’s.

I made a couple more tweaks to my ever-evolving “Pattern formerly known as Lydia“. Since at this point I’ve altered the waist curve, the shoulder angle, the sleeve-cap, sleeve length, sleeve shape, and the neckline, I should probably give up on calling it a “Lydia“, and just call it my “Knit top TNT” or something equally generic. This time, I tweaked the sleeve-cap again, removing a bit more height, and attempted a seam-free swayback alteration, which creates much the same change in the angle of the back shoulders as Sherry’s method, except that… well, I dunno, I like the funky pivot-and-slide stuff. I then decided, on a whim (actually to optimize my pattern layout) to cut the back on a seam, so I took the opportunity there to add a teeny bit of shaping as well. If I decide to make the CB seam a regular feature, I can do a much more thorough swayback fix in the future.

No-seam swayback alteration. Yes, it affects only the shoulder.

Anyway.

My previous Lydias have been scoop-necked and plain. I didn’t want to just make another version in blue, so I decided to try a boatneck and a back ruffle, a nifty little feature I am blatantly stealing from Heather of Feathertysews. Thanks! I was a little hesitant about trying it in such a heavy fabric, but it actually worked out really well. Yay!

Flatlocked seam (open)

So, back to that CB seam. I didn’t really have enough room to add a seam-allowance, so I decided to try flatlocking the seam. This is a trick you can do with a serger, where you basically turn the needle thread tension way down. That way, after you serge the seam, you can basically pull it open so the ends of the fabric butt up right against each other. One side looks “serged,” the other side has these horizontal loops of thread—actually quite decorative; I have a RTW tee that features it (and I thought it was a super-cool feature when I bought it). It works best with a fairly beefy fabric, and I gather is used a lot in active wear, for butting fleeces and things like that. Here’s a better overview than mine… Since my knit is a fairly sturdy athletic/winter knit, I thought it would work, and after a certain amount of messing around (my serger’s tension settings are wonky at the best of times) I got it to work. I wasn’t too concerned with it being super-even, as my next step was to cover it with my little stegosaurus ruffle.

Ruffle closeup

I cut a piece of clear elastic just a little bit longer than my shirt back, and a strip of

my fabric about twice as long. I was originally planning to be quite scientific and match my ends, halves, quarters, etc., but it seemed like that would require too much stretching of the elastic, not to mention require more precision than I’m truly capable of. So I just held the elastic as taut as was comfortable, and slowly let it out as I stitched (a narrow zigzag) along the middle of the fabric strip, though both elastic and fabric. The result is that the strip isn’t gathered as evenly as it could be, but it doesn’t really show (and even if it does, I can’t see it 😉 ). Then, using the same narrow zig-zag, I stitched the ruffle overtop of my flat-locked seam.

Stegosaurus ruffle!

I used Sherry’s binding method here for the neck, which I attached in a C (that is , after sewing one shoulder but with the other one still open). It’s a wee bit gapy but I’m hoping that will go away in the wash. I didn’t include any clear elastic this time as the fabric is already fairly bulky… we’ll see if I regret that in the long run.

You can see that, although an improvement, my swayback alteration attempt was not enough to remove folding at the small of my back (the fact that the shirt is riding up on my belt isn’t helping, but I promise even when tugged down the problem persists). I’m happy to say the change in shoulder-angle doesn’t seem to create a problem, which I was worried about. If I try a CB seam again, I’ll do a real swayback tuck.

The further reduction of the sleeve cap seems to have hit a sweet spot (finally!); it went in (flat) essentially flawlessly, even on the serger.

I have to say, beefy, stable knits are such a dream to work with. I twin-needled the hems without needing to stabilize, with no problem at all.

Whew, I needed that after yesterday’s fiasco.

These posts will also double as my Me-Made March day 6 🙂

23 Comments

Filed under Sewing