
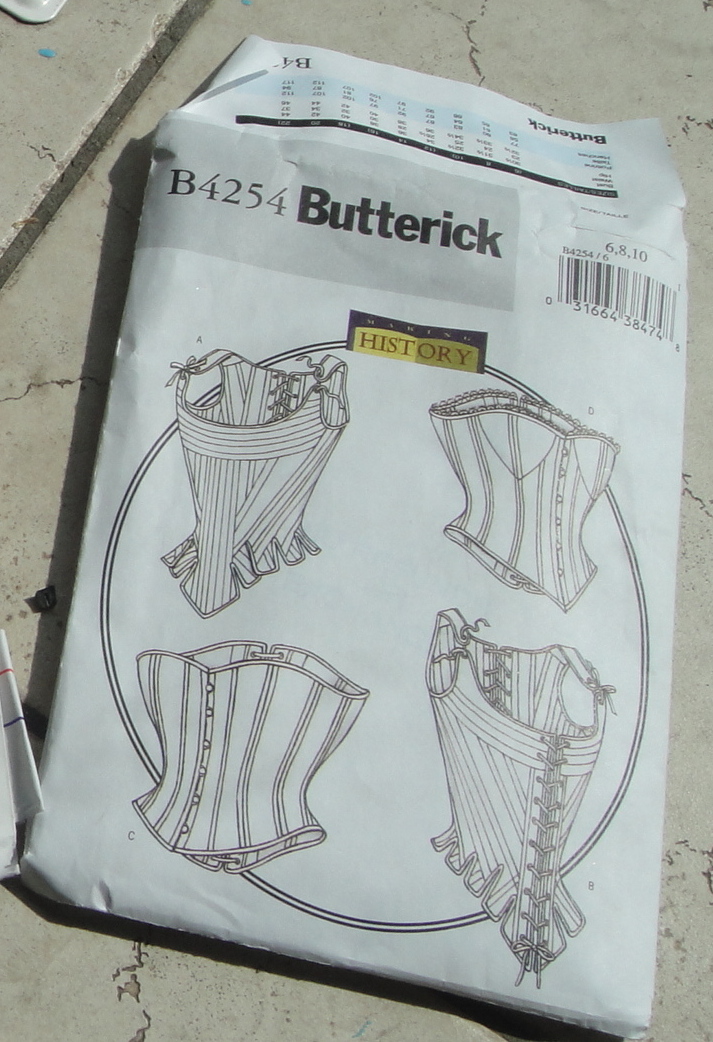
Butterick 4254
Despite a number of itty bitty things like, oh, not having ANY actual corset supplies (except eyelets, I do have eyelets), guess what I did when Osiris’s best buddy dragged him out of the house today, leaving me alone for HOURS?*) I make a mockup of Butterick 4254. After I deflated the mound of empty boxes that was occupying most of my charming new sewing dungeon space, and got the one machine that I have over here set up. I have traced out View C, which is about as simple as it could get.
Before even starting, though, there were a couple of things I wanted to do. First was shorten the pattern above the waist. I took a 2 cm tuck across all of the pieces. The grainlines on some of them are really weird. Any experienced corset makers reading—should the grain lines go up and down relative to the piece, or relative to the corset overall? Shouldn’t those things be more or less the same thing? I confused. Anyway, for the mockups I went with the grain as drafted.
I read all the reviews on PR. Some (who appeared to be the more serious corset-wearers) found that the pattern lacked compression (i.e. it’s drafted at zero ease, not with negative ease at the waist. So the size 10 (the largest size in my envelope, and a size smaller than I normally make) has a 25″ waist, as drafted. Me being me, this is plenty of compression. I was a little less sure about the bust and hip, but willing to go with it. Several people said they found the corset short, and since I had just shortened it further, I figured I would extend it by a couple of cm all around the back.
I did not make one of my staple adjustments—a swayback adjustment. I did, however, add a bit of extra width at the high back hip.
And I made a mockup. As per the suggestions in Linda Sparks’ “The Basics of Corset Building,” I added a 2″ panel to the back where the lacing will be. Since I haven’t got a busk (see above about having no actual corset supplies), I subtracted the seam allowances and cut the front on the fold.
I’m torn on the whole busk thing. On the one hand, that’s a lot of money and effort and waiting (I would have to order online) for my first corset. On the other hand, I’m aiming for that Victorian corset look and as far as I can tell, they were all about the busks. Anyone with actual historical-fashion expertise (as opposed to my rather lazy google-fu), please correct me if I’m wrong. And yes, I’m aiming for at least superficially historical here. Why? Well, basically my mother’s been involved with a local small museum volunteer type thing for yonks, and there’s a possibility we could maybe develop a “pioneer sewing” program-type component and, well, I’m having visions of everything from treadle-sewing workshops to steampunk picnics when (if) summer ever comes, so yeah, I’m feeling historically oriented with this project. Vaguely, anyway.

Version 1.0
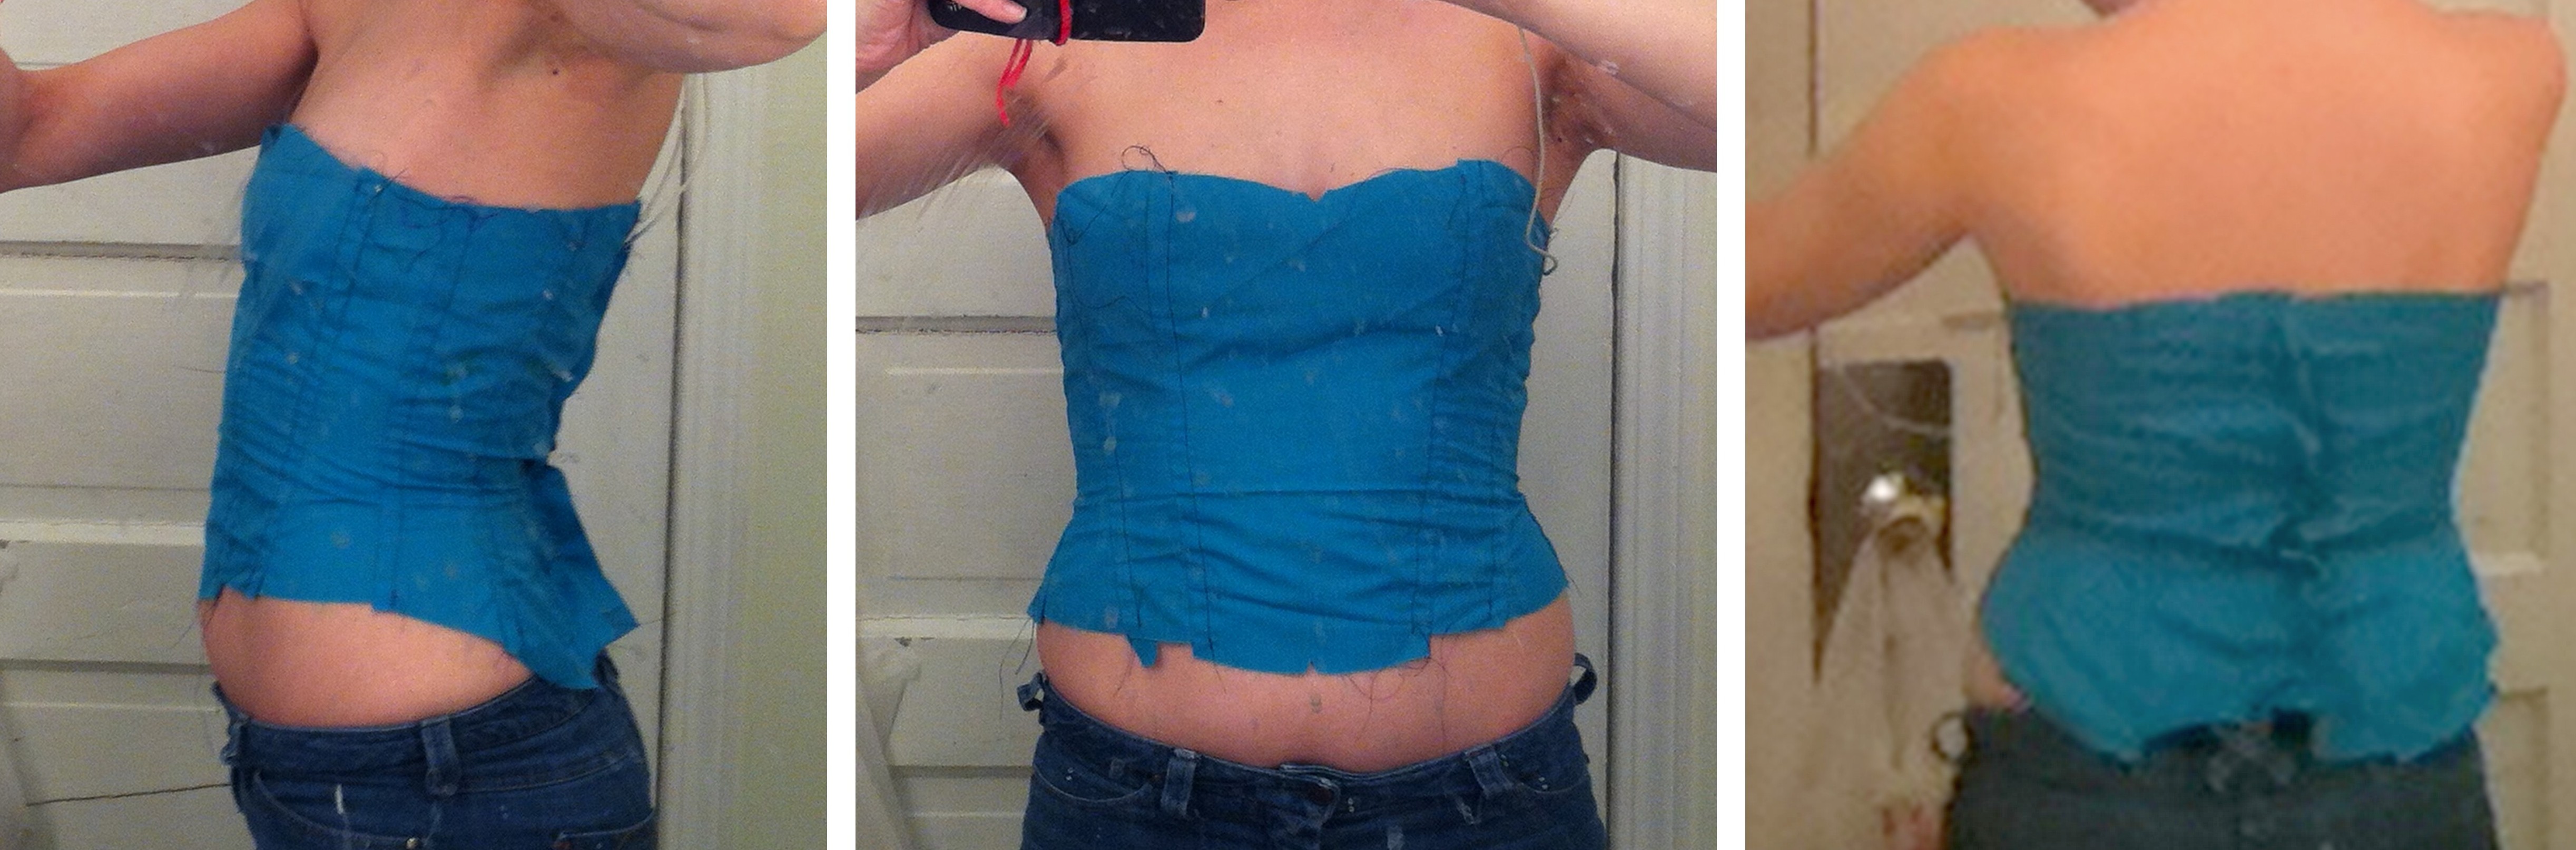
Anyway, about that mockup. Will you ever forgive me for these horrible dirty-bathroom-mirror fitting photos? I may never forgive myself. Especially the back photos, which I took with the reverse camera on the iPhone, which has crappy resolution and no flash. Anyway, so, bust fit seems ok (recall that since the top and bottom of the corset are bound, there’s no seam allowances to fold under there). Waist fit as well—it’s tighter, but it’s supposed to be, right? It’s just below the waist everything goes, um… yikes. Ok, so obviously my hips are not appropriately Victoriany. But the biggest thing, really, is that weird length thing from front to back. The corset, from the illo, is supposed to arc up over the hips, and down in front and back. Well, I have the back bit just fine, but the front? WTF? So, obviously I will be lengthening the bottom of the front. Like, a couple of inches.
Anyway, I took in the loose wobbly bits below the waist, probably a total of about four inches.
And then I stitched down my seam-allowances to make boning channels. Except I have no boning (not even zip ties) to put in them.
Version 1.1
Nonetheless, I think the results are MUCH better (OK, not trying it on with seam allowances out probably looks better, too. It’s just much easier to make the adjustments with seam allowances out.) I think the fit over my hips at the side is spot on. I’m a little more worried about the back—it’s doing its usual sway-back wrinkle, assisted, no doubt, by shoddy pinning. Will the boning smooth it out, though? Or should a corset be “fixing” my little posture problem, anyway? For that matter, how appropriate *is* fitting a corset? I mean, isn’t the point of a period silhouette that it squishes you into ITS shape, not the other way around? Thoughts?

The altered pattern
Anyway, here are my pattern alterations, to the extent that you can see them in the dappled daylight on the kitchen floor. I guess I could’ve moved them to a better spot on the floor, but that would’ve required, y’know, forethought. The red outlines my post-fitting changes, both where I slimmed the hips and my length extension in the front (on the right). I suppose I should really do a second mock up to test that length alteration, but I’d really like to plunge ahead and cut my real fabric. Not that I have proper coutil or anything, either, mind you.
*Just for the record, I love my husband. I love spending time with my husband. I love that he wants to spend lots of time with me. But right now, he’s getting a lot more alone time during the day, while I’m spending my day surrounded by and interacting with people, and while my introvert/extrovert ratio is pretty close to even, the fact that I’ve had NO ALONE TIME EVER for seven or eight months is starting to take a toll and I’m really wishing to just have time to do my things. Like sew.


I so get you about the alone time. I am an only child and being alone is my default. Being around people all day all evening is a recipe for mental health issues. Even on vacation I have to be by myself for a little while. Glad you got some down time.
BTW, i am of course no help about anything to do with corset making. It does make for interesting reading though.
Glad I’m not alone (in wanting alone time. Ha! I kill me! 😉 ) yeah, it will be interesting…
I totally get you on the alone time. I used to pray for business trips.
Oh, yeah, those are heavenly!
I crave my alone time too, so I totally understand. 🙂 I have no useful info on the corset-making though. Except that the best way to learn something is to just jump in and do it, so you’re off to a good start! 😉
Hehe! Thanks. 🙂
The busk is there so you can put the corset on yourself. A corset that laced in the back was the mark of a monied woman, since it showed she had a MAID to help her. A corset that laced in the front was for the not-so-monied who had to lace themselves. As a former corset-wearer, I can tell you that even a 2-inch reduction is serious business for those who have never worn a corset, and definitely takes some getting used to!!. By “reduction I mean “down from your natural waist measurement by a corset constructed to take that kind of pressure” Hence all the criss-crossy business with the grainlines. Also, corsets with bra cups are much more uncomfortable than those without any “cuppage” and that sit an inch or two below the bust because they “push up from under” when you sit down. Which can only be on a HARD chair; you haven’t felt “uncomfortable” until you’ve sat in a squishy chair while wearing an actual ,steel-boned reducing” corset! Also, you need to make a “lacing panel” to protect your skin from getting “burned” by the laces , when you pull on them. It also hides the giant crease that corseting makes in your back skin!
that sounds like so much fun, why did we stop wearing them?
I know! 😉
Thank you! I think the reduction here will be ok, as I can pin it closed at the waist and it is snug but not uncomfy. Maybe it was drafted for a smaller lacing gap than the 2″ I am working with. I don’t think I will ever wear this without a chemise, but I will probably do a lacing panel anyway. Thanks for the comments!
All fascinating. If you love your real fabric, a second mock up may be in order. Sounds like a fun day!
Yeah I wasn’t planning anything super special for my fabric, at least for this one… It will be an undergarment.
I’ve wondered the same thing about corset fitting myself! From what I remember back when I wanted to make historical costumes, the Victorian corset patterns you have are basically “corset lite”. To have the more constrained Victorian corset look it’ll have to fit lower over the hips. Livejournal has a great corset makers group that should be of help. I’ve seen some people use hooks and eyes along the front–the NZ costumers have some good workarounds.
Yeah, I have lurked the livejournal community from time to time. I was thinking about hooks and eyes, but they also seem so flimsy. Hmm. 🙂
And yeah, “corset lite” sounds about right here. 😉
Oh alone time is magic. I am hoping for some (without errands) this week so fingers crossed you find some too.
Oh, and good luck with the corset. Sorry no help there from me.
Oh, good luck on getting your alone time! 🙂
I’ve been a silent reader of your blog for a while now – love your projects (Star Wars dress!). I just thought I’d pipe up, as I know a little about corset making (I’m currently finishing off a qualification in corsetry) and might be able to help a bit …
RE corset fitting. Yes, you do need to do some, while also planning for the shape you want the corset to make you, if that makes sense? It looks like you’ve done a good job so far. If I were you, I’d take out that crease at the back with a sway back adjustment (had to do this on a corset toile myself recently!), then do another toile, as that can have a knock-on effect on the rest of the corset. I think the other horizontal wrinkles will probably be sorted out with the boning. What fabric did you use for the toile? Thicker fabrics (like a med to heavy weight calico (Muslin in the US? The usual toile-making stuff, anyway.) or some use cotton duck, I think) will hold up a bit better on their own, compared to something softer and thinner like a cotton poplin and so will give you a better idea of fit for the final piece.
And yes, I know it’s a pain to have to keep toile-ing with your corset and you really want to get on to making the actually thing already! BUT! Trust me, it’s worth getting the fit right before you cut into your precious fabric and put all that effort into making a corset, only to find it doesn’t look as good as you’d hoped. (Ask me how I know!)
You might also want to make the CF even longer, at least for the toile, where you can draw in your finalised lower line. I say this, because that waist reduction needs to go somewhere, and for a lot of people (even the very slim, like yourself), this can result in ‘pooching’ of the tummy below the corset. Not the best look. (Again, ask me how I know! 😉 ) Though, if you only ever plan to wear the garment with full skirts, then that wouldn’t be an issue. I usually cut the toile a bit longer than I think I’ll want and sit down while wearing it, then use the crease that forms over the lap to tell me what the maximum length would be. I use that line formed by the crease as a reference to draw on the toile while it’s on myself with a sharpie. (I do this with dark, tight-fitting clothes (leggings and a lycra vest top as we call them in the UK – is it a ‘tank’ over there?) beneath, just in case the pen leaks through. Luckily I didn’t have to learn this one through experience, lol!)
RE the busk … To reiterate Sufiya above, I would say that while a busk can be expensive and annoying to wait for if you have to order them, they do make the whole process of corsetting yourself a lot easier!!!
With regards to reduction, I would add to what Sufiya said about 2 inches being a lot for someone not used to wearing them … It depends. Your natural size and squish-factor make a huge difference, as well as the construction of the corset itself. For example, I have friends who are very squishy at the waist and they can easily get a 4 inch reduction without any discomfort. They are larger than myself, but not obese. I have been laced into a gorgeous corset by a bespoke corsetier with a 4-5 inch reduction (I don’t wear corsets regularly) on a natural 31 inch waist without discomfort, though I would have struggled to eat a large meal or sprint in it! I don’t have an athletic figure, I have a naturally small waist compared to my hips and bust (a natural hourglass-esque figure), I am more fleshy than muscular (!) and this particular corsetier makes very curvy designs to high standards, designed to be able to take a lot of reduction. So, the 2 inch reduction really does depend on a lot of factors.
Also, a mistake I’ve heard of a lot of people making is to factor in reduction at the hips and bust. Please don’t do this! It will most likely result in muffin tops and ‘pooching’. In a standard corset, the waist is reduced and compressed, while the hips and bust are not. If you’re reducing a fair amount, adding a little ease to the hips and/or bust line can actually help direct that redistribution of fat/flesh and stop the muffin tops and ‘pooching’. Here’s where the ‘corset shaping you’ part comes in. Going back to what you mentioned about reshaping a sway back in your post, personally, I don’t have experience of reshaping back posture through a corset and understand it to be a quite advanced and specialised endeavour, which can in fact be dangerous if not done properly. Personally, I wouldn’t risk it!
Anyway, sorry, I’ve rambled quite a lot here, but I think I’ve addressed a lot of the queries you had in the original post! Lucy’s Corsetry has a lot of great tips and videos about wearing and making corsets – http://lucycorsetry.com/
Good luck with your foray into corsetry!
PS – just remembered – you said you had eyelets already. Are they the single-piece type or the ones with separate washers? I’d strongly recommend the two-part type with separate washers, like these: http://www.amazon.com/PRYM-542371-Eyelets-washers-oxidized/dp/B0074OJ31C/ref=sr_1_6?ie=UTF8&qid=1365944897&sr=8-6&keywords=prym+eyelets The washers ensure you don’t have any sharp edges to catch on your lacing or (even worse!) your skin when lacing up. Plus, they look better, finish-wise 🙂
Thank you so much! This was exactly the kind of feedback I was hoping for! Given that I could pin this all the way shut even at the waist, I think the waist reduction will be ok (I don’t reduce well, based on a few try-on experiences over the years). My mock up fabric is a quilting cotton/broadcloth type, maybe not as heavy as you’re describing but with no give at all. There is a bit of positive ease at the bust and hips.
And yes, I would only use the two-part eyelets. I’ve never found that one-part ones hold well for anything. Thanks again!
Hi Tanit!
I still meant to wish you the best of luck with moving house. I hope everything is finding its place by now and you can get back to normal life. And sewing 😉
I have a bit of experience with corsets and I can tell you that none of the Butterick ones are historically accurate. They are ‘look-a-like’ things, drafted for the company’s modern-day standard woman, at zero ease. For a more historically accurate Victorian style corset, you typically want between 5 and 10 cm (2 and 4 inch) of waist reduction. Some seamstresses try to achieve this by going down two sizes, but like Clare S, I would really recommend that you do NOT do this. Basically, you can only compress soft tissue so having the corset too tight on your ribs and/or hip bones is painful and doesn’t help with the overall shape.
A busk is not necessary but highly recommended because it would allow you to put the corset on and take it off without help.
For the muslin, you’ve pinned the corset closed, but you don’t want you brand corset to fit only when it’s laced completely closed because it will stretch out a little bit over time. A gap of up to 5 cm at the back (preferably with lacing guard) is often better.
Grainlines, in my experience, should be at a 90 degree angle to the waistline in each pattern piece (because that’s the bit in which you really want no stretch). Also, in a cinching corset the waistline is usually re-inforced with a piece of twill tape which is not attached to the fabric but sewn in place when the boning channels are put on.
I also think you corset is a bit short. This may be comfortable if you don’t intend to wear it tightened up (because it won’t constrict your movements as much as a longer corset would) but I have made a Butterick corset once and I never wear it anymore because it digs into my flesh above the hip bone. A little more ease at the bottom and a slightly longer line over those bones would have made a lot of difference. The big difference in front and back length looks like it is cause by your swayback.
About the swayback, and whether or not to adjust for it… Corsets have often been used to ‘improve’ a lady’s posture. A victorian corset will make you stand up very straight, while an Edwardian (S-curve) one thrusts the bust forward. These, however, are not things to play around with. It would only really ‘work’ if you ease into adjusting you posture and wear your corset a lot and even then, it’s not necessarily healty to do so.
If the corset is for occasional wear and for the fun of the look (as mine are and I think yours is), make sure to adjust it to your natural posture or at least something close to it.
I have a couple of links for you as well:
This is my favorite RTW corsetry store which also offers some general information:
http://www.fairygothmother.com/
This blog is a great resource: an English lady who makes corsets, sells supplies and teaches corset-making classes:
http://marmaladekiss.blogspot.nl/
Unfortunately, this site is only in German, but it has tutorials for drafting a few different kinds of corsets (and lots of other goth-style clothing besides that):
http://www.natronundsoda.net/main.html
Best of luck with your project!
Thanks so much, Lauriana! You’re quite right about what I am going for here… And I was thinking the front/back inequality was swayback related, too. I added a 2″ panel to the CB for fitting purposes, to account for the lacing gap so I think the ease will be all right. Yeah, I really don’t want bulging and poking at the bottom!
And thanks for the links. 🙂
Ditto to all the expert advice above. Here’s some free etymology: A “strait-laced” person (man or woman) is one whose corset is tightly laced. Think about the rigid physical posture this induces, and how that might be a good description of someone’s rigid mental or social outlook. A “loose” woman is one who’s corsets were not tied tightly — or at all — and implied both slovenliness and sexual availability.
As to your question about whether the person should fit the corset, or the corset should fit the person, it entirely depended on the wealth of the wearer. Could he/she afford the services of an expert corset fitter/designer? Or was he/she constrained to make do with commercially available goods or whatever he/she was able to sew up by copying an original?
Today, custom-fitted corsets are mostly either an indulgence by the wealthy fashionista; or a medical accessory to correct posture, or to offer support for weak muscles ( a truss is a sort of corset, for example). Some recent research indicates that corseting could be an effective treatment for autistic children. Period costume shops also churn out a fair number of custom corsets, for historical dramas, operas, and historical re-enactors. I suppose that bridal shops could be counted in that group, with the current appetite for strapless gowns that must somehow incorporate a corset inside the gown.
I’m sure that the different grainlines have to do with where you want the DOGS (degree of greatest stretch) to run on various parts of the corset — you may not want all the stretch to run one way, but to pull against each other and work together to contain and shape your flesh. I don’t have the engineering know-how to figure all that out. It is a well-kept secret among corset and bra-makers, who need to guard against industrial espionage.
Pingback: Oh, yeah… | Tanit-Isis Sews
Alone time is good for the soul I think, it can be quite refreshing! And look at what you did with that time! Wow! I can’t offer any corset advice but I have tacky enjoyed the comments, and I’m looking forward to seeing the finished article.
Just wanted to say congrats on your first corset making experience. It can be addictive. I was super lucky to be able to take Linda Spark’s corset making course. (great b-day present from hubby) She has an excellent website for corset making supplies…http://farthingalescorsetmakingsupplies.com/index.html
In a pinch, when I have an item that needs boning and don’t want to wait by the mailbox, I use zip ties….you can get them in 3/8 inch and more width at hardware stores. I just cut them to size and round the ends off with a nail file.
Thanks for those tips! I’m aware of that site and actually have a shopping card there just waiting for me to save up my corset-making pennies… although I may give in and use the inferior, locally-available materials for this first one.
I know I’m really late to the party, and you’ve already got a lot of excellent advice above, but I just wanted to add my two cents here, and say that in my experience, having a good busk (not one of those flappy plastic ones LOL) makes a BIG difference in the wearability and durability of the corset. A steel busk (and boning) in particular, will help your corset to stand up to regular wear and tear over time, and keep its shape, even on a once-in-awhile-worn “corset lite”. I know some people like the plastic stuff but I just think it’s wretched and steel is so much more comfortable (sounds weird but it’s true LOL).
As a side note, Farthingale’s is where I get my supplies from; even though there are cheaper places in the UK and US, steel (even the tiny bits used for boning and busks etc) is VERY heavy and shipping costs from those countries to Canada obliterates any savings you might get from them. Plus the peeps at F’s are extremely helpful & professional and you’ll get your supplies in a very reasonable amount of time, as opposed to waiting weeks for something stuck in customs.
Pingback: Historical Dabbling | Tanit-Isis Sews
Pingback: Remedial Corsetology | Tanit-Isis Sews