Tag Archives: finished projects

Confessions of a (sewing) pusher

Kathleen of Little Hunting Creek is right. I feel like a pusher.

Recently, my Stylish Sister-in-Law finished her first ever sewing project.

So Stylish!

Ok, I maybe helped a bit.

By, y’know, casually mentioning making this, or that, every time I’ve seen her since we moved back. And possibly by shoving my phone (with pattern-tracking app) in her face at every opportunity. You know how fun it is to dig through your patterns, virtually or otherwise? Well, it’s even more fun to do it with someone else. (Or two someones… I’m working on my other SIL, too, but she works full-time so it’s a slower process) Anyway, finally a week or two ago she cracked, and went through my entire pattern catalogue and presented me with the list of her choices.

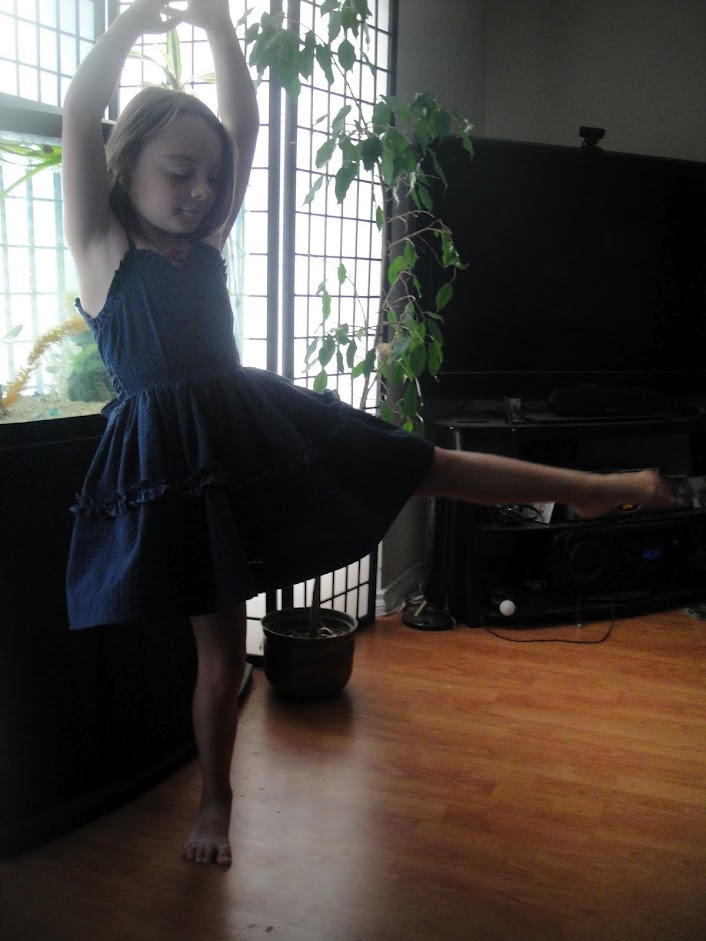
Most of them were lovely sundressy things that, while they might or might not have been good beginner’s projects, are just heartache waiting to happen, as we perch here on the cusp of the Canadian winter.* I didn’t want her first project to languish unworn in a closet for six to ten months. So we negotiated, and she opted for the tunic version of New Look 6789.

This pattern, humorously, is the same pattern I helped my friend Trish make last summer. Which, I might add, I still haven’t made up for myself. /pout. Stylish has expressed interest in making up the skirt and maybe even the pants, as well… but we’ll cross that bridge when we come to it.

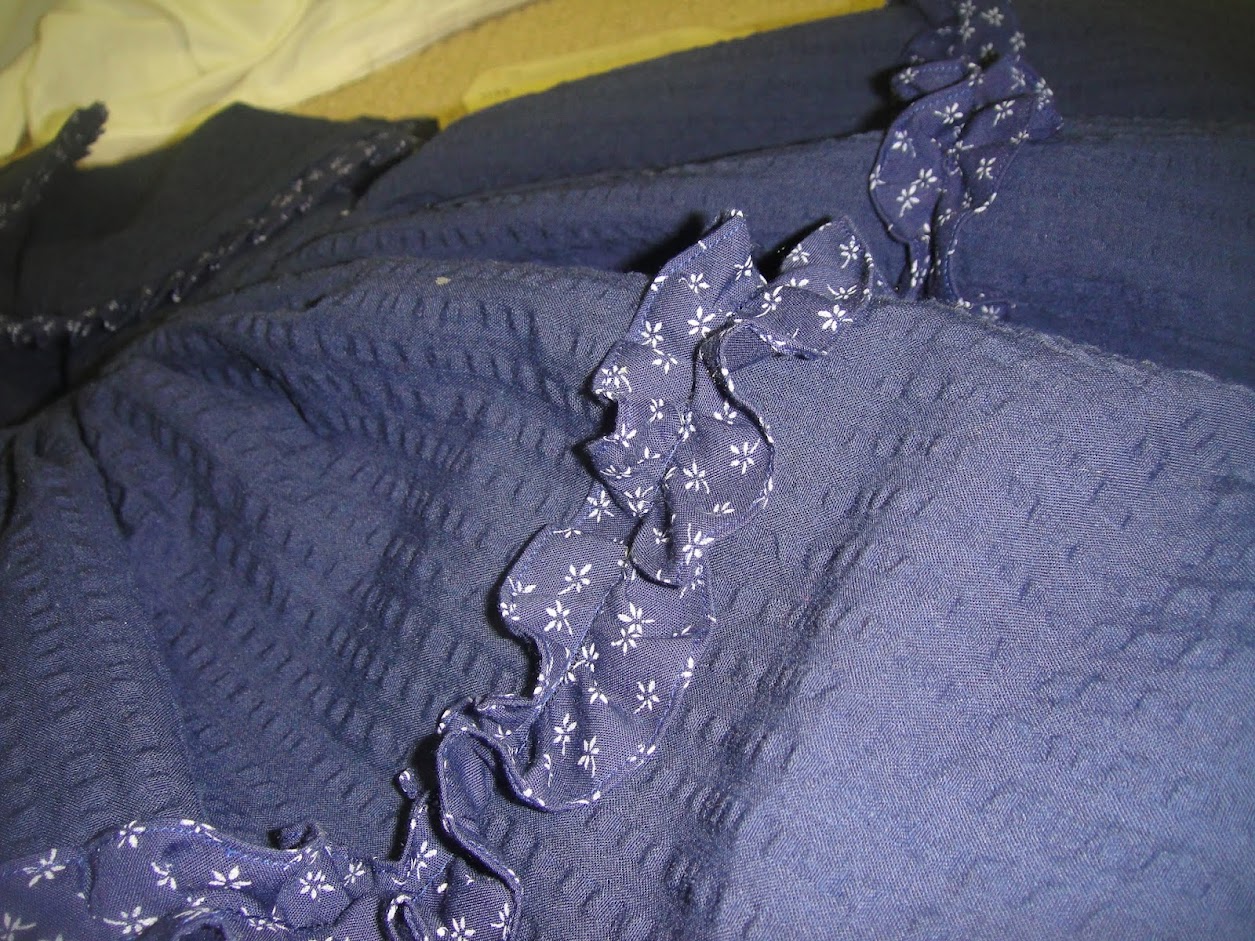
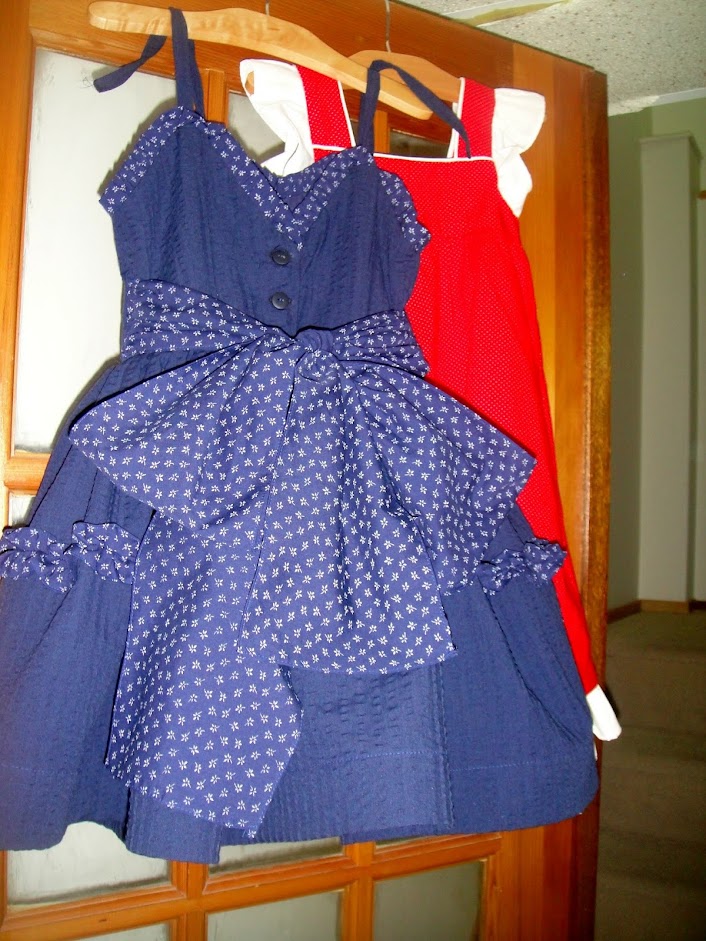
Stylish already had fabric, salvaged from a long-abandoned “old fashioned dress” project a family friend had apparently started for Stylish long and long ago, which has languished, half-draped and loosely basted, in a bag in Stylish’s storage. I’ve never draped anything, so I don’t want to comment on the quality or lack thereof, except that it’s pretty clear that it wasn’t anywhere near done.

Anyway, Stylish acquiesced to my tracing neuroses and traced the pattern all on her own. I took a back measurement to confirm my hunch that some waist-shortening would be in order, but otherwise had her trace a straight size twelve. We’re much the same size, but very different in shape, so I didn’t want to jump the gun on a bunch of alterations.

And then, I made her iron her sadly-crumpled fabric, quite possibly the first time she’s ironed anything in her life. She did it quite well, and may even have enjoyed herself.

The sewing itself was a joint effort, particularly since I elected to have her follow the pattern instructions and begin with the front princess seam. Was your first seam of all time a princess seam? Yeah, mine neither. I did the bust part and then let her do the rest of it (other than the zipper). The serger is at my MIL’s, so I made her finish the seam allowances with a triple-step zig-zag. I feel pretty mean for doing that; I don’t think I finished a seam in the first fifteen years I ever sewed. But it’s a pretty ravelly fabric. She’s most satisfyingly particular and precise in her sewing. It makes me pretty jealous, frankly.

So Stylish.

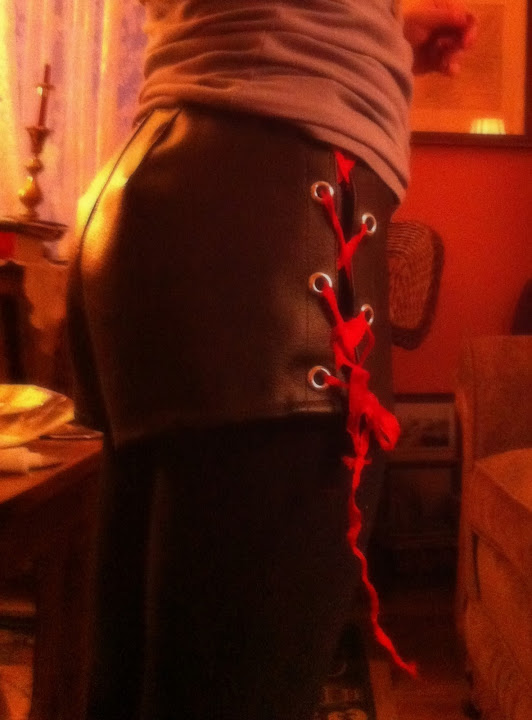
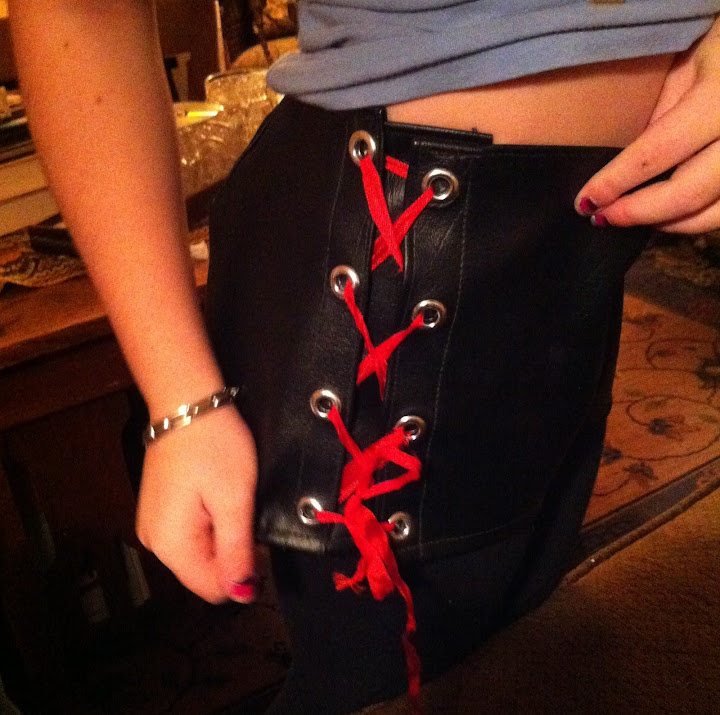
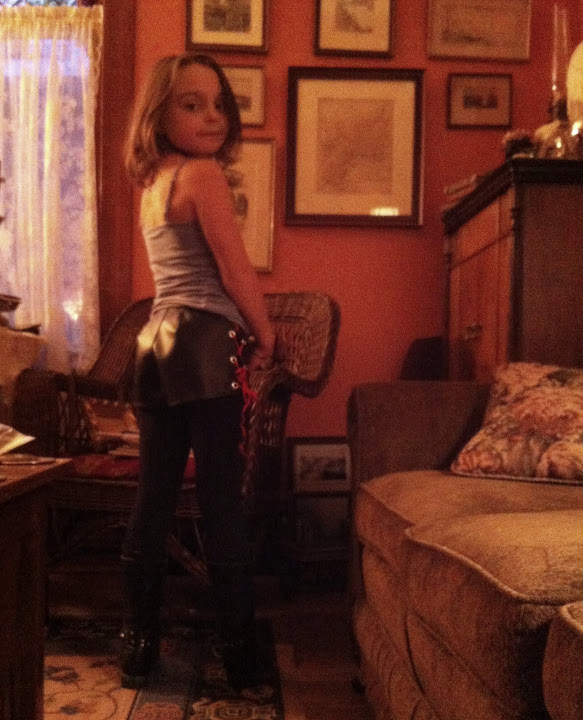
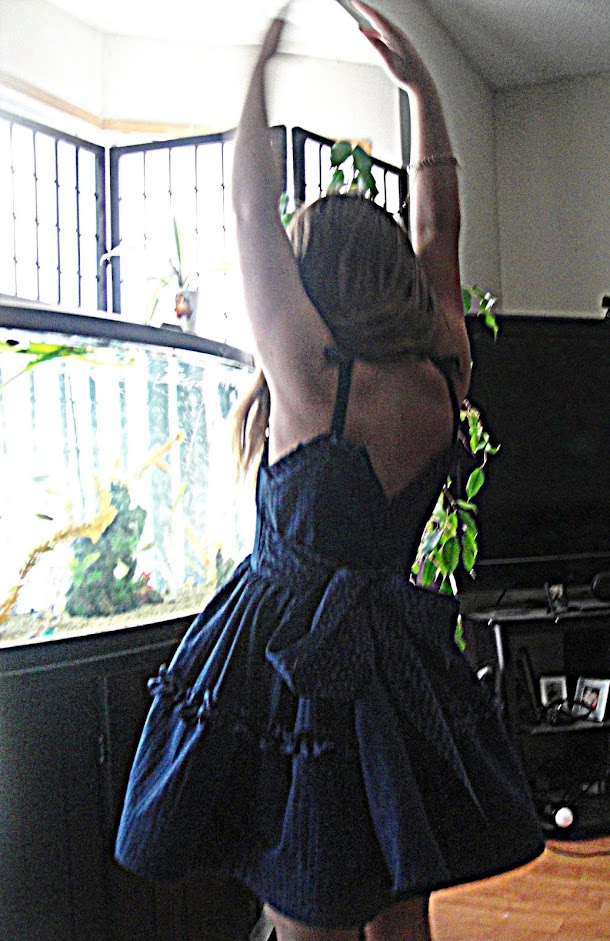
And, voila! Not perfection; it could use a little more shaping in the back, I think. (But then that might also cause more ripples and necessitate that swayback adjustment and stuff.) And the band gapes a bit and we should’ve placed the straps a little closer together for her narrow shoulders. But still pretty smart for a first try, I do think. I am grinning ear to ear every time I see her in it. And it’s not too hard to throw a sweater over, either, since it’s, um, not exactly sleeveless season here anymore.

And she wore it out to her birthday dinner tonight, so I’m pretty sure that counts as a win.

12 Comments

Filed under Sewing

Hallowe’en Spotlight: lace-up leather shorts

Lace-Up Shorts

It’s been a Hallowe’en sweatshop around here for the last little while. Last weekend was devoted to, as Steph of 3 Hours Past has put it, sewing with hammers. I spent Sunday with the kids at my mother’s, working on the goggles, and also Syo’s lace-up shorts. Rivets and grommets and wire, oh my.

I was already using McCall’s 5312 for the kids’ tailcoats (more on that later), so I decided to use the pants also included in that crime of a pattern.

Cutest pattern ever?

OK, I’ve whined about McCall’s 5312 before. Despite their supremely cute illustration, these McCall’s “Sassy Girl” patterns are dumbed down almost to the point of not being worth the time, IMO. I hate dumbed-down, simplified patterns.*

On the other hand, that makes them perfect for costume patterns, right? This might be why I hate making costumes…

Anyway, since I had the pattern out, I figured it would be a good candidate for Syo’s shorts—basic pants, no pockets, no waistband to worry about.

Laces!

I traced off the size 7 as shorts, and cut them out from my fake leather. This was my first time working with vinyl, and not being able to pin really threw me for a loop. It’s funny, because I tend to think I don’t use pins much. Well, working on this high lighted every single instance I reach for them. Closepins were helpful, but not really satisfying. I made about half the shorts on my machine, and half over at my mother’s; her old Pfaff has one thing none of my machines have—a roller foot. It made a BIG difference in sewing with the vinyl, especially for the topstitching bits. Topstitching was essential since I couldn’t exactly press this stuff in any meaningful way. I also used a lot of Wonder Tape.

Back darts

I used a very quick ‘n dirty pants-fitting method for these where I sewed them up sans darts and then added the rear darts by pinching to fit. I skipped the front darts, which really don’t make any sense to me when fitting any kind of a rounded tummy—something I’d say about 90% of kids have. Though, I don’t think the darts I wound up sewing are hugely different from the original pattern darts. And, yes, they’re pointy. I’m not worrying myself about it.

Front view

To make the laced sides, I just folded over the edge about 2 cm (I ended up folding the front edges over a further 2 cm) to make the placket, topstitched, and added a “modesty panel” attached to the back side. She was not thrilled about this, having wanted “real lacing,” which apparently doesn’t have fabric behind it. She can deal, at least until she’s eighteen. Not that she would ever not be wearing leggings and tights underneath for a Hallowe’en costume. This is Canada, after all. And not one of the warmer bits of Canada. (Although comfortingly free of both earthquakes and hurricanes. I hope all you easterners are doing OK with Sandy.)

Grommets

We added the grommets last. Actually, Syo did the front grommets more-or-less on her own, since by then my fingers were so sore from setting the back ones (plus all the goggle-making). It took her a while, but she got them done, only one ending up a bit distorted. I’m not sure why I am always startled by her strength and coordination. You’d think I’d have it figured out by now.

Back View

I don’t know if it’s a “good fit”, but they stay on, come up more or less to where she wanted them, and the gap between the lacing is a good width. So, really, I should probably apologize to McCall’s 5312. It really came through for me this time.

Except that I just made two tailcoats out of the jacket pattern, and, well, I’ll go into that later. Not horrific, just dumbed down and predictably bad.

And, sorry for the fuzzy iPhone photos. My mom’s house has gorgeous backdrops but terrible light, and I keep forgetting to take my real camera along.

*Note: I have nothing against simple patterns, where simple is called for. What annoys me is patterns for intricate designs that are simplified to make them “easier”, generally at the expense of fit and style.

10 Comments

Filed under Sewing

Unmentionables

As I write this, I am wearing my first “successful” pair of self-stitched undies.

Pillow form.

I will keep “successful” in “quotation marks” because, well, wearable they are but perfect they ain’t. In particular, my elastic tension leaves, ah, something to be desired. (Scroll down to the full wrinkly mess, I didn’t want to start off the post with it.) And as proof that home-stitched undies need not resemble elderly dried fruits, I’ll link you to Carolyn’s drool-inducing sets.

The pattern, as I may have mentioned before, is Kwik Sew 2100, which is actually in print (I can never tell with Kwik Sew patterns based on the envelope art… except for the few 70s-era ones I have, anyway.)

The upside of using an in print pattern (especially having found it at the thrift store) is that there are reviews on Pattern Review, and for once I even remembered to check them. They were universal in two recommendations: go down a size (or two) and narrow the crotch piece.

Not being one to ignore the wisdom of PR (except when I do, usually to my own detriment), I dutifully went down to a size 4 (the smallest in the envelope, about 1.5 sizes below the one indicated by my measurements). I also shaved 1 cm off each side of the crotch piece, tapering to nothing at the edges where it seams to the front and back pieces. Then I promptly lost the crotch pieces, and there things languished until the other day, at which point I rallied my courage and cut new ones.

Now, last time I made attempted undies, I really had a hard time wrapping my head around the fancy sandwiching that creates a neatly-finished crotch. Maybe it was the Kwik Sew instructions, or maybe I’m just better rested this time, but I found it pretty simple to sort out this time around. It’s the same “burrito” construction method you use with a yoked shirt, except instead of a shirt front and back you have pantie front and back, and instead of a yoke you have a crotch piece. And it is a nicer finish than anything storebought, which is probably the only really nice part on th

So that was good.

Elastic—stretched.

Less good was I realized that the pink lingerie elastic I had been planning on using was nowhere near long enough, so I had to hunt through the notions stash (which is even more poorly-organized than the regular stash) and all I came up with was some plain black 1/4″ elastic. Not really nice for undies, but available. Even worse was my elastic-tension, which was too loose on the first leg, perfect on the second, and then too tight on the waistband. (I should say, being worn they are comfy and feel and look fine. Unworn, they crinkle up pretty badly except at the one leg where they are stretched out.) Ok, so I probably should pay attention to the actual suggested recommendations for elastic length. Bite me.

Umm. Ruffly much?

Now, on to the fit. I made (of course) the “bikini” rise. The rise in back is pretty good, the rise in front is a tad high—it could easily be lowered an inch; as it is it ends up riding down the underside of my tummy and bagging a bit. A little more annoying is the width of the front of the crotch-gusset, where I blended back to the original width. I think I could’ve narrowed it there, as well. They are still a bit big—this fabric has good recovery, so it’s not a big problem, but if it were inclined to stretch out it would be annoying.

Stretch Sewing  400

Next time—I’m a bit up in the air over whether next time should be with the Kwik Sew pattern, tweaked, or another pattern, out of curiosity. I acquired this stretch-sewing undies pattern at the thrift store (Value Village in my hometown is expensive for patterns, a whole dollar apiece except for the ones that come in annoying baggies.)

Pattern piece comparison

I’m a little curious over how the differences in pattern shape would play out (the seam allowances are the same, if I recall correctly.) The length of the crotch gusset in the 70s pattern seems to be longer, while the rise of the front & back pieces seems similar—so the overall rise might be a bit higher, right? The shape over the leg is very different, but maybe some of that would be accomodated by the longer crotch gusset? I just don’t know. But I sure am curious.

And obviously, I need a lot of practice on the elastic insertion. 😛


29 Comments

Filed under Sewing

Another Closet Monster

20121005-163011.jpg
Another city, another birthday party, another monster made (loosely) from the Closet Monster book.

20121005-163441.jpg

This one is not really as cool as the first. It’s ok, though. Its chief claim to fame is its super long limbs, which were harvested from an old octopus costume I may have worn for a school play a quarter century or so ago. Yes, my mom has stuff like that lying around.

20121005-163813.jpg

It enjoyed playing in the back yard for a few minutes before being wrapped up and sent away.

20121005-165011.jpg

Tyo sewed on the limbs, button eyes, and stuffed it. I made the belt, including a salvaged buckle, and did the big final seam around the rectangular body, which was pretty tricky since all the limbs were stuffed inside by the end. The purple embroidery on the face doesn’t show up as much as one might have wished… I should maybe have insisted on white.

In any case, it’s one more on the list of projects down. In enabling news, my crafty sister-in-law stopped by to show me the plaid coating she picked up at the thrift store the other day. So we’ll be going through my multisize coat patterns soon…

3 Comments

Filed under Sewing

Holy Frock!

A tale of terror, tailoring, and tragedy.

The Coat.

Okay, I’m no good with suspense. I need to get this over quickly. I finished Osiris’s frock coat.  This is what it looked like Friday evening, as we headed out for a night on the town.

Closeup.

Here’s a slightly-clearer closeup.

And this is what it looked like Sunday afternoon…

Continue reading

38 Comments

Filed under Sewing

Minimum Blogable Unit

Leggings. Also motorcycle.

I made Syo leggings.

Possibly there is no less glamourous or discussion-worthy thing I could sew; hopefully the photos (Syo’s idea) make up for that. The pattern is Kwik Sew 1670, which I’ve made up several times now, and I didn’t even up the size. (I did actually take a 2cm vertical tuck in the pattern, as the last pair was too wide.) I did not use my serger at all, as it doesn’t make as strong of a seam. And it’s threaded with cream and I’m lazy. I used a black cotton-Lycra bought at the last major Fabricland sale I went to, and while it curls rather annoyingly, it’s otherwise a nice sturdy, stable knit. Syo is currently in rebellion against real pants, so I think these will be a really useful wardrobe addition, especially as the weather continues its inevitable slide towards the Canadian winter. (Though the last few days have been gorgeous, so no whining from me yet.)

A slightly more stretched out (and grubby) view.

They are still a little loose in the thigh, especially after wearing them all day, but pretty decent. The length is supposed to be 3/4.

Closeup

I used Steam-a-Seam Lite in the hems and stitched in the elastic at the waist with two rows of topstitching. Not quite RTW, but it’s nicely finished inside and functional.

At the same time I cut these out, I cut out a pair of Kwik Sew 2100 with the bikini-rise, in a size 4. I am, according to the measurement chart, a size 5 or 6 but the reviews are universal in the pattern running large by at least two sizes, and 4 is the smallest in the envelope. I also narrowed the middle of the crotch gusset by 1cm off each side, as it is apparently quite large. Then I turned around and lost the crotch gusset pieces, so I have not been able to stitch them. >_< if they don’t show up soon, I will cut new ones. So I can’t really report anything else. Sarai made herself a pair of these recently—it’s almost like celebrity sewing.

Or, y’know, not.

Ok, one more thing.

Motorcycle.

14 Comments

Filed under Sewing

Back in the Saddle (?)

I sewed!

Sewing!

It took a lot, both in terms of re-organizing (the box with my main sewing machine conveniently wound up at the very bottom of the middle of the massive pile of stuff we have in storage right now) and personal patience. This having the sewing room in someone else’s house bites bigtime. Not least because every time I go over to try and tackle things, I feel like I’m being rude for heading down to work rather than upstairs to visit. Going to have to work on that.

There was the predictable myriad of small, unanticipated hiccoughs, from not having my good pins or my seam-ripper, to discovering that my mother-in-law, who is currently allowing me to occupy a corner of her basement with my sewing stuff, doesn’t have an ironing board. I had assumed everyone with a “real household” would have one. I mean, she has a rice steamer, people. She said, “I don’t iron.” I said, “I don’t bake. But I still have cookie sheets.” That may not have been my most diplomatic moment as a daughter-in-law. >_< So I also need to dig my ironing board and iron out of storage.

Former T-shirt

Anyway, I did eventually settle on the quickest of projects, a T-shirt refashion. Why didn’t I get a damn before picture? /headdesk. This black tee has been kicking around the bottom of my wardrobe for roughly a decade at this point, one of those shapeless “unisex” T-shirts that I can never actually bring myself to wear, courtesy of my student club days. The pattern is an old one, dating from one of my first knit projects, but is presumably roughly comparable to Zoe’s vest pattern. I used the same fold-over elastic that gave me such fits with Tyo’s tank top back in the spring, and I’m happy to say that with a good deal more care and attention to the stitches (and practice samples!), helped along by this more stable fabric, I was able to attach it more or less adequately. Because this particular fold-over elastic doesn’t fold on its own, I stitched it on in two passes, using a three-step zig-zag and being careful not to let my stitches reach the midline groove, where they basically shred the fabric of the elastic.

The T-shirt knit is not as stretchy as the last fabric I used this pattern for, so the top is quite snug, giving a bit of a flattening uniboob thing. But it’s comfy, and infinitely more wearable than it was before. And nice and long.

Strappy fun.

I decided to bring both straps to the centre back, partly because it looks cool, largely because it meant that I could just stitch them in place without worrying about where the straps should be positioned. They are a little long, but I didn’t have time to re-adjust before I had to round up children (my own and nieces) for home-made pizza at Uncle’s house. The pain of having family around, I tell you.

Oh, and for the really geeky among you, the logo says “Miocene Park” and the skeleton is that of an entelodont.

Is this the beginning of big things? I really don’t know. I have hopes (I have coats on the brain, frankly), but we’ll see. Also, I got eight (possibly nine) patterns at the local Mennonite thrift today. They’re usually 50¢ there, but the guy only charged me $2 for the bunch. Yay. I think I need to sew more, if only so I’ll buy fewer patterns…

29 Comments

Filed under Sewing

Prezzies (2)

Simplicity 1149

More fun, although considerably more time-intensive than Style 2304, was Simplicity 1149. This is probably in the running for cutest little pattern ever. I was a little concerned about the width vs. length ratio, and obviously that kind of horizontal skirt poof isn’t going to happen without intense crinolining of a type I’m not keen to subject my nieces to, but I’m hopeful the sheer cuteness will make up for it.

Damn, this is cute.

Dress & Bolero

My older niece, Fyon (who is five), loves having dresses that match mine (well, loves it more than my kids do, anyway), so I thought I would use up the rest of my navy seersucker from the Cambie on a dress for her. I looked through my patterns for something close in style to the Cambie, but the closest I could find was actually the dress I made her last year, and I didn’t want to re-use a pattern where there are so many other crazy fun ones to try. So, Simplicity 1149. And I thought this navy cotton (cotton poly?) with the little white flowers would be the perfect complementary fabric. It originally came from my Grandmother’s stash, and Tyo had sorta earmarked it to make boxers out of, but hopefully she’s forgiven me for putting it to a more immediate use. I used it for the sash, the lining of the little jacket, and, most importantly, the ruffle ornament.

Ruffles!

There are two kinds of “ruffle” on this dress, both of which were pleated using the ruffler that came with my Pfaff, attached to my singer Featherweight. I have three ruffler feet now, but one only works with the army machine (which is put away and not really reliable) and the other works with the quick-snap foot on my modern machine, and has driven my absolutely fucking nuts in the past.*  I set it to pleat (gathering every five stitches, rather than with every stitch) although really there are plenty of places where it screwed that up. It looks fine, though—half the battle with ruffles is not to sweat the small stuff, in my opinion.

Anyway, for the skirt ruffle, I ripped on-grain strips, stitched them all together, and finished the edges with the rolled hemmer. For the edging, I pressed the strips in half lengthwise and basted down the open edge—I find if you don’t baste it closed, the ruffler tries to ruffle just the top layer and Bad Things Happen.

A very blurry attempt at a closeup. 😦 Showing edge-pleats and back buttons and bow.

Syo was eerily enthused when she came home after a quick mom-free vacation and discovered this little thing lying around the house. The first thing she had to do was try it on. (I’ll remind you that Syo just turned nine, while the pattern alleges itself to be a “size 5”.) It’s absolutely not the sort of thing she would be willing to wear in public—but some latent toddler in her just couldn’t resist trying it on to twirl around the house. It’s SNUG—she has to exhale a bit to get the waist button closed (These fifties pattern that assume that children have waists. Pfft.) But it’s still on her.

You cannot resist the Cute. You will be assimilated.

The skirt is obviously very short on my nine-year-old. Fortunately Fyon is a little narrower than Syo, and significantly shorter, so I’m thinking the fit should be great.

I finished the skirt hem with the last of my 2″ horsehair braid (actually, I was about 2″ short, and had to patch in a little section of hem with bits of 1″ horsehair braid. It is Not Pretty, but it’s all covered by fabric now and doesn’t seem to show. And combined with the double-tiered lining I added (made of stiff cotton-poly blend broadcloth) it really had a surprising amount of loft.

Bringing out the Inner Ballerina

We are so cute

Back view

Yes Yes We are.

Oh, wait. What. You’re still reading? Sorry, I kind of succumbed to The Cute there for a minute. Insidious stuff, that. Sorry for the grainy photos—this was the best light we could find in the five minutes we had before I went off to work that morning, and the camera did not like it.

Back, with buttons

Here, have a quick closeup of the back buttons (buttonholes made using my Greist buttonholer, ). I guess I shoulda taken a photo without the sash tied, too. /sigh.

but sooooo cute…

*possibly because there’s just too much vibration and movement on the light-weight, modern plastic machine, but anyway, I don’t trust it and didn’t feel like taking the time to experiment, when I have a perfectly good Pfaff ruffler foot anyway.

26 Comments

Filed under Sewing

Prezzies (1)

Tiny sundresses

I confess: I finished up my Last Sundress, and what did I do?

Turned around and made two more.

At least these ones aren’t for me—they’re for my little nieces. And they give me a chance to use some of the really insanely cute vintage kids’ patterns I’ve picked up, that my kids are just not going to go for.

Style 2304

Let’s start with Style 2304, which is intended for my younger niece. Is that not the epitome of 70s-kid-cute?

So I was a little worried about starting with a regular size 4 pattern; this is the Waif we’re talking about, who is four but probably still newborn in width. I decided, upon cutting it out, that it was way too wide, and shaved a couple of inches off by adding a pleat at CF and taking a bit off at the back. Because the yoke was now narrower, I narrowed the straps by a similar amount. So the look is a bit different—longer relative to its width, and more delicate—than I think I was really going for. And I didn’t want to shorten the length because I know my stylish sister-in-law doesn’t really like how short a lot of the vintage kids patterns are, but combined with the narrowed-ness and the ruffles, I kinda feel like it looks a bit more little-house-on-the-prairie than I had intended. Not quite my favourite look. I suppose I can always shorten it later if desired.

Buttons

I went with buttons in the back. I had three not-exactly-matching red buttons fished out from the random button stash, but when I went to stitch them on the plastic between the the holes of one was, ah, missing. Meaning the thread fell straight through. Not exactly a useful button to hold on to, button stasher. So now I’m a button short; I’ll have to go through and see what else I can come up with.

I must admit, I kind of broke my brain adding the piping and the little ruffle sleevelets on this one. In the end I resorted to finishing the inside of the armscye by hand.

I like that the amount of gathering under the yoke is really minimal (even with me lopping a couple of inches off the yoke and leaving the skirt piece the same.).

And I think that is about as much as I have to say about that dress. Under the fine old academic principle of the Minimum Publishable Unit, I’ll tell you about the even-cuter Simplicity 1149… next time!

18 Comments

Filed under Sewing

Funnygrrl’s Dress (the Making Of)


Pattern & Fabric

Whew! That Promaballoona really took it out of me. I need a weekend after my weekend.

Ok, so, finally, here is the actual post about the making of  Simplicity 5549, view B, otherwise known as the Funnygrrl Dress.

This dress was perfect for several reasons—cute, shaped empire waist, relatively straight hem, and, most importantly for this project, it would fit on the 1.5 m of fabric I had at my disposal. WIN.

I made the size 12, with all my usual alterations—petite (both at the shoulder and 3 cm  removed above the waist in the skirt), square shoulder, and swayback. Lots and lots of swayback. I probably could’ve gotten away without the square shoulder—I’m beginning to think I shouldn’t bother with that one for strappy, narrow-shouldered patterns. Other than that, the alterations worked great!

I cut out the bodice in my “lining fabric” (aka white bedsheet from the thrift store) and basted it up quickly to check the fit, making a few minor tweaks. The most significant was to lower the neckline. I dropped it 2 cm, and widened a little bit as well—3 or 4 cm would’ve been fine. It was very, ah, demure. I should probably have paid a little more attention to the length of the “shorter” skirt on the model, as well. It reaches easily to the bottom of her knee, which is a good two or three inches longer than I like. I don’t usually pay attention to skirt lengths since I always figure I’ll just hem it at the end, but of course that’s not how it works with a border embroidery motif. D’oh.

Piping

Obviously, the dress needed black piping on the bodice to go with the black embroidery on the skirt. Pipe, pipe pipety pipe.  I am pleased to report that not only has the last of the black piping Claire sent me last winter been used up, but it was used up with only inches to spare (as you can see in the photo). I tried to be very careful not to stretch the piping while sewing, this time, lest I end up with puckery fabric. This worked well, but since I ended up with a fair bit of gapiness at the underarm, I’m thinking some pulling might’ve been in order, at least there.

Gapsies

I confess, I did not even look at the instructions for this dress. I promise when I have a little more time for sewing, I will start reading instructions again. In this case, I figured a construction order just like the Sewaholic Cambie would work just fine (only backwards)—and it did. Did I mention I really like the back of this dress? The straps widen and angle in towards the middle and it’s REALLY CUTE. Not to mention bra-strap covering, for those of you for whom that is a major issue. Also, unlike the Spiderman Dress, I think I nailed the swayback adjustment this time. WOOT! Having the extra darts for shaping certainly helps, too.

Look at that back fit!

Halfway through construction I realized I had no idea if I had any kind of suitable zipper or not. Some diving through the stash produced another vintage, metal-toothed invisible zipper in an off white colour. Not perfect, but close enough for an invisible zipper, especially if the alternative was delaying construction until I can visit a fabric store. I am trying really hard to avoid fabric stores right now. I’ve started packing up my stash for our pending move, and it’s, ah, traumatic.

Full length

I did zero matching of the embroidered motifs. I considered it for about half a second, but frankly, I was lucky to get the dress out of the amount of fabric I had period. There was only about 3″ of wiggle room along the width of the hem, not enough to match anything

Wiggle!

I gotta say, it’s easy to quibble about little things like the gaping under the arm and the length of the skirt, but really—I am so stoked over how this turned out. The back is AWESOME. The fit over the hips is close but good. It’s cute, not too over the top, and easy to wear. I love the back, not something I usually get to say. So yeah! I’m going to call it a win. 🙂

Nothing procrastinates like procrastination…

Thanks, Funnygrrl! 

31 Comments

Filed under Sewing