Category Archives: Sewing

Monochromatic Clown: Accidental Wardrobe Planning

Ok, I confess I’m really enjoying this outfit.

McCall’s 6955 and Quick Sew 535. And stripey socks.

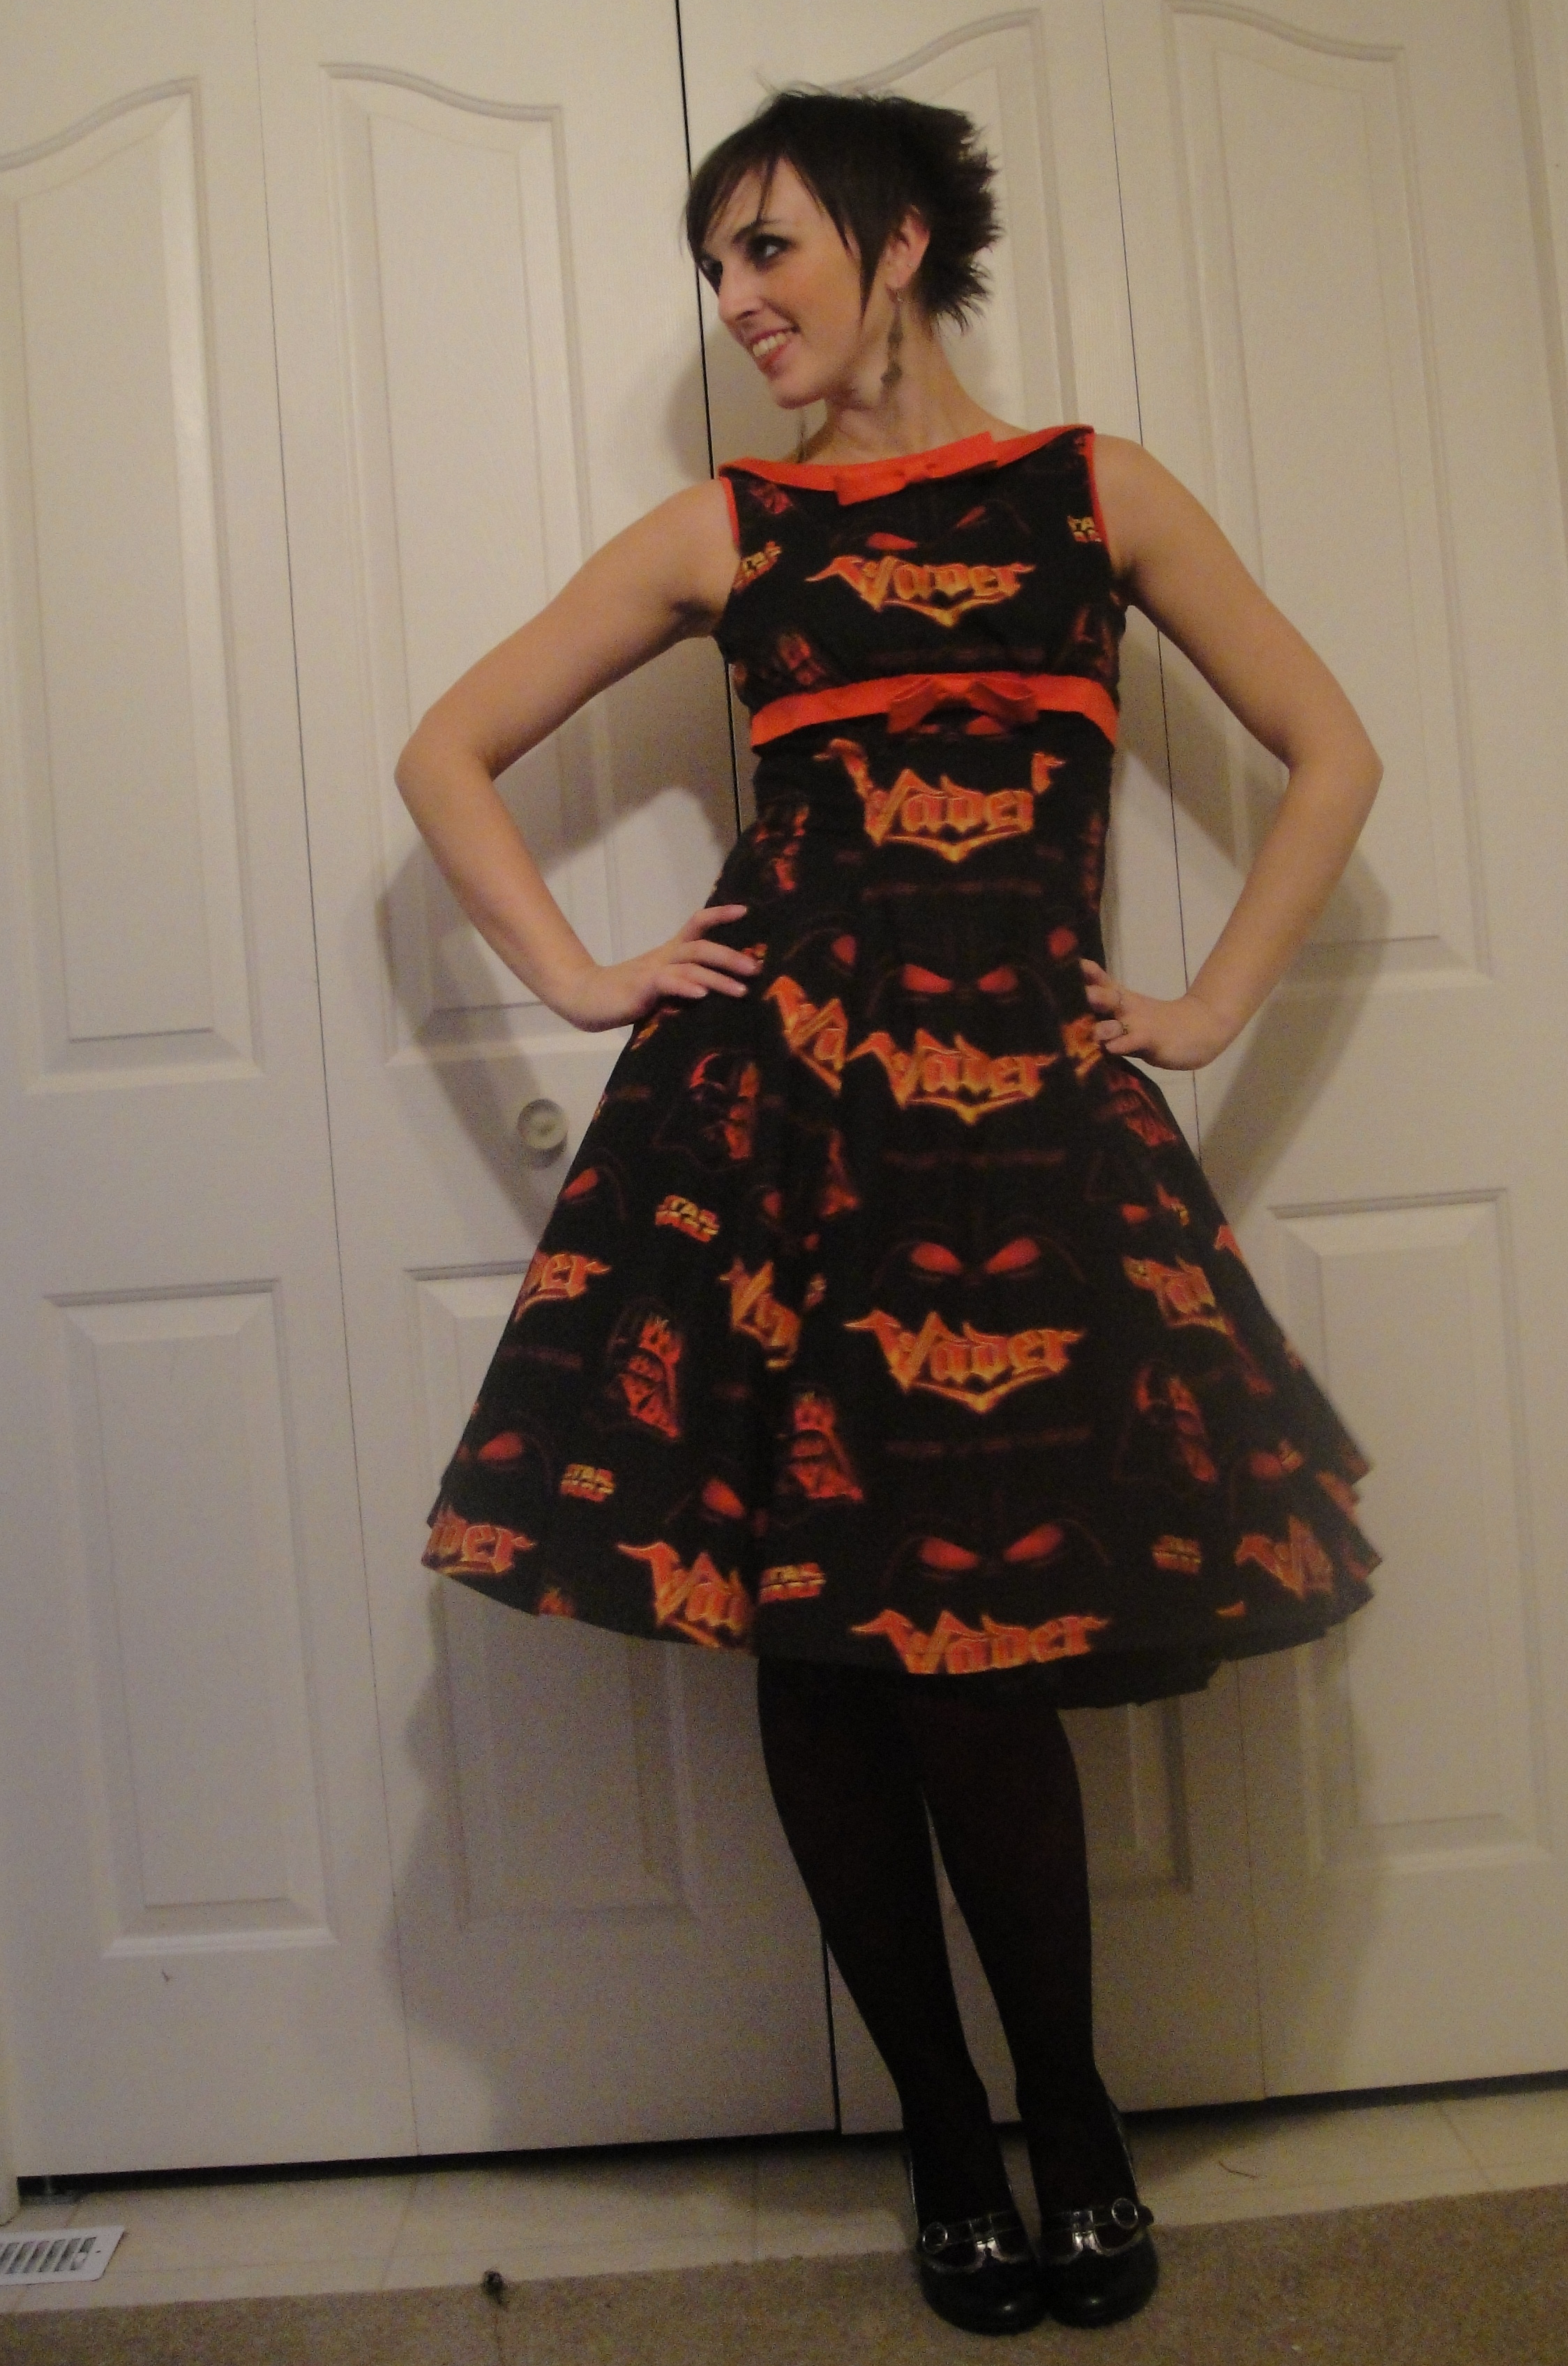
The dress is McCall’s 6955, and while I confess I was a little bit disappointed when I put it on and it didn’t instantly transform me into the voluptuous bombshell I was hoping for, it is pretty fun.

I’ve been experimenting with making fewer alterations, seeing what I can get away without. I didn’t do a swayback adjustment, as the skirt was full. I only shortened the bodice below the armscye, as I think I maybe don’t need to petite McCall’s quite as much as I did Simplicity. I think I should still have done the swayback  to the bodice, though, and probably added a bit of length at the bodice CF as well (the flip side of the swayback alteration, I guess… my back is shorter and my front is longer. Silly body.) I always think this after, but somehow I never actually act on it.

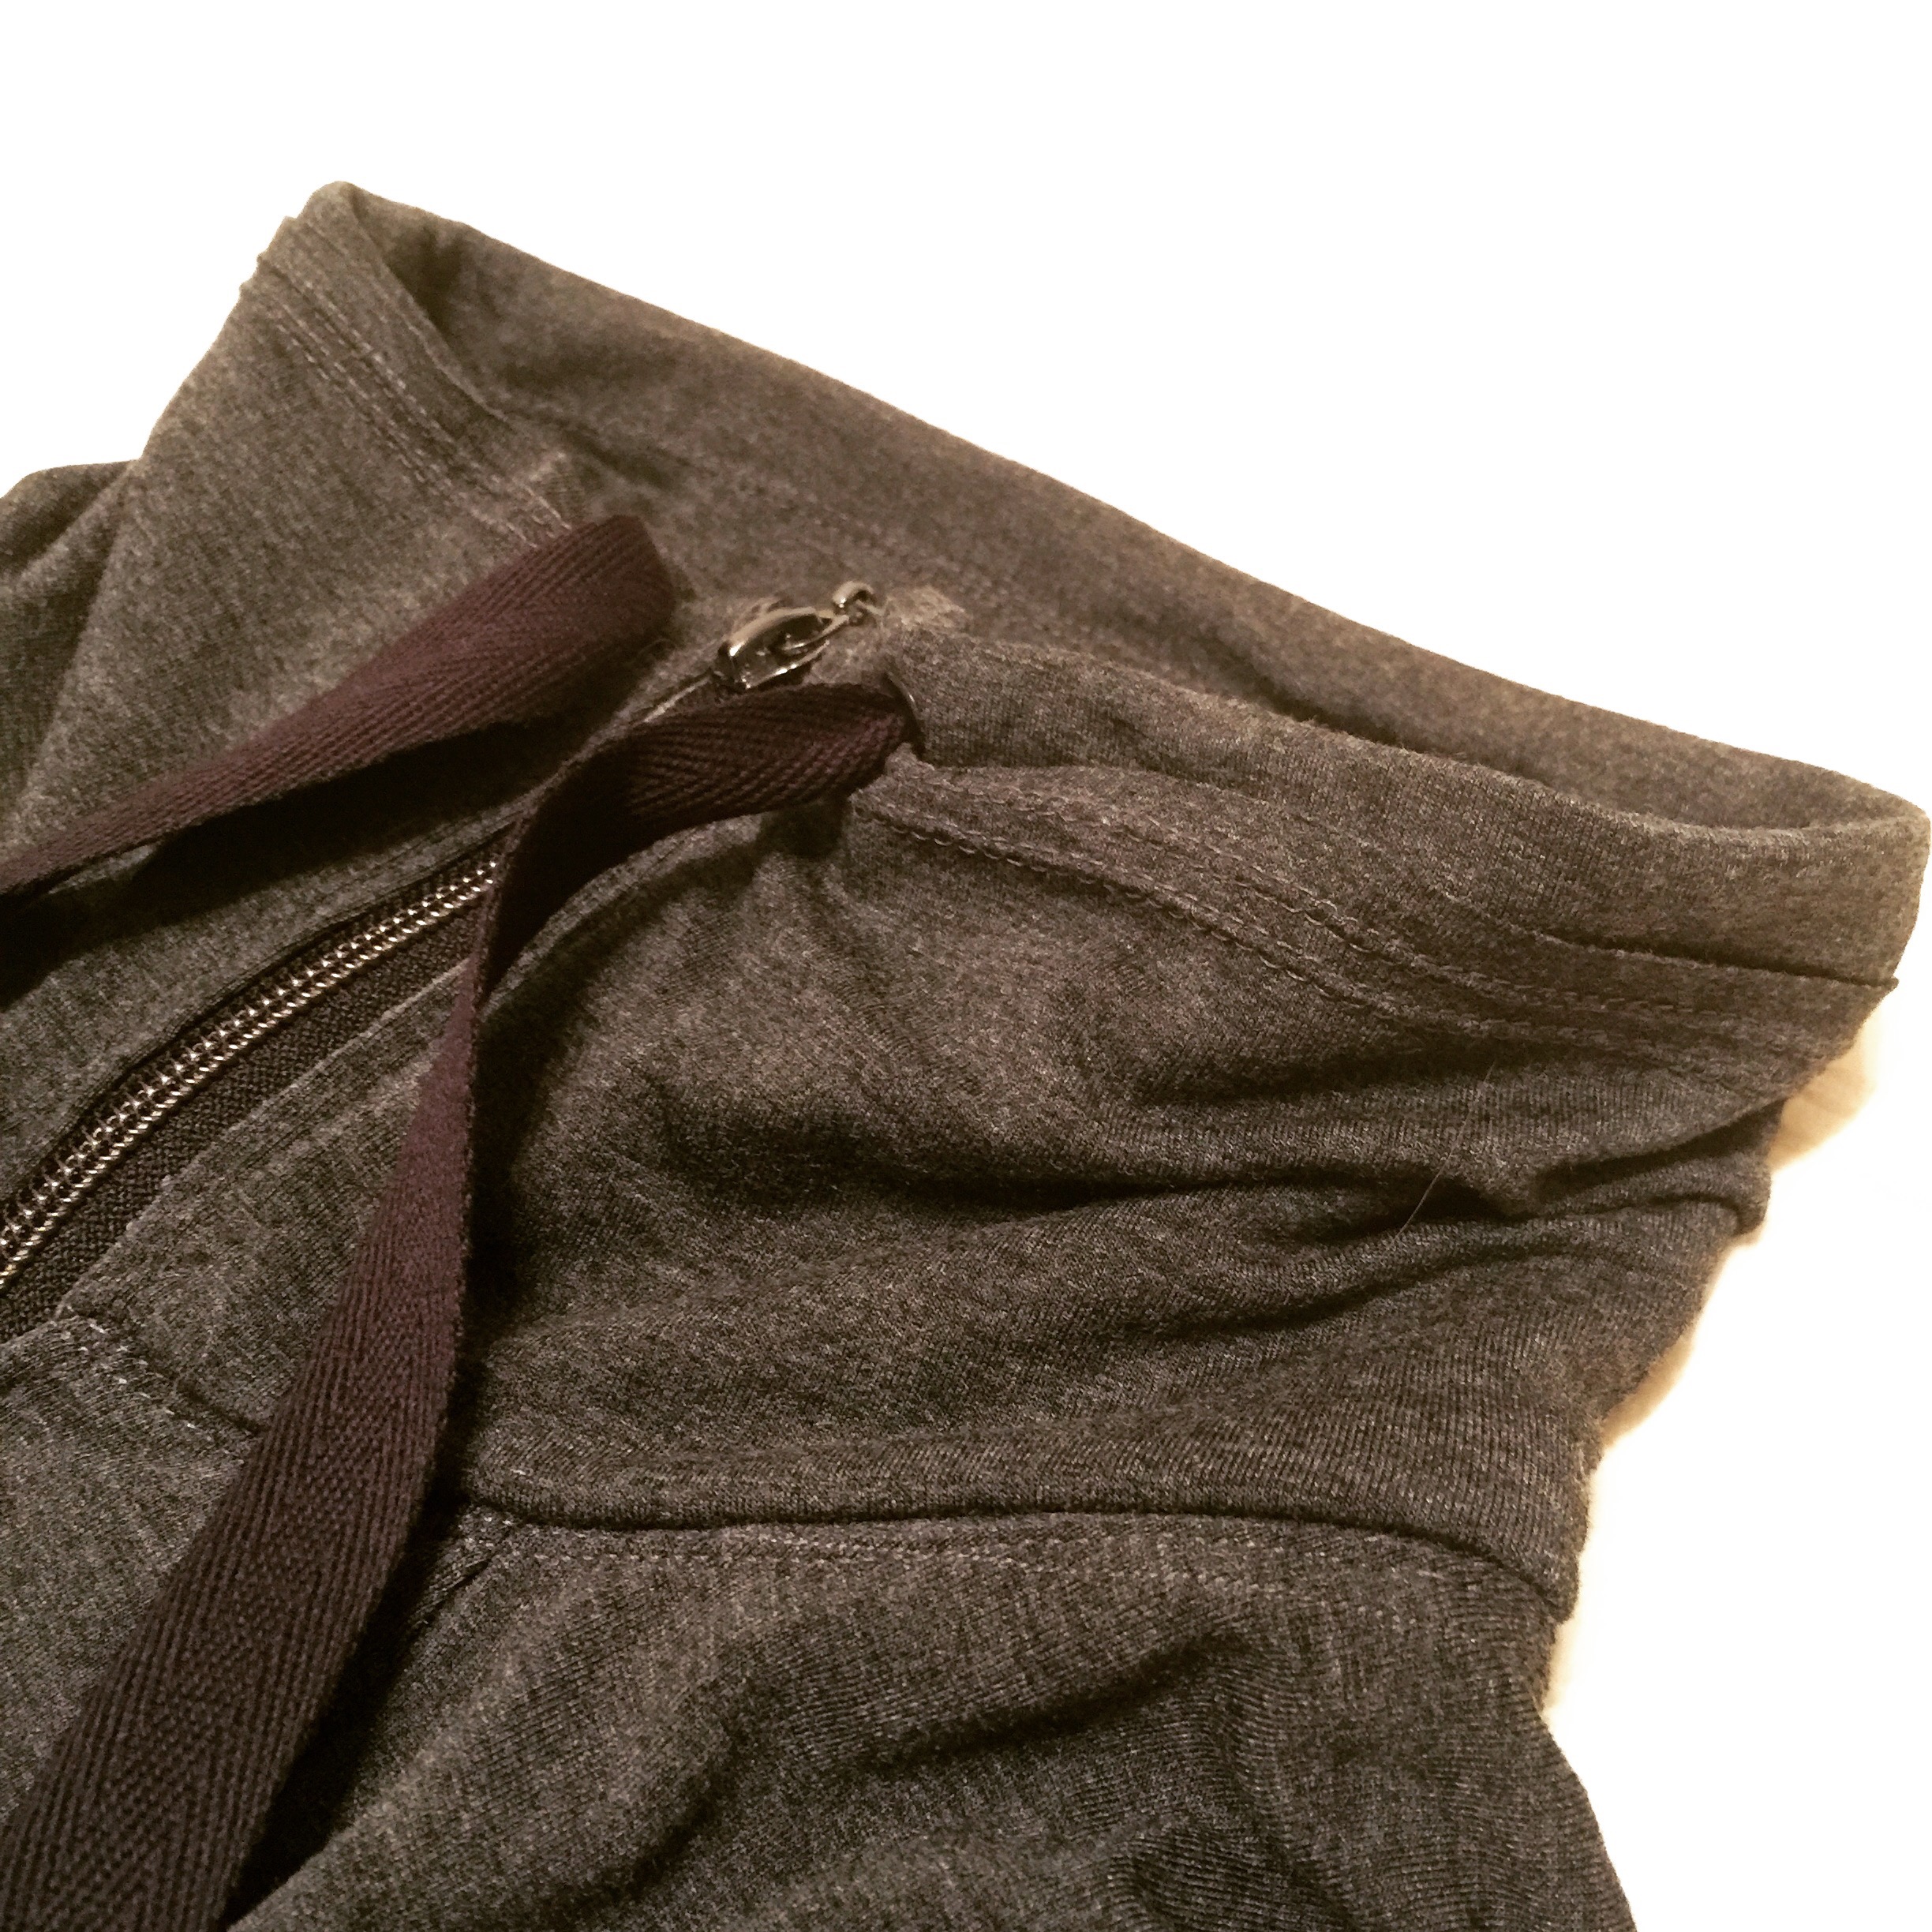
I picked the racerback option because the standard version just seemed a little TOO boring. (Yes, apparently I thought crazy kindergarten polkadots were boring. /headshake.) And of course, black piping at the neckline and armholes. #pipeallthethings

Not my best photo face ever. 😛

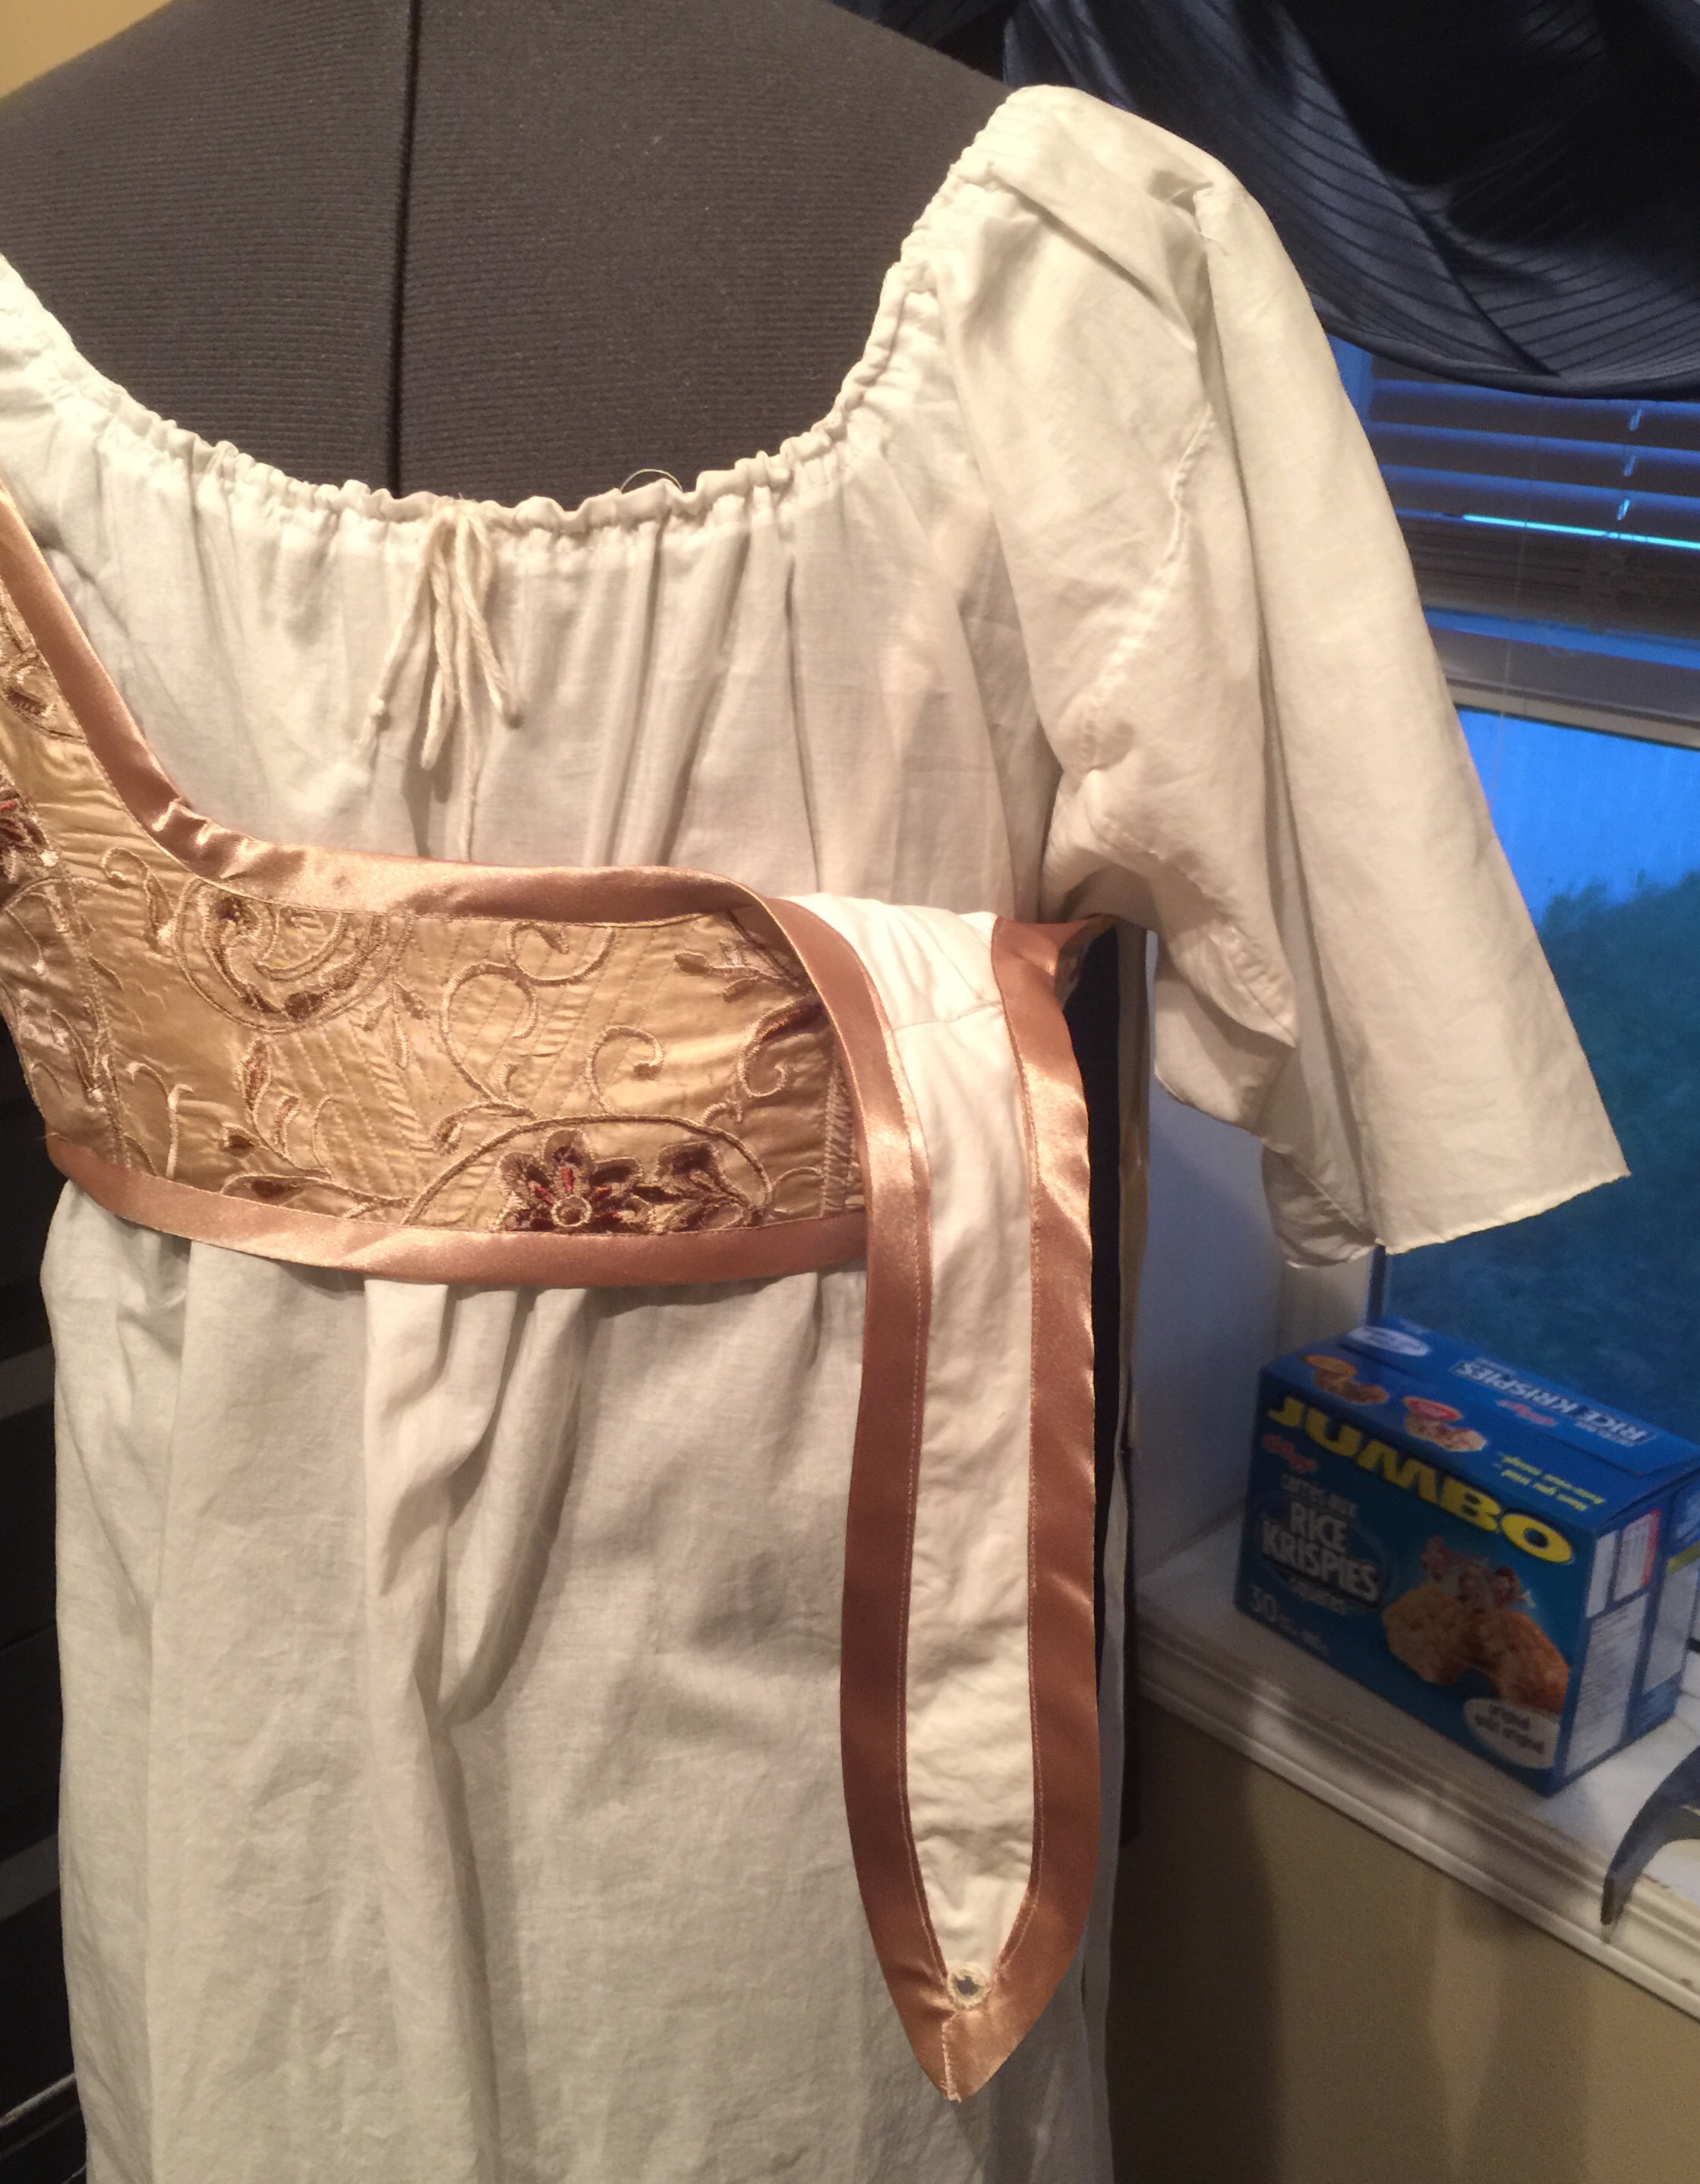
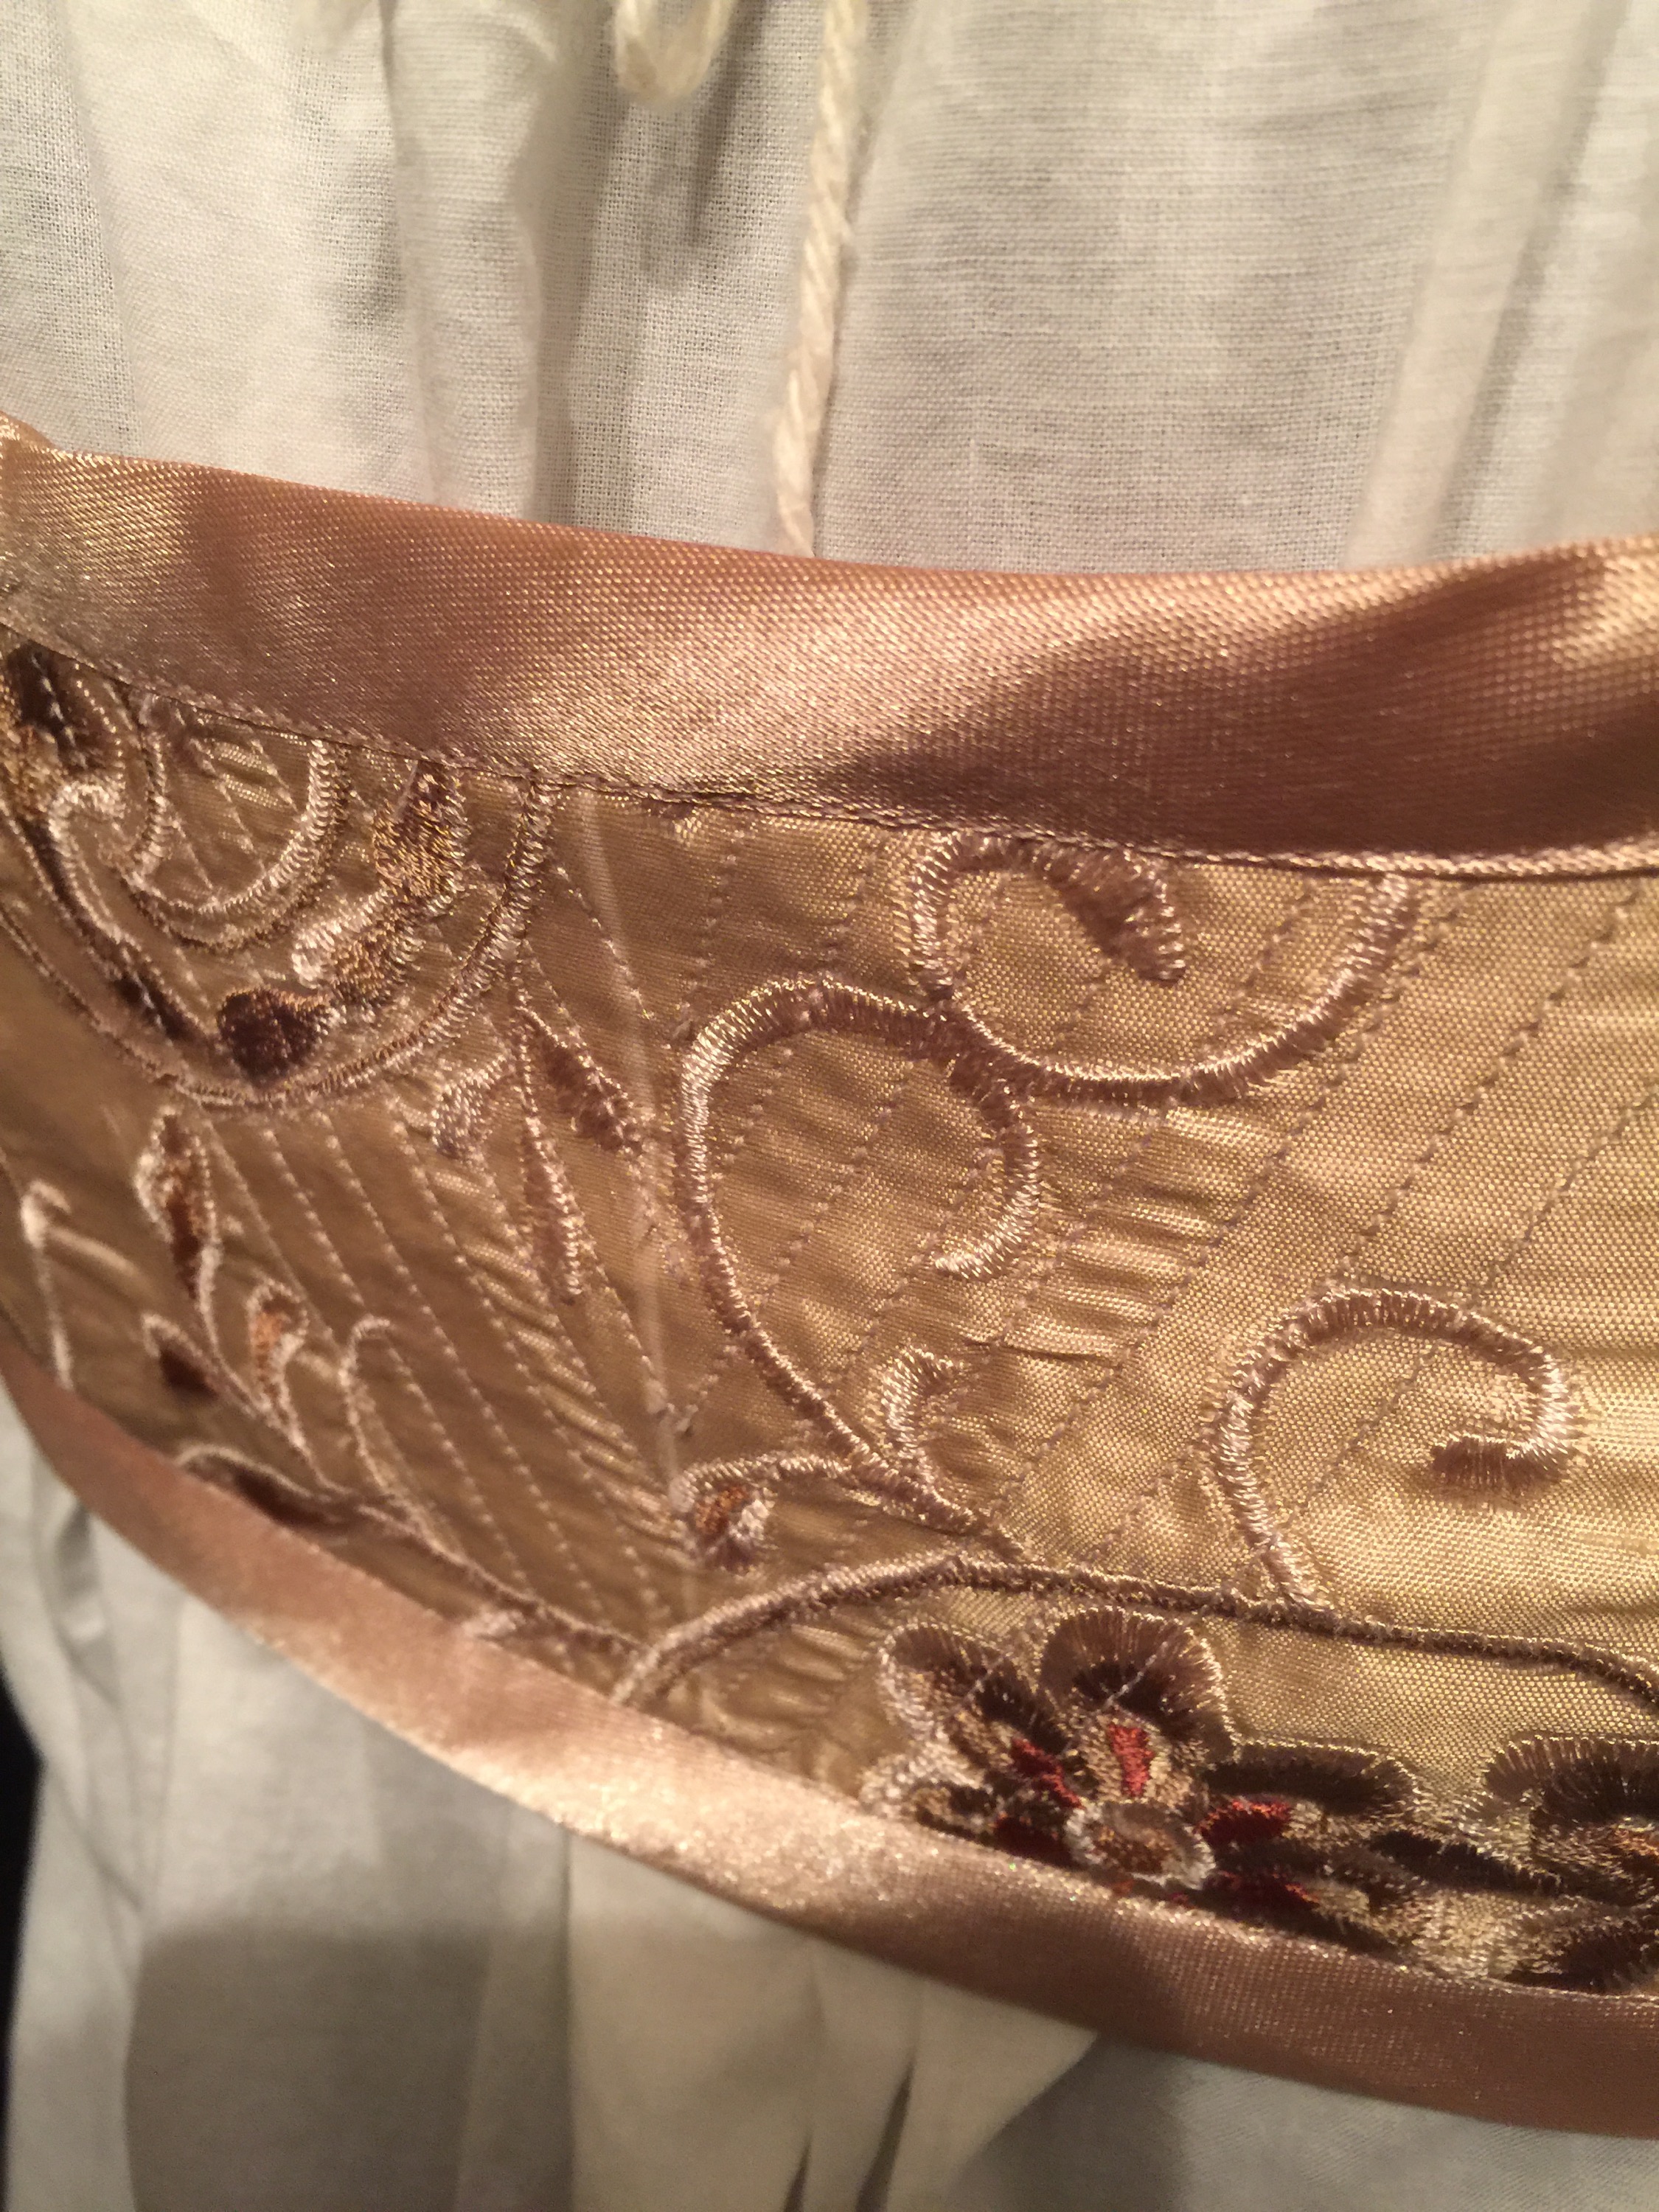
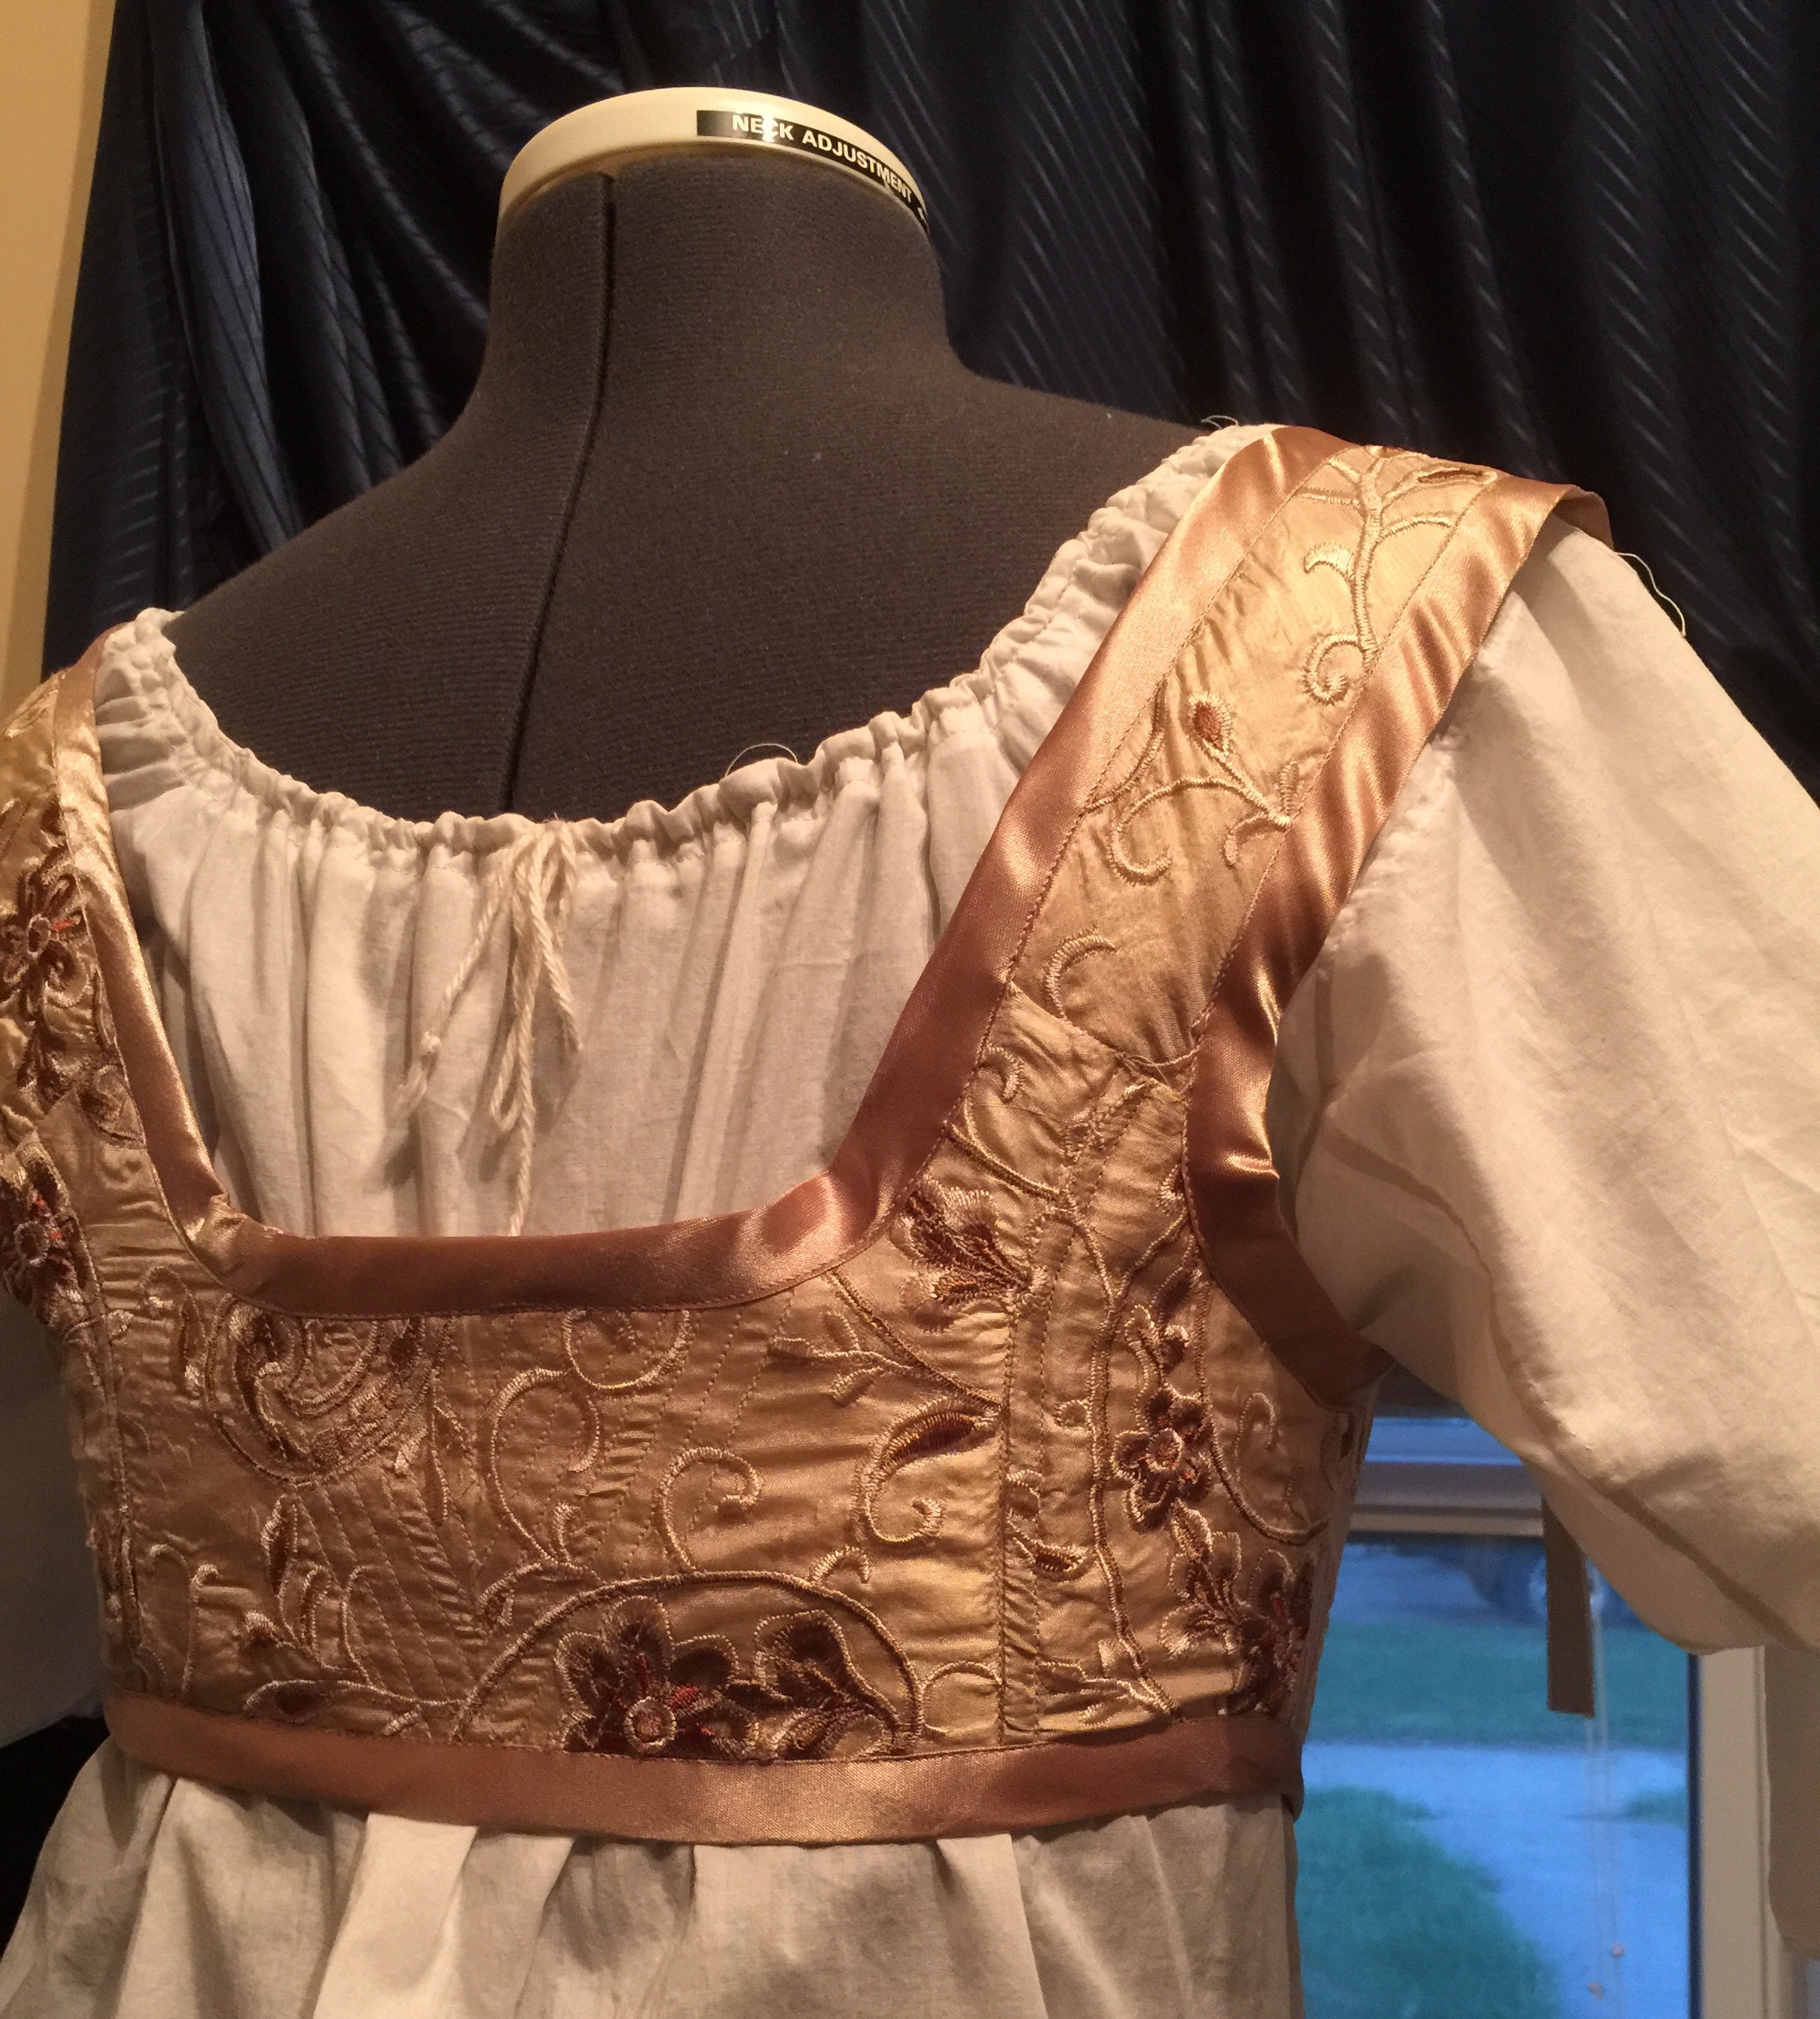
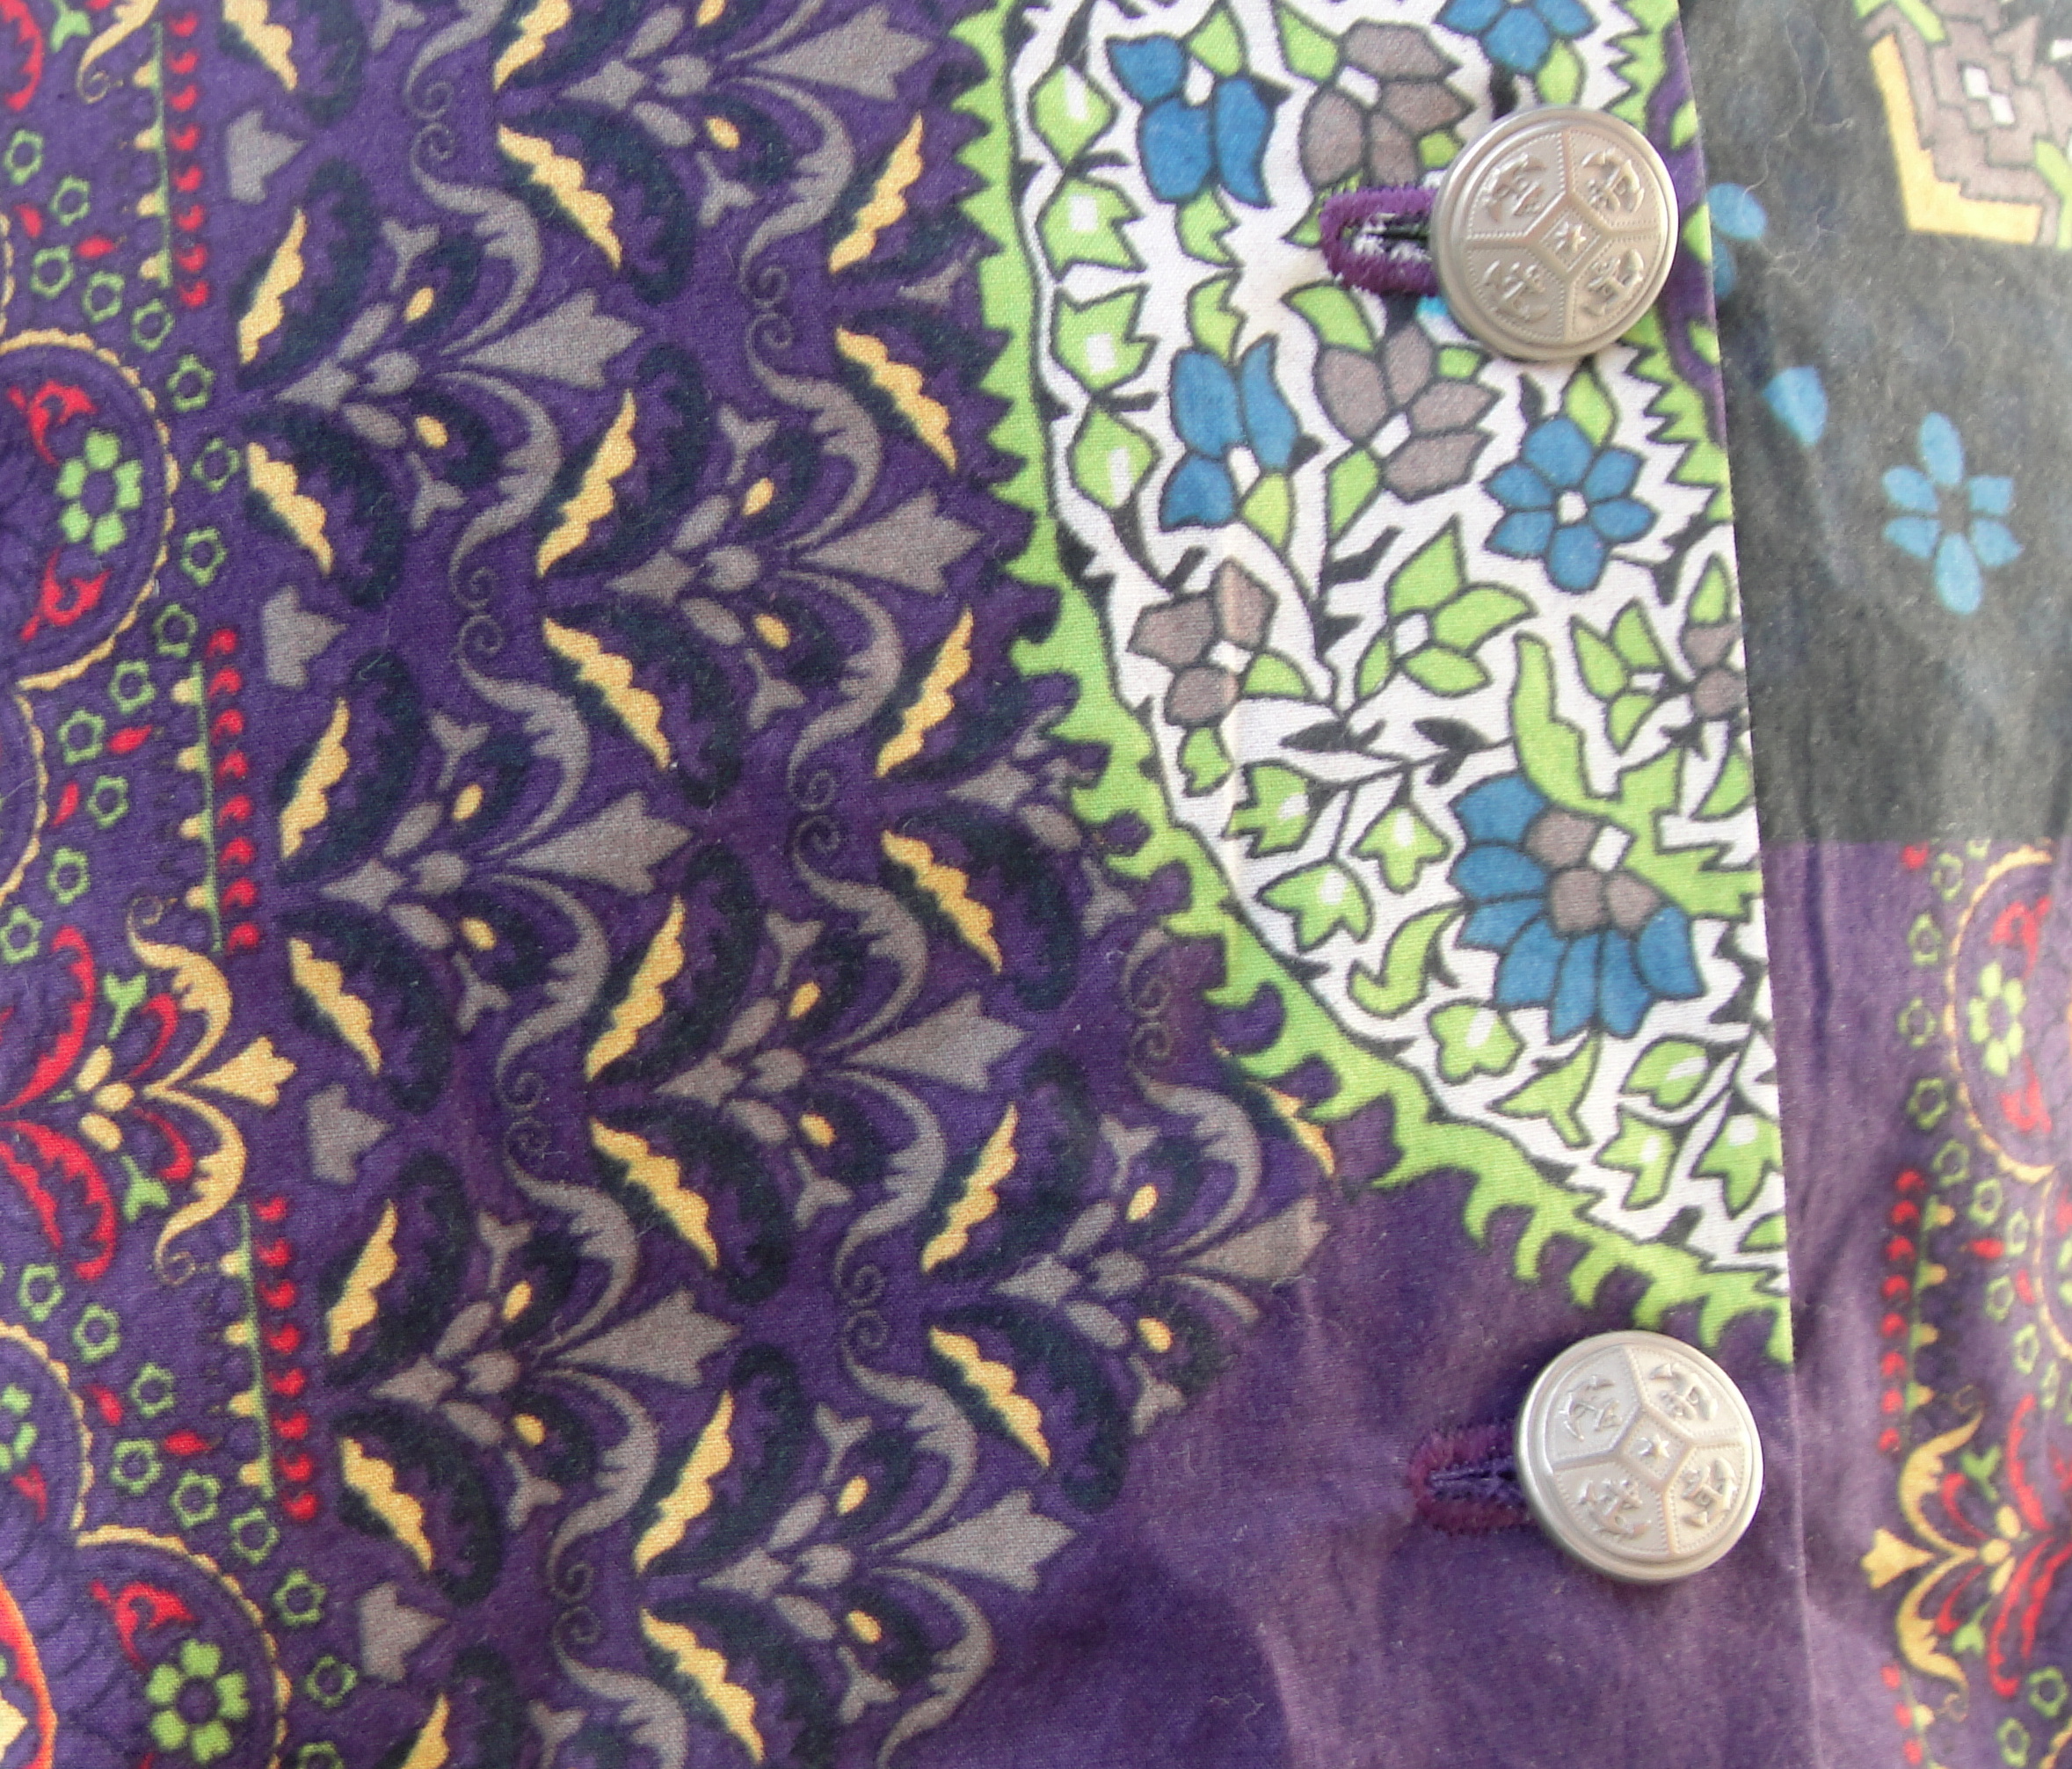
I made this as a Fabricland project back in the summer, mostly as an excuse to use some of this gorgeous “cotton satin” they got in. Man, I petted that fabric every day for weeks… The print is a bit out of my comfort zone, but it is fun. You can see that I didn’t even try to match it. Mostly this doesn’t bother me, although now that I look at these photos it would’ve been nice to match at least the bodice across the zipper in the back.

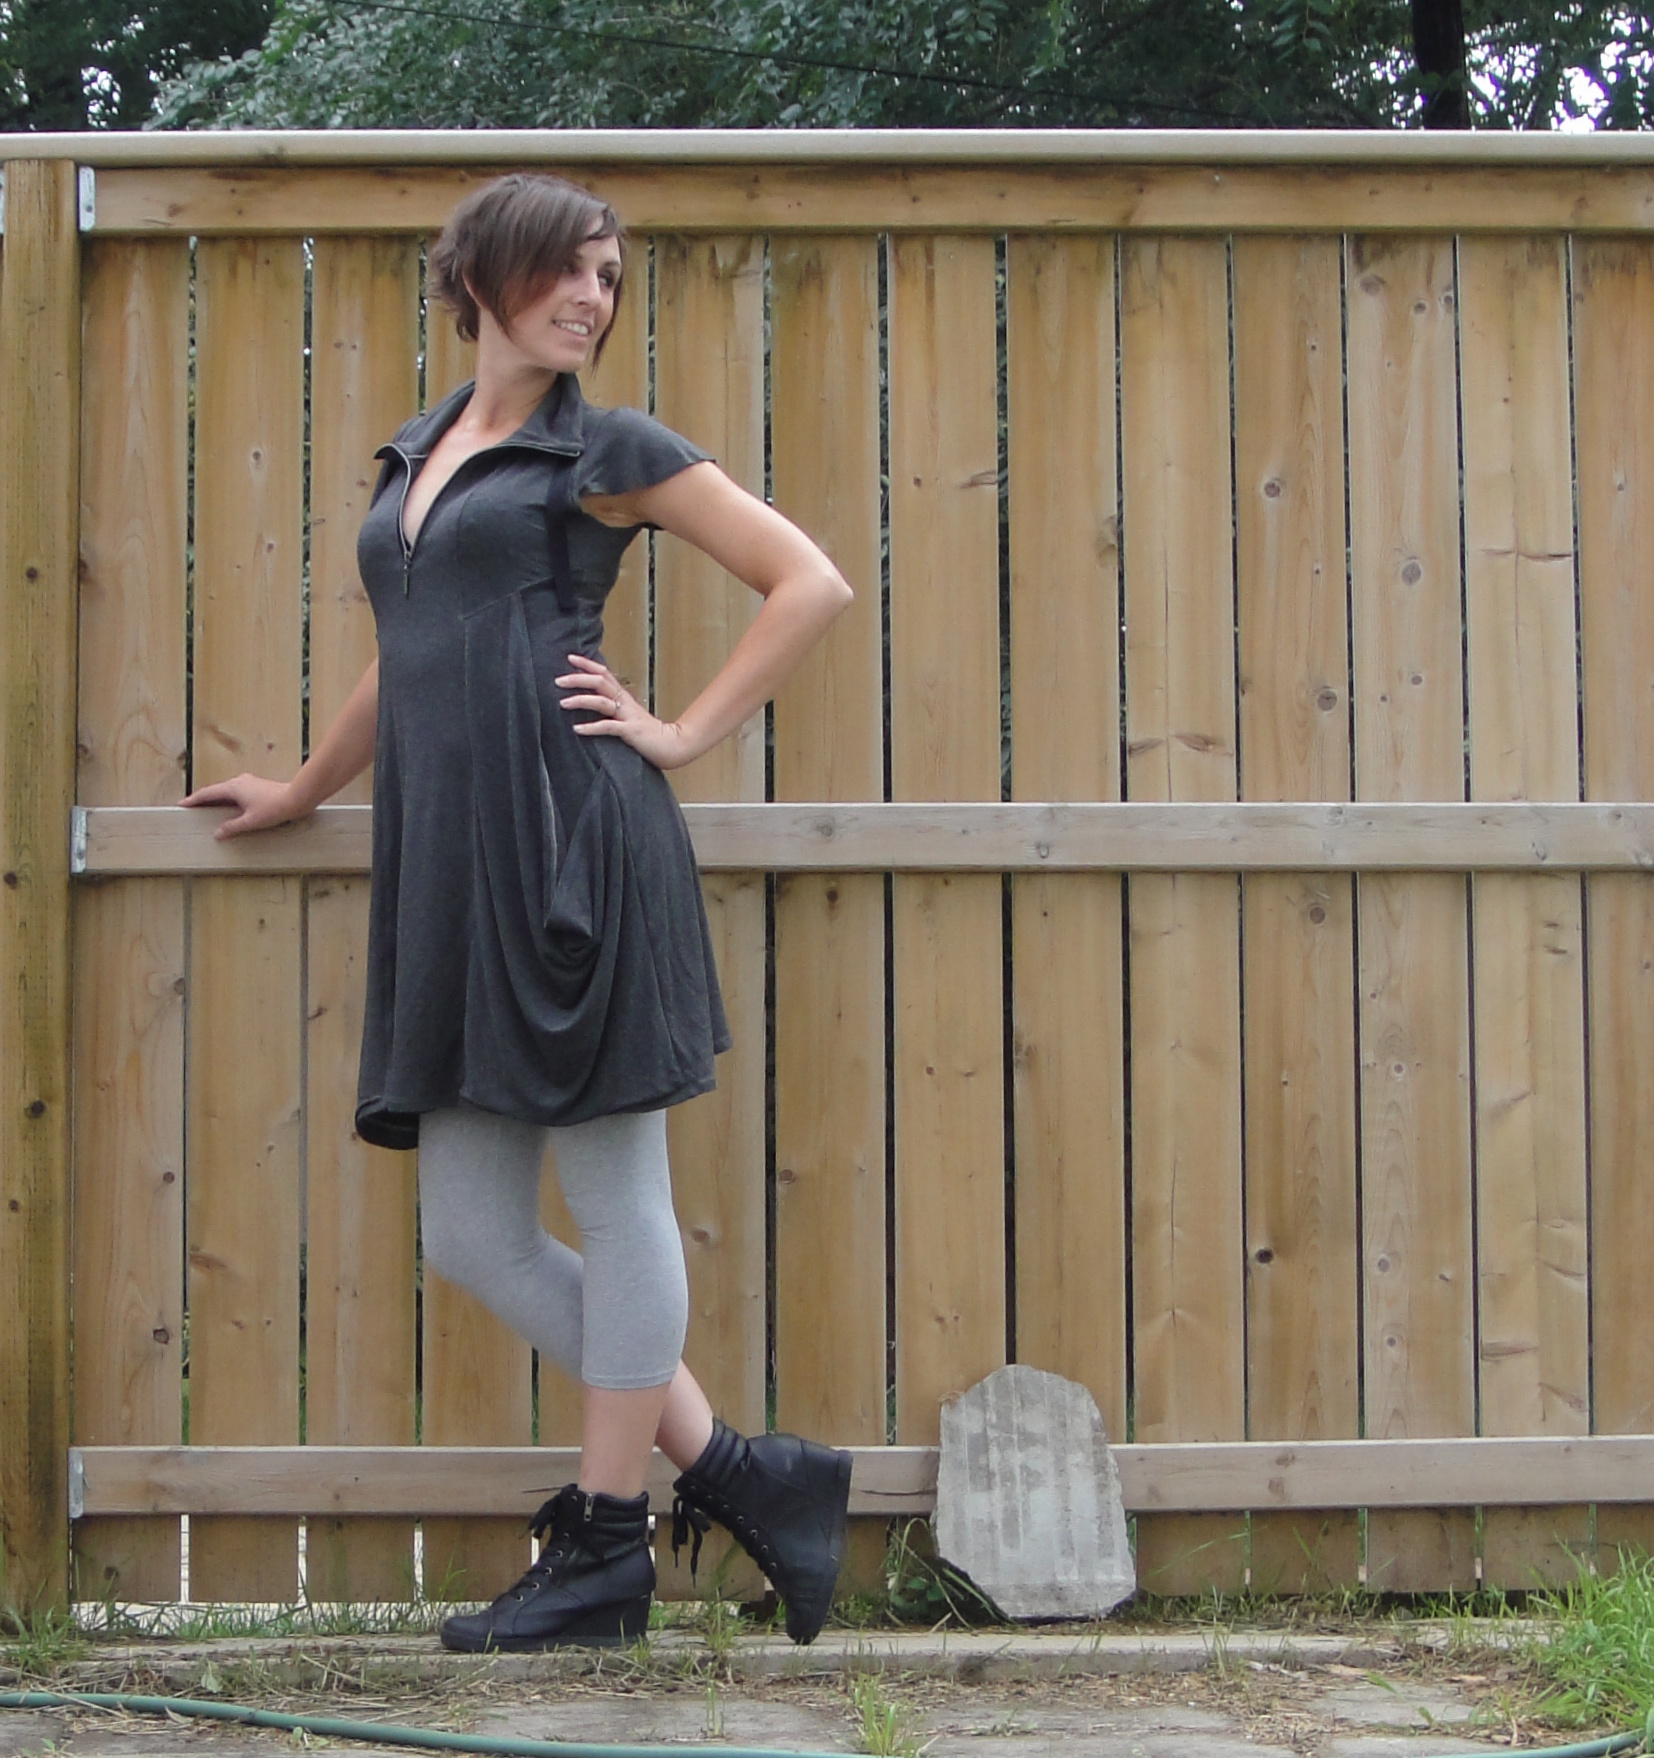
I made my proper size (size 12) as the fabric didn’t have stretch, but I wish I had made the 10. I took out the extra width in the side bodice, but I feel like the shoulders are just a bit too big. Some of that might be that I didn’t shorten the bodice through the armscye, either. And yeah, I didn’t really think that sleeveless, narrow shoulders, barely more than straps, like these could actually FEEL too big or too small, but they do. If I hadn’t done all that crazy piping, I’d take them in half an inch, but I’m not quite willing to break up the piping. The skirt is quite short; I did a faced hem (is there any other way to hem a circle skirt?) so only took it up a 1/4″ and it’s still three or four inches above my knees. Not bad, but something to be aware of. And it shows off the lace on my petticoat. Totally intentional, I swear. 😉

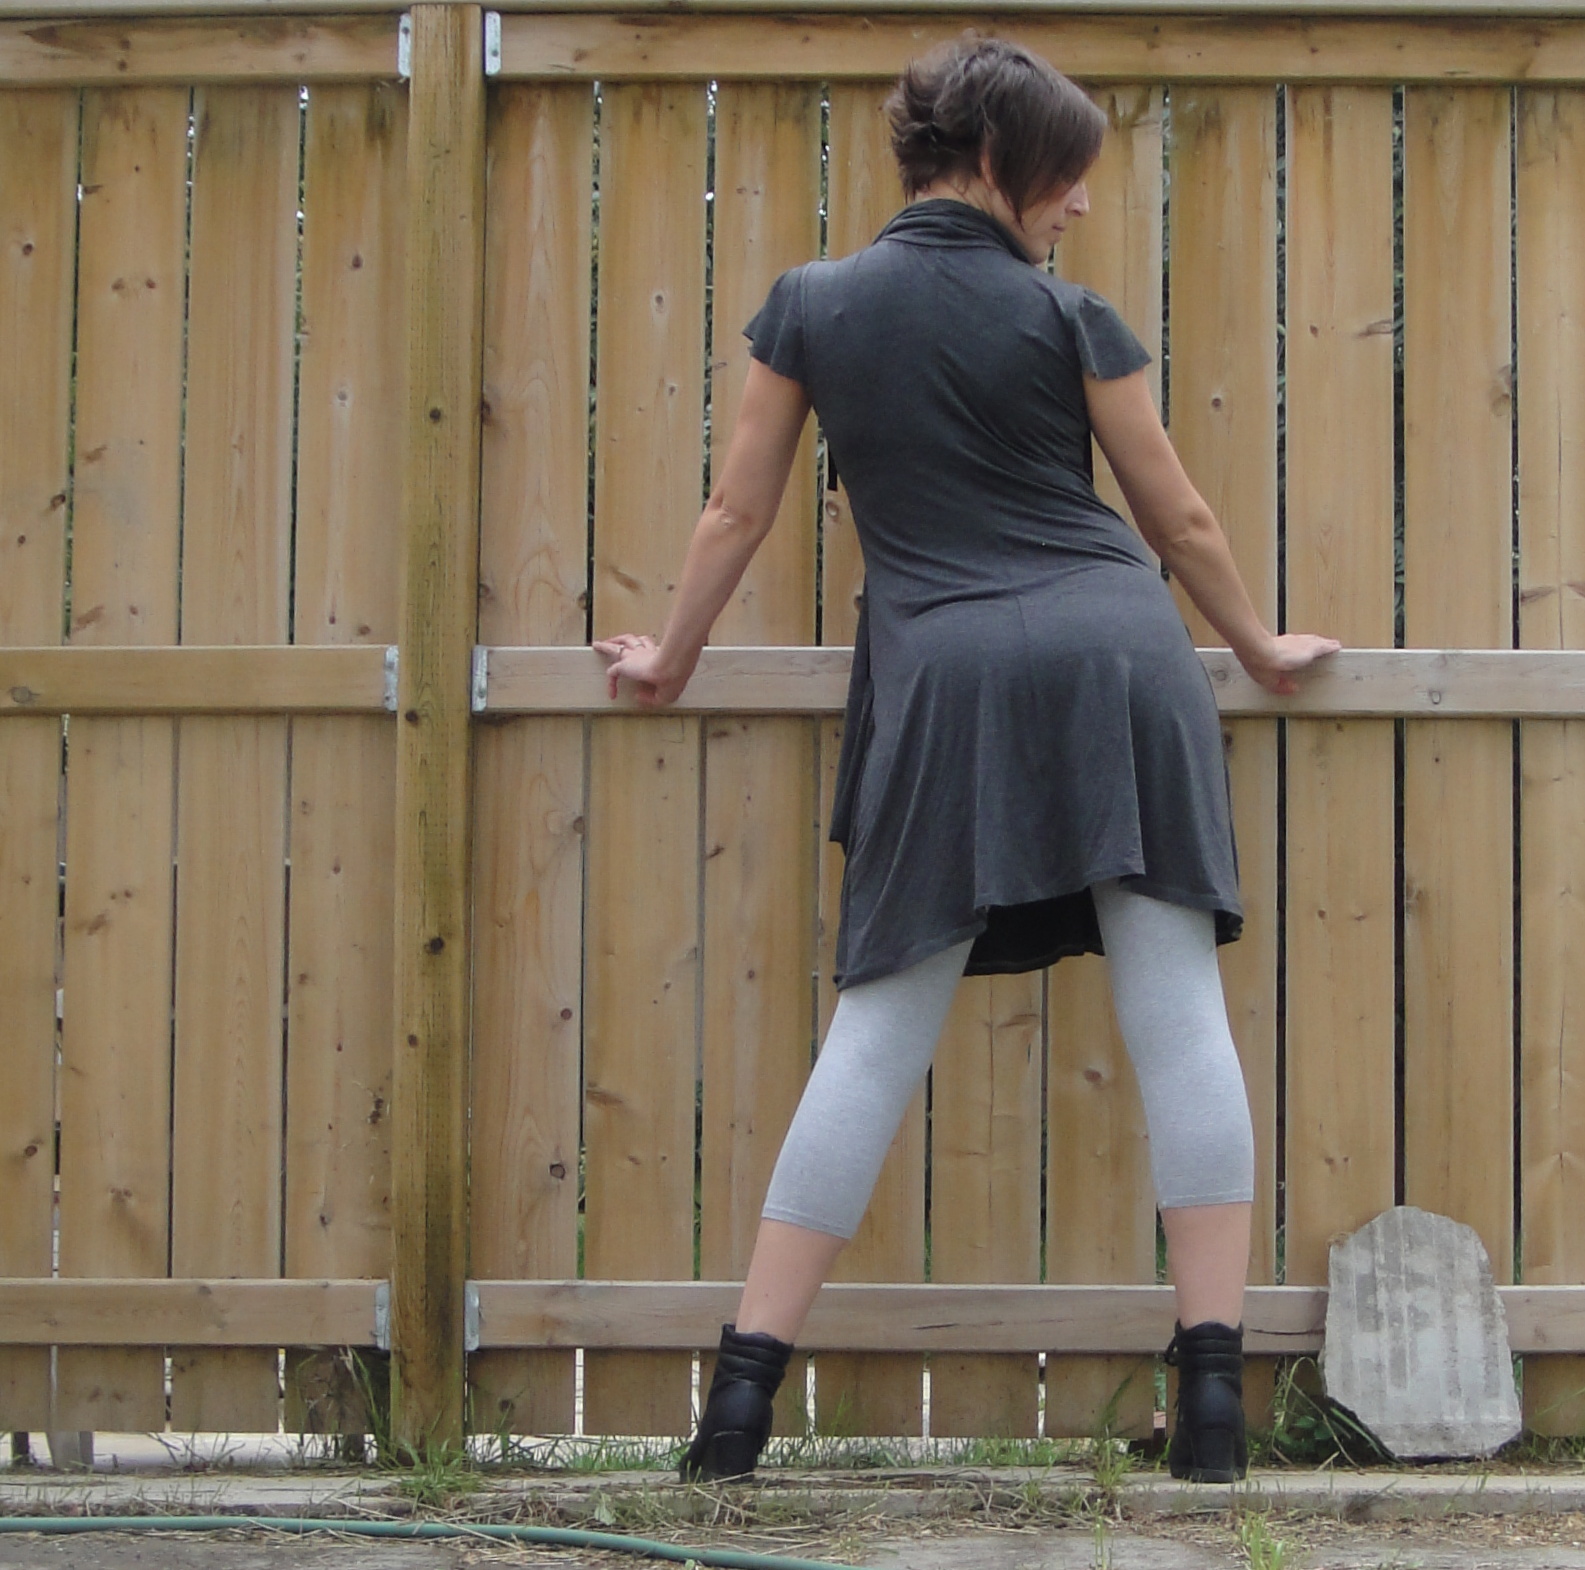
Back view. Not compatible with the slip I am wearing, nor with bra straps. I will just have to channel Tyo and not give a fuck about them showing.

I added pockets because all circle skirts should have pockets. It’s fully lined in cotton batiste (one of my other perennial fave fabrics).

I do have one quibble that I THINK is with the pattern (although it’s possible I got my markings wrong, because lord knows I’m bad with notches, but I was using the side notches to line up my pocket pieces so I’d swear I actually got it right because I was paying attention to them for once) Anyway, when I cut it the grainline of the back skirt is rotated 90º from the front. I noticed this vaguely when I was cutting out, but as it’s a circle skirt so one edge is going to be on the cross grain anyway, I didn’t think anything of it. It wasn’t until I was sewing up my side seams that I realized that my polkadots are actually arranged in subtle stripes, and they are perpendicular to each other, running horizontally across the back of the skirt and vertically on the front. HEADDESK. Also, if I’d realized those stripes were there I could totally have added a front seam and gone to town with polkadot chevroning! As for the mis-matching stripes, I could totally have fixed that by just unpicking the side-seams and switching the back pieces around, since they are 1/4 circle each, but I already had the pockets all sewn in, so I didn’t. Apparently I was not into self-improvement when I made this dress. #badsewcialist

Anyway, despite all my quibbling it’s still really fun to wear, especially with a little sweater to cover the less-than-optimal bodice. Which brings us to part II of this post:
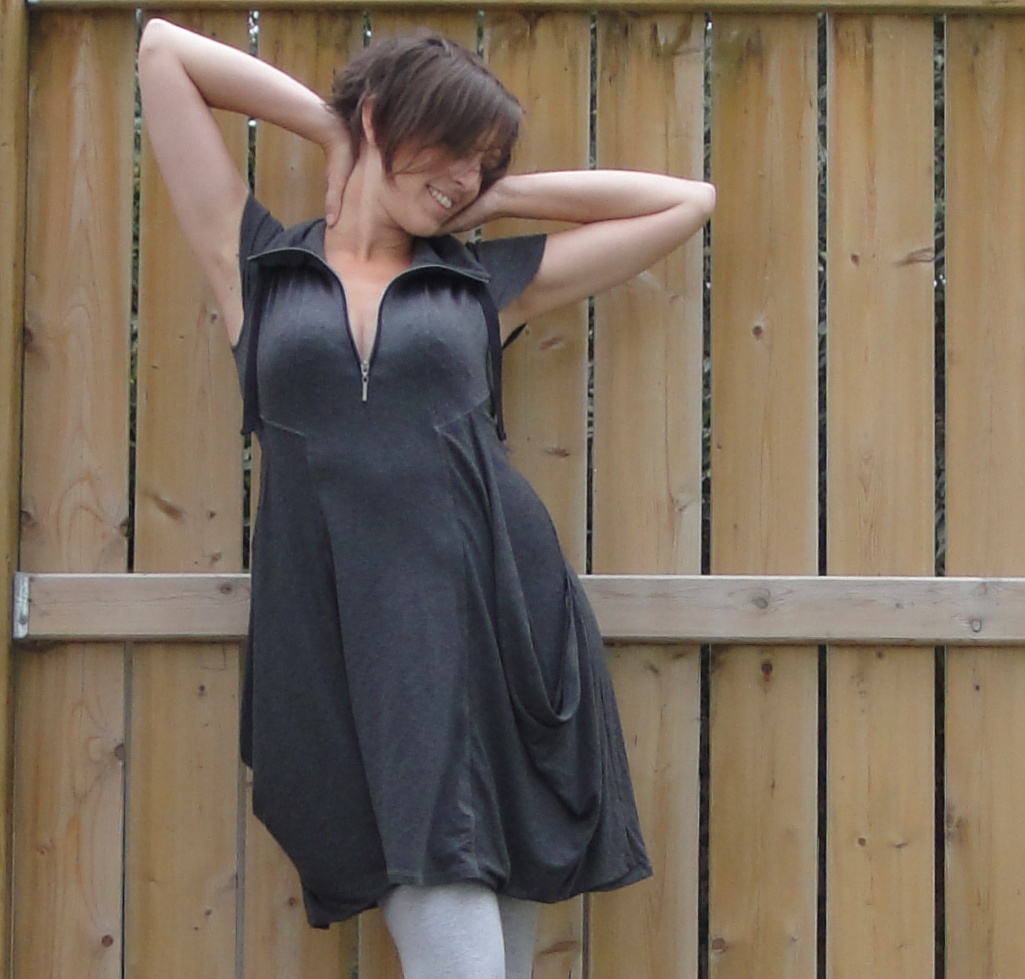
Kwik Sew 535

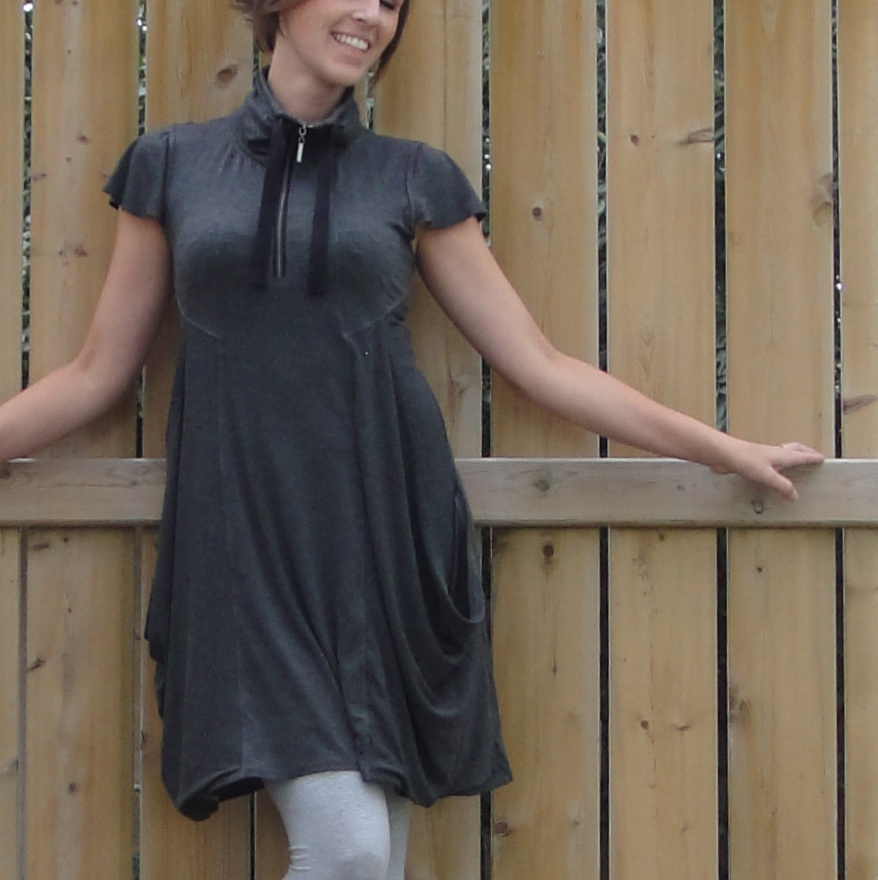
While the dress was a spur-of-the-moment impulse kind of project, this sweaterette has been percolating through my brain for AGES (OK, like a year). I can’t even remember when I got this pattern, but it is weirdly cute, and it has grown on me as my fascination with teensy shrunken sweaters blossomed over the last couple of winters. Except that obviously it needs to be shortened, because a fitted bottom band that starts right at your waist (or just below it) as the picture seems to indicate… well, that’s just going to ride up anyway.

Front view

I overdid the cropping a little bit. Another inch, even two, all around would just relax everything. I do have enough of both these fabrics to make another version, should I decide to. We’ll see. There were some hairy moments in the construction I don’t know if I want to revisit.

It looks cute lying on the bed, anyway!

I got both of these fabrics last winter sometime. The main fabric is a scratchy sweater-knit/burnout kinda thing that was one of those random end pieces Fabricland often gets, which seem to have been collected from the trash behind some apparel factory. The fabrics are unusual, sometimes even spectacular, and often grievously flawed. This was a flawed piece, being both badly stained at one end and varying wildly in width as one selvedge has a crazy yaw going on. A long soak in Oxy-Clean minimized the staining, but there’s no saving that weird shape. It’s ok for itty bitty things like this, though.

This seems like the best view of the sweater. Or maybe it’s just my best angle. 😉

For the ribbing, I used this luxuriously soft rib-knit (almost more of a sweater-knit, except I hate hate hate rib-knit sweaters). Based on the way it changes texture in the wash, I think it’s largely rayon, and unlike almost every other rib-knit I’ve ever met, it feels great. It’s got more stretch than Elastigirl, though, and was the main cause of all the hairy construction moments I mentioned above.

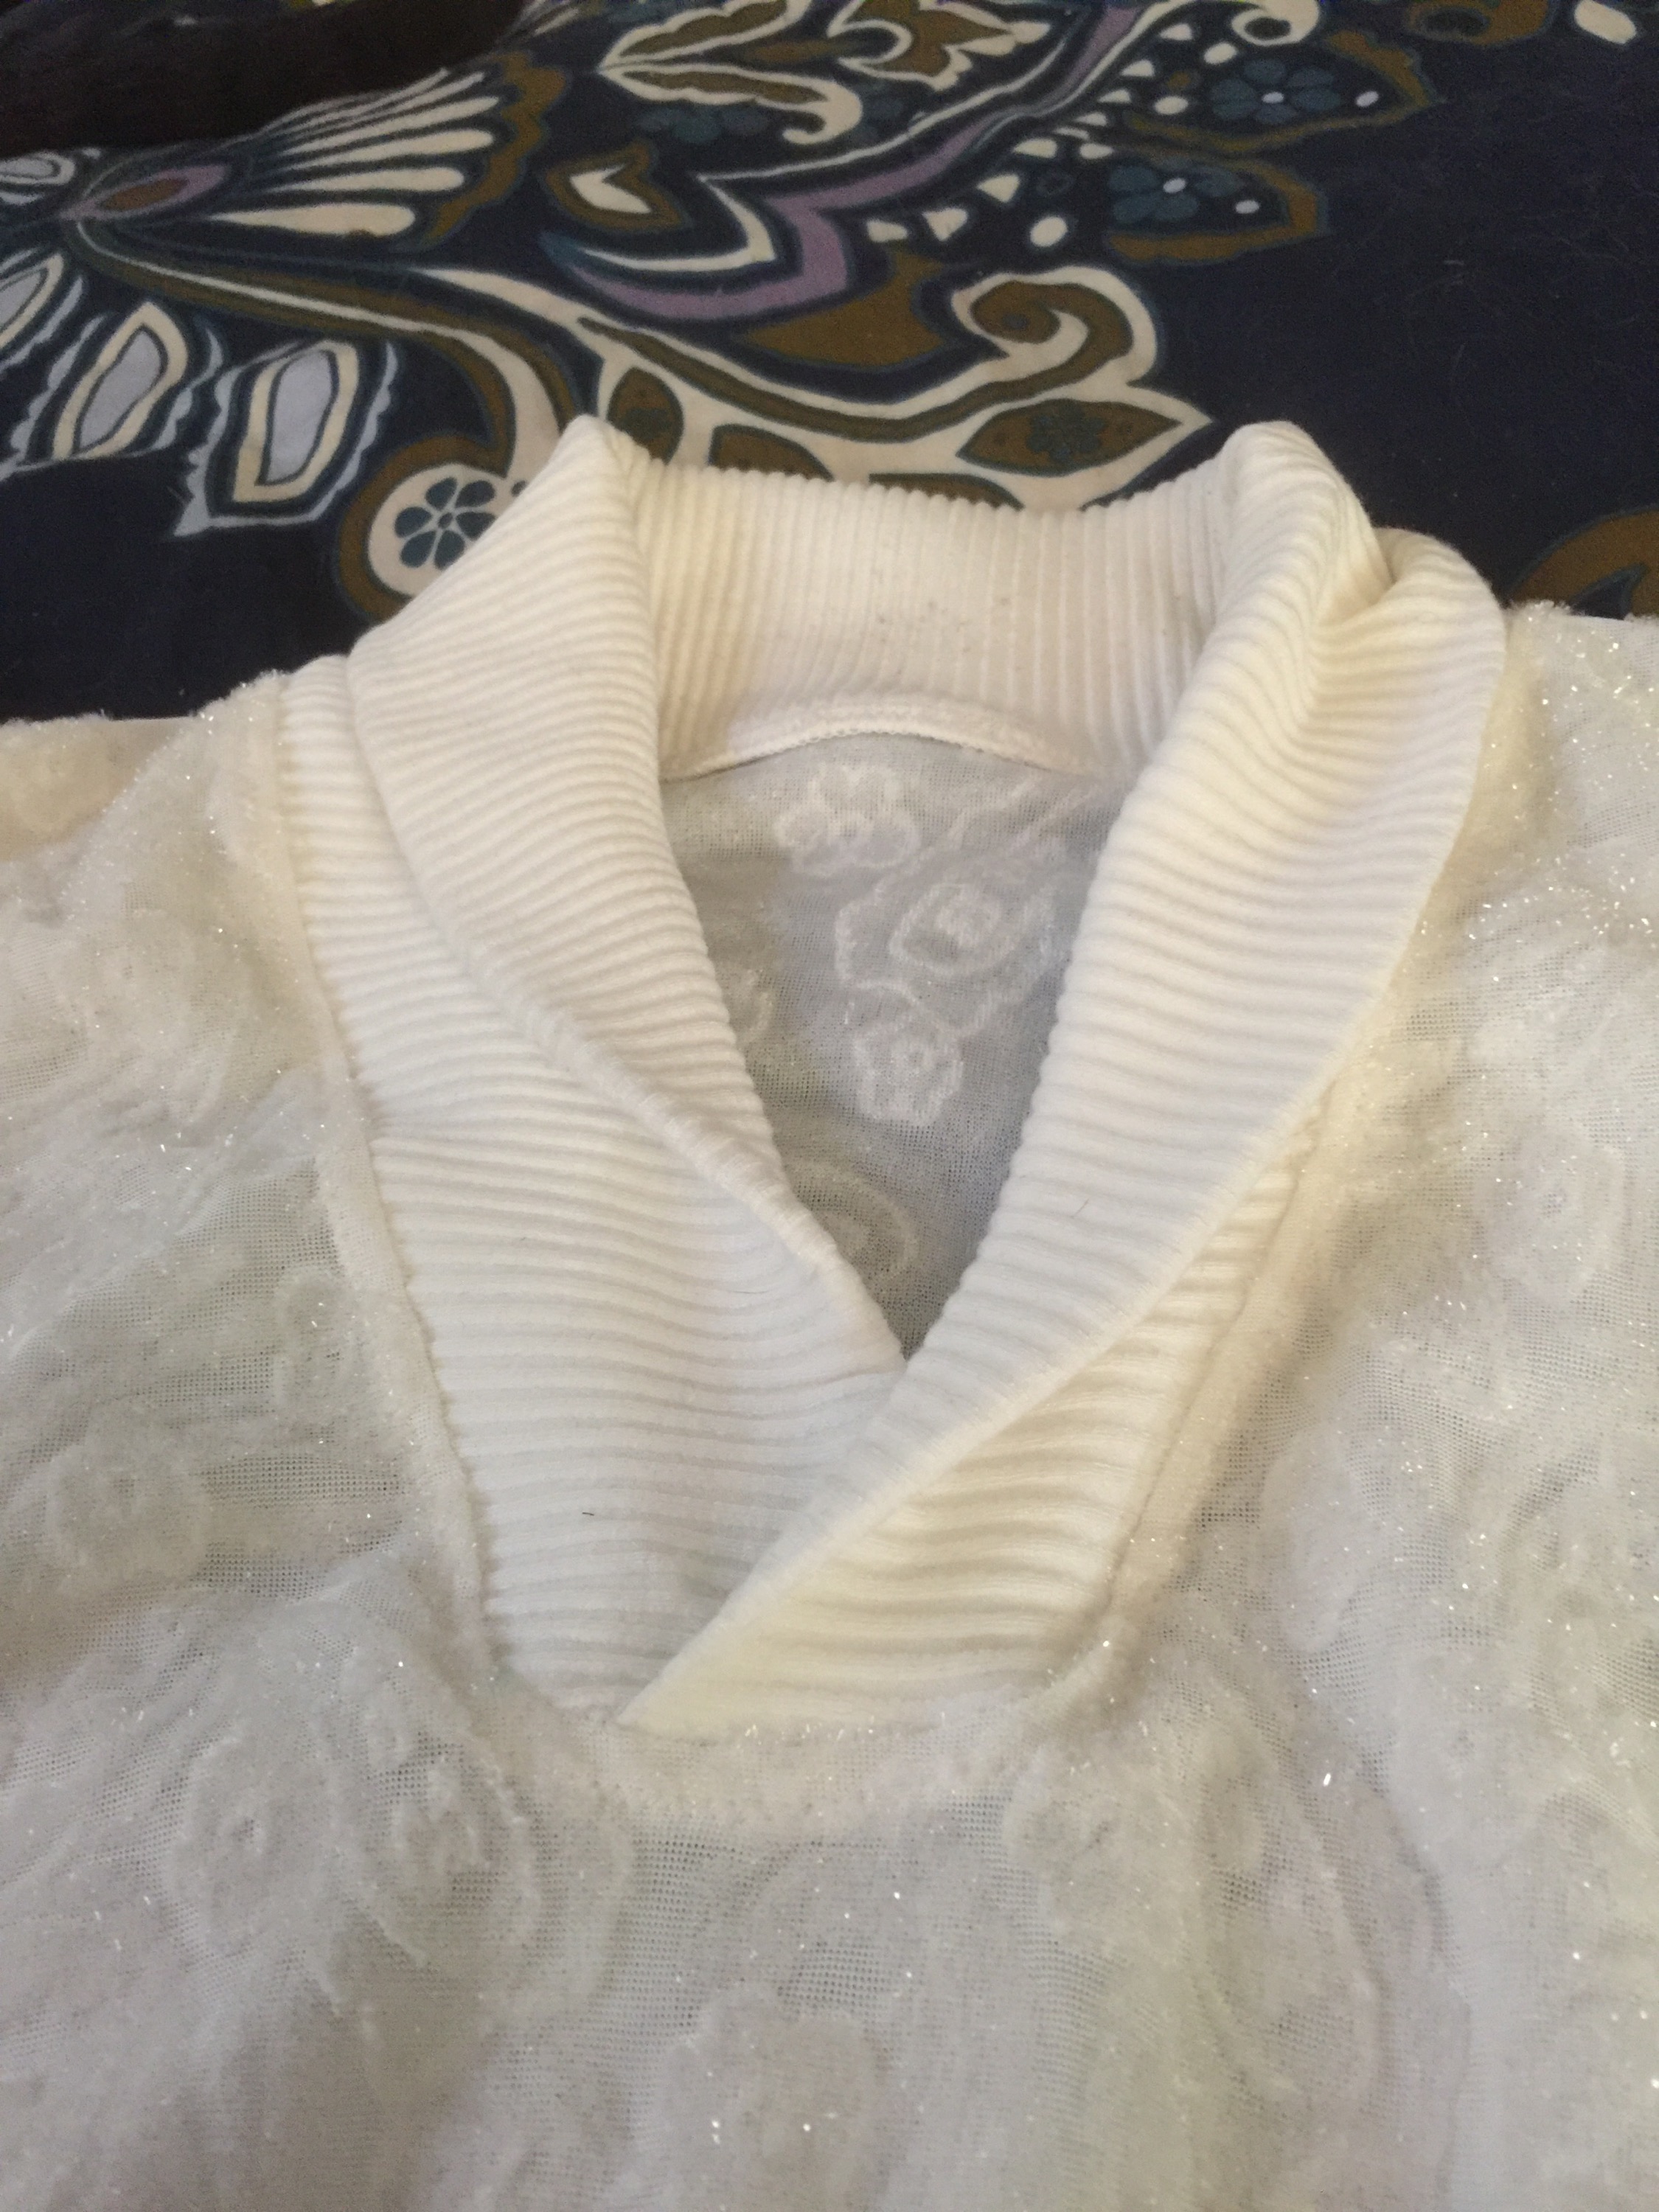
This was my first attempt at this kind of a neckline; it was a little nerve-wracking, and I should have stabilized more, but I am content with the result.

I was pretty darn excited that the Kwik Sew pattern had separate cutting lines/pattern pieces for the bands and collar depending on whether you were using ribbing or the self fabric. Obviously I was using ribbing, so I went with those. Um, did I mention this ribbing is really, really stretchy? I actually had to go back, iron the ribbing to flatten it as much as possible, re-cut my pieces with it flattened, and then shorten some more. And I still could’ve made the bottom band a couple of inches shorter—it kinda flaps out at the bottom. I did stabilize the seams with 1/4″ clear elastic where I could (neckline and bottom, if I recall.)

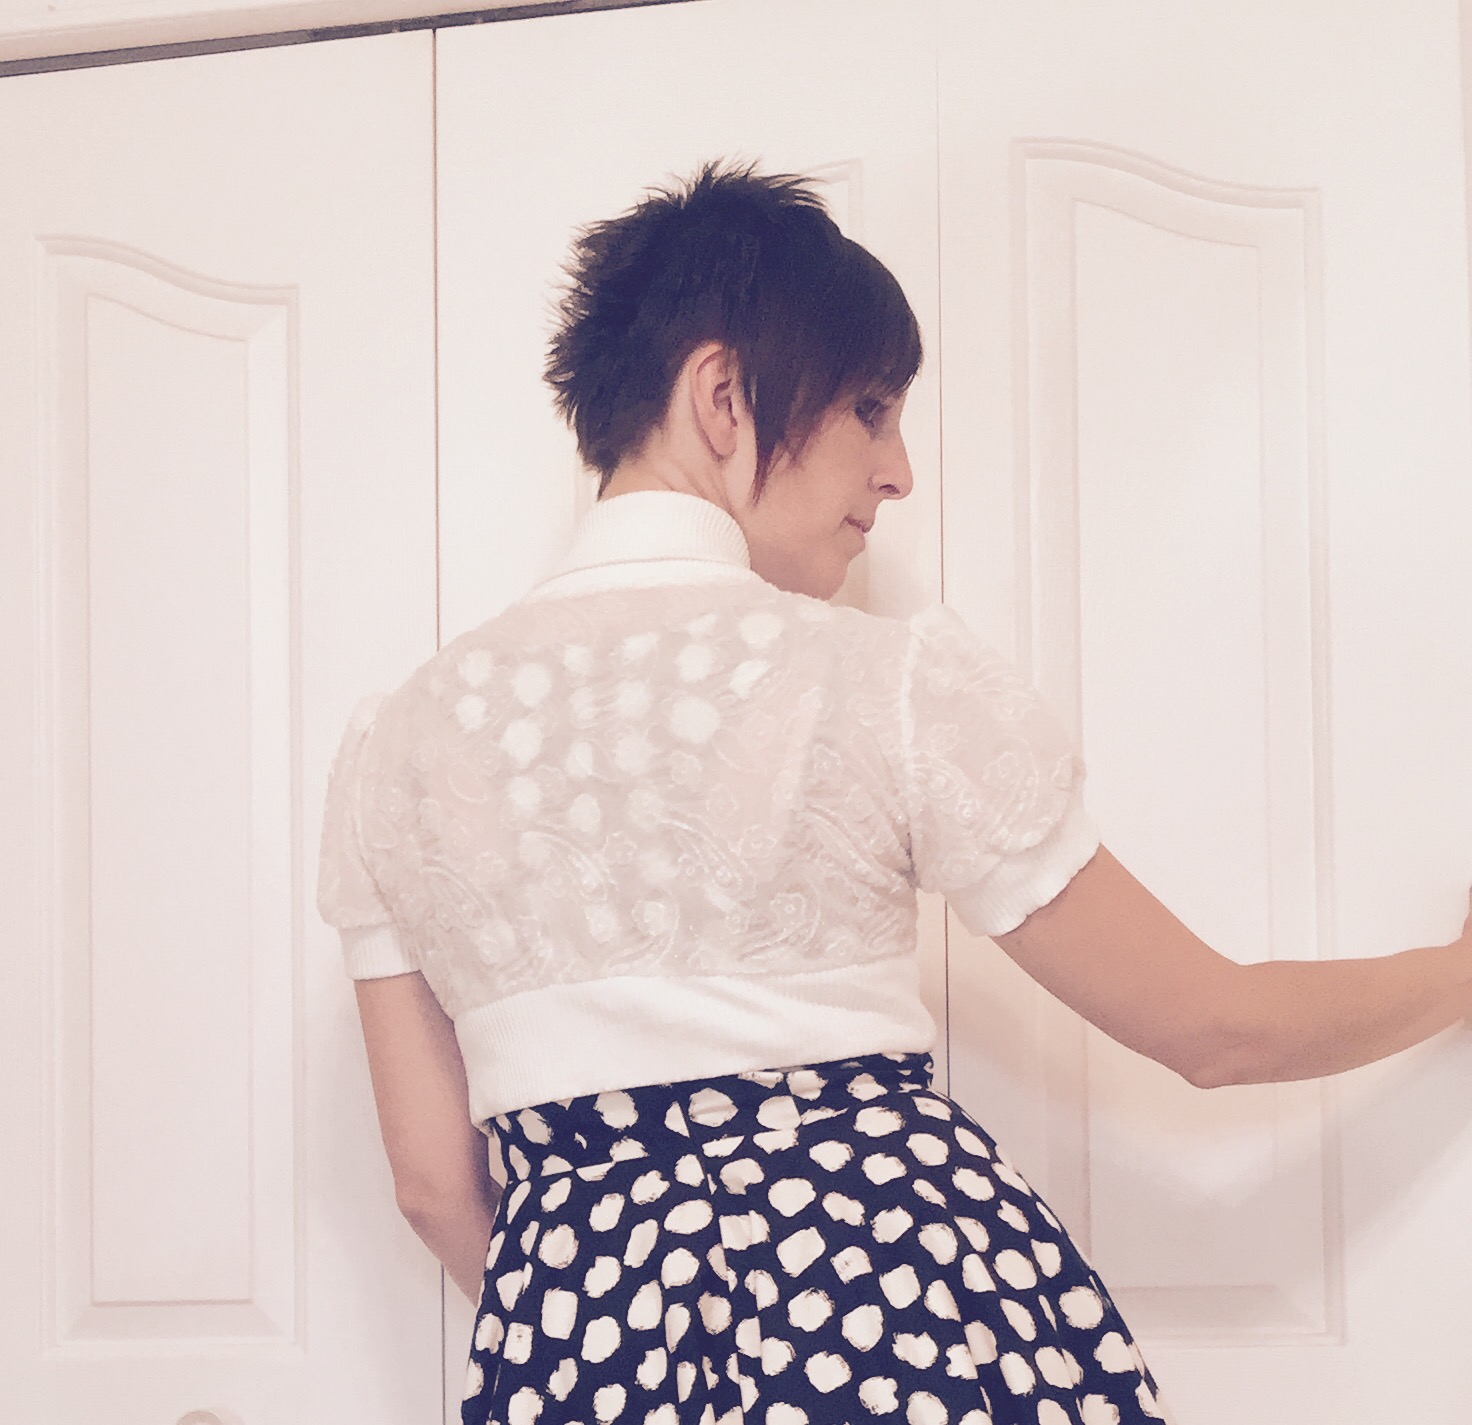
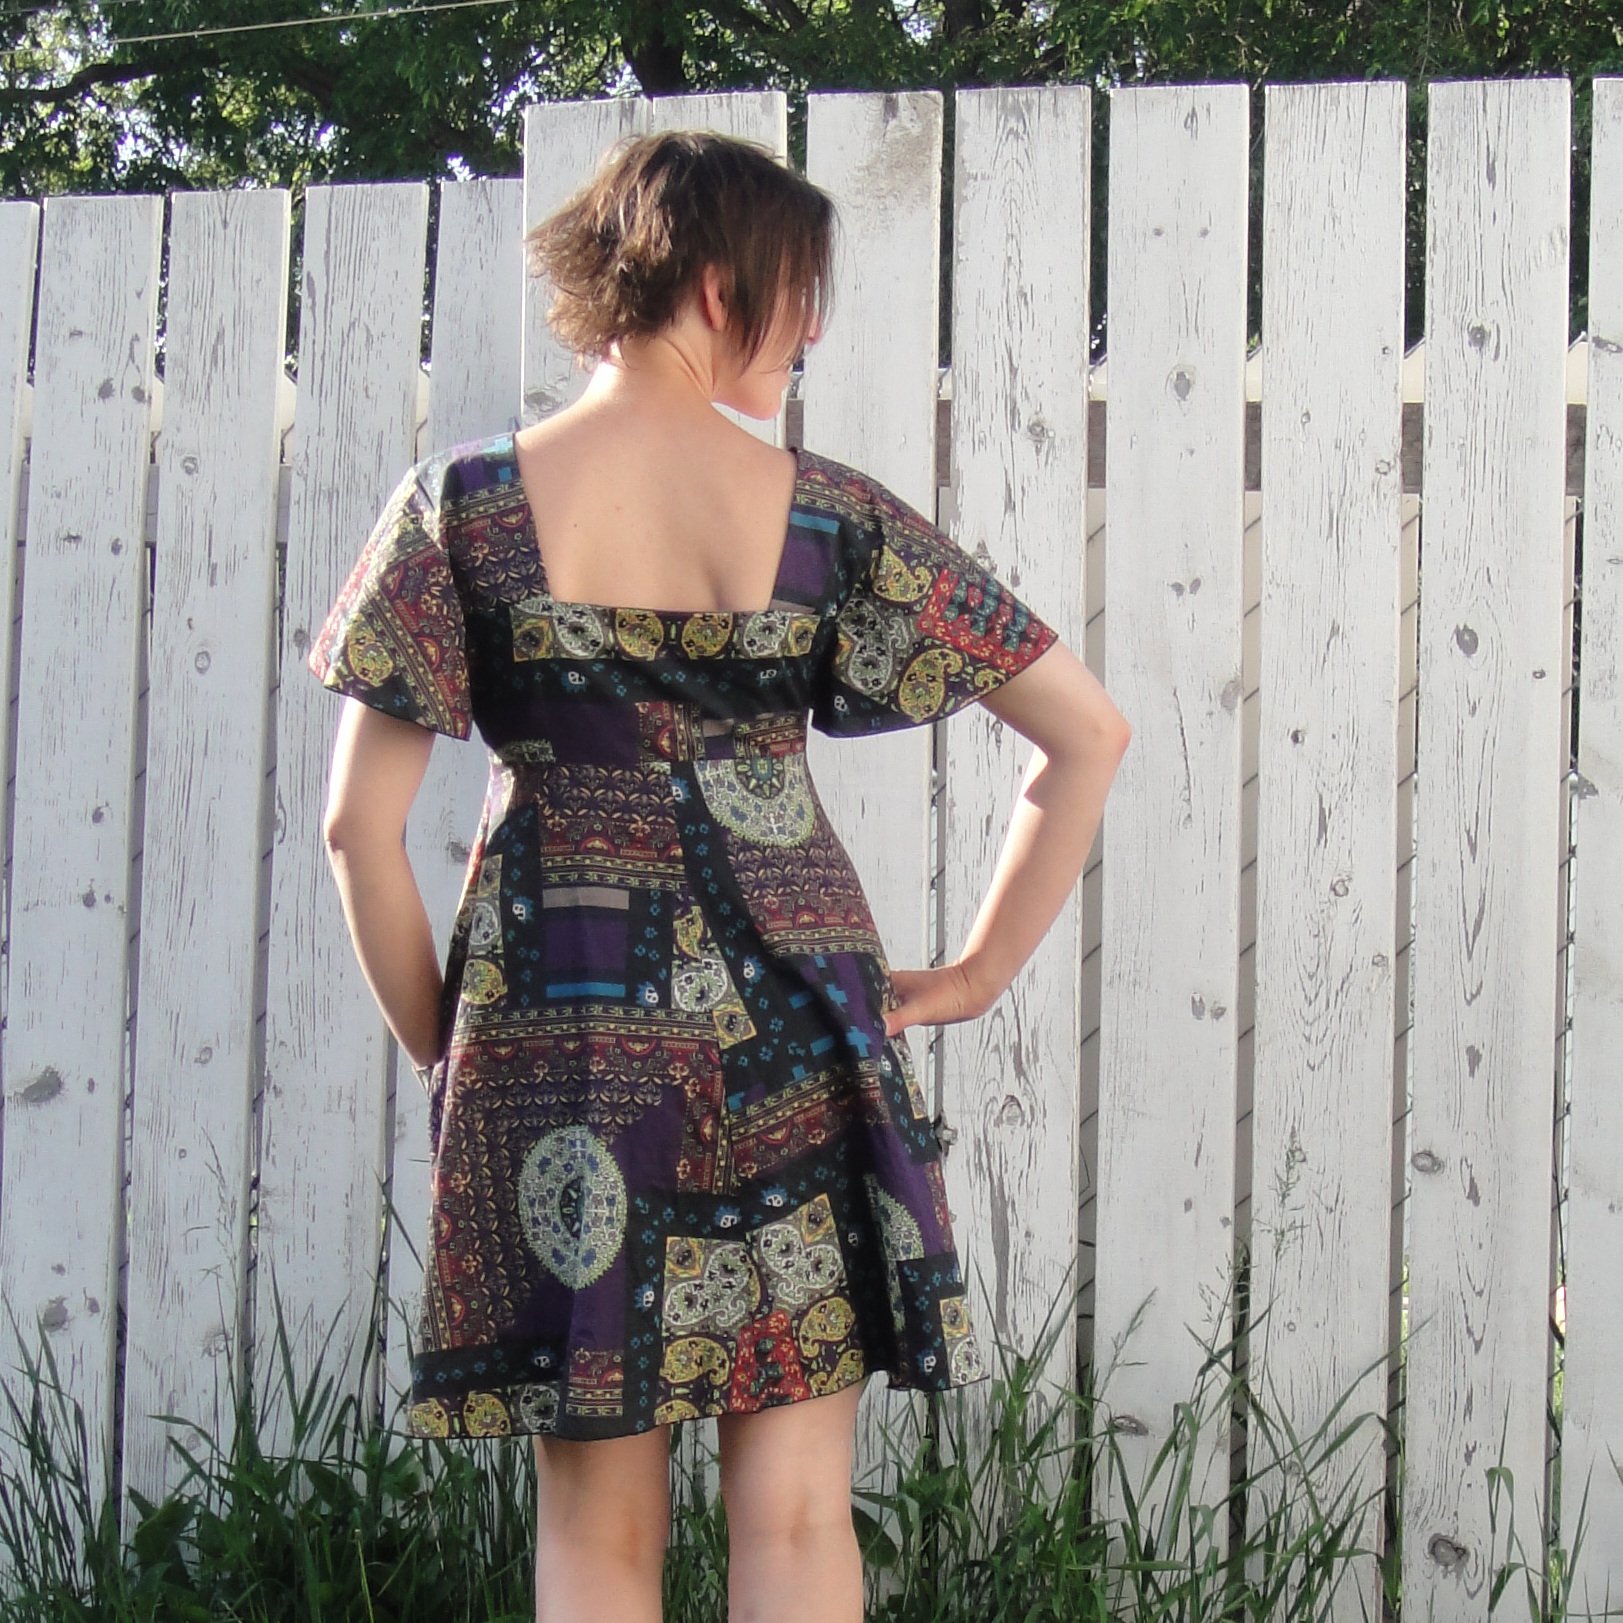
Back view. Shoulders a little wide.

I hadn’t even looked at the pattern size when I picked KS 535 up (one mustn’t be too fussy with vintage patterns, after all), but this particular envelope only went down to size 14! Oops. So I started off by grading down a size, not as easy as it might be as the nesting was not particularly regular—not sure if that’s a quirk of how the grading was done or just of pre-CAD drafting days, when you couldn’t just instantly nudge everything into perfect alignment. But it worked well enough, though the shoulders are still a tad wide for my taste (I like my little sweaters LITTLE. Like the sweater version of the shrunken hipster suit. Especially if you’re going to add puff sleeves. These have just the perfect amount of puff, by the way, enough to be pretty without nudging into linebacker territory.) I did my other usual changes as well, of course, petite-ing the bodice and squaring the shoulders. If only I’d left just a little more length on the bodice below the bust…

Especially good with a stripey scarf. And my Springy Coat, but I didn’t get a good photo of that.

I didn’t actually plan these pieces to go together, nor were any of the accessories acquired with them in mind—but somewhere around the time I started this blog I picked a bit of a mental “palette” and have come back to ivory/off white again and again, and I guess it does pay off eventually, because I have the most luscious array of black and ivory things to pair with either of these pieces. To the point where the pleasure of constructing the outfit, and then wearing it, far outweighs my little nit-picks at the individual items. So that was actually a neat thing, too—I don’t do a lot of wardrobe planning, but stumbling into some by accident is pretty darn awesome.

6 Comments

Filed under Sewing

Best Laid Plans…

Burda 6849

Tyo wanted a plaid flannel shirt.

She has several, but the best one actually belongs to one of her friends and she’s going to return it. Tomorrow. Totally. So could I make her one just like it? I made Syo a whole dress for her cosplay a few weeks ago, and the last thing I made Tyo was a lousy sports bra like six months ago. Jeez, mom.

She was complaining that she no longer knows what to do when modeling clothes for photos; the ease she felt at nine and ten and twelve has melted away. I think this is code for “You should make me more stuff so I can get more practice modeling,” though I’m not convinced I believe her.

It’s been a long time since I made Tyo a flannel shirt. Like, um, five years? How the hell did that happen? I will say, that was an awesome shirt, even if it was too small. One of my nieces still has it, and a few weeks ago it floated back into our house and I was looking at it and I was all like, man, I did a great job on that shirt! I had always planned to make Tyo a bigger one just like it, and had even bought more of the fabric. I found the piece shortly before I started this project; I got a one metre cut. How the hell did I expect to make a shirt for a ten or twelve year old out of 1m of 42″ wide flannel? How the hell did I even manage that the first time, which was something like a kids’ size 7, but lengthened?

What all the cool lumberjacks are wearing.

While I’m not going to complain about the final product (and Tyo is thrilled, so that pretty much fixes everything) there was definitely a fair bit of, um, sideways on this project.

It started with the fabric. Tyo wanted red. I leaned toward a red-and-black plaid myself, but I thought Tyo would love this more colourful one, with its blue and green and bits of yellow. That are not, as you may notice, symmetrical (Is that the right word? I’m too lazy to google proper plaid terminology, though I know I’ve read posts on it before.) I didn’t even think about this until I started cutting out, and trying to mirror left and right. Yeah, doesn’t really work. Headache number one.  It didn’t help that the fabric had dried slightly off-grain after the pre-wash, so getting the lines on one side to match up to the lines on the other side when cutting was, um, not working. The sane thing to do, by the way, would’ve been to iron and steam the fabric back square, but I’ve been trying not to leave my ironing board up in the kitchen between projects (at which I am intermittently successful) so I didn’t have it out when I was cutting this out. What I did instead was yank and fudge so that my plaid lines roughly matched up, although everything looked weirdly twisted, and then iron them back into submission (and symmetry) after everything was cut out. It worked, fortunately, but I do not recommend this method.

Burda  6849 is a beautifully tailored women’s shirt. What Tyo wanted, on the other hand, was a loose, slouchy I-stole-this-from-my-boyfriend kind of shirt. Archer would likely have been perfect, but I don’t have that one, and I wanted to do this as a shop project—and while I can and do use Indie patterns for those, the cost can`t be included in the budget and I didn’t want to shell out the money. I figured I could make it a size up, and with a mod or two, all would be well. I left off the front and back darts, and cut the back on the fold with a little more width than the pattern called for, to make a pleat. Tyo was a bit concerned that it wasn’t going to be long enough, so I also lengthened the back—through I think it would’ve been fine; I removed most of the length I had added before hemming.

Sleeve tabs.

She loves shirts with those button-up tabs to keep the sleeves rolled up, so I added some of those as well.  It was pretty simple, although I should’ve made them a little longer.

Flannel and toques go together like peas and carrots.

Other than shortening through the waist a little bit, I made none of my usual fitting alterations.  It felt really weird, especially when I didn’t add four inches to the sleeve length. In hind sight I could’ve graded out another size at the hips, but ah well.

This.

Either the sleeves are very narrow, or my bias cuffs stretched before I interfaced them, because there was no little bit of gathering or pleating—the sleeve fit smoothly right into the cuff. I always use this technique of Sherry’s to attach cuffs—I’m so happy I can link to that again! 🙂 My one disappointment with the pattern was that there isn’t a real sleeve placket piece—the opening is just finished with a bias band. This is a technique that reads much more “blouse” to me than “shirt,” but whatever. It’s also fast and less nerve-wracking, so there is that. I’m pretty sure Tyo hasn’t noticed.

The Importance of Cardboard Templates in shaping Bias Pockets.

I have been trying to skip pocket templates lately, but it was not a good idea in this case. That was definitely three minutes well spent.

So many options

I initially planned to include bias pockets, pocket flaps, and front yokes, all great features included in the pattern. Except, when I got them all laid out, my eyes started to bleed. And I made the pockets and flaps in bias so I wouldn`t have to match the plaid, but I didn`t match the plaid of the flap to the plaid of the pocket. D’oh. In this busy fabric, it was much better to dial everything back and just use the pockets. Another piece of sideways.

Attempting at a chebroned back yoke.

My attempt to do a chevron back yoke by adding a CB seam there was foiled, as well. Turns out, when your plaid is very even (Like, the same stripes vertically and horizontally), the chevron effect doesn’t show up at all and you might as well just cut the whole thing in one bias piece.

Adventures with snap setters.

One of the things I wanted to experiment with (this is encouraged in shop projects) was using a snap setter. I tried out this hammer-in style, that basically helps hold the snaps in place for you, and I also managed to figure out that the ancient set of pliers below, which have been kicking around my sewing hardware since I found them at my moms aeons ago, would also work for this size/style of snap. Which was a big relief. I have been so close to getting rid of these so many times, but I’m a hoarder at heart and couldn’t quite do it. I’m so glad I’ve figured out how to use them now.

Vintage snap pliers, used at last.

I’m still not completely convinced that the snaps will hold, mind you, but we’ll see. One side of the collar stand popped right off, but the fabric there is really thick; I wish I would’ve trimmed my seam allowances much more aggressively.

Back View

The back of the Burda pattern has a centre seam and fisheye darts for shaping. Both of these seem like REALLY good ideas to me… but were not right for the shirt Tyo wanted. So I cut on the fold, and added a wee bit of ease to include a pleat below the yoke. I could probably have used a bit more, but oh well.

Just needs snaps…

In any case, it’s done and hanging, and when she gets it back Tyo will be a very, very happy teenager.

Fabulous Lumberjack Child

Fabulous Lumberjack Child

20 Comments

Filed under Sewing

Coming clean 

Butterick 6241

Butterick 6241. I love this pattern and I love the fabric, but the odds are I wouldn’t’ve splurged on either if it weren’t a store project.

So, a while back there was a bit of a kerfuffle in blogland about sponsored and otherwise compensated posts, projects, patterns, etc., and the need for transparency about such things. And I didn’t have a thing to say on the subject, because let’s face it, I’m barely managing to blog projects these days, never mind actually think about ethics and transparency and things like that and then write about it. Except that actually I do. Because, though I haven’t mentioned it on here, I’ve been working part time at my local Fabricland for almost three years now, and aside from the lovely people I work with, one of the major things that keeps me there is the chief perk—the staff projects.

IMG_1100

Sense & Sensibility Patterns Regency Stays. The fact that it was a project that was going to hang was a big factor in me picking this fabulous embroidered silk for the outer layer of the stays, rather than a boring but more accurate cotton or coutil.

You see, rather like the Mood Sewing Network, but with much less prestige and a much smaller viewing audience, every  month I have the opportunity to pick out a project, within a budget, based on the fabrics and patterns available at my store. I make it up, it hangs for a month, inspiring customers and giving me (hopefully) plenty of opportunities to yack about how much I loved the fabric or pattern or technique, and then I trot it home and it’s mine, all mine.

DSC08318

Vogue 9106 (on the to-blog list)

I haven’t really wanted to blog about working there, because a) who wants to write about work, and b) I don’t want to feel like I’m either a corporate shill if I only say nice stuff, or an unprofessional employee if I say nasty stuff. But I have increasingly felt the need to come clean about which of my projects that I blog here are staff projects, because while the projects themselves are very self directed, it definitely does affect my choice of both fabric and patterns. While I would probably still be getting most of my fabric from Fabricland (local selections are fairly limited and heavily quilt-centric otherwise) projects give me the chance to use brand-new fabrics, rather than haunting the sale racks, and also to play with things I would not be able to afford. (Though the project budget is pretty limited, too.) And frankly with working there and at my day job, my sewing time is very limited, and a lot of it does end up being projects.

Pockets!

McCall’s bomber and Jalie dress.

Initially I just didn’t blog shop projects—I’m not being paid for the blogging, after all, the projects have hung on display as per requirements, my obligation is met. But first and foremost this blog is my sewing journal, and I like to record the alterations I make, the changes, the struggles I have. Especially for years later when I can’t even remember what I did. And a lot of my own creativity goes into these things—I want to share that. Some of my very favourite things I make these days are projects

IMG_0032

I used my project budget to help me explore applique techniques on knits in this sweatshirt for my husband. Good sweatshirt fleece is EXPENSIVE!

I don’t have time to go back over three years of posts and point out the culprits (though a large number of them are decorating this post), but I want to put it out there, for the sake of honesty, and being able to tell the whole story in the future. If you want to know about a specific project, please ask.

Rear view

I get to play with crazy, new-to-me fabric.

The second best thing about projects (after free patterns and fabric), is the deadline! They have to be completed within a fairly tight time-limit, so shit gets done. A luscious fabric doesn`t get purchased and then lurk in stash for heartbreaking months or years.

I am content.

Something by Butterick.

The flip side, of course, is that a lot of the stash doesn`t get touched.

20140331-205316.jpg

The Gertie slip. I love this one so much. I need five more.

20140316-165001.jpg

Drape Drape top and Burda jeggings.

Because of the tight deadline, it can be hard to pick complicated projects—it`s much easier to go with something you can whip up quickly.

DSC08117

I was so excited when this McCall`s coat pattern came out, and when we got this camo twill it tied in so perfectly.

But sometimes there`s just no resisting. When the right fabric and pattern come together, you’re off.

DSC08041

This Vader dress was another casualty of the early ‘not blogging projects’ policy.


20131107-202329.jpg

Hallowe’en Project


20130703-120240.jpg

Father’s Day project


What's right

Simplicity knit dress.


It'll do.

This was my very first store project!


So that’s it. Mea culpa. I hope you aren’t mad (but if you are, well, I get it.) Going forward, I will be mentioning which projects are shop projects, which is a big relief because sometimes a big part of the story of why I picked a particular project is to do with that, and I do’t want to edit those stories out. Sometimes, they`re even pretty funny.

23 Comments

Filed under Sewing

Susan Sto Helit

Sask Expo Selfie!

This weekend is the local comics convention. A few weeks back I bit the bullet and bought tickets for the kids and I—we had been to the one in Cow Town, but we’ve never been to this local one (this is only its third year running.) This local offering was definitely a bit more budget-friendly, even without the seven-hour drive each way. And while it’s much smaller than the Cow Town event, it was still plenty big enough to wander around, and being local I knew several people with tables there, which makes it nice. 😉 The hubs declined to join us, alas… somehow the prospect of escorting a passle of teens hither and yon through bedlam and mayhem didn`t appeal to him. I can`t imagine why.

Joker, Elf, half-ass-Ninja-Turtle, and Wendy Marvell.

Joker, Elf, half-ass-Ninja-Turtle, and Wendy Marvell.

Tyo went as a generic elf (it was that or wear the Batgirl costume I made her last Hallowe’en), in a couple of my costume/dance pieces that she tried on in a fit of playing dress-up one night, and totally rocked. Moms out there, you know: that moment when your daughter steals your clothes and looks way better in them… yeah. I still love her. Mostly.

Syo wanted to be Wendy Marvell, a character from her current Anime obsession, Fairy Tail. Which outfit deserves its own whole post, so I won`t go into it too much except to say, it went well, better than I had anticipated, actually.

Still life with rat.

Still life with rat.

Me, I went as Susan Sto Helit, arguably the best female character in the whole Discworld (with exception of Granny Weatherwax, of course. And Lady Ramkin is pretty awesome also. Actually, there are lots of awesome females in that series…) I knew I wanted to cosplay her at some point as soon as I heard that Terry Pratchett, the author, had died earlier this year. He was one of my favourite authors, maybe my most favourite. His books are the most amazing blend of humour, wit, fantasy, and social commentary, and I will miss him terribly.

DSC08370

Now, Susan actually appears in the movie The Hogfather, based on the book of the same name, so I could`ve gone with that version of the character.

Everyday Susan

Everyday Susan

But a) I hate to be bound by one person’s imagining of a literary character, and b) I was busy making Syo’s costume and with a few liberties I could throw a Susan costume together pretty much entirely from pieces I already had on hand, if I didn’t try to match the screen version.

Fancy Susan (with Death, her grandfather.)

Fancy Susan (with Death, her grandfather.) This would still be fun to make at some point, of course.

All I needed was the wig and the Death of Rats, which are what really make the costume, of course.

DSC08369

Back view, not that you can see anything with all the hair.

OK, I’ll be frank here—the main reason I’m posting this is that I wanted a reason to post cool and self-indulgent pics of the costume. This post containers very, very little sewing. So there are way too many boring pics of me standing by my  fence (not even in cool dance poses) and if you click away now I will be completely not hurt at all.

DSC08367

A fair chunk of the costume, including the key elements that make it recognizable (wig and skeletal rat, as I said before) weren’t even things I made.

Blouse & Vest

Blouse & Vest

The blouse is a pseudo-Victorian-looking thing I yoinked from my mother last spring when we did all the historical costuming stuff,* and the vest is a really-too-small piece that belongs to Tyo. She wears my clothes, I wear hers, I guess. Sometimes it works out. As long as I don’t try to do up the top button, anyway.

DSC08366

I wore a pocketwatch, because it just suited. Although technically for the character a big fancy hourglass would’ve been better.

My mom had actually purchased the little skeletal rat for her own Hallowe’en decorating, so I was able to borrow him, and all I had to do was make him a raggedy little black robe.

The Death of Rats.

I haven’t sewn anything that small since I stopped making Barbie clothes when I was about fourteen. Plus I decided to use some scrap black knit (so I didn’t have to finish anything) that is a beast to cut and even worse to sew on a regular machine (and no way I was trying to maneuver something this tiny through the serger). Let’s just say it was not a couture creation. I do like how his (inaccurately bony) ears hold the hood in place, though.

DSC08365

I did make two elements of the costume. The skirt I blogged here, and while it may not be the only long black skirt in my wardrobe, it has been the one I reach for the most, at least in the winter (since I oddly don’t often reach for full-length black wool-blend skirts much in the summer…). In a perfect world I would’ve make a real Victorian skirt, but this one did the job just fine.

The other part is the little black underbust corset, which I made back at the beginning of the summer. It was supposed to be part of a costume I’m making for for a friend, but has a number of flaws, so I’m going to call it a prototype—first, I couldn’t find my pattern pieces, so I cloned the pattern off my boring corset with Press ‘n Seal. This was not a bad way to do it, but I “lost” a teeny bit at each seam due to turn of cloth that I didn’t think to accommodate for, so it ended up being just that little bit smaller than I was aiming for.

Underbust corset, with other costume elements.

It also isn’t quite as curvy as I wanted—I think to do with cutting down the full-length pattern to basically a waist cincher. And then I didn’t fully bone it, and I used spiral steel along the back lacing—not a good idea, incidentally—and didn’t leave quite enough seam allowance for the binding in a few places and, well, it’s fine for my own use but not something I’m proud enough of to sell.

All in all, it was pretty nice to just throw something together from what I had (because let’s face it, at this point I have quite a bit). In the end, the hardest part was probably adding the black streak to the white wig I found… via Sharpie marker. Maybe not the best way to do it… 😉

Fun!

Fun!

*FYI, and in case I don’t manage to blog it again because I’m terrible these days, we are doing another Historical Sewing series this fall, only more hands-on—bring your own project! And yes, the first date is next weekend.

A Victorian Sewing Circle

at the Marr Residence, 326 11th Street East, Saskatoon, SK     


Sunday September 27                  

Sunday October 18                         

Sunday November 15                    1:00-4:00 p.m.  each date

Come join us this fall at the Marr Residence for a Victorian Sewing Circle! We invite you to bring your historical sewing project to spend the afternoon sewing, planning, and sharing information about historical costuming in Saskatoon. 

We provide space, basic sewing equipment (straight stitch machines and pressing equipment), light refreshment and—best of all—lively discussion and learning about historical costuming, especially with regard to the periods interpreted in the house (1880s-1920s). Marr Residence volunteers will also be on hand to provide guided tours and information about the history of the house.

13 Comments

Filed under Sewing

Secret Pyjamas

Butterick 6241

Butterick 6241

I made Butterick 6241.


This project, for once, started with the fabric. My pokey little Fabricland has actually gotten some REALLY nice fabrics this fall—the nicest since we moved back here. One that I was really dying to work with was this slinky rayon knit that is just that much heavier than most of the thin rayon knits they get—making it extra scrumptious (though I’m sure not quite as luxe as the stuff K-Line has been playing with…). I came *this* close to making a Jalie Bella dress, but I thought the rayon is still just a wee bit thin for that… Butterick 6241, on the other hand—perfect.

Too many photos.

Too many photos.

It was kinda hard to wrench myself out of historical costuming mode—I’ve been pinning regency-era stuff pretty much obsessively since mid July and I REALLY want to get started on a actual dress. But I reminded myself how much o loved the fabric and sucked it up and changed all the machines to grey thread. (Yes, all. While I did most of the construction on the serger, I set up the Rocketeer for twin-needling and there was still a fair bit of basting and stay-stitching to do on the Pfaff. )


Slinky!

Slinky!

My fabric is pretty stretchy and the pattern called for moderate stretch, so I decided right off the bat that I’d size down a bit. After a quick comparison with my knit sloper, I thought a bit of shortening through the armscye was in order, and since there was a back seam I took the opportunity to add a bit of a swayback adjustment. I roughly squared the shoulders, as well. It’s always a bit hard to tell in a knit if the changes you make actually made make a difference or just didn’t matter, but the fit ended up being pretty much spot on so I’m not going to complain.

Back view

Back view. Catches up a bit on my butt, not helped by the not-at-all-slippery leggings.

I really really hate sewing knit patterns with 5/8″ seam allowances, so it takes a fair bit of love to get me to sew one. And I won’t say this pattern changed my feelings on that score, but it wasn’t overly traumatic, either. It’s not an easy knit pattern, however. There are a lot of seams that have to go together without rippling.

I did a LOT of stabilization—knit fusible stay tape (out of curiosity—it’s a little lighter than the knit interfacing I usually use and I think the heavier might’ve been better in this case—but it was still nice and convenient), clear elastic, and even old fashioned stay stitching. Which doesn’t make for the prettiest insides. I also wish I’d matched my serger thread better—I could only find two of my dark grey serger spools so I used lighter grey in the loopers. It stands out, and is somewhat visible inside the pockets and when the collar is unzipped.  Blerg.

Collar closeup

My only real change to the construction was to skip the front facing.I mean, everyone hates facings in knits, right?  Well, it would’ve made for a much nicer finish on the inside zipper if I had kept it, and since I mostly plan to wear it with the collar open, it’s not ideal (although it’s not as bad as I had feared it might be.) also I think the method described in the instructions for inserting the exposed zip would probably have been better than what I did, which was tuck the edges under, hold everything in place with wonder tape, and topstitch. It is not particularly perfect, plus I had to stitch down the collar inside the zipper by hand. Go with the instructions, though I would stabilize the outer fabric with more than just the stay-stitching they suggest.

yummy unipped collar

yummy unipped collar

The collar itself is pretty interesting, with a weird raw-edged overlay with topstitching and grommets for the drawstring. I thought it was a bit weird that they tell you to baste on the overlay and then pull it back to insert the grommets underneath. I added the grommets first and everything was just fine. While they do have you interface the side of the collar that gets the grommets, I was using a super-light-weight knit interfacing for that so I added some squares of regular interfacing where the grommets were  going. The collar overlay piece is slightly longer than the collar piece, I think to allow for turn of cloth, but since the collar is interfaced and the overlay isn’t, I actually would up trimming off a couple of cm to get my overlay to fit. They’re all rectangles—not the end of the world.

Zipped up collar. Still cute, less me.

Zipped up collar. Still cute, less me.

Steam-a-Seam came to the rescue again for hemming the pockets and the bottom, and I think the walking foot on the rocketeer was a big help for keeping things together over the pocket part. I had actually expected the pocket to be formed by some nifty fabric folding at the hem or something, but no, it’s just a big piece basted to a smaller under-piece so it drapes nicely. Much simpler that way, mind you, plus I could decide to shave an inch off the bottom without causing too much trouble. I actually might’ve shortened more—not that it’s long, but I was thinking mini-length in my head and it’s really a very comfortable knee length (I’m 5′ 7″)—but I was worried about getting into the drapey part of the pocket. Although now it’s hemmed it seems shorter… some of that is probably my camera’s 18″ high tripod perspective.

Dress

Dress

I was not overly pleased with the sleeve, solely because there is sleeve-cap ease. 😦 this isn’t necessary on a knit, I think, ever, and certainly not on a little flutter sleeve. I actually cut the smallest size of sleeve in the hope this would get rid of it, but there was still a bit left. I then made the mistake of just trying to ease it in with the machine, which resulted in a rather stretched out back of the armscye. Blerg. So partly my fault, too, for not bothering to address the problem properly. I don’t think it will bug me too much, anyway.

Dress

Dress

So, all in all, despite a few quibbles with the pattern and instructions, and a few more issues with my own choices, I’m pretty darn happy! It’s a cute, comfy dress that is already making me less upset about the fact that fall is here. And I LOOOOOOOOVE that  fabric. 🙂

26 Comments

Filed under Sewing

Bib-ity, Bobbity…


Woven-stripe “muslin”

 I found the perfect fabric for a stereotypical Regency muslin dress to go over my short stays, right there in my stash just waiting for the right project. (Seriously—it was one of those fabrics that I had bought purely because it was gorgeous, with no project in mind.) However, it’s also really freakin’ sheer (as Regency-style muslin should be) so, obviously a petticoat or underdress was in order. Since my stays are, um, a bit extravagant (i.e. not plain white at all) I wanted a full bodice for the under-dress, not just a strapped petticoat. And after paging through Janet Arnold’s Patterns of Fashion, I wanted to do a back-closing muslin dress, so I thought it might be preferable, then, that the under-dress have a different closure. And what else would spring to mind than trying out a bib-front closure. I was thinking along the lines of this:

  
But with a bust-covering part to the bib. 


worn with no stays and totally the wrong chemise.

 Mine ended up a fair bit, um, fluffier.


A wee little bib front.

 First off, I had read that bodiced petticoats often had a coarser fabric for the bodice part, so I dug around until I found a smallish end of fairly coarse-woven cotton. I had obviously cut it into something else, but I have no idea what. >_<  Then I went looking for something a little finer for the skirt—but not too fine. I found a big pile of white, medium weight, nice weave—oh wait, that’s the poly-cotton broadcloth I got from the bargain centre for $1/m because it was stained. (Stains came out in the wash.) But, no poly cotton on historical costuming, thank you. Next I found an even better option—pure cotton, nice close weave, not too heavy—wait, that’s the extra-wide stuff I bought for making that bedsheet. Um, no. Eventually I went back to the leftovers from the batiste I had used to make the chemise. A little lighter than I had been hoping for, but it would work. And there was just barely enough to make the skirt I wanted with enough length to add some tucks. Fortunately lace was on half-price that weekend. 


felled seams, homemade bias tape on the edges.

 After some fussing and trying to decide if I could be bothered to scale up the pattern pieces from Patterns of Fashion and other angst, I decided to just modify the regency short-stays pattern for the bodice—cut it down in front and omit the gussets and it would look very much like the bodice in the picture above. At least then it should (theoretically) cover the stays. I have a feeling I should’ve cut everything a little wider and higher though…


there’s a hole in my dress!

 I wasn’t really clear on what the best construction technique was (accuracy-wise), so I  bound the edge with some home-made bias tape from the same fabric as the skirt. I even used my little bias-folding-ironing doohickey. It’s not my best work, but it will serve, although I’m pretty certain it’s not terribly historical. The batiste bias tape is pretty delicious to work with, though, especially with just a little bit of starch added. 

  It took a couple of iterations of the bib to get the sizing and amount of gathering right, and it may still be off once I try it with the stays, which are away being on display for a wee bit. I initially made the same booboo the Dreamstress recently fixed on her gown, gathering all the front width onto the bib, rather than having part of it extend around the sides below the join.  Again, I’m not sure how accurate my narrow band/ties are, but it’s certainly functional. I haven’t found as much on the details of regency construction as I did on Victorian bodices—maybe I just haven’t been digging in the right places.  

Hallowe’en costume, Tanitisis. CHILL. 

  I was pretty annoyed that I had to go buy lace for the hem—I so wanted this to be a stash-only project—but I was very thorough with my other petticoats with using up everything I had for their lace, and the only eyelet lace I has in stash had a distinctly polyester vibe, especially around the embroidery, that would drive my nuts on a project like this. (Hallowe’en costume, Tanitisis!)

  I finally mastered (on my second attempt) the method for attaching eyelet so that the seam is hidden in a tuck—basically the bottom tuck is a large, lop-sided French seam sewn on the outside of the fabric.   

  My hem finish was inspired by this bodiced petticoat at the Met, though its longer waist looks a teeny bit later to me (but what do I know?) and obviously it isn’t a bib opening design. 

  In

Kj

MK

6 Comments

Filed under Sewing

Boring. 

I’m not really sure why I’m feeling the need to post about this considering all the other more interesting things I’ve failed to blog recently, but here it is: I made a bedsheet.  

 
I got this extra-wide cotton back in the spring, (which for me these days is actually fairly efficient), especially with the intention of making a new fitted sheet, since one of our two previous ones finally shredded itself. I even got as far as pre-washing the fabric and cutting it roughly to length. And then it sat, until today when I very nearly turned it into a petticoat. So I thought I should probably finish turning it into a bedsheet before I forgot what it was for again and made it into something else (because it really is a very nice cotton). And trying to get our lone bedsheet washed and back on the bed same day every time was getting old. 

Blerg. That was boring. And I managed to sew one of the corners wrong-side out, so I french-seamed it because I’m much too lazy to rip stitches on a bedsheet. And now I wish I had French-seamed all of them, because it looks so much nicer. (Don’t ask me why I might ever care how the inside of my bedsheet looks.)
It does fit the bed. I checked.

But I bet you’d much rather be reading about a petticoat. 😉

11 Comments

Filed under Sewing

Regency Underoos


Sense & Sensibility Patterns Regency chemise and short stays

 It occurs to me that I’m establishing a bit of a pattern here. I’ve made another set of historical underclothing. Hmm. If you go back and include the fairly-mediaeval bliaut I made way-pre-blog (hand-worked eyelets up each side, dude), that was basically an underdress as well… well, let’s just say I have yet to produce any historical outer wear of note. Hmm. Maybe I should give up and just go with “underwear across the ages”. 😉

Regardless of what that says about my sewing inclinations (or maybe just my attention span), I have made another set: Regency underthings this time, perhaps aiming for a date around 1805, although frankly I’m trying to restrain my latent authenticity Nazi and don’t feel like researching ’til my brains ooze out my ears. But I kind of spent a bunch of time on vacation last month pinning Regency fashions, since they’re some of my favourite (and arguably considerably more translatable into a modern aesthetic than anything much before or after), and then I got it into my head that maybe it would be a fun Hallowe’en costume. One impulse purchase of the Sense & Sensibility Patterns Regency Chemise and Short-Stays pattern (PDF), some serious grumbling over the printing thereof (not pre-tiled, layout not at all paper-maximizing), and a very very small piece ofsome very scrumptious embroidered silk and, well…


Chemise

  I didn’t really follow the chemise pattern, partly because I only printed half of it, but mostly because I prefer a gored construction method, and I’m pretty sure it’s still historically accurate. I did copy the neckline, but otherwise I used the same two-gored construction I did for my Victorian chemise. In hind-sight, I wish I’d done the single, asymmetrical gore (more “old fashioned”) but I forgot at the time. Apparently I need to make another. Because I really need another historical chemise. >_< Add rectangular bits for sleeves and the last couple of square scraps for gussets.


Flat felling, be hand and machine

  I did all the long seams flat-felled on my machine, but I can’t quite wrap my head around flat felling the gussets by machine, and I never do a very good job of matching things up so my seam allowances were, ah, wonky… So I felled those seams by hand. Hand-sewing: for fixing fuckups. 😉

  I made hand-worked eyelets for the neckline drawstring to pass through. However, not being overly bright, I worked them in the BACK of the neckline. Oops. I’m not really happy with the neckline anyway (I did a fairly terrible job of applying the bias tape drawstring casing) and it seems a little high so when/if I get the time and inclination Imay redo it. 


Coffe, coffee everywhere. 😦

 The short-stays were more fun, and slightly less of a comedy of errors. Aside from the part where I dumped an entire cup of coffee on the pattern and fabric. We won’t speak further on that. At leas the silk is pretty coffee coloured to begin with. 


Ticking lining

 I used ticking for the lining and interlining, rather than coutil, mostly because a friend had recommended it as a locally-available alternative to  coutil, apparently very low-stretch due to the tight weave. Though I’m not sure this was the best project to test it out as the short stays are very lightly boned. The softness of the ticking wouldn’t be too much of a problem in a fully-boned corset, but might be an issue in something that has less boning than some of my bras. Though at least initially it seems to be working. I used the maximum amount of boning suggested (the instructions are pretty thorough in going over various options for boning and cording and even quilting. And there’s an online version with extra photos, too.)


Quilting

 Speaking of which, I added some quilting to the back, which is completely unboned, for a wee bit more support. It looks nice, anyway. 


Back view

 I wanted a coordinating silk in a solid to make my bias binding (the idea of trying to make a binding out of my embroidered silk was a bit horrifying) but there was naught to be had. So I threw authenticity out the window* and went with a very modern polyester satin bias trim, which was both fast and easy and a great colour. 


Front. My dressform does not squish as well as I do.

 I made my eyelets by hand, as per period (and not nearly as many as that damn mediaeval dress, as I reminded myself constantly) but reinforced with metal jump rings. Although I’m not sure how often this was actually done, (I did read about it, though, somewhere) it was fun to try out and the resulting eyelets are nicely circular and sturdy. 


Eyelet inside, with jump ring.

 After studying my Pinterest boards, I opted for spiral lacing. Regency seems to be pretty much right around when the switch from spiral to crisscrossing lacing happened, but more of the extant garments and images seemed to me (in a very unscientific survey) to be spiral-laced. (Or have holes spaced for spiral lacing even if their laces are currently cross-laced.) 

The bottom of the stays is designed to have a drawstring to hold them down. I left the channel open but haven’t tried to thread it—my rib cage  doesn’t exactly taper downwards, so I’m not convinced it would help with anything. 


On me. Hopefully I’ll have better pics eventually

 I cut a size 12 (same sizing as big 4 patterns, as far as I can tell, how nice), with the B-cup gussets. I optimistically auditioned the C-cup versions but, ah, no. I also cut down to a size 10 in circumference, though I didn’t mess with any of the vertical measurements. 


Shoulder tie.

 The only actual change I made to the pattern was to have the straps separate in the front and attach with ties. Not so much because I thought there was anything wrong with the pattern length but just in case, y’know. Plus I had this fabulous matching velvet ribbon. I think I set them a little further apart than the original pattern would call for—this isn’t inappropriate for the period but would probably be too wide for a lot of people (including my dress form.) They seem to stay fairy well on me, though—though I haven’t tested them under heavy movement yet. 


Lift and separate!

 
It was a pretty darn fun project, anyway, however ridiculously impractical. And quick.  And now I can think about a Regency gown for Hallowe’en.

Although first I’m gonna need another petticoat. 😉

*if there was anything left to throw out after I chose my embroidered silk; I haven’t been able to find anything in period even remotely as ornate as my silk. 

11 Comments

Filed under Sewing

Maxi Mania

Jalie 3246

Jalie 3246

Maybe it was Carolyn’s recent binge on maxi dresses, or maybe it was that EVERY stylish lady in my office (and frankly, I think that’s all of the ladies in my office) has been wearing one at least three days a week for the last month, but I finally made time to make up Jalie 3245.

Jalie 3246

Jalie 3246

I meant to make this up last summer, but time slipped by me, as it often does.

The Black Version

The Black Version

As with most Jalie patterns, once you make one, it’s hard to stop. I made the first once in about two hours on a Saturday morning before I had to go to work, and that includes tracing out the pattern. I made it from a fairly heavy black knit (a doubleknit, I think) with a crep-like texture on one side—it’s got great drape and more stretch than a ponte, but is still a fairly firm and potentially sweaty fabric. Maybe not the best choice for a summer dress.

Front, black.

Front, black.

But it sure looks classy. I made this one up pretty much exactly as per pattern, only grading form size R at the bust to S at the waist and hips and adding a bit of length on the bottom. Since I recently ordered a million miles of narrow black fold-over-elastic off Etsy, I used it for the neckline and arm-bindings, which is super fast and would have looked great if I’d taken three more minutes to test my tension on a scrap or two.

FOE, slightly wavy.

FOE, slightly wavy.

As it is, it looks fine on but is a bit wavy off—limits the hanger appeal. Boo. Fortunately, handmade clothes aren’t really about the hanger appeal. 😉

Skirt: Narrow.

Skirt: Narrow.

The only major problem I had was that the skirt is VERY narrow. This means you can easily get the dress out of a pretty teeny amount of fabric, but it’s not great for walking in, especially in my rather firm fabric. There is also something slightly off about how the hips fit, which goes away when I hike it up about 1.5 cm—so for the other versions I made a small tuck between bust and waist and they sit very nicely. I’m glad I didn’t try to shorten the bodice at the shoulders, which is what I often have to do, because the armscyes are NOT deep at all, and in fact could probably be lowered a wee bit.

Back, black.

Back, black.

After the fact, I took a bit off the sides to get a closer fit in the back. It’s hard to get dresses like this to cling to the extreme back-curve I have there. The back is pretty wrinkly even when I’m not standing with my hips off to the side, but that’s life with a swayback.

How to walk in a narrow skirt.

How to walk in a narrow skirt.

The main problem with the narrow skirt is that I wind up walking around with it hiked up to my knees so I can take a decent-sized step.

Version 2 (or is it three?)

Version 2 (or is it three?)

I cut out the other two versions together a couple of days later. Both are rayon jerseys of some variety, although very different in terms of their overall stretch and feel. This dark, processed-photo-looking floral (with blue roses!) is super-stretchy and very drapy, with lots of weight, but a hard, almost scratchy feel.

Back view, with seam.

Back view, with seam.

In an effort to maximize my skirt width, I cut the second and third dresses with a back-seam and a non-directional layout. This also let me add a swayback adjustment and some shaping to the back seam, so really no downside here—and, I figured if the skirt was still too narrow for walking, I could add a slit at the back seam as well. (I know I could’ve left side slits on the original version of the pattern, but I just don’t like that look as much.

Flared skirt cutting diagram

Flared skirt cutting diagram

This may not have been the best choice since technically both my prints are directional, but I’m hoping they are big and crazy enough that nobody will pay attention.

Crazy Paisley

Crazy Paisley

Incidentally, I wasn’t paying attention to print placement at all… for the third maxi, there’s a distinct repeat to those giant paisleys that wanders from almost dead centre at the hem to distinctly over to the left side at the bust. Oops. In my defense, what I was paying attention to while ignoring the print was the grain of the knit, so I’m pretty sure that the print is not at all square to that. And maybe this is better than direct boob paisley?

Butt paisley

Butt paisley

For the non-black versions, I didn’t have a fabulous matching fold-over-elastic to speed me on my way, so I opted to bind the edges.

Step one: overlock.

Step one: overlock.

I pretty much always use the same method, only varying whether I include a bit of clear elastic in the mix or not: cut a band across the greatest stretch of the fabric, 1.5″ wide or so (I am not overly precise in this, and for the roses maxi I actually used the rather off-grain strip that was left from between the two pattern pieces—plenty stretchy in this fabric but it led to some rippling that was much less of a problem when using cross-grain pieces.) These days, I typically layer fashion fabric (right side up) – knit band (right side down) – clear elastic on top, and serge away. If I’m being good, I test to see how much tension I need on both knit band and clear elastic… if I’m not, hopefully I started somewhere like the bottom of the arm-hole so no one will really see how messed up the first few inches are. I don’t pre-measure and I don’t apply it in the round, more because I am lazy than because I think it’s a better way to do things.

Serged!

Overlocked!

Once I have this firm base attached, I wrap the binding around so that the loose edge is to the back and snug it up—having plenty of width makes it easy to pull it gently snug.

Wrap binding around to back and topstitch.

Wrap binding around to back and topstitch.

Typically, I actually just use a narrow zig-zag to topstitch—I have kinda developed a hate for twin needles, mostly to do with their cost vs. the teeny amount of sewing I’ve ever managed to do with one—I don’t think I’ve ever had one last through a second project (arguably, I am hard on my needles.) However, for this project I decided to try out a feature of my Grandma’s Rocketeer that I read about in the manual but hadn’t tested yet—it can actually hold two needles in its needle slot, side by side. How? You just keep opening the screw until they both fit. They do sit side by side, so it’s a narrow spread between, about 2mm, but that was perfect for the narrow bindings on these dresses. I’m pretty darn happy with how it worked, actually, and if I bust one, all I’m out is a regular stretch needle, not some fancy expensive twin.

Trim the excess off the back.

Trim the excess off the back.

After topstitching, I trim off the extra from the back—hooray for non-fraying knits! (I wouldn’t want to use this on a knit that runs, but then those are like sewing with the devil anyway.

A little press and, voila!

A little press and, voila!

I’m pretty sure I originally got this technique off of Pattern, Scissors, Cloth, which is no longer available, a fact which makes me cry on an almost weekly basis because Sherry had SUCH great info. Everytime I go to think about making a jacket now I want to go check up on her RTW Tailoring Sewalong, and then I can’t and the sadness just wells up.

Voila!

Bindings!

I’m sure there are a million other tutorials on this way, and I know there’s lots of other ways to attach a binding, too, but this one is the one I keep going back to.

Side paisley

Side paisley


It seems kinda dumb that I just spent so much time going over the neck and arm bindings on this pattern, but really, that’s 3/4 of the sewing time—everything else is just a quick zip over with the serger. And the hem, of course—Steam-a-Seam is my go-to in that department.

50 Comments

Filed under Sewing

A long time coming.

Simplicity XXXX

Simplicity 5691

It’s been a while since I made a 70s pattern, and this one was a LONG time coming—but I’m so happy it’s finally done. I can’t even remember when I picked up this pattern, though I think I could probably find it in the blog archives since it dates back to the days when I would proudly show off all my new purchases here (as opposed to shamefacedly stuffing them out of sight before my husband finds them, like I tend to these days. The pattern collection is, um, excessive.)

Worst Women’s Pattern Ever?

70s Simplicity patterns are hard to beat for their cuteness, and in my opinion this is one of the cutest. Although, here it is on in Peter’s “Worst Women’s Patterns Ever” Pinterest board. 😉 possibly the tunic version with the wide-legged bell bottoms hasn’t aged as well as the dress version? 😉 I confess this is not the only pattern on that board that I own, and paid real actual money for, too.

I found the perfect fabric amidst a mess of different things at Fabricland labeled “European Fashion Designer Prints”… It’s what I would call a lawn, lovely, close woven cotton, crisp but not at all hard, and surprisingly wrinkle-resistant. The mock-patchwork print is just about my favourite thing ever. And ever so 70s, too. It has all the intricate, geometric/paisley details that make me go all squee over a print, plus that mock-patchwork look. Serious love.

Back View

Back View

Unfortunately, I started this project a little too late last summer—I got the dress nearly complete just in time for the weather to go cold, and then  when I got it to the try on stage, the square shoulder adjustment I didn’t do bit me in the butt and I needed to unpick around some of the unusual sleeve-to-bodice structure. I stalled, and the dress got wadded up and stuffed in a ziplock UFO baggie for the winter.

Buttons closeup!

Buttons closeup!

Finally, a few weeks ago, my craving for a new spring dress with minimal effort finally outweighed my distaste for unpicking and on the fly fit-fudging. I unpicked and cut down the inside-shoulder piece. The visible, fluttery sleeve is no problem, of course, but there was this full-shoulder-covering lining that just wasn’t working. I cut it down to about an inch wide (along the neckline side) and it works much better now. Then I procrastinated for a couple more weeks until I finally put on my big girl panties and did the buttonholes.


Slant-Shank Buttonholer

Slant-Shank Buttonholer

I dug up the Rocketeer to try out my new slant-shank Singer buttonholer, which my crafty sister-in-law found at a big neighbourhood garage-sale this spring. It worked beautifully.  Though that might’ve been the glorious fabric.


Wash-away stabilizer behind buttoholes

Wash-away stabilizer behind buttoholes

Or the wash-away stabilizer I added, because that stuff is my new fave notion. It’s much sturdier than the thin film stuff I’ve used before. Anyway, flawless, even the one over the “waist” seam which was a bit touch and go. My button-attachment is less flawless, and horizontal buttonholes are not very forgiving, so there is a little bit of bunching here and there where my button placement ended up a trifle off. It’s not bothering me enough to actually fix. Oh, and the hems on the sleeves and the bottom are rolled with my serger. Which, while not really a period finish, works really well for this look, I think.

So glad I didn't skip the giant patch pockets!

So glad I didn’t skip the giant patch pockets!

Confession: I still need to hand-stitch down the bottom of the bodice lining, which is a soft, lighter purple voile. And I’ve already worn this more times than I want to admit. It’s great, easy to throw on for work or at home, and perfect since the weather seems to think its July already.

One down from the Dresses list.

Back at the beginning of last summer, I had pulled a trio of summery dress patterns from stash that I wanted to make up—this was going to be the only one in the group that I actually accomplished last summer. Yikes. I wonder what the odds of me getting to another one are? I’m leaning towards the one on the right for summer, and then the middle as we creep up on fall.

I’ll doubtless be distracted by something else along the way, mind you.

30 Comments

Filed under Sewing