

Jalie 3246
Maybe it was Carolyn’s recent binge on maxi dresses, or maybe it was that EVERY stylish lady in my office (and frankly, I think that’s all of the ladies in my office) has been wearing one at least three days a week for the last month, but I finally made time to make up Jalie 3245.

Jalie 3246
I meant to make this up last summer, but time slipped by me, as it often does.

The Black Version
As with most Jalie patterns, once you make one, it’s hard to stop. I made the first once in about two hours on a Saturday morning before I had to go to work, and that includes tracing out the pattern. I made it from a fairly heavy black knit (a doubleknit, I think) with a crep-like texture on one side—it’s got great drape and more stretch than a ponte, but is still a fairly firm and potentially sweaty fabric. Maybe not the best choice for a summer dress.

Front, black.
But it sure looks classy. I made this one up pretty much exactly as per pattern, only grading form size R at the bust to S at the waist and hips and adding a bit of length on the bottom. Since I recently ordered a million miles of narrow black fold-over-elastic off Etsy, I used it for the neckline and arm-bindings, which is super fast and would have looked great if I’d taken three more minutes to test my tension on a scrap or two.

FOE, slightly wavy.
As it is, it looks fine on but is a bit wavy off—limits the hanger appeal. Boo. Fortunately, handmade clothes aren’t really about the hanger appeal. 😉

Skirt: Narrow.
The only major problem I had was that the skirt is VERY narrow. This means you can easily get the dress out of a pretty teeny amount of fabric, but it’s not great for walking in, especially in my rather firm fabric. There is also something slightly off about how the hips fit, which goes away when I hike it up about 1.5 cm—so for the other versions I made a small tuck between bust and waist and they sit very nicely. I’m glad I didn’t try to shorten the bodice at the shoulders, which is what I often have to do, because the armscyes are NOT deep at all, and in fact could probably be lowered a wee bit.
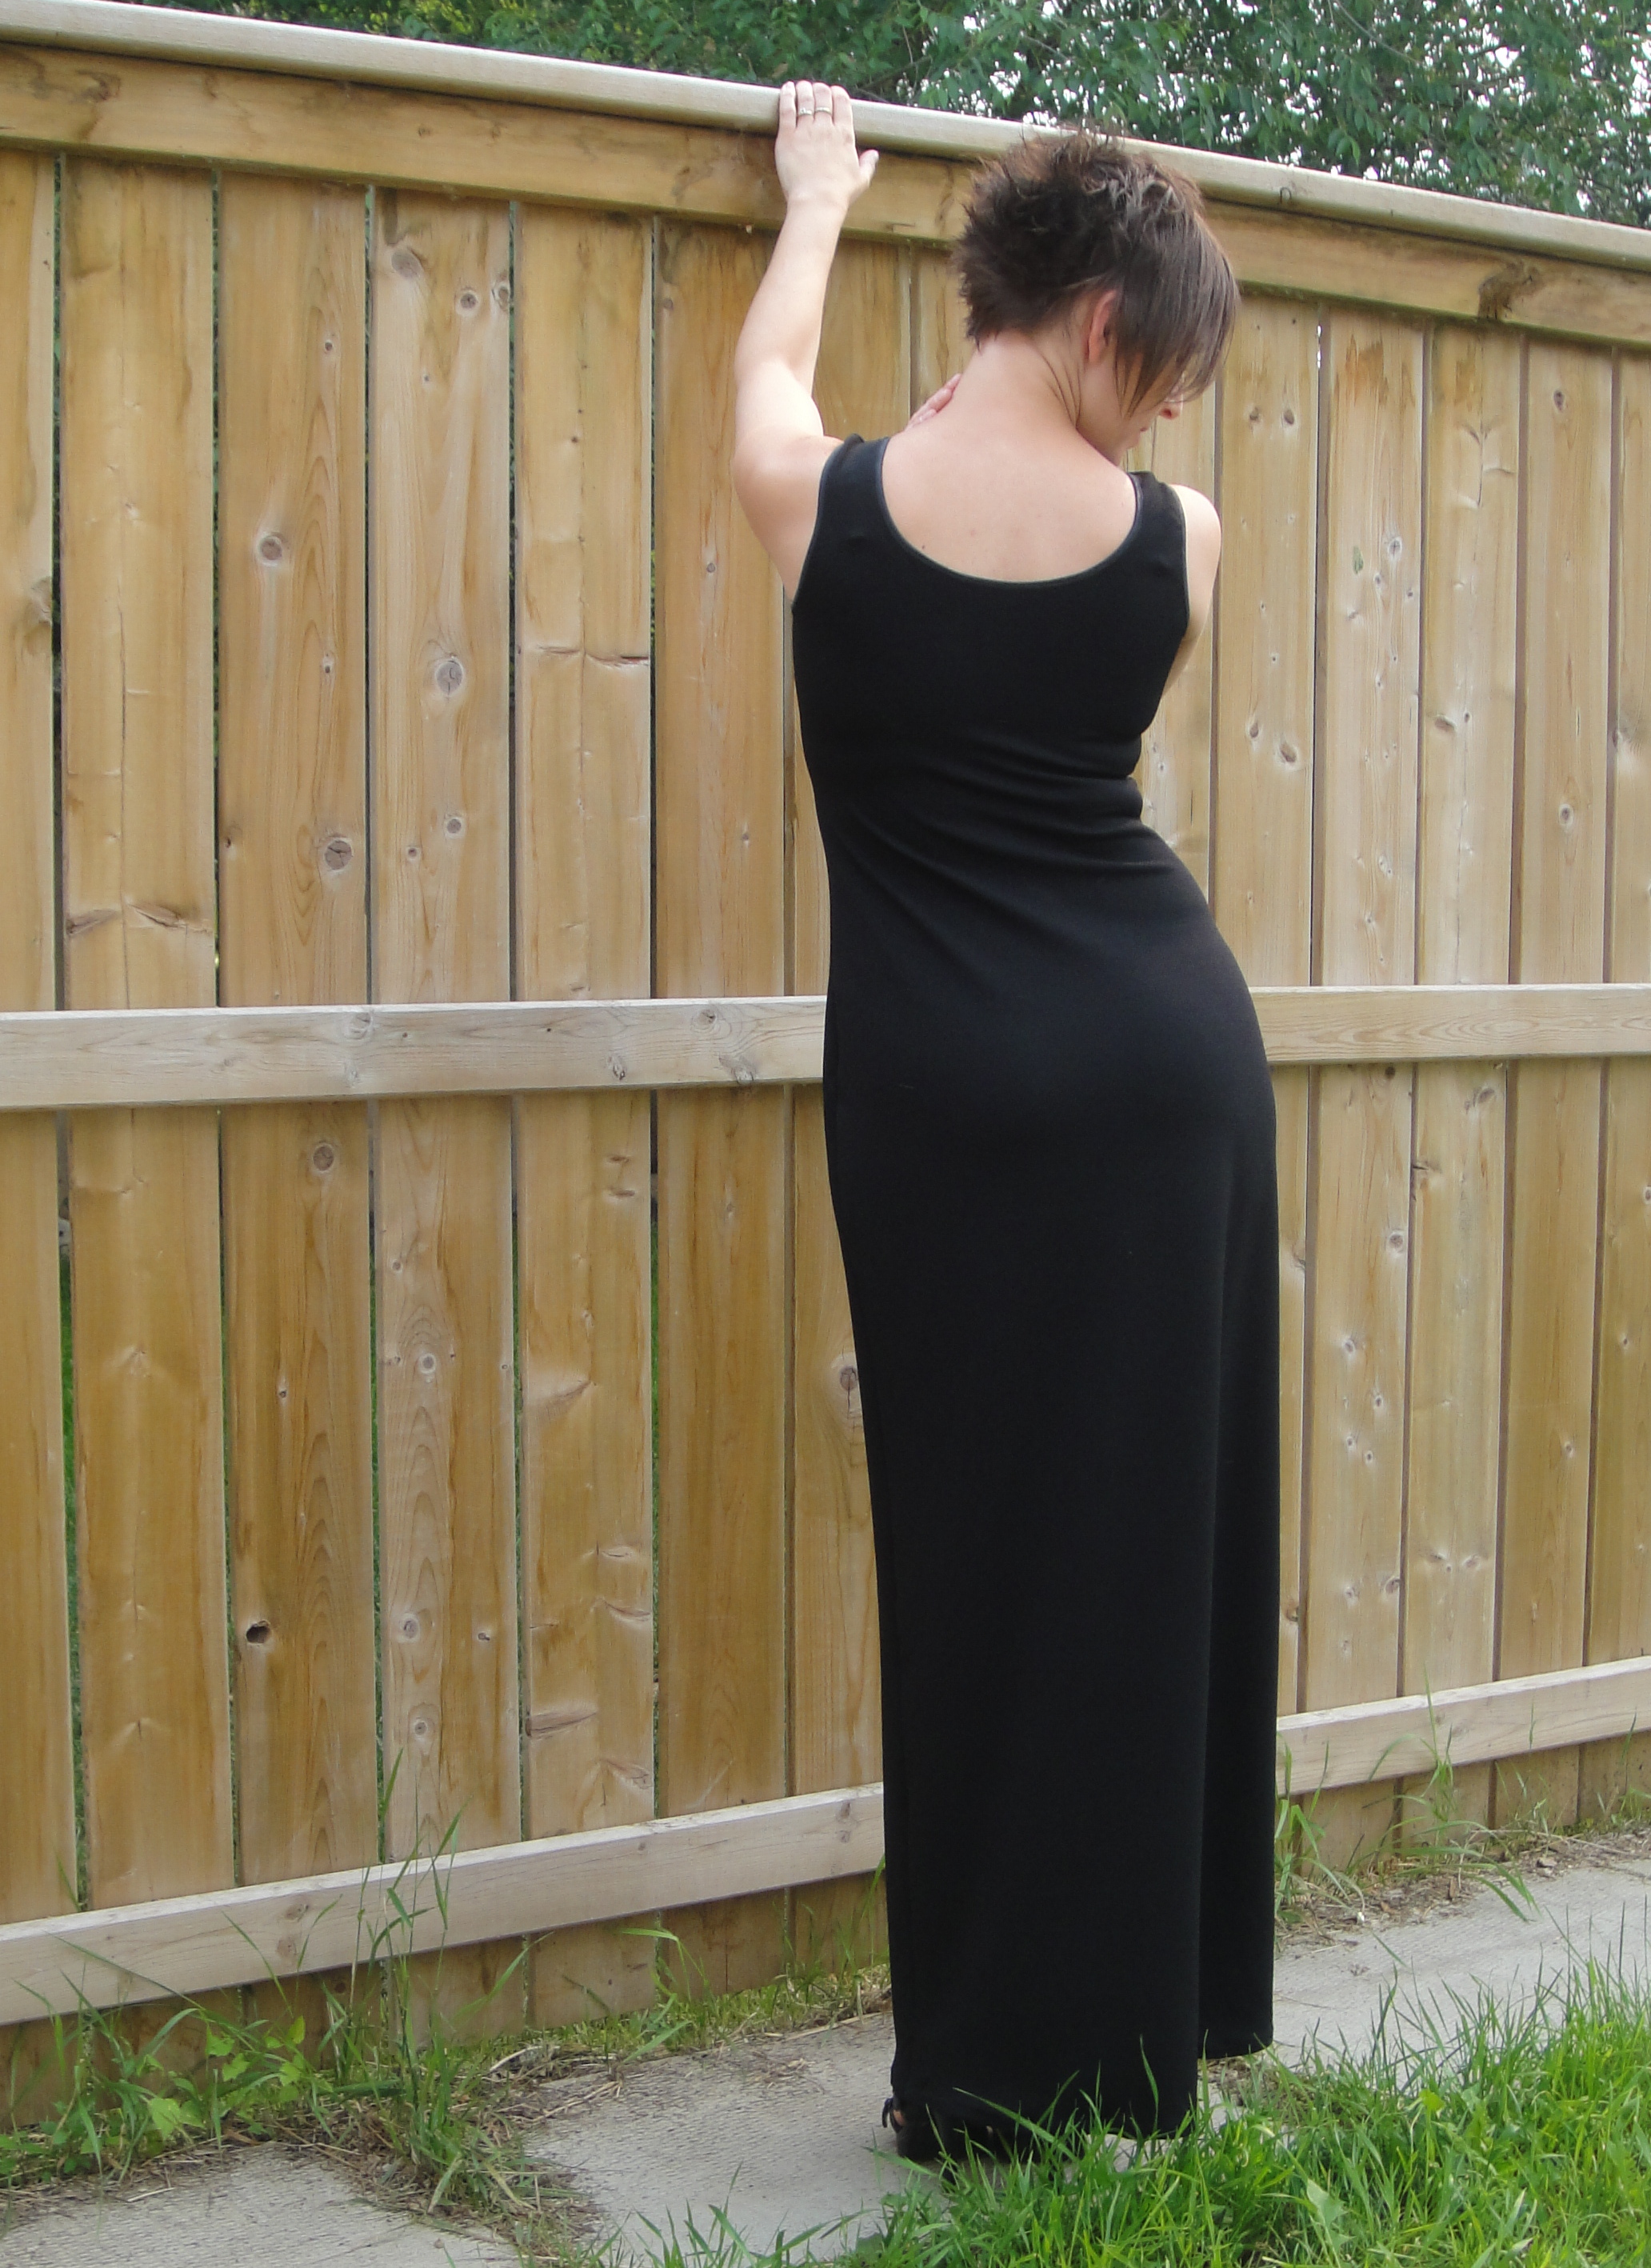
Back, black.
After the fact, I took a bit off the sides to get a closer fit in the back. It’s hard to get dresses like this to cling to the extreme back-curve I have there. The back is pretty wrinkly even when I’m not standing with my hips off to the side, but that’s life with a swayback.

How to walk in a narrow skirt.
The main problem with the narrow skirt is that I wind up walking around with it hiked up to my knees so I can take a decent-sized step.

Version 2 (or is it three?)
I cut out the other two versions together a couple of days later. Both are rayon jerseys of some variety, although very different in terms of their overall stretch and feel. This dark, processed-photo-looking floral (with blue roses!) is super-stretchy and very drapy, with lots of weight, but a hard, almost scratchy feel.
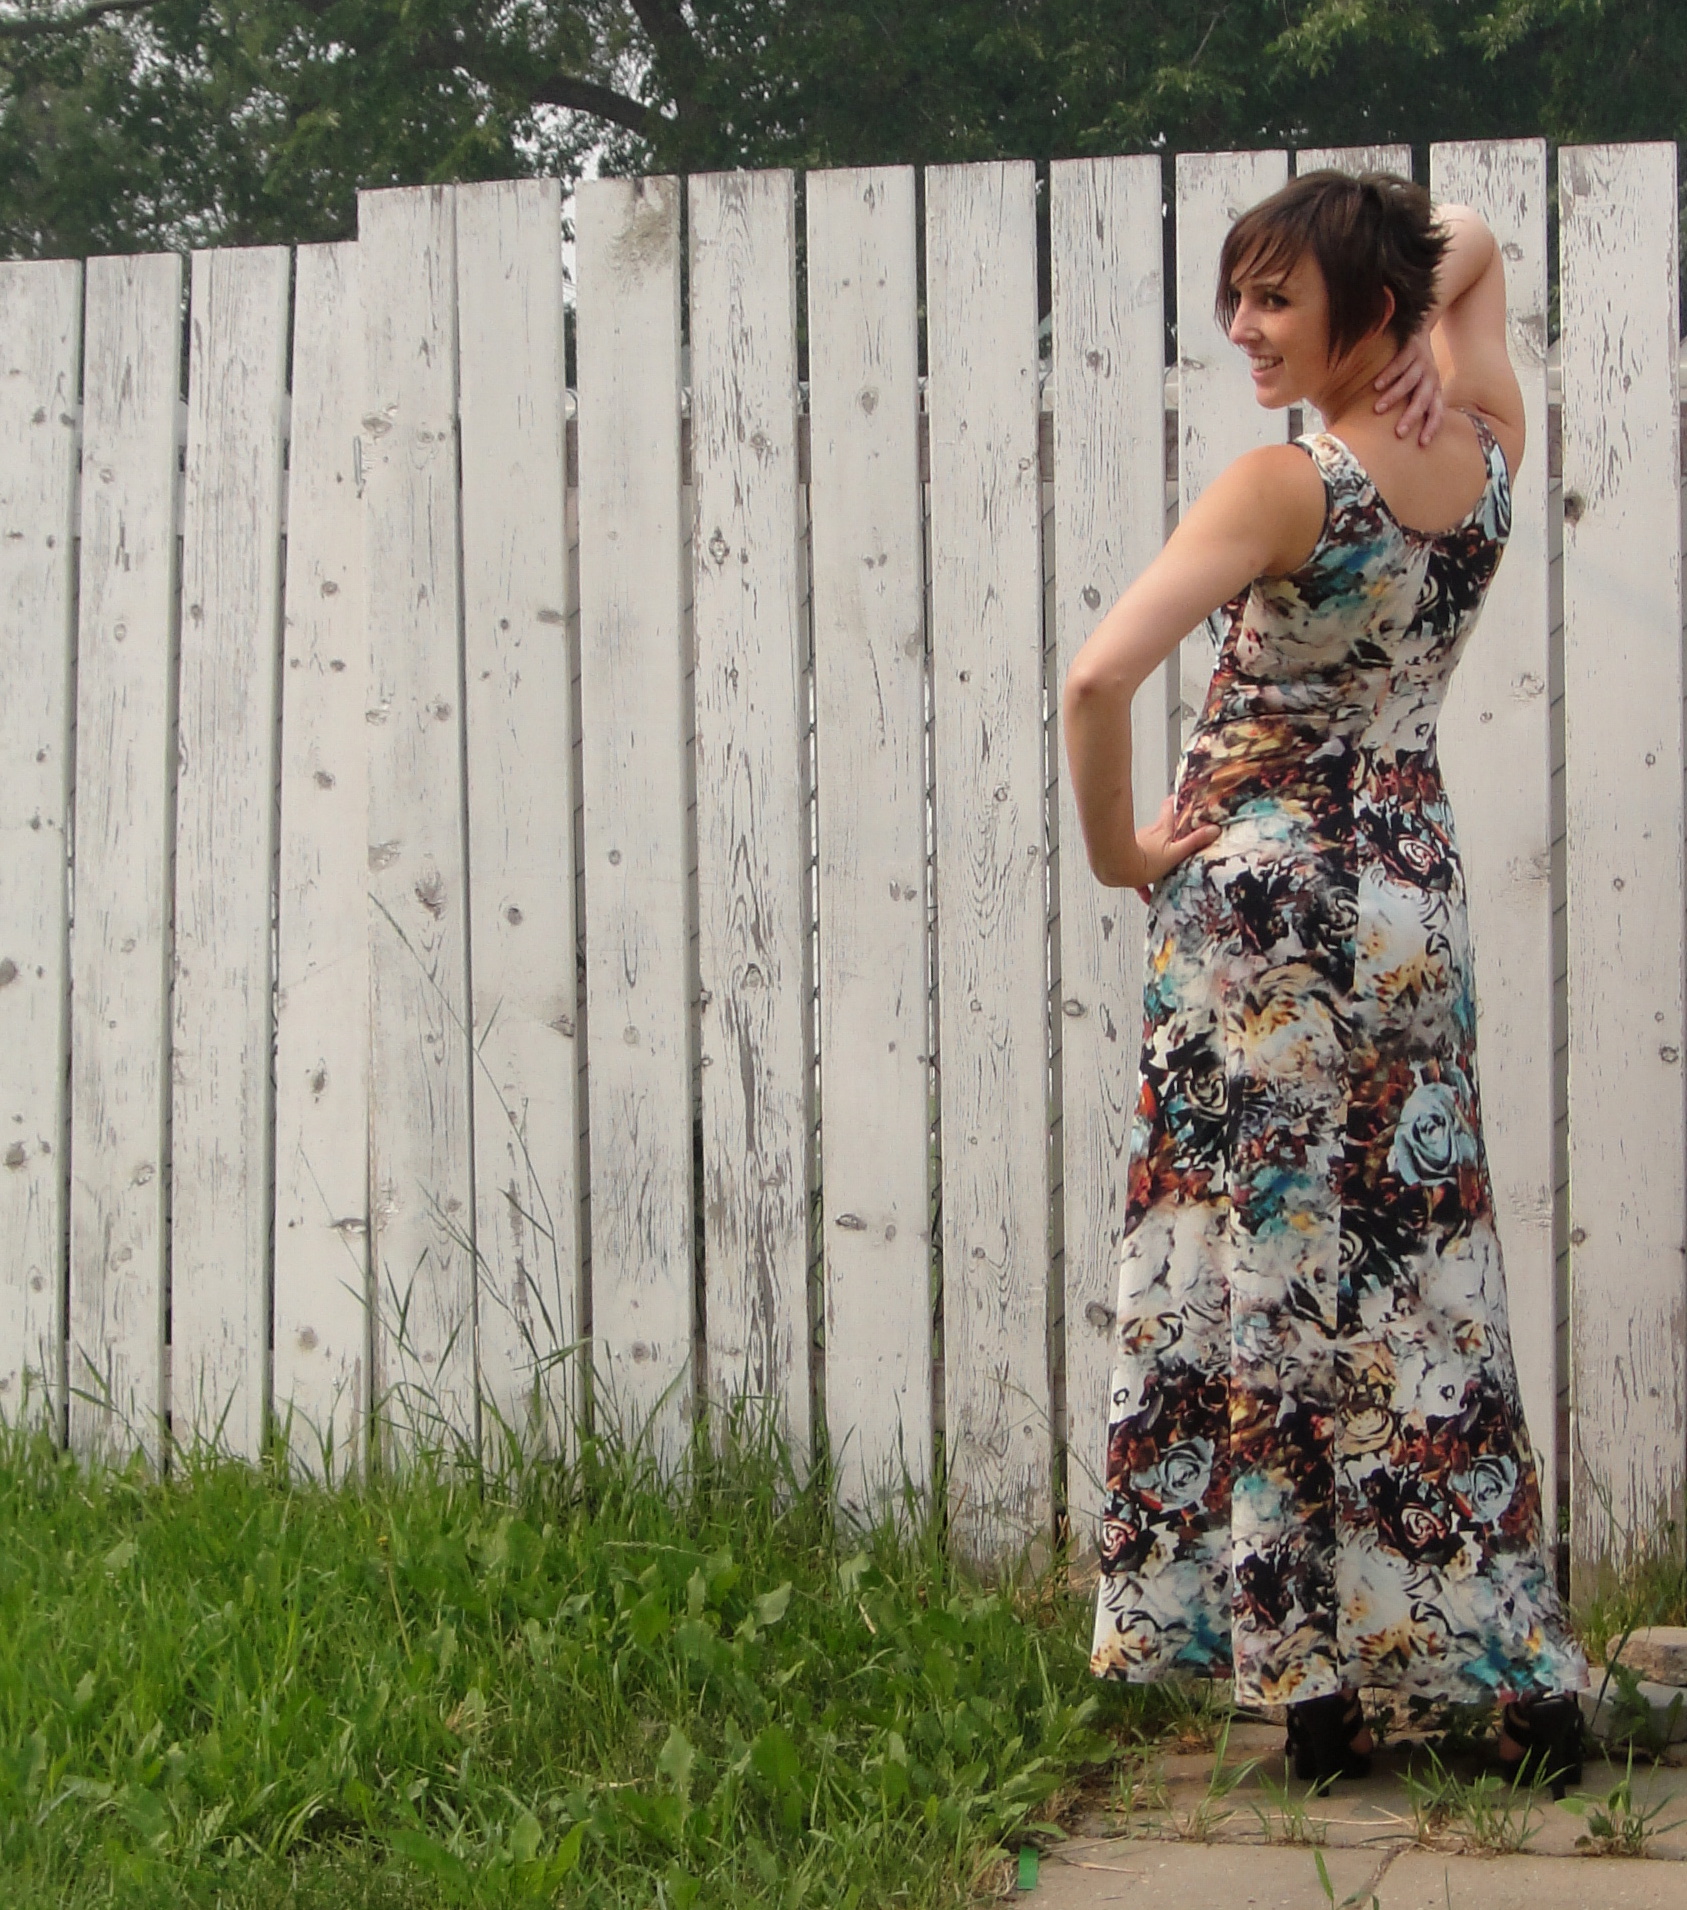
Back view, with seam.
In an effort to maximize my skirt width, I cut the second and third dresses with a back-seam and a non-directional layout. This also let me add a swayback adjustment and some shaping to the back seam, so really no downside here—and, I figured if the skirt was still too narrow for walking, I could add a slit at the back seam as well. (I know I could’ve left side slits on the original version of the pattern, but I just don’t like that look as much.

Flared skirt cutting diagram
This may not have been the best choice since technically both my prints are directional, but I’m hoping they are big and crazy enough that nobody will pay attention.

Crazy Paisley
Incidentally, I wasn’t paying attention to print placement at all… for the third maxi, there’s a distinct repeat to those giant paisleys that wanders from almost dead centre at the hem to distinctly over to the left side at the bust. Oops. In my defense, what I was paying attention to while ignoring the print was the grain of the knit, so I’m pretty sure that the print is not at all square to that. And maybe this is better than direct boob paisley?

Butt paisley
For the non-black versions, I didn’t have a fabulous matching fold-over-elastic to speed me on my way, so I opted to bind the edges.

Step one: overlock.
I pretty much always use the same method, only varying whether I include a bit of clear elastic in the mix or not: cut a band across the greatest stretch of the fabric, 1.5″ wide or so (I am not overly precise in this, and for the roses maxi I actually used the rather off-grain strip that was left from between the two pattern pieces—plenty stretchy in this fabric but it led to some rippling that was much less of a problem when using cross-grain pieces.) These days, I typically layer fashion fabric (right side up) – knit band (right side down) – clear elastic on top, and serge away. If I’m being good, I test to see how much tension I need on both knit band and clear elastic… if I’m not, hopefully I started somewhere like the bottom of the arm-hole so no one will really see how messed up the first few inches are. I don’t pre-measure and I don’t apply it in the round, more because I am lazy than because I think it’s a better way to do things.

Overlocked!
Once I have this firm base attached, I wrap the binding around so that the loose edge is to the back and snug it up—having plenty of width makes it easy to pull it gently snug.

Wrap binding around to back and topstitch.
Typically, I actually just use a narrow zig-zag to topstitch—I have kinda developed a hate for twin needles, mostly to do with their cost vs. the teeny amount of sewing I’ve ever managed to do with one—I don’t think I’ve ever had one last through a second project (arguably, I am hard on my needles.) However, for this project I decided to try out a feature of my Grandma’s Rocketeer that I read about in the manual but hadn’t tested yet—it can actually hold two needles in its needle slot, side by side. How? You just keep opening the screw until they both fit. They do sit side by side, so it’s a narrow spread between, about 2mm, but that was perfect for the narrow bindings on these dresses. I’m pretty darn happy with how it worked, actually, and if I bust one, all I’m out is a regular stretch needle, not some fancy expensive twin.
Trim the excess off the back.
After topstitching, I trim off the extra from the back—hooray for non-fraying knits! (I wouldn’t want to use this on a knit that runs, but then those are like sewing with the devil anyway.

A little press and, voila!
I’m pretty sure I originally got this technique off of Pattern, Scissors, Cloth, which is no longer available, a fact which makes me cry on an almost weekly basis because Sherry had SUCH great info. Everytime I go to think about making a jacket now I want to go check up on her RTW Tailoring Sewalong, and then I can’t and the sadness just wells up.
Bindings!
I’m sure there are a million other tutorials on this way, and I know there’s lots of other ways to attach a binding, too, but this one is the one I keep going back to.

Side paisley
It seems kinda dumb that I just spent so much time going over the neck and arm bindings on this pattern, but really, that’s 3/4 of the sewing time—everything else is just a quick zip over with the serger. And the hem, of course—Steam-a-Seam is my go-to in that department.


That’s lovely!
Thank you! 🙂
I love all your dresses! I would be so all over this pattern if I wasn’t already a Mission maxi girl. Thank you for showing your binding method – I’ve been playing around with attaching the folded binding to the wrong side, and folding it over and topstitching from the right side, but I keep finding that it stretches out the edges massively. Do you find that? I’ll give your way a try sometime!
I haven’t tried the double-folded method as I’m always thinking it’ll be too bulky… I find adding the clear elastic helps keep the binding from stretching and rippling, but the biggest thing is lightening the presser foot pressure. But it can still be a PITA… Especially with slinky rayon jersey! 😉
Hey, I appreciate you going over the armhole and neck binding! I’ve never seen the method that includes the clear elastic in the sandwich, and I’m going to try it on my next knit top. 🙂
I love your dresses! I really like both printed pattern dresses. I think your print placement is just fine! I keep wanting to wear maxi dresses, but I always feel like a dumpy hobbit when I try. Give me knee length dresses though, and more recently, tunic length, and I’m happy!
Which actually, based on that ‘how to walk in a narrow skirt’ picture, would look really cute in this pattern!
I totally get having styles you love that you just don’t love on your body! You’ll pretty much never find me in a tucked-in shirt for the same reason. It would be totally fun at knee length, though… 😉
Your dresses are lovely. Thanks for the binding tutorial. Where do you get Steam-a-Seam? I met a Portuguese lady in Holland who uses Steam-a-Seam on her neckline edges and probably armhole edges too without any stitching and it looked really beautiful.
I get mine at Fabricland, but I’ve also found it at smaller places. They have it in packages of 1/2″ or 1/4″ tape which is best for hemming. 🙂
Thanks so much. I’ll go to Fabricland. I’d heard it was not available in Canada. It just goes to show ya…
It was out of production for quite a while (like a year?) but it’s been back for six months or so, fortunately!
These are great! Nice how to on the binding!
Thank you! I hope someone finds it helpful… I’m not much of a tutorial type. 😉
Great dresses! Wow, I learned a lot from this post. I gave away my serger a few years back as it was an old model that was worthless. I’m considering a new one, but for now, I’m using the overlock stitch on my sewing machine which is good in a pinch, but not quite the same…I love how you did the binding. I’ll refer to this post again and again.
I sympathize with the lack of serger, the one I had before this was almost worse than no serger at all… But you can still make great knits without, it just takes a bit more planning… 😉
Thanks for the binding tip. All three dresses look super on you. I’m not noticing any issues with the print. They all look great!
Thank you! Well, there aren’t any really good shots of the straight on front for that one. Maybe for a reason. 😉
Wow, these look great on you!
Thank you!
Awesome! They all look awesome. And I miss sherry’s blog, too. So much good info.
Thanks! Did you see her comment below? 😀 😀
I have never seen two needles side by side like that before..interesting! I miss Sherry’s blog and tutorials too. I’m still hoping she’ll come back one day. Looks like you have a go-to pattern now. I have found the armholes on Jalie patterns to be too high before and it took me several makes to realise it wasn’t just my binding mistakes, but the pattern.
Interesting to hear! I was wondering if there was some seam allowance around the arm I wasn’t taking into account. Usually I’m raising armscyes not dropping them. 😉 Also, yay, we brought Sherry back!!!!!
Move your dresses especially the Paisley one. Like your pictures for the bindings, it’s great to see how others do things 😃
Thank you! There are so many different ways to do everything aren’t there? 🙂
I LOVE your versions! I think I may need to go snag some jersey for a black maxi dress of my own 🙂 Also, thanks for the binding photos – super helpful!
A black maxi is SOOOO classy somehow! 😀 thank you!
You’re stealing my thunder with these lovely dresses, LOL! I just made a paisley maxi dress too! And I hear you on the removal of the PSC blog, I used that site on nearly every project more complicated than a t-shirt.
And it’s back up! Caloo callay! ;). Maxis are sufficiently fabulous I think there’s enough thunder to go around—I hope you’re enjoying the snot out of yours. 😀
It must be a TNT dress pattern. It is lovely!
I think it is! Thank you!
These dresses look so cute, I might have to jump on the maxi dress band waggon as well!
Thank you! Careful—it’s a very addictive bandwagon! 😉
Oh you so suit a maxi! It’s a very elegant look but it must be so comfy in a knit! I was really interested in your binding technique, thanks for sharing it, I will give it a go!
So insanely comfy—it’s very hard to put on something else! 😉
Glad you liked the binding technique, I always enjoy the different ways people do things. 🙂
dude, who cares how they look on the hanger when they look like THAT on your bod! slinky summer sultry!
Too right!!!!!
These look great and they fit so well! Thanks for the warning about the narrow skirt width. I have a long stride so I prefer a skirt that doesn’t restrict. I think the print versions are lovely. I know what you mean about not paying attention to the repeat. I have had that experience, too. 😉
Thank you! Yes, we must be able to stride freely. 😉 I also destroy non-stretch pencil skirts. 😀
Just popping by to see how you are getting on and read your comments, so – back online, just for you! (and liza jane, and katherine!)
I might even manage a post or two, I’ve finally finished that teal mohair jacket!
OMG ARE YOU SERIOUS? THANK YOU SHERRY!
No, seriously. You have no idea how much I’ve missed your info, or how many people I’ve said “go read this website, she has a great post on X”… Even if you never write another word, to have your blog back up would be amazing.
(Of course, I’ll selfishly hope you do write more, at least from time to time, because I’d love to know what you’re up to, but I totally get that life changes and what you want to spend time on (and spend time writing about) can change, too. Heck, how many posts have I had this month? >_<)
Did I mention it's great to hear from you?!? 🙂
You can also dig up Sherry’s blog posts on archive.org. https://web.archive.org/web/20140802024520/http://buzzybeesworld.blogspot.com/
great dresses and so glad you wrote what you did, as 1) you lured Sherry back to blogging and 2) I didn’t know about the 2 needles in the Rocketeer which is on of my best machines, love it! I am going to try that immediately. Thank you!
I’m so stoked! I need to go read the whole RTW tailoring sewalong again, front to back. Possibly committing it to memory.
Yeah, the two needles is pretty cool! 🙂 did it work out? 🙂
they are fantastic
Thank you! 🙂
Wow, these are gorgeous! This shape really suits you!
Pingback: Fastest Stash in the West | Tanit-Isis Sews
Thank you so so much for bringing back Sherry! I’ve missed her so much!
Pingback: Palate cleanser | Tanit-Isis Sews
Pingback: Chaos Tank | Tanit-Isis Sews