Tag Archives: 50s Shrug

An Un-Blogged Shrug

20130524-084433.jpg

Vintage Shrug, Teal

I’m pretty happy this year with keeping my Me-Made May posts off-blog—the outfit shots seem to make sense on Instagram, Twitter, and Flickr—but since I never actually blogged this little shrug, I thought I’d throw it in here. After I made my Tiramisu last winter, I had just enough of my green wool jersey (exclusive of moth holes) to squeak out another version of my vintage shrug pattern, something I’ve been meaning to do for AGES. However, I finished this one (they are very quick to make) and promptly stuffed up royally on the buttonhole. I seem to recall putting something in the instructions about making the buttonhole before you attach the neck band, but why would I read my own instructions? /headdesk. Because getting a buttonhole centred on that little band (in a knit!) after it’s attached is nearly impossible, doofus. Inserting a wee bit of interfacing inside the end of the band would probably be a good idea, too, come to think of it. Hindsight 20/20, etc. Anyway, due to this stuff-up, it languished for most of the winter until I finally bestirred myself to sew a hook and eye on (I was dreaming of a pretty black knotted frog clasp, but was far too lazy to make that happen. Yet, anyway.

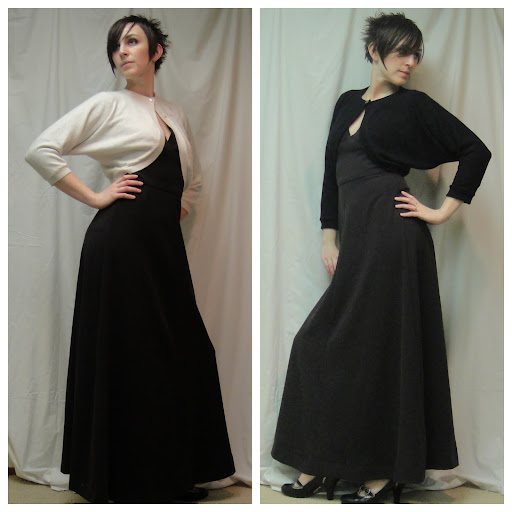
Even wearable, it’s not as versatile as my cream and black versions are, because I’m still a bit hesitant in my colour pairings. I tend to only want to wear it with something black. Frankly, I tend to only wear it with this dress. But I do really like it with this dress.

Original, First clone (size medium), and second clone (size small)

I have noticed something about the shrugs—I really like them to fit SNUGLY. I never wore my first clone (or the original, for that matter) much because they were a bit loose around the body. When I graded the pattern, I made my cream version out of the size small and liked it MUCH better. Last fall some time I got up the courage to do surgery on the first (black knit) clone. I didn’t change the sleeve length, but I did take in the entire under-arm seam on both sides, just a little bit at the arm (which is quite close-fitting)  to a couple of inches off the side. This adds a seam to the hem band at the side, but made the whole thing fit just how I like it—like the picture on the right. Being able to do this alteration right at the end is handy given the way knits sometimes stretch unpredictably, too.

Of course, if what you like about the shrug is the loose, batwing look, please go for it! 🙂 And if you have a version, I’d love to hear about it, too. 🙂

Advertisement

7 Comments

Filed under Sewing

50s Shrug—Now Multisize!

A snugger shrug

Hmm, need I say more?

I have, by dint of more fiddling than I quite want to admit, graded the 50s Shrug Pattern into three sizes, Small, the original Medium, and Large. I have also, for my enjoyment and your edification, stitched up a second version for myself, in the small. Stitching up the shrug itself took only the minutest fraction of the time grading the pattern took. This really is fast to stitch up.

Note: I did not follow any particular grading procedure in this case. I knew roughly how much smaller I wanted the Small to be than the Medium, and made the Large larger by a similar amount. This is highly unscientific, but seems to have worked at least in the case of the small. Anyone who tries the Large, please let me know how it works!

Extraneous shrug pic

This pattern is VERY forgiving of fit, since there’s no shoulder seam and it doesn’t entirely cover the bust, so I made quite a large gap between the sizes. I’d venture to suggest the following size-range:

    • Small: bust 30-33″; 76-84 cm
    • Medium: bust 34-37″; 87-94 cm
    • Large for busts 38-41″; 97-105 cm

It’s entirely possible that both larger and smaller sizes could fit, depending on your fabric and the look you’re going for.

Shrug, size Small: back

I made this up in the same fabric as my swingy cardigan. It’s not quite as soft, stretchy, or drapy as the fabric of my first shrug, resulting in a fairly snug garment. I like the length of this size much better, though, both in the arms and the back—the medium reached to my (admittedly high) waist, which is not a particularly flattering length on me. It looked much better on Amy.

The neck is extremely prone to stretching out. Although I haven’t tried to stabilize it with clear elastic, you might want to; otherwise, just be sure that the neck band is a good length for you and then be prepared to do plenty of easing when you stitch band to neckline. I had trouble stitching the buttonhole in this knit, too, but it worked much better when I put a piece of tissue paper underneath the fabric.

Look! A line drawing!

I have even come up with a (somewhat crude) line drawing for your entertainment.

The multisize pattern is located HERE.  There is also a link from the Patterns page. The instructions are found in the original shrug post. I attempted to tile it in such a way that it can be printed on both US Letter and A4-size paper without losing bits; this does mean that you will probably want to trim at least some of the white edges. I still haven’t developed a method for making a nice border around the pattern that doesn’t drive me nuts, so I do apologize for that. When printing, make absolutely sure that you are printing out actual size/no scaling/100% etc. There is a 10 cm/4″ sizing square for your convenience :).

Left: original vintage shrug; middle: size Medium; right: size Small.

Have fun! And if you do stitch it up, please let me know. 😀

49 Comments

Filed under Sewing

Shrugspotting

Quixotic Pixels version!

I have a confession to make. I did no sewing this weekend. Well, a bit of unpicking on the pillow cover, but no real progress. Partly I woke up Thursday with that dreaded omg-everything-aches-too-tired-to-move-but-can’t-sleep sick feeling, and didn’t really leave my bed for the next three days. I was feeling a bit better by Sunday, but my sweetie brought home Two Worlds II, which I’d never heard of but hits pretty much all my RPG buttons just right, despite it’s glitchiness and occasionally clunky animation. So Sunday was spent on the couch cheerfully wrangling over which side-quest/dungeon/area to explore next. GINORMOUS world map. Need I say more?

Anyway, in lieu of actual content, I’m thrilled to report that another version of my 50s Shrug has been unveiled in blogland. Amy of Quixotic Pixels made this version not just on a whim, but for her Sew Weekly challenge (inspired by none other than Olivia the pig!) (I’ve seen several of these outfits inspired by children’s books, but somehow I can’t find the link to the original challenge itself. Weird!)

Some of you may remember me lamenting that the shrug was not quite the right size for me. Well, I must say it is a MUCH better size on Amy, and she is smoking in it!

This makes, to my knowledge, the second version of the shrug that has been stitched up (other than my own). The first  belongs to Karen of Sewing by the Seat of My Pants, and looks like it would be so yummy and warm!

Anyway, it thrills me to bits to see these other versions out there, and reminds me that I really should get around to grading this pattern—the sizing is so flexible, a S, M, L size range would cover most people.

Are there any other versions of the shrug out there I haven’t spotted? What did you guys do for Mother’s day? (My children forgot, if you can believe it! So my hubby brought me cereal in bed…)

10 Comments

Filed under Sewing

A (probably) vintage shrug

Two cute shrugs

Above left is a very cute little cream sweater shrug I nabbed from the dress-up box at my Grandma’s house ages ago. I can’t actually confirm its age, except that it’s been kicking around the farmhouse for as long as I can remember. It might have belonged to my mother or her sister (in which case it would be late 60s or very early 70s) or not. A Google search of “50s shrug” turns up examples of identical style, so even if the actual garment isn’t that old, the style certainly is.

In particular I think it’s adorable with my 70s dress. I don’t like it as much with my circle skirt, though on someone with a longer waist I think the look would be great.

Drapey sleeve

Sadly, however, the fabric is starting to disintegrate—little moth-holes everywhere—so it’s no longer really wearable. However, it was such a cute little sweater, and so simple a pattern, that I thought I would give making a pattern a try. So I spent some time this past weekend measuring the original and plotting out lines in Inkscape, and came up with a pattern! Hooray! Which sewed up into a passable copy of the original! (That would be the black version, by the way.)

So, in a first for this blog, I’d like to share with you my 50s Shrug Pattern! (Also tiled for A4—warning, not tested, and the first, overview page is for sure not A4 sized).

The back---would look better on someone with a longer waist.

Now, this first go came out a bit larger than the original, although the sleeve-cuffs are still quite nicely narrow; in particular, the arms are longer. I’d say it would be good for someone with a bust in the 34-36″ range (as opposed to my 33″). I may down-size a wee bit for my next one, in which case I’ll post that pattern, too. For those in the larger range, I’m sorry, my pattern-grading skills are nonexistent. I don’t think it would be too hard, though…

In the original, the bands are made of ribbing, but for mine I just used cross-grain strips of the same fabric and it worked fine.

So, without further adieu, here’s my instructions, such as they are. Please bear with me—I’ve never done this before! 🙂

Recommended Fabric: 1 m (or yard) of sweater-knit, 60″ (150 cm) wide (slightly narrower might work, but not much). Pattern includes 6mm (1/4″) seam allowances; I used the serger for all construction, but any stretch-stitch would do.

Instructions:

Pattern piece on folded fabric

  1. Print and tape together pattern; there are nine pattern pages, numbered as in the overview page. Test square for sizing is placed on numbered page 1, and should be 10 cm (4″) square. Trimming should not be necessary, although there may be a small blank space around the outer edge of the page due to printer limitations. (Again, I don’t have any A4 paper so I couldn’t test this version. Sorry!)
  2. Fold fabric lengthwise; place pattern piece so Centre Back is on fold. Cut out pattern piece.
  3. From remaining fabric, make two cross-grain bands, one 8 cm (3″) wide by the full fabric width, one 6cm (2 1/4″) wide by 44 cm (17″) long. Fold bands in half, wrong sides together, and press.
  4. Cut two 24 cm lengths from the wider strip; align raw edges with right side of sleeve ends and stitch. The process is the same as described here for T-shirt collars, except not in the round and without topstitching afterwards. The same process is used for applying all bands on the shrug.
  5. Stitch curved under-arm seams.

    Cuff band attached, ready to sew curved underarm seams

  6. Mark centre of bottom back and centre of remaining wide cross-grain band (roughly 120 cm or 47″)
  7. Distribute wide cross-grain band around the shrug’s hem, from neck opening to neck opening, matching halfway points. The cross-grain band should be slightly stretched, especially  around the curved areas in front. Stitch as for wrist-bands.
  8. Fold ends of narrow cross-band strip right-sides together; stitch ends and turn wrong-sides together so that ends are neatly enclosed.
  9. Align raw edges of narrow band with neck opening, again aligning centre back with halfway point on band and stretching/easing to fit. Stitch.
  10. Work buttonhole in front-right corner of neckline; attach button on front-left.
  11. If desired, press band seams towards garment interior.
  12. Wear, looking adorably cute!

How’s that? Clear as mud? Writing sewing instructions is HARD! (Way harder than sewing the actual thing was. I feel like that’s all clear as mud)

31 Comments

Filed under Sewing