Two cute shrugs
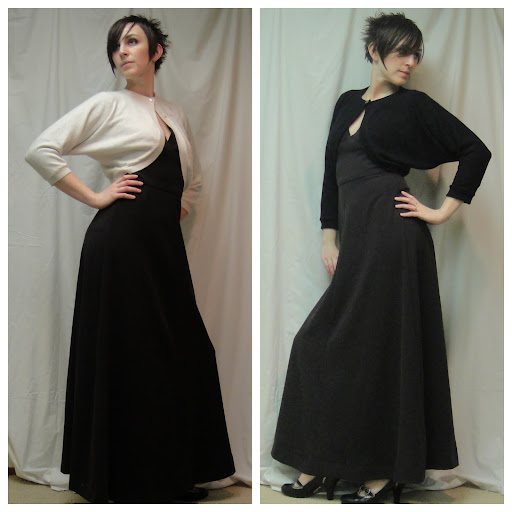
Above left is a very cute little cream sweater shrug I nabbed from the dress-up box at my Grandma’s house ages ago. I can’t actually confirm its age, except that it’s been kicking around the farmhouse for as long as I can remember. It might have belonged to my mother or her sister (in which case it would be late 60s or very early 70s) or not. A Google search of “50s shrug” turns up examples of identical style, so even if the actual garment isn’t that old, the style certainly is.
In particular I think it’s adorable with my 70s dress. I don’t like it as much with my circle skirt, though on someone with a longer waist I think the look would be great.

Drapey sleeve
Sadly, however, the fabric is starting to disintegrate—little moth-holes everywhere—so it’s no longer really wearable. However, it was such a cute little sweater, and so simple a pattern, that I thought I would give making a pattern a try. So I spent some time this past weekend measuring the original and plotting out lines in Inkscape, and came up with a pattern! Hooray! Which sewed up into a passable copy of the original! (That would be the black version, by the way.)
So, in a first for this blog, I’d like to share with you my 50s Shrug Pattern! (Also tiled for A4—warning, not tested, and the first, overview page is for sure not A4 sized).

The back---would look better on someone with a longer waist.
Now, this first go came out a bit larger than the original, although the sleeve-cuffs are still quite nicely narrow; in particular, the arms are longer. I’d say it would be good for someone with a bust in the 34-36″ range (as opposed to my 33″). I may down-size a wee bit for my next one, in which case I’ll post that pattern, too. For those in the larger range, I’m sorry, my pattern-grading skills are nonexistent. I don’t think it would be too hard, though…
In the original, the bands are made of ribbing, but for mine I just used cross-grain strips of the same fabric and it worked fine.
So, without further adieu, here’s my instructions, such as they are. Please bear with me—I’ve never done this before! 🙂
Recommended Fabric: 1 m (or yard) of sweater-knit, 60″ (150 cm) wide (slightly narrower might work, but not much). Pattern includes 6mm (1/4″) seam allowances; I used the serger for all construction, but any stretch-stitch would do.
Instructions:

Pattern piece on folded fabric
- Print and tape together pattern; there are nine pattern pages, numbered as in the overview page. Test square for sizing is placed on numbered page 1, and should be 10 cm (4″) square. Trimming should not be necessary, although there may be a small blank space around the outer edge of the page due to printer limitations. (Again, I don’t have any A4 paper so I couldn’t test this version. Sorry!)
- Fold fabric lengthwise; place pattern piece so Centre Back is on fold. Cut out pattern piece.
- From remaining fabric, make two cross-grain bands, one 8 cm (3″) wide by the full fabric width, one 6cm (2 1/4″) wide by 44 cm (17″) long. Fold bands in half, wrong sides together, and press.
- Cut two 24 cm lengths from the wider strip; align raw edges with right side of sleeve ends and stitch. The process is the same as described here for T-shirt collars, except not in the round and without topstitching afterwards. The same process is used for applying all bands on the shrug.
- Stitch curved under-arm seams.

Cuff band attached, ready to sew curved underarm seams
- Mark centre of bottom back and centre of remaining wide cross-grain band (roughly 120 cm or 47″)
- Distribute wide cross-grain band around the shrug’s hem, from neck opening to neck opening, matching halfway points. The cross-grain band should be slightly stretched, especially around the curved areas in front. Stitch as for wrist-bands.
- Fold ends of narrow cross-band strip right-sides together; stitch ends and turn wrong-sides together so that ends are neatly enclosed.
- Align raw edges of narrow band with neck opening, again aligning centre back with halfway point on band and stretching/easing to fit. Stitch.
- Work buttonhole in front-right corner of neckline; attach button on front-left.
- If desired, press band seams towards garment interior.
- Wear, looking adorably cute!
How’s that? Clear as mud? Writing sewing instructions is HARD! (Way harder than sewing the actual thing was. I feel like that’s all clear as mud)