Tag Archives: in progress

A Victorian Sundress (skirt)

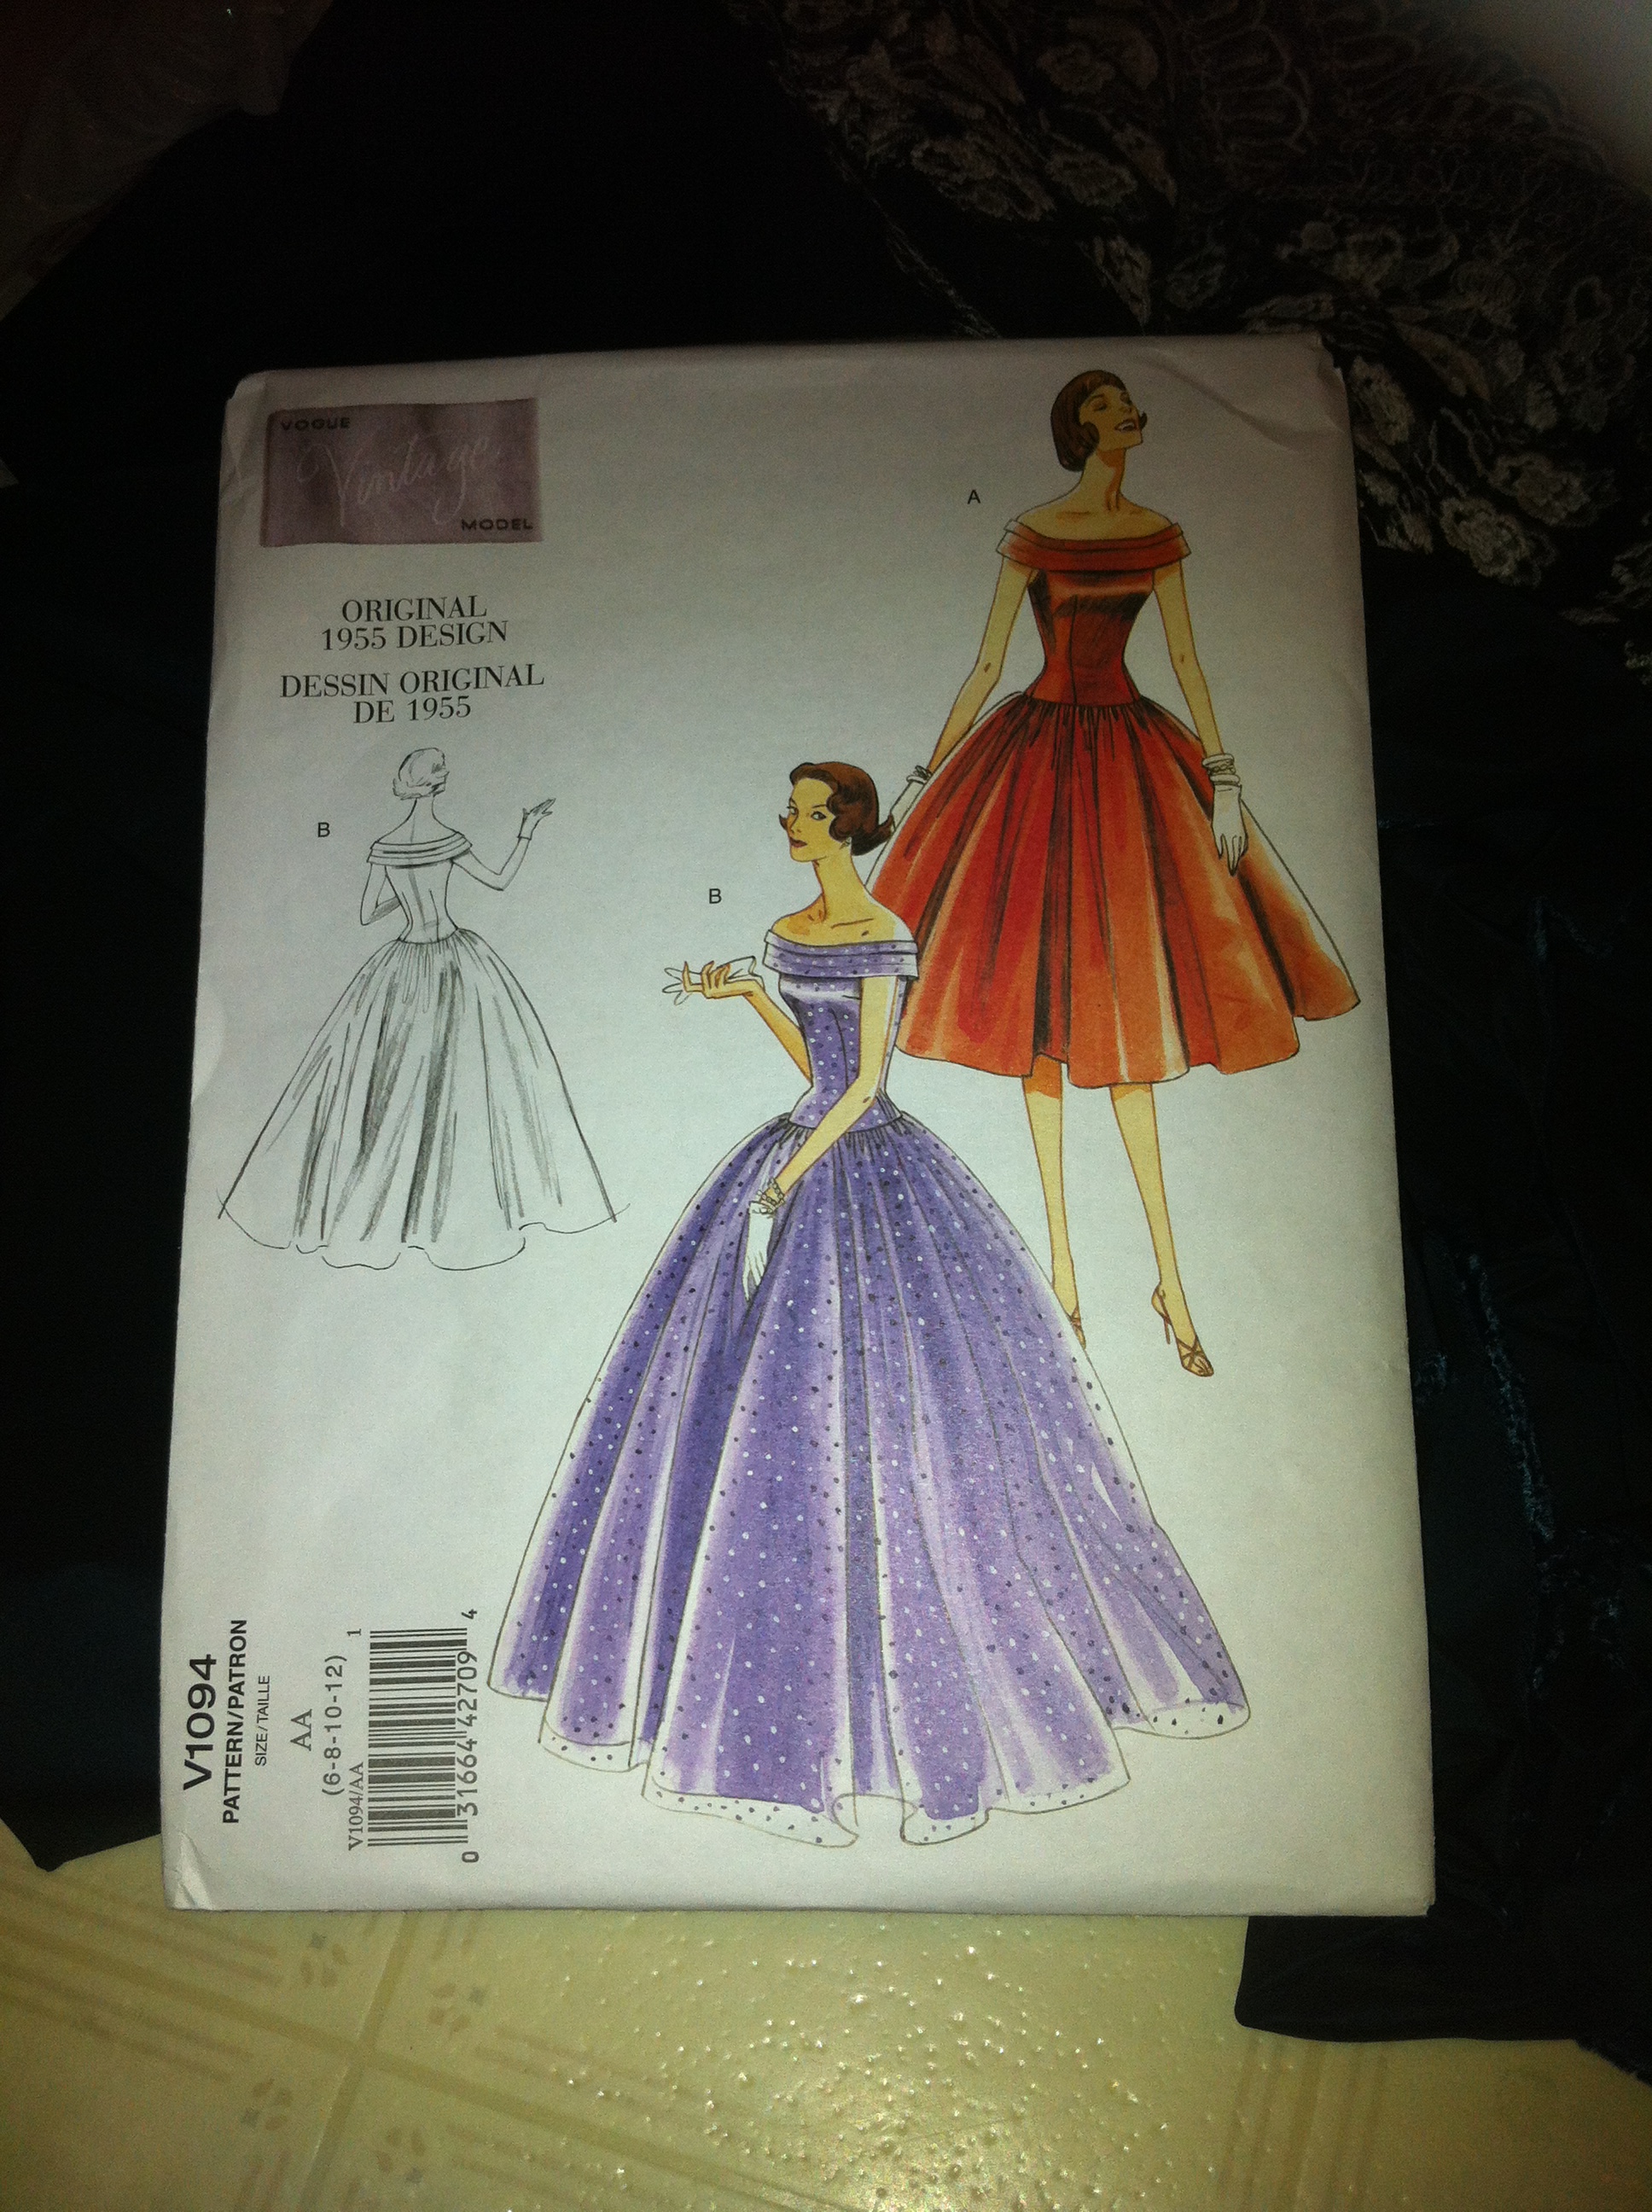
This is part 2 about my “Victorian sundress” project. I drew on two main inspirations for the skirt. One was this blog post from the Fashionable Past, about an extant and very lightweight summer dress (unlined skirt!!!), and the other was this pattern from Etsy, the “Étamine Dress.”

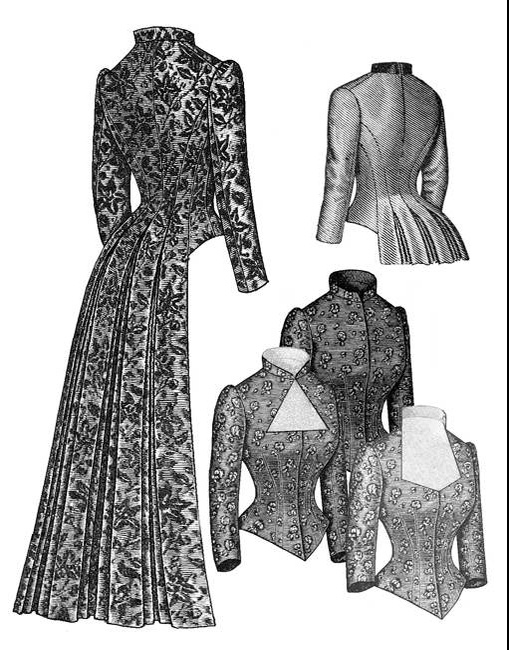
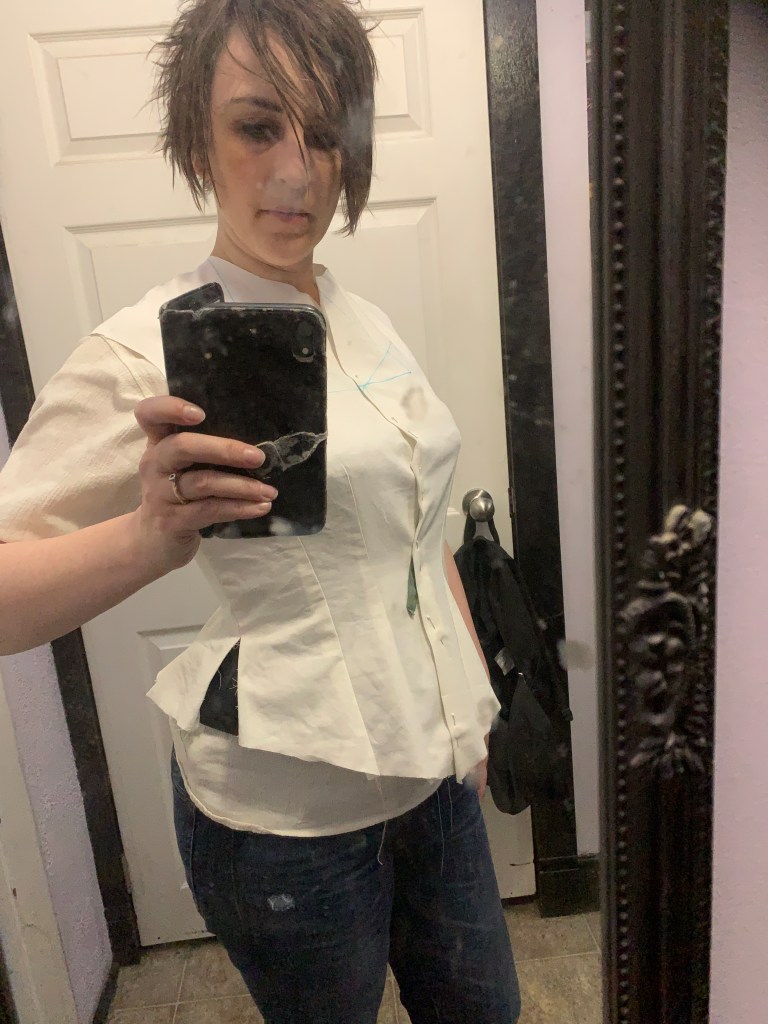
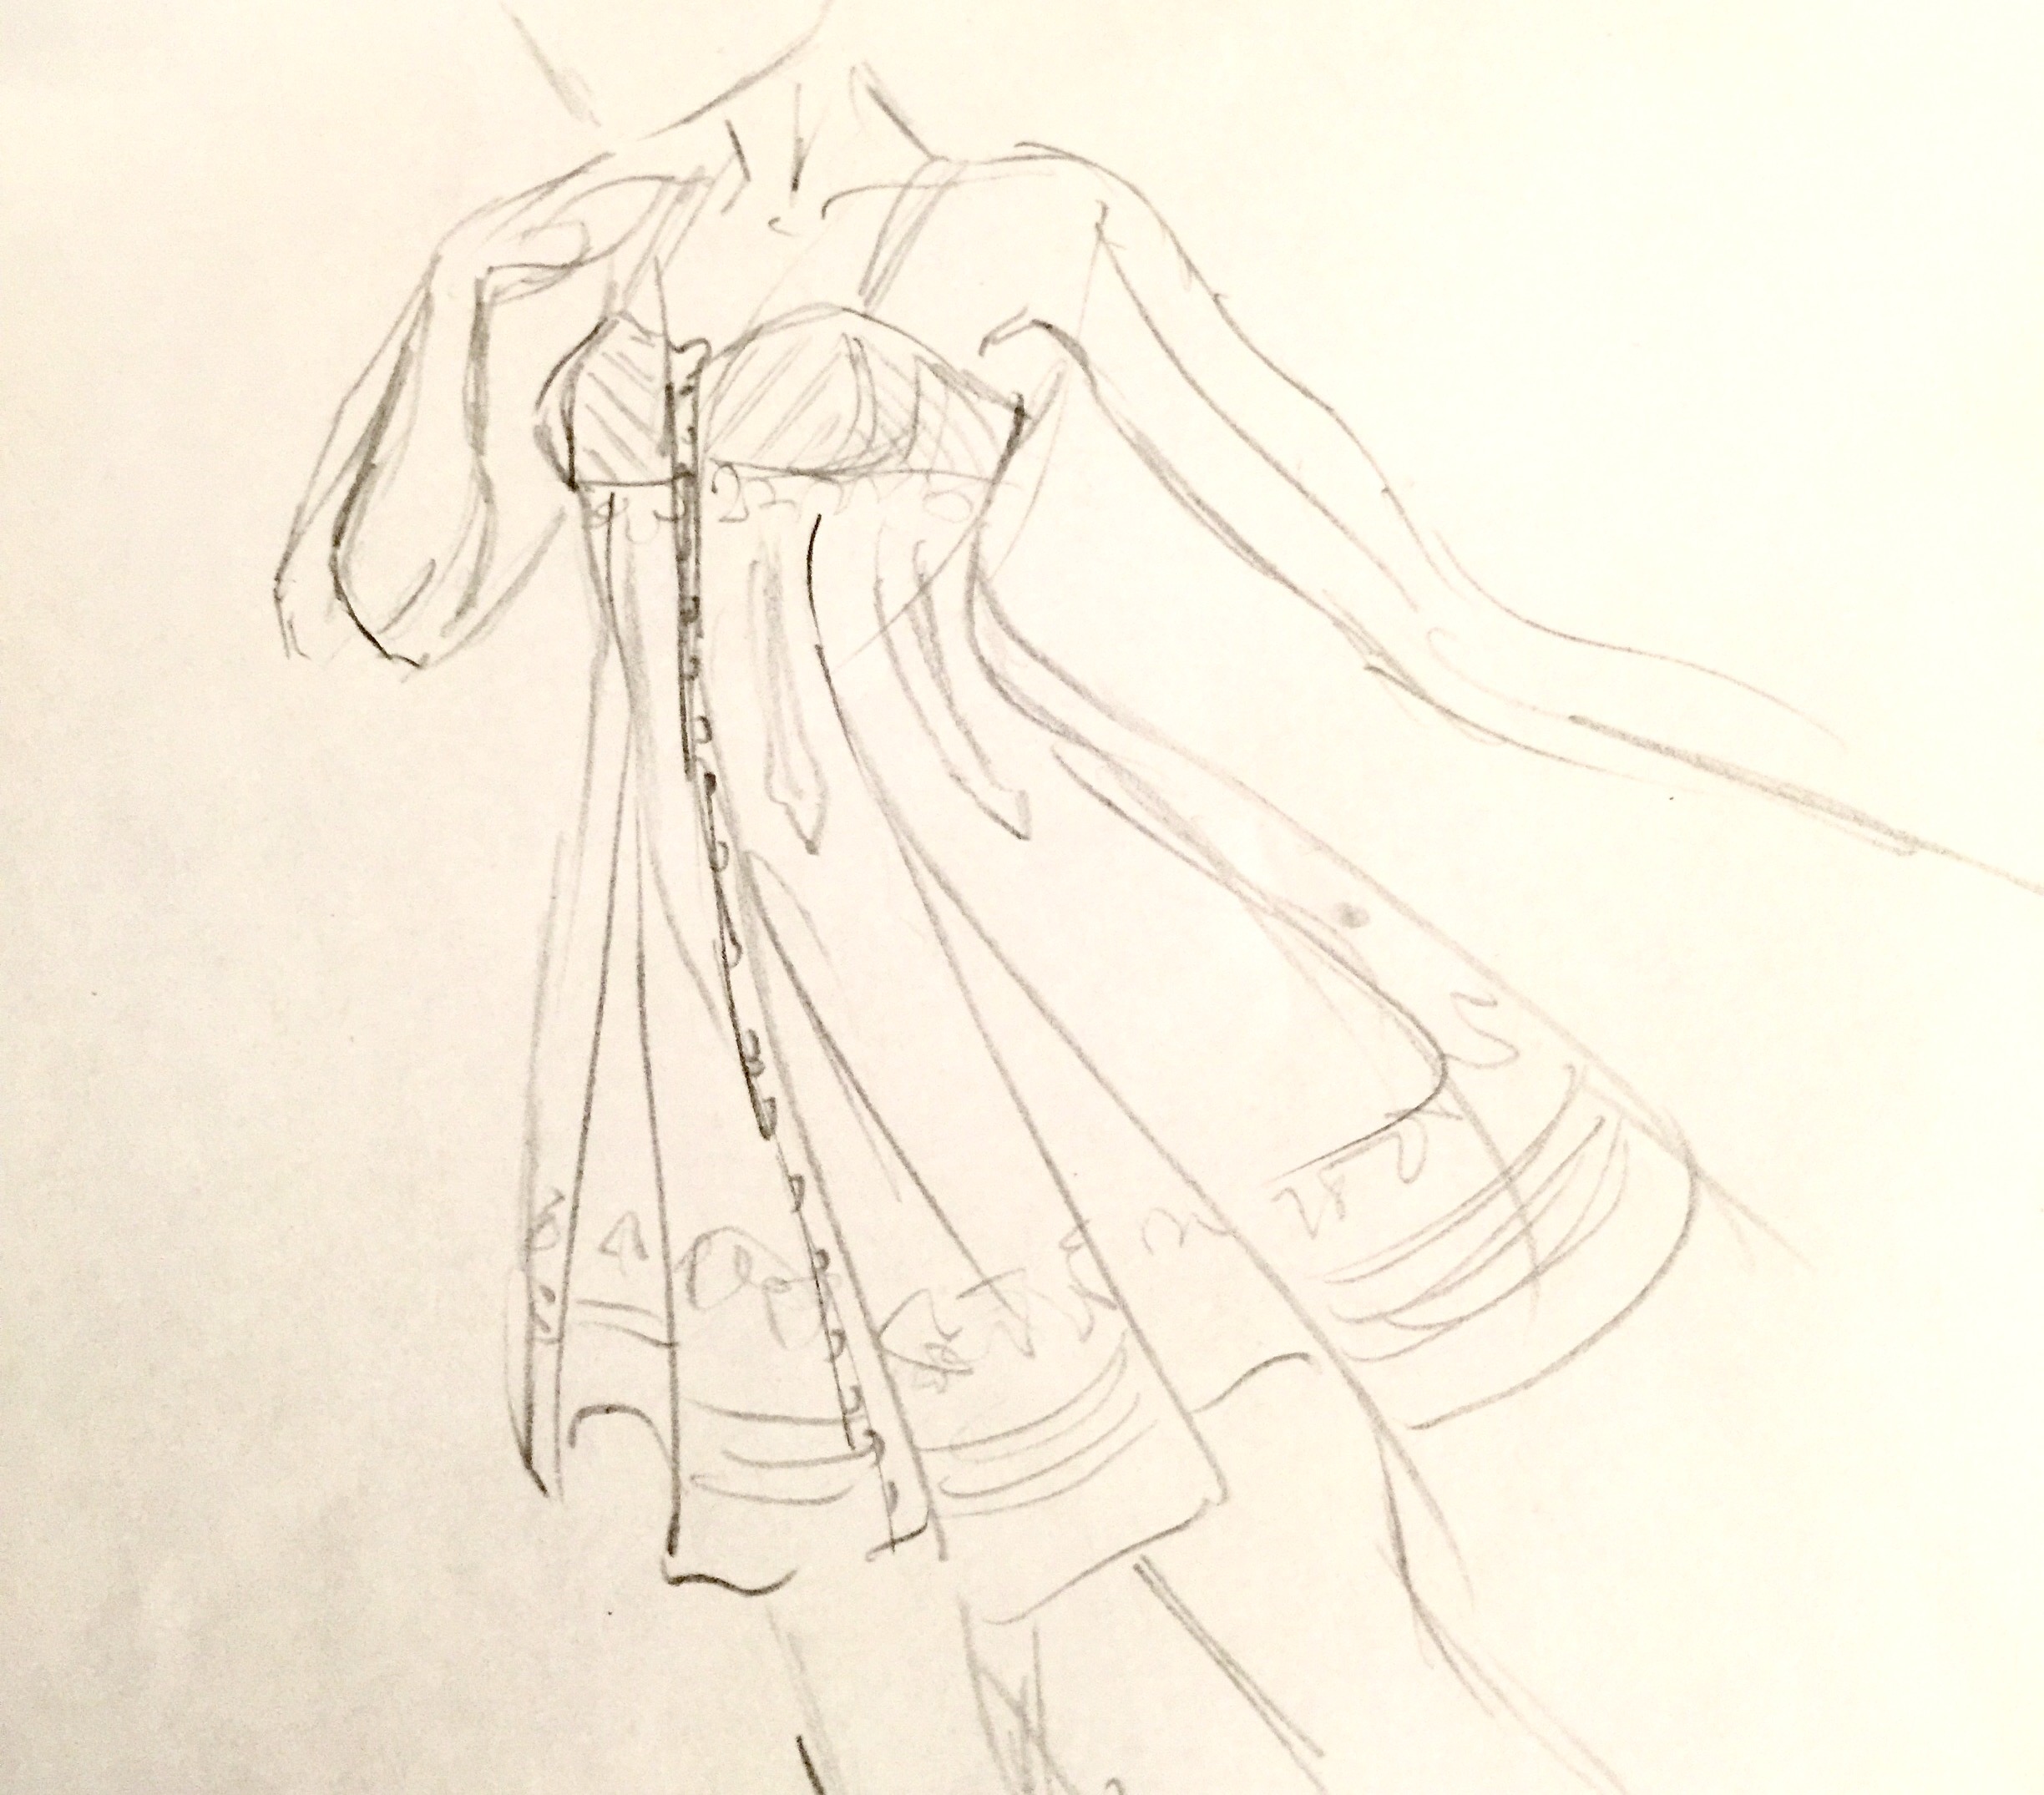
It’s one of those “unimproved” ones based on an original from Harper’s Bazar. No grading, no additional instructions. I didn’t particularly care about the bodice, having just muslined my own, but after a few mind-boggling attempts to work out all that layered pleating on my own based just on the illustration, I bought the pattern.

As I had feared, the pattern piece was LARGELY a rectangle. with a very slight curve at one end. So I was basically paying for the marked pleat points, and about two lines of instructions. Ah well. (Actually the terse instructions were really helpful in clarifying the dizzying array of layers on the dress in the image, even if I wasn’t likely to have enough fabric for all of them. )

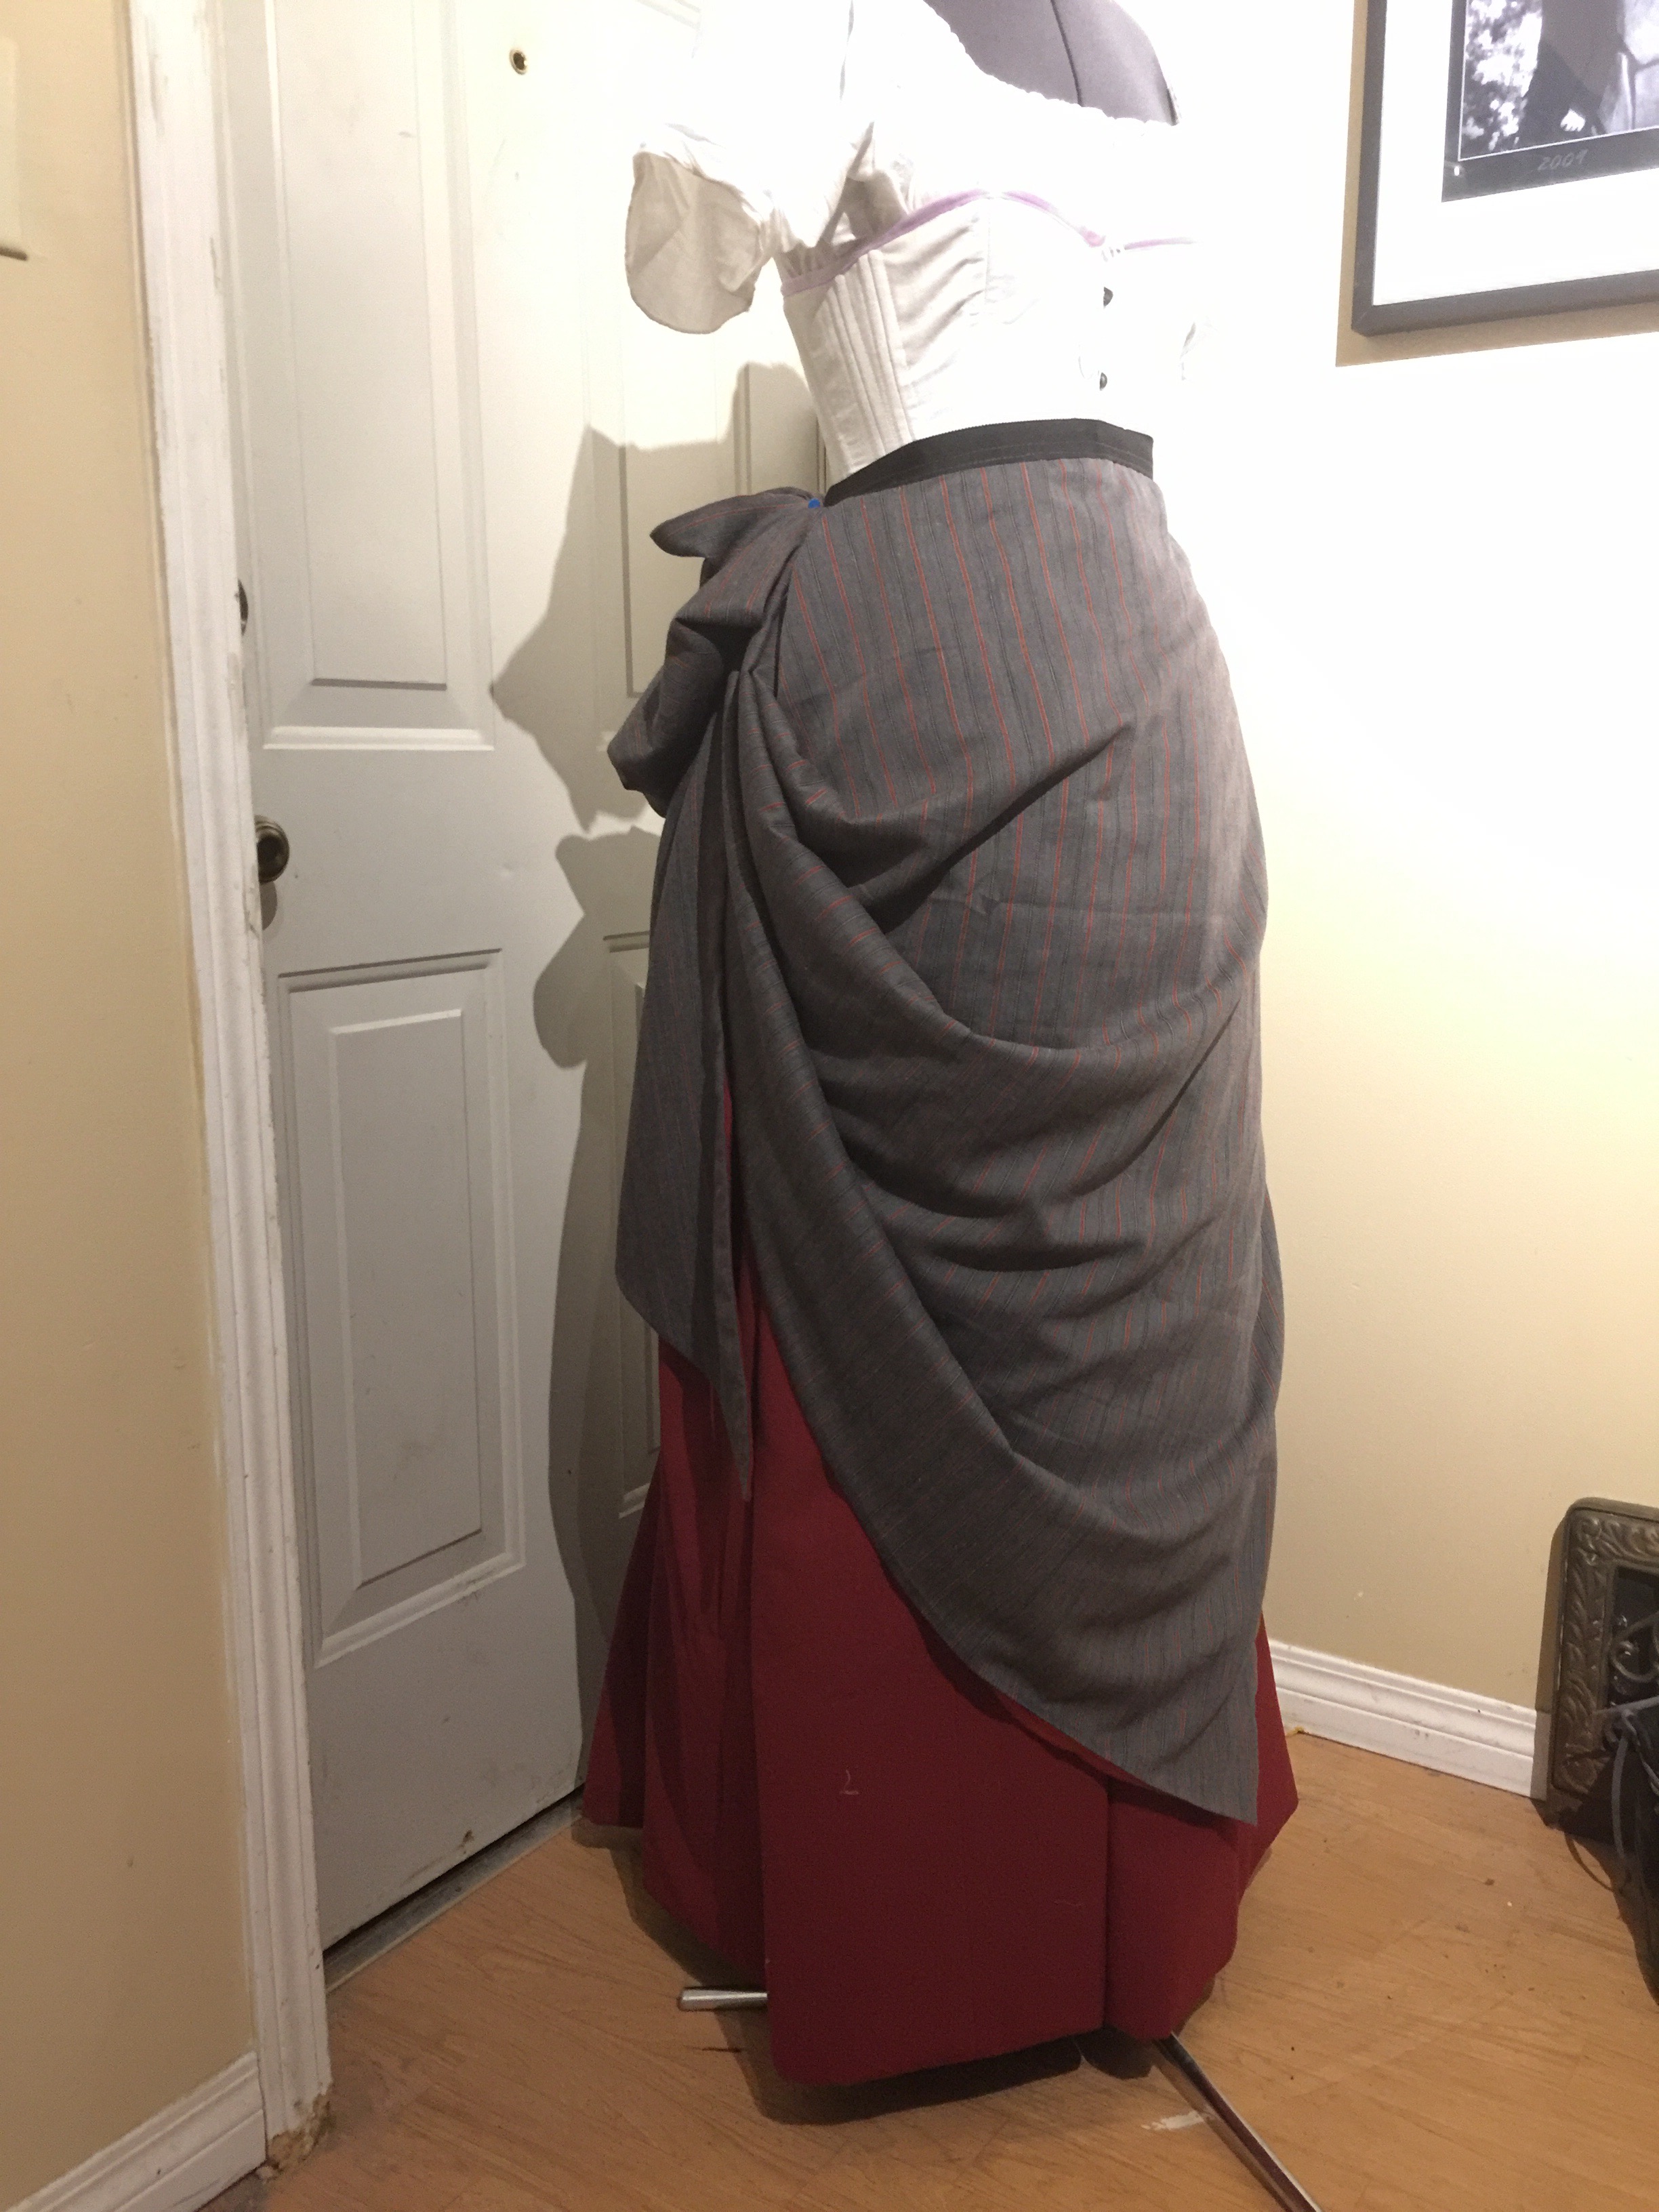
The Étamine pattern skirt, as written, contains four layers. From the inside out:

  1. The foundation skirt,
  2. A “tablier front” pleated just across the front, visible in the slit between all the other layers,
  3. The “straight breadths”, a straight, pleated layer (probably meant to be applied to the foundation skirt?), and then finally
  4. The swagged outer layer.

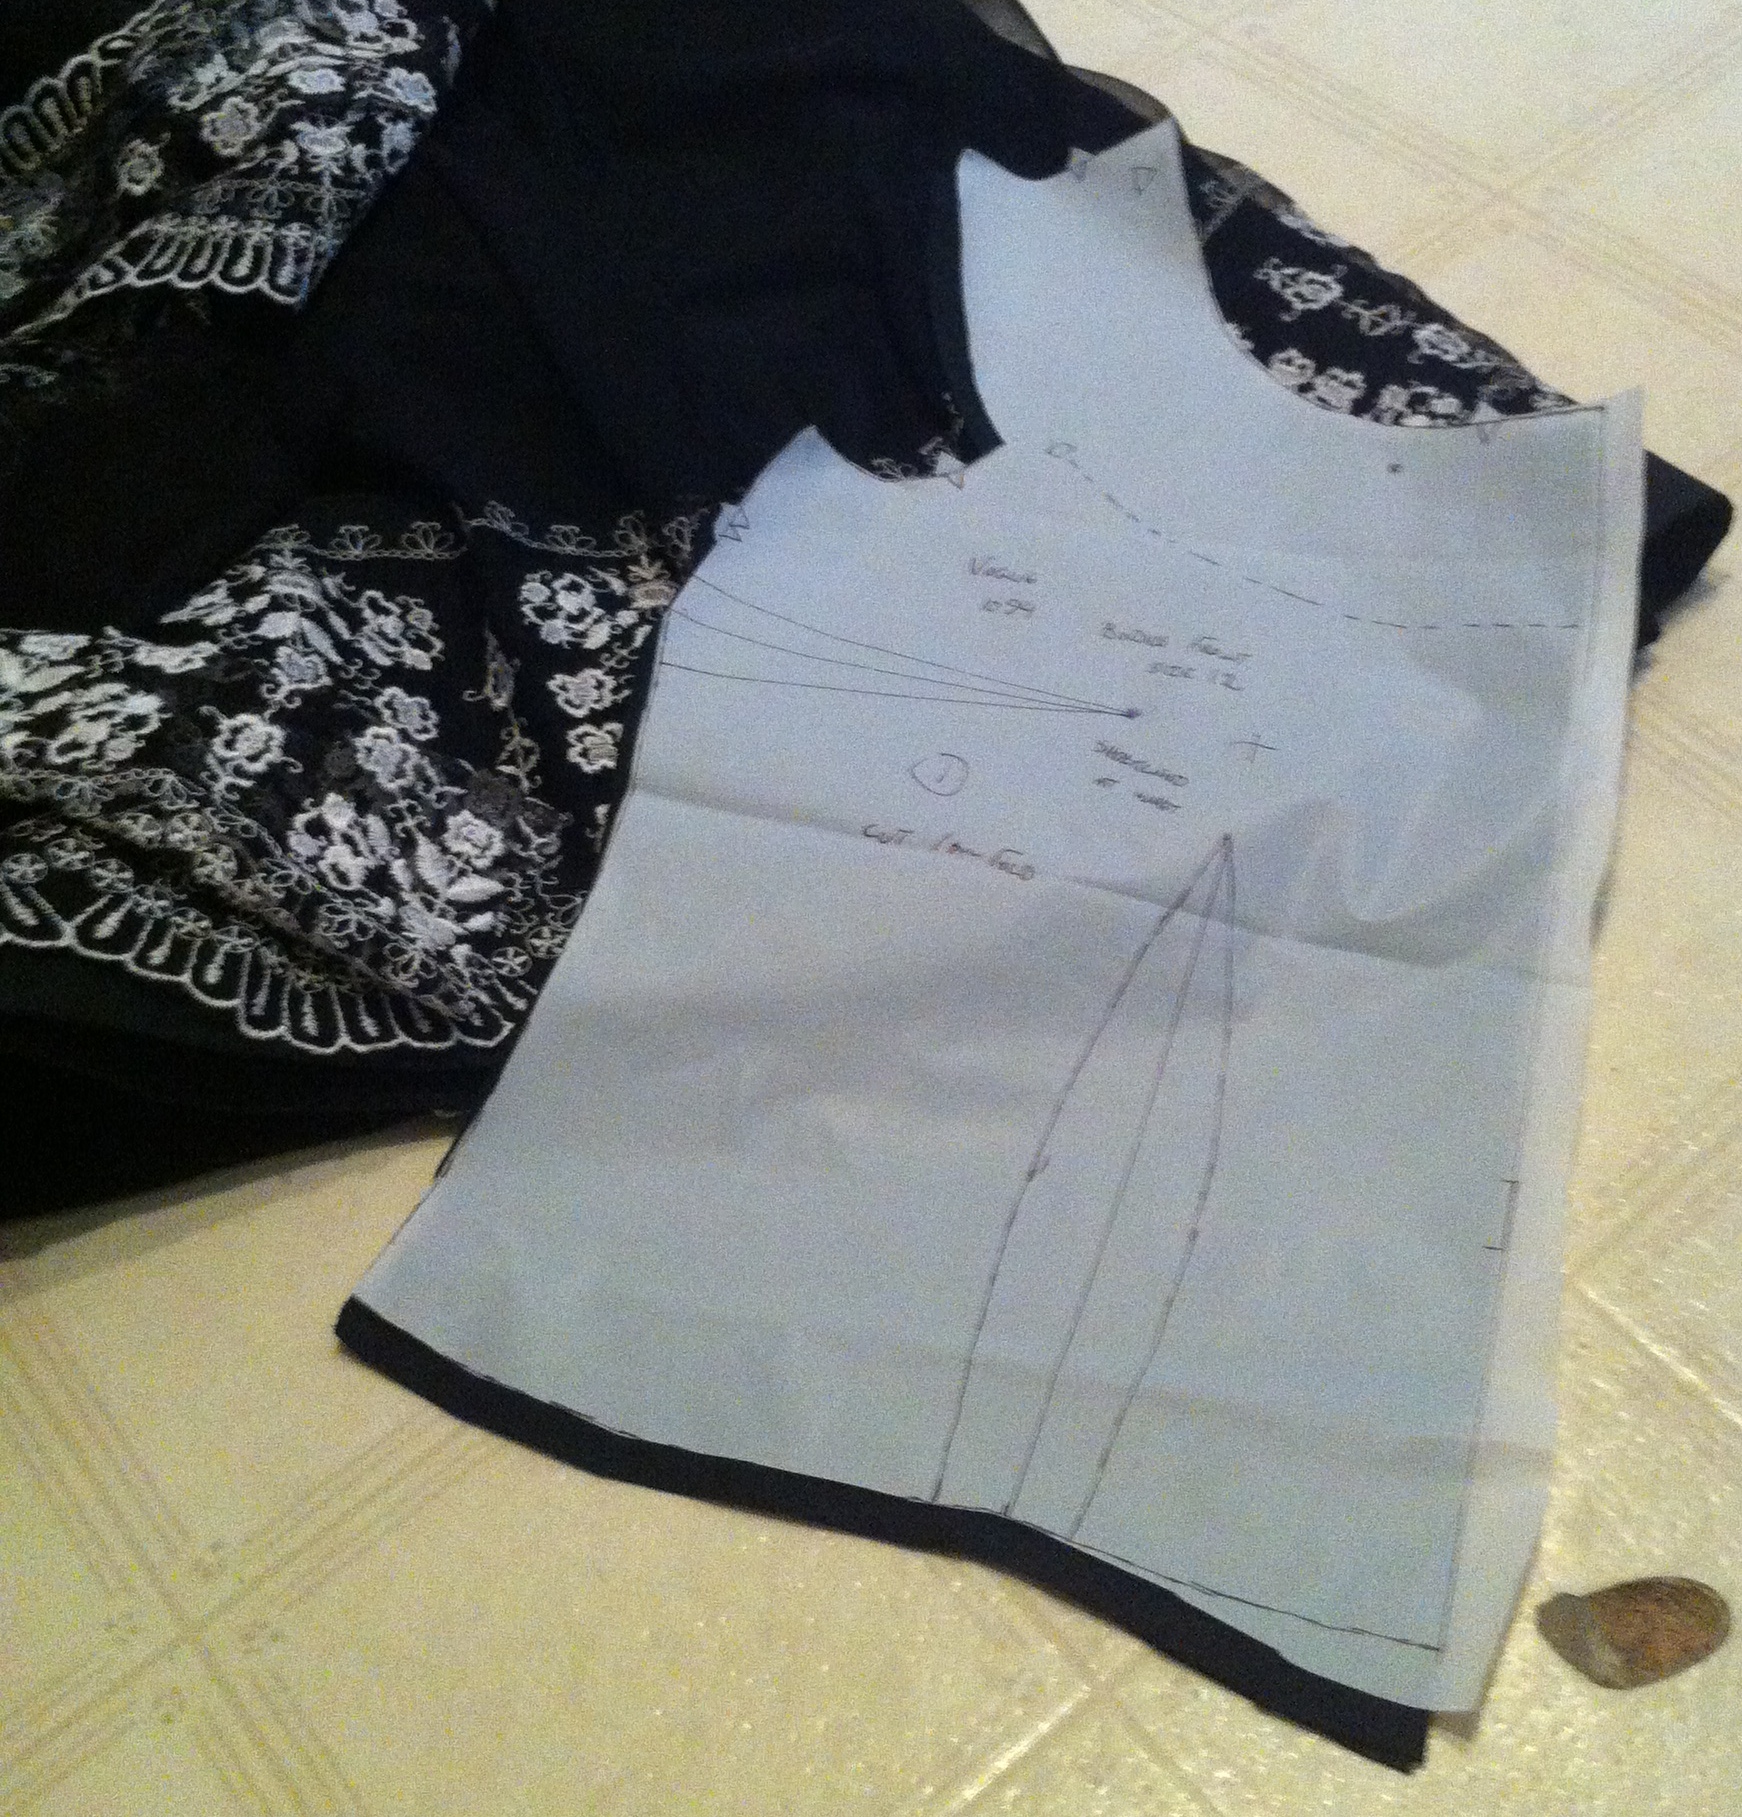
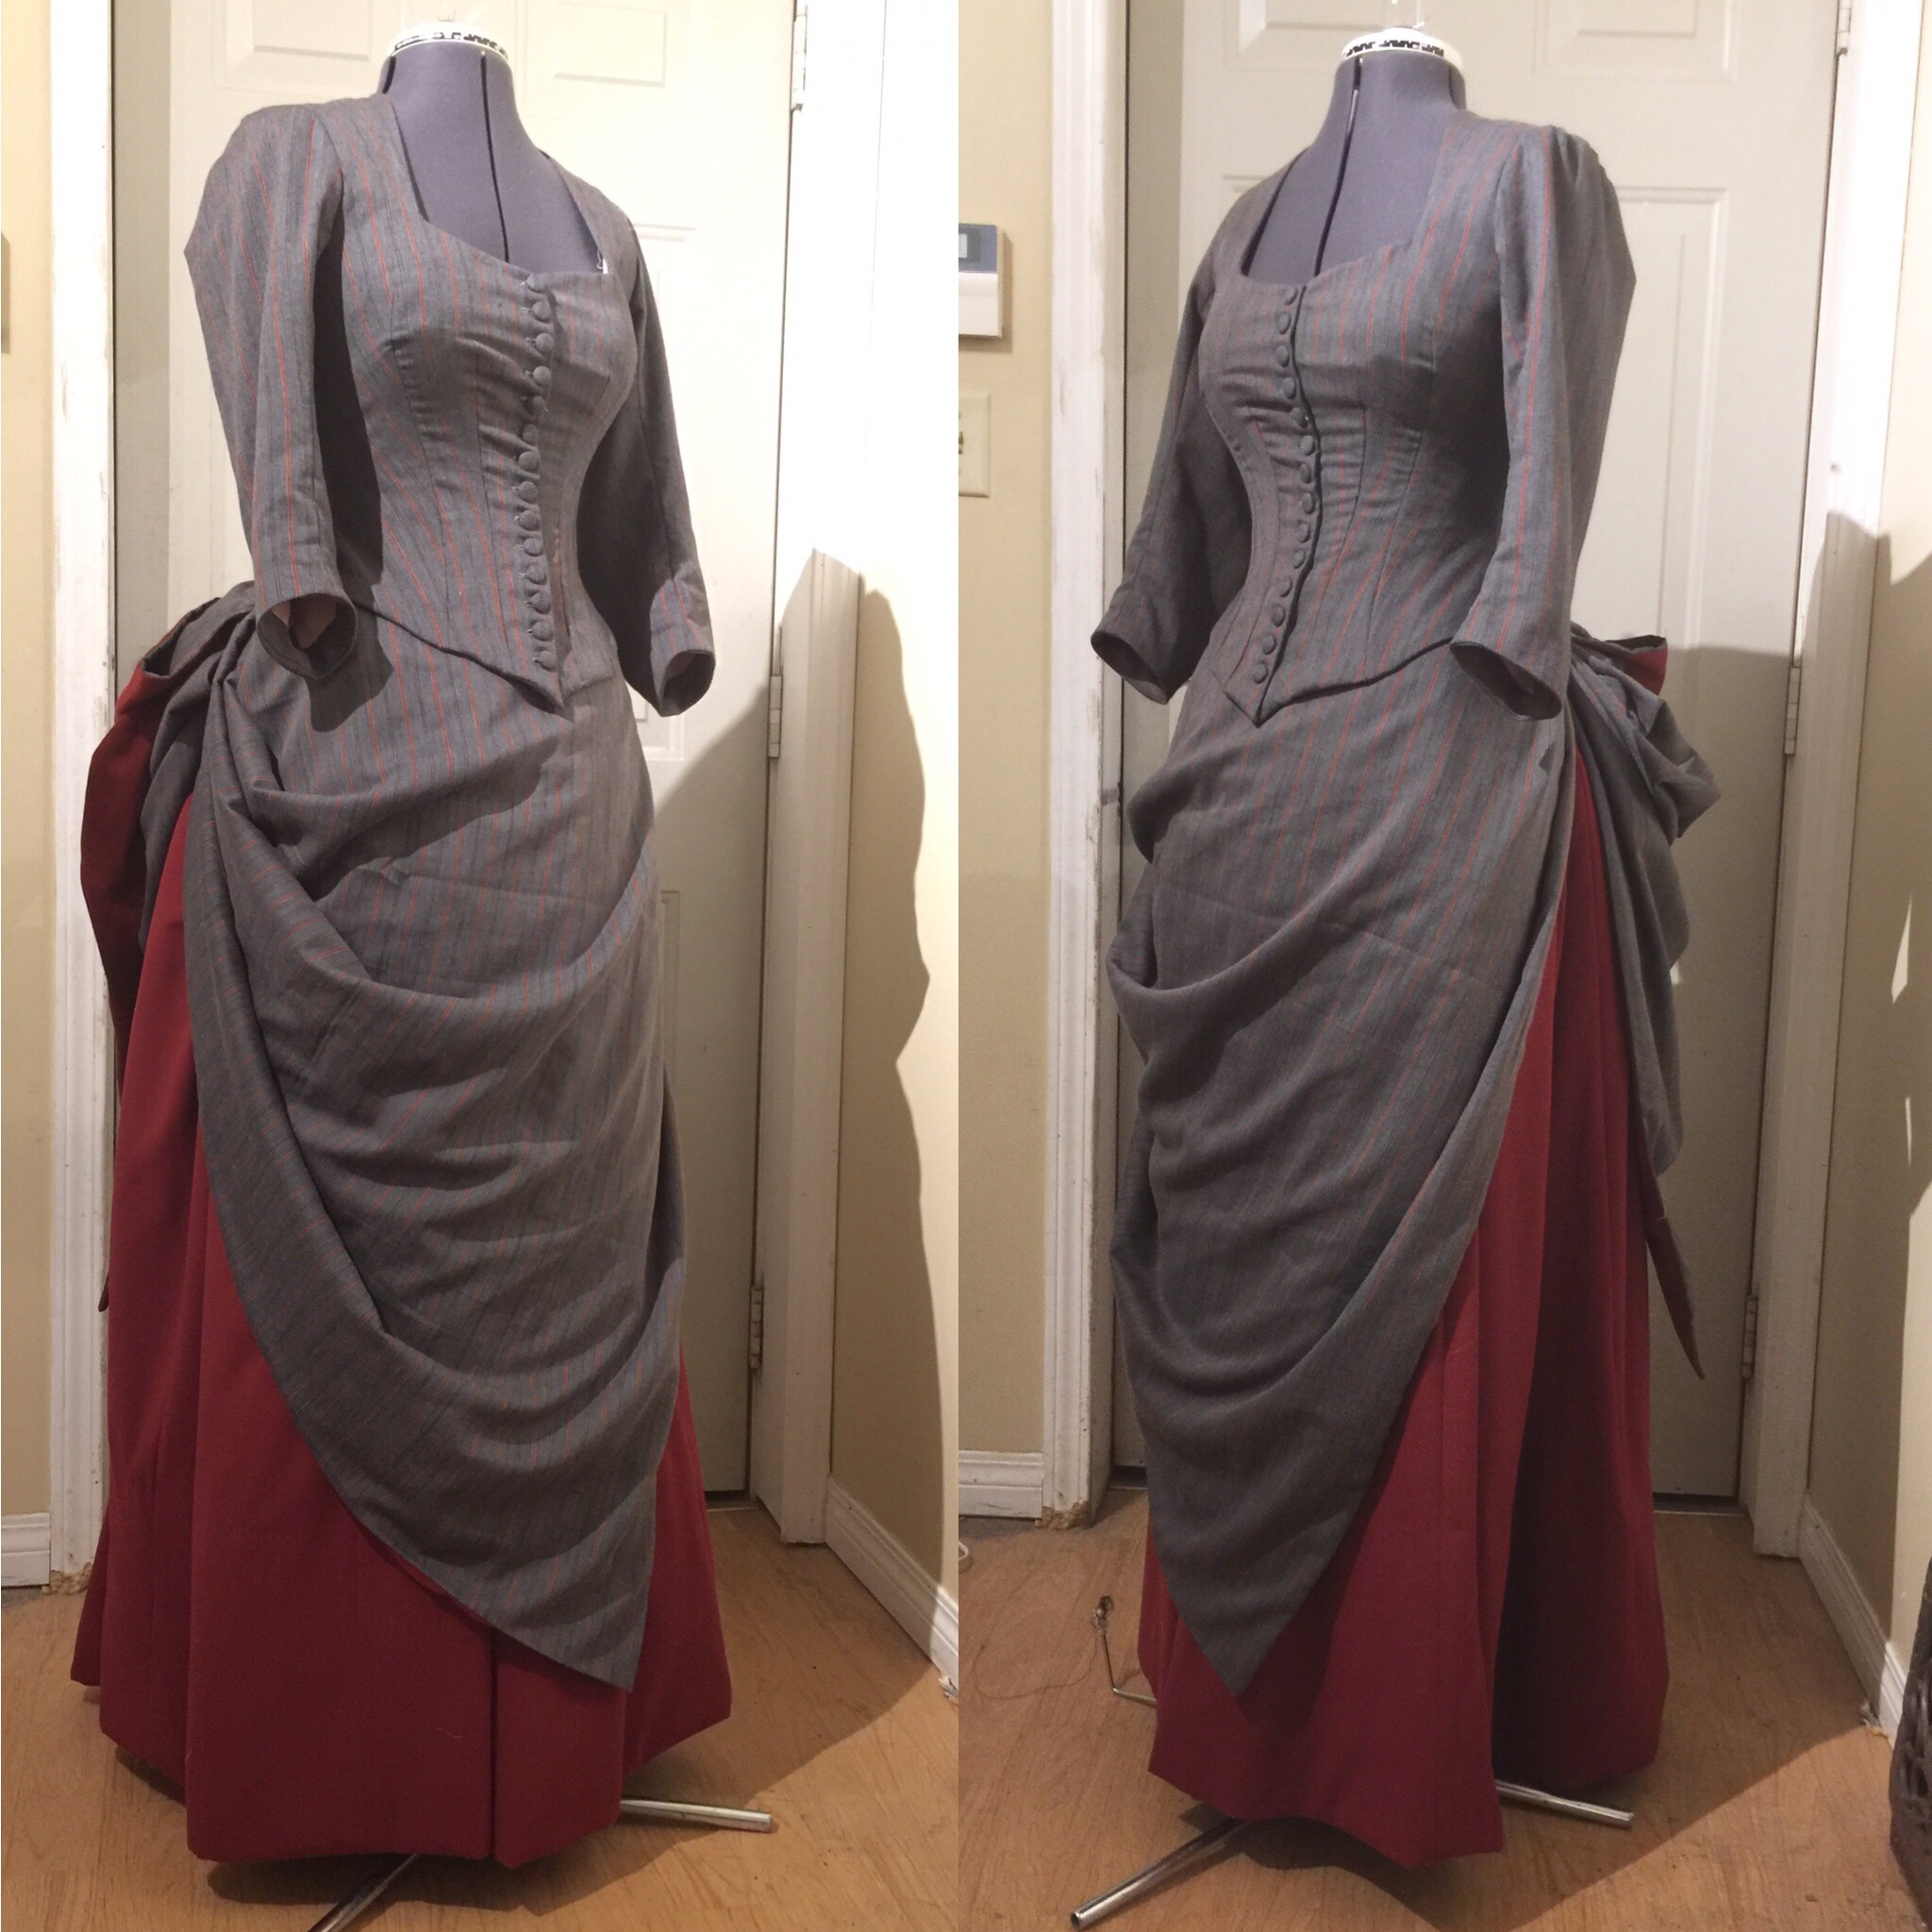
The pattern actually includes a piece only for the final, outer layer—which was the main reason I bought the pattern, and which, it turns out, is also basically a rectangle, curving only very slightly on the top front. (And in hindsight that curve probably only exists to accommodate attaching this layer to the bodice, as per the instructions, which wasn’t my plan until I realized that)

But I’m getting ahead of myself. First I needed to construct the foundation skirt.

Based on both my desire for a maximally light weight dress and this blog post from The Fashionable Past about recreating an extant, and remarkably lightweight, dress in her possession, I decided to throw propriety to the wind and make an unlined foundation skirt. The complete invisibility of the foundation skirt in the Etamine dress illustration did little to dissuade me from this course, and actually, if the “straight breadths” and “tablier front” layers were mounted to the skirt as I suspect the pattern intended, it might very well have been a single layer foundation skirt that was intended.

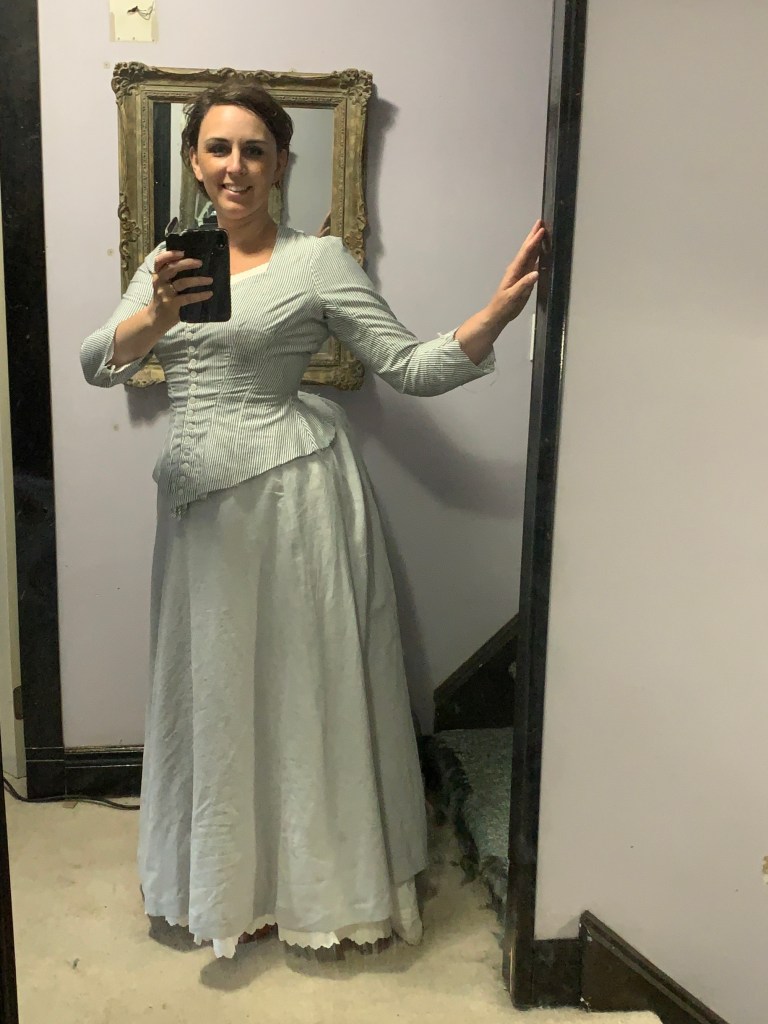
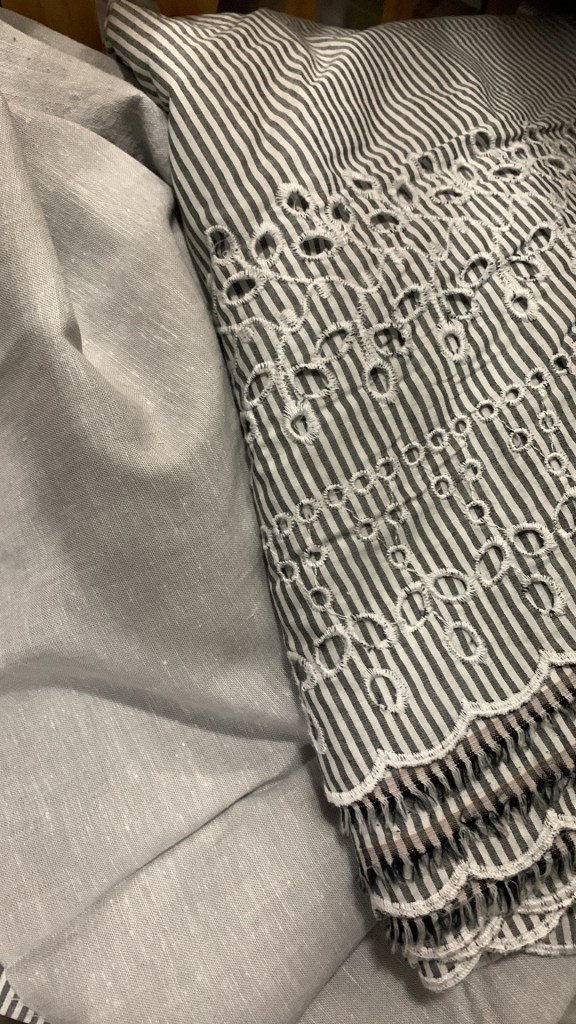
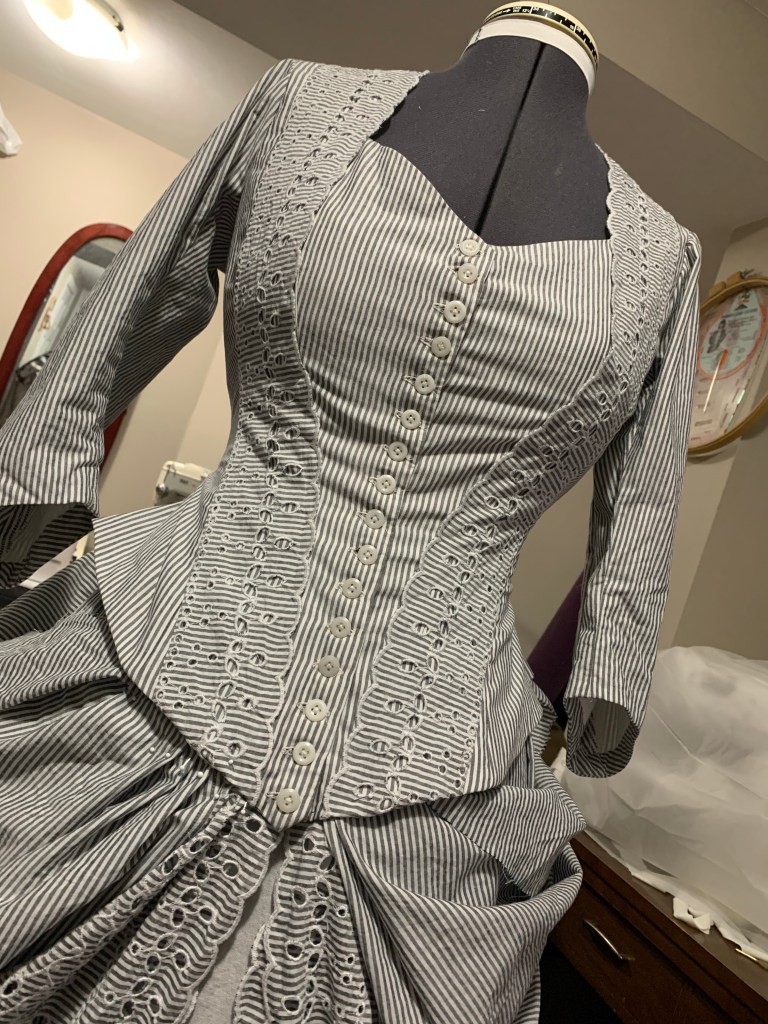
My fabric was about three metres of this grey cotton-linen blend, a long-stashed remnant from this Vintage Vogue dress. The colour coordinated well with my grey striped border embroidery, although if it proved invisible in the final product it wouldn’t matter. It’s not a particularly historical-looking fabric, but it is yummy.

I constructed the foundation skirt in a low-waste gored manner similar to this skirt draft from my 1882 book and this 1903 petticoat draft, although slightly modified to take advantage of my wide modern fabric. I cut both front and side gores from a single length, and then used a further full width to make my back panels. In hindsight the front gore is too flared for this skirt style, making the seams run somewhat diagonally down the skirt. I should’ve cut it narrower at the hem edge, and then had a bit more fullness to pleat in to the back waist. But, see the part about how it’s basically going to be invisible, I’m not too bothered.

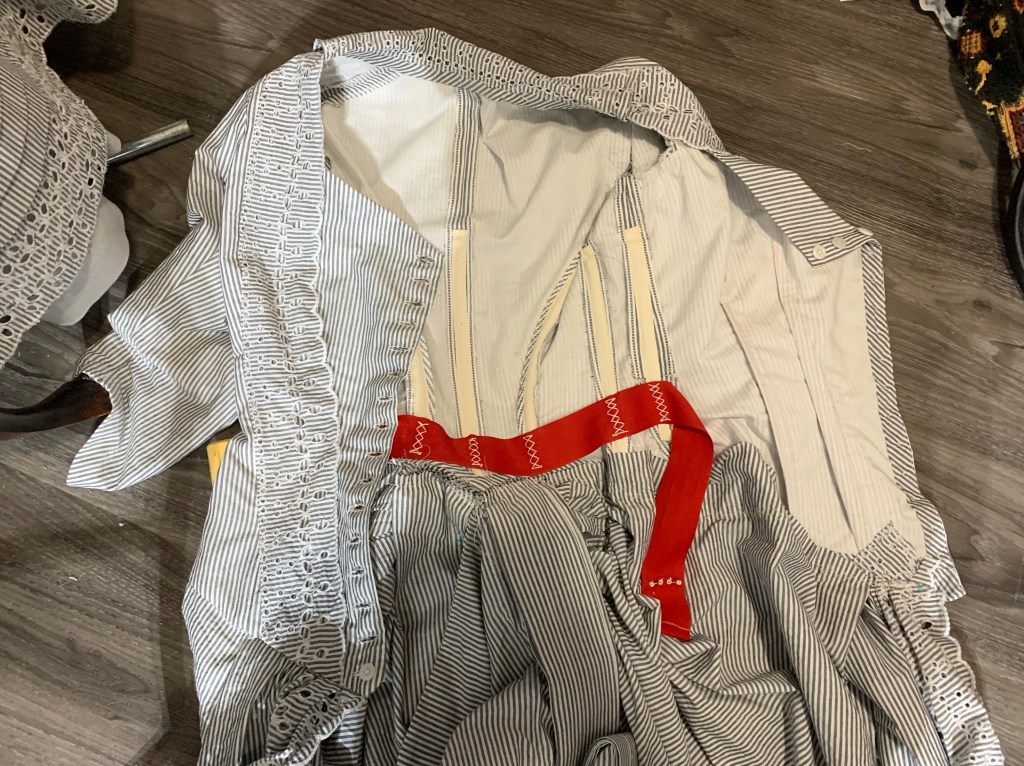
For the closure, I made a pleat-placket in the middle of the back breadth, using the same slash method I did for my first petticoat, which according to past Tanit came from Plain Sewing and Amateur Dressmaking (published in 1887). This part was entirely hand sewn. It’s completely covered in the final dress, but somehow was just fun to do.

The Étamine pattern, by the way, barely even mentions the foundation skirt layer in its terse instructions, except to say it has a four-inch box pleating of the fashion fabric at the hem. They were obviously assuming their reader either had a basic foundation skirt pattern they liked, or would just draft their own like I did.

Because I like the look, I decided to try out stacked pleating at the centre back, covering my placket pleat. I didn’t fuss over it too much. The single layer of fabric definitely made this a less bulky feature than it might have been.

My hem is just a very basic machine hem, again based on the Fashionable Past example, although a little narrower.

I also made a pocket, again very much following the same method I’ve used in the past. However, it somehow turned out too small. So I may need to open up the bottom of it and patch on some more. I also initially sewed it in upside down, because you’re never too experienced to make mistakes.

Pocket fail. The pointy end should go up towards the waistband.

Now, the skirt came out relatively short. This is partly because of fabric limitations and partly because all my Victorian skirts ever have been too long, at least for day wear. I did not want that for this skirt—but I definitely needed to shorten my petticoats.

(This one is still too long though)

I did this by the very inelegant method of adding a 1” tuck just above the bottom ruffles. Because the front and sides are gored (i.e., wider at the bottom than the top) this means that the underside of the tuck needs to be eased to fit. The period manuals talk about basting a gathering stitch along that line and easing it in. I just pressed and hoped. It mostly worked out better than expected, though there are one or two bad spots.

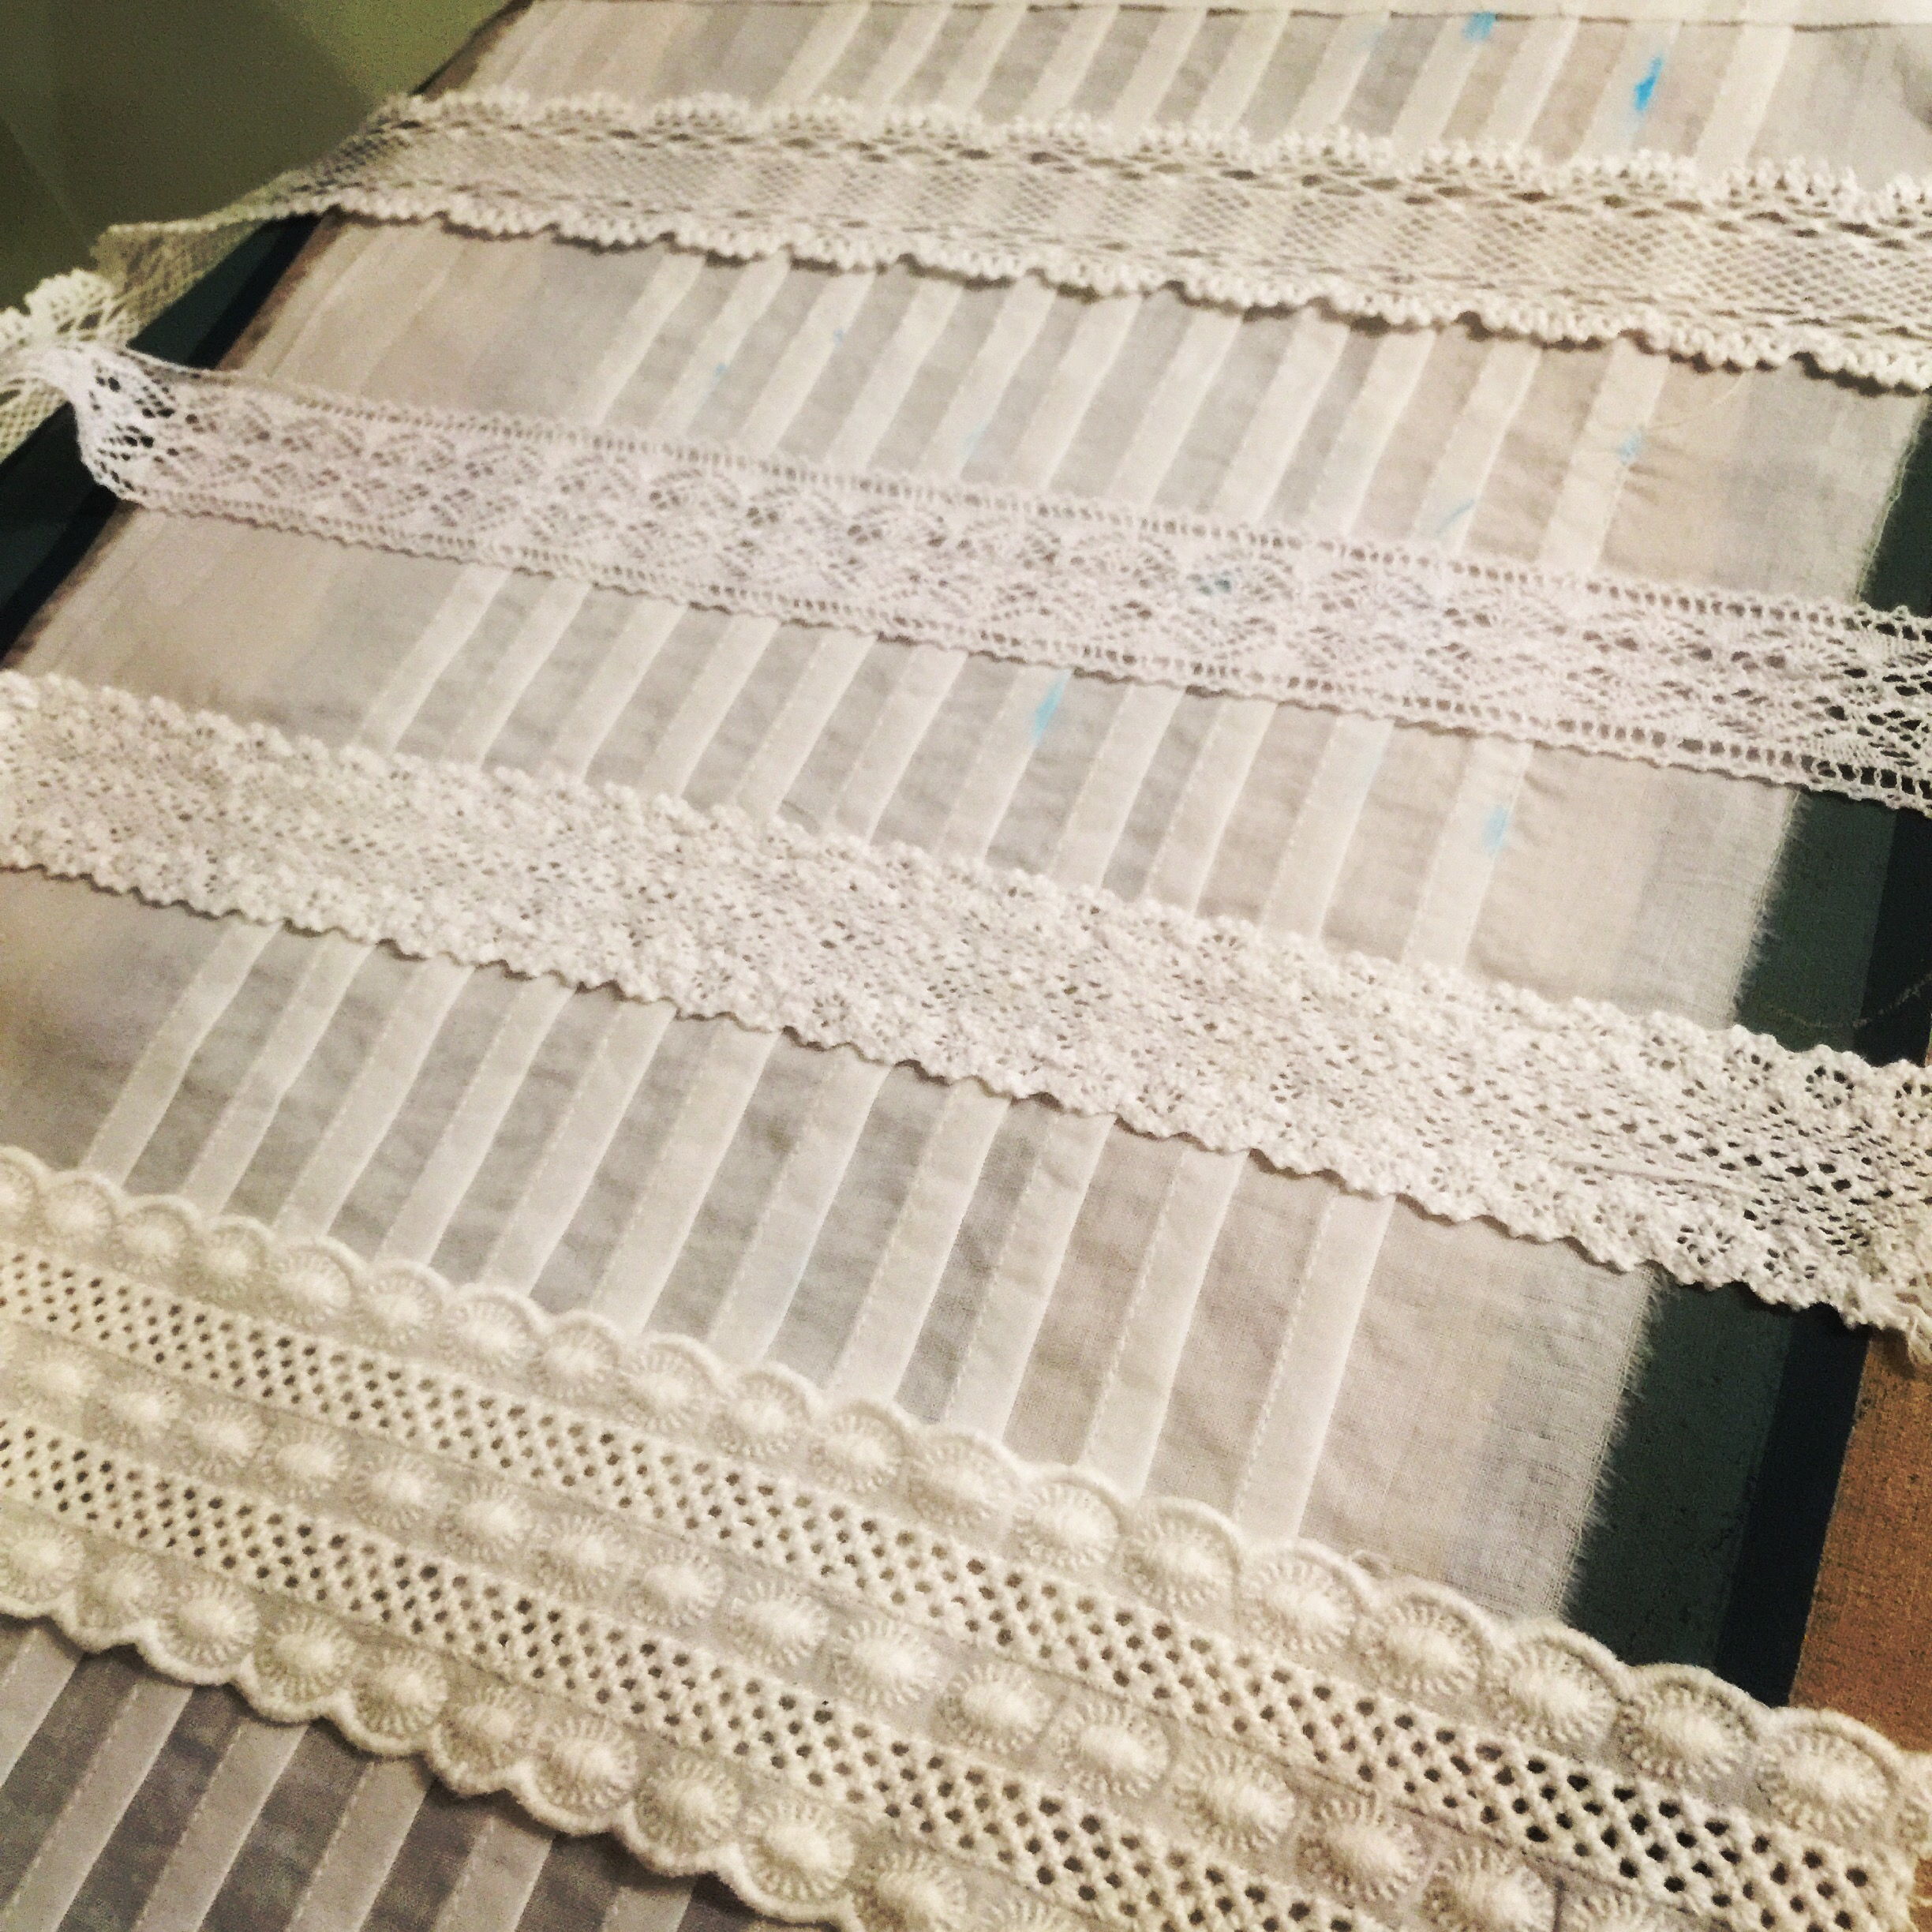
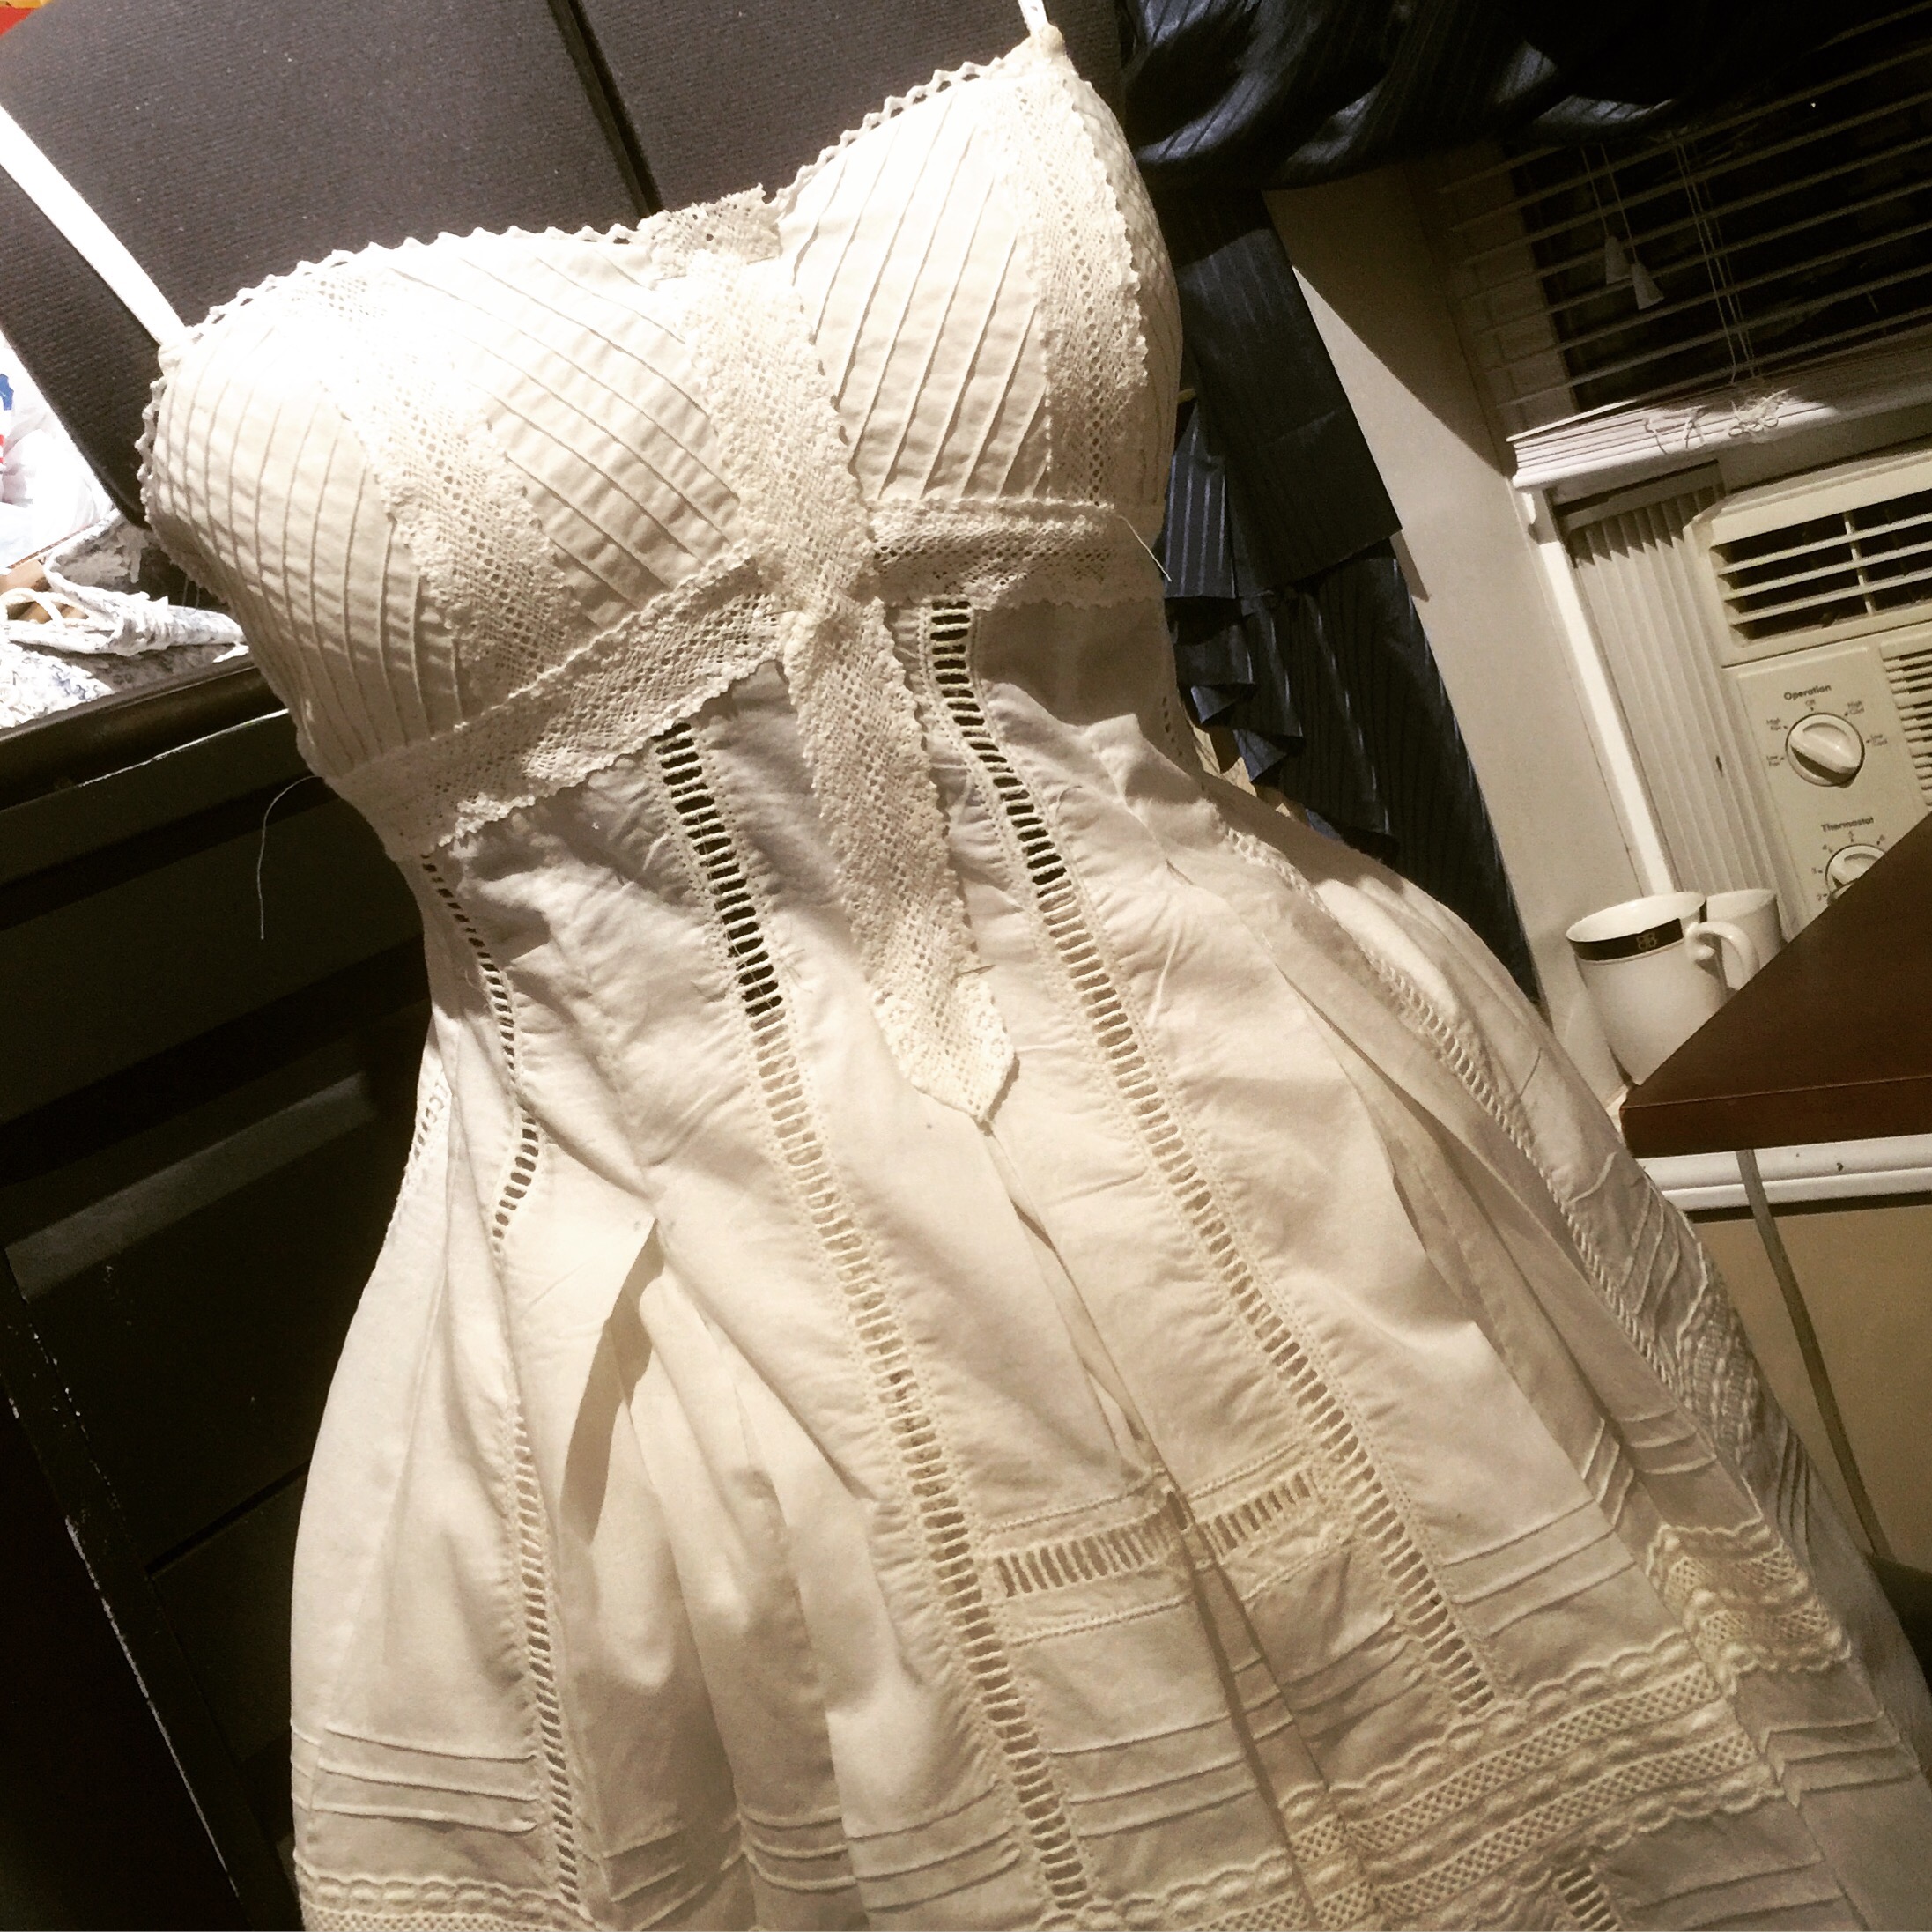
With considerable fussing and measuring, I eventually determined that I did have enough of the border embroidery to do at least the upper two layers of overskirt, although not the tablier front layer. I was content to have my foundation skirt show a tiny bit though. I had enough extra eyelet trim from the making of the bodice to add a vertical piece to the centre fronts of the topmost layer.

There was, however, nothing left for the longer fronts of the middle layer, what the pattern termed “straight breadths.” Never mind any excess for trimming the bodice. I considered for a long, painful while, but I knew what I had to do: make more edging.

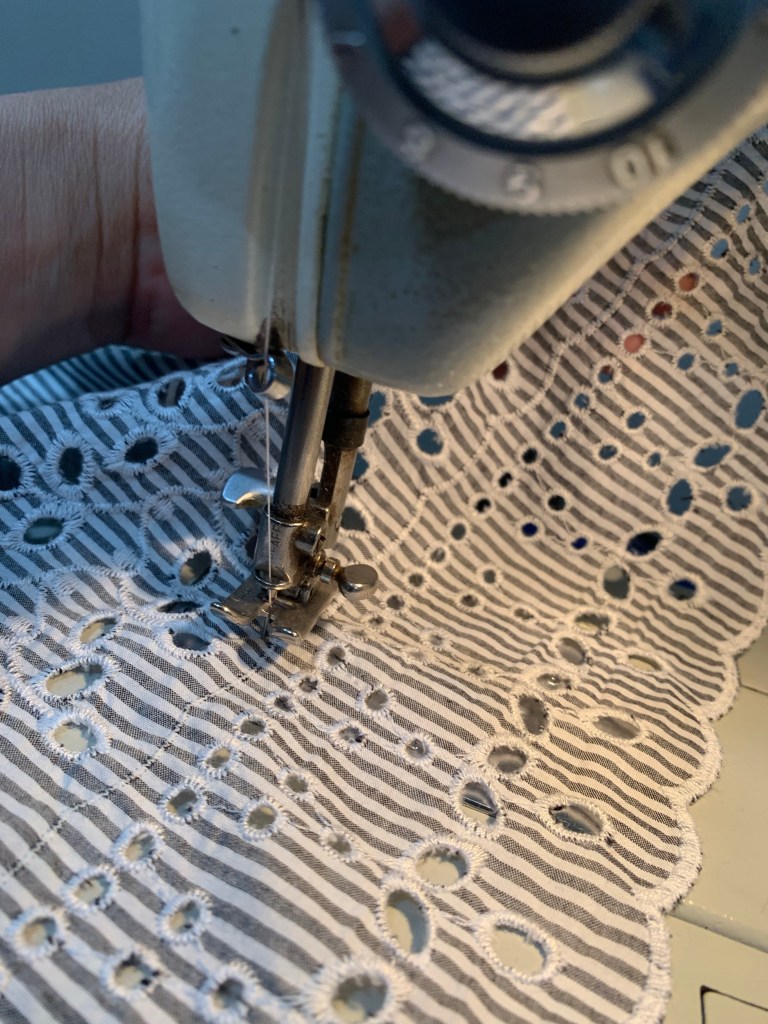
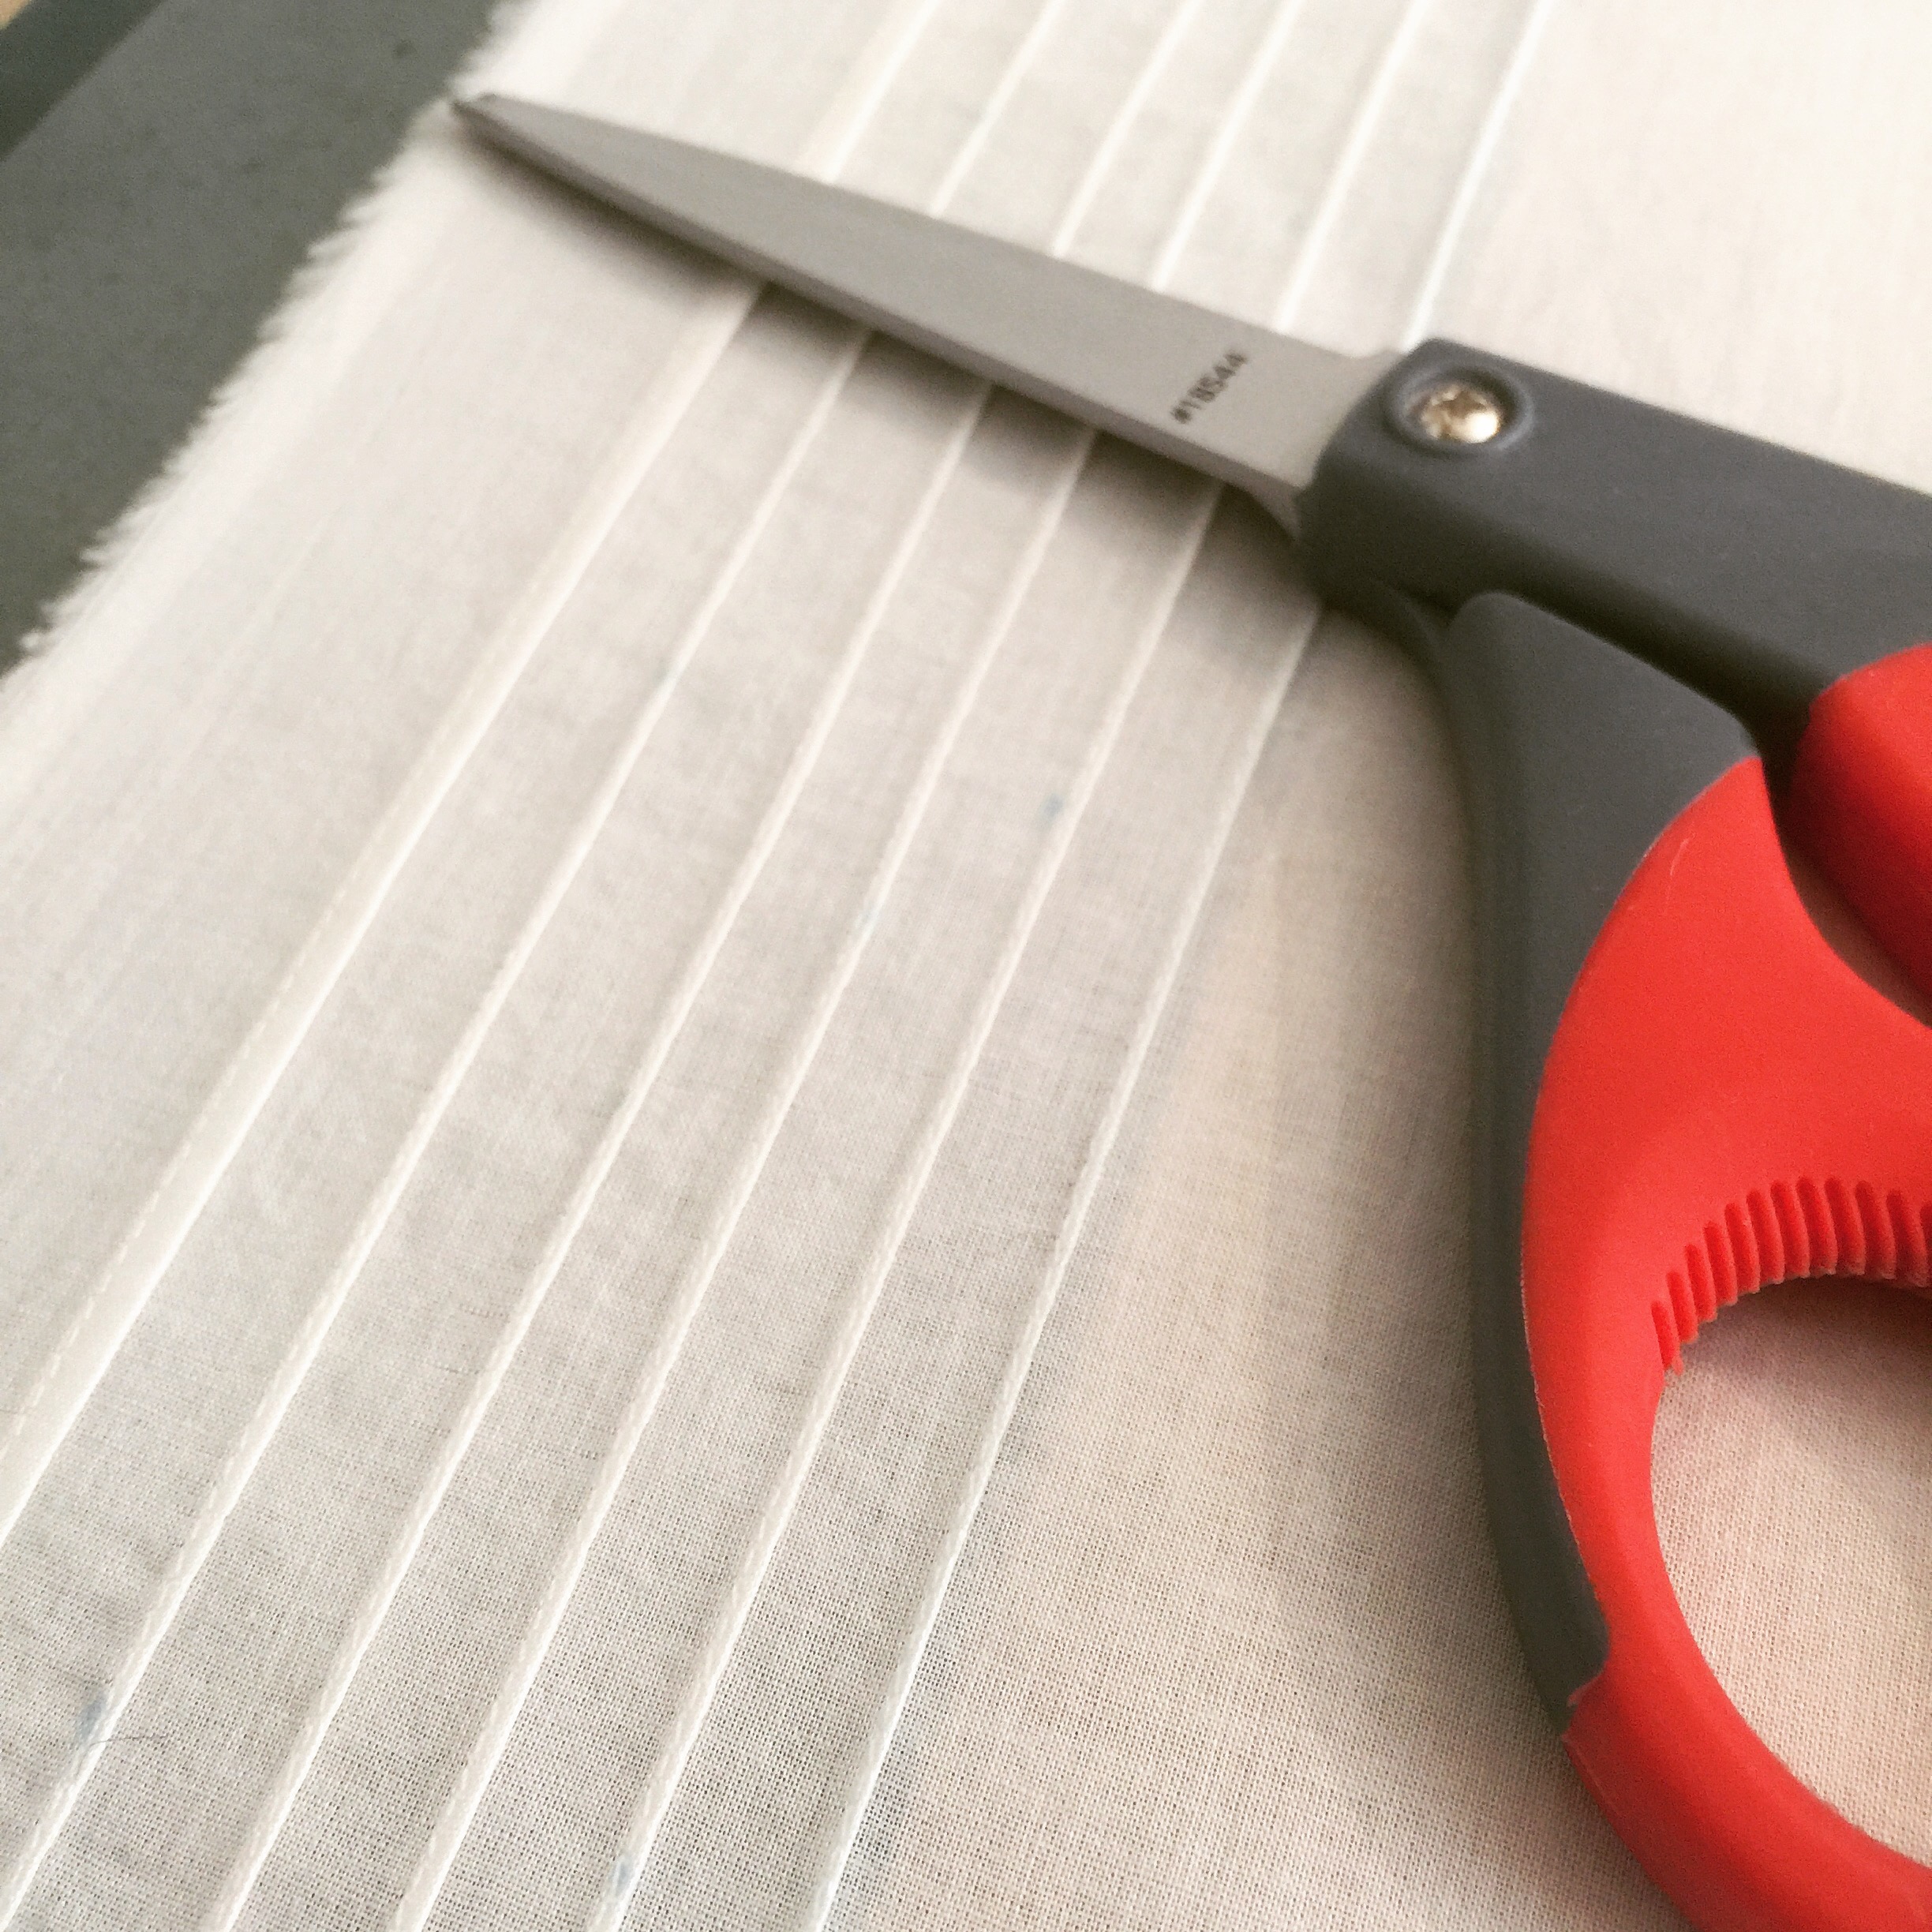
You see, as it happened the existing border embroidery was arranged kind of in two rows with a small space between them. This made it possible, with enough patience, to add a scalloped zig-zag in the space between that I could then cut along, instantly doubling the amount of eyelet edge I had available.

I thought the best machine I had for the task would be the Pfaff 360, as its embroidery stitches are customizable to length. However, it has a dodgy tension and hadn’t been out of the carrying case in, um, years.

Eventually, I managed to nerve myself up, pull the Pfaff out, and get to work.

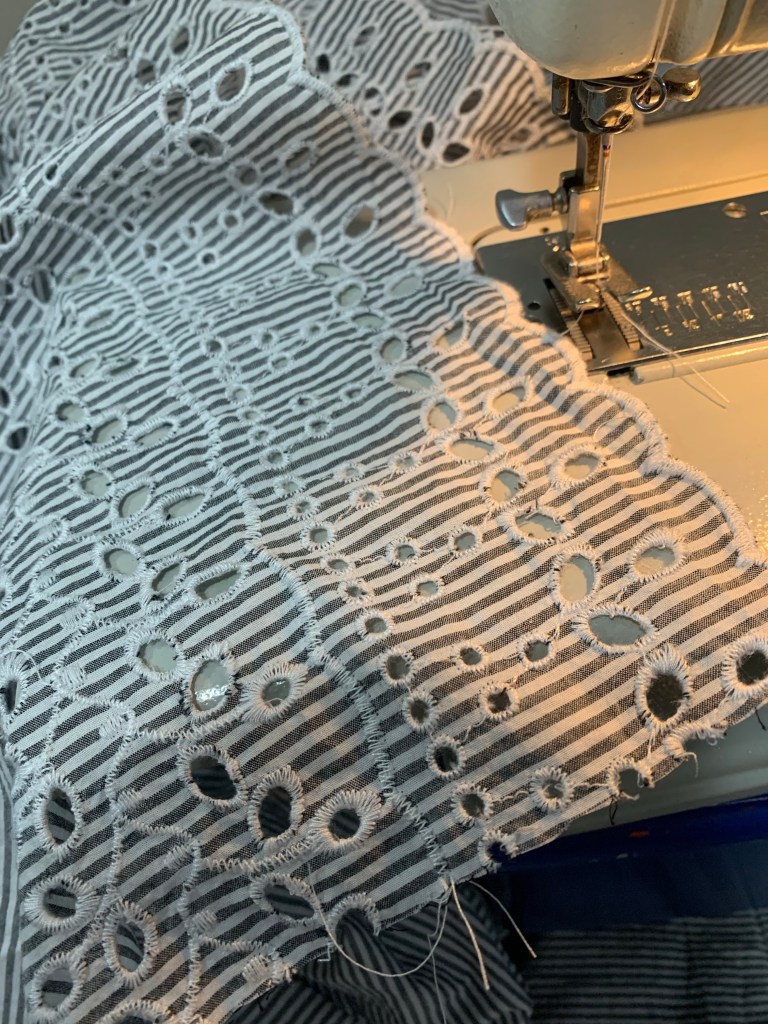
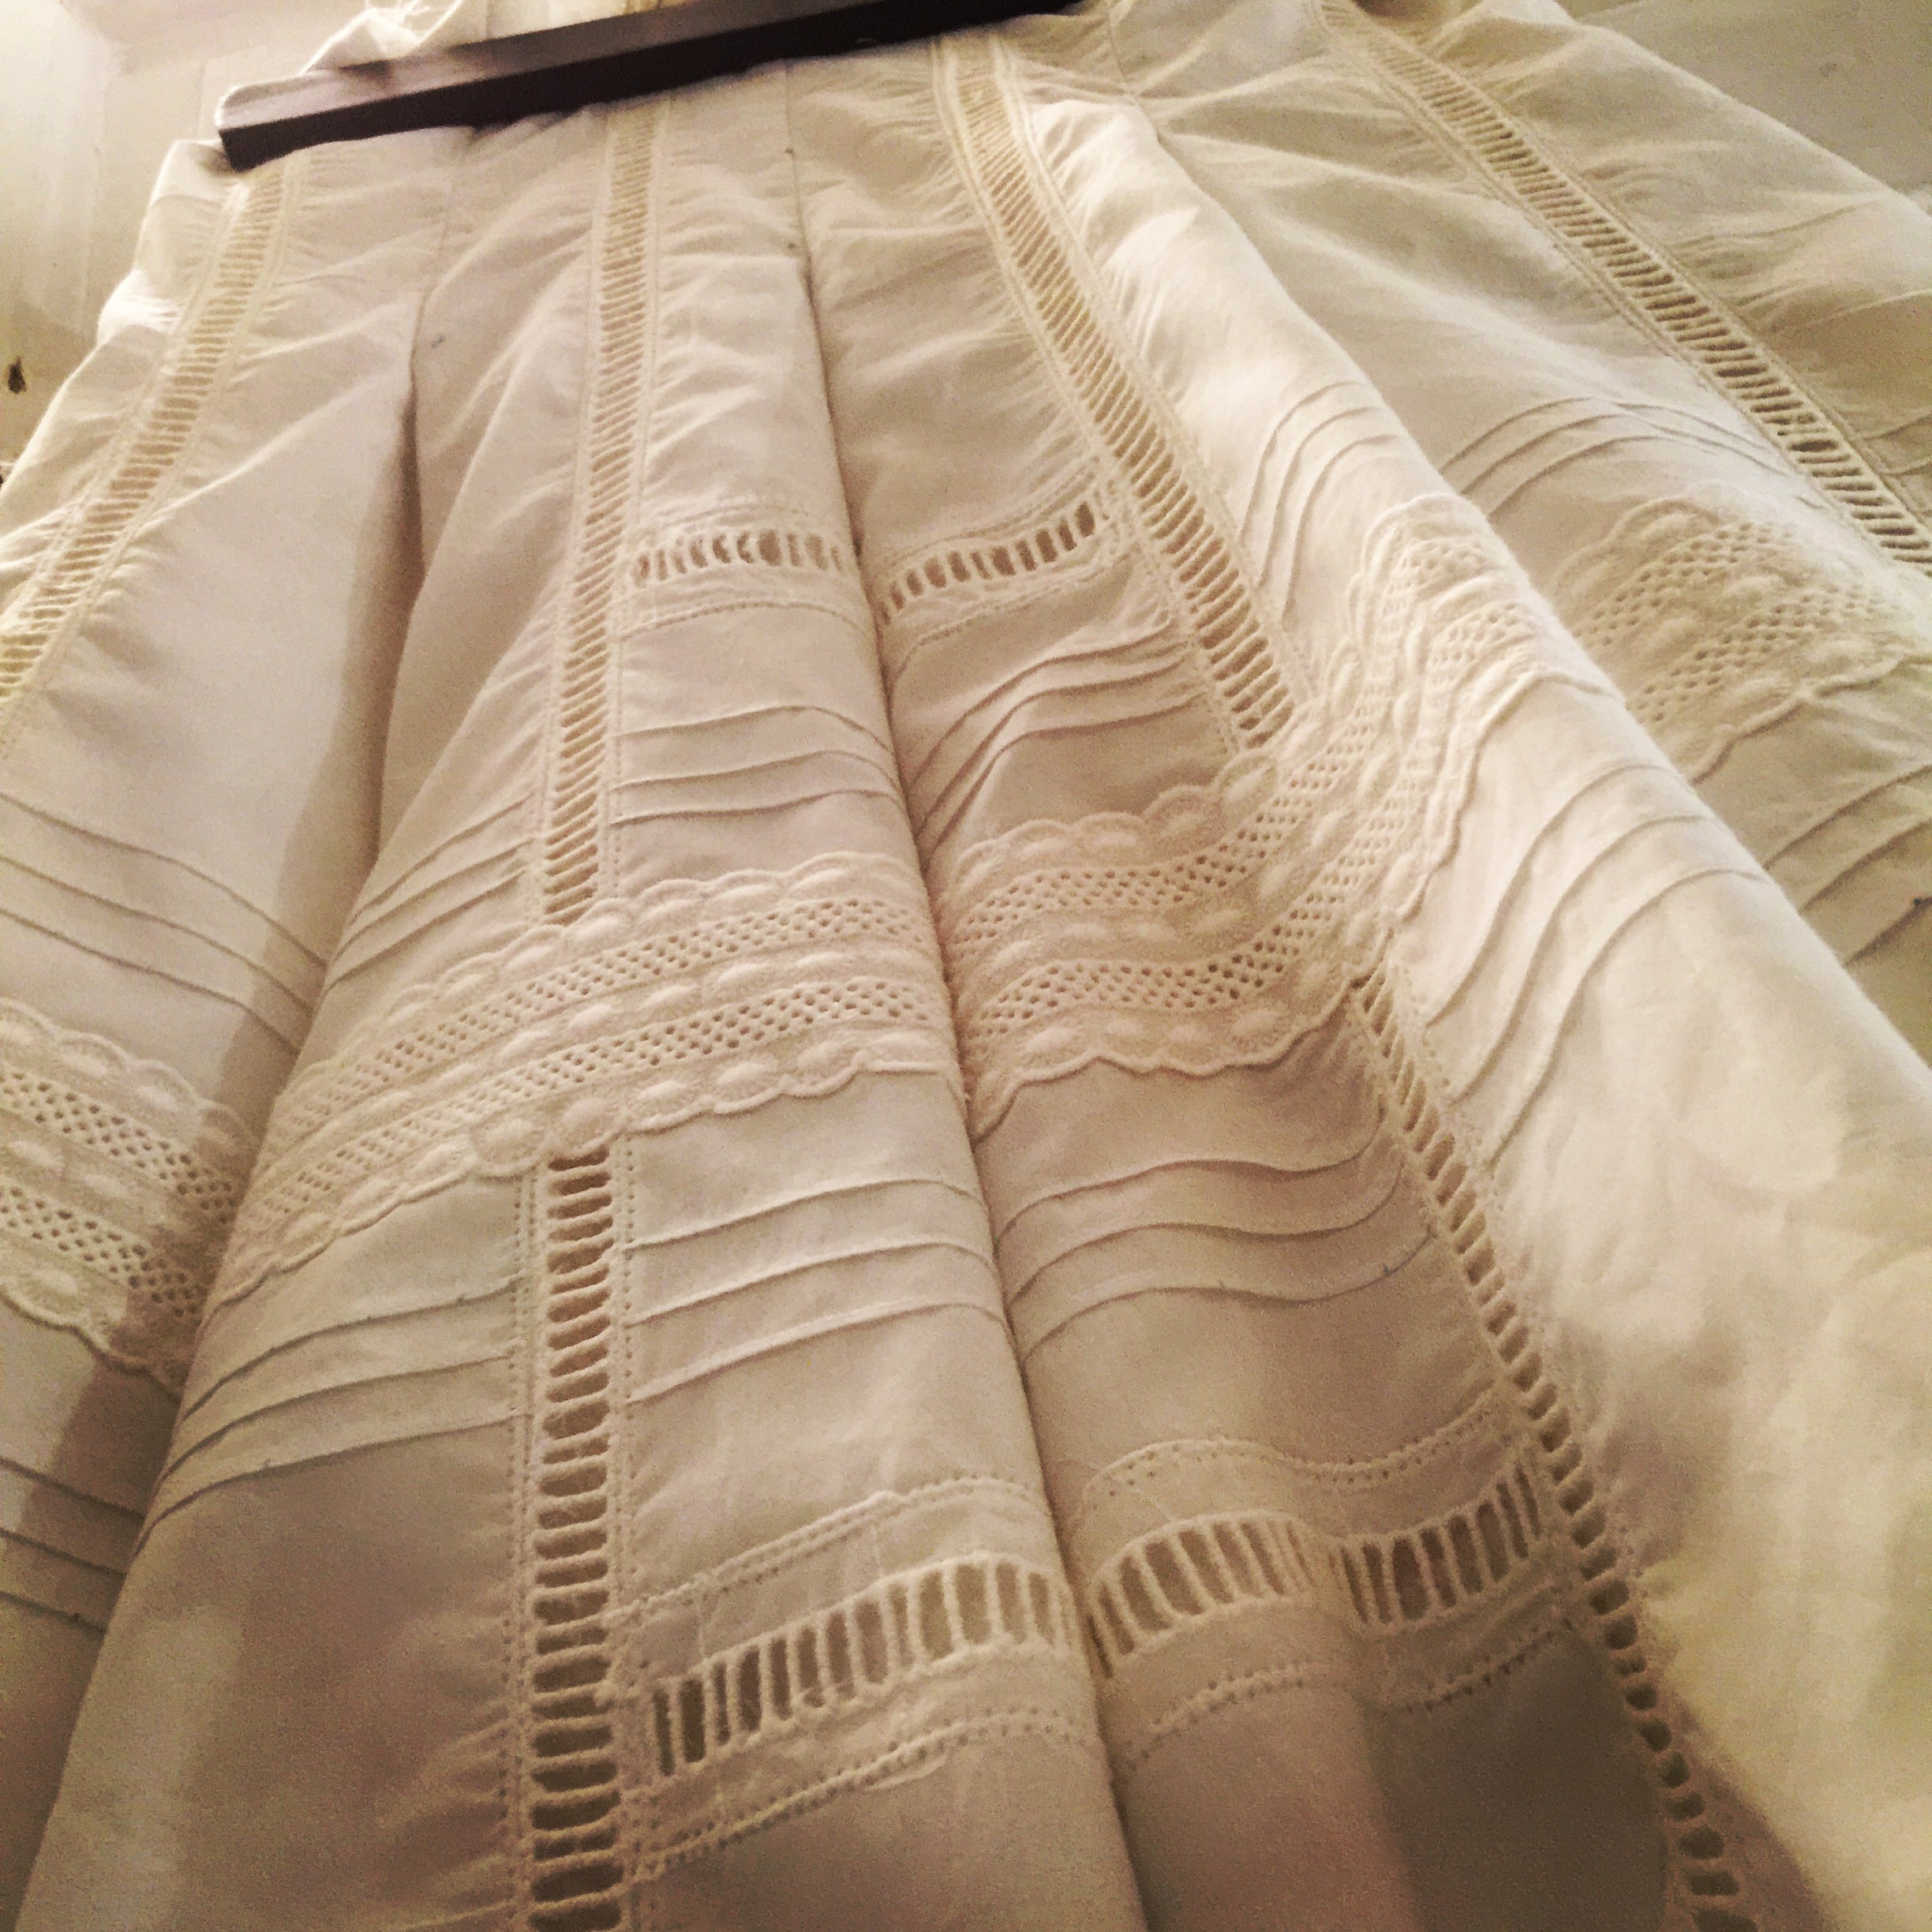
The tension was actually being fairly well behaved, but the embroidery stitches didn’t seem to be engaging, or at least only very randomly. I eventually traced the issue to a series of little levers under the main cover of the machine that are supposed to drop down into slots depending on which stitch option is selected, which were not dropping without manual assistance. So, eventually, I was able to get it to do a scallop the length that I wanted—but there didn’t seem to be a width adjustment available for the scallop setting, and I could only make it do a very narrow zig-zag. I think this is a limitation of the machine, since it has a fairly narrow total stitch width; in the end I went over the automatic scallop with a wider zig-zag freehand, and aside from the tension being a little too low (I had turned it down as that tends to work best for machine embroidery, and it looked great on top and didn’t pucker up the fabric, but it is quite loopy on the back side.) It’s not indistinguishable from the original, but it won’t be noticeable, and I desperately needed that extra length of edging.

I think cutting the strip off the bottom may actually have taken longer than embroidering it. But eventually it was done. Then I remembered I also needed to add three 1” tucks to the “flat breadths” panel before I pieced on the edging at the short ends.

But eventually I got it done. It was easier than the upper layer since the mitered corner was narrower. The removed edging isn’t the same as the remaining piece, but at least their width is similar.

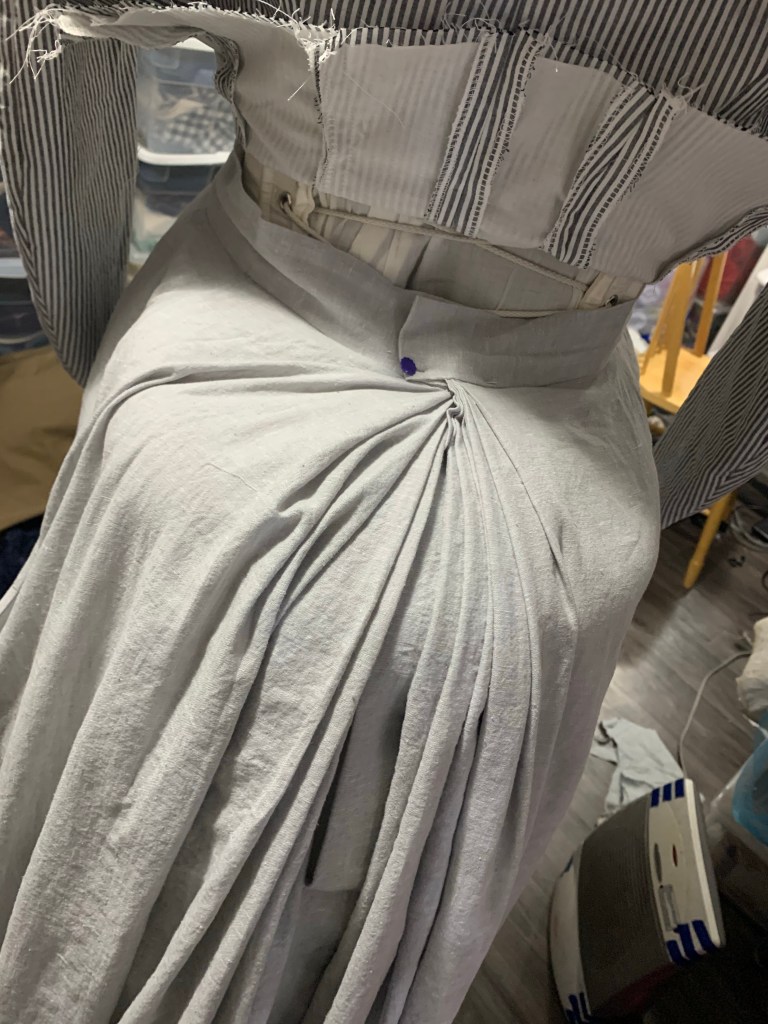
Based on the terse instructions, I actually think the “flat breadths” layer was supposed to be attached directly to the foundation skirt, attaching partway down, even though the illustration doesn’t exactly fit with this idea. But I didn’t want to do it that way, mainly because I feel like I might want to wear the foundation skirt alone for other things. As a result my “straight breadths” are pleated into a twill tape waistband and hike up a bit in the back. If I really wanted I could probably come up with a bit of an upper skirt to mount them to, but at the moment I’m not sure I’ll bother.

At last I could truly play with the upper layer. I was grateful to the pattern for at least clarifying the rough plan for the pleating; I basically used its markers at the front and back edges, and then added some fudging in between to get it to both fit and look how I wanted. I originally tried underlining the fabric with a craft netting to give it more volume, but my smooth fabric didn’t cling to the netting at all so while the netting had big, smooth folds, the fabric just slid over the top. So my folds definitely aren’t as full and thick as in the illustration. (Apparently étamine was a lightweight cotton, loosely-woven, almost mesh like fabric… so I’m not sure how much body it would have had either.) But I think they will do, even if they aren’t quite like what was illustrated.

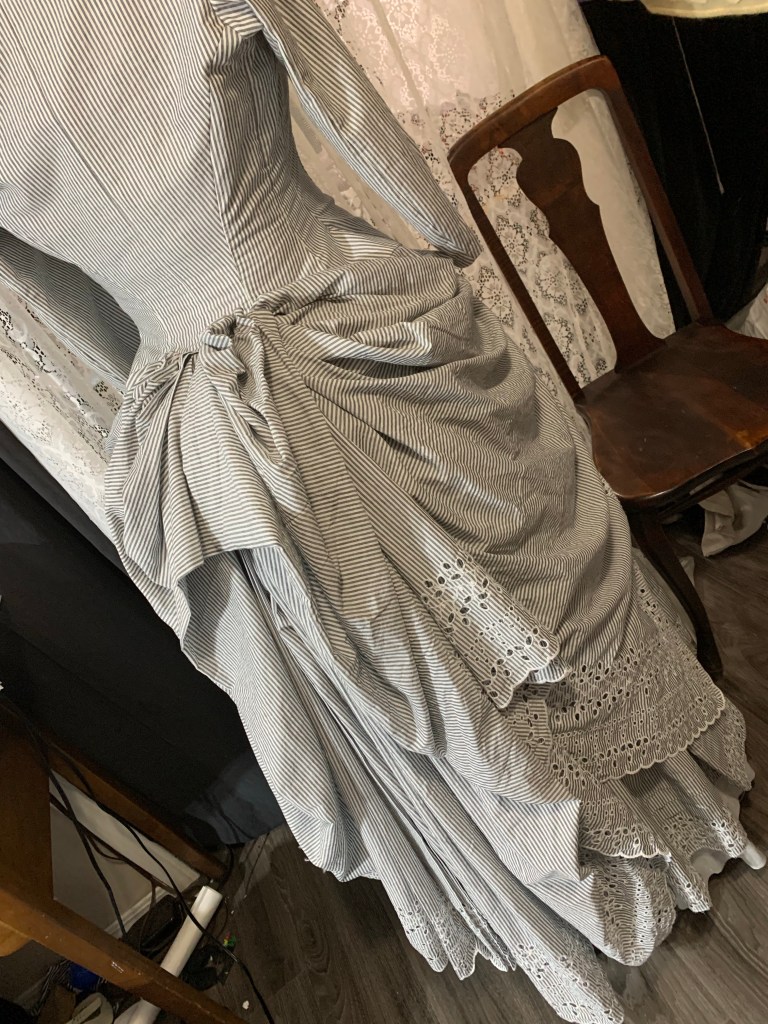
Arranging the pleats and folds of the upper layer was definitely the longest and most nerve wracking part of this project. Once done, I hand-basted them to the bodice and then carefully hand-stitched from the right side, and then catch-stitched down the seam allowances on the inside. This took forever as I kept having to tackle it in tiny ten minute intervals, but did eventually, and it does make the intricate upper layer very simple to take on and off.

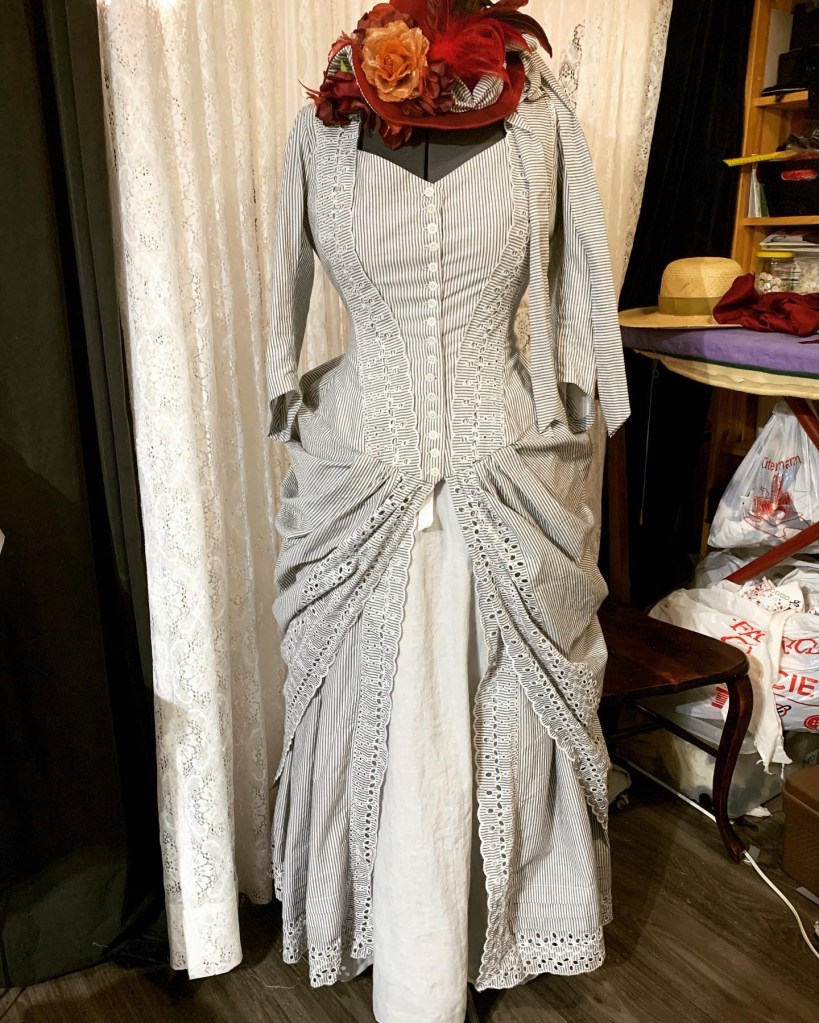
And that’s about that! I’d like to add a big red bow on top of the bustle, and I might just have enough long skinny scraps to add the 4” ruffle the pattern describes to the foundation skirt, if I want to. I’m contemplating some hooks and eyes at the bottom front of the bodice, to keep the various layers all together in the front, since that’s one of the things I like about the original illustration. But on the whole this has been a much bigger project than I had originally envisioned, so I’m happy just to get to wearable!

1 Comment

Filed under Sewing

A Victorian Sundress

So Victorian Sewing Circle is carrying on through the summer this year. Hooray! Except. The one Victorian outfit I have at the moment is, um, fairly heavy wool. This is not going to be fun come July. (Hopefully it’s still July when you’re reading this. )

So, I decided to pull the trigger on a project I’ve been halfway planning for a long time. What I’ve mentally dubbed a “Victorian sundress”

I had picked up this light cotton border embroidery on clearance ages ago when I was working at Fabricland. I actually got several different colours, though previously I have only used a tiny bit of the red to make these dresses for the twins. The most important thing about it though, was that there was something like nine metres of the grey colourway alone. For a bit of interest (and to stretch my fabric as I only had about 9m of the stripe) I decided to pair it with this grey cotton-linen blend, not historically accurate but yummy nonetheless, for the foundation skirt.

I started with the bodice; the skirt will get its own post.

It’s the same pattern I’ve used before, TV 462 although since I’m a very different size than I was in 2016 when I made it the first time, I was basically starting all over again. Which is ok, since I didn’t exactly nail it the first time. I had actually muslined the new size back in the winter. Truly Victorian uses a fairly complicated system of measuring for their bodices where you choose front, back, and sleeve sizes separately and then adjust to make it work. My bust and back were only one size different, so in the end I decided I would make everything the (larger) back size and if I had extra bust room, just pad it out. I still had to narrow the shoulders pretty massively, and I did a lot of vertical length adjustments since these patterns seem to skew long and I have a fairly short torso. I also did my usual preemptive swayback and square shoulder adjustments. When I tried on the muslin I determined that the front was actually pretty darn good, as was the back width across the shoulder area, but there was a lot of extra room in the back waist. I ended up taking 1” out of the side-back piece to get the shape approximately right, which improved the back fit immensely.

Also added width at the side seam below waist. May have overdone it.

One thing I forgot to consider, since there was a bit of a gap between muslining and cutting out my fashion fabric, was the shape of the back hem of my bodice. My pattern is for a tailed bodice, with a non-tailed lining, and to save fabric I had just muslined the lining pieces. At some point between muslin and final fabric, I’d decided on a different overskirt style that didn’t work with a tailed bodice, so I just went ahead and cut the final fabric with the same hem as the lining pieces, without thinking too much about the final shape it would make. If I had it to do over, I would try to draft a slightly longer, more elegant V point in the back. It’s a kind of short, meh shape on its own.

I went for the “closures first” fitting strategy, finishing the front of my bodice with bias tape and then adding the (machine) buttonholes and buttons. This let me try it on without pinning, which makes it a bit easier to fit. I then refined the fit a little, reshaping the side seams (taking in the waist 1/4” on each side and letting out the hips an equal amount.) and also wound up deepening the centremost front darts by about 1/4”. Not unexpected given the size I chose.

I was quite silly about how I positioned the boning in the front darts this time, putting it close to the fold of the dart where it flips around rather than against the stitched edge. But it doesn’t really show in the finished garment.

I added a waist stay, of course, using some of a wide red twill tape I got as a hand-me-down last year. It’s perfect for the job. I was a little worried about show-through on my light fabrics, but it seems to be fine.

I selected the “dinner bodice” neckline again because it’s both my favourite and maybe more cool than a high neck. However, I think I should probably make a high-necked little dickey to go under it, since this is meant to be a day dress.

Once the basic construction was done, it was time to consider embellishments. I had a (very limited) amount of eyelet edging left over from the skirt draperies to contribute to the bodice decoration. After some playing around and an abortive attempt at adding it to the ends of the sleeves, I settled on a strip going down each side of the bodice, coming to a V at the front bottom point. This kind of decorative feature is SUPER common in 1880s illustrations, although usually creating a faux-vest kind of look. I don’t think my variation is beyond reason though. I hand-stitched the trim in place, along the whole length at the straight edge, and tacked down between each scallop on the inner edge. I was a little anxious about getting such a wide flat piece smooth on the rather curvy front of the bodice, but it worked out ok. Did I mention I hand-basted it in place? I did more hand-basting on this project than I’ve done in YEARS.

I had one last tiny bit of trim (the piece I started to attach to the sleeve but didn’t like) so I made that into a small standing collar at the back of the neck. I think it’s cute, but I should probably add a little bit of wire to support the ends.

It turned out that the top layer of the skirt is actually sewn directly to the bodice, creating what the pattern terms a polonaise. I hadn’t planned on doing it that way, but I do like the simplicity of wearing that it gives the resulting dress. There is definitely some extra width in the hips, though I think more in the back—I like where the side-seam falls. I’m unlikely to take it in at this late stage, what with the upper layer of the skirt draperies attached directly to the bodice; I might add some padding to the area to smooth it out.

I also want to add a hint of red, to coordinate more with the hat, which will have a post of its own, too… but for now, at least, it’s wearable!

2 Comments

Filed under Sewing

Hey, mom…

I’m making you a coat. It’s a shop project so it has to be done in a couple of weeks. So you should really pop by.

1 Comment

Filed under Sewing

Excessively Heirloom

I’ll do proper pictures when I get a chance, but I wanted to throw this up before I forget everything. Like much of my recent sewing, this project draws on my desire to wear historical clothing, except not actually be in costume.

I first fell for McCall’s 6956 back in the spring. The Plucky New Girl at work had taken it out as a project, and, well, kinda bit off a bit more than she could chew, what with never having sewn from a pattern before. Since this was pretty much my entire approach to sewing from about 1989 up to, oh, 2010, I give her full credit. I just hope she wasn’t too traumatized. Anyway, me (and some other ladies) got to play angel and help her finish it off, and in the process I got to try it on and was, well, thoroughly charmed by it.

Also, I am so deep in sundress mode right now, I can’t even. ALL THE SUNDRESSES!!!

Anyway, it’s that awkward seasonal changeover at Fabricland where the old fabric is on the way out but the new stuff hasn’t much arrived so project pickings are slim, and it’s best to focus on the small core of non-seasonal fabrics that are always in stock. 
And did I mention sundress mode? Also, I was still craving DETAIL after the fun of the Gabriola skirt and its bodice. 

So I doodled up a picture something like this:

To be made out of our always-in-stock cotton batiste. And then I went looking for a pattern that sorta fit, and ended up with McCall’s 6956.
And then I went half-ass-heirloom insane.
OK, so I am not totally clear on the exact definition of “heirloom sewing”. I’ve read a few old Threads articles, and a lot of Victorian sewing manuals that describe the techniques, but not under that name. Anyway, what I’m basically saying is I experimented liberally with pin tucks, lace insertion, and faux-hem-stitch using a wing needle.

The pin tucks took the longest, partly because pin tucks take FOREVER and partly because I had a friend over so my sewing setup was optimized for hanging out rather than for quick changing between machine and pressing. No regrets. I tested out the cheater-pin tucking with a twin needle, but while I have a pin tuck foot for my Janome, I didn’t have a real twin needle, and while I can put two needles in the Rocketeer at what would be a perfect distance for twin-needle pin tucking, the foot won’t fit that machine and when I tried with other feet everything just went wonky quite easily. So all the pin tucks were done the old fashioned way—measure, mark, and stitch. I switched the Rocketeer to straight-stitch plate and foot for this, which I think helped me get the teeny tucks I was going for. (Oh, and I also wasted quite a few hours on quarter-inch tucked panels, too, before deciding I wanted a more delicate look. Hopefully I can use those for something else later.)
I cut the pieces for the bodice out of pre-tucked fabric (pintucks taken at 1 cm intervals, by the way), but did the tucks on the skirt after cutting. There was a lot of laying things out on the floor to make sure the tuck-lines matched up. (Mostly they do.) 

Everything else blurs into a haze of lace-insertion and indecision. I had gotten a bunch of this ladder-type insertion trim on deep clearance, and wound up going to town on that. I ran a strip down every panel except for the centre back ones (and I would have gotten them too except I ran out of trim.) 

I put the skirt all together. 
I pulled it off again.
Twice. That’s how long it took me to figure out the lining needed to be completely free from the outer dress, otherwise it just looked stupid. Eventually I figured out how I wanted the dress constructed. Then I started adding lace.

And cutting out the fabric behind it.

And, let’s just say I had better be damn careful when I wash this thing.

When the lining was incorporated into the pleats, it was way too puffy.


Oh, the tucks in the front are not as long as the pattern dictates, partly because that’s the look I wanted and party because I cut a size 10 and the waist was, um, snug. This fabric has a lot less give than that glorious grey linen-cotton. The bust fits perfectly though. 

Batiste is not really the right fabric for hem stitching, but it was still fun to do. I spent quite a bit of time (how many times have I said this about this time-suck of a project?) experimenting with how different stitches looked, but in the end one of the nicest was a simple zig-zag. Which is good because I used that lots of places. Whether it was a good idea, will remain to be seen…

My initial concept sketch buttoned up the front, but when I started working with the pattern I decided I liked the centre front tuck too much to get rid of, so while there are still some buttons, they are strictly decorative. And I have no photos of them because I actually sewed them on right before I hung the dress at work. 

There are millions of mistakes, flaws, and other irregularities that I won’t go into. The only one that’s really bothering me is that the front isn’t quite symmetrical. My best guess is that this happened when I was inserting the ladder-trim—I think when I cut the piece in half to sew the insertion in, I didn’t line it back up perfectly (since the top edge is slanted this is a bit tricky, I should’ve worked from the hem.) And I didn’t realize until well after everything was topstitched and lace slapped on and fabric underneath cut away and, well, crud. It is what it is (and, if you didn’t notice anything until I said so, well, hey, what’s that over there? No, pay no attention to the rest of this paragraph…)

Anyway. Finished the hem with zig-zag faux hem stitch, and the lining hem with the last of my lace. Seriously, I had like six inches left over. Whew!

And then I raced off to work to hang it, so I didn’t even get any decent finished pictures. Which means they’ll have to wait for their own post after I get it back at the end of August… Basically, after sundress season is over. Um, not my best planning ever. 😦

Oh, well. I should really be making Tyo that birthday flannel she wants, anyway. 😉

17 Comments

Filed under Sewing

A draped overskirt

Last weekend I continued to futz with the Victorian outfit. The waistband is still a mess, but I hemmed the skirt. And hemmed. And cried. And hemmed. And it’s not perfect but it’s hemmed (not pinned!) and doesn’t look too terrible from a safe distance, so we’ll go with that.

 The next (almost final?) phase of the half-assed Victorian outfit is the draped overskirt. They’re not quite mandatory for 1880s outfits, but pretty darn close. My texts say either “these things are crazy, go get a pattern” or “use about this much fabric and go to town.”

And of course, “But be tasteful.” The Victorians were big on taste, apparently. But also sure that basically no one had it. Personally I’m pretty sure I will fail at taste, so I’m not going to sweat it.


I did, in fact, buy myself a pattern, last summer, Truly Victorian 368, the “Waterfall Overskirt”. I wanted to see a basic idea of how they went together. It was very interesting, and also very simple, once you had it it laid out for you.

I’m planning on using the waterfall version for my blue dress, so I wanted this one to be different.  I had a vague mental image of the overskirts that leave one side ungathered so there is kinda a point at the bottom. 

To start, I eyeballed what I had left of my grey suiting (around 2m) and estimated what I wanted to drape over the front, and cut that much off.

After some experimenting, I took my general shape (a rectangle with a bit more length on one side—mostly to do with the shape of the fabric I had remaining) and added the lining and an interlining of some random stash drapery sheer that was thin and a little crisp, on the theory that it would give my thin and drapey suiting a bit more body.

img_3279-1
I was all set to put in darts when I decided I didn’t want the disruption in the stripes, so I cut a curve out of the top instead to go around the waist. There followed a lot of futzing with pins and playing with pleats until I had it arranged to my liking. I’m very glad I took the time to adjust the dress form for wearing my corset—it took a fair bit of wriggling and padding but with the corset it actually approximates my corseted shape quite well—kind of like those skin-tight covers they talk about making when you pad out a custom dress form. Unlike anything it has ever done for my un-corseted shape.
But doing this kind of draping without a form would be tricky.

 The back drape I cut into some shallow points at the bottom, finished the edges (it’s just lined and turned, with the same interlining as the front), and then started pleating and pinching and messing around.

 I ran a piece of grosgrain ribbon down the inside of the back to anchor the central tucks onto. On its own I actually liked it better without it being all tucked up in the middle, but once I layered the bodice tails over I added some more tucking.

 I had messed around with pinning up the tails before, but I think I have a much better arrangement now.

 And I like the button. I think I need to move my waist stay down a bit in the back, so the bodice hugs the back a little better.

2016-02-16 06.02.37
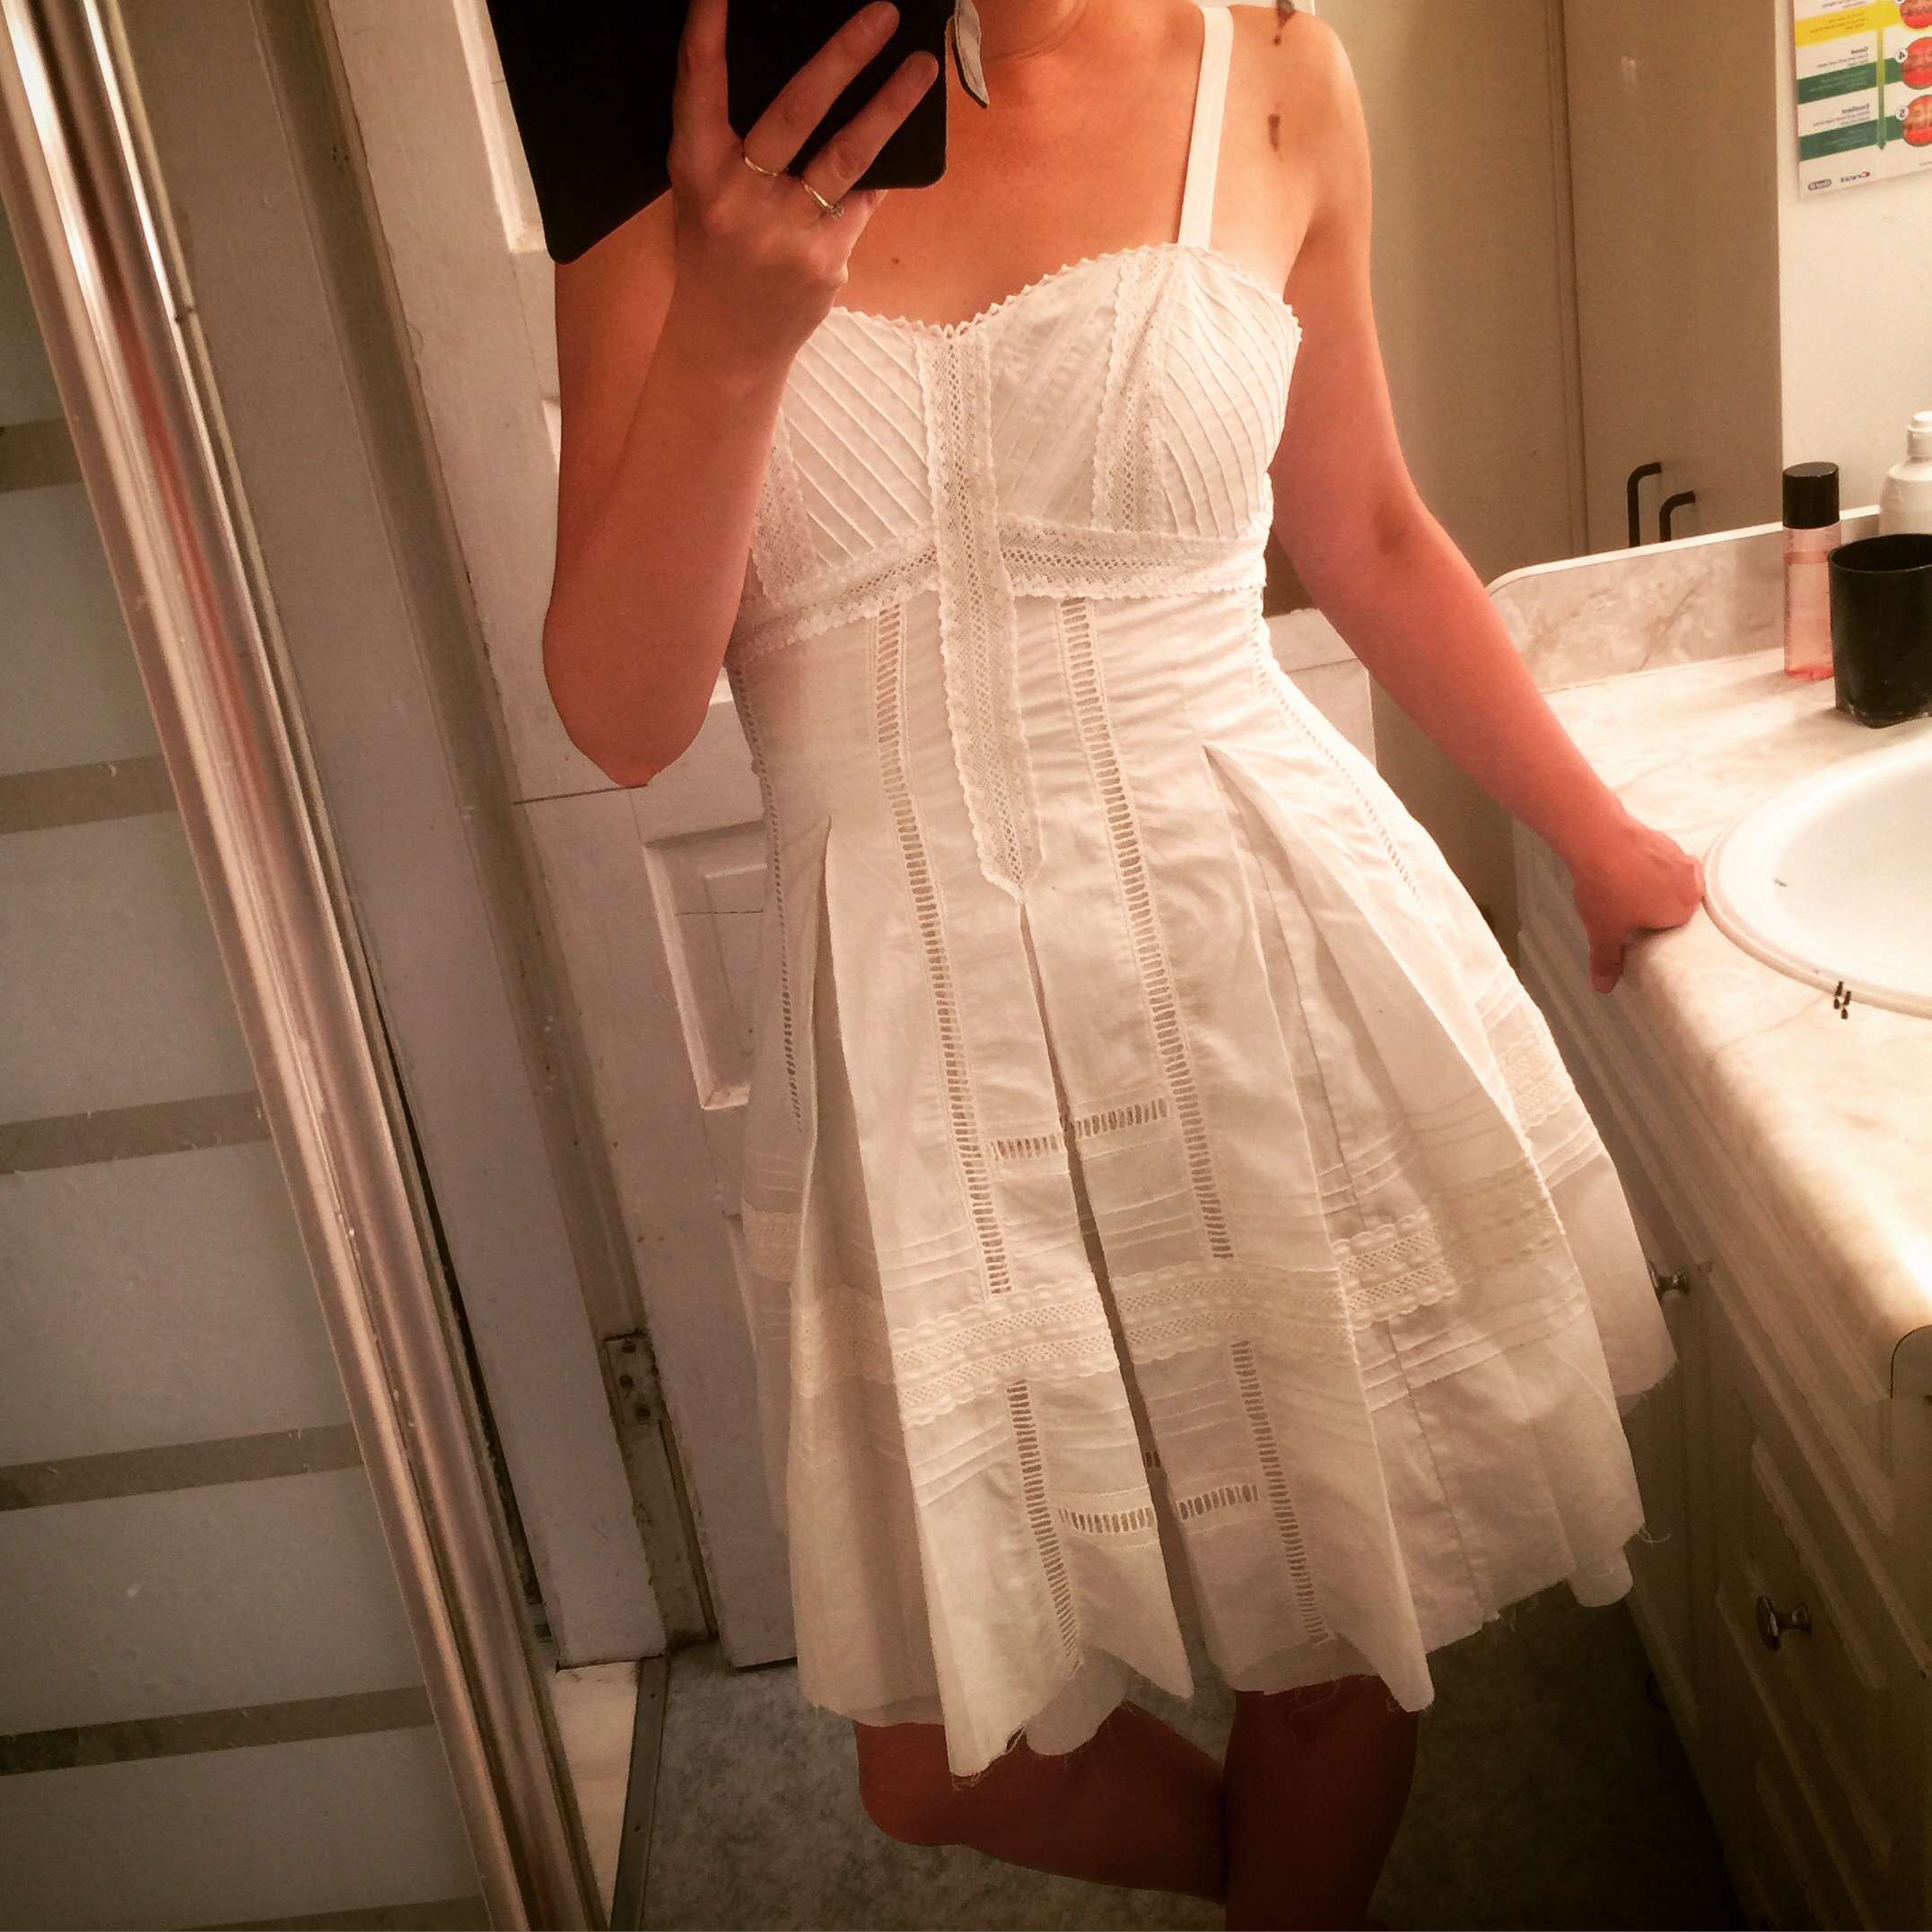
And then I need to bite the bullet about trim. I have a ton of 5/8″ satin ribbon in the right red, some pleated, some not… But what, where, and how much is enough? Or too much. Is it possible to have too much of anything on a Victorian getup? I think we’re straying into “taste” territory again…

10 Comments

Filed under Sewing

V8801—men’s jeans

Men's Jeans

Men’s Jeans

I’ve been wanting and not wanting to sew jeans for Osiris for YEARS. For all the usual reasons: he is picky and has some specific fitting issues. Frankly, making shirts for him hasn’t been hard—as long as the sleeves are long enough and he gets the details he likes, he’s pretty much happy. But jeans—now that’s all about fit. Scary, scary fit.

So, let’s start with his main requests: slim/tapered legs (but they can’t be too tight) and a rise that isn’t too low. Fit issues will be leg length (easy) and his curvy-for-a-dude butt. (potentially horrifying. The fitting challenge, not the butt itself. I quite like that bit.)

I have a couple of patterns I’d like to try, starting with Vogue 8801. I’m kinda hesitant since what is out there for reviews are fairly mixed. (Everything from too tight to too loose to right on, but some concerns about the pocket placement and yoke proportions seem more consistent.) I was pleasantly surprised my husband’s 32″ waist and 37″ hips were within the same size range—but then he’s a little “chunky” right now, which makes him a lot easier to fit. (When he’s not “chunky” he has a 28″ waist, try finding men’s pants in that size. 😉 )

I also compared the Vogue pattern to an old indie pattern* I have that looks like it stepped right out of the rodeo. And was pleasantly surprised that they were very similar in overall size and rise. The Vogue seems to have a narrower front, but wider back pieces, and the angle of the legs is a bit different.

Curved yoke piece.

Curved yoke piece.

I made (perhaps unwisely) a few preemptive fitting adjustments. These are the same curvy-butt adjustments I make for Tyo (and to a lesser extent myself): increased height at CB with a wedge, and curving in the top of the back yoke. This may throw off the waist size, but we’ll cross that bridge when we come to it. Happily the waistband has a CB seam which should help with tweaking the rear fit.

At Osiris’s request, I’m using stretch denim. He’s had some health issues the last few years that contribute to a lot of weight fluctuation and variable bloating, so stretch denim has become his friend. The denim I’m using for the “muslin” pair is just barely stretchy , but the one I am hoping to make the “good” pair out of is both beefier and stretchier. (Frankly, it is taking every bit of my willpower not to make it into something for me… I totally downloaded the Ginger jeans pattern a few weeks ago… 😉 )

Fabric. And pocket lining.

Fabric. And pocket lining.

Another thing I’m curious but ambivalent about is the shaped waistband in this pattern. I mean, I’m all about that in my own jeans, but I wear them low, where curvature is needed—not at all where Osiris wears them. And they’re supposed to be interfaced (I even bought waistband interfacing, which of course won’t work with the contour band). If I do interface, I’m thinking I’ll go with a knit fusible, to get some extra heft but keep the stretch Osiris is loopin

Anyway, wish me luck!


*Designer Jeans #260, from Sharon Marie Studios, which appear to have been published out of Edmonton, Alberta, in the late 70s and early 80s. I have actually collected the entire family—men’s, women’s, baby, and a couple different size range of children’s jeans. My mom squealed when I showed them to her—apparently she made me a pair of jeans with one of the kids’ patterns when I was small.

9 Comments

Filed under Sewing

This is going to be way too much fun.

20140607-230159-82919136.jpg

9 Comments

June 7, 2014 · 11:00 pm

In Progress

20140207-221519.jpg

McCall’s 6800.

20140207-221537.jpg
But first, bias tape.

20140207-221550.jpg
Lots and lots of bias tape.

20140207-221608.jpg
Sandpaper for distressing seams before topstitching.

20140207-221628.jpg
Topstitching. Also lacing loops in back. Because everything is better with lacing.

20140207-221654.jpg
Bound seams.

20140207-221710.jpg
Sneaky pocket topstitching.

20140207-221741.jpg
It’s coming together! Also, full circle skirt. Also, I got 4 metres of that lace, and it’s all laid out there.

Tomorrow, I put in sleeves! And maybe buy more lace. And more fabric for bias tape. I’m going to run out.

29 Comments

Filed under Sewing

I am a bad girl.

Oops!

Oops!

I have a winter coat cut out that needs to be sewn. Syo needs some costuming made for a dance performance at the end of the month. And did I mention I’m working two (sometimes three)  jobs right now? AND I need to get started on my Christmas sewing, if I’m actually going to do any. Which I want to. I have a whole post on that in drafts, alongside the post on the Vader Dress and a number of other things I haven’t managed to blog.

So what am I doing?

Vogue 1094

Vogue 1094

Making Vogue 1094. Because no reason, except that this border-embroidered mesh (which really wanted to be a sari in another life) demanded it. Because I need another fluffy fifties dress SOOO badly. (The poor 70s, they are getting so neglected. I actually had someone at work say to me that I had a 50s-vintage style going on, and I was all like, well, the 50s are fun but really the 70s has my heart, and then I took stock of what I’ve actually been WEARING, and, well…)

I’m probably going to use some of the rest of it to make a gathered drape around the top rather than do the folded bias bands the pattern calls for. I love the drapes (even if they are a little strangely-constructed) but really, with this fabric, how can you not use the lace, um, EVERYWHERE?

When I went to trace the pattern, I found myself boiling it down to a mere three of the Voguety-million pattern pieces. Bodice front, bodice back, and skirt. For the skirt, it calls for six identical, tapered panels. There is a separate piece for the skirt lining, but on comparison the only difference was length. I knew I wanted to use one wide, gathered rectangle to make the most of my embroidered mesh, so I only traced the one.

For under my mesh, I found a gorgeous, two-toned taffeta that is mostly black with just a hint of blue. I wasn’t sure about the blue with the black overlay, but in and of itself I liked it better than any of the five other black taffetas I looked at, and the part where it was 70% off an already reasonable price didn’t hurt, either. It is, by the way, the hardest fabric to pin through that I’ve ever met.

Bodice front

Bodice front

The construction described for this dress is, well, odd. There’s a lot of handwork, not surprising, and the lining is more of an underlining—which suits me fine, I suppose, but as I said, I’m not using the lining bodice pieces, which don’t extend into the shoulder region. Yeah, I don’t really get it either. Although I’d be curious to try, at some point, just to see what it turned out like. Just not with this particular fabric. For this make, the fabric is totally boss.

Before tracing the bodice pieces, I pulled out my pieces from Project Drop Waist to compare. I wound up shortening only at the waist, and adding a centre back seam to make my swayback adjustment. We’ll see how the shoulders end up fitting—it’s pretty hard to gauge in this style. Other than that, and a little side-seam twiddling, I don’t THINK I need to do much. I suppose we’ll see if it fits.

Yesterday, when Stylish and I got together for our weekly Jacket Makings session, she made fleece pants (one can never have too many) and I worked on this. Since I didn’t have anything over there good for marking darts on dark fabric, I mostly worked on the skirt. Yes, we had a largely jacket-free Jacket Makings day.

Skirt

Skirt

I cut the skirt panels from the taffeta and sliced off one entire side of my 4.4m of lacy yardage. I shortened the skirt by 2″, which puts the hem more at my knee than below it—which is where I like it, although it may throw off the overall proportions of the dress. So be it. I also narrowed the bottom flare of the pattern piece just a smidgeon, because  it was SO CLOSE to fitting double on my taffeta and it would save so much fabric. Not that I know what I’m going to do with an extra metre of blue-black taffeta, mind you.

Hem interior---braid on right, taffeta on left.

Hem interior—braid on right, taffeta on left.

I also got the pattern-recommended 3.5 m of horsehair braid. Which brings me to my biggest irk so far. Recall that I shortened the pattern, and that I narrowed the skirt slightly, all of which would have narrowed the hem. I still wound up being short about 15″ of braid. ARGH! WTF? Should I have stretched the horsehair more? I know it’s flexible stuff, but somehow that seems like a bad idea. If I’d been at home, I probably would’ve had a remnant somewhere I could splice in, but as I was at Stylish’s, I didn’t, so I settled for splicing in a piece of the taffeta, cut on the bias. Probably some interfacing would’ve been helpful, but I was irate and didn’t think of it until just now when I was typing this. It doesn’t show on the outside, and I suspect that the small, slightly-more-flexible part of the hem won’t be at all noticeable once all the gathering is said and done, but still. I’m annoyed.

So the skirt is pretty much ready to be gathered on to the bodice, which leaves me with the scary part of the dress-making—the bodice. I guess I’d better go pull up my big girl panties and find my tracing wheel…

(And did I mention that there’s about three metres of the other edge of the mesh fabric, with the same lace border, left? can we say skirt?)

9 Comments

Filed under Sewing

Not dead.

Life.

Life.

Although that might be easier. Er, not. Quite.

Refugee serger camped out on the computerdesk. #sewdontclean

Refugee serger camped out on the computerdesk. #sewdontclean

To start with the good news, the serger survived her little bath. I left it a week, silica gel-packs stuffed inside (although it occurred to me later that the key part is probably the motor, which is actually mounted on the back, not inside where the gel packs were. I tried to get the cover off the motor but the bolts holding it on were not cooperative and I didn’t want to strip them. So I waited.) Anyway, when I finally dared to start it up a day or two ago, after cleaning and oiling (although I really don’t think the water touched anything that actually moved…), she was fine. Aside from her recurring tension problems, anyway. (I continue playing with the bit of extra thread wrapped around the  needle-thread tension disc.) The White (which is my main sewing machine right now despite being a little temperamental) has some rust on the foot pedal I don’t think was there before, but everything is working.

Wedding Dress Trial #1

Wedding Dress Trial #1

Which is good because I have a month to finish Epona’s wedding dress and five bridesmaid dresses. Holy fucking cow. And work is likely to be at least somewhat insane during that time, too. On the up side, the wedding dress itself is pretty simple (the practice version took two days to sew up, obviously I’d like a bit more time with the real thing) and I could’ve had the first of the bridesmaids dresses finished last night if I hadn’t kept stopping to watch bits of “Oz the Great and Powerful” with the kids and hubs.

Bridesmaid dress bodice... in progress

Bridesmaid dress bodice… in progress.

Which kids are done school now. so no peaceful days of working at home, unless I can manage to bribe my MIL to take them to the lake for a week or something.

Wedding dress back. I'm kinda stoked about how the lacing turned out.

Practice wedding dress back. I’m kinda stoked about how the lacing turned out.

Speaking of the children, it has now been over a decade since I was last pregnant. Happy birthday, Syo!

Syo is now ten.

Syo is now ten.

And I have a late birthday dress cut out for the Waif, but unlikely to be sewn up until the wedding is done. DAMN.

Waif's birthday dress.

Waif’s birthday dress.

Waif just turned five. It is a size 3 pattern. I added an inch of length to the bodice, but it will probably still be too wide. Going for the middle view, of course.

And as a result, I’m spending all my “free time” ogling corset forums and adding and removing things from my fantasy cart at Farthingales.

How’s your summer going, stitchers?

15 Comments

Filed under Sewing