Tag Archives: corset

Long Stays

Back in the winter, I got inspired to try and update my long-neglected Regency period wear. In particular, certain world events have had a lot of us Canucks thinking about the War of 1812 a lot more than we ever had before… which got my little historical sewing group planning an 1812 picnic on August 24. First off, I wanted to make a new set of regency stays, since my old ones aren’t fitting quite how they used to. And I’ve always wanted a set of long stays, anyway.

I actually mostly finished these back in April, but I wasn’t quite satisfied with the fit. Recently, I finally made some tweaks that I think have saved them.

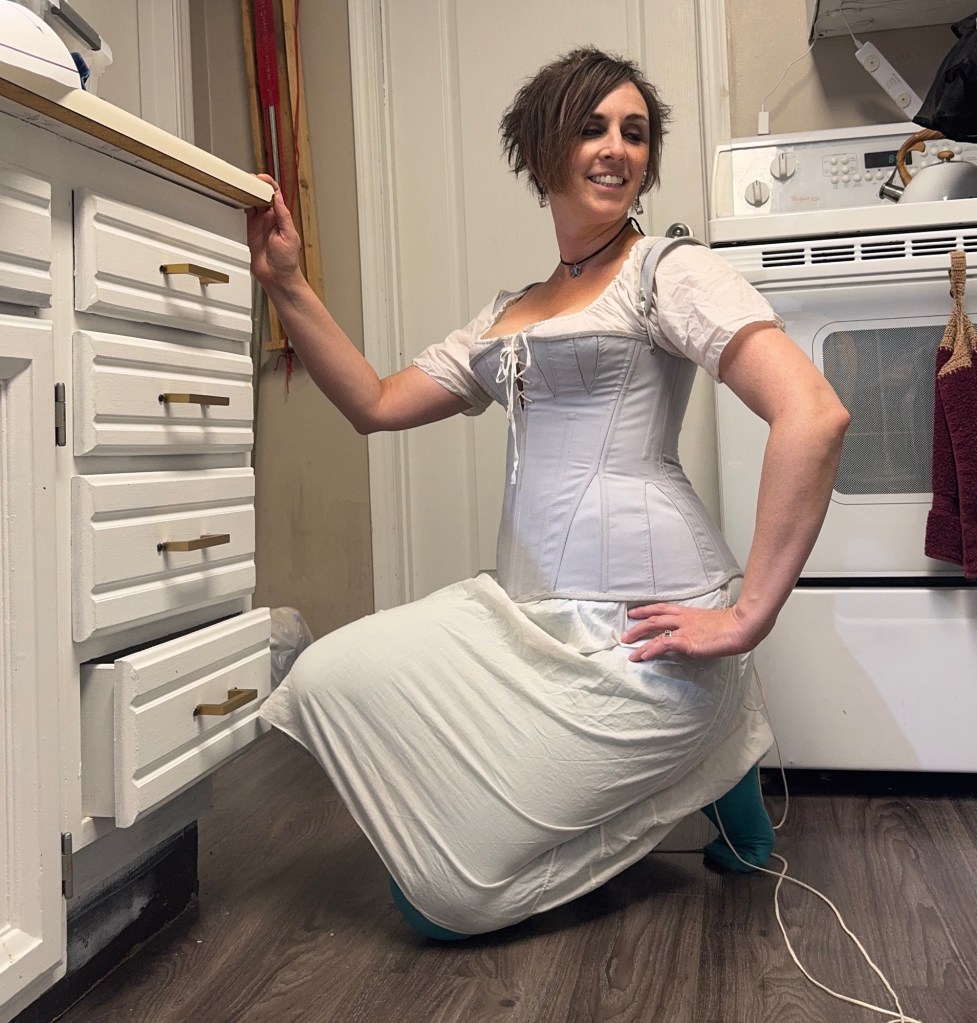
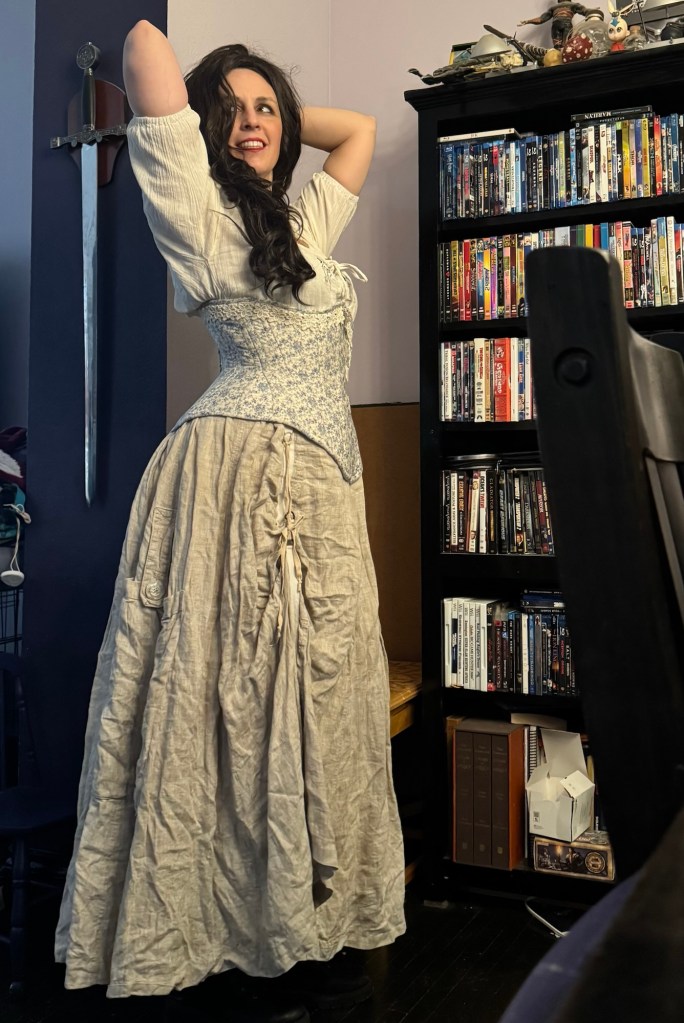
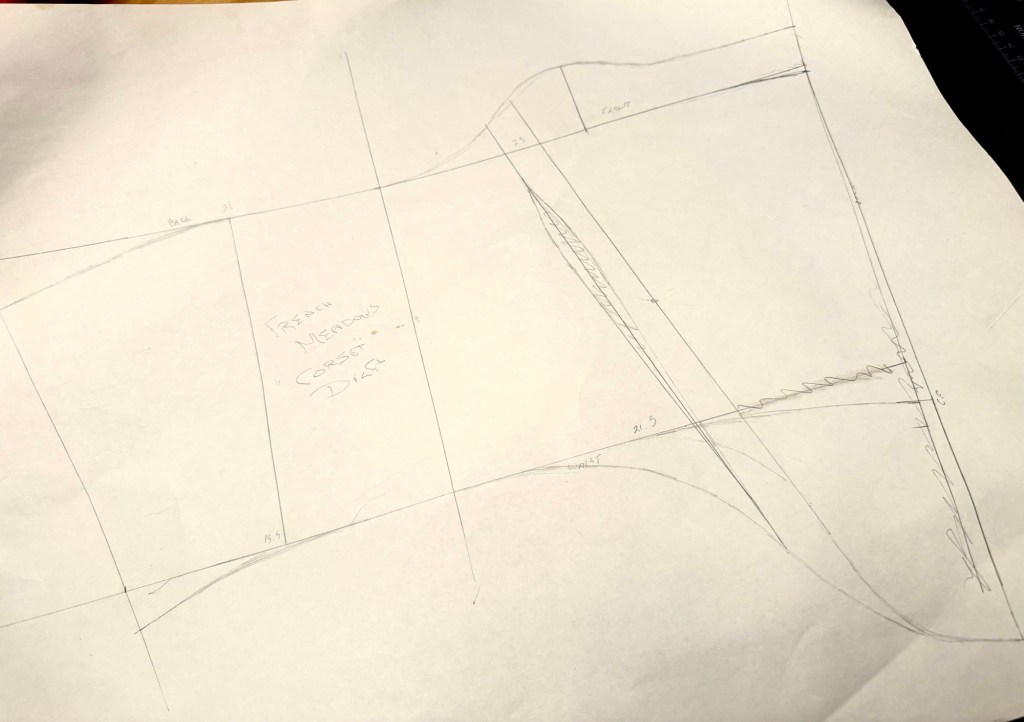
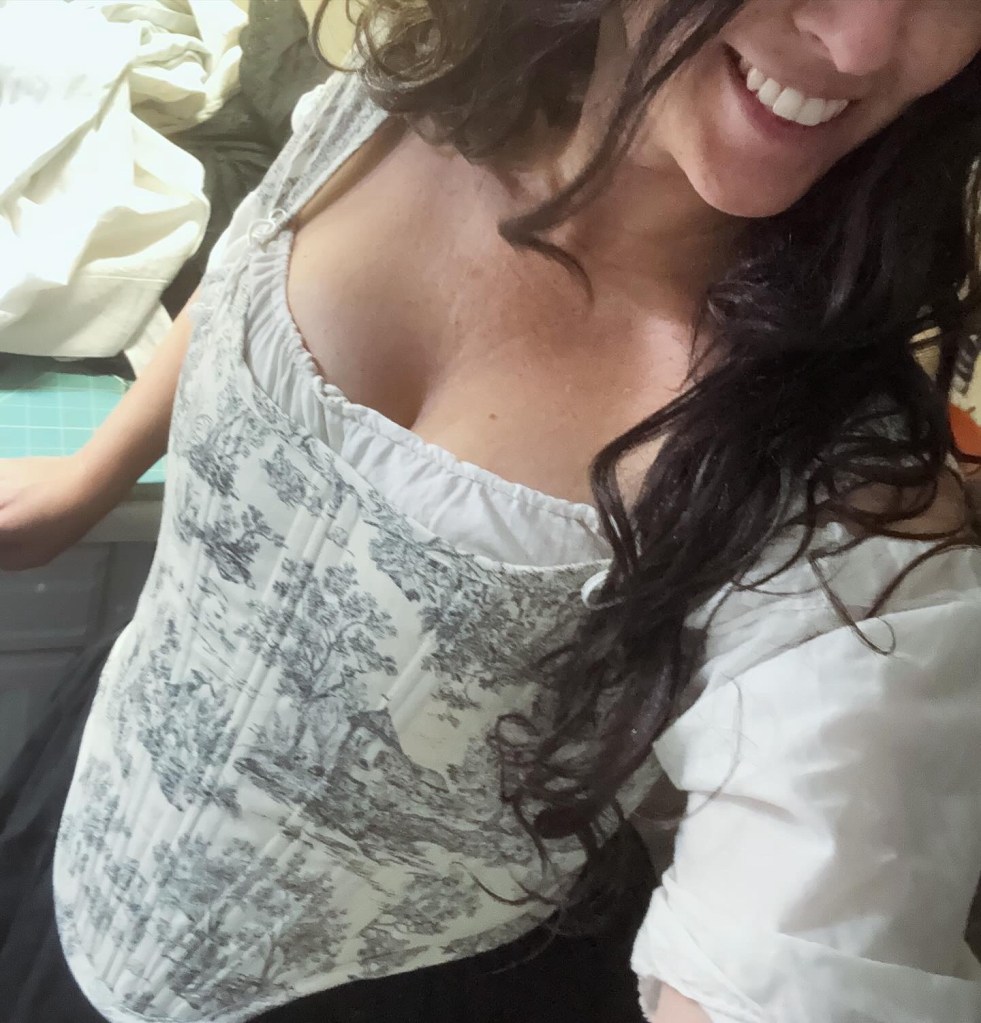
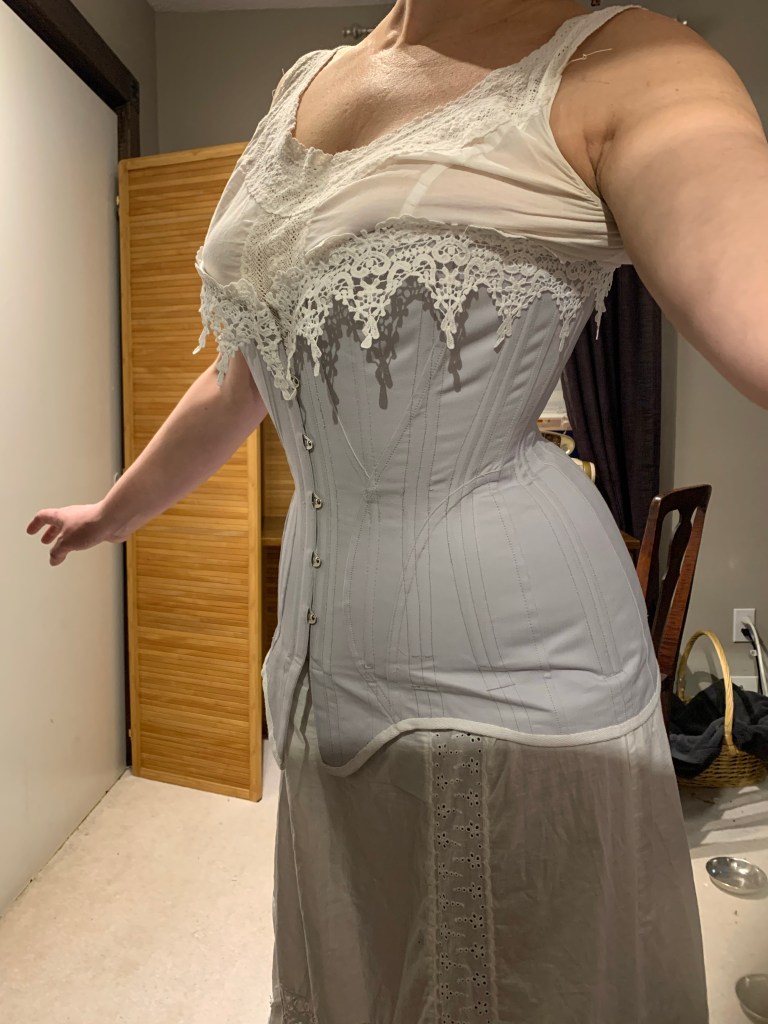
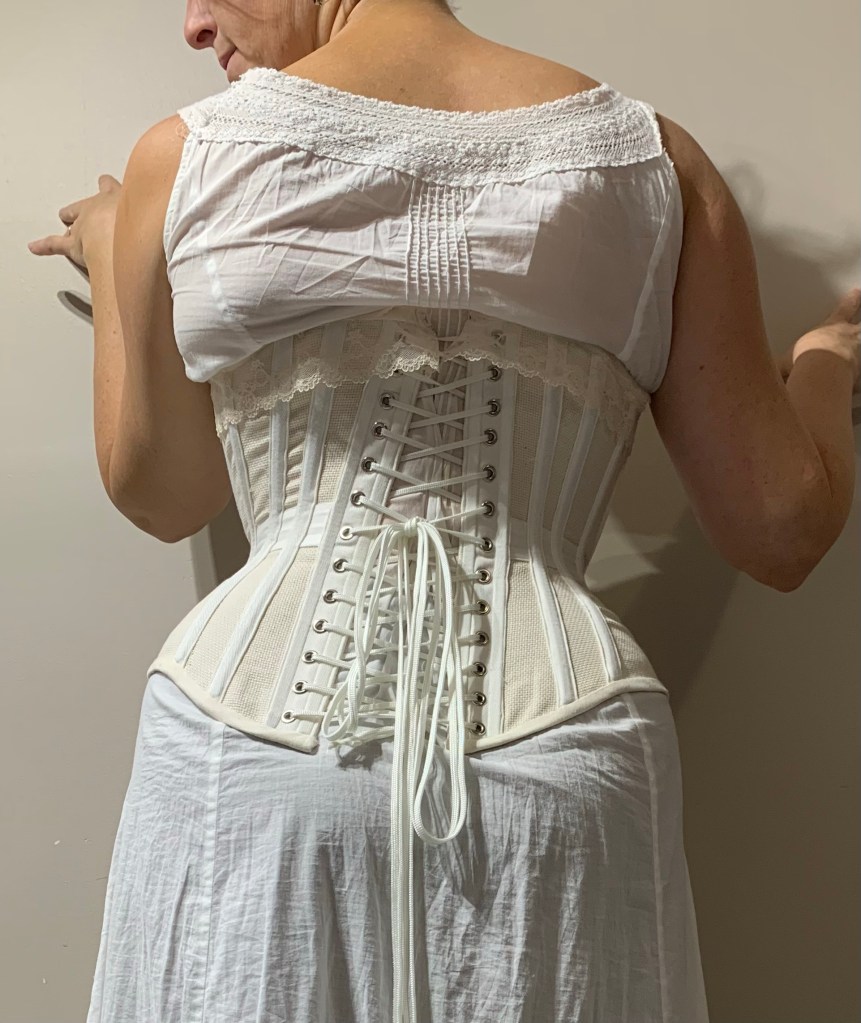
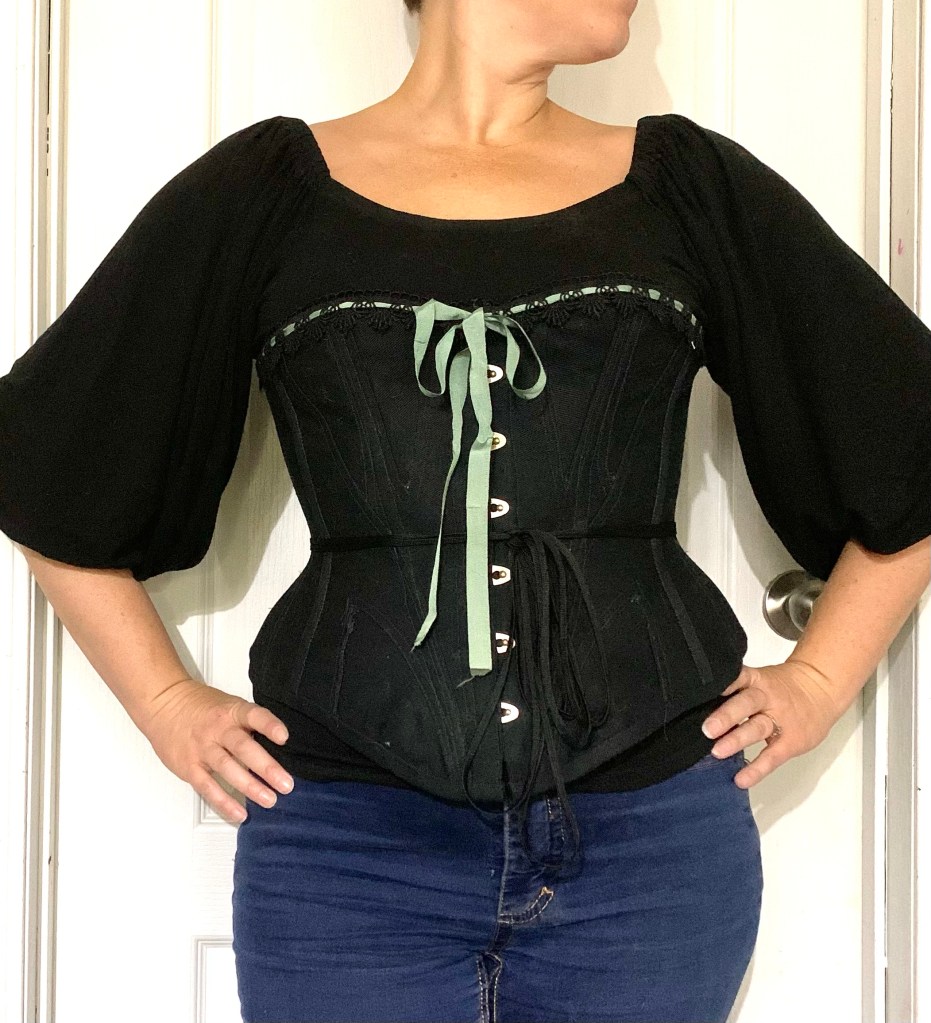
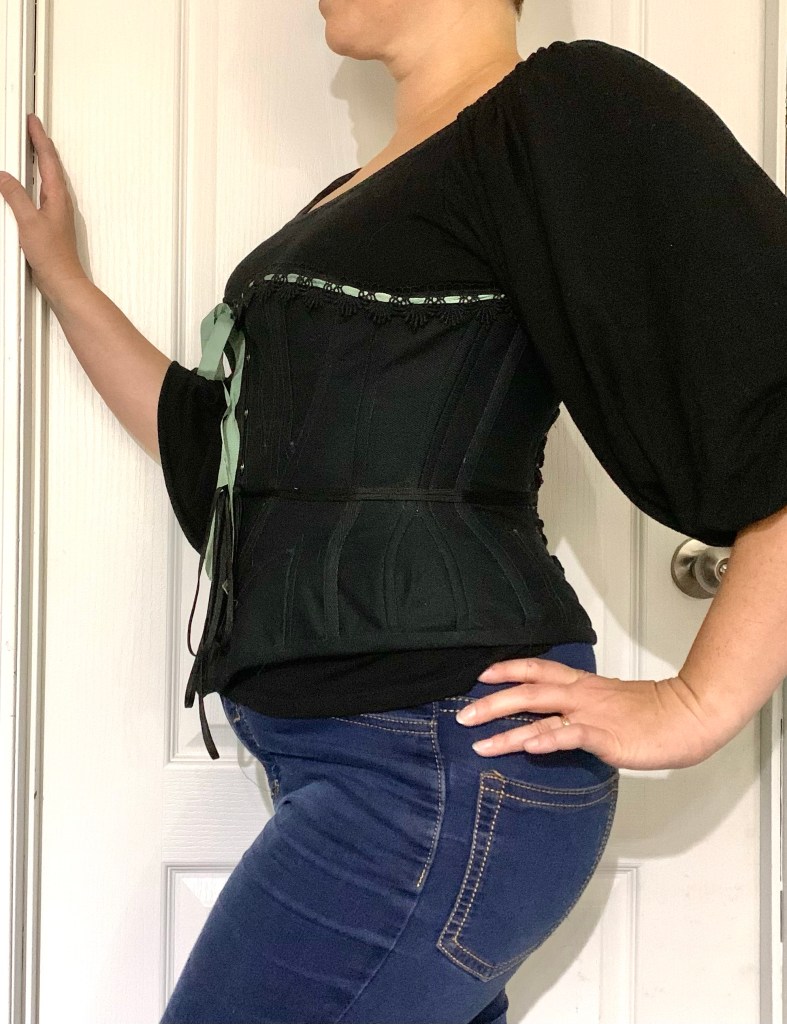
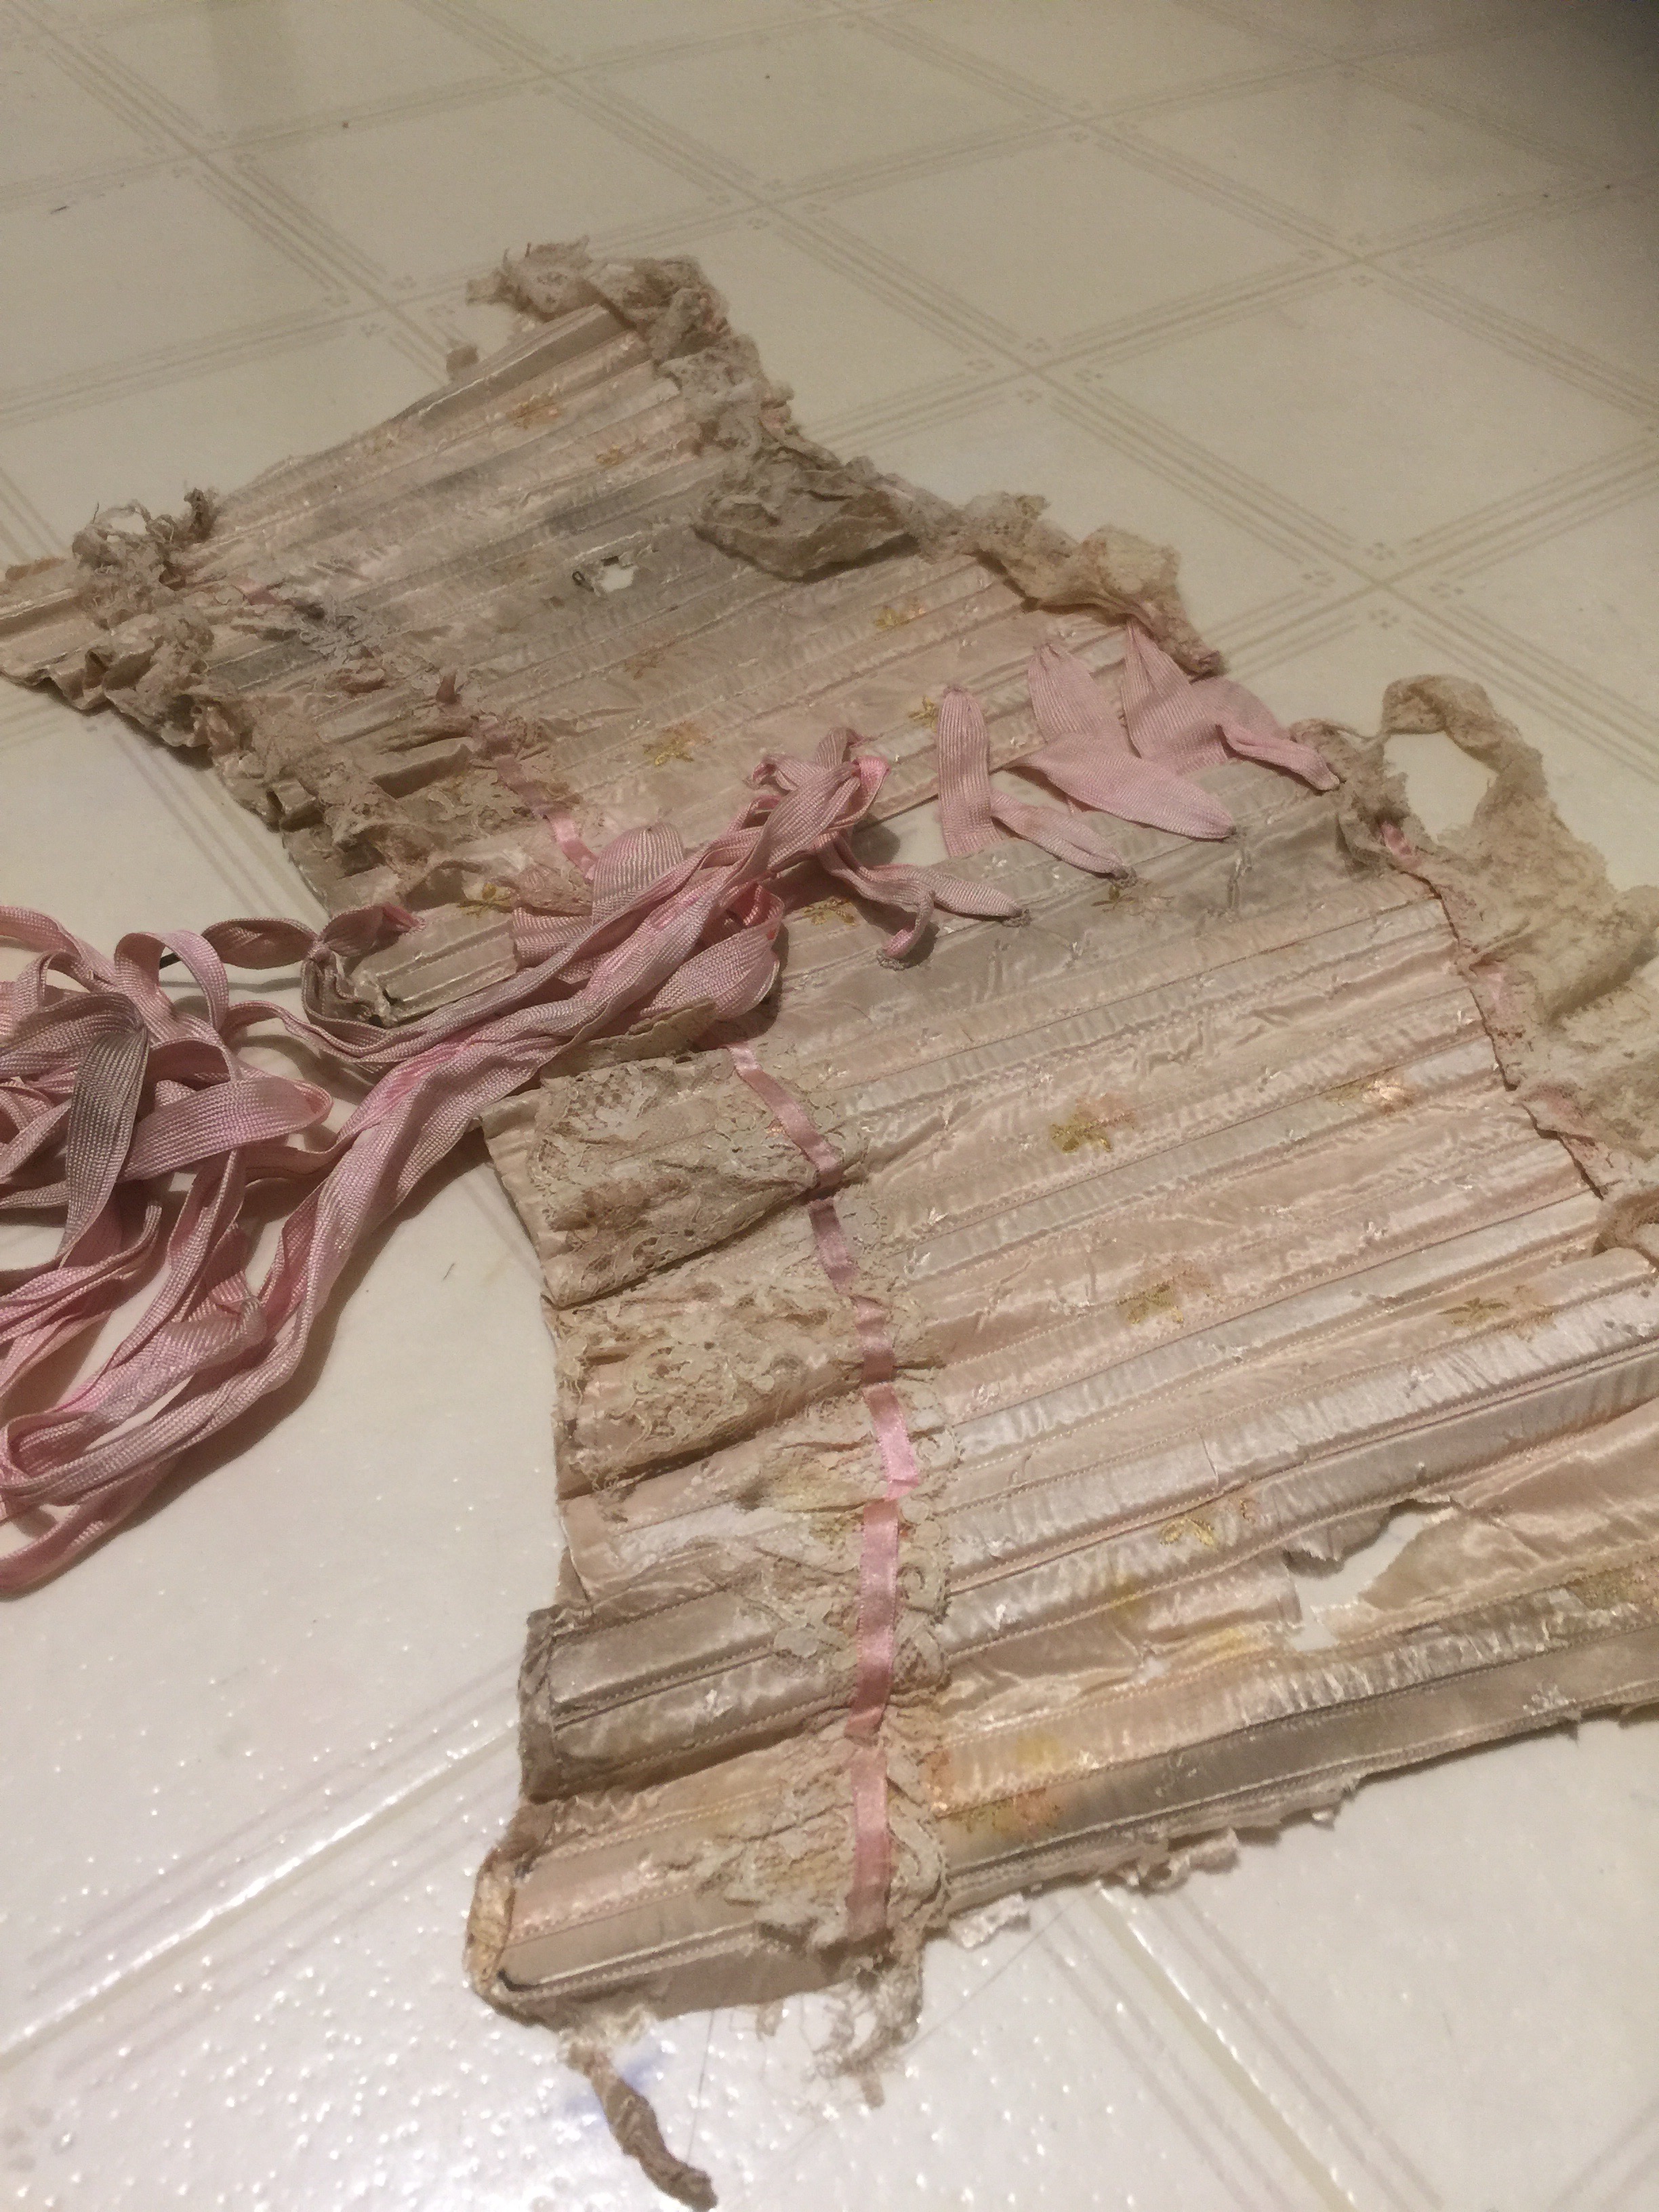
It’s the Redthreaded pattern, but my copy is from back in the day when they only came in single size, which is no longer the size I am. So I had added some width, but apparently I overdid it because it was lacing closed and not really doing what it needed to. This period of corset was aimed less at waist reduction and more at bust lifting (with a side of keeping a flatter tummy to look a little less pregnant in the high-waisted gowns), but at least at my age I need the underbust area to fit snugly, like a bra band, to get the proper support/lift. So, since I couldn’t quite bring myself to redo the binding, I just took a half-inch tuck right beside one of the boning channels at each side seam, all the way from top to bottom, so that my stitching was right on the seam line. The tuck is hidden on the inside and hopefully the tuck won’t be too irritating during periods of longer wear; I didn’t notice it at all while trying it on.

But let’s back up a bit. While sewing, I had a lot of regrets about my decisions with this project.

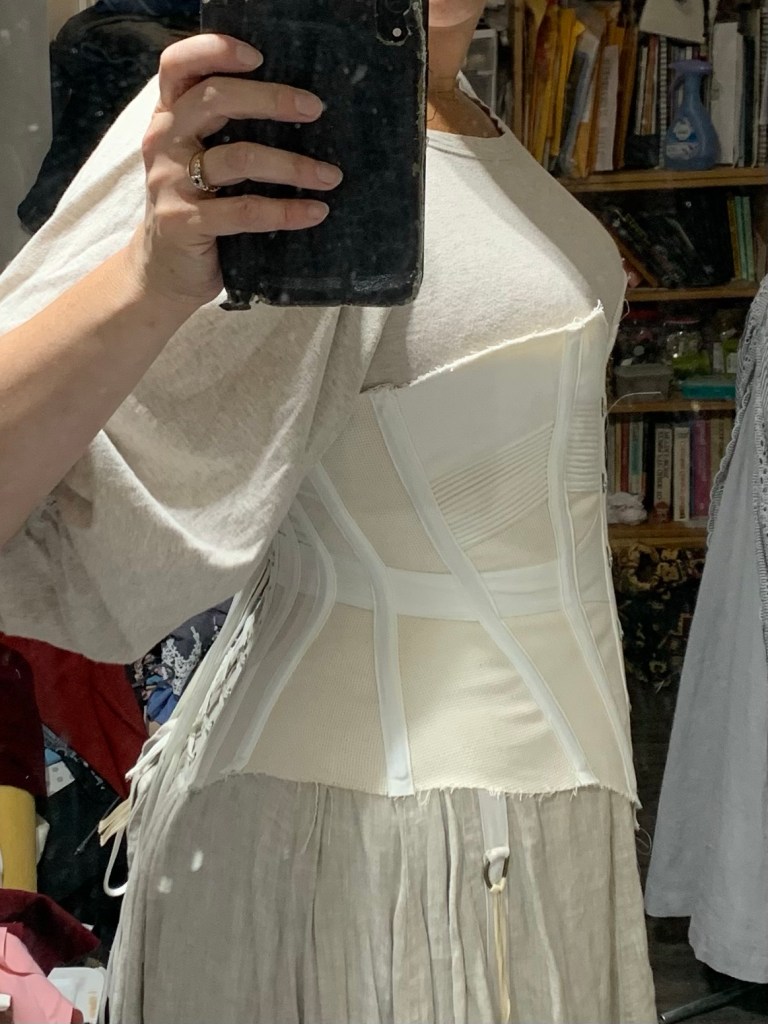
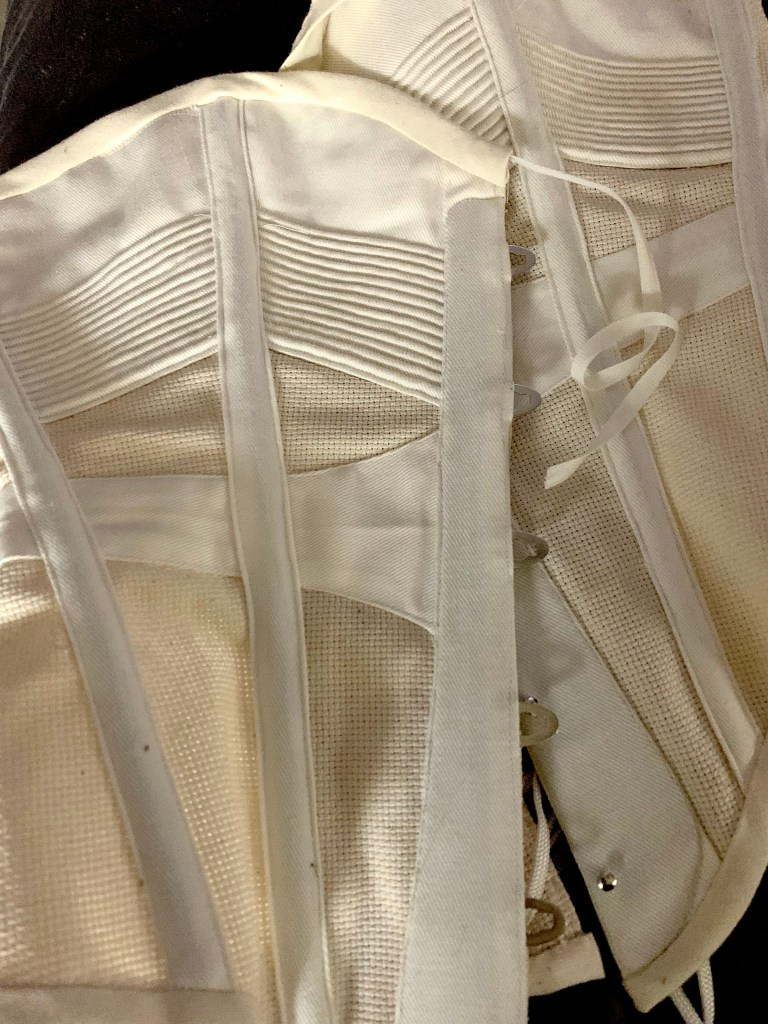
First, the materials. Corsets of this period are usually made of a double layer of cotton sateen (ticking would work in a pinch) with quilting, embroidery, and cording supplying a lot of the support. I could not for the life of me find my original digital pattern and instructions, so I was kinda winging it, just modifying my old printed version, and somehow I settled on single layer construction (so no cording or quilting) using the last of the grey coutil from Farthingales I used for this Edwardian corset. This stuff is beautiful and the finished corsets are great, but it’s stiff as cardboard, hard to sew even on a machine, and not even remotely accurate to the period in this case. I mean, my historical accuracy is never super high, but what was I thinking?

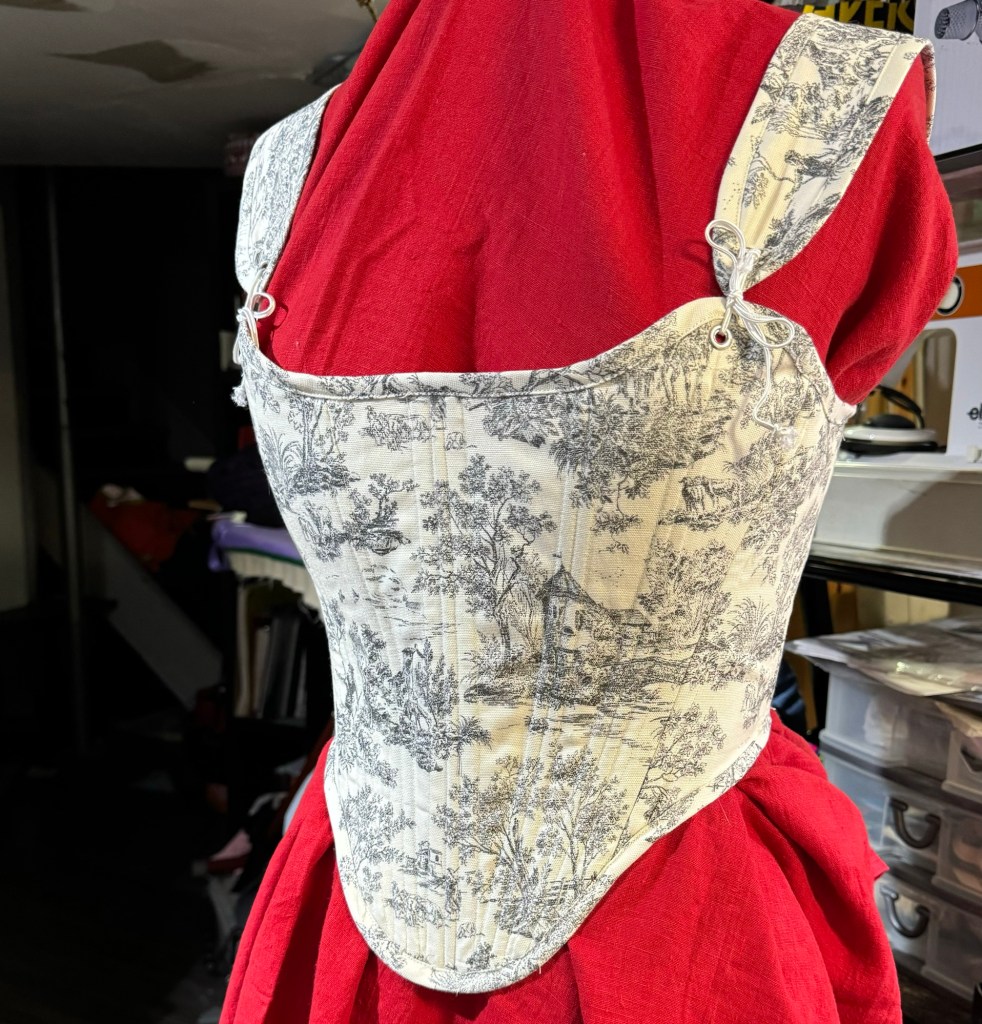
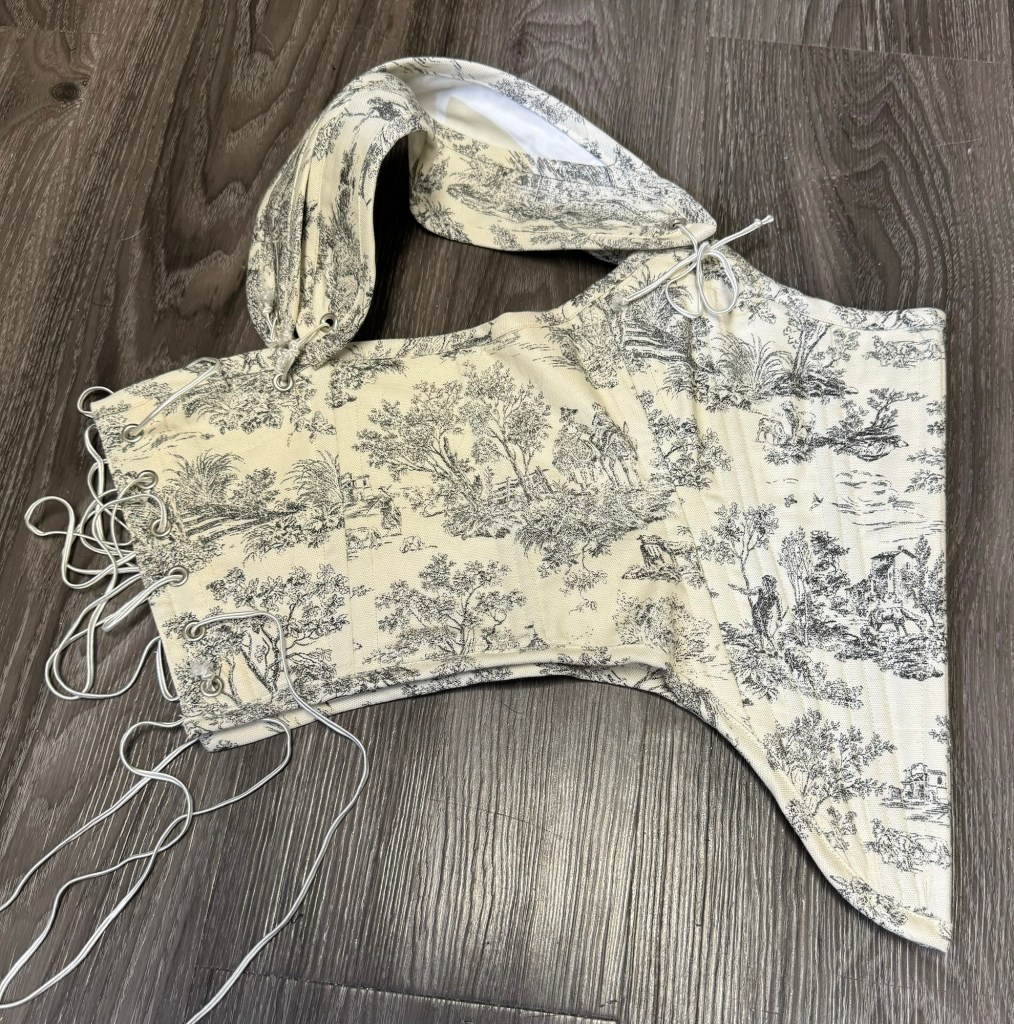
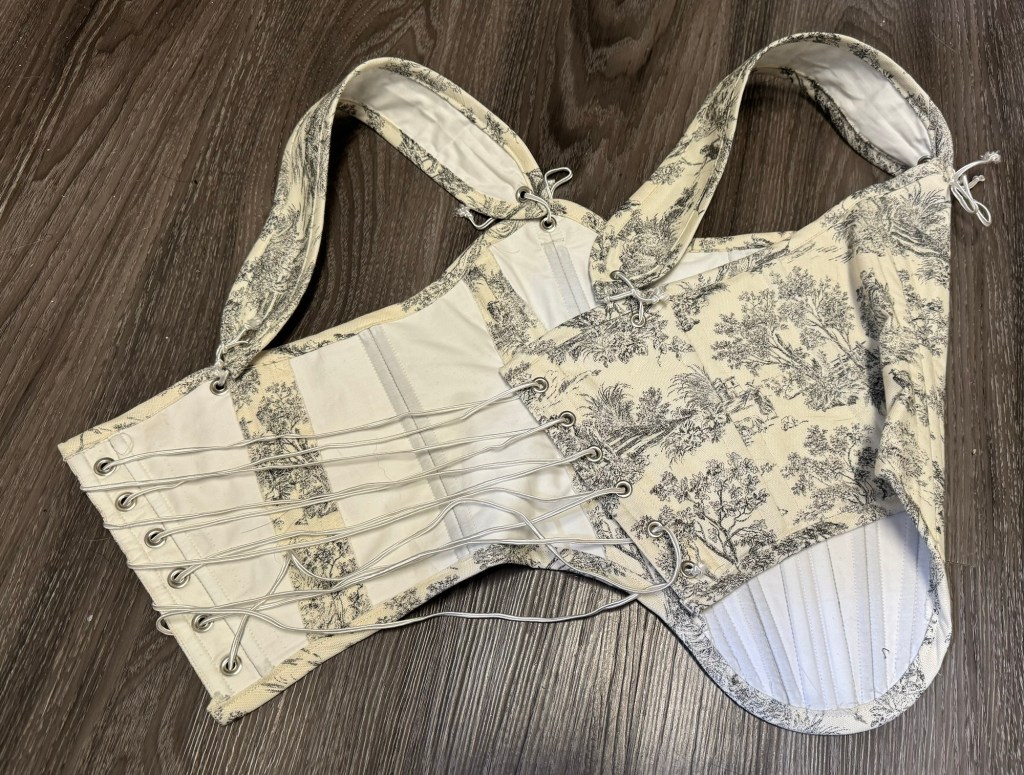
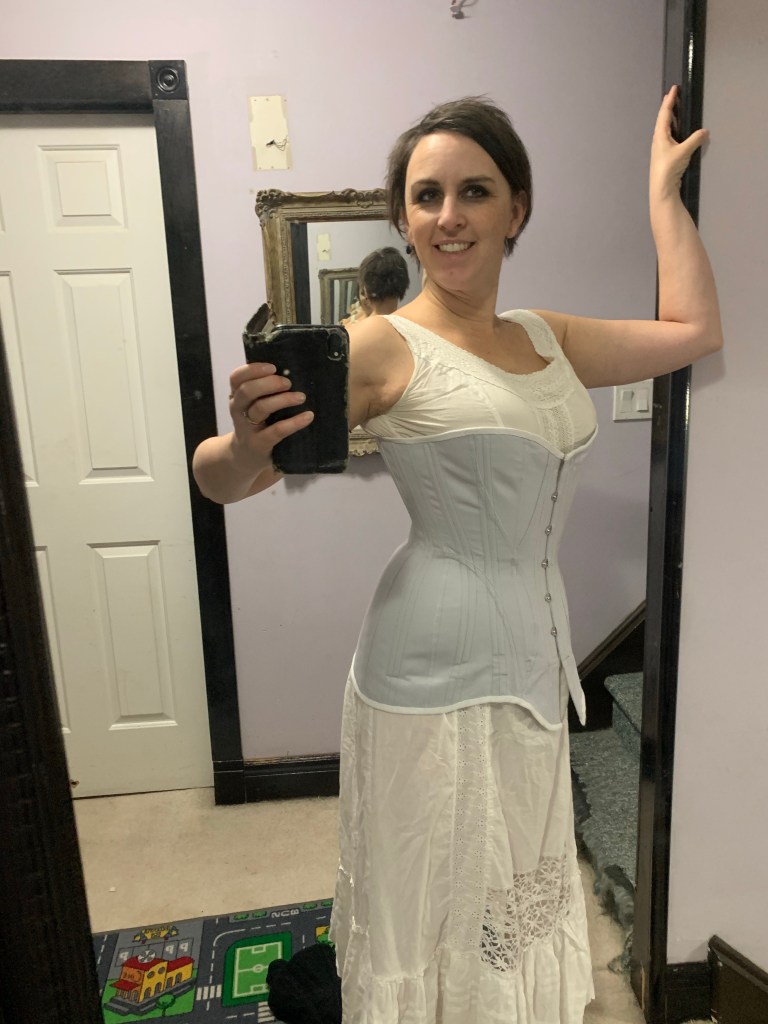
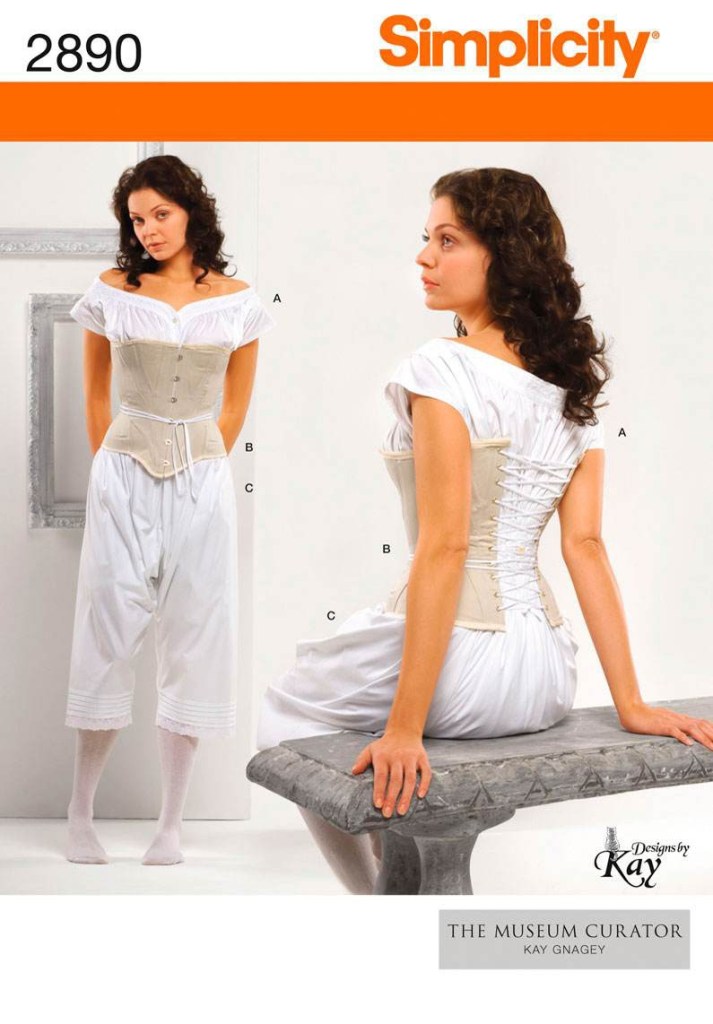
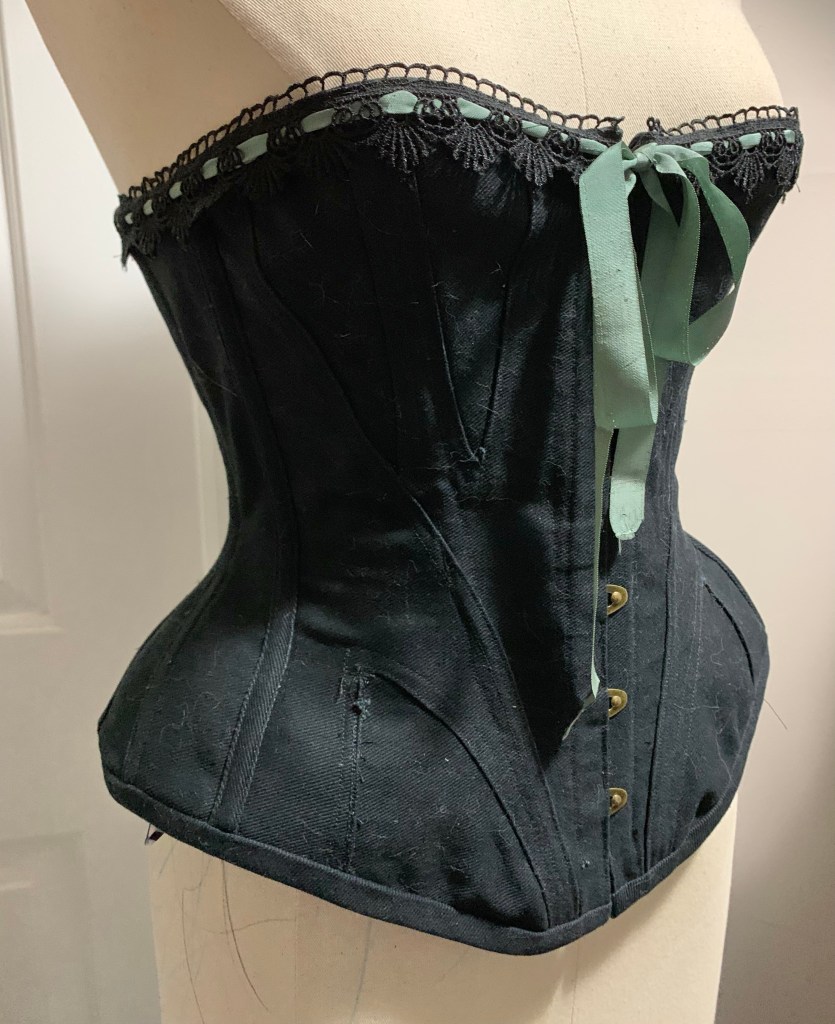
I didn’t have a lot of the coutil left, either, so when laying out my pattern it became obvious I would have to add a front seam. However, I seized on this opportunity to add some lacing in the upper front, similar to these transitional stays at the V&A:

Or the ones included in the Scroop Augusta Stays pattern. This detail really makes no sense in a pattern with bust gussets, at least for someone like me who has no space between their breasts, but I do think it’s a cute detail and I don’t really regret going for it.

Hand eyelets on the front. Not on the back however.

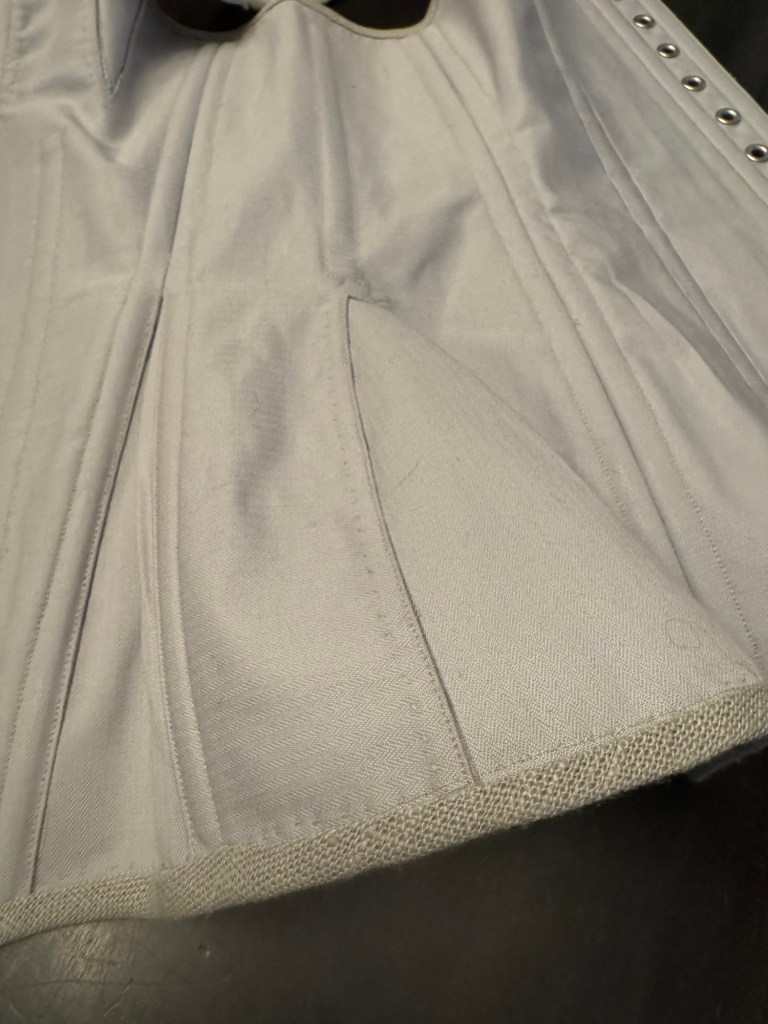
I did a LOT of hand stitching on these, and I regretted just about every moment of it, because this coutil is so dense and hard to stitch. I inserted the bust gussets by hand, including turning and stitching down the seam allowances on the inside. I love the look, but the process nearly killed me.

Detail of the V&A gusseted corset

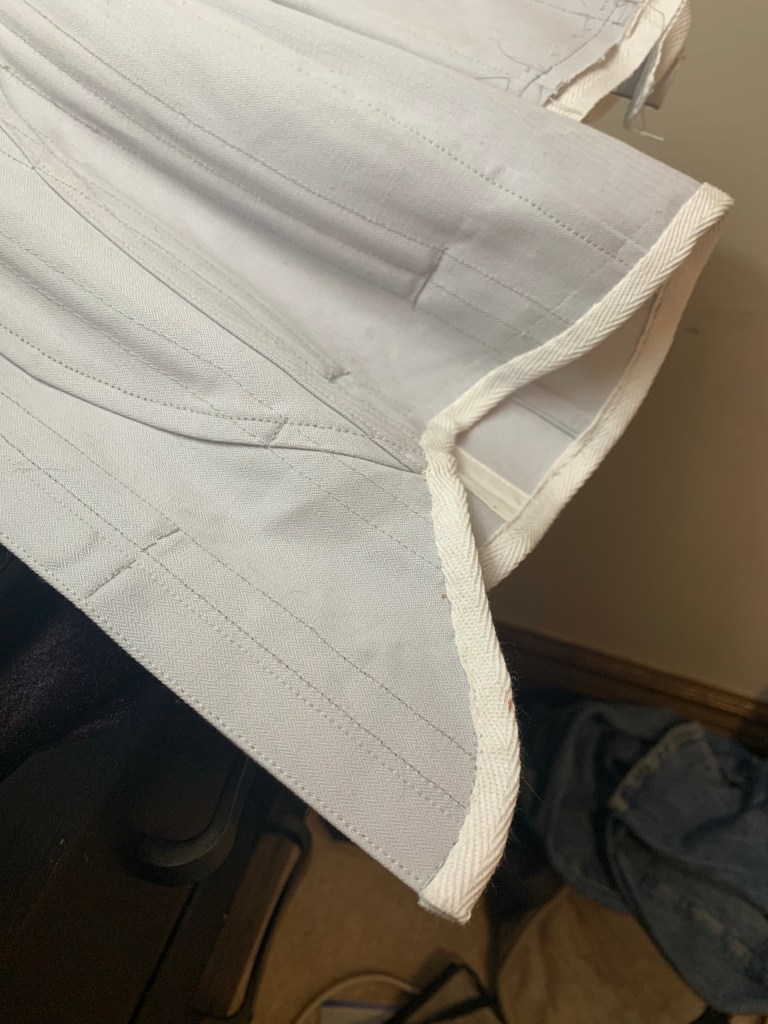
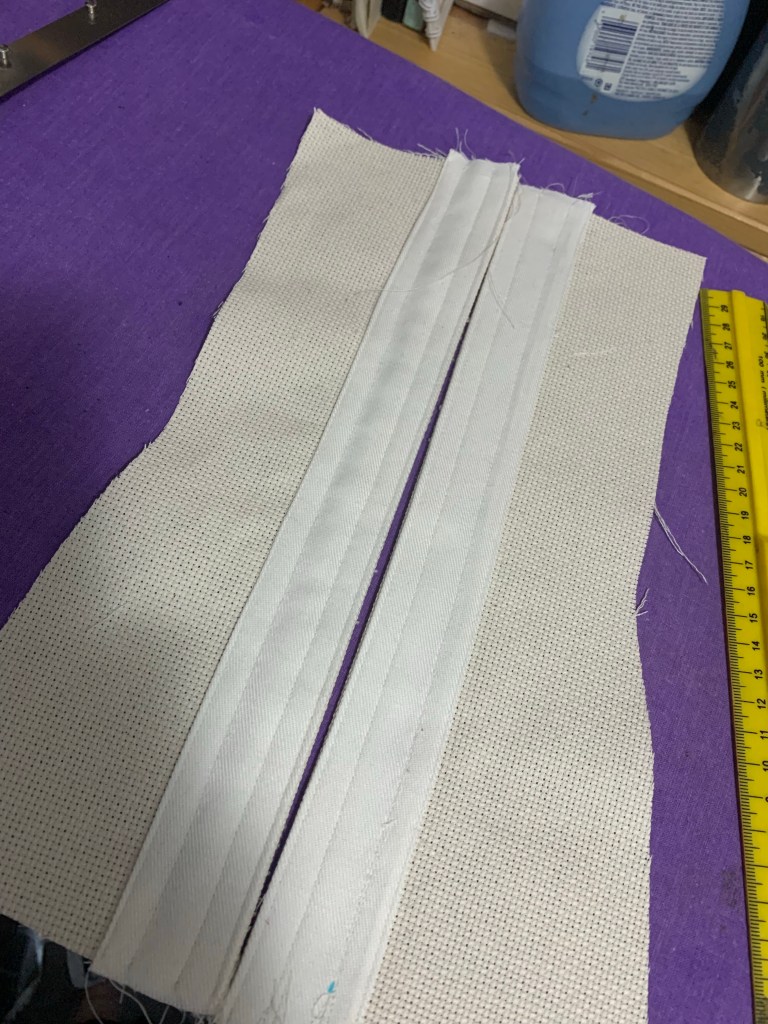
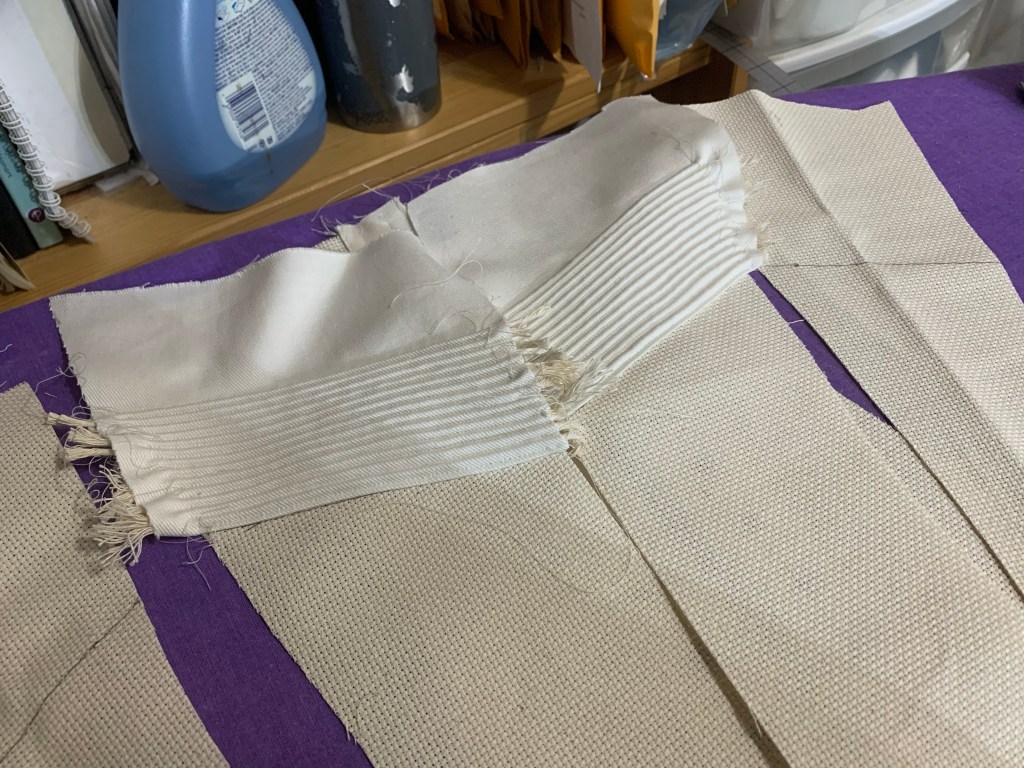
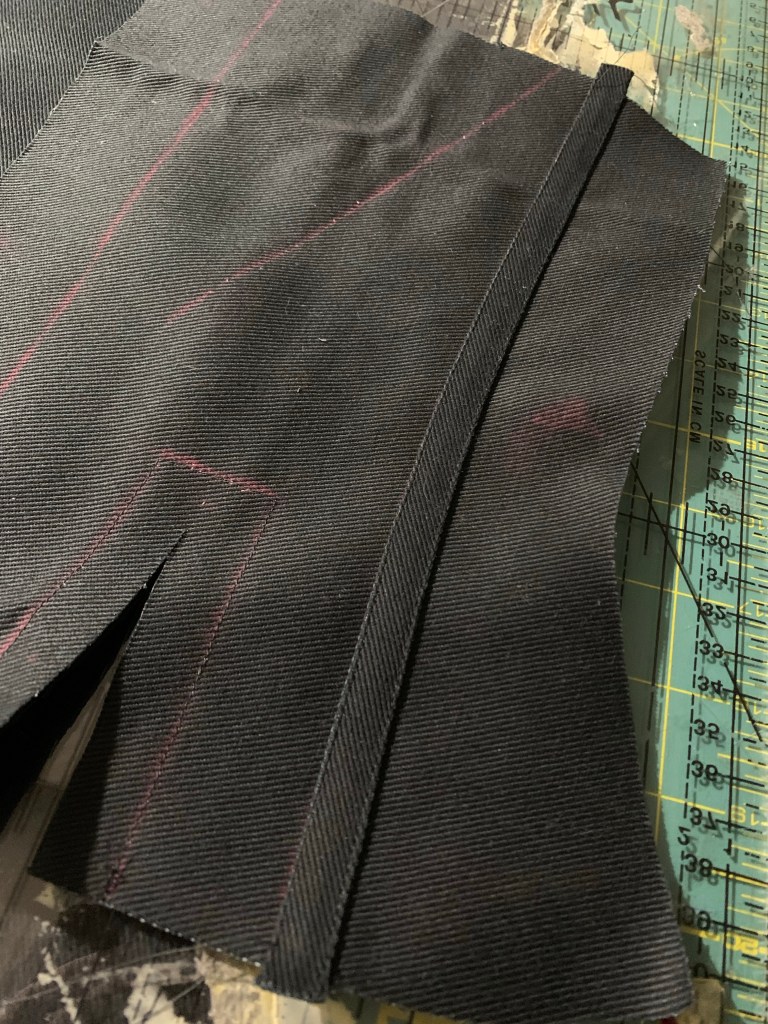
I used a different technique for inserting the hip gussets, based on looking at some 1830s corsets on the V&A website. See how the point of the gusset is actually square, covered in a satin stitch? You get this if you cut your slit as a T, and the edges you fold under are the same width all along instead of tapering to nothing at the point. It was so much easier than trying to taper the seam allowances to a V point, especially when sewing by machine! I do still have to go back and do the satin stitch across, though.

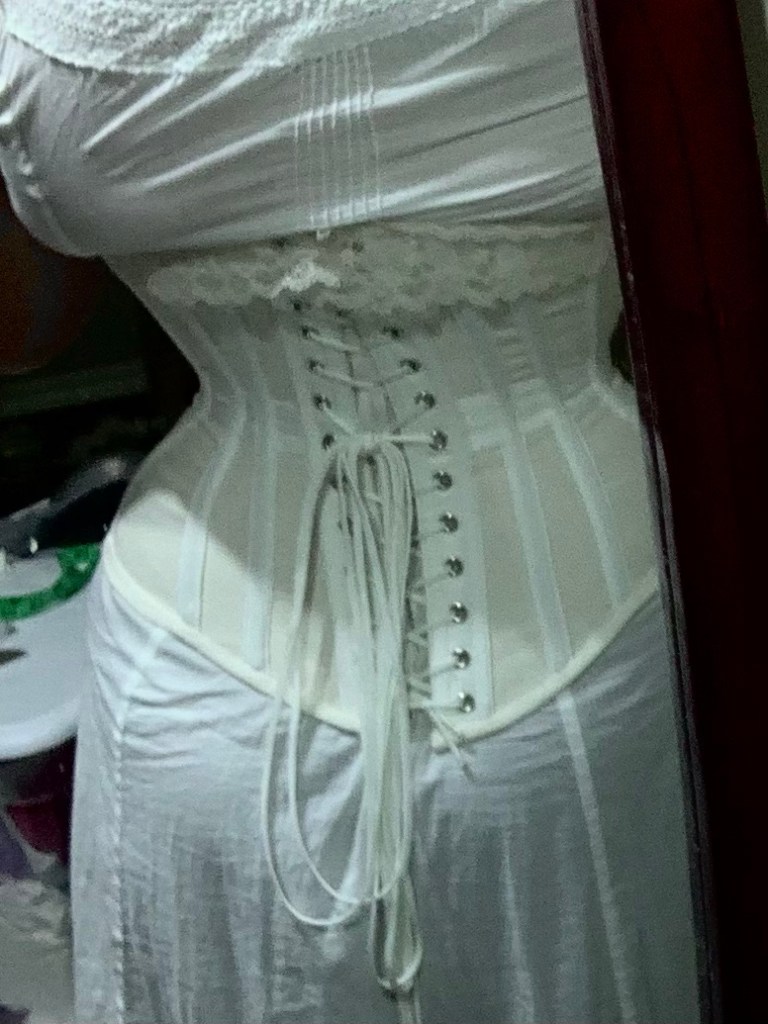
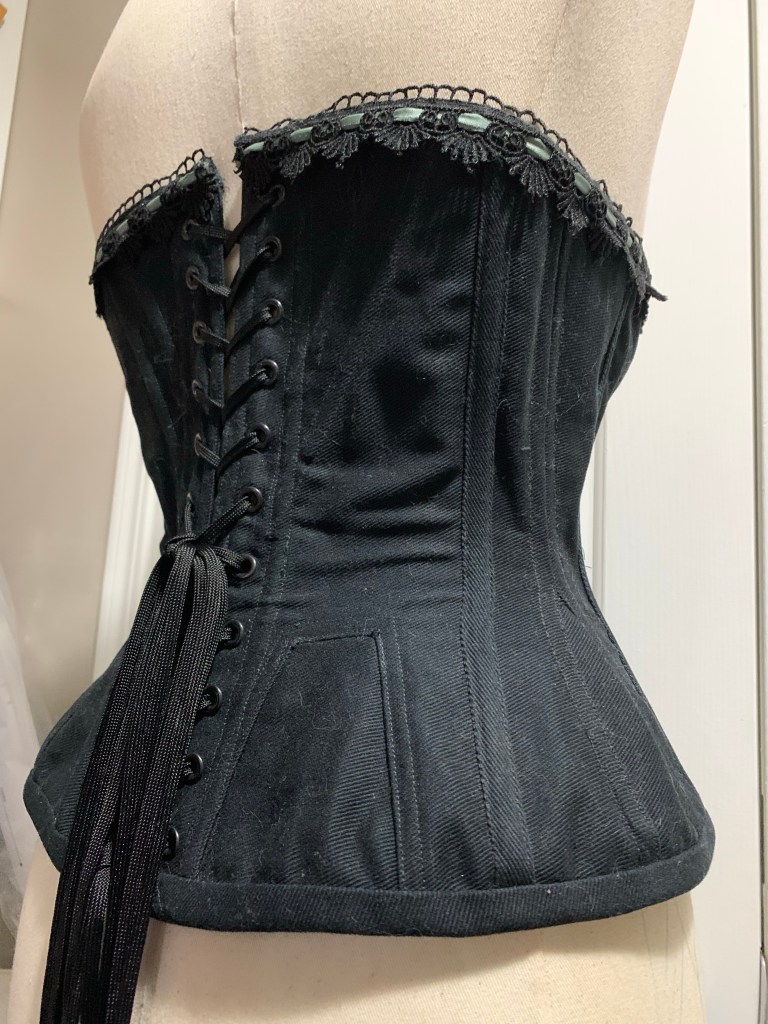
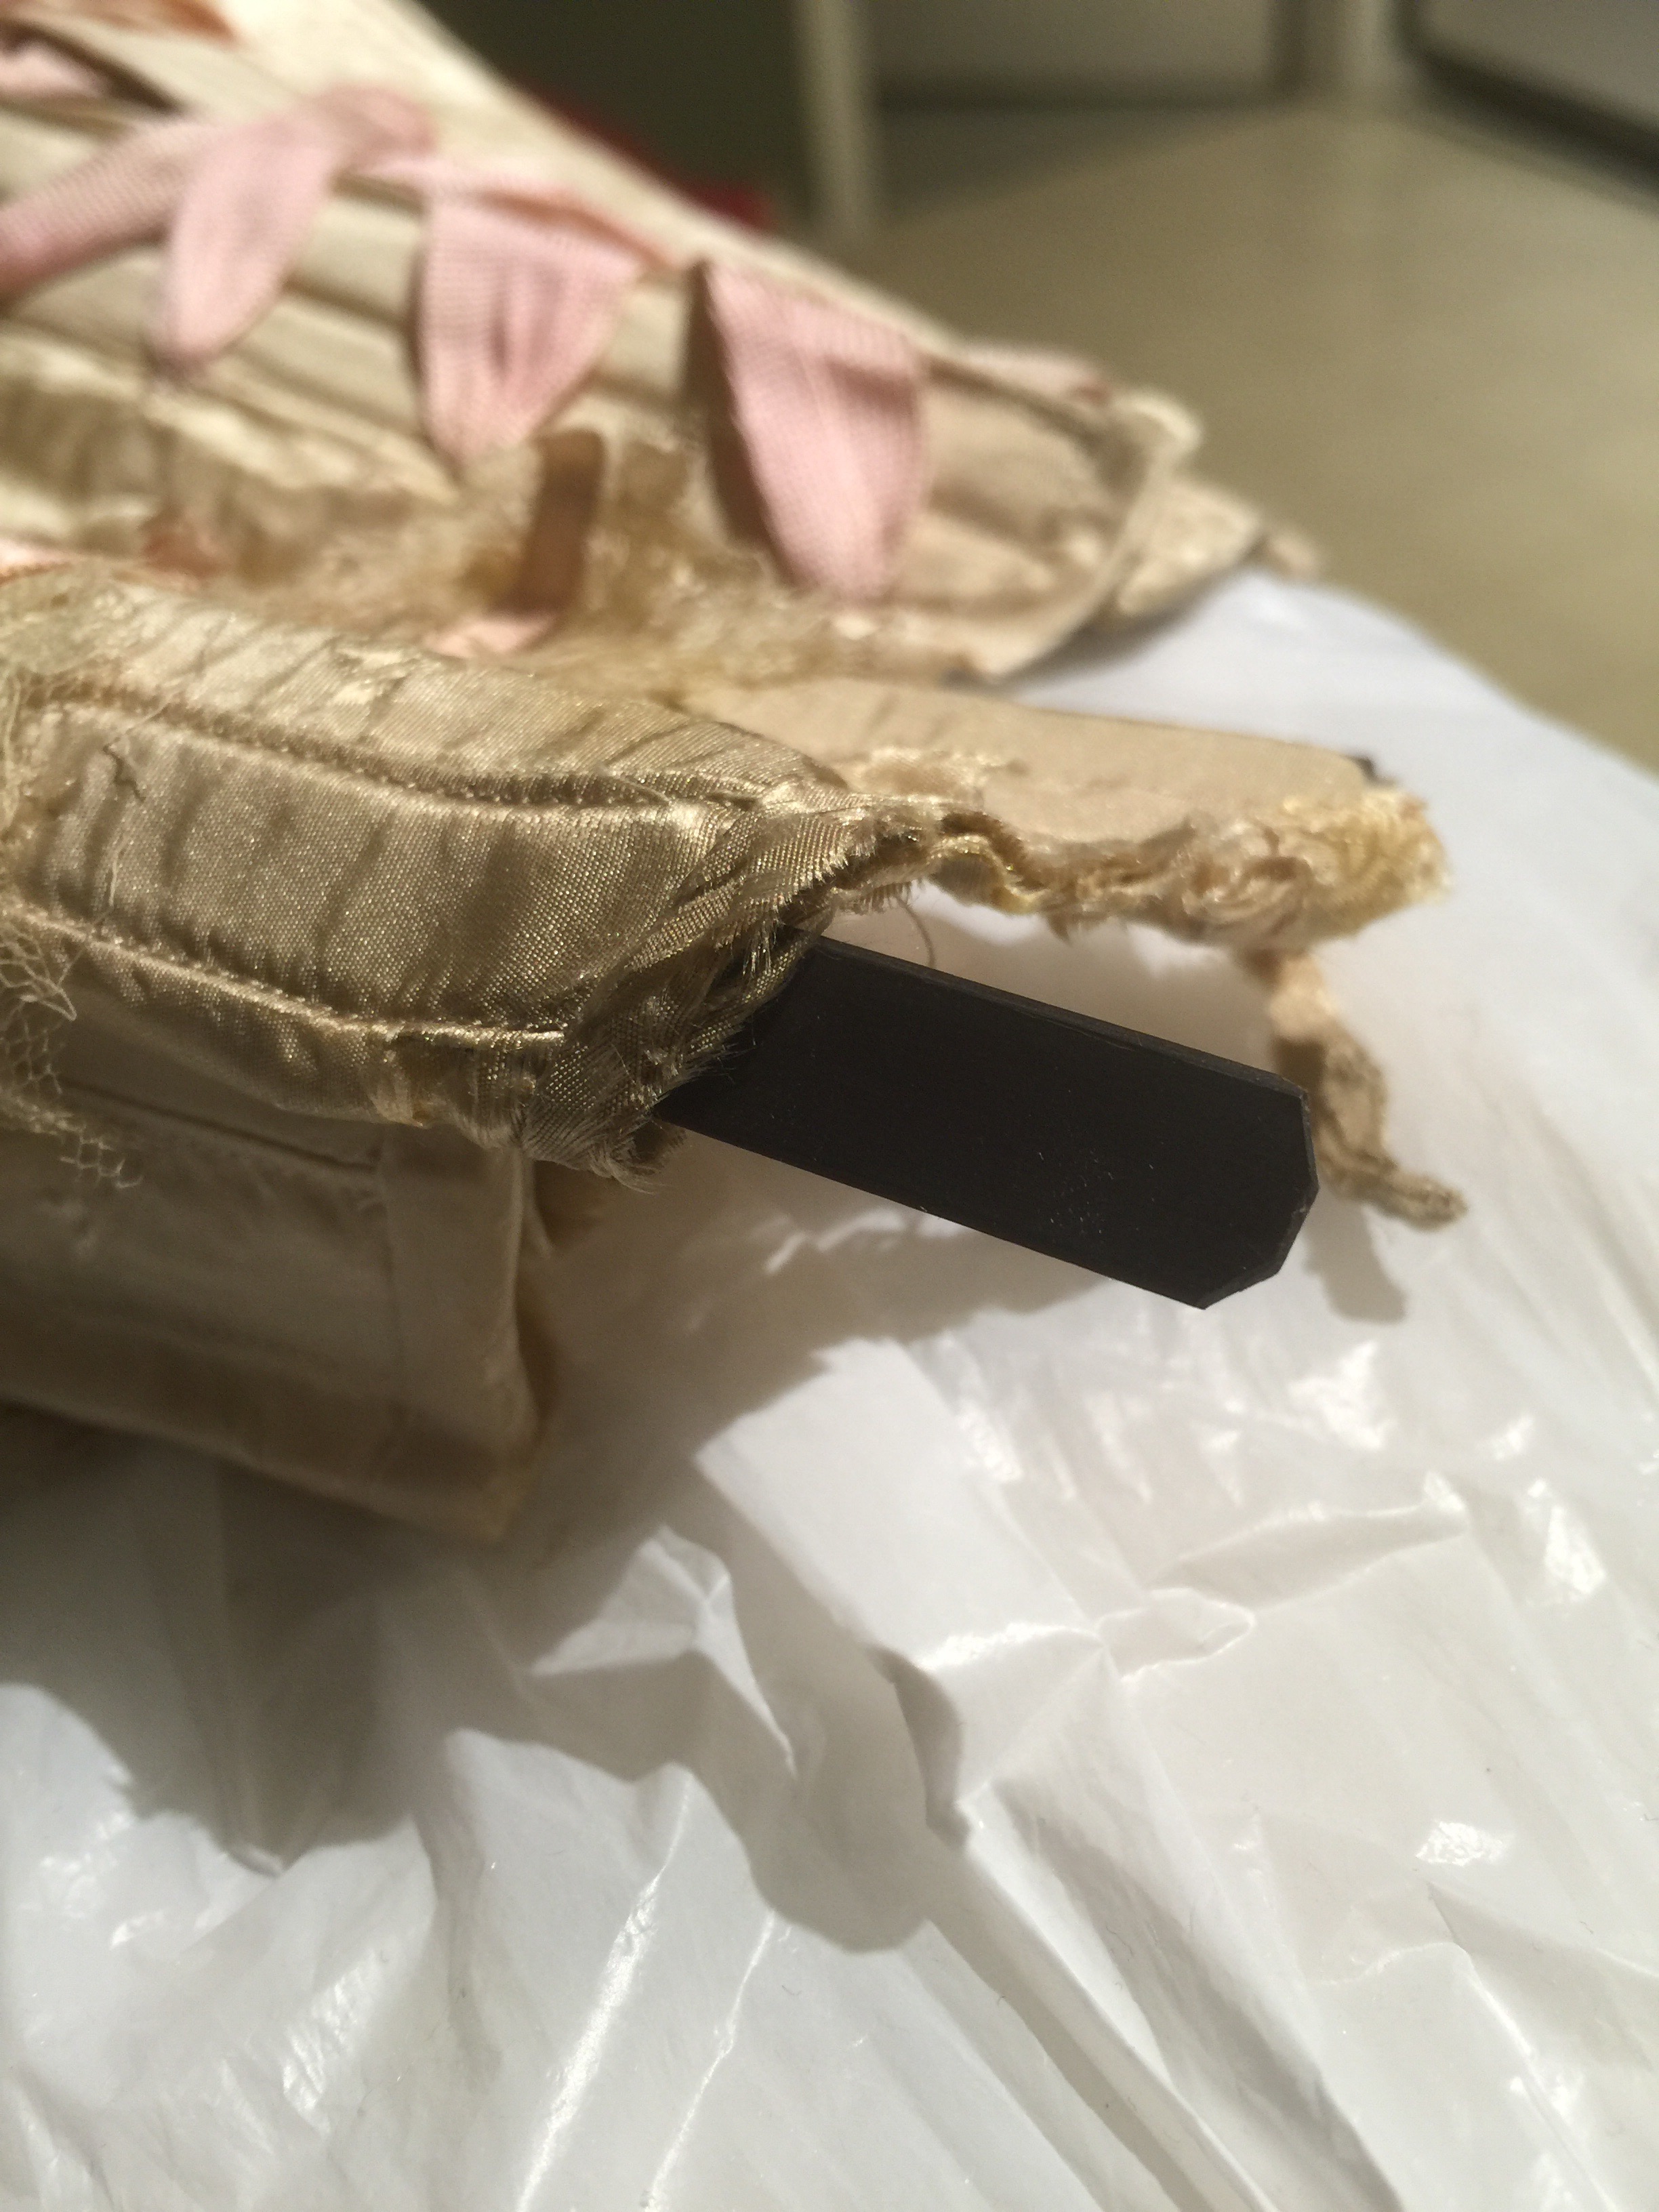
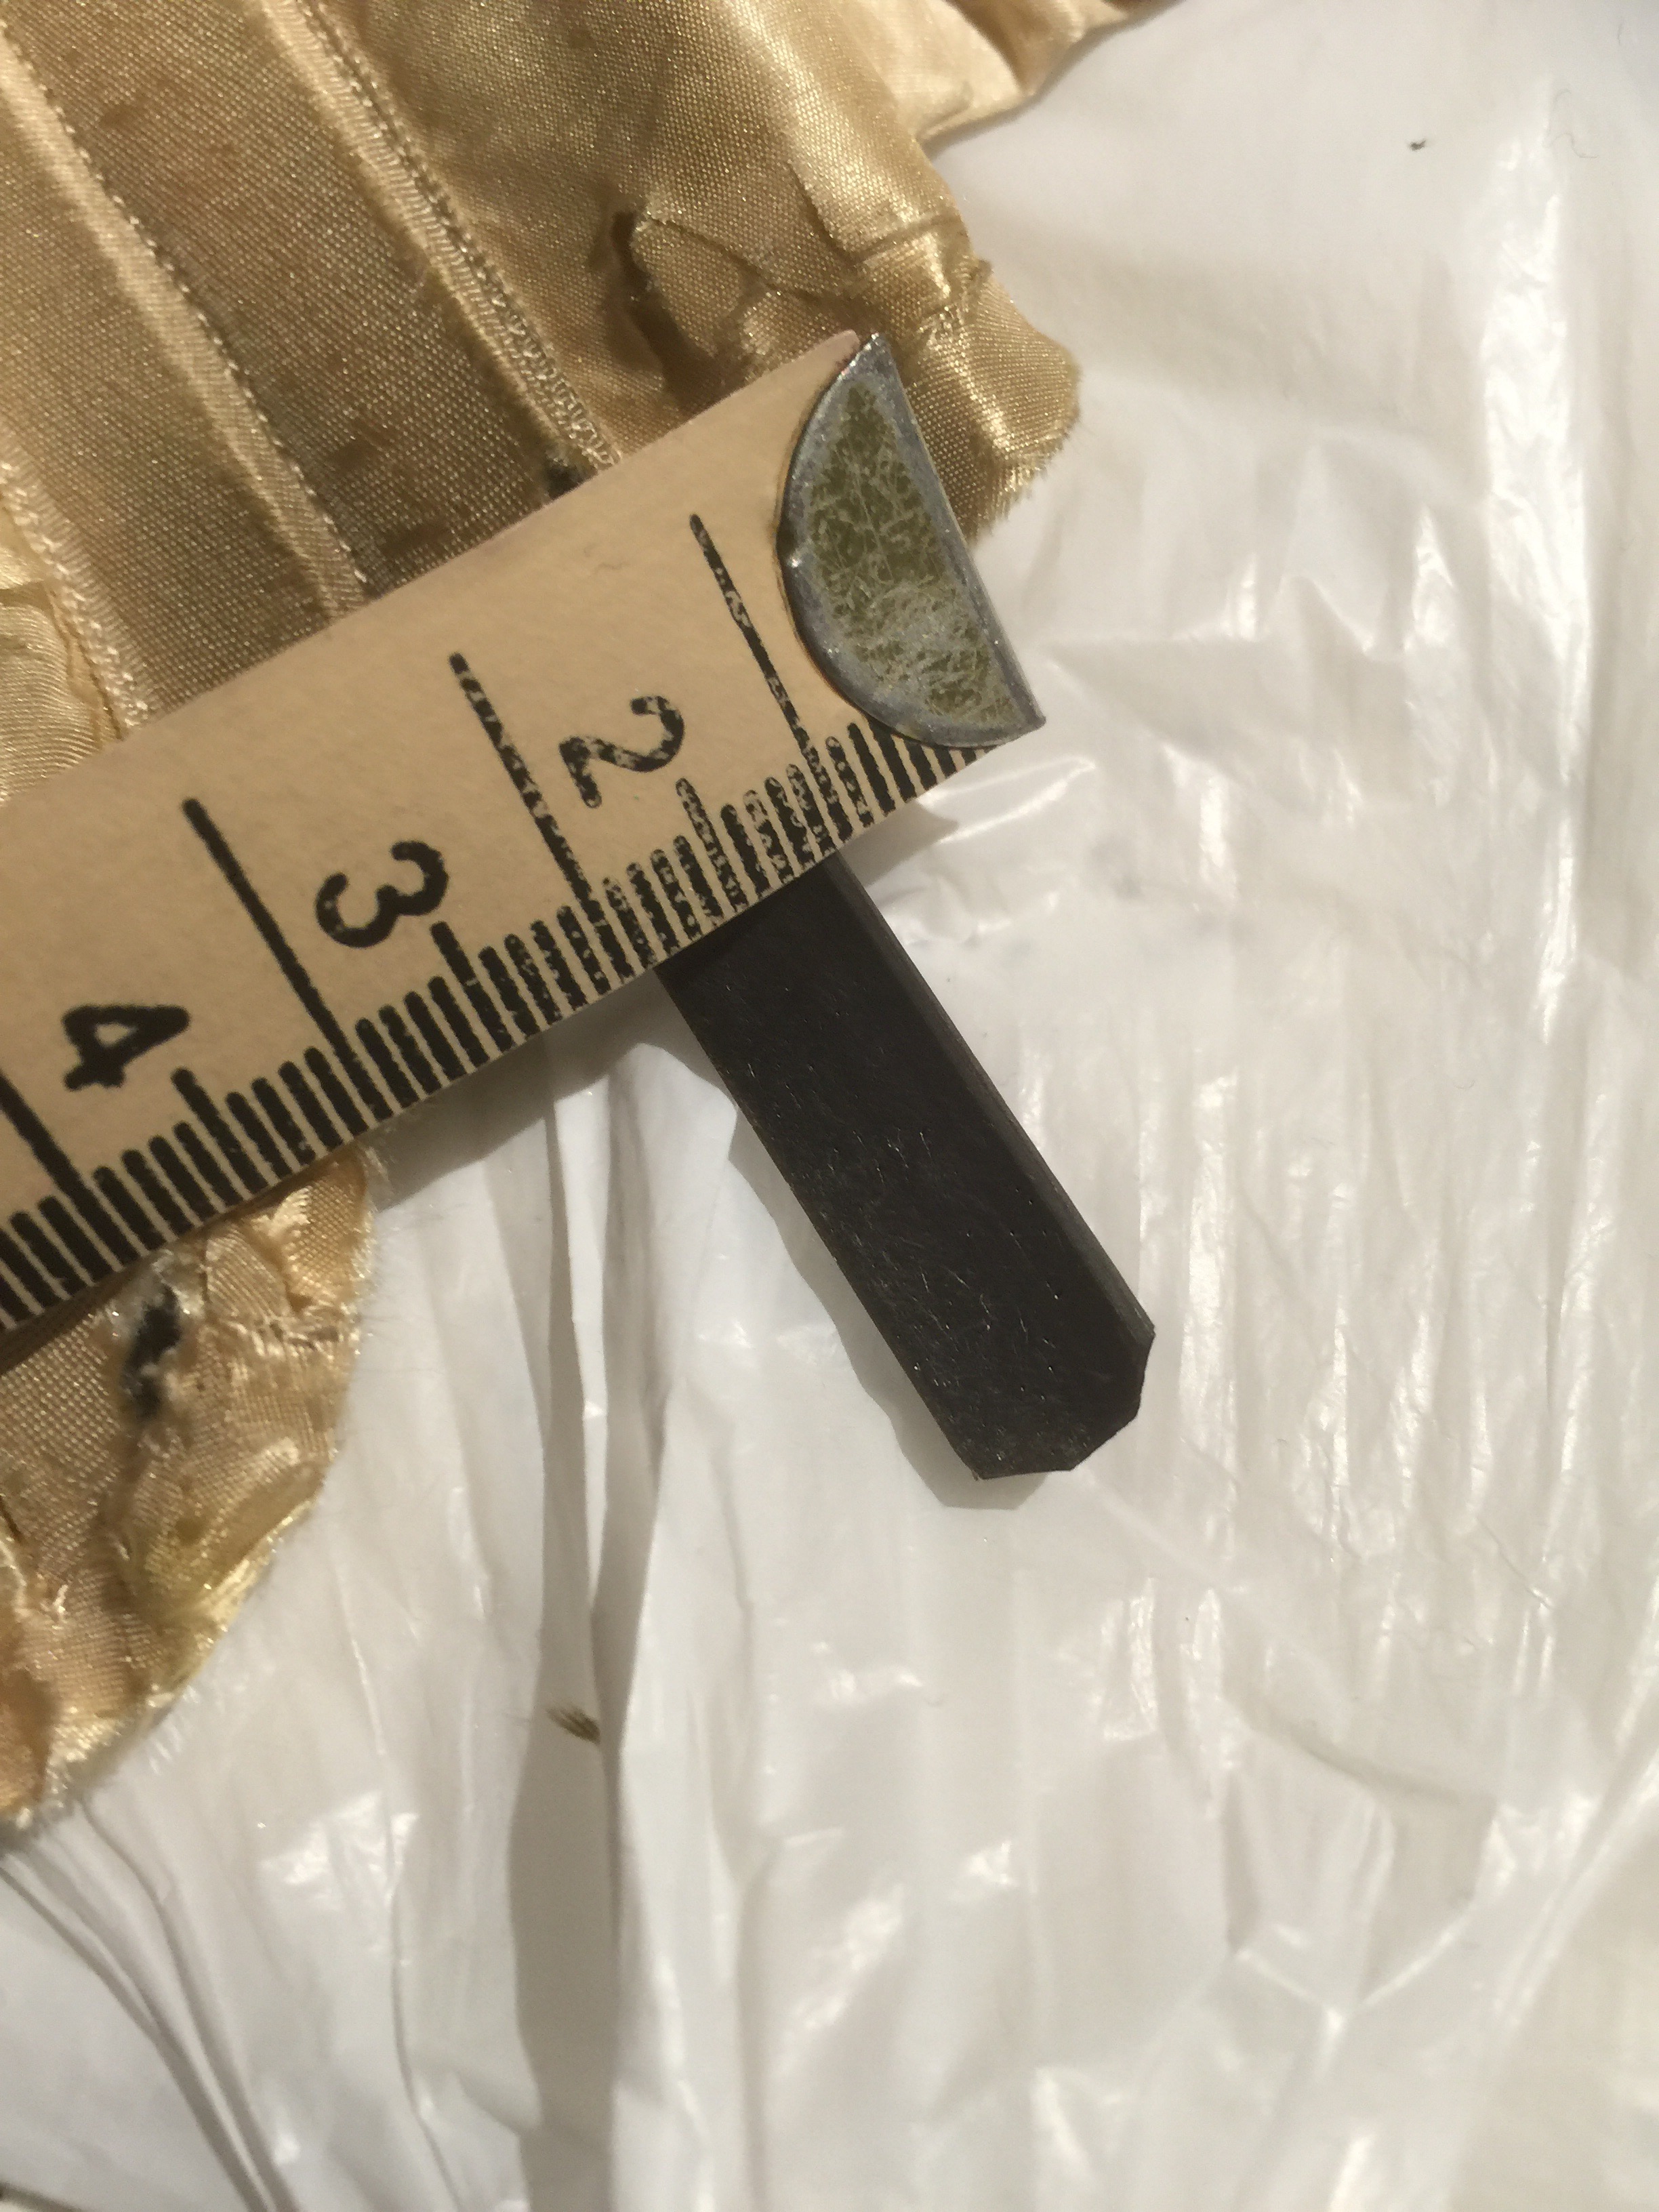
The boning is a mix of spring steel, spiral steel, and a bit of plastic imitation baleen when I got lazy. I also added a pocket for a wooden busk in the front (aka a paint stir stick) although I had to make it a bit shorter due to the presence of the split section at the upper CF.

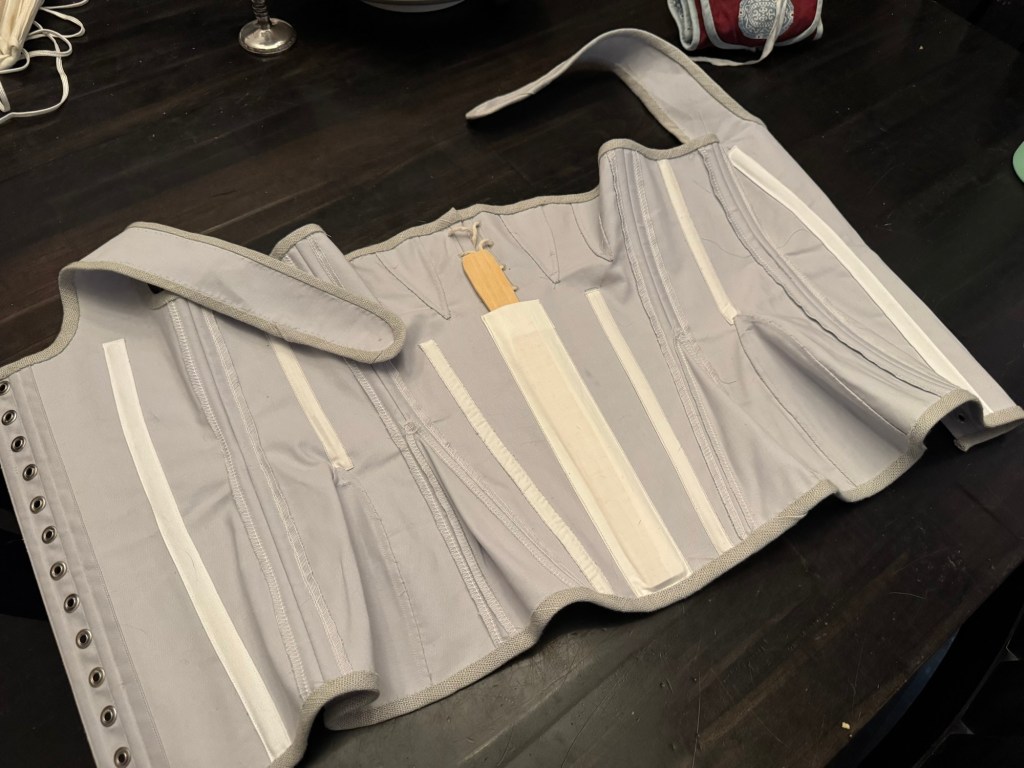
The binding is a coarse linen(?) type bias binding I originally made for this corset a billion years ago.

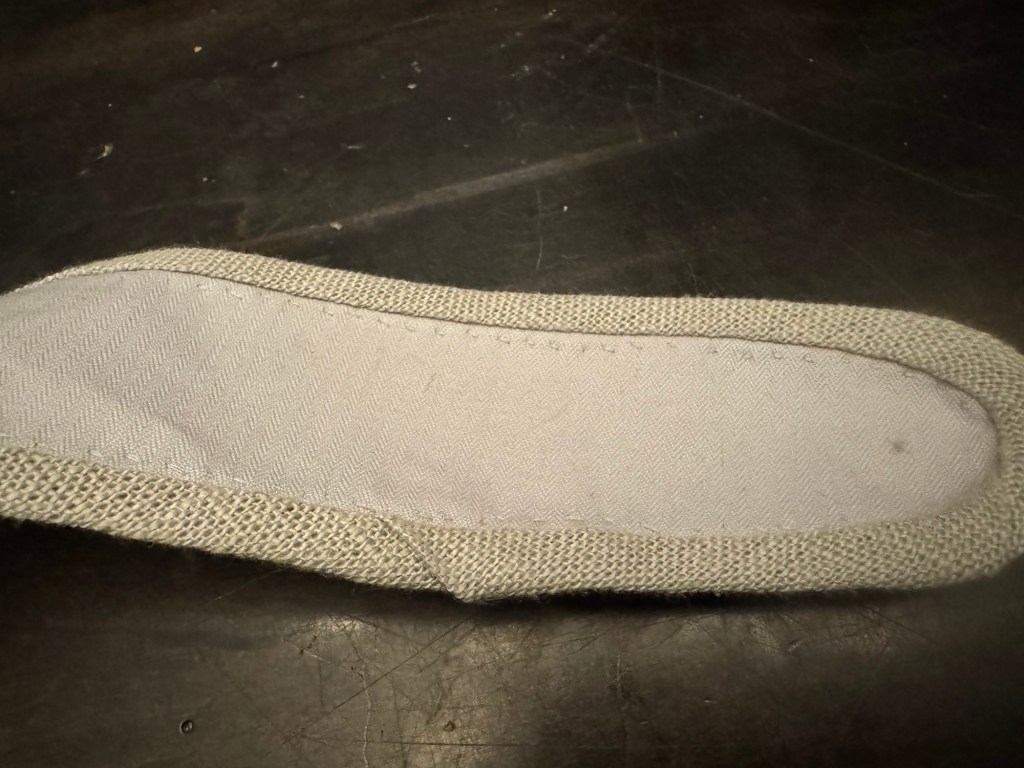
It’s been kicking around my overflowing bias tape box ever since. I really should go back and revamp that corset, actually….

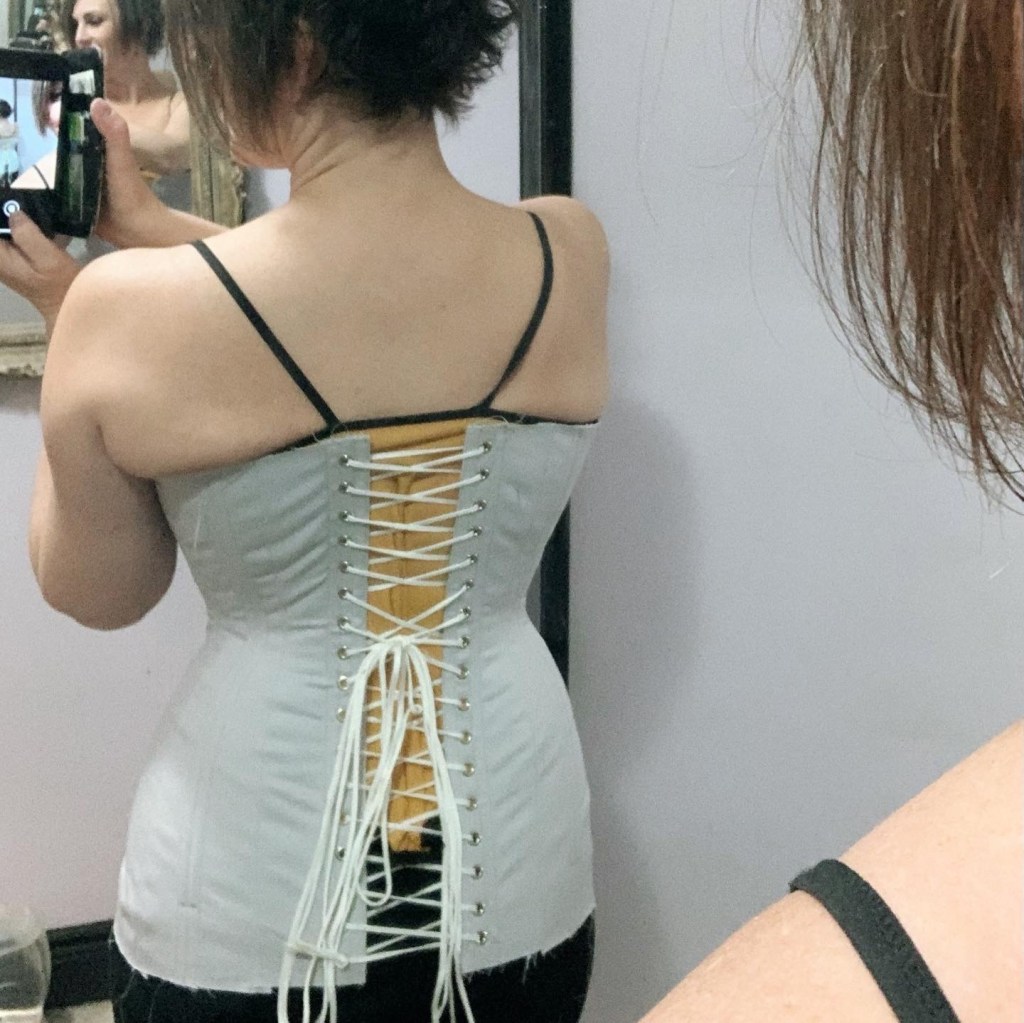
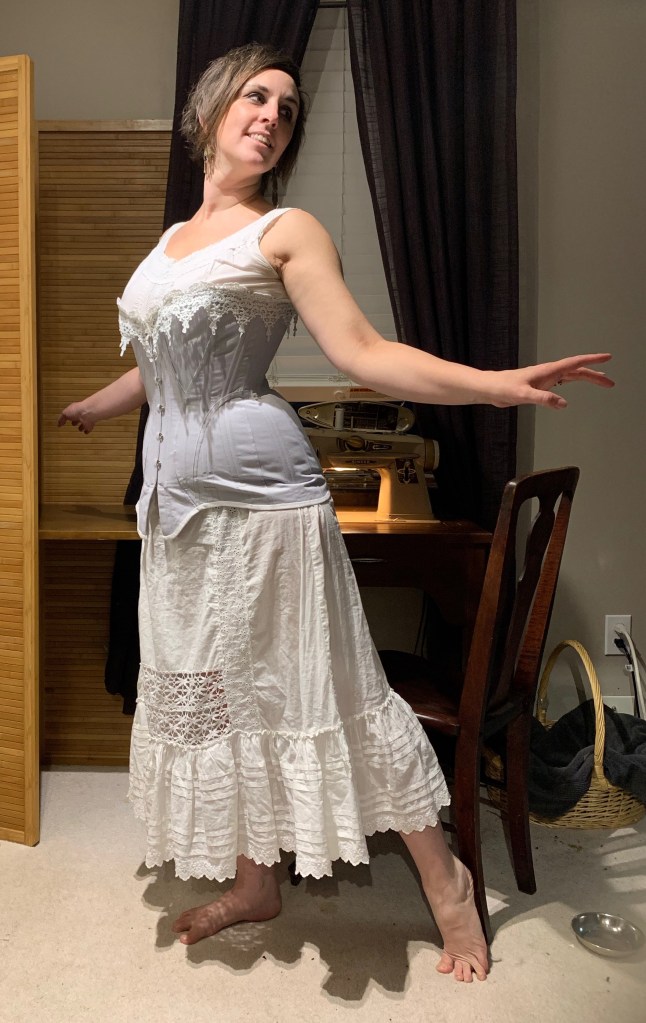
The hip spring isn’t quite adequate (hence the flare out of the lacing gap at the bottom)—I should have tested that more closely, and enlarged the hip gussets as necessary. But for the moment I’m going to live with it. I also spiral-laced it, which is period appropriate but a pain to tighten up and I have no idea how to tie it off efficiently. More research needed. If you know the secret, please let me know!

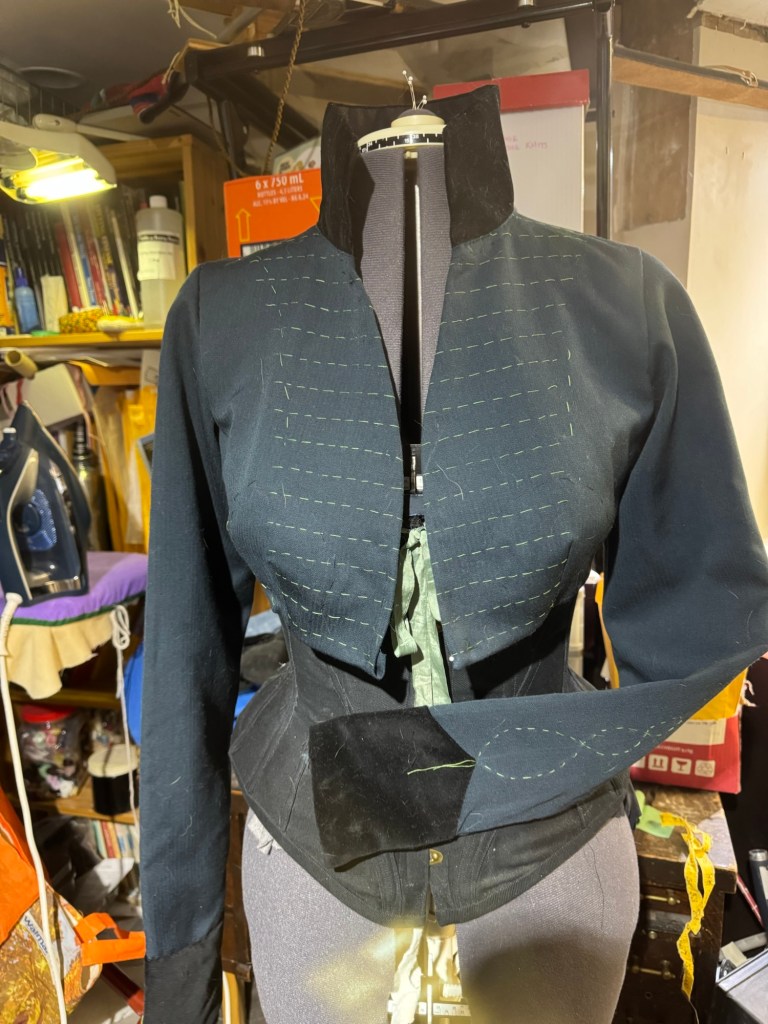
But anyway, it’s done (however imperfectly), and I am excited to start work on my 1812 military-inspired riding habit….

(Inspiration from these guys)

Just not sure if I will manage the red sash or not…

Comments Off on Long Stays

Filed under Sewing

Corset remake

The first corset I ever made, back in 2015, has always been one of my favourites.

But, it’s also never really been wearable. Partly the fit wasn’t great, but the biggest glitch was my failure to properly bone the outer edge of the back lacing, which made it impossible to lace very tightly; it was also a bit big, though entering my 40s has fixed that problem for me. And as my bust has, ah, improved over the last few years, the upper edge went from not-quite-mid-bust to awkwardly low. There was nothing like enough hip or bust spring, either. So it’s been sadly awaiting a makeover for quite a long time.

I’m a bit between projects right now and a little too burnt out to tackle anything big, so I made myself start mindlessly seam ripping.

Fortunately I had the rest of the fabric still in stash, since I needed to add gussets to the hip and cut new binding for the top and bottom, as well as adding a casing to the lacing edge.

Lace flowers.

Removing the binding took the longest (well, except for adding the binding back on). I had to take off the lace along the top as well, and removed one of the carefully scatter of artful lace flowers that were pretty much my favourite feature of the corset, and I should probably reposition more of them, but we’ll see if that happens.

That being said, it really didn’t take nearly as much time as I thought it might. The original corset was layered over a white denim, but for the new additions I layered the fashion fabric over some bits of ticking, which is much more corset-appropriate. It’s a little thinner but this isn’t a big problem for the gussets.

Can you see where I added the hip gussets in?

Once I had the binding off I seam-ripped the bottom half of the side seam, drafted up a gusset shape to fill in that space, and marked where I thought the under bust curve should go. (I also ripped WAY up one side trying it on to get an idea of how big the hip gussets should be, and had to hand-stitch it back together, which worked surprisingly well. Here’s hoping if it works for 18th century stays it’ll work for me.

The result is a much curvier underbust corset—maybe not as historical, but it wasn’t really good at that anyway.

I think it’ll be much more useful as a cute outerwear piece than it was before.

And it was always a bit showy for underwear.

So yeah. Quick project. Very satisfying.

Comments Off on Corset remake

Filed under Sewing

Full cottagecore

For the last year or so an urge has been building. To make… not exactly a corset, not exactly stays, but a boned, fantasy bodice. A little mediaeval tavern wench, a little bit Ren Faire… and, let’s face it, a lot cottagecore.

I couldn’t quite settle on a plan, however. What pattern? How historical do I want to be? I have Butterick B4254, the 18th century view of which I haven’t made. I have the Scroop Augusta Stays, which the internet at large seems to agree is an excellent pattern. But what I really wanted was something a little more romantic and whimsical. Outer wear, not underwear. Something a lot like the creations of French Meadows, whose Instagram posts help keep my feed suitably aspirational.

And then, a couple of months ago, the creator of French Meadows posted a YouTube tutorial on how she drafts her corset/stays patterns.

And I was sold.

I have to say, her method (based apparently on instructions in Janet Arnold’s Patterns of Fashion 5, not one of the two volumes I own), worked pretty well. There’s a fair bit of art mixed in with the math of it all, but I can’t say I mind it. The draft itself just produces a kind of flared curve, which you then add details such as the front V, nubs for strap attachment, and other seams as desired.

Once I had it drafted out (which took a while since I have been so time-poor this summer), I decided to dive right in. I made extra-wide seam allowances and just went for it, figuring I could tweak the other features as I went.

As it turned out, my tweaks were quite minor: I added a bit more shaping to the side/bust seam, and I took in the side/back seam by about 1/4” on each side. When I make it again, I think I would narrow the front piece (and widen the side correspondingly) so that the seam is closer to a princess seam so I could add the shaping right there. It’s not historical but I do like the look for a fantasy piece like this. And I might add a bit of a swayback adjustment (raising the bottom of the center back), something French Meadows mentioned as an option but which I didn’t try.

But all in all, considering how arbitrarily I added my style elements, I’m pretty darn happy with it. The nubs where the straps tie on are in a good place and the front V only needed very minor reshaping. I had initially raised the front about 1” above the bust line but I did drop it down a bit between the strap tie nubs.

In terms of construction, I wanted to make something cute but not too precious. I opted for this toile de jouy print upholstery fabric (I thought it was cotton but it’s pretty soft and slippery and frays pretty badly… I should maybe do a burn test), with two layers of ticking as a backing. Ticking is nice for lightweight corsets and mockups as it doesn’t stretch, and two layers meant I could sandwich bones between the layers and add more channels on the fly as needed. (Turns out I needed an extra set of bones in the front). I used the same fabric for the bias binding, which I just attached in a single machine pass, rather than attaching the front by machine and finishing the back by hand. Again, for this fantasy piece the topstitching doesn’t bother me. And I managed to catch the back almost everywhere, which is always nice.

I did manage a decent mitered corner on binding on the front of the straps, so that turned out well.

I did initially play around with a wooden busk (aka ruler) for the front, but it seemed bulky so in the end for this non-historical piece I went with some of my heavier 6 mm spring steel boning for the front, which keeps it nicely flat, and spiral steels for the rest (except around the lacing, which is also spring steel, as usual).

I would like to swap out the soutache currently serving as strap ties and the back lacing, as it’s a little too slippery to hold how I would like. And I should make some slightly shorter versions of the straps so Syo and Tyo can wear as desired.

I am faced with a conundrum, however. For basically the first time in my life, I’m wanting skirts that are either gathered or pleated at the waist, as that seems to be the style that goes best with this kind of bodice. Mind blown. It’s not a style that works at all with my uncorseted body.

Oh, and I had to make it its own blouse to go underneath, but I’ll give that its own post.

4 Comments

Filed under Sewing

Another Very Boring Corset

Many years ago now, (like, early 2015) I made a Very Boring Corset. And then wore it To Death. It got altered at least twice (taking in the tummy then adding more shape to the hips via a gusset… possibly undoing the first alteration?

Grommets popped out at least twice; I patched and darned the holes and reinserted them. I gained about twenty-five pounds, and wore it with an unreasonably wide lacing gap in the back. It was the first corset that I ever really broke in, and frankly it’s still one of the comfiest I own. Though the part last summer where it got stained with bright blue splotches from a punctured ice pack moved it a few rungs down on my preferences list.

I re-altered my very altered pattern again last summer to make my Summer Corset, which fits about as well as a girl could ask for. But.

I’ve been wanting a simple underbust version—my other underbust corsets are all very fashion-y, not underwear-y, and I wanted a plain underwear-style corset I could wear with a regular bra, when I don’t want quite such a “historical” silhouette.

So, I took my new pattern, subtracted the bust part, and got sewing.

Mainly last Saturday.

Looks not too bad for no bones

By Saturday night, I was doing my first (no bones) try on. If I did it again I would maybe not cut down quite as low under the bust (raise it 1 cm?) but otherwise I’m super happy with the shape.

Once I got the boning in on Sunday, I was super desperate to get it bound. So I wound up trying to attach very narrow pre-made bias tape (I didn’t have wider in white and didn’t want to take time to make more), in a single pass. I like the low-profile edge it makes, and it might even have worked sewing it on in two passes (as I usually do) or hand basting first, but I was in a rush and with the narrowness of the binding there was no margin for error. So I had to unpick and redo several sections where I somehow didn’t even catch the corset at all, and there may be more to come that are hanging by a few threads.

So yeah. Take your time. Do it right.

I didn’t do a waist stay this time (yet, anyway). I wanted a slightly softer shape. Not sure I like it, but I can always add one later.

Oops, pulled the hips a little tight.

Not much else to say. I like it. The busk sits low enough it doesn’t push the underwires of my bra up into my chest, which my other underbust corsets do. I didn’t have to take this coutil version in in the way I did my summer mesh corset from the same pattern, so that was definitely caused by stretching, as I kind of thought.

It’s comfy, y’know, as corsets go, by which I mean it’s fine for standing, walking, and sitting upright, but definitely not what you want to wear bumming around on your couch. And with any luck it will be perfect for that “fantasy heroine” aesthetic I’m so fond of these days. I’m also excited to try it under some of my 1950s style dresses, but it’s a bit chilly for them right now, as winter has finally arrived.

Comments Off on Another Very Boring Corset

Filed under Sewing

Persis-tence

I fell hard for the Persis Corset by Scroop Patterns the first time I saw it, in the call for pattern testers back in the early summer. I put in my name to test (something I don’t think I’ve ever done before!) but sadly got declined. (In hindsight, I think I’m the same size as the original draft. So, um, probably they had that size tested already.)

(Image from scrooppatterns.com)

Anyway, when it finally came out in about August I bought it most promptly, and ordered a metre of lovely grey coutil from Farthingales

And then I did about five other projects, but really, in the grand scheme of things, not too much procrastinating.

So, the Persis is designed to be an Edwardian kind of shape, accurate to about 1907-1911. The silhouette at this point was still quite curvy but beginning to tone down on the hips—no more padding or extra structure there. The longer shape helps create a smoother line over the hips. My black Princess Skirt is from much the same period and would benefit from a corset like this to go underneath, because my other corsets tend to leave a visible bump right where they end on the hip.

The pattern has a lot of good fitting information, which is really nice. It has two fit options for the hips, “Average” and “Slender”, and each has three options for the bust size. (And for those who get the pdf copy shop printed, each sheet is one complete pattern so if you’ve decided which hip version you want you needn’t print both, like I did). To my surprise the bust measurement instructions put me in the largest size of the bust gores, since I have more than 5” difference between my underbust and full bust.

However, I also do not have the slimmest of hips, despite them not being terribly visually wide. Based on my measurements, even with the “Average” hip version, my hips were a size up. So I made the size 36 for the bust and waist and graded up to the 38 for the hips.

I also decided to preemptively do a small swayback adjustment. I don’t always do this in corsets, but I find that if I don’t I have a tendency to slouch, and I’ll just be more comfortable overall if I do it.

And then, wildly, rashly, I decided to cut right into my coutil and just go for it.

Why would I do such a silly thing?

Well, on the one hand I trust Leimomi and her detailed sizing instructions. In particular, I wasn’t too worried about length; I’m a smidge short-waisted but corsets of this era are starting to edge towards the underbust so if it wound up too tall I could just trim it down and if it’s too short, we’ll just call that a design choice. Also, corset pieces are small so I figured if major changes were necessary I would just recut a couple of the side pieces. This corset also features both bust and hip gores, too, which can be fairly easily swapped out if needed. (Although I then went and promptly finished the reversed felled seams as per the pattern so, maybe not so easy.) Additionally, I don’t often find corset mock-ups super useful, as the fabric and boning never seems to behave quite the same.

Grommet chicken. No, there were not enough.

However, this decision to fit as I went played hell with the order of construction, which is designed to give a really nice finish with negligible ability to alter. So I was kinda winging it, which led to some maybe not ideal decisions. in particular, it wasn’t possible to nicely tuck the waist stay in behind the boning channels. I also inserted the busk first, as I tend to, but that made sewing the swooping curves if the front panel a little extra tricky. The cardboard-like texture of this coutil doesn’t help either. So I ended up with a pretty large jog at the hem. There may also have been a cutting error involved that I didn’t catch, since the unevenness is so symmetrical on both sides. I’m pretty sure it’s not a pattern error. My stitching is definitely not the best I’ve ever done, either, but I love the overall look enough that I’m refusing to dwell on it.

One more set of bones will support the bust, but I didn’t want to add that casing until I knew what the bust fit was doing.

The whole construction was delayed a fair bit as I got halfway through inserting the grommets and ran out (apparently this can still happen even when you order grommets by the gross, who knew.) I had to make an emergency corsetry order to Farthingales Corsetmaking Supplies. I had hoped to have the whole thing ready for hand finishing by my Victorian Sewing Circle in November, but as it played out the package with the grommets didn’t arrive until about an hour before Sewing Circle. Which was still a full day early, and on a Sunday no less, so no complaints, really. I raced to set the last ten grommets, threw everything I thought I would need to cut the bones and finish off the corset into my bag, ran off to Sewing Circle (a whole other fiasco involving a train and a parade)… and forgot several key items. But still, progress was made, and eventually I got it to a state where I could try it on.

The hips fit like a glove. The swayback adjustment—total success. Might even make it bigger if I made it again. Back lacing gap—perfectly even.

There was a little bit of extra room in the bust and maybe a bit too much height at the bust and under the arms.

So I unpicked one edge of the gusset (the one that wasn’t yet a flat-felled seam), trimmed off about 1/2” of width, tapering to nothing at the base of the gusset, and then went ahead with flat-felling all the seams.

This corset calls for 1/4” plastic whalebone boning, and since I had to do a corset order anyway, I ordered some. It was my first time using the stuff, though a lot of online costumers seem to swear by it. And I will say, it was fantastically easy to cut to size and insert, especially nice when I decided at the last minute that the bones over the thigh area needed to stop an inch or so higher than they did. However, I think the bone to space ratio has to be a bit higher. The pattern includes instructions for increasing the boning in larger sizes, but the size I made still fell within the “base boning amount”. However, there was still some wrinkling over the bust, so I added another single bone there, and I kind of wish there was another row in the back and maybe the one side seam.

I found the busk I had ordered a little disappointingly floppy, so I wound up using a spring steel bone beside the busk, and another one would have been a good idea; the pattern calls for two in this area but I couldn’t for the life of me figure out how to fit them into the space designated on the pattern. This may have more to do with imprecision in my stitching than anything else mind you. My one complaint about the patterns is that the facings have very little wiggle room if your channels are even the slightest bit larger than the pattern calls for. In particular, if I made it again I would widen the front facing to include the two boning channels that are supposed to flank the bust. This would be much easier than trying to fit a separate boning channel into this small space.

Anyway, I did eventually get the waist stay inserted and the top and bottom edges bound with twill tape.

It’s a fantastically comfy body hug of a corset. The long line takes a long time to lace up, but does look great. I should probably add a hook and eye to hold the extension below the busk a little more closed.

I would have liked to add a drawstring to the bust but discovered at the last moment that I was down to about 10” of the 1/4” cotton stay tape I like to use for this. So I skipped it, and I think it’s fine in this case.

I waffled over the top lace for a WHILE before deciding to go for broke with the last bit of this heavy-duty scalloped lace. It took me a minute to get used to it

On the whole I think it’s a pretty fabulous pattern. The swoop of the seam on the front is unique and lovely; the fit is pretty much spot on. There is a LOT of information provided on fitting, which is nice. The construction as given makes for a gorgeous finish inside and out, even if I didn’t follow a lot of the methods since I wanted to fit as I went.

The worst part, in the end, is that now I have to wear clothes over it!

14 Comments

Filed under Sewing

Summer Mesh Corset (in time for Fall)

Inspiration:

Original mesh corset at the V&A museum

I’ve been in love with the idea of doing a summer, mesh corset for a WHILE. I picked up a chunk of Aida cloth for the exact purpose back circa 2015. And when I made my Victorian Sundress (better pictures still pending) it occurred to me that this might also be the perfect time to make a light, aerated summery corset. So I set to work… and then summer blazed past in a blur of everything-but-sewing, and here it is just in time for the weather to turn chilly.

But back to the inspiration: I swear I saw one in a corset book somewhere, but damned if I could find it when I looked recently. This one from the Victoria & Albert shows the features I was interested in, though: solid bits, mesh panels, “waist belt” piece.

Now, Aida cloth (the stuff for cross-stitching) is nowhere near as open as the mesh used in the inspiration corset, nor is it, frankly, particularly stable. It made this an interesting project, and I’m not at all sure how long-lived the results will be.

Auditioning materials

Materials: aside from the Aida cloth, I went with some fairly beefy white denim for the details. I liked the white and cream contrast. Probably coutil would’ve been better for those parts but I was hesitant to sacrifice good coutil when the main fabric was a bit dodgy. I also decided to use my last spoon busk, just to make my life harder; the inspiration piece doesn’t have a spoon busk but it is right for the time period I’m roughly going for. I used 1/4” spring steel boning but given that my boning channels are single and not the double ones I’m used to (and the rather shifty Aida cloth) I’m thinking maybe a slightly wider, more stable boning might have been preferable.

The pattern is a veritable saga of its own. The kernel, as with most of the corsets I’ve ever made, is Butterick 4254 view C, a basic six-panel corset. but over the years I’ve altered, traced off, and re-altered the pattern so much I couldn’t even tell you how much it resembles the original. I still wear my old white corset from this pattern regularly (despite it being technically far too small and, more recently, badly stained with bright blue after an incident involving a gel ice pack and a cat), and the shape is pretty much perfect for me, but I wanted to make sure that the various layers of alteration I’ve added to it over the years were reflected in the pattern I used, while re-sizing to be closer to my current measurements. This involved adding quite a bit of width to the front, and substantially re-shaping the side seam to mimic the effects of a hip gusset I had added to the white corset at some point, as well as an inch or so of height to the top. I had shortened the corset pattern initially, as I’m short waisted, and the top had always been a hair low, but somehow as my bust has gotten larger the last few years this problem got worse (even though I’m pretty sure my bust point is lower than it was). So this latest version aimed to incorporate the added width and side-seam shaping, while adding the missing height to the top.

I don’t think I’ve quite nailed my revamped pattern (and a test in real coutil, or at least ticking, is probably needed to really tell), but I do think it’s a step in the right direction. The bust height is great; the side-seam needs a little more refinement in the shape of the hip flare (which I accomplished in this piece by playing with the seam allowance), and I had to take out some excess width in the back, though I’m not sure if that’s just due to stretching. I might try to adjust the fall of the side seam above the waist forward a little; below the waist it’s perfect.

Construction

  • Original has solid outer on top of mesh inner at corset front/back
  • Overlay solid portions over mesh around busk, lacing panels, and bust area, plus shaped waist belt
  • Seams to the outside, covered by bone casings
  • Cording on bust solid parts (in hindsight the original may just have been quilted)
  • Waist belt added after main seams but before adding busk and lacing panel coverings
  • One bone per seam, in bone casing, applied to the exterior
  • Extra bone just beside the busk for added support (not necessary for spoon busk)

The trickiest part about this project was coming up with the order of operations. (Spoiler: I messed this up, more than once.) I added the “bust cover” patches first, with cording. Then sewed the panels together. Next I should’ve added the waist-stay panel, but instead I did the back lacing area so I could test the fit before I stitched over all those seams. It’s good I did—I had to take the back portion in significantly, and tweak the hip curve at the side seam. I’m not sure if I had added too much or if the Aida cloth just stretched; it definitely wasn’t as stable as would be ideal. But it also meant I had to unpick a portion of the back lacing panel to tuck the waist stay under it.

Cording the bust area wasn’t hard, though it was a tad tedious. I was pretty sure within the first few lines that I should’ve used a thinner cord, as my channels are VERY raised. Looking back at the inspiration piece, they may actually have just been quilted, not actually corded at all. Oh well. If I were to do it again I’d move the entire corded section higher by a good inch, as it mainly sits below my bust. But that was pretty much impossible to determine in advance.

The trickiest part of the construction was wrapping the busk covering panel close around the busk pieces, but still with enough room to edgestitch it down, without breaking a needle. Especially while getting the busk in place over the bulk of the corded patches. I used a fairly thick string for the cording and in hindsight I wish I’d used a thinner one. Those parts are VERY thick and were really hard to sew over, even for my Pfaff 360, and I’m a little worried all the trimming I had to do may have left these seams vulnerable to fraying.

(Laced a little too tight at the upper back. More comfortable when laced more straight.)

Even with the width I removed, the corset is not really “tight”… I can lace it very nearly closed, although I wouldn’t want to wear it like that all day. If it stretches any more with wear it might still become too big. Although, I’ve also lost a little bit of weight this summer; if that reverses come winter I may be glad of a little extra room!

Maximum lacing tightness

I had planned to use the same white denim for my binding, but at the last moment decided to go for a lighter-weight cream twill, for less bulk at the edges of the corset. No regrets, although the texture of the heavier denim would’ve been nice.

I also remembered to add drawstrings in the upper binding, using more of my 1/4” stay tape. Which is possibly my favourite notion at the moment and I may need to just bite the bullet and buy it in bulk.

Anyway, I’m cautiously thrilled with the results, imperfect and experimental though they are in many ways. The shape is very much what I wanted. The bust height is so much better than previous versions. The size is a pleasant change from nearly-too-small corsets. I love the solidity of the spoon busk. How will it be as it breaks in? Don’t know. Will it self-destruct after a few hours of wearing? Could be! Will it be fun to sew? Definitely.

And now… to the fall sewing!

5 Comments

Filed under Sewing

The Black Corset

Of all my wardrobe “needs,” one could, very reasonably, argue that another corset should not be at the top of the list. My one pair of jeans has a rip in the knee and recently blew the topstitching around the fly (something I’ve never experienced before, by the way). My underwear drawer is just, well, sad. I have almost no leggings left.

But no, we’re resuming (after a three year hiatus!) the Victorian Sewing Circle, and my old corset is Too Small. I mean, so is the rest of my 1885 outfit, and I will have to restart the bodice I’d been working on for the “new” outfit to make a bigger size (and not accidentally use ticking for the lining. Ticking is great for many things, because it is very stable. It is not great for lining clothing that you need to move in.) But one must begin with the corset.

Black grommets, because apparently I ordered a 10-pack of antique brass busks but no matching grommets?!?

I have quite a few corset patterns roughly suited to the period, although most of my previous versions were based on Butterick 4254, which maybe isn’t the best starting point but that’s where I started and once I had it fitting well you might as well go on with it. Until it isn’t well fitting, of course.

All the “Victorian” corsets I’ve made have been paneled, but I enjoyed the gussets in the two regency style corsets I’ve made and was curious to try a later gusseted pattern. Especially as they’re a handy way to adjust the sizing very specifically.

Which brought me to Simplicity 2890.

The envelope pic isn’t terribly promising, but it did have gussets. Some internet searching (aka reading the reviews on Patternreview.com) revealed that it is in fact based on an original historical corset pattern from 1872 (despite the more 1860s vibe of the chemise.) This blog has a nice discussion of it. The internet also agreed that the pattern was lightly boned, short-waisted, and ran small.

Tech drawing, poor resolution.
Back view of technical drawing. Possibly even worse resolution.

Short waisted was fine by me. Lightly boned, I wasn’t too concerned about, as I’m looking for a comfortable rather than tight-lacing corset.i added 1/2” to each side-seam to hopefully make up for the “runs small” part (not adequate, by the way), and dove in.

My mock-up seemed promising, but some extra room in the hip would be helpful. However, I didn’t fully appreciate the issues of my mock-up fabric (which really wasn’t stable enough) and the fact that it wasn’t fully boned. When I tried it on, it seemed like opening up the front hip gusset gave me the extra hip spring I needed. But this was actually my too-flexible fabric “borrowing” the width from the front—-where I needed the width was right at the side seam. Since I didn’t realize this until my “final fabric,” version, I wound up doing most of my fit-futzing on the final version, removing a lot of the width I had added to the front hip gusset, and ripping out the side-seam to insert a gusset in the hip there.

Hip gusset in side seam. It looks thrown to the back here because the dress form is very small—on me it is indeed at the side.

This greatly improved the hip shaping, so I proceeded with construction.

I will say, I definitely prefer to topstitch my gussets in place as opposed to constructing them “normally” as the pattern instructed. There’s a fair bit of fraying around my gussets already from futzing with the seams to get them smooth with the “regular” method, which I will have to zig-zag over at some point.

So let’s talk about this pattern. What a weird, weird pattern.

First, it’s only two main pieces; almost all the shaping comes from gussets. This made the only other preemptive fit change I would’ve made, a swayback adjustment, impossible as without a side-back seam to absorb the angle change it would leave the CB line not straight.

Can you see how the bone casing stitching crosses the weird front seam line?

The single weirdest thing is that curved seam in the front. It isn’t a seam—it’s a tuck. A long, curved, narrow tuck. Why is it there? Does it add shaping? No. It does make it slightly easier to sew the gusset that emerges from it, but the other bust gusset doesn’t have one.

It does create a very attractive curving line across the corset front, which may be the only point of its existence, but then the bone casing runs straight up the front, crossing it, and at least partly diminishing its effect. Weird.

The other oddities may be effects of grading—I didn’t love how close the back hip gore is to the back boning, for example.

This was my first time, believe it or not, doing applied boning casings—Butterick 4254 uses the seam allowances for all its boning casings. I just cut 2.5 cm strips of my fabric (a bull denim, not a proper coutil as the sewing room gnomes have absconded with my coutil) and then ran the strips through my bias-tape maker and pressed. They are meant to be applied on the inside but I accidentally stitched the first one on the outside and I really liked the look. However, you can’t really apply ALL of them on the outside, as the end of the angled casing on the back is covered by the facing folding to the back, and the front boning casing crosses over that decorative front tuck so if you stitched it on the outside it would obscure that feature even more.

The pattern doesn’t call for a waist stay, but I added one, and I’m very glad I did as I think the waist shaping would be a lot mushier without it, especially in my not-coutil fabric.

Lacing gap is still wider than ideal.

While it gives a stronger shape than indicated by the cover model, it’s not a particularly extreme corset. The hip-spring before I added the gussets there was very gentle. I could probably have enlarged the bust gores a wee bit, too—I did sew them with narrower seam allowances to add a bit more room. The light boning gives it a less cylindrical, more organic shape than my other corsets. At least when it’s on me—not so much on the dress form.

I didn’t have to put much thought into the lace and ribbon selection as I only had two pieces of non-stretch black lace, but I love it. The lace is just a guipure from Fabricland. The “ribbon” is a rather battered chunk of vintage rayon seam binding that came from inherited deep stash—I should probably tidy up the ends, but it was the perfect addition, I think, to relieve the sheer black.

On the whole it was a fun experiment, anyway. It may not hold up very well, not being coutil, but I don’t exactly wear my corsets heavily either. And if it does fall apart, well, with any luck by then the sewing room gnomes will have returned my coutil and we’ll just call this version the mock-up.

6 Comments

Filed under Sewing

Brand-new pink corset

Of course as soon as I got the antique pink corset I wanted to copy it. If only to get a better sense of how it is shaped. 

This is not such a replica. If anything, it’s a crude approximation, with little of the delicacy and grace of the original. Everything is too heavy—the fabric, the boning, even (especially) the lace. It is excused only by the fact that I REALLY wanted to do a work project with this pale-pink Chinese brocade, because, um, gorgeous. 

The pattern is my altered version of Butterick 4254. The fabric is a Chinese brocade, the strength layer made from ticking. I’m out of busks, so since this is a work project I subbed in something we do carry at work—hook and eye tape. It’s not as pretty as a busk, but a bit more delicate, which is in keeping with the style of the original. It’s also really annoying to hook up, by the way. 

I made a number of poor choices in the construction, but I will say that the top and bottom lace hides any number of sins, and enhances the Victorian-hourglass impression as well. 

It also got some little pink bows (à la original) just in time for me to hang it up at work, but not in time for these quickie-bathroom-mirror pics. It is growing on me.

I made a princess-line chemise to go with it, mainly because a corset alone on a display mannequin looks a bit, ah, naked—fine for a contemporary corset, not quite the right look for a Victorian one. I was inspired by originals like this:

Although I didn’t want to do buttons, because time. Most of the princess-seamed chemises I could find online seem to come from 1900+, but The Home Needle (1882) mentions them so they were around. I couldn’t find any patterns I was super into, plus this is not exactly a proud piece of historical recreation, so I pulled out a princess-seam dress pattern, McCall’s M7189, in fact, though I think it doesn’t matter that much which exact one. I added a bit at the waist so I could slip it in without a closure, and deleted a bit at the top to add the lace neckline and straps—this took some interesting stretching and squishing of the lace to create the curve. There are two rounds of lace and I was completely astonished when it turned out to sit just right on my shoulders. 

Then I tried to save time while putting the ruffle on the bottom by using my ruffler foot to attach it, and had to tear it out three times because I made it too small. Dur!


All in all, though, I am satisfied with the overall look, given the limitations of my materials. 

4 Comments

Filed under Sewing

Pink Mystery Corset

A little while ago I took one of my besties from Cowtown, who was visiting, out for coffee and a little toodle through some of the local antique shops. She didn’t find anything, but one place that sells a charming, or possibly annoying, array of select antiques and hipstery artisanal doodads, had a shabby little antique pink corset on display. Naturally, I had to inquire as to the price. It was right (as it should be given that the condition is, well, let’s just say not museum quality. 😉 ), so I came home with an authentic Victorian-ish little corset. 

It’s quite a short corset, no more than about 28 cm (11″) at the tallest surviving part. (That’s at the bust area.)

At the side: 22 cm (8 3/4″)

At the back: 25 cm (10″)

Half bust: 38 cm (15″)

Most sadly, it is missing the front busk entirely, so I don’t know how big most of it would have been. Only the very top edge is complete: about 15″ per side. I don’t think it would have reached up to the full bust, so it’s maybe not actually as tiny as that first appears: 15″x 2 + 2″ lacing gap is 32″, which would actually quite possibly have fit me. 

Surviving half waist is 23.5 cm (9 1/4″), but this is short at least 2.5 cm (1″) and probably more like 4-6 cm. If the original waist was 11″ per side, that would work out to about 24″ total for a 2″ lacing gap—too small for me but a very reasonable Victorian waist size. 

It’s made of two layers of rather shattered silk in a pale ivory/blush colour; the outer layer has a brocade pattern of scattered tiny flowers.  There is a wide (6cm, 2 1/4″) lace trim both top and bottom, stitched down along a narrow pink ribbon. 

It’s made strictly in panels (no gores or gussets), six to each side, and boned along each side of each seamline, with two bones at each side of the back lacing. The shaping appears to be fairly slight, though it’s hard to get a good sense of the shape without stuffing it on something. 

The bones are stitched into ribbon casings on the inside. The binding was machine stitched on the outside, and then hand-stitched down on the inside. 

I am assuming these are real whalebones. I’ve never actually seen the real thing to compare. 

They are flat, thin, very light, and still quite springy and flexible. 

The lacing runs through tiny handstitched eyelets, no metal grommets, so it wouldn’t have stood up to heavy tightening. 

The lacing appears to be original, and is a wide, flat woven tape that compresses very tiny to go through the tiny eyelets. It is tipped with long, dark metal tips at the bottom ends, but all the extra length is pulled out and tied at the waist. 

The pink ribbon anchoring the lace has teeny bows at both front and back ends. 

It’s quite exquisitely delicate. I only wish the busk, or whatever front closure was used, had survived.

I have some thoughts of my own about the age and kind of corset it may have been, but I’m so far from an expert I hesitate to throw them out there. I’d love to hear your thoughts. (Especially if you know a good method for taking a pattern from such a fragile item!)

11 Comments

Filed under Sewing

Underbuster Parfait

Last summer at the local Fringe Festival, i bought a costume piece from a local leatherworker (Of The Gods’ Blood Armory, fyi)—a steampunk-y (or maybe that’s dieselpunk?) faux gas mask. It was an impulse purchase, completely unjustifiable by any measure except that I was supporting a local artisan, and I love it to bits.

But it obviously needed an outfit. I have a few bits of army surplus gear from here and there, but nothing at all cohesive, and the army-greenish colour is not part of my usual palette. A corset was an obvious pairing, but I didn’t have any fabric that immediately spoke to me.

Except that I did. Whilst digging through the stash looking for something to complement the sweaterknit for my dad’s cardigan, I stumbled on this textured faux-suede that I acquired when a co-worker was de-stashing. It’s olive green, although that particular variety of olive green that looks mostly brown under fluorescent light.

The pattern is a further tweaking of Butterick 4254, underbustified, but at this point I couldn’t tell you anything else about what changes I made. Except that I felt like I had finally wrapped my head around a construction order that let me fit as I went, with the result that this is the comfiest corset I’ve ever made. It’s a bit big, in that I can lace it completely closed, but the shape is just right. (I was aware that it was coming out big and left it that way as it’s an “outer” corset and I wasn’t sure how much bulk I might add with garments underneath it. Anyway, I wouldn’t want it any tighter than it is when laced closed…

First off, this is NOT the sturdiest method of making a corset. It’s the same one I’ve used for all my corsets, and I havne’t burst a seam yet, but I’m also not wearing any of them for days on end. Five or six hours at a span, rarely more than once a month, and I’m not going for more than an inch or two of reduction.

anime-070
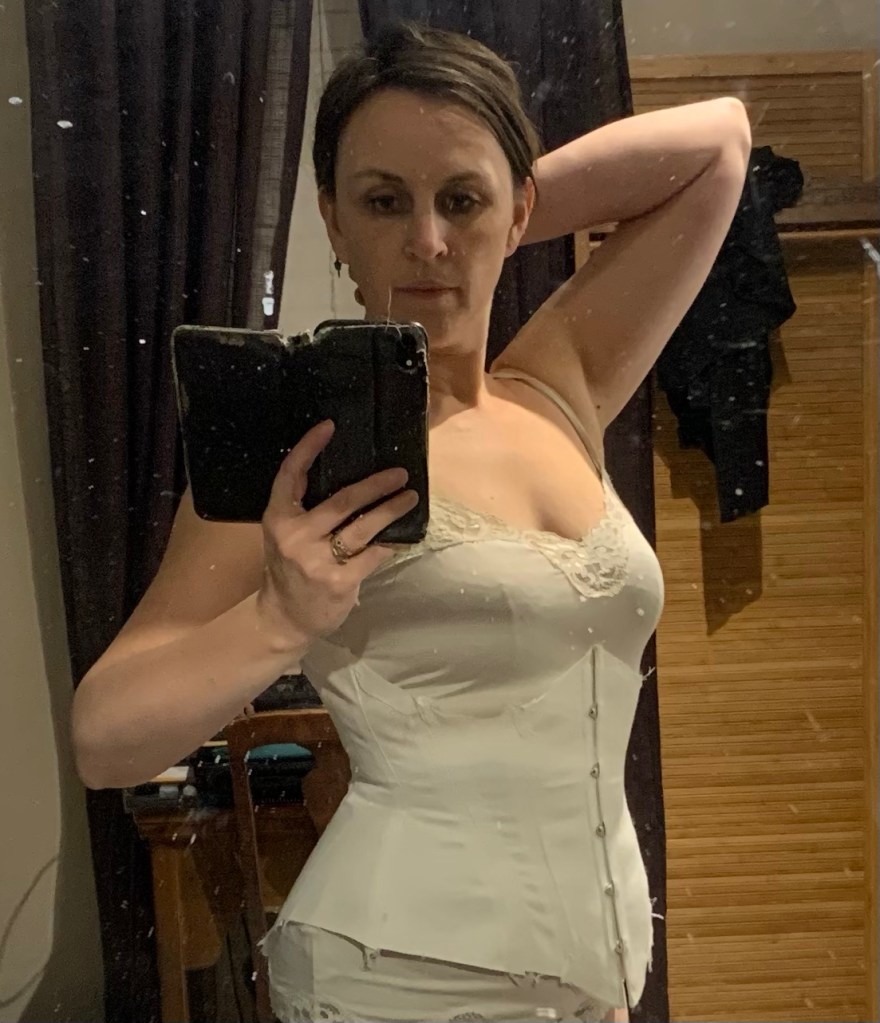
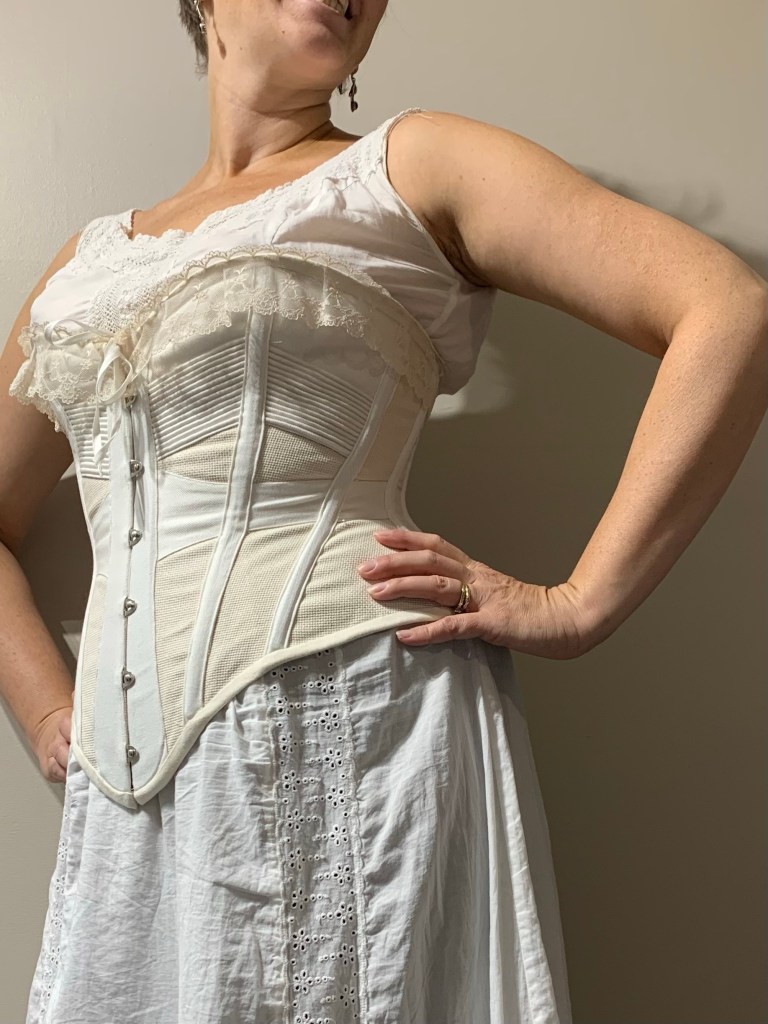
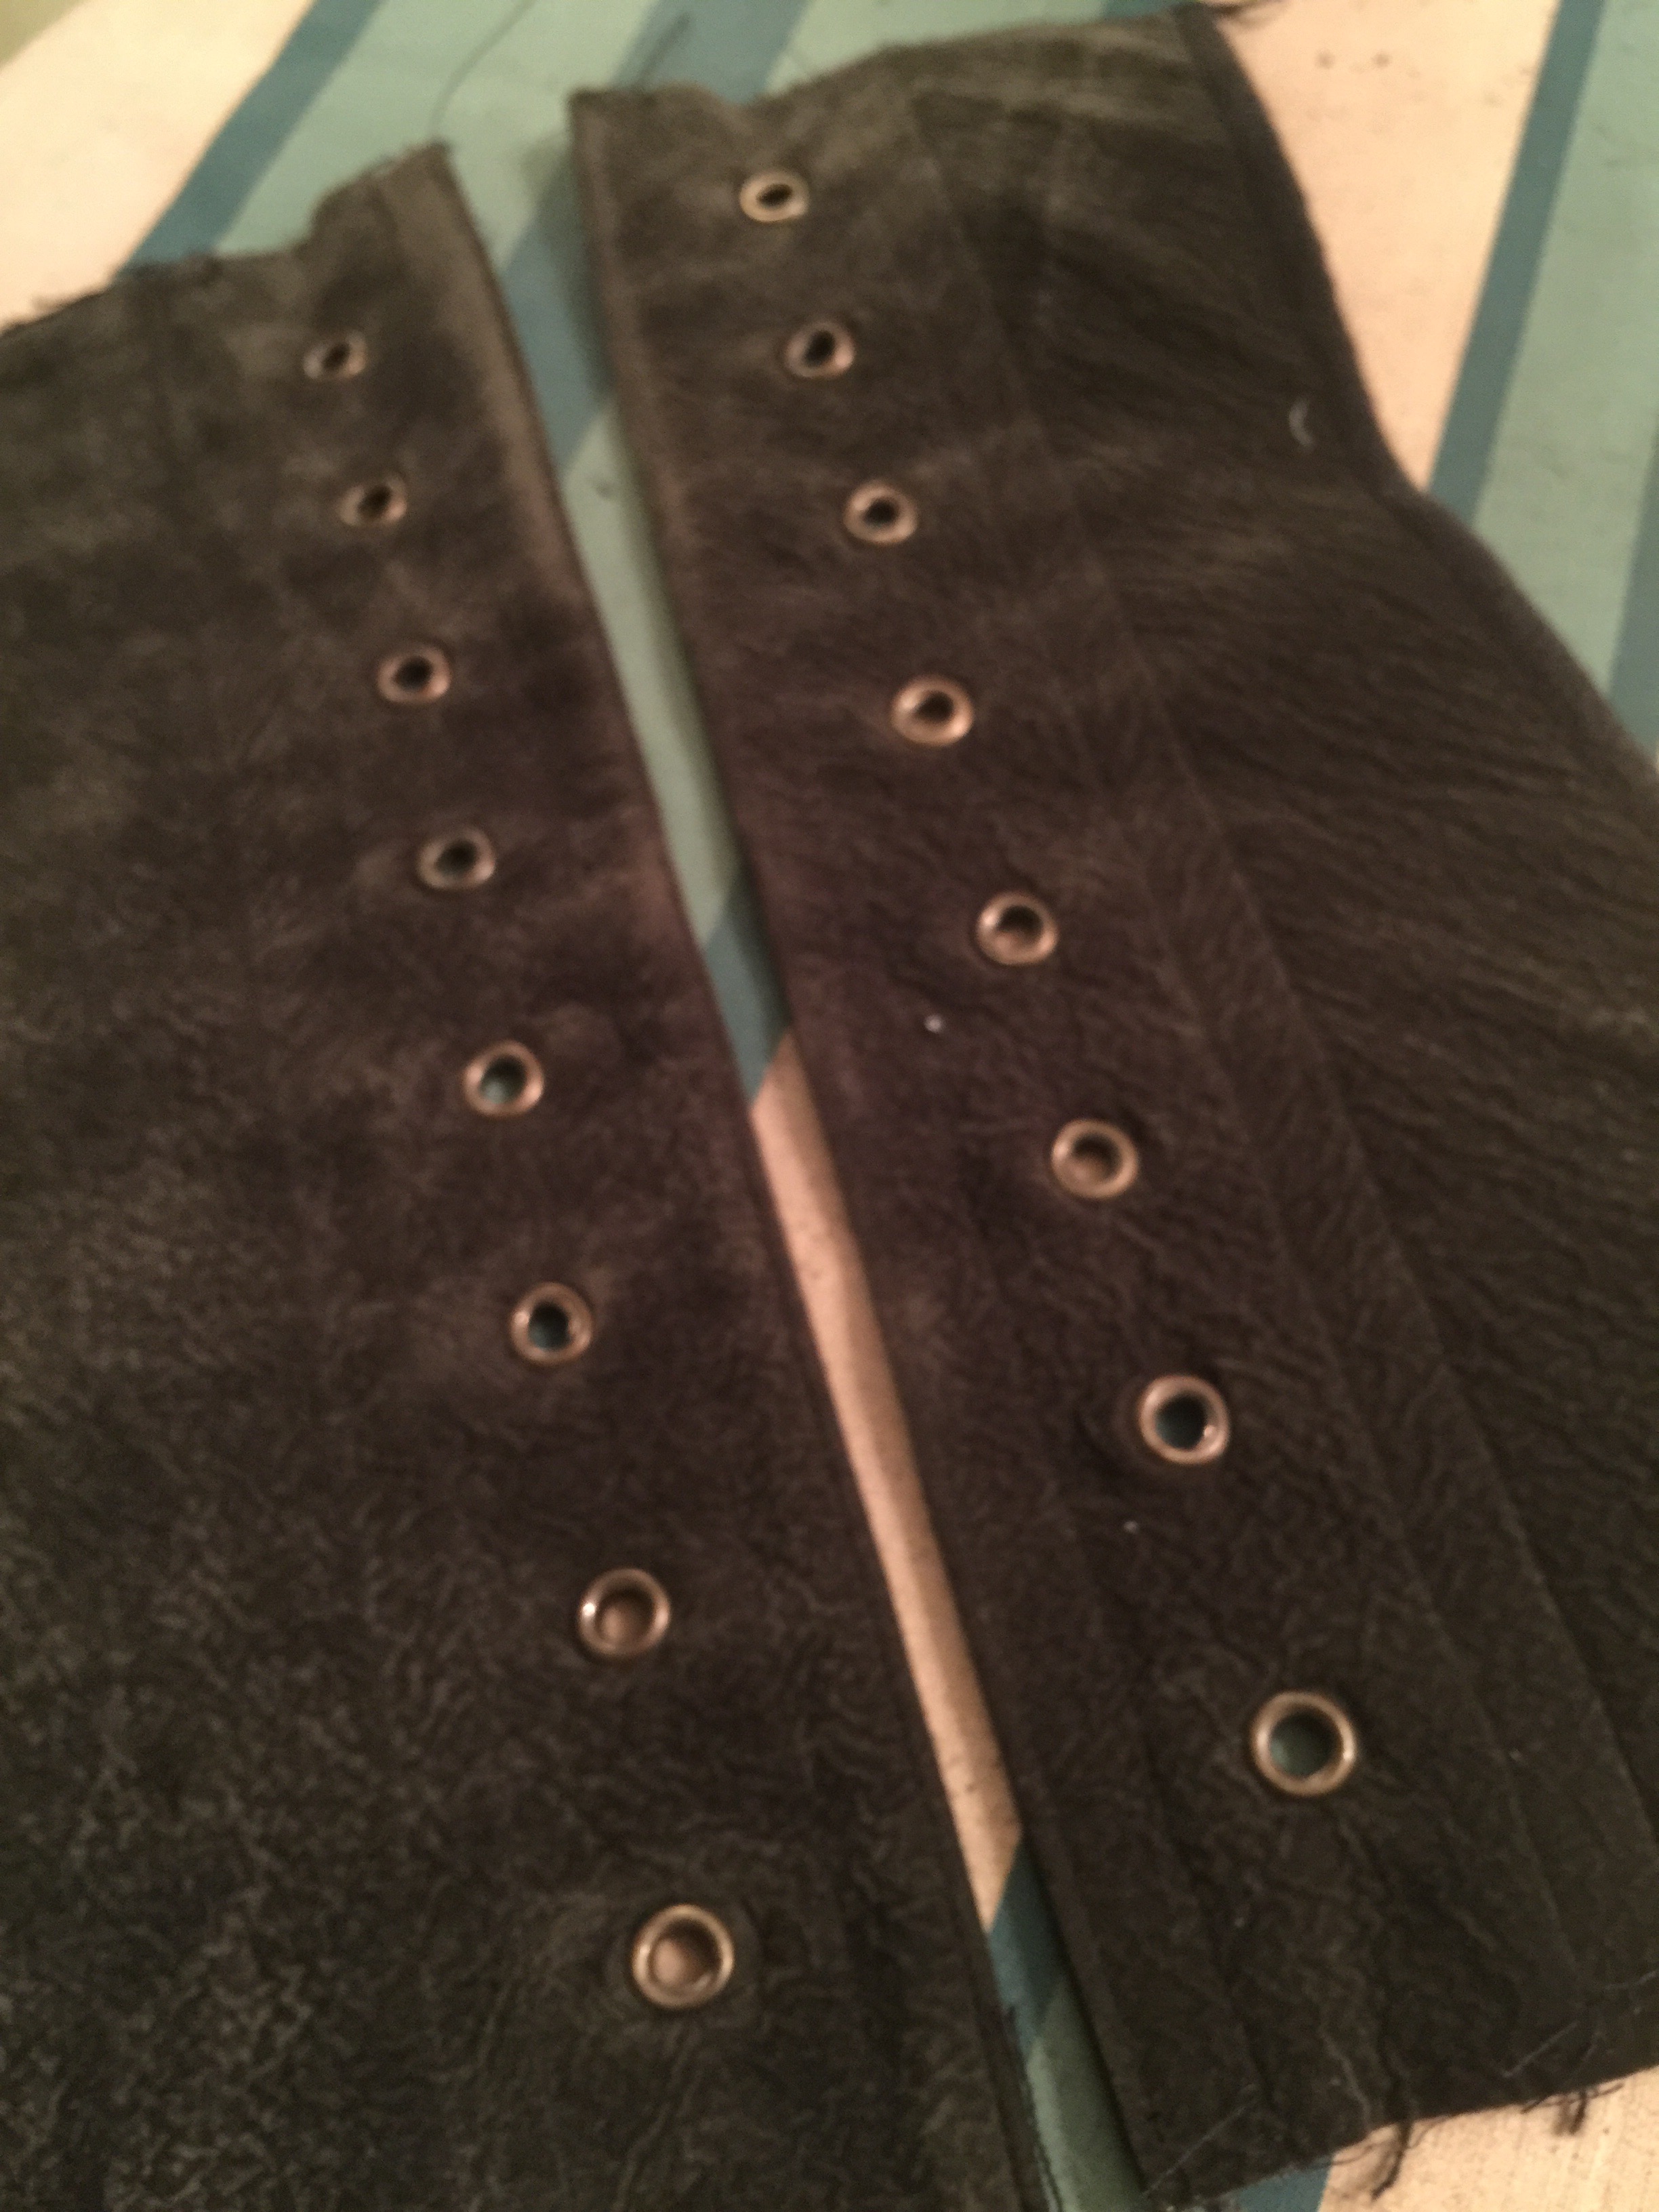
It’s the method described in “The Basics of Corset Bulding” by Linda Sparks (mainly used because that’s the book I have. 😉 for making an alterable corset. You construct the front piece with the busk and the back pieces with the grommets, first. Then the other pieces are sewn together, and the seam allowances stitched open to make bone casings. But this time, I put in the bones around the grommets in the back, and then tweaked the fit—finalized some seams and added bones, and tweaked a little more—and so on until everything was just right.  This let me get the fit I like, the shape I like, AND end up with a super comfy corset, so I’m pretty stoked.

anime-162
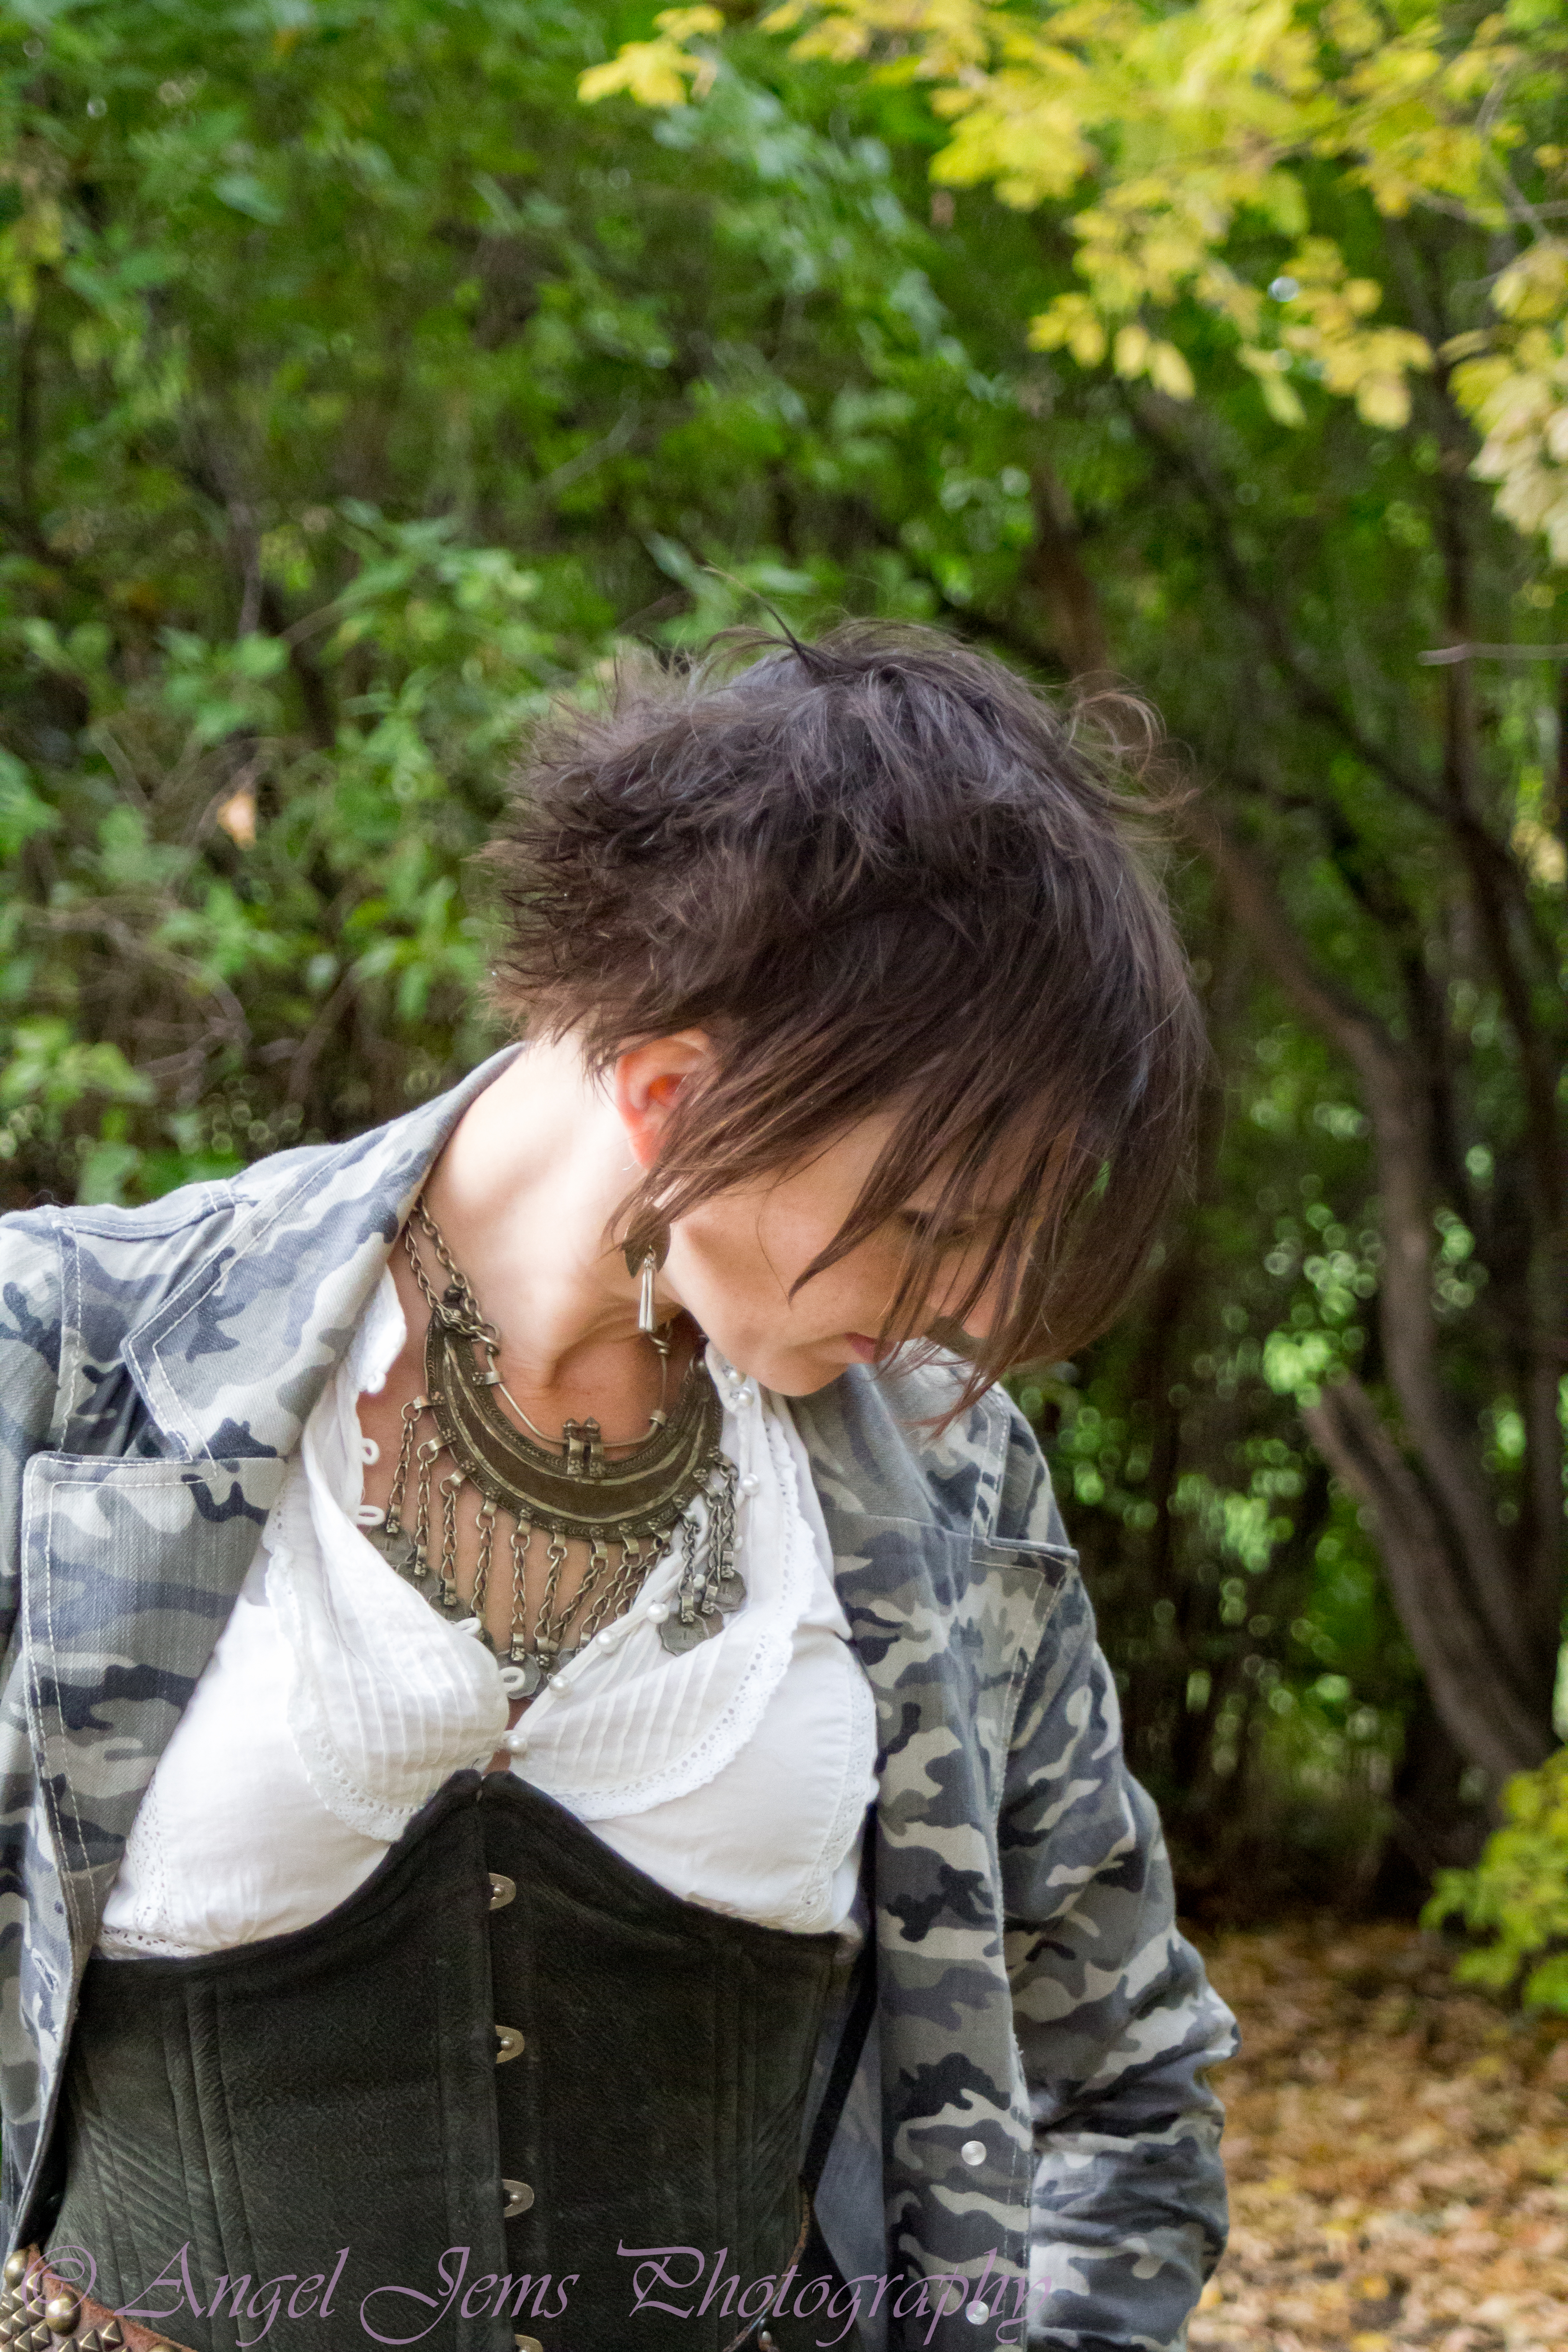
For fun, I added small sections of cording in the front. I think a bigger or firmer cord would’ve been a good idea, but they were fun.

And then I completely failed to take blog-worthy photos for almost a year. Sorry?

anime-093

Walking with Wendy Marvel and Terry Bogard.

Well,it finally got an outing at the local comics expo this fall, and I managed to wrangle my sister-in-law into taking photos beforehand, so meet my  vaguely-airship-pirate outfit! (It’d be really nice if I could manage to blog the girls’ outfits, too, but we’ll see how I do. Oh, and the pants I’m wearing, which are Vogue 9210. They’re fun. And hard to photograph.)

anime-084
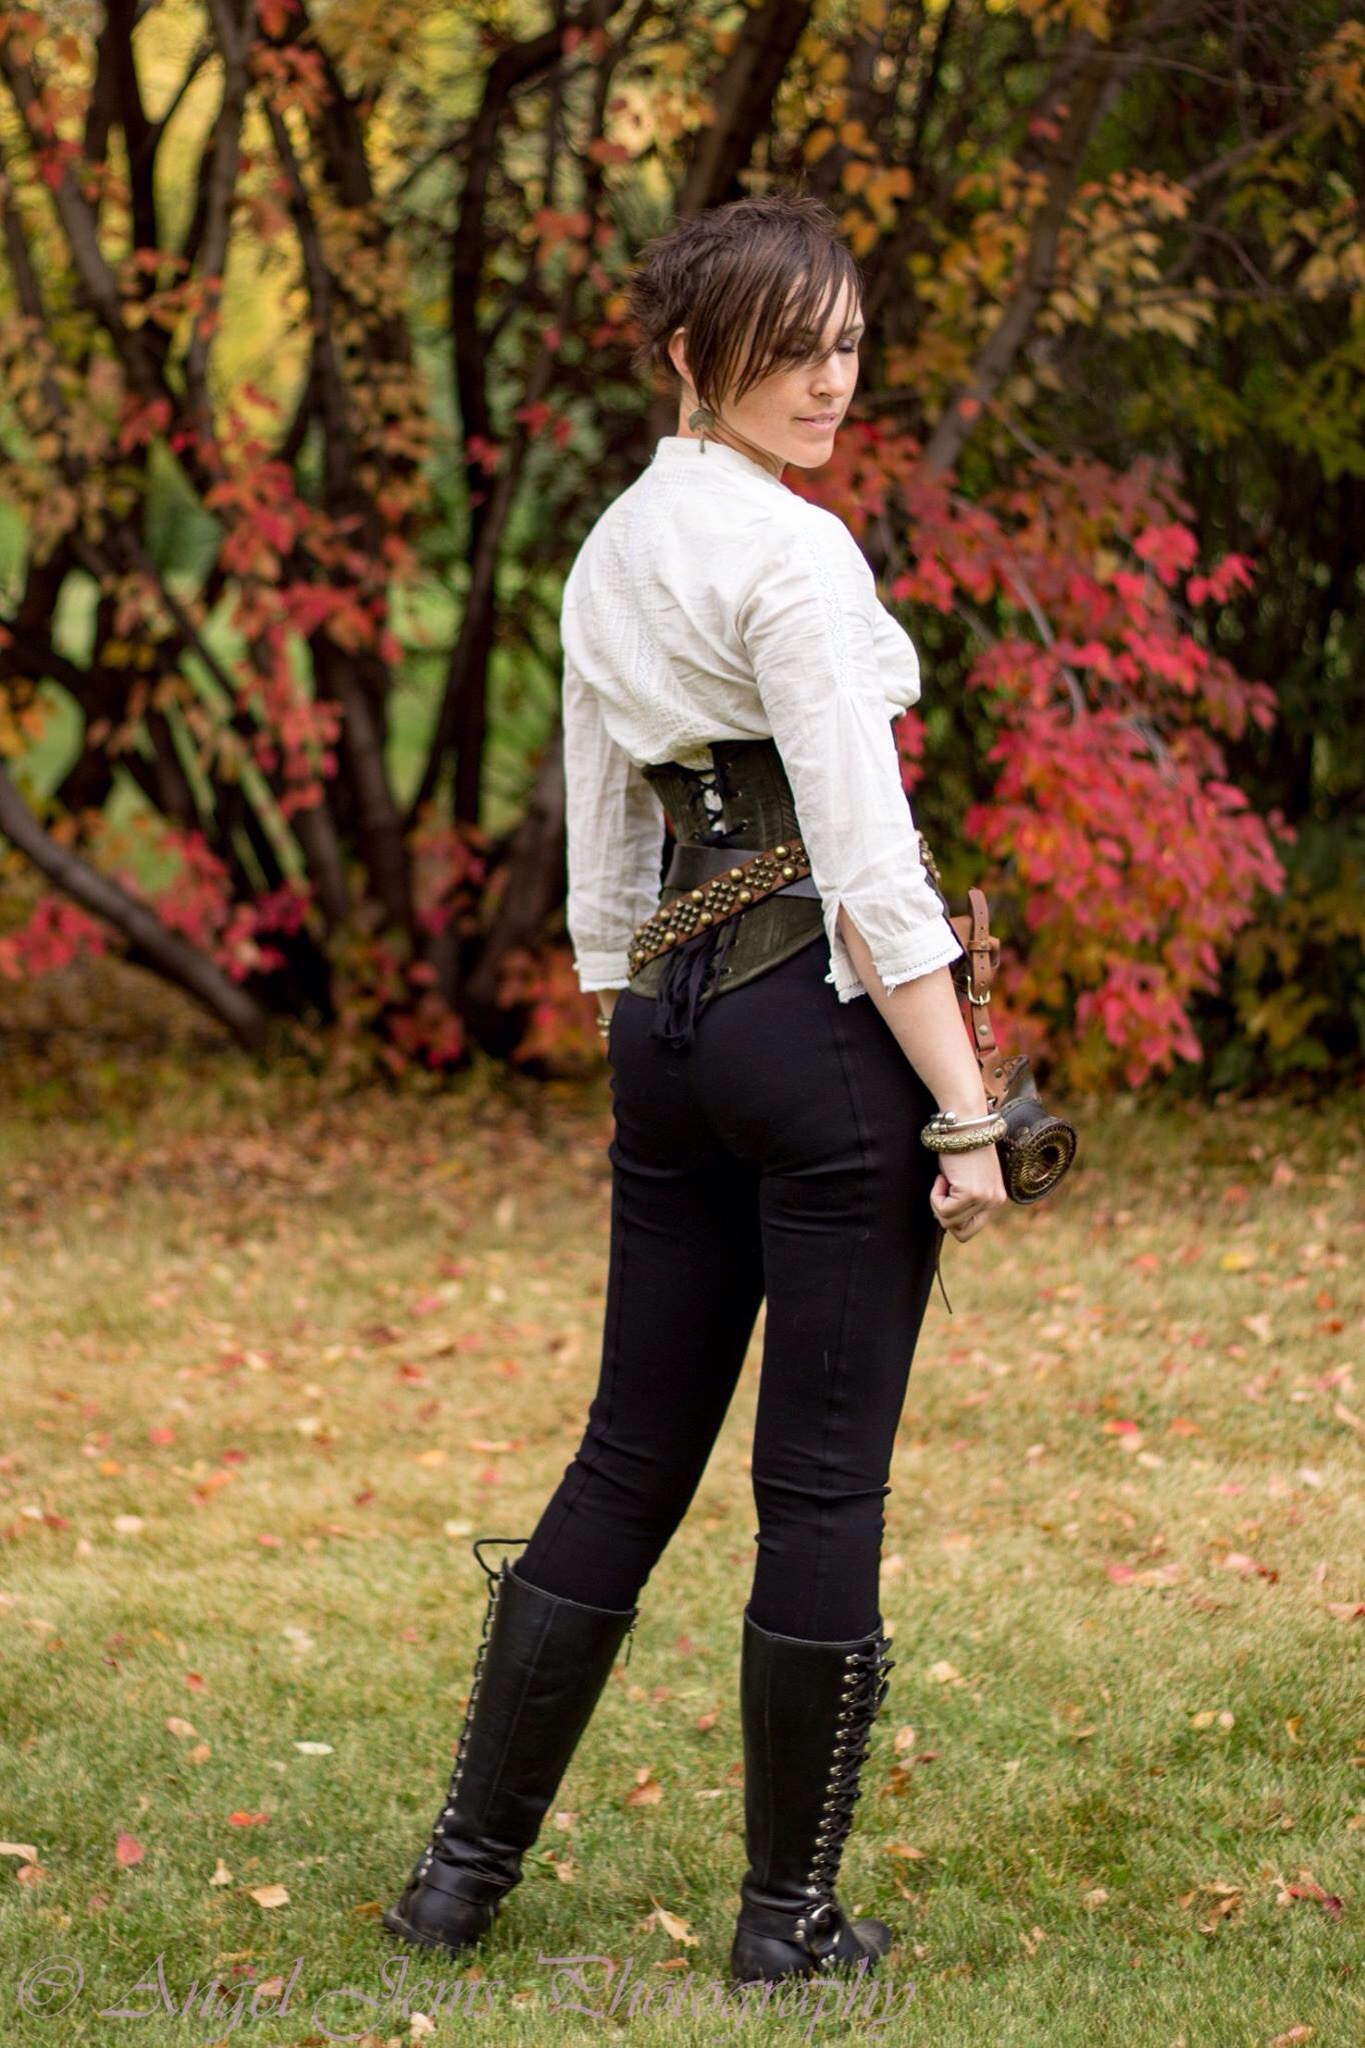
My sister-in-law shot us amidst gorgeous autumn leaves, which are lovely and natural and not really suited to an outfit that demands wrought iron and gaslight, but I wasn’t willing to go further than the next-door park on that particular morning, so I’ll take it.

anime-73
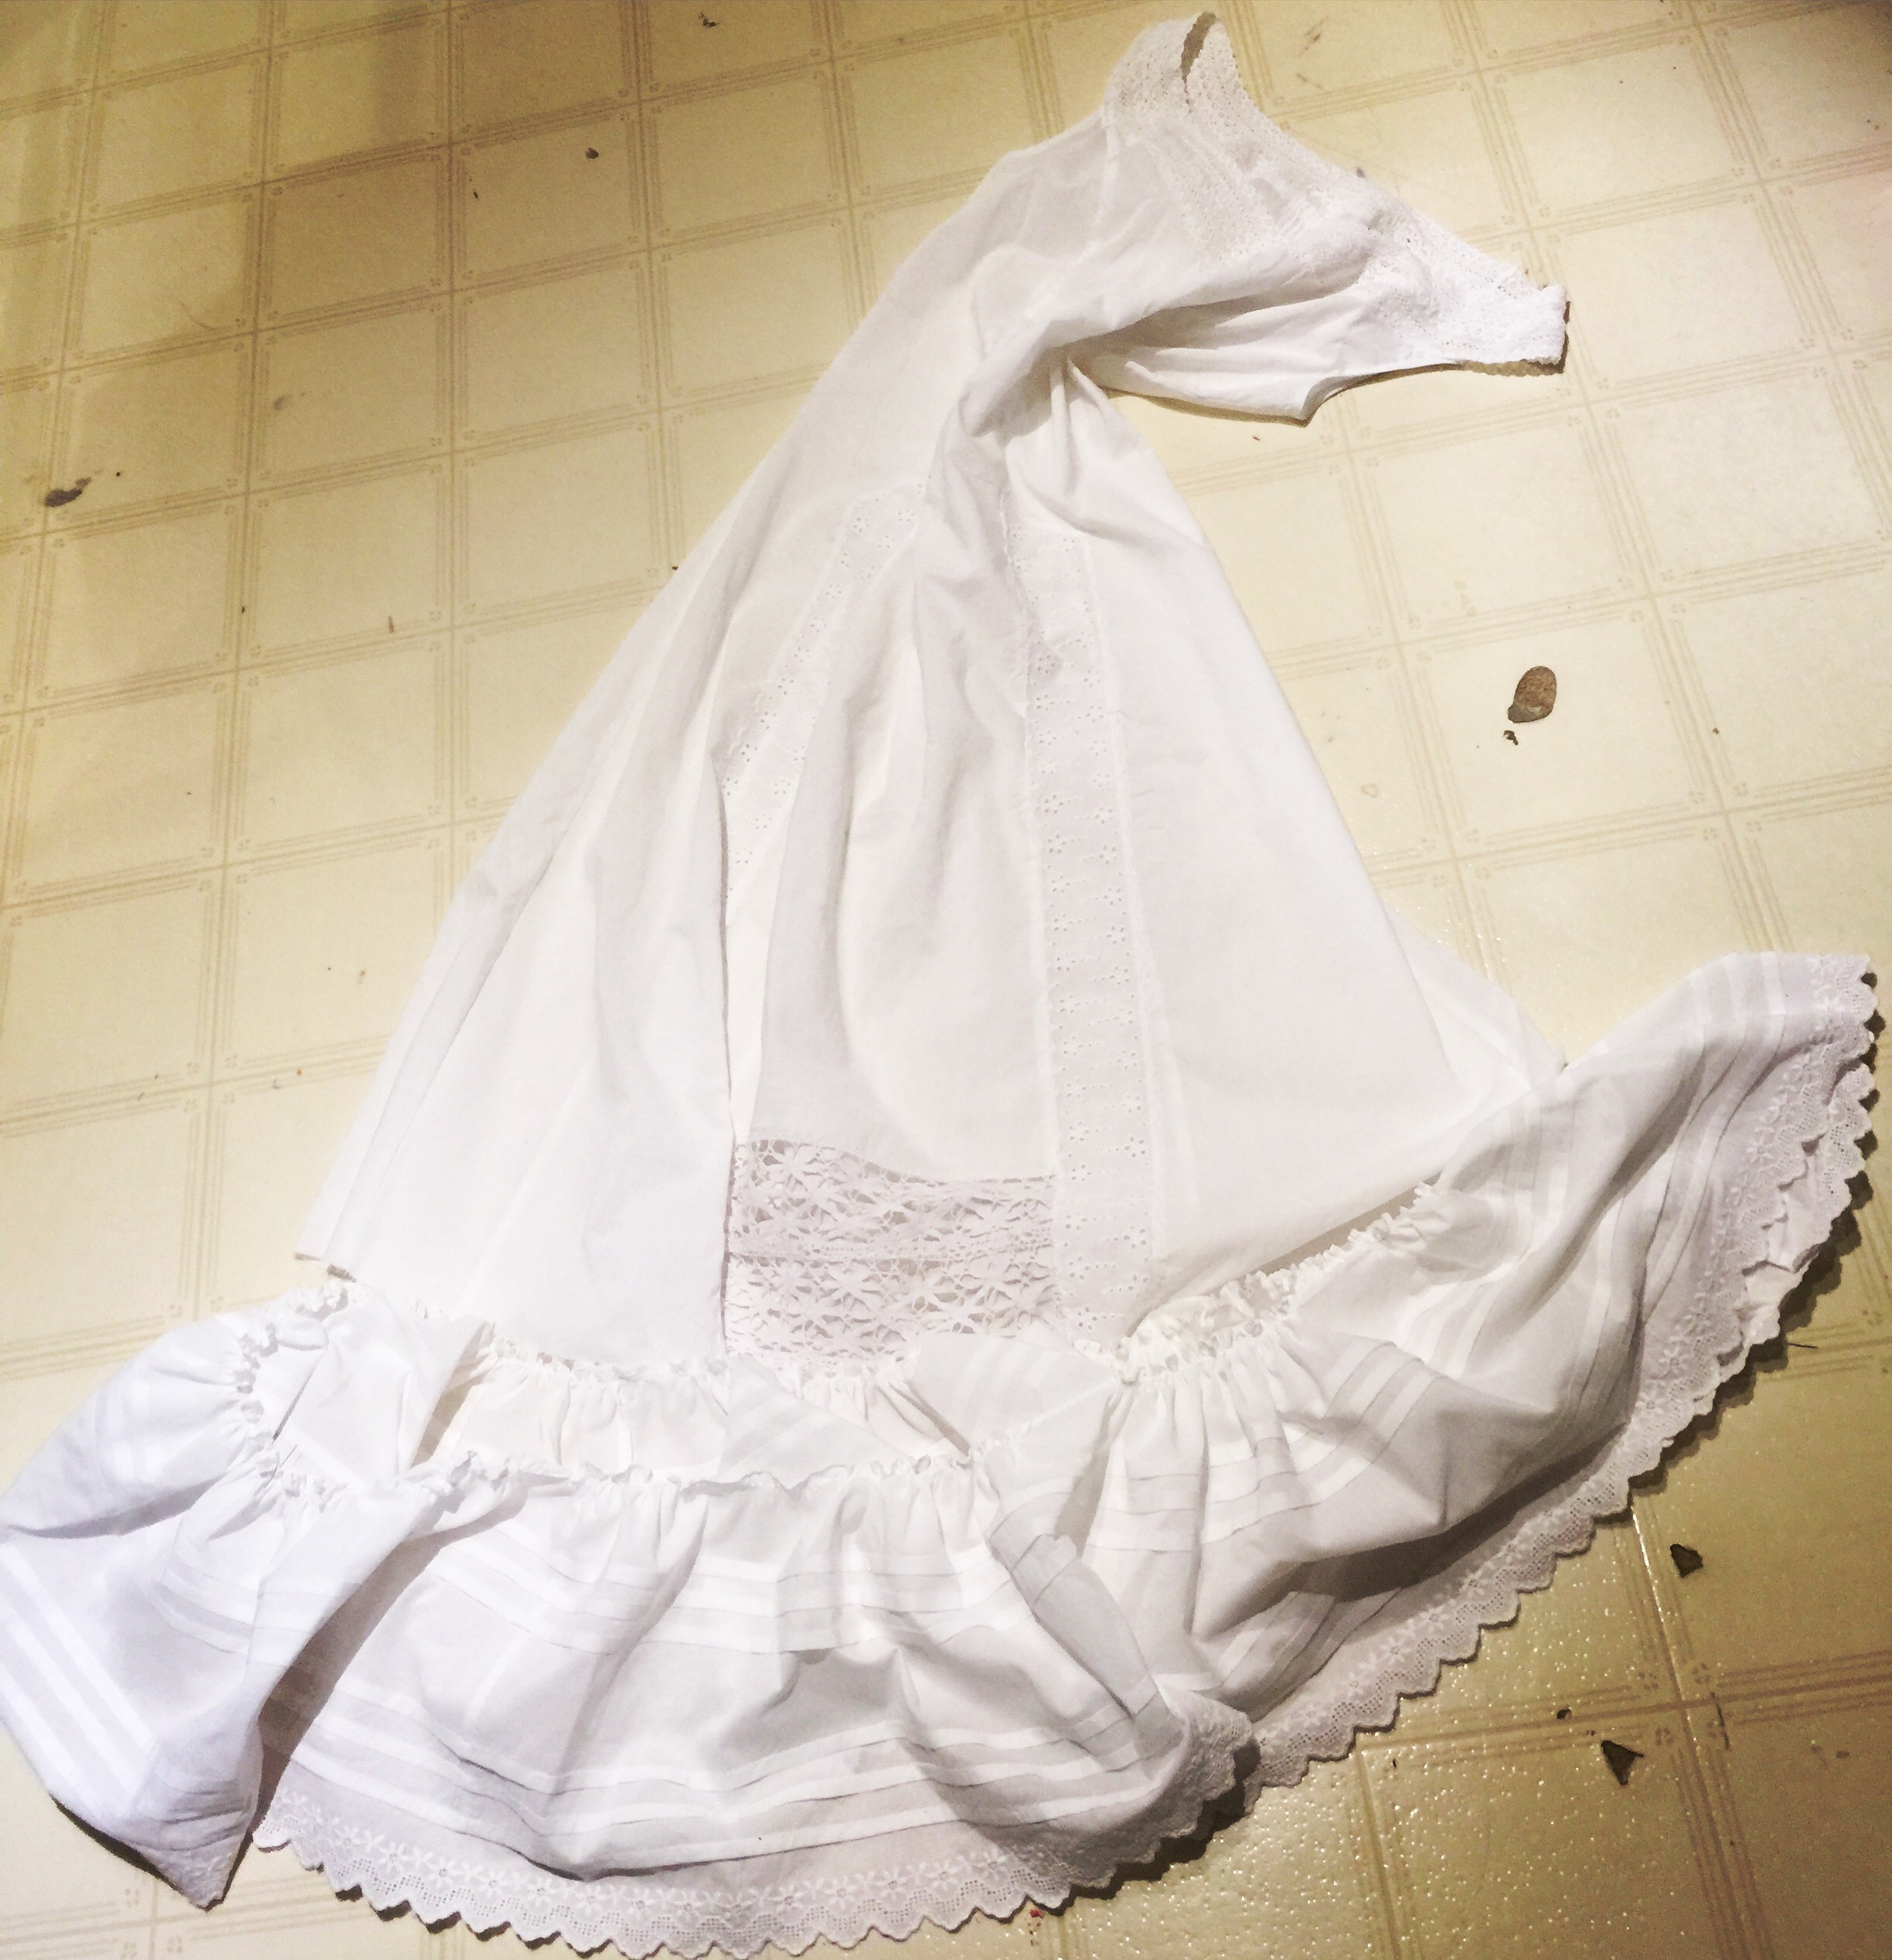
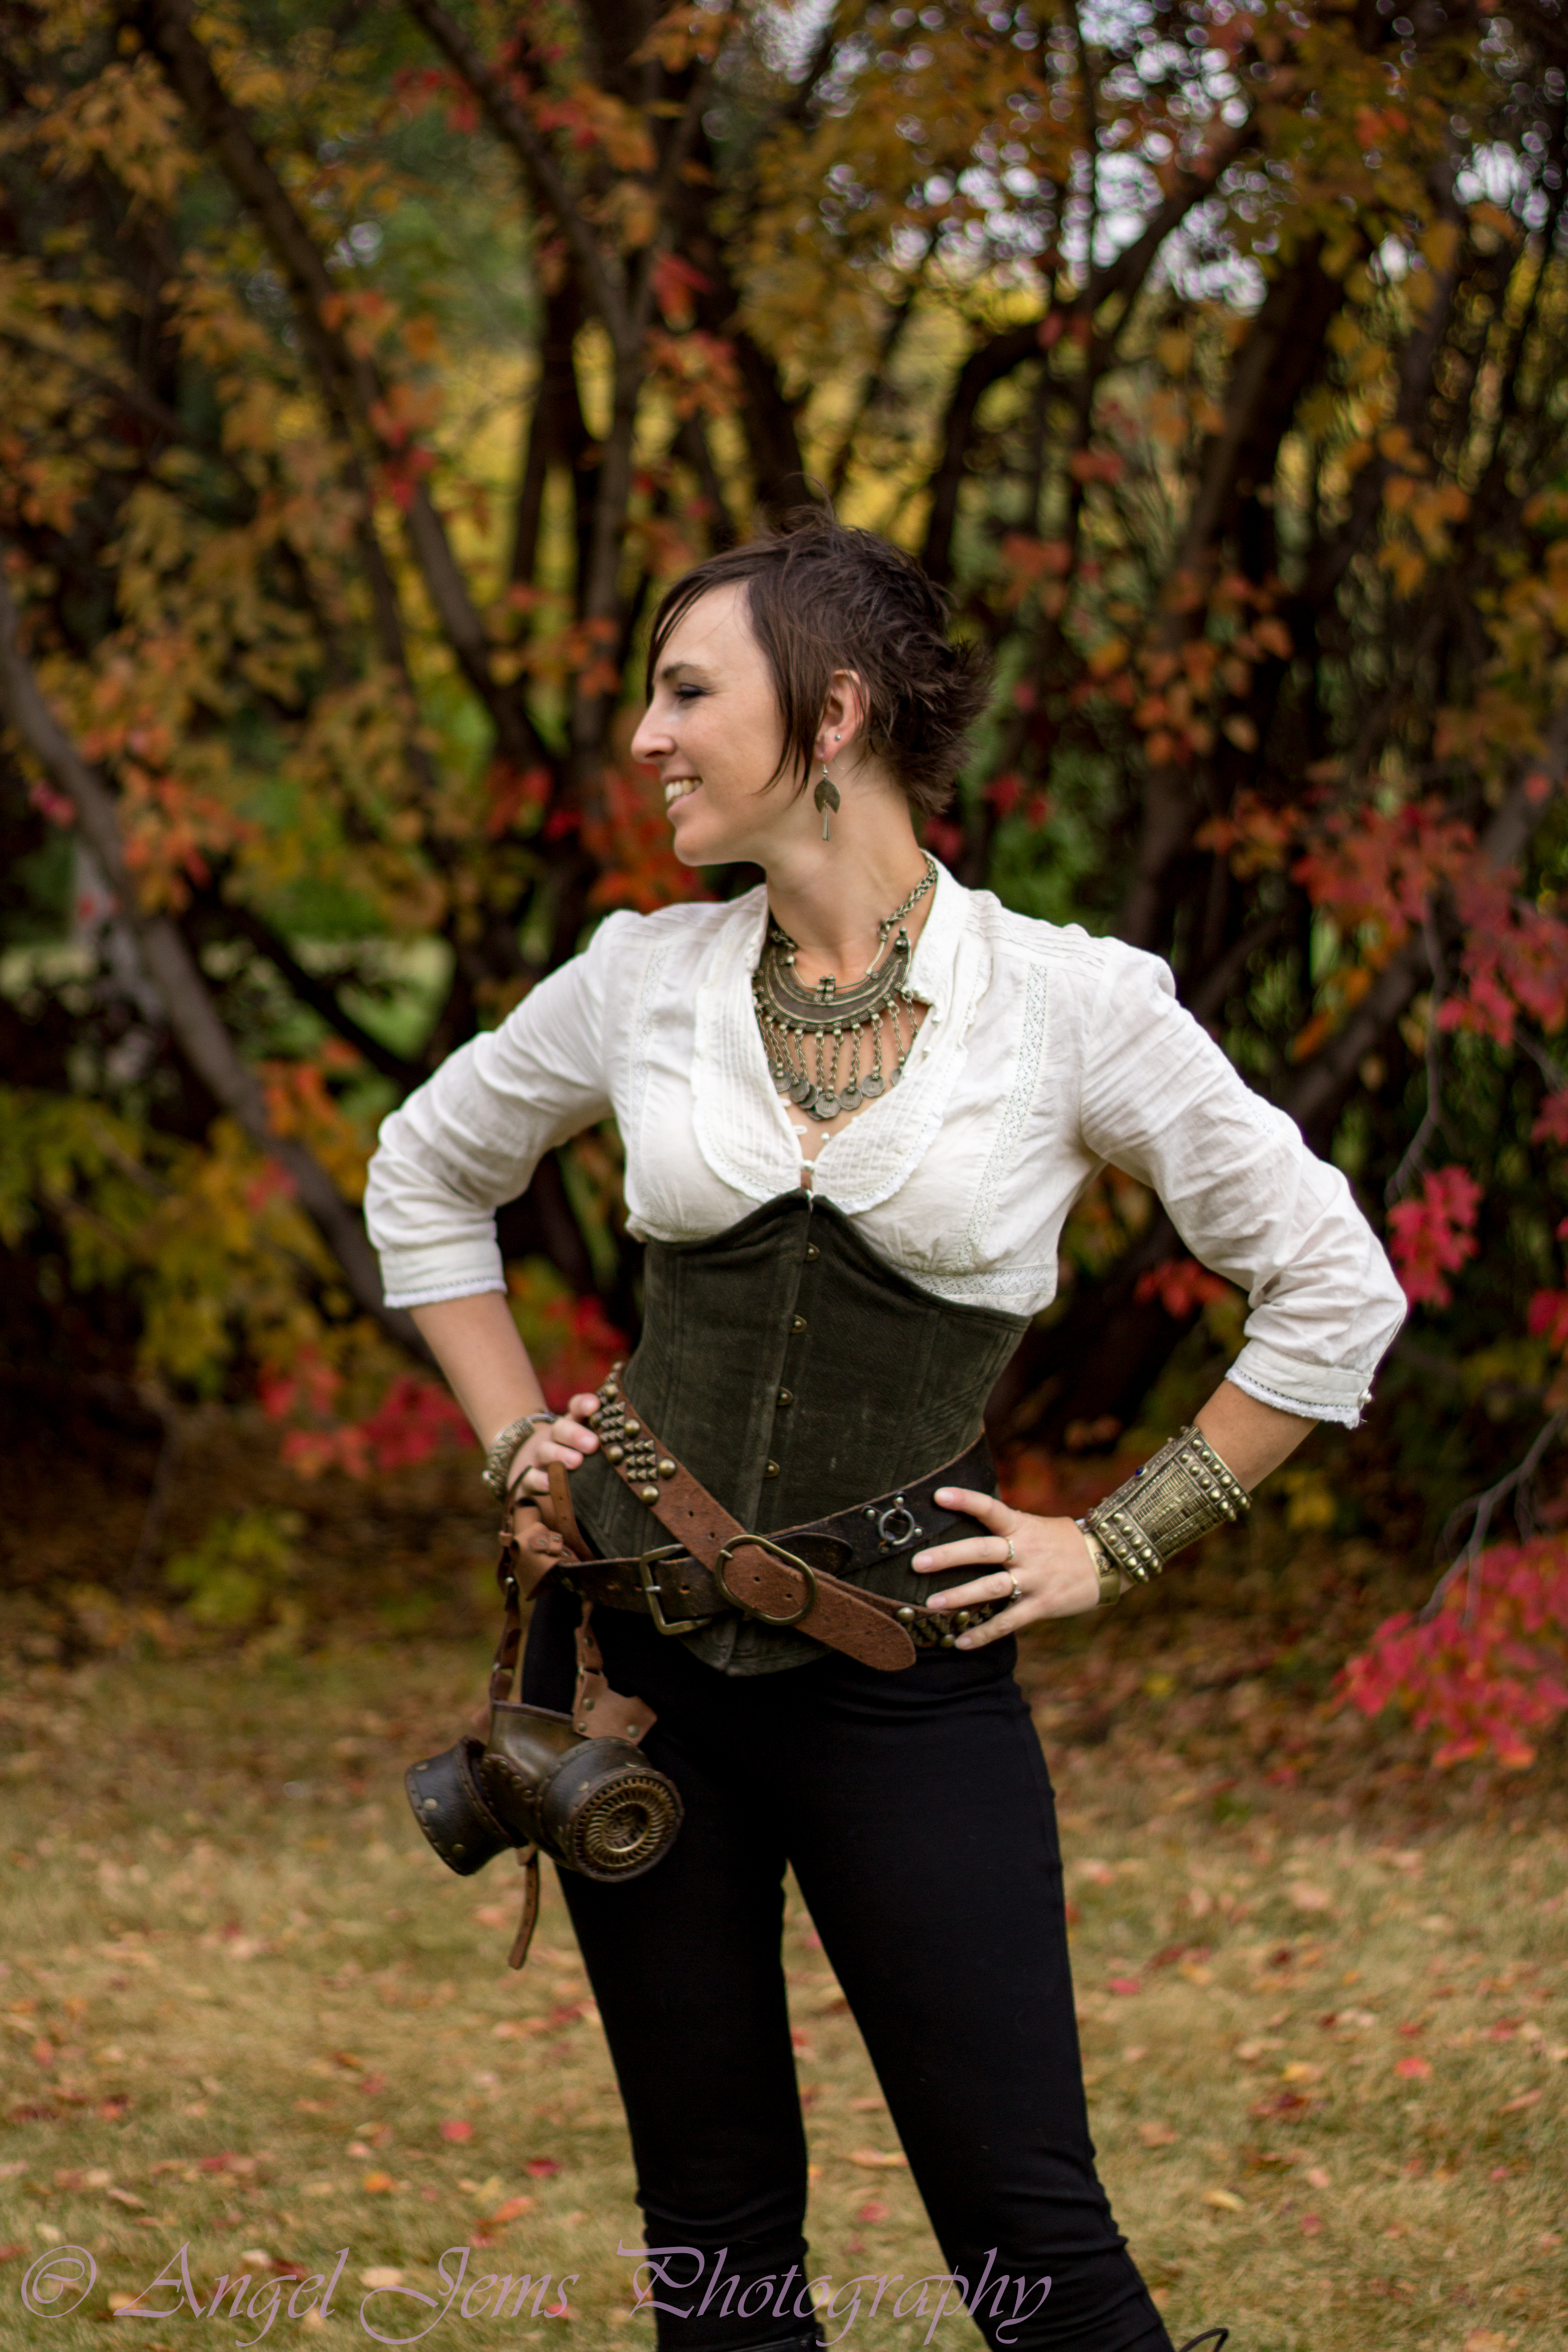
That’s the same white pintucked (not made by me) blouse I wore last year, come to think of it.

anime-138The camo coat wasn’t actually the best topper for the outfit—it kinda swamped the corset & hip decor, though it looked cool from certain angles. I have enough of the  faux suede left to make a matching jacket; I’m thinking something cropped and faux-military would be fun. Maybe in another year?

4 Comments

Filed under Sewing