Wired

In lieu of actual sewing (which has consisted of two zipper repairs and a lot of daydreaming), I bring you yet another post on old sewing-related junk.

Antique Dressform

Another of those home-town resources.

A long time ago, my mother bought a dressform.

Of course, being my mother, she didn’t buy it because she was sewing, and she certainly didn’t go down to Fanny’s Fabrics and pick up some wobbly new thingy.

No, she brought this lady home from an antique store.

John Hall Dressform (The other leg says John Hall but the photo wasn’t as good.)

Some googling turned up a patent from 1881 for a very much similar form. Although not a whole lot else other than some exorbitantly priced ebay listings.

Neck & shoulder adjustable

I’m fascinated by all the varieties of fitting you could get in this. Total height is adjustable (though short, at least at the moment.) Torso length is adjustable. The skirt could be umbrella’d in or out depending on the fashion. The shoulders are adjustable. The neck is a high, solid (but adjustable) piece, for aid in fitting high collars, I suppose. There are built-in measuring tapes at waist and hips.

Hip tape measure.

And, yes, she sits around in my mother’s upstairs hall, usually sporting a hat or something. I’d be too terrified to actually use her, that’s for sure.

If you dress it…

The patent has a further measuring tape at the bust, which makes me wonder if she might have lost one there, although there’s no obvious sign of one.

15 Comments

Filed under Sewing

A treadly weekend

20121104-205835.jpg

Ehm. I got a bit excited. The girls and I went to visit my mom again this past weekend, and I spent most of the afternoon upstairs playing with my treadle. Not the Singer (which belongs to Stylish), but the one my wonderful enabler mother bought me for my birthday.*

I gotta say, I can see how this treadle-collecting thing can become a problem. My mom’s boyfriend was mentioning one he saw in a pawnshop recently that had a cupboard-type cabinet, and I had to stomp very, very hard on the WANT. Bad want. Go to your room and think about what you’ve done. The electric machines were bad enough…

Anyway, I spent most of the afternoon ignoring my family and messing around with kerosene and oil and rags and an old toothbrush, and at the end of it all, when I should have been taking my kids home in time to have baths before bed, I threaded it all up and tried actually sewing with it.

20121104-205856.jpg

I didn’t have the almost-the-right-manual or any of the threading diagrams I’d managed to collect, so I was actually pretty astonished when I was 1) able to thread the bobbin into the shuttle, 2) put the shuttle in place, and 3) able to (half-assedly) thread the machine. I don’t think I’ve ever felt quite so triumphant about a sewing machine as when I spun the wheel the first time and was able to bring up the bobbin thread. Except possibly a few minutes later when I put the presser foot down and actually (by dint of careful handwheeling) sewed the first few stitches.

All is not perfectly well. I still haven’t gotten the faceplate off to clean in behind it. The tension is balanced but high (It’s also allegedly self-adjusting. I’m scared). The top thread tends to break, probably because there’s some sharpish bits in the threading (cheap, elderly thread doesn’t help). The needle is really, really big. They don’t use standard needles. There are about half a dozen in the attachments box that came with the machine, ranging from sturdy to harpoonlike. According to the NSMCO Yahoo group, you can usually use regular needles and just not push them all the way up… we’ll see. I made another “staple” to mend the broken belt, out of wire. It’s not quite as sturdy as the original staple, but it doesn’t seem to give the machine any problems. I used one of the already-wound bobbins, so I haven’t tried to wind my own yet. I am really, really lucky that this machine had bobbins and shuttle and needles with it, because I think I’d have a really, really hard time finding replacements. Note to self: always check if a machine runs, has bobbins, bobbin case, and needles. Well, if it’s not some weird old treadle you can probably skip the needles part.

20121104-205918.jpg

I am still not very good at treadling. I’m terrified I’m not going to get it “all the way over” (if you’ve ever treadled you know what I mean, and if you haven’t, well, if you ever try you will) and make the machine go backwards and then the Elder Treadling Gods will smite me.

So the other week I tried to get my Crafty sister-in-law’s old 70s kenmore zig-zagger running and couldn’t seem to get the needle position/threading right or something. It was pulling the kind of “I don’t want to make stitches” crap my Featherweight did when I had the needle in wrong way around, except that I tried every combination of needle direction and threading that I could think of. So anyway, the fact that I could get this old thing actually threaded and stitching kind of made my weekend. Yay me. 🙂

Now if only I could get the gunk cleaned off the outside.

In enabling news, Stylish bought herself seven patterns at the Simplicity $1.99 sale today. And I really will sew for myself one of these days…

17 Comments

Filed under Sewing

Sphinxology

20121103-102135.jpg

I was going to come up with some clever riddle about sewing machines, but then I decided I’d rather just get this post out.

This is the treadle machine belonging to my husband’s family. As with a lot of heirlooms, it’s a bit tricky to say who it actually belongs to, but it currently resides with my Stylish sister-in-law, serving as a table for her Janome, which I’m happy to report is sewing just fine the vast majority of the time.

20121103-101935.jpg

The machine is a Singer, I think a 127, with handsome if slightly worn Sphinx decals. It
was last used by Papa, Stylish and my husband’s great-grandfather, who, I am told, used it to stitch harness and tarps and other manly things. Before that, Nana (my husband’s grandmother) says it belonged to her mother, Papa’s wife, although I don’t get the impression she was a serious seamstress (Papa outlived her by a good forty years, hence the horizontal transfer of “ownership”). Nana seems to think it was likely a wedding present, as its manufacture date, 1924, is pretty close to the time of Papa and Kokum’s marriage. (For those hoping to date your own Singer machine, you can look up the serial number either on the Singer website or the ISMACS one.

The machine lives in a rather plain but sturdy six (seven?) drawer cabinet. The cabinet is a bit beaten up, with veneer lifting on the top and the odd splash of pain over the surface. While the drawers contained many treasures, including plenty of thread, vintage zippers, and what I think is the never-used rolled-hem plate to my serger, it did not contain any accessories or feet for the Singer.

20121103-102105.jpg

The single most obvious problem, when I first opened up the machine, was that it was missing a presser foot. It’s amazing how sad and deformed it seems, just lacking that one little detail. However, my sadness was swiftly relieved when I realized it took just a basic low-shank foot—much easier to find than a replacement for one of those top-clamping types.

20121103-102120.jpg

On first opening, the machine moved (YAY! I don’t think I quite have the chops to tackle a truly seized machine.), but various bits (like the slide cover plates that hide the shuttle and the stitch-length screw) were seized. Although the running was pretty rough at the beginning, once I had dribbled oil in all the oil holes and on everything else I could see that moved, top and bottom, it was running just fine, except that I still couldn’t get the slide plates open to get at the shuttle. It was at this point that my principles went out the window and I grabbed the WD-40. Internet Opinions are split on the evils of WD-40 for restoring old sewing machines, but the most measured ones I found seemed to be that it’s OK for a solvent as long as you remember it’s not a good long-term lubricant. So I’ve mostly tried to wipe it off once I got the bit working, and added sewing machine oil. Perfect? Probably not, but also not the first time I’ve angered the Sewing Gods (it seems to me that the Great Elder Treadling Gods may be more wrathful than the Younger Electric Sewing Gods, but I’m just going to hope that lack of worship for the last few decades has diminished their power to smite me.)

20121103-101921.jpg

Anyway, injudicious application of WD-40 and judicious application of a mallet and wood dowel (AKA unsharpened pencil crayon) eventually got all the bits off that should come off (needle plate and the front and back slide plates). Unfortunately, the slide plates are really, really tight even after being wiped down; I tried to scrape along the grooves they fit into and clean out any gunk, and I oiled them, and I’m still afraid to put the front slide plate back in lest I end up unable to get it out without pulling out the hammer again. While things like the needle plate and the front plate on the left of the machine only really need to come off for cleaning (and there was really not that much crud behind either), the slide plates are how you get at the shuttle, which holds the bobbin, so really needs to be readily accessible. I’m not sure what to do about that—there’s no rust and doesn’t seem to be much gunk. For those of you as new to treadles as I am, this machine (like my Eaton’s Seamstress, actually) has what’s called a vibrating shuttle. Rather than a short, fat bobbin and casing that goes around like a wheel (OK, I know that’s a simplification), this is a long, thin bobbin and casing that goes back and forth. I’m assuming the rotary version is an improvement, although these vibrating shuttle models were still being made as late as the 50s.

Anyway, after waiting three days to get at the shuttle, of course, I discovered that there was no bobbin within the shuttle at all. Curses! Now, this was not as simple as swapping in a foot from one of my other machines.

Fortunately, a quick nose around Sew Classic revealed a stock of new VS bobbins for Singer models including 127. Woot woot! This is the upside of old Singer machines—you can actually find the bits for them. So, as we speak, this order is hopefully winging its way towards us… and then I get to find out if I can actually make it sew or not. I’ve been watching youtube videos on treadling and how to wind vibrating shuttle bobbins… so here’s hoping. 🙂

21 Comments

Filed under Sewing

Hallowe’en Spotlight: lace-up leather shorts

Lace-Up Shorts

It’s been a Hallowe’en sweatshop around here for the last little while. Last weekend was devoted to, as Steph of 3 Hours Past has put it, sewing with hammers. I spent Sunday with the kids at my mother’s, working on the goggles, and also Syo’s lace-up shorts. Rivets and grommets and wire, oh my.

I was already using McCall’s 5312 for the kids’ tailcoats (more on that later), so I decided to use the pants also included in that crime of a pattern.

Cutest pattern ever?

OK, I’ve whined about McCall’s 5312 before. Despite their supremely cute illustration, these McCall’s “Sassy Girl” patterns are dumbed down almost to the point of not being worth the time, IMO. I hate dumbed-down, simplified patterns.*

On the other hand, that makes them perfect for costume patterns, right? This might be why I hate making costumes…

Anyway, since I had the pattern out, I figured it would be a good candidate for Syo’s shorts—basic pants, no pockets, no waistband to worry about.

Laces!

I traced off the size 7 as shorts, and cut them out from my fake leather. This was my first time working with vinyl, and not being able to pin really threw me for a loop. It’s funny, because I tend to think I don’t use pins much. Well, working on this high lighted every single instance I reach for them. Closepins were helpful, but not really satisfying. I made about half the shorts on my machine, and half over at my mother’s; her old Pfaff has one thing none of my machines have—a roller foot. It made a BIG difference in sewing with the vinyl, especially for the topstitching bits. Topstitching was essential since I couldn’t exactly press this stuff in any meaningful way. I also used a lot of Wonder Tape.

Back darts

I used a very quick ‘n dirty pants-fitting method for these where I sewed them up sans darts and then added the rear darts by pinching to fit. I skipped the front darts, which really don’t make any sense to me when fitting any kind of a rounded tummy—something I’d say about 90% of kids have. Though, I don’t think the darts I wound up sewing are hugely different from the original pattern darts. And, yes, they’re pointy. I’m not worrying myself about it.

Front view

To make the laced sides, I just folded over the edge about 2 cm (I ended up folding the front edges over a further 2 cm) to make the placket, topstitched, and added a “modesty panel” attached to the back side. She was not thrilled about this, having wanted “real lacing,” which apparently doesn’t have fabric behind it. She can deal, at least until she’s eighteen. Not that she would ever not be wearing leggings and tights underneath for a Hallowe’en costume. This is Canada, after all. And not one of the warmer bits of Canada. (Although comfortingly free of both earthquakes and hurricanes. I hope all you easterners are doing OK with Sandy.)

Grommets

We added the grommets last. Actually, Syo did the front grommets more-or-less on her own, since by then my fingers were so sore from setting the back ones (plus all the goggle-making). It took her a while, but she got them done, only one ending up a bit distorted. I’m not sure why I am always startled by her strength and coordination. You’d think I’d have it figured out by now.

Back View

I don’t know if it’s a “good fit”, but they stay on, come up more or less to where she wanted them, and the gap between the lacing is a good width. So, really, I should probably apologize to McCall’s 5312. It really came through for me this time.

Except that I just made two tailcoats out of the jacket pattern, and, well, I’ll go into that later. Not horrific, just dumbed down and predictably bad.

And, sorry for the fuzzy iPhone photos. My mom’s house has gorgeous backdrops but terrible light, and I keep forgetting to take my real camera along.

*Note: I have nothing against simple patterns, where simple is called for. What annoys me is patterns for intricate designs that are simplified to make them “easier”, generally at the expense of fit and style.

10 Comments

Filed under Sewing

Goggles.

20121028-170102.jpg

Slowly getting there.

Also, my fingers hurt.

12 Comments

October 28, 2012 · 5:02 pm

Maximal procrastination

The Blazer of Awesome

I am (as my husband will assure you), one of the world’s champion procrastinators. It’s a major handicap, actually. But this jacket fix represents a level of procrastination rarely met even by me.

I got this little grey blazer in high school, ladies and gents, which was kind of a while back not that long ago after all, from my old standby Value Village. The fit was, and is, astounding—perfect shoulders, perfect waist length (no swayback issues!)… Great.

Except. The more I wore it, the more creepingly aware I became of the one, glaring, unforgivable flaw.

You guessed it. The sleeves are too short. (I need some kind of “ba-dum-dum” sound effect every time I say that. 😛 Or maybe a laugh-track.)

Back—OK, maybe not quite as perfect as I thought (or it used to be 😉 ). Still pretty damn good.

Not too long after graduation, the frequency of its appearance in my regular wardrobe rotation dropped dramatically. I am really not fond of the cold wrists >_<. But still I couldn’t give up on it entirely. Everything else was too perfect. So it hung in the back of the closet, making me sigh with occasional wistfulness.

About four years ago, I found a black corduroy curtain abandoned in the lobby of our apartment complex (these occasional windfalls are the only thing I miss about apartment living. Well, that and the endless hot water.) I bundled it home, and soon realized that the wale width and texture was a perfect match for the details on my poor jacket. And since the jacket had plenty of other black cord details, why not cuffs as well?

Nonetheless, four years passed. The corduroy curtain served many purposes, most of them involving taking up space in my closets, but never became part of a blazer.

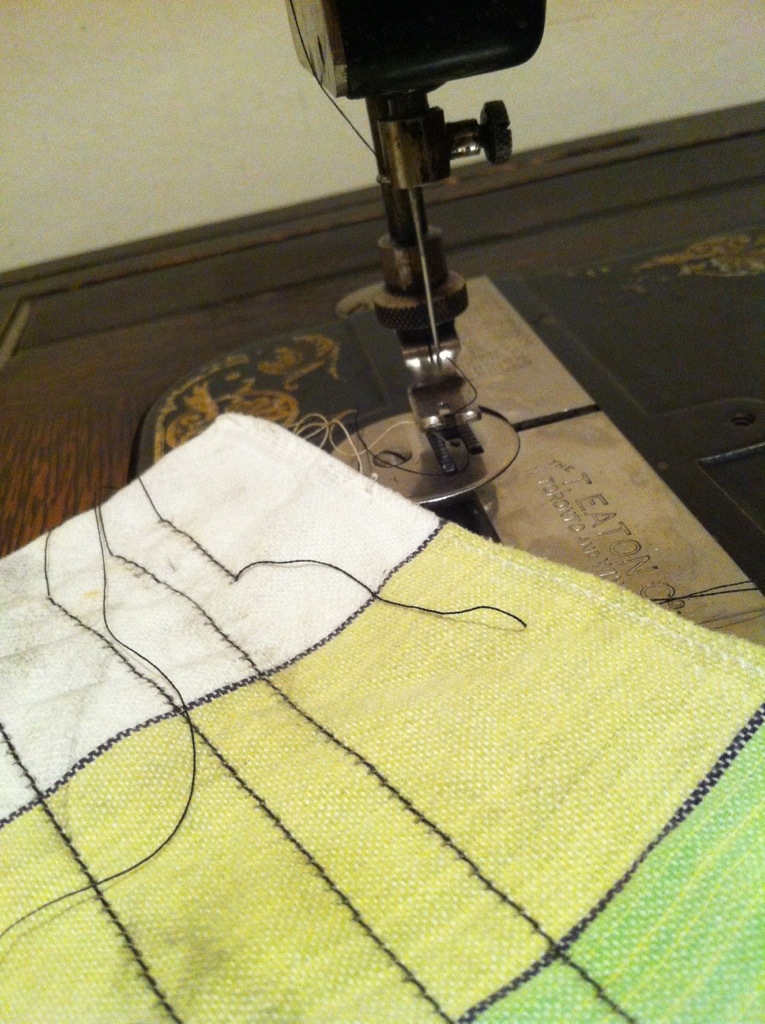
Cuff closeup. Photographing black corduroy is rather akin to photographing dark matter, I’m thinking.

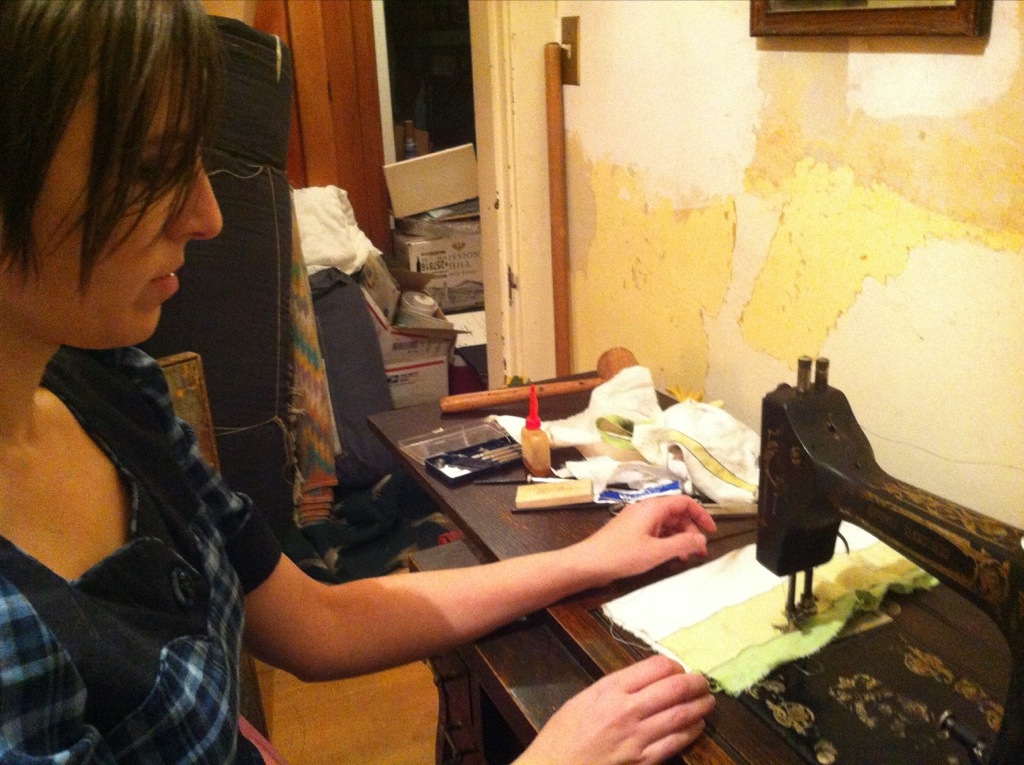
Well, finally today the prospect of a quasi-job-interview prodded me to haul out something approaching office attire—the businesswoman suit. By some miracle (probably as a way of displacing some intense anxiety), I motivated myself to find the curtain, locate the portion where the fading of the blacks matched best, and cut out two plain cord rectangles. I interfaced them with Armoweft, stitched into tubes and folded them in half, and tacked the resulting tubes inside the ends of the sleeves. Voila, stupid simple cuffs. Total time, probably about 30 minutes, plus time to dig out the fabric from the garage.

Because I enjoy a bit of a tailoring dissection, here’s some closeups on the jacket itself. Fortunately, the lining is loose, not bagged, so I could flip it up and gawk at the insides.

Label

The label is “Newport Sportswear Ltd” from Toronto, Canada. The jacket is #4138, and a size 7, according to the hand-written label. Google did not give me much (any) info about this brand, aside from some Etsy listings for vintage clothes. I had never really thought about the vintage of this jacket, but it’s certainly not a typical fit for the 80s or the 90s (remembering I got it in the latter part of the 90s). The rather flexible lady certainly has the hair to be 70s.

Corduroy insert, with fold

My favourite feature by far is this little corduroy insert on the back shoulder, which greatly increases the range of motion, otherwise the blazer would be way tight. According to Allison of A Fabric Fixation, this kind of feature is called a bi-swing back. (My motorcycle jacket has one as well, which makes sense.)

Bi-swing inset, interior view

This is what it looks like from the inside—it forms a little folded pocket or pleat. The shape is a bit more complex than it looks on the surface!

Lapel fold and pleat in lining at bust. (Sherry had us ease this in.)

Other little details? Well, the “tailoring” and construction is virtually identical to what Sherry went over in her RTW sewalong, which is to say it’s distinctly tailored but not heavily or intricately so. If this IS a 70s jacket, it’s also a testament to the powers of early fusibles, because everything’s still perfectly in its place.

Shoulder pad

The shoulder pad is very thin, two layers of felt, but it does the job. I had taken some photos of the buttonholes (machine) and collar interior, but really they didn’t turn out terribly informative, so I’ll spare you them, and just repeat how much I love this jacket.

Especially now that, fourteen or fifteen years into owning it, the sleeves are finally long enough. And it doesn’t even look funny!

(OK, I don’t think it looks funny, so if you do, you can suck it. It’s my blazer, not yours. And I’m going to wear the snot out of it, now.)

18 Comments

Filed under Sewing

Very Little Hats

The workshop

This past weekend, the kids and I trooped over to my mother’s and made hats.

For the Hallowe’en costumes. You remember.

Little, teeny, steampunky tophats.

Little hat

I used this pattern as the starting point, and then kind of hung a left. It turned out it called for all kinds of esoteric stuff like fusible fleece and craft foam. OK, I did have craft foam, and I actually was looking at the fusible fleece in Fabricland the other day and then decided not to buy any (on account of not having looked up the pattern yet so I didn’t know they were going to call for fusible fleece). And the craft foam I picked up at the dollar store was stupid thin and nearly useless. So we mostly used Bristol board and, well, it’s not exactly sew-able. And I kind of forgot to trim off most of the seam allowances, so our hats ended up a little larger than otherwise. And they probably took longer to make, since I was hand-covering and hand-stitching all the fabric that holds them together. And then sewing on trims and feathers and bits and bobs, and then painting. Actually, there were several iterations of sewing/painting/sewing/painting. I thank my ever-generous mother for her contributions to the trim, and for willingly sacrificing artifical flowers and berries that are probably older than I am to The Muse. I quite enjoyed the painting (it’s been ages since I dry-brushed anything), though of course as soon as we were doing it I wished I had five other colours.

Closeup

All I need to do now is sew on the clips which will (in theory) attach them to the hair of various children come Hallowe’en. Oh, and keep the damn things from getting shredded between now and then.

(Oh, and yes, there are two hats, but I only remembered to photograph one while at my mom’s.

Next up… goggles!

17 Comments

Filed under Sewing

My first pattern

20121021-081026.jpg

Butterick 6206

Long and long ago (I’m guessing I was about sixteen), I found this pattern kicking around the house. It was, presumably, my mother’s, and I was (just barely) able to look past the 70s styling to the romance of a sweet peasant blouse.

Being me at sixteen, I turned it into a crop top and made it sheer. Subtle, I was not.

The only thing I didn’t do was lengthen the sleeves. My congenital arm-length abnormality hadn’t really sunk in yet, so it didn’t even occur to me that the pattern drafter wouldn’t magically know that my family has ape arms*.

20121021-081015.jpg

Pattern pieces

I’m pretty sure I had some help from my mother, if only of the “this is a grain line—you know what grain is, right? Yes, that bit goes on the fold” variety. I had been sewing (Barbie clothes) for years at this point, but this was probably my first commercial pattern. I know I did no seam finishing, but it wasn’t a ravelly fabric. Not that that would’ve made a difference.

It was not a terribly practical garment, but it looked pretty much how I had hoped and served whatever costumey goal I had in mind. So when I found the pattern the other day while digging around my mom’s sewing stuff (she has a surprisingly large stash for someone who “doesn’t sew”) I had to throw it up here, for old time’s sake.

In hind-sight, this was actually a pretty damn good choice for a beginner project. Not that I thought of that.


*This is the spot where I stop and point out that humans are apes because you can’t construct a natural group that includes all apes but excludes humans. For the same reason, although much further removed in time, birds are also dinosaurs. Dontcha love cladistics? 😀

20 Comments

Filed under Sewing

Fantasy Sewing: World’s cutest blouse edition

20121019-060327.jpg
Yup. I can’t be certain, of course, but I think this just might, possibly, be the world’s cutest blouse pattern, EVER.

I love every single detail of every single view. And (unlike some patterns of a certain era) it really is three different views, not one view in different fabrics. And it’s totally my size. I love the collarless view with the serious little bow. I love the wide neckline with the stand-up collar. I love the ruffly, deliciously silly little white view (although I think those sleeves should maybe be puffed. Or would that be overkill?)

And yet, I fear this one will remain relegated to fantasy for longer, rather than shorter. Why? Because that nagging, insidious part of my brain that likes to keep my sewing practical is reminding me that, despite the adorable illustration and cute collar details, this is really a basic, boxy little blouse. The only shaping comes from those teensy bust darts.

It’s a blouse that, in fact, is made for tucking in.

I don’t tuck.

Seriously, I enjoy my body, I don’t obsess over my weight, I have about as healthy a body image as it’s possible to have as a woman in the western world. And few things send me into the pits of body-loathing despair quite like a tucked-in blouse. Actually, anything cinched in at the waist. It’s something about the shortness of my waist, or the fact that there’s no discernible taper from my underbust to my waist, so anything blousing out around there just makes everything look wider than it is. I know loads of people who love the look, who look drop-dead gorgeous in it. I just can’t do it on myself.

Although, that cummerbund look is cute. And possibly a really wide cummerbund could make tucking doable (OK, in honesty it needn’t be really wide. My bra line is only about three inches above my waist at the best of times). Especially if the cummerbund were shaped to extend below the waist… but then you’re venturing into territory where the cummerbund becomes, not a fancy belt, but the mainstay of the outfit, and that’s a bit of a different look altogether.

But you can rest assured, tucked or un, this blouse will certainly keep its place in my fantasies…

(And yes, there has been a little bit of progress on the Hallowe’en costume front and other sewing, but it’s been in haphazard and piecemeal little increments that make it really hard to talk about. And I bought a new seam ripper, but I lost it already.)

22 Comments

Filed under Sewing

Unmentionables

As I write this, I am wearing my first “successful” pair of self-stitched undies.

Pillow form.

I will keep “successful” in “quotation marks” because, well, wearable they are but perfect they ain’t. In particular, my elastic tension leaves, ah, something to be desired. (Scroll down to the full wrinkly mess, I didn’t want to start off the post with it.) And as proof that home-stitched undies need not resemble elderly dried fruits, I’ll link you to Carolyn’s drool-inducing sets.

The pattern, as I may have mentioned before, is Kwik Sew 2100, which is actually in print (I can never tell with Kwik Sew patterns based on the envelope art… except for the few 70s-era ones I have, anyway.)

The upside of using an in print pattern (especially having found it at the thrift store) is that there are reviews on Pattern Review, and for once I even remembered to check them. They were universal in two recommendations: go down a size (or two) and narrow the crotch piece.

Not being one to ignore the wisdom of PR (except when I do, usually to my own detriment), I dutifully went down to a size 4 (the smallest in the envelope, about 1.5 sizes below the one indicated by my measurements). I also shaved 1 cm off each side of the crotch piece, tapering to nothing at the edges where it seams to the front and back pieces. Then I promptly lost the crotch pieces, and there things languished until the other day, at which point I rallied my courage and cut new ones.

Now, last time I made attempted undies, I really had a hard time wrapping my head around the fancy sandwiching that creates a neatly-finished crotch. Maybe it was the Kwik Sew instructions, or maybe I’m just better rested this time, but I found it pretty simple to sort out this time around. It’s the same “burrito” construction method you use with a yoked shirt, except instead of a shirt front and back you have pantie front and back, and instead of a yoke you have a crotch piece. And it is a nicer finish than anything storebought, which is probably the only really nice part on th

So that was good.

Elastic—stretched.

Less good was I realized that the pink lingerie elastic I had been planning on using was nowhere near long enough, so I had to hunt through the notions stash (which is even more poorly-organized than the regular stash) and all I came up with was some plain black 1/4″ elastic. Not really nice for undies, but available. Even worse was my elastic-tension, which was too loose on the first leg, perfect on the second, and then too tight on the waistband. (I should say, being worn they are comfy and feel and look fine. Unworn, they crinkle up pretty badly except at the one leg where they are stretched out.) Ok, so I probably should pay attention to the actual suggested recommendations for elastic length. Bite me.

Umm. Ruffly much?

Now, on to the fit. I made (of course) the “bikini” rise. The rise in back is pretty good, the rise in front is a tad high—it could easily be lowered an inch; as it is it ends up riding down the underside of my tummy and bagging a bit. A little more annoying is the width of the front of the crotch-gusset, where I blended back to the original width. I think I could’ve narrowed it there, as well. They are still a bit big—this fabric has good recovery, so it’s not a big problem, but if it were inclined to stretch out it would be annoying.

Stretch Sewing  400

Next time—I’m a bit up in the air over whether next time should be with the Kwik Sew pattern, tweaked, or another pattern, out of curiosity. I acquired this stretch-sewing undies pattern at the thrift store (Value Village in my hometown is expensive for patterns, a whole dollar apiece except for the ones that come in annoying baggies.)

Pattern piece comparison

I’m a little curious over how the differences in pattern shape would play out (the seam allowances are the same, if I recall correctly.) The length of the crotch gusset in the 70s pattern seems to be longer, while the rise of the front & back pieces seems similar—so the overall rise might be a bit higher, right? The shape over the leg is very different, but maybe some of that would be accomodated by the longer crotch gusset? I just don’t know. But I sure am curious.

And obviously, I need a lot of practice on the elastic insertion. 😛


29 Comments

Filed under Sewing