The Real Thing

The real thing

The real thing

I finally got a hold of my mom’s Genuine Article Victorian Drawers (TM).  Well, I can’t actually date them particularly well—but they’re certainly older than 1920s, and they’re almost perfectly in keeping with everything Victorian I’ve read about what drawers should be. Which doesn’t seem to have changed much over time, except possibly for length.

The Originals

The Originals

I gotta tell you, I feel pretty naughty for trying them on. The fabric’s in pretty good shape, but it still feels kinda sacreligeous.

Back view

Back view

They’re a little more snug than my pair.

closeup

closeup

The hem is a gorgeous eyelet lace, not gathered. I don’t think I could find a lace like this if I offered my firstborn child.

side by side

side by side

Here’s the two side by side. Neither of my lace additions are particularly spot on, are they?

that thing

that thing

Now, THAT, my friends, is a hand-worked buttonhole. Well, except for the frayed bit. You’d be a bit frayed, too, if you were over 100 years old.

button

button

I think I got my button just right, though.

Felled seam

Felled seam

I believe this seam was sewn by machine, then hand-felled. Yes, the Victorians are judging me for wimping out.

Length adjustment

Length adjustment

The wide tuck to the left was done before the inseam was stitched, as per all the different instructions. The one I’m holding here, though, was added after. I wonder if the seamstress thought the space needed “something” or if it was intended to shorten the length a bit?

yummy

yummy

I wish I’d done more narrow tucks, rather than three big ones, on my pair. No, I’m not re-doing them. Incidentally, the band of lace above the trimming lace is finishing the hem, exactly like the band finish on my pair except on the outside and pretty. I wish I’d thought of that one, dammit.

fabric and hand-stitching closeup

fabric and hand-stitching closeup

Both of us stitched the outside of the waistband by machine and then hand-stitched the inside. My stitches are not quite as neat and small as the Victorian’s, but they aren’t too bad.

In other news, reader Meadowsweet Child sent me some spoon busks all the way from civilization (aka Ontario*)! Woohoo! And I may have gotten a bit click-happy on Farthingales, so with any luck I’ll have some boning and things soon, too…

*It occurs to me that ordering supplies, for anything really, from Ontario is probably terribly historically accurate for early Saskatoon. Everything, even lumber, had to be shipped from out east. Then, since the railway didn’t even arrive until 1890, it had to be carted up from Moose Jaw, over 200 km.

4 Comments

Filed under Sewing

Misrepresentation!

20131008-161830.jpg

Kandel Knits, you lie!

This pattern was one of several by this company, which I had not run into before, in the haul of old patterns Ra pulled from the dumpster for Stylish. It appears to be another in the radiation of knit-specializing indie pattern companies that appeared in the late 60s and 70s as the big 4 failed to fill that niche adequately. It claims to be produced by a professional knitting mill, so they should know what they’re talking about, right? The most interesting thing about the pattern, of course, is the front-shifted side-seam on the bottoms, although the top is cute as well.

I made the bikini bottoms, although of course I made them up as underwear, excited by this unusual seaming feature.

Well, of course as soon as I traced the pattern, I was wondering how that was going to happen. The width of back and front pieces was pretty comparable and there was no recognizable “shifting” of the seam toward the front. Nonetheless I soldiered on.

Sizes and pattern

Sizes and “True Measure” pattern

The pattern instructions weren’t great, but they were interestingly patchy—a lot on different ways to sew knits, quite a bit on fitting (maybe if I’d followed that part more closely I’d have had more of that front-shift to the side-seam), but then the actual instruction was along the lines of “sew this seam. Now hem this.”. There was no crotch-liner piece, but it was pretty easy to improv one. There’s no information on the sizing on the pattern or envelope itself, although I THINK it’s the same sizing Kwik Sew uses for underwear—but fortunately (?) for me, the helpful previous owner had written most of the sizes and measurements out from the front. As you can maybe see in that first photo, the pattern sizes are, um, small. 32″ hip for a size 7 (I guess that’s about the same as the standard Miss’s size 8.) Even more fortunately for me (I do not have a 32″ hip. My 13-year-old does not have a 32″ hip.), the pattern is drafted for “fabric with very little stretch;” I’m thinking the “True Measure” thing means it’s drafted with 0 ease.  My fabric, while a nice, stable cotton-lycra, has a very decent amount of stretch. I used comparison with my McCall’s 4471 pattern to verify that the size 8 should be just fine. (Actually, in terms of overall width and length, AKA rise, the two patterns were reassuringly similar.)

20131008-171135.jpg

Finished set. Very adequate. Side-seams pretty much right at side.

And when sewn up, they did end up being pretty much fine, ordinary underwear (I lowered the rise a teeny bit, especially in front, but that’s typical for me), but, as suspected, that promised shifted side seam is not at all evident.

My biggest hold-back on making underwear usually ends up being the elastic. I have zillions of little scraps of knits I could use, but I tend to only buy elastic in small quantities as I need it. And then use it up pretty efficiently. So for this pair I tried something I had read about on someone’s blog (but damned if I can find where)—just using a self-fabric band. I’ll report back on how it works when I’ve road-tested them for more than five minutes, but initial fitting seems promising. As with Kwik Sew 2100, the crotch is a bit wide, but now that I’m actually paying attention that’s super-common in my storebought underwears as well. It’s not uncomfortable, just something to maybe be trimmed down in the future (and it’s worth noting that I added a band, while typical swimwear finishing would fold over at least 1/4″ on each side while attaching the elastic.

In conclusion, seems like a decent basic bikini pattern, but that shifted side-seam is nowhere to be found.

There’s an obvious solution, of course. I’ll have to draft one for myself.

23 Comments

Filed under Sewing

Little leggings, legion

20131004-193251.jpg

A small selection

Last weekend, as often happens, we went to my Stylish sister-in-law’s. Certain television premieres may have been airing that, since we gave up cable, wouldn’t be watchable chez Isis. But before the stories were watched, we sewed. I’ve had a leggings itch ever since working on the Espresso leggings for Cake Patterns, especially with the weather turning. And this purple polkadot Michael Miller knit was kinda burning a hole in the stash ever since I caved and bought it last month.

20131004-193311.jpg

Laying out little leggings

The purple was never meant for me; I handily got three little leggings out of it, for Syo, Fyon, and Waif, and there’s enough left for two more leggings or any number of pairs of underwear, depending. Stylish worked on tracing her pattern for Coat Club, but she is easily distracted by frivolities like cleaning her house and making supper, so she didn’t get much done. I, on the other hand, made five pairs of leggings, mainly by dint of ignoring everyone else.

20131004-200059.jpg

Trying on.

I spent, by far, the most time laying out and matching up zig-zags.  The purple knit isn’t as substantial as I’d originally thought and I’m really not sure how well it’ll wear—although it is CUTE. The zig-zags actually ran lengthwise on this fabric, which didn’t seem right, so I cut them on the cross-grain, which means the maximum stretch isn’t quite right. As a result the leggings are a bit snug, even on the Waif, who isn’t at all used to anything being tight.

I think the cuteness has made up for it, though—I made the leggings on Sunday, it’s now the following Sunday, and I’m not actually sure they’ve been taken off.*

20131004-193228.jpg

Tags

My fave bit was using Stylish’s embroidery machine to make little tags with the first letters of their names to help the girls distinguish between their pairs. And tell front from back. The only problem with this scheme is that Syo and Fyon have names that begin with the same letter, but they don’t live in the same house so I’m hoping it won’t be a huge issue.

20131004-193211.jpg

All mine!

And my pair? Plain black, just below knee length. I wanted them mostly for sleeping, and they have been serving that purpose nicely.

*okay, they probably have. Stylish is pretty firm about things like pjs and baths…

20131006-190006.jpg

… and more…

Ok, so in the time it’s taken me to write up this (painfully poorly photographed) post, I made up two more leggings, from this slippery nasty spandexy stuff Syo talked me into buying ages ago. I had a metre, which turned out to be just enough for a pair of leggings for me and another for Syo. It actually wasn’t bad to sew (slippery but not rolly and it doesn’t run), but I did have to sew just about everything twice, because the narrow zig-zag I used the first time around didn’t have enough stretch. So I switched to a bulkier, but stretchier, mock-overlock stitch on the White. Incidentally, Stylish’s Memorycraft has a mock-overlock stitch and an over-edge foot that works REALLY nicely with it. Since my serger a) doesn’t make strong enough seams for stuff like this, and b) has decided not to cut anything, this kind of thing has been kinda important. They’re all really slow compared to a serger, though. *pout*

Hopefully at some point this week I’ll manage to write up the underwear I’ve been making, the Hallowe’en outfit, or even the Darth Vader dress…. but next weekend is Canadian Thanksgiving, so I’m not holding my breath for too much sewing time…

5 Comments

Filed under Sewing

Sexy lingerie…

This is not. I assume adding a corset will make it better, but I am currently unconvinced. No wonder Victorians were so sexually unenthused (although they did invent the vibrator…)

So, here, only a few weeks late, are some final finished photos of my drawers. I had been holding off, hoping to get comparison shots with an actual pair in my mother’s collection, but I had a few free moments this morning while Osiris was still in bed (and so not around to laugh at me) so I figured I’d better seize them and get some photos. However, my cameria is AWOL (actually, probably somewhere in the bedroom with Osiris, and if I bang around in there I’ll wake him up and lose my opportunity), so you still get iPhone photos. Sorry. 😦
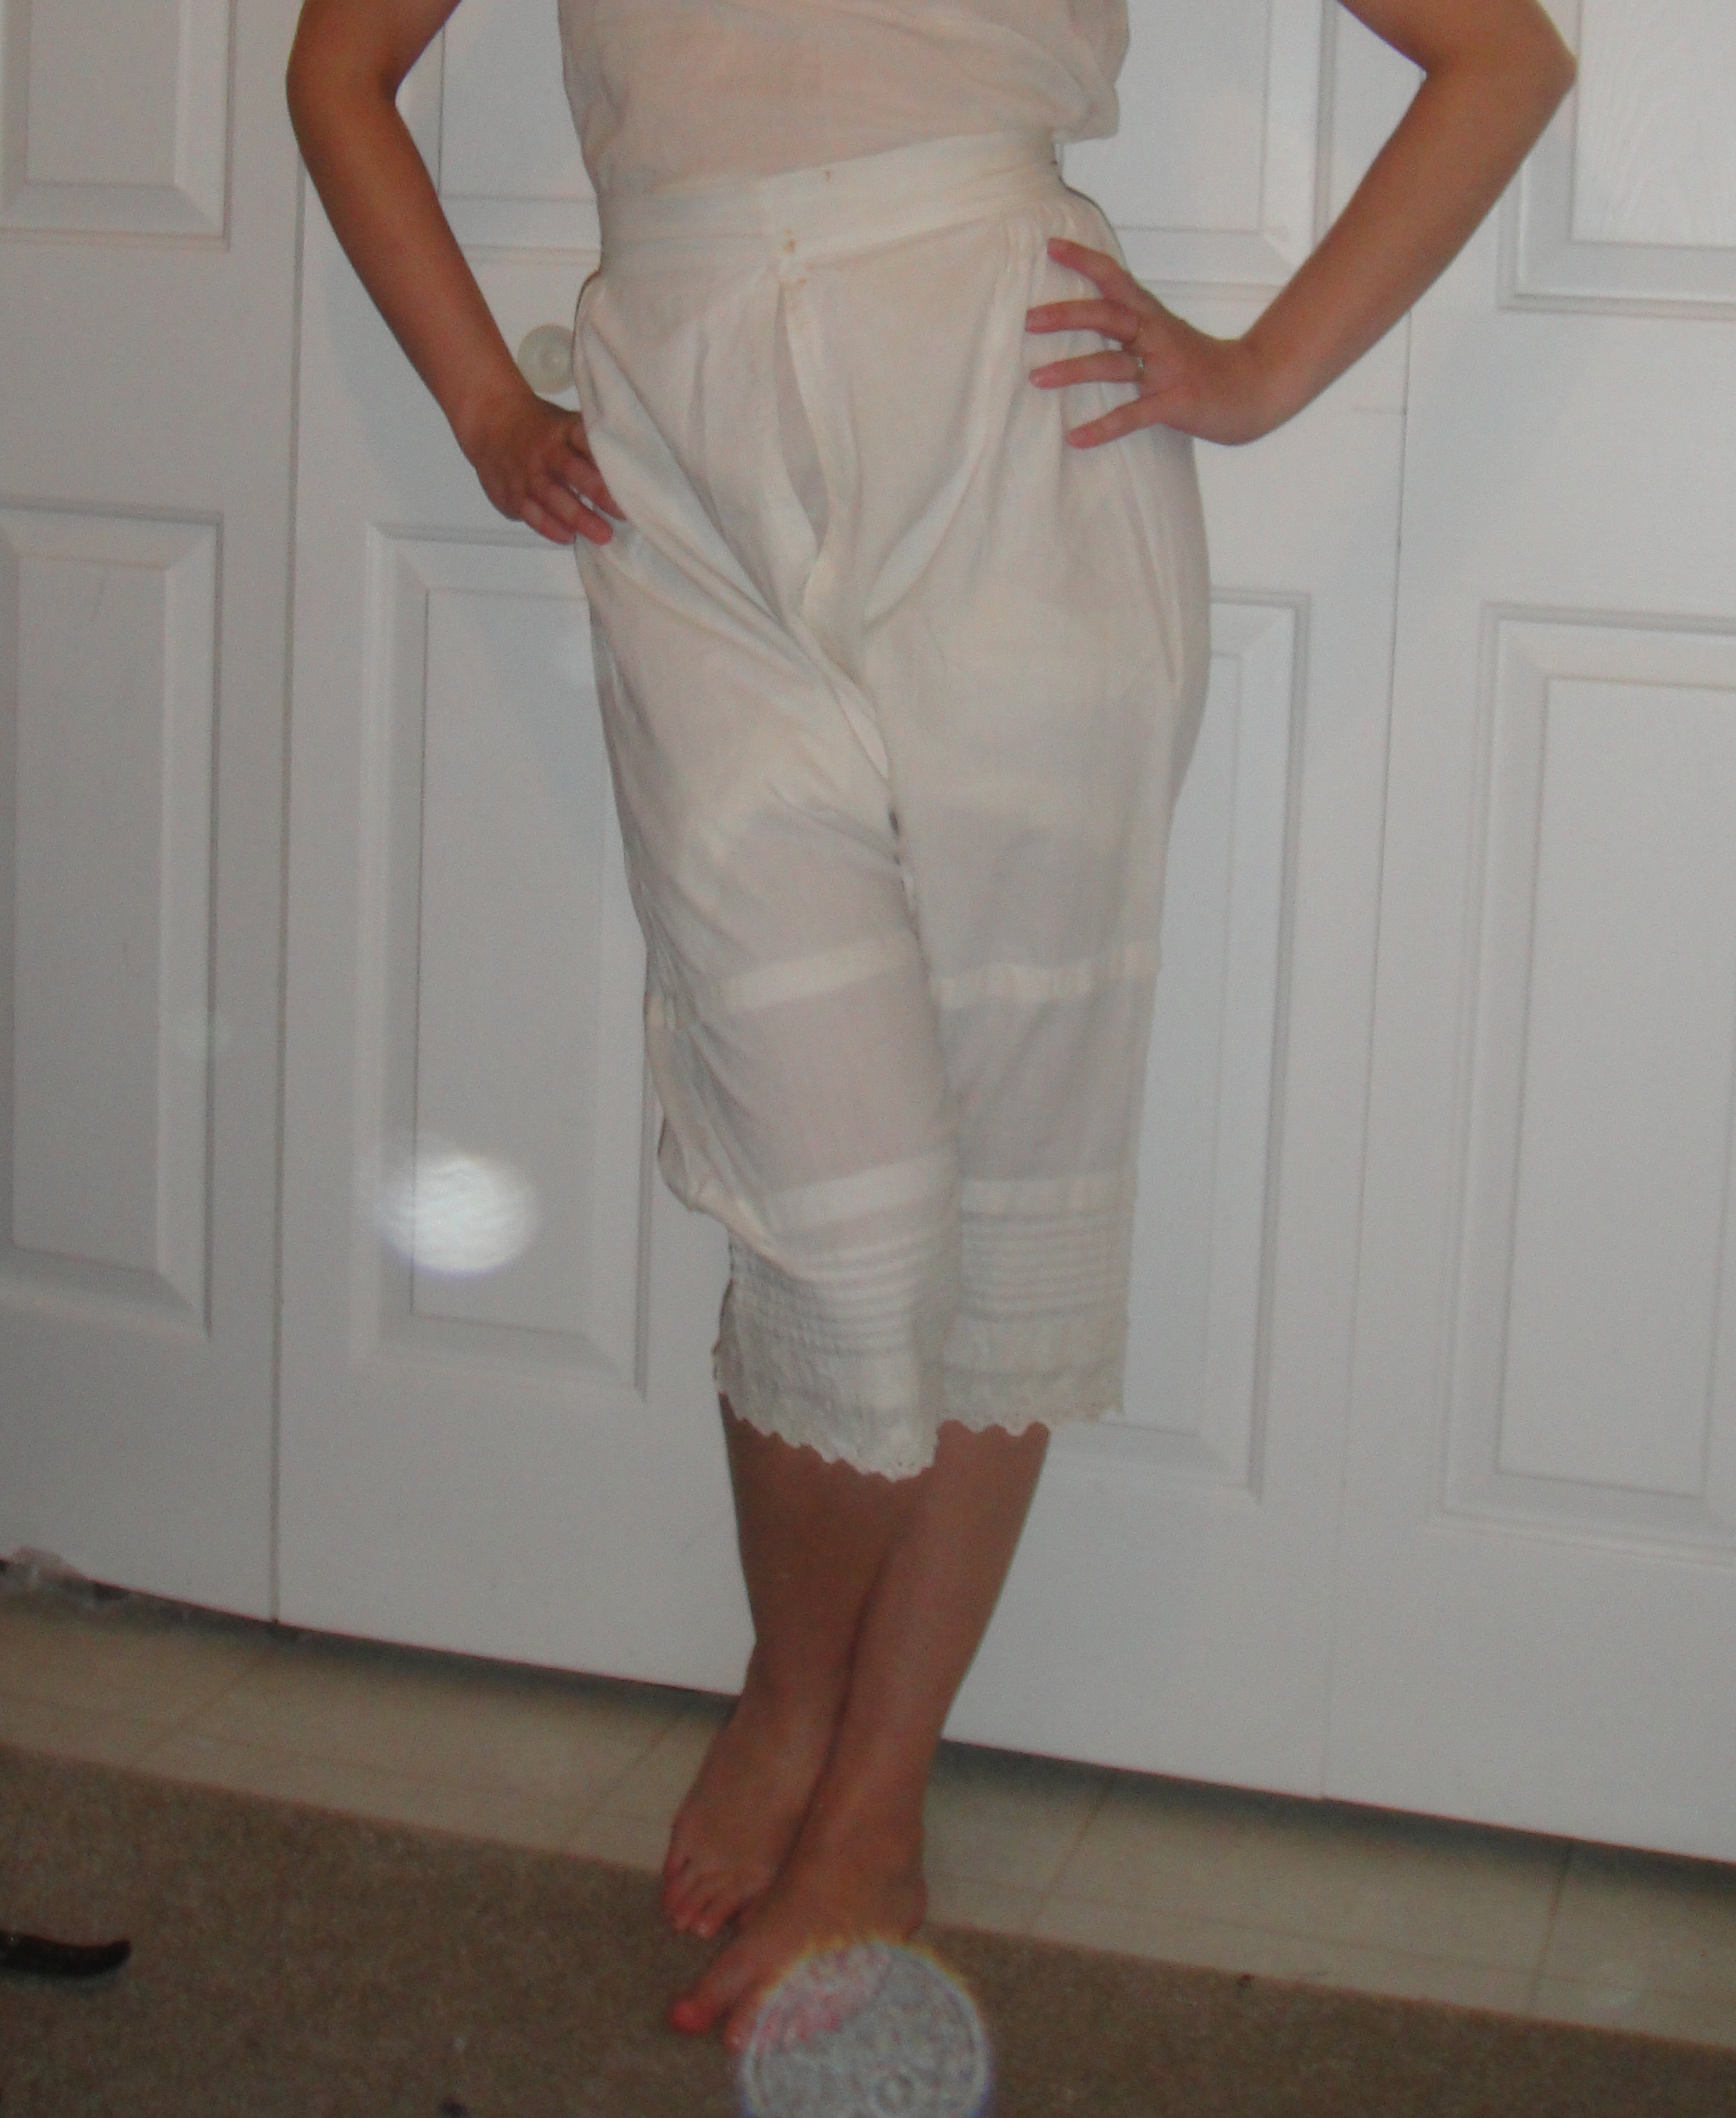
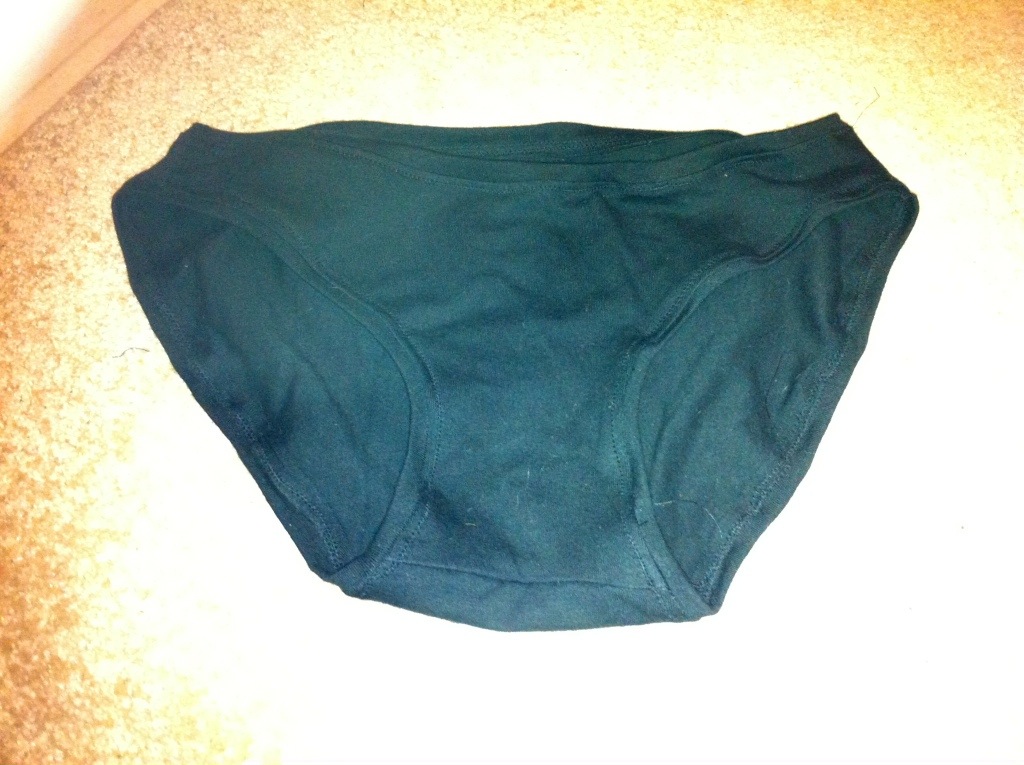
20130929-082742.jpg

Front View

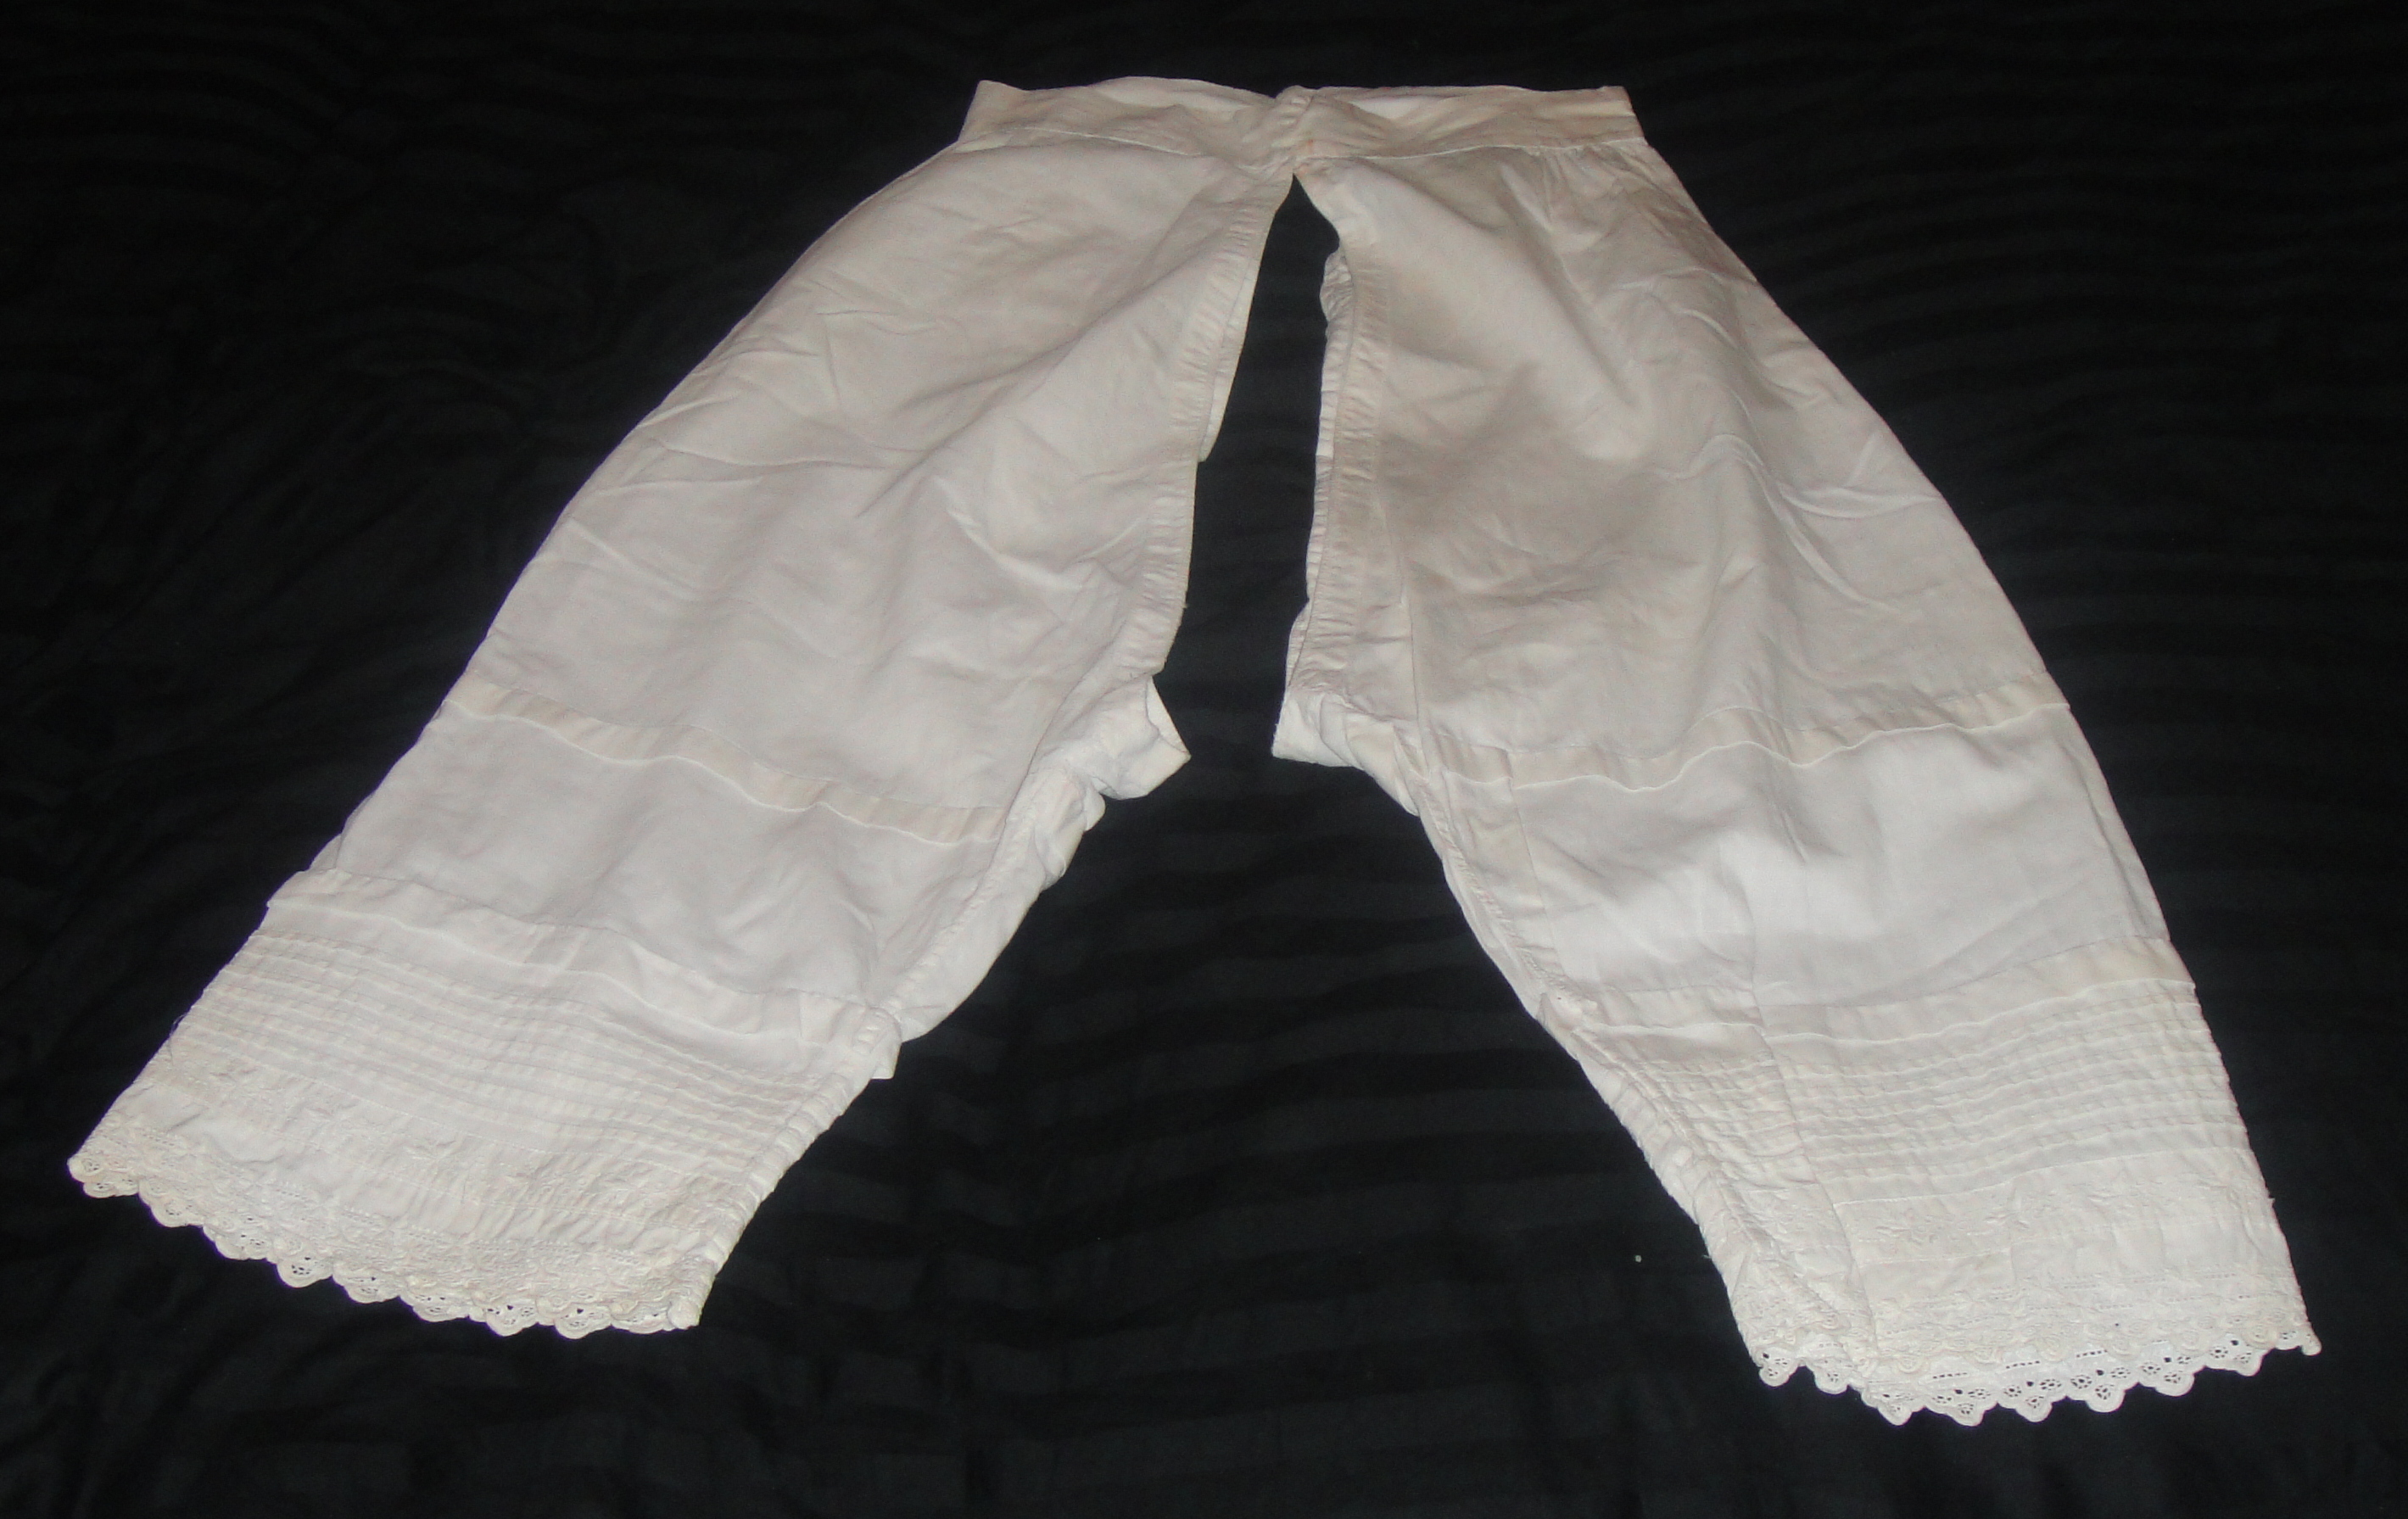
The drawers fit, for a given level of “fit”. The length is about right, or maybe it’s a bit too long. Apparently they should be just below the knee—anything longer is slovenly. And the saggy-baggy-puffy-crotch thing seems to be part of the charm. Or, y’know, something.

Speaking of which, my main source of instruction have been threefold: “The Home Course in Dressmaking and Ladies Tailoring” (copyright 1908), which I actually have in paper copy, whence came the actual draft for these drawers, an ebook, “The Home Needle,” from 1882, by Ella Rodman Church, and the pair of antique drawers in my mom’s collection (hereafter referred to as “the extant pair.”). I love the 1882 book because a) it’s just about my time period (mid 1880s), b), it’s mercifully brief, and c) it’s delightfully opinionated. Mrs. Church starts right in by excoriating the sewing-machine (by the time of my 1908 book, the sewing machine was much more accepted and there is much less emphasis on hand sewing of things like basic seams.), and the state of sewing generally, and she’s full of important tips like the one above about the appropriate length of drawers. Whenever I find myself lacking, seamstresslywise, I remind myself that I keep company with all the half-ass, slipshod Victorian girls just plugging away making shoddy, poorly sewn items purely to annoy mavens of excellence like Mrs. Church. And if she finds my drawers slovenly… well, she’ll never have to see them. 😉

20130929-082757.jpg

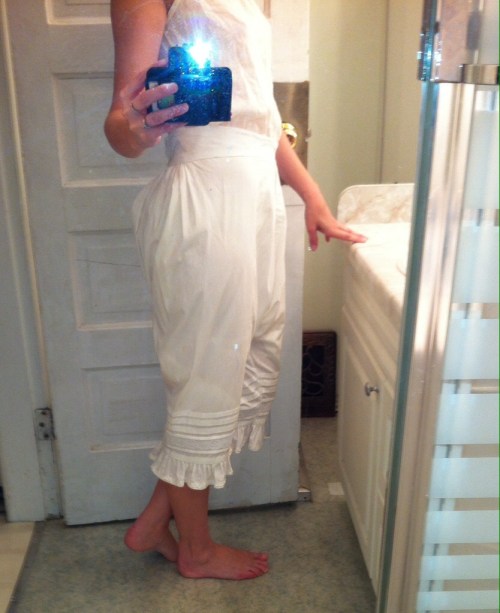
Side view. Note puffy butt and tapering waist-band.

Although I based the draft for my drawers on the later Home Course, I did take a couple of details for them from Mrs. Church.

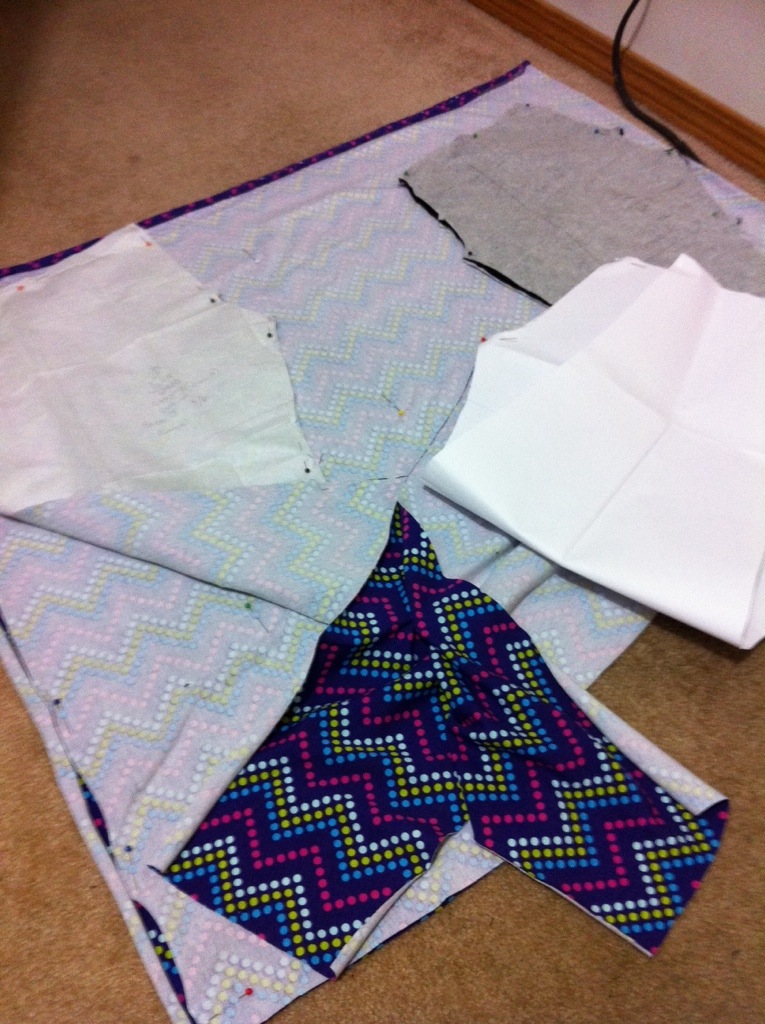
Drawers draft from The Home Needle (1882)

Mrs. Church’s drawers draft has a curved front crotch, and no rear crotch curve at all. This is actually the same as the drawers in Simplicity 9769. I assume this creates an extra-puffy bum, which would be desirable in the bustle era. (I wonder if the front curve has to do with the pattern being designed to have the crotch closed in the front.)

Drawers draft

Drawers draft from Home Course In Dressmaking (1908)

The 1908 draft I used, by contrast, has no curve at either front or back, but both lines angle back in pants-fashion, rather than one angling and one not.  And I departed from both drafts on one thing—when I compared my pattern with my mother’s extant pair (which, of course, I don’t know the precise dating of), I found the leg of the extant pair to be WAY, WAY narrower than my draft. So I narrowed that. Actualy, a lot of the details I wound up picking—the tucks, the lace, the ruffle, even the band finishing the crotch edges—kind of go back to that original pair.

20130929-082812.jpg

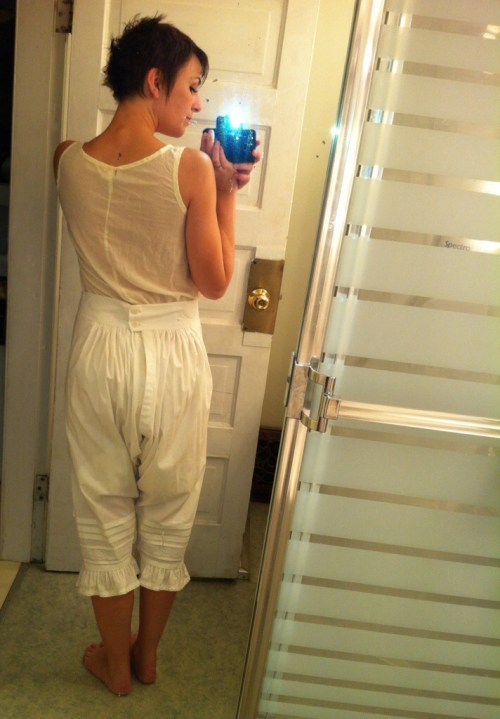
Rear view. The “chemise” is a slip left over from a 90s sheer-floral-rayon dress (you remember the ones). It actually kinda works, although the neckline is all wrong.

Although I initially drafted a curved waist-band pattern based on on the 1908 book, by the time I got around to this part of the sewing I had misplaced it and figured I would go with Mrs. Church’s instructions, which are more my proper period, anyway.  She says that although most people make a straight waistband, about an inch folded over, it’s better to make one wider at the back, that tapers to the front, and closes with two buttons rather than one. So I did. It would probably sit better at my actual waist, but despite all the fussing and futzing it turned out a bit large. I could, of course, move my buttons over, but I’m thinking the less bulk at my waist the better, once all the layers start coming together.

20130929-082848.jpg

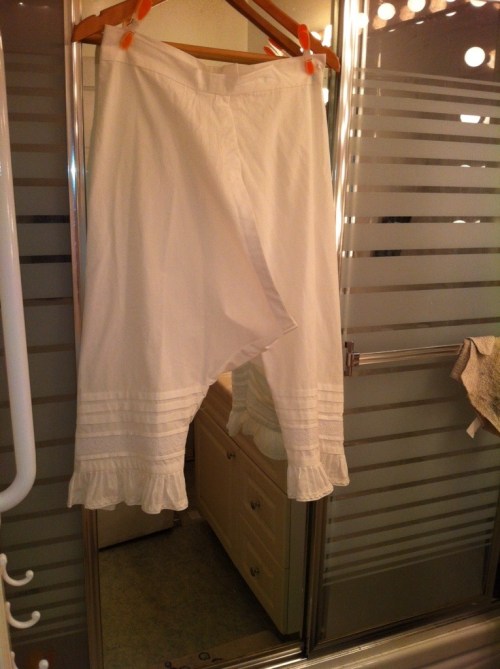
Phew. OK, let’s stick with hanger shots.

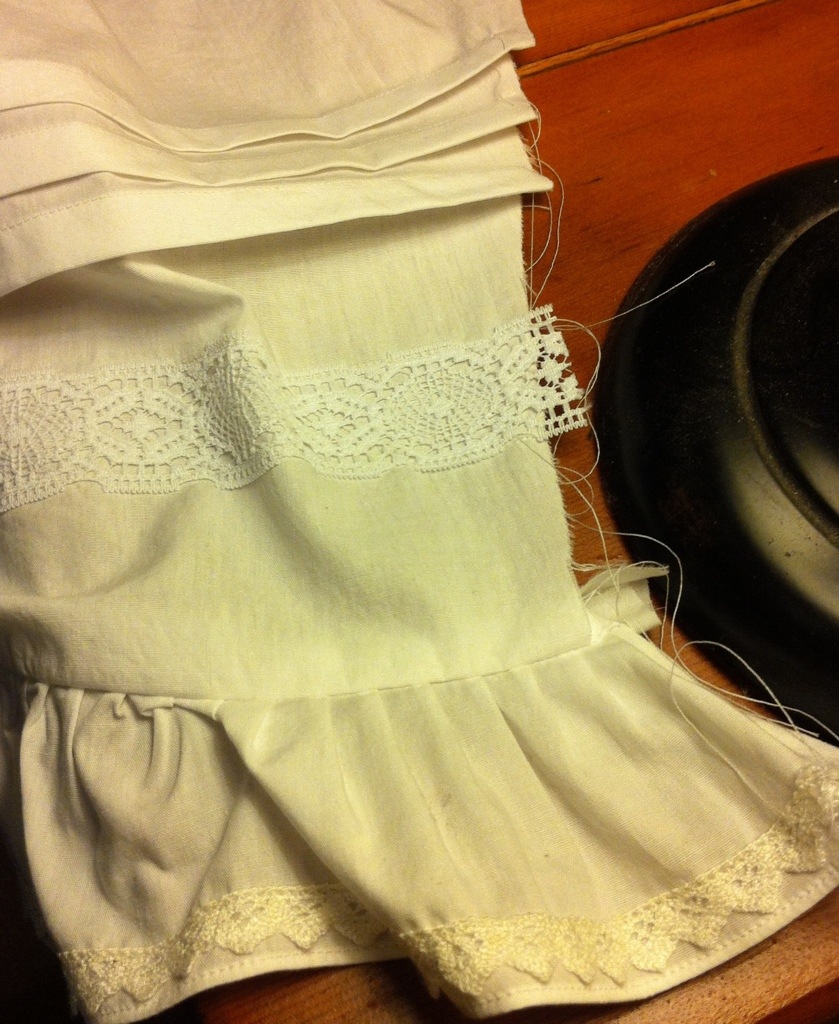
I added a few more small tucks around my rather-ugly lace. I’m more or less okay with it now, although of course I’ve since found several laces in stash that would’ve been better. I did not remove the fabric behind the lace—there’s top-stitched lace exactly like this on the extant pair of drawers. I suppose see-through panels on your drawers might not be quite the thing, or maybe that seamstress was just a bit lazy. Either way, I have precedent.

20130929-082905.jpg

I added a few more small tucks around the wider lace. I like it better now.

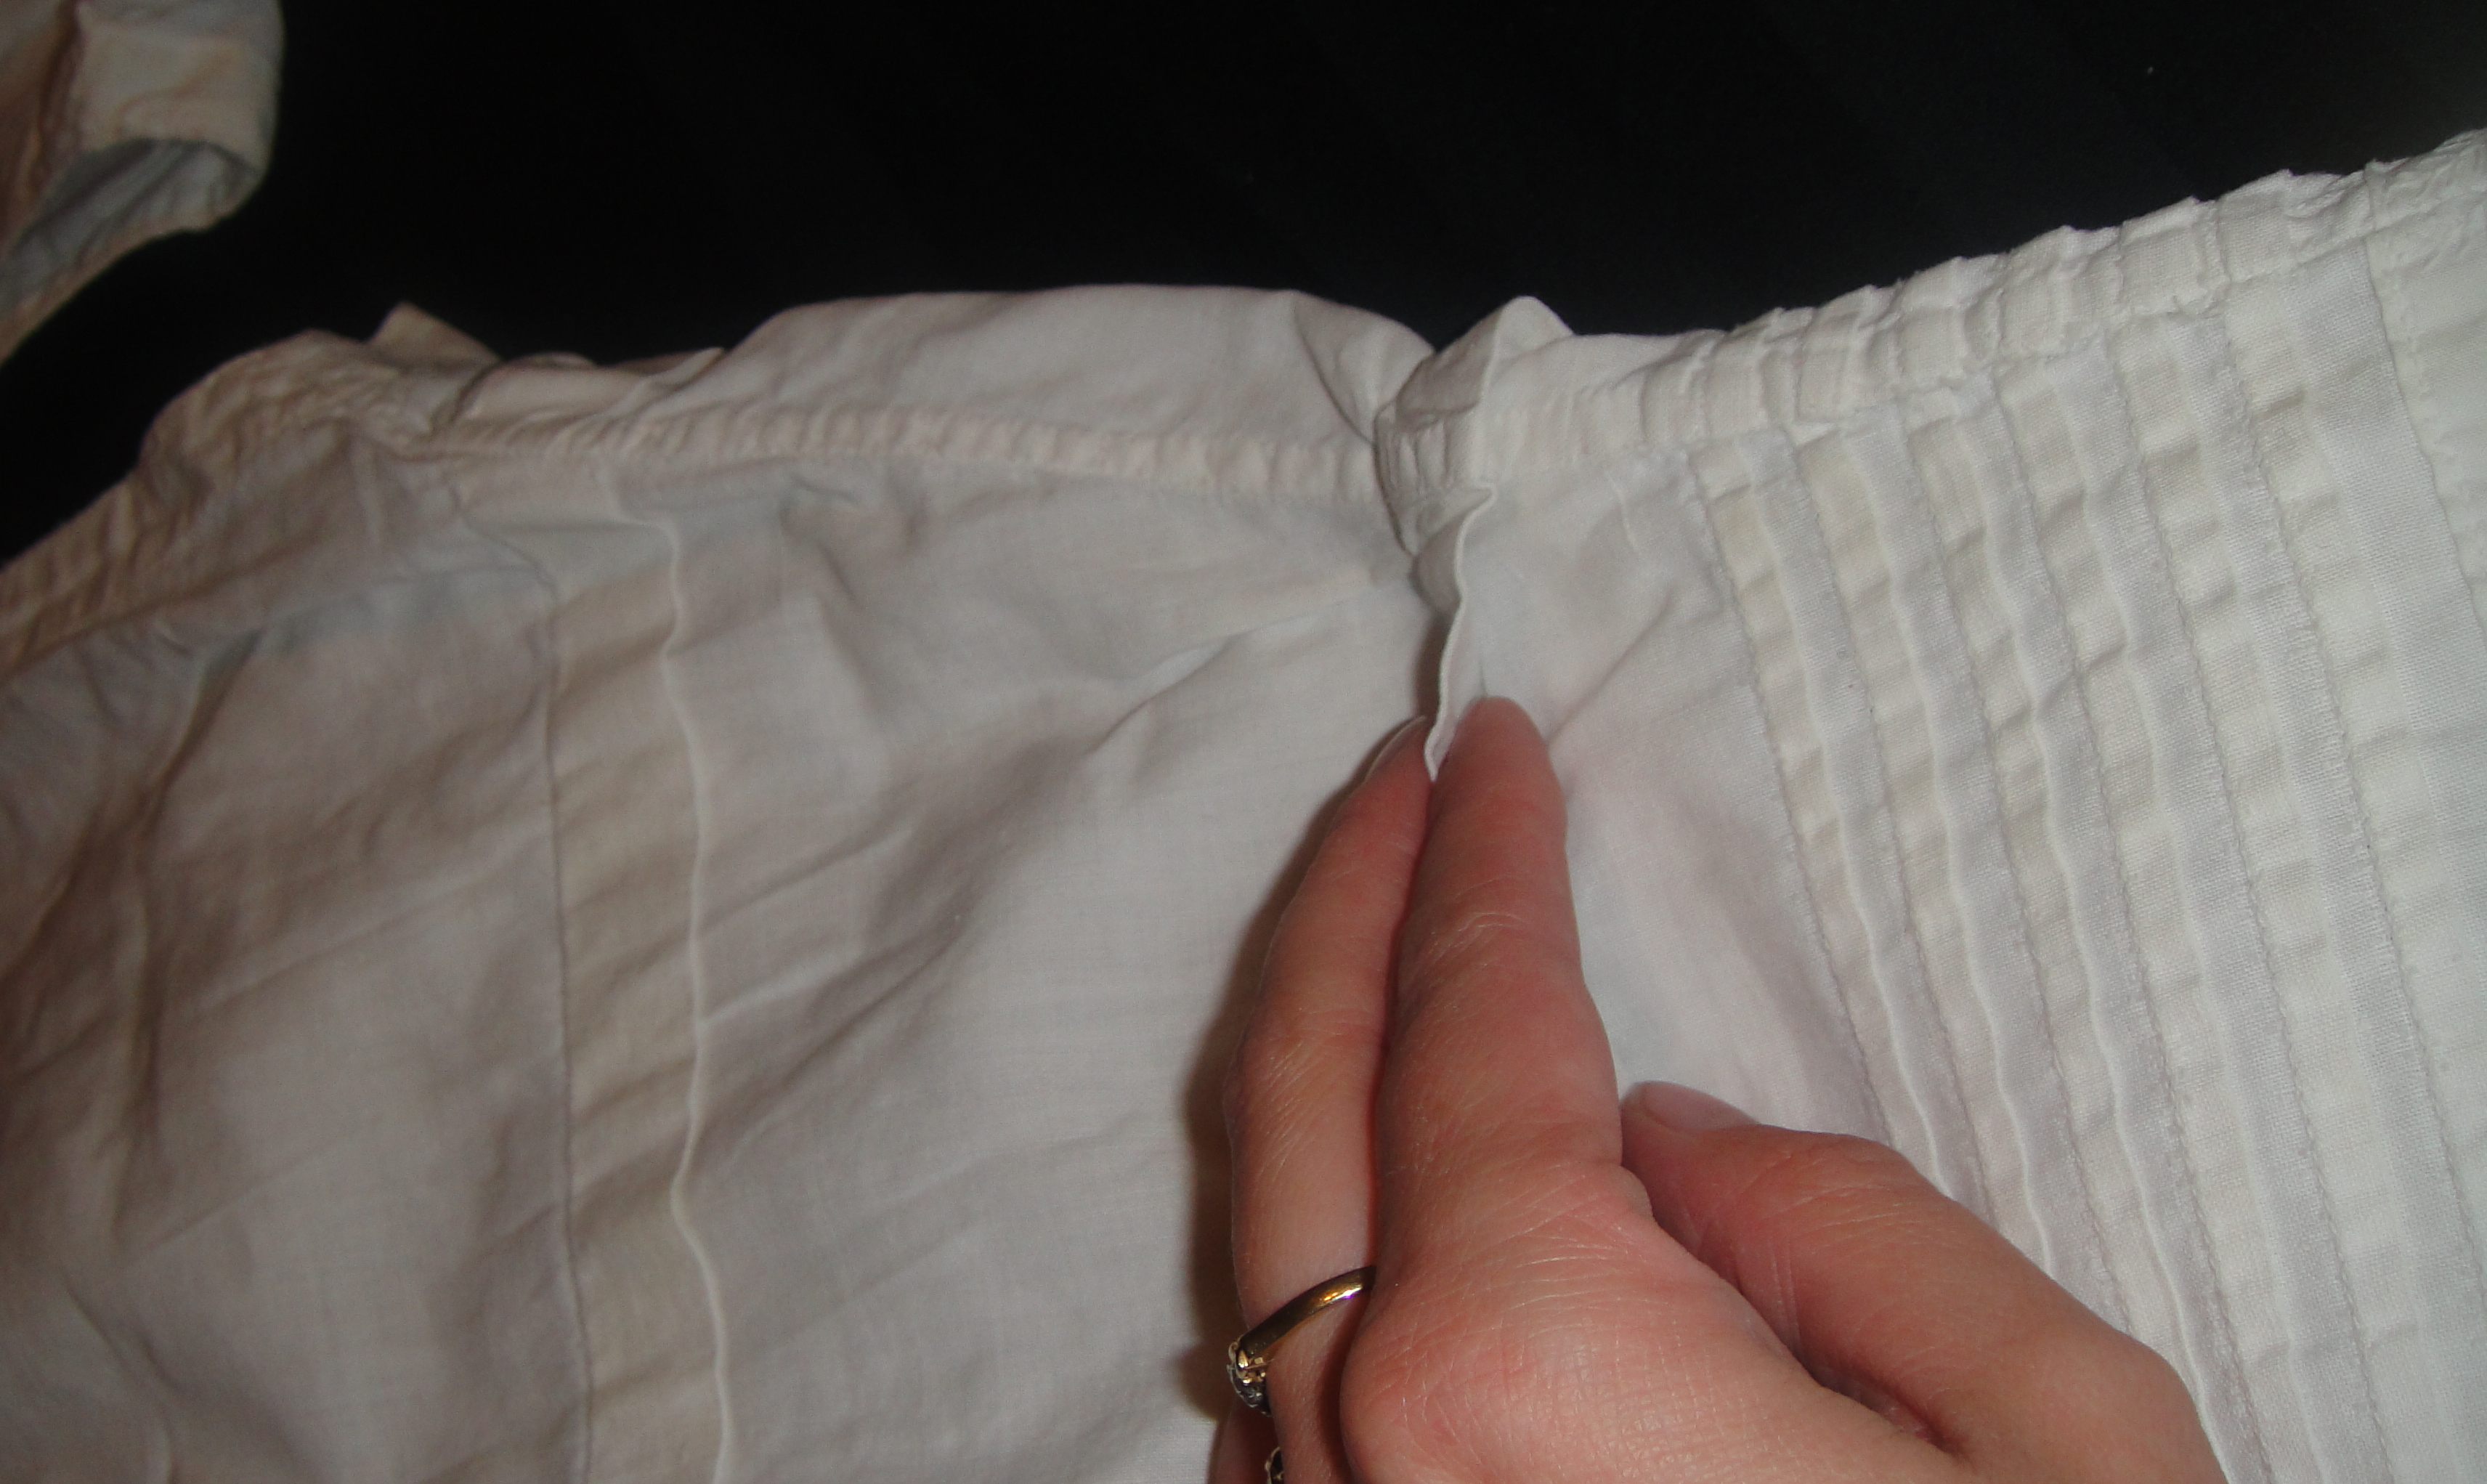
I finished my inseam with a French seam, as per the 1908 instructions, contra Mrs. Church and the extant pair, both of which use a felled seam here. I can see why—the fell would be flatter and less likely to, ah, chafe delicate parts, since the low crotch sits pretty much right between your thighs. Since I don’t plan to be wearing these for days on end, well, I’ll live.

20130929-082920.jpg

Inseam, finished with a French seam.

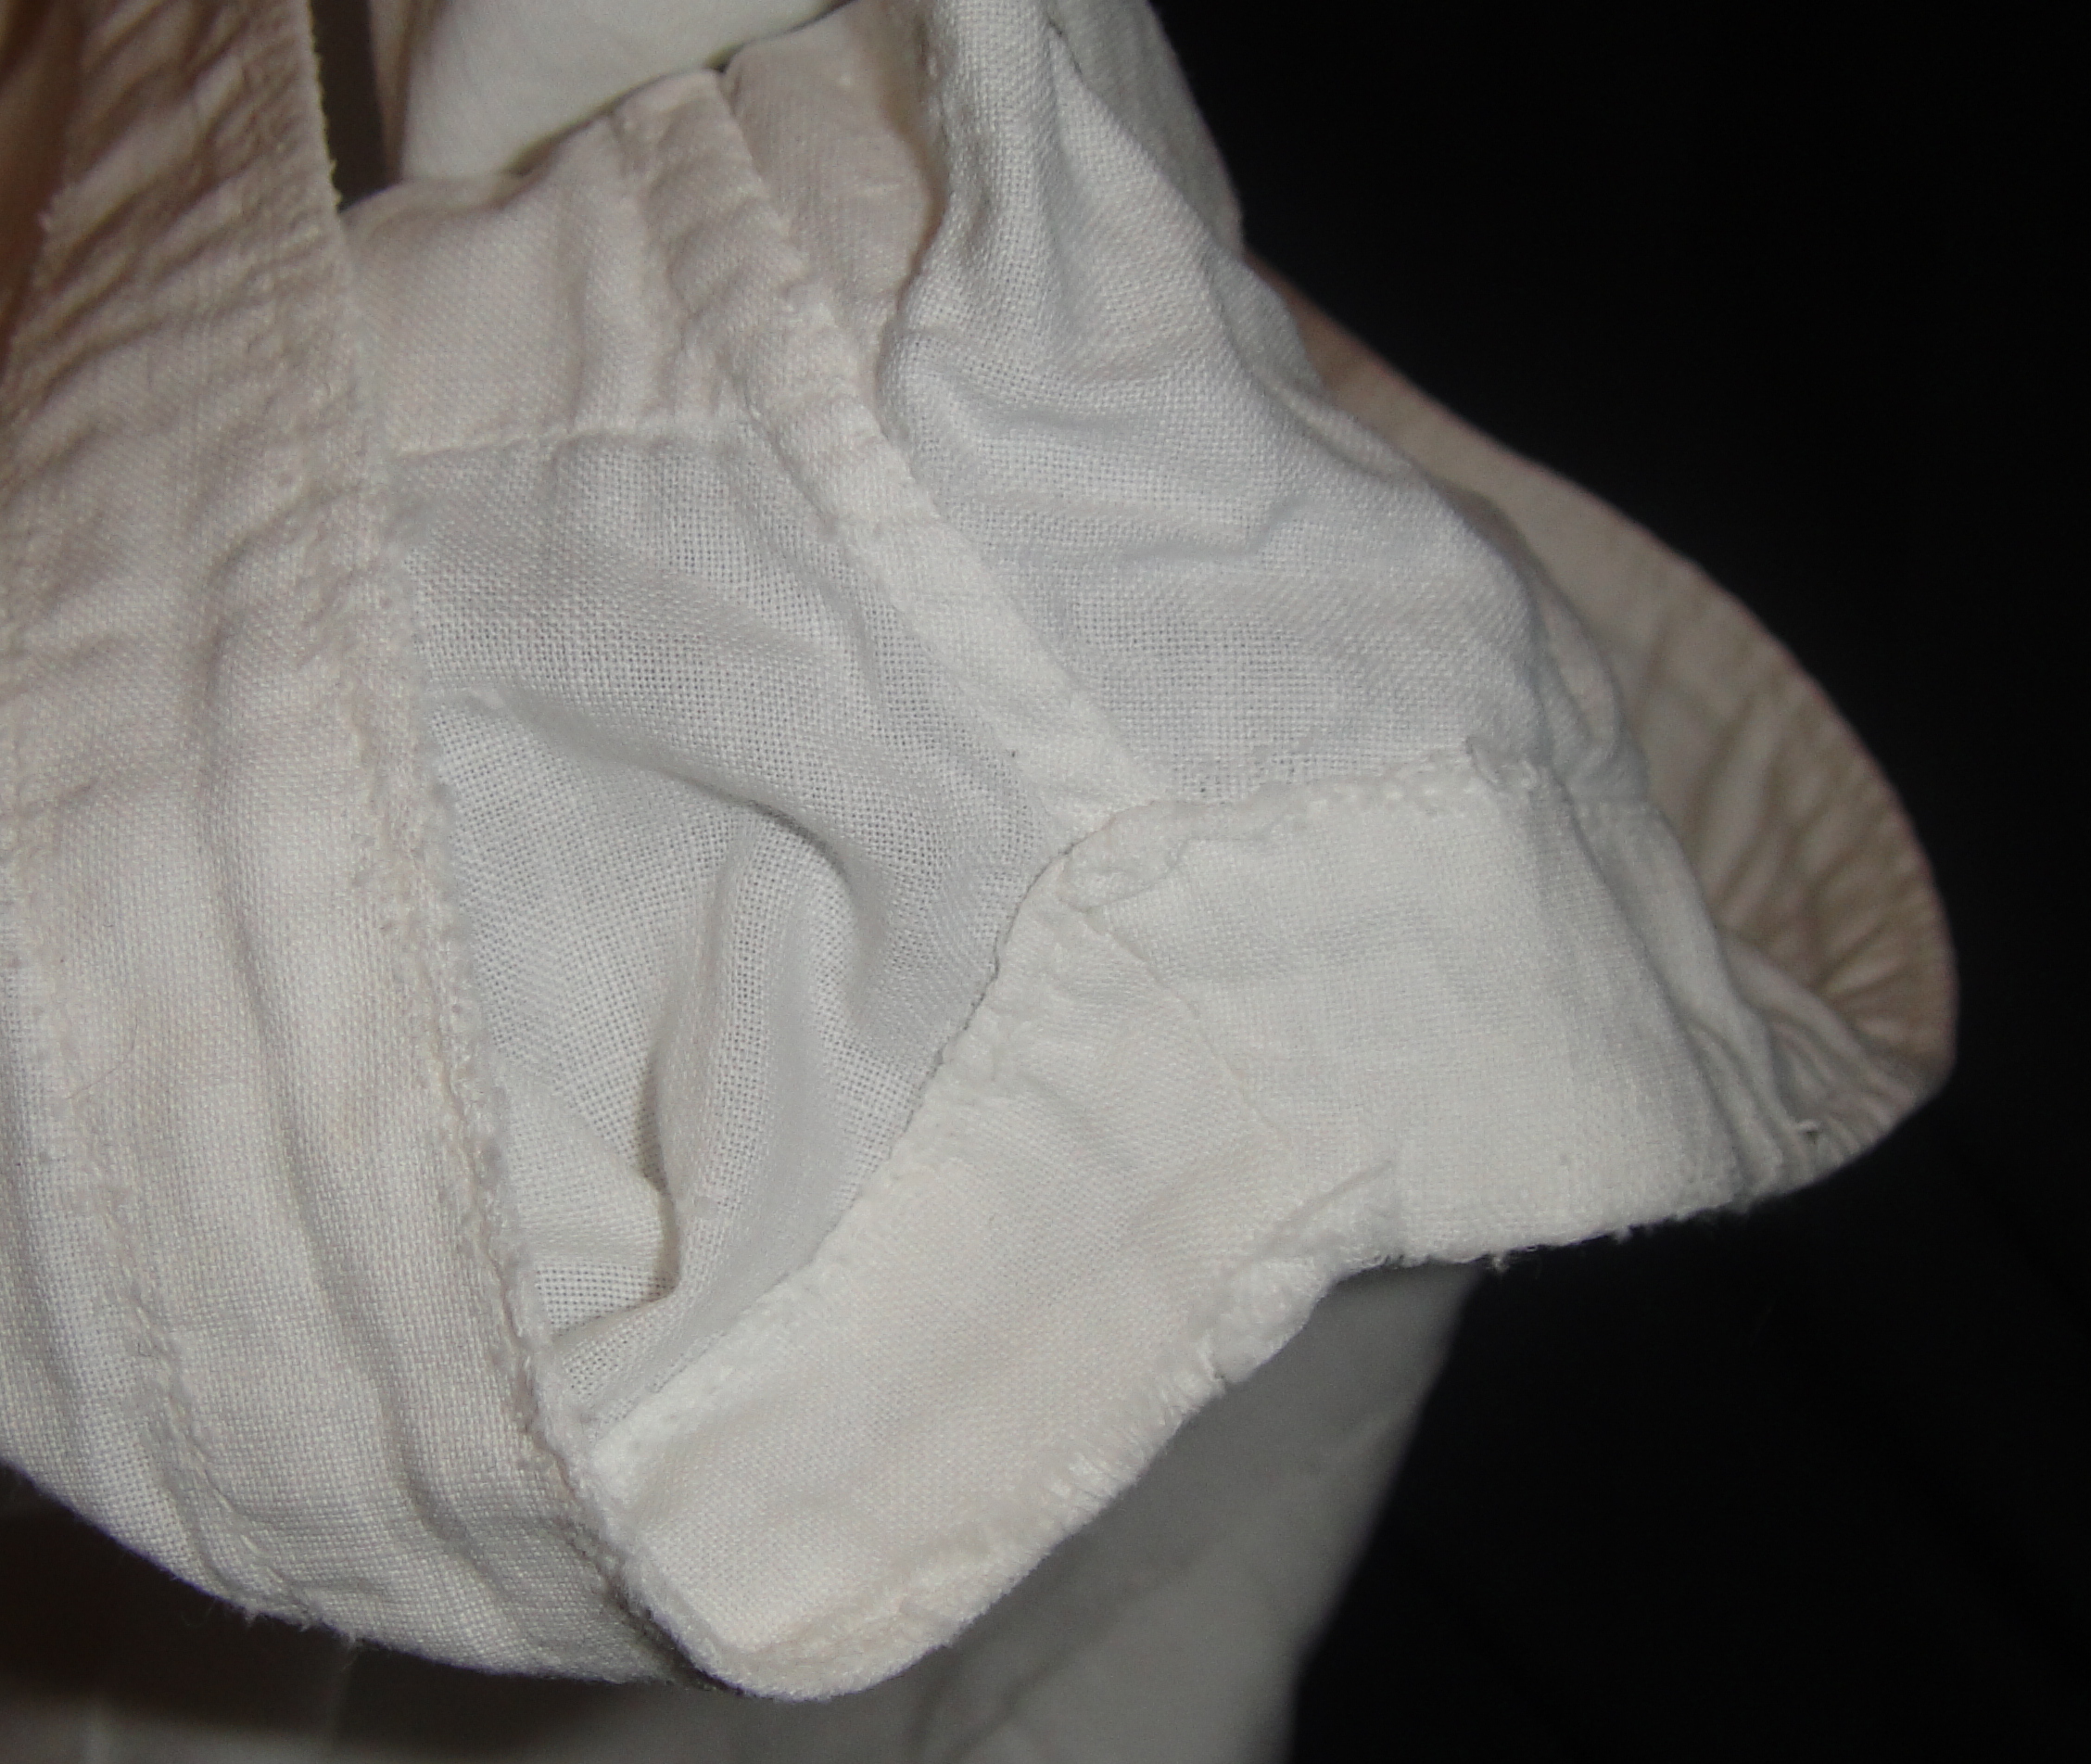
I also finished the crotch with a straight band, as per the 1908 book and the extant pair, contra Mrs. Church, who advises some kind of a shaped facing, wider at the crotch point and narrowing toward the waistband—I couldn’t really make heads or tails of what she was describing, frankly. Which is the downside of the Victorian sewing books, but anyway.

20130929-082935.jpg

Two medium buttons

A few weeks ago my mother handed me two baggies of mixed buttons she had picked up at a garage sale. Ah, the joy. Anyway, I went through these looking for the perfect buttons, and found quite a few plain, smooth white glass buttons that seem just perfect. Medium size buttons, not small, in accordance with Mrs. Church’s instructions.

20130929-082949.jpg

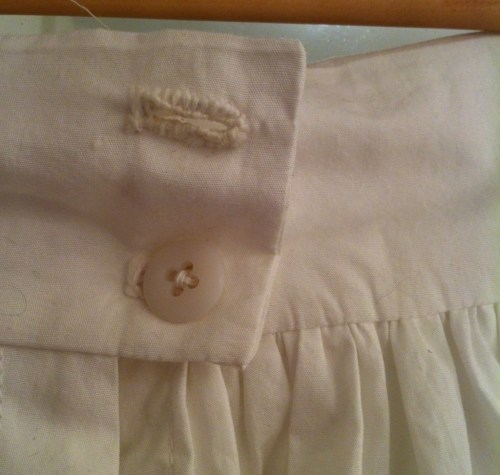
Unbuttoned to show my terrible-ass buttonhole.

I remain impressively terrible at making hand-worked buttonholes (especially when I compare myself to actual examples). For something different this time I used a darning yarn that was in the sewing stuff I recently got with my Grandmother’s machine. I used it doubled and single would’ve been better, and it turns out after the fact that I was using a blanket stitch rather than a buttonhole stitch (they’re much the same except for the directly of the needle), which explains why my knots never end up in the right place. However, they are sturdy. Mrs. Church is rolling over in her grave as we speak.

20130929-083022.jpg

Now you can REALLY see the difference between the front and back waistband width.

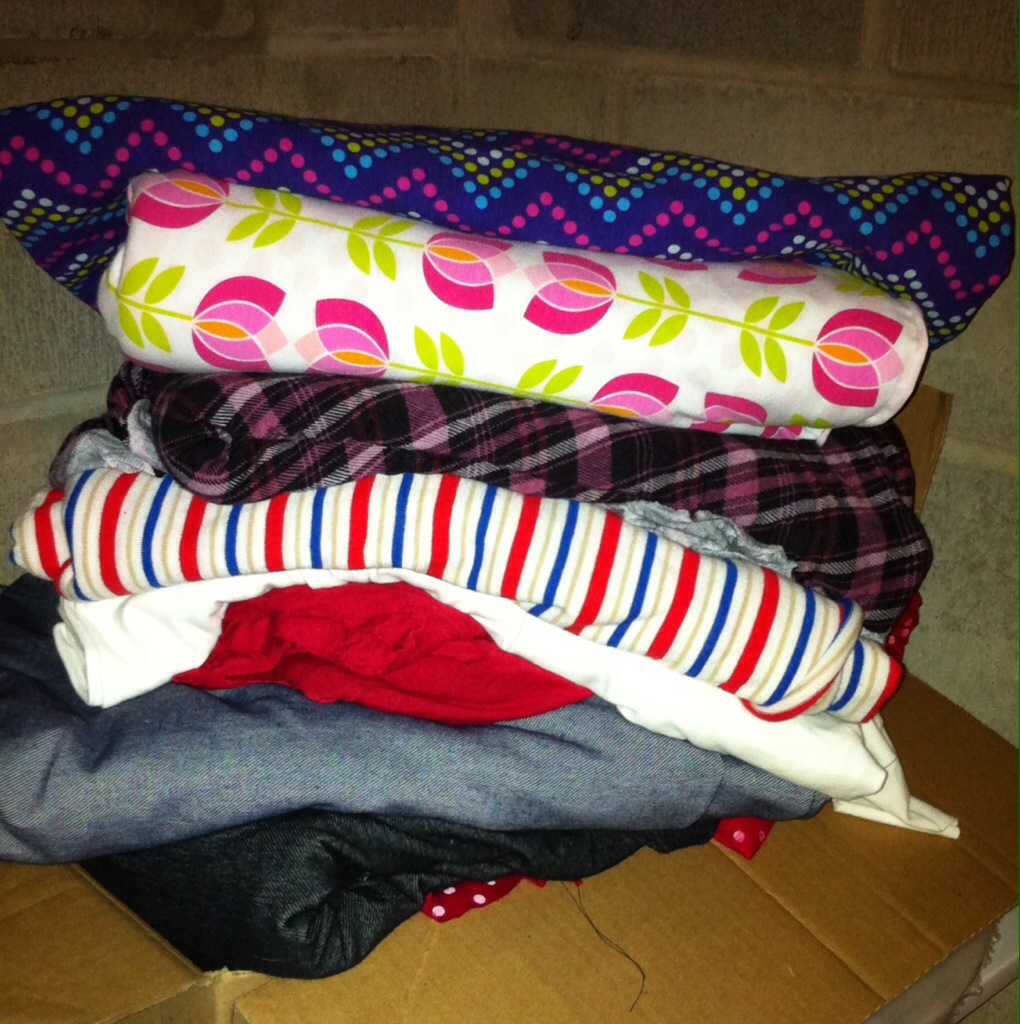
These were pretty fun to make, although I must say finishing something and not being able (or even inclined) to immediately wear it out and about is pretty frustrating (and why I have resisted the siren-song of historical costuming in general, the last few years). Next in line: chemise, corset, petticoats, bustle. Not necessarily in that order. At my current rate that should only take, oh, another two years?

29 Comments

Filed under Sewing

Madly off in all directions

Despite actually having a wee bit of time that could’ve been spent sewing this weekend, I instead dithered to the point of getting almost nothing done.

20130922-222737.jpg

I have started a Hallowe’en outfit—not really a costume, but a fun outfit. Above will become a neon green crinoline.

20130922-222756.jpg

And then the blouse will be this spiderweb lace.

20130922-222823.jpg

This is the pile of various knits that I want to become leggings and underwear and other handy basics for the fast-impending winter.

20130922-222853.jpg

My Victorian obsession continues apace. My post-birthday splurge on some Truly Victorian patterns arrived. But I really can’t even start fantasizing about the outer layers before my underpinnings are under way. The pantaloons are finished (photos pending) so the next logical step should be the chemise, but of course the corset is far more fun to fantasize about even though I haven’t pulled the trigger on ordering the necessary hardware.

20130922-222927.jpg

I’m actually contemplating two corsets, one sedate and underwearly, and one more glamorous, using this gorgeous scrap of red and gold brocade that’s too narrow for much of anything else.

20130922-222945.jpg

I’m leaning towards this pattern for the chemise, as it appears most similar to the chemise instructions in my Victorian sewing texts—although the same texts refer to patterns that are available that have more shaping.

20130922-223013.jpg
This cotton batiste is ready to go whenever I stop dithering. Also a selection of lace.

20130922-223035.jpg

But of course what I really should be working on is this pair of jeans for my niece, whose birthday is tomorrow.

/sigh.

16 Comments

Filed under Sewing

Draw(er)ing

20130914-220829.jpg
After a week or more of #cleandontsew (which is not nearly as fun as #sewdontclean) I got home from work and realized that, for the first time this week, I had no evening plans. Woohoo! Then my sister-in-law called and invited us over. But for a few precious, fleeting moments, I had time to sew.

I worked a bit more on my Victorian drawers.

20130914-220839.jpg

I added some more nice cotton lace to the bottom of the ruffle. It doesn’t match the colour of the not-nearly-so-nice not-cotton lace above. I am tempted to pull the other stuff off, except that would be annoying.

20130914-220848.jpg

I started binding the edges which won’t be the crotch, because these are going to be split drawers, but which would be the front and back crotch seams if these were closed crotch drawers. Except, I got confused and used the wrong white cotton (somehow I have acquired at least six swathes of white cotton in my “Victorian underthings” box. Yes, I now have one of those.) So the strips are rather lighter weight than the rest. I’m thinking I don’t care. Or I could make up something about it reducing bulk. As long as I remember to use the right stuff for the waistband.

20130914-220910.jpg

I used a similar band on the inside where the ruffle attaches. This is not one of the hemming techniques that my Victorian sewing texts recommend—one suggested making a quarter-inch tuck three eighths of an inch above the bottom of the fabric and sewing the ruffle on so it attaches under the tuck. Another said to finish the hem, then slash the bottom and sew the ruffle in between the two layers. I thought that this would produce pretty much the same effect as a separate band, so I’m doing a separate band.

20130914-220858.jpg

I feel like my drawers are suffering a bit from issues of scale. The tucks are too big; the lace not sufficiently delicate. All the things that tend to make reproductions of Victorian items look like, well, reproductions. I’m trying not to sweat it—hello, novice costumer here—but I can definitely understand the authenticity-snob mindset. /sigh.

In other Victorian Costuming news, I think there’s enough of that lightweight, unbleached cotton twill that came in the Box Of Quiltness to make a petticoat. Possibly a bustle also. I am coming reluctantly to the conclusion that I need to make a bustle. The house was built in 1884, prime 2nd Bustle Era. Anyone with thoughts on suitable alternatives to metal bands for a lobster tail bustle? The American Duchess has a great tutorial. Also, now I want her button boots. >_<

12 Comments

Filed under Sewing

Hark the herald fabric bin

20130912-203917.jpg

… My Crafty sister-in-law’s young co-worker gave her a bunch of fabric that had been abandoned by some relative. It, of course, found its way here. It’s mostly quilting cotton, some cuter than others. There’s a lot of Christmas fabric, which I confess doesn’t do much for me, but maybe it would be a good excuse to make a zillion reusable fabric gift bags. And there’s some really nice unbleached cotton twill. And apron prints. Lots of apron prints. >_< what would you do with a sudden and unexpected abundance of quilting cotton?

21 Comments

September 12, 2013 · 8:46 pm

Jeans at last.

Jeans!

Jeans!

I’ve needed new jeans for a while. Like, a really long while. The last pair was these skinnies, a year and a half ago. Which, I’ll add, wound up twisting annoyingly in the one leg, so I don’t wear them much. I think I definitely need to embrace the single-layer cutting for jeans. /sigh.

Jeans

Jeans

There’s not much to say about these. It’s the same pattern as ever, the same techniques, even the same frickin’ pockets. I’ll repeat the detail shots from the last post just for the sake of completeness. I did spend some time tweaking my contour waistband pattern, which began life as the waistband from the Burdastyle Ellen pants (which are no longer free, WTF?) but has since gone through several iterations. This version is wide, curved in the back and straight(er) in the front, and doesn’t gape over my butt even a little bit. More importantly, it didn’t gape over Stylish’s butt, which I am really frickin’ proud of, but I guess that’s another post (assuming I can pin her down for blog photos. These non-bloggers, /sigh.)


Front details

Front details

I used this polkadot (?)chambray for the pocket lining and inside waistband. It’s nice, but a bit lighter than I’d like for this purpose, I think, even interfaced. The waistband is fairly wide, and it ended up being a bit floppy, even with my adding a CB seam so the front could be on the grain. Also, I should’ve added two buttons for the width, not just the one. Hopefully we’ll get around to the rivets sooner rather than later.

Back details

Back details

I did not put a whole lot of work or thought into the pocket design. Just something simple I could copy fairly easily. I was busy overseeing Stylish’s pair.

Back view

Back view

Oh, yeah, and I’ve recently discovered the one up-side of having a child large enough to steal your clothes. You can steal hers back.

Side view

Side view

And, while I normally wouldn’t show this much tummy these days (never mind on the internet), Osiris’s reaction to this ensemble was, shall we say, sufficiently positive that I’m gonna put it out there anyway.

Ma butt

Ma butt


Hmph. Done.

Hmph. Done.

Of course, just as I finished these, summer’s last gasp really set in and we’ve had nothing but hot, sunny days completely unsuited to jeans. Ah, well. Winter’s just around the corner and I’ll have plenty of chance to wear them soon enough…

19 Comments

Filed under Sewing

Wrestling with a New Family

New Family Sewing

New Family Sewing

(Which is a provocative title for a post about a sewing machine.)

Today, I got to play with the Singer New Family/Model 12 at the Marr Residence. I’ve poked at it a couple of times before, but today I finally had needles, courtesy of The Treadle Lady.


A proper 12x1 needle

A proper 12×1 needle

Just for reference, the needle in the middle is the proper needle for a Model 12. The needle on the right is the one that was in the machine. Yikes. Shorter and with a much fatter base (with a flat shank, when the proper needle has a round shank), it was also about as broad as a tree trunk, and as sharp.

Needless to say, it was a much happier machine with the proper needle in. The horrific skipped stitches vanished pretty much almost immediately.

Ze Singer

Ze Singer

Several other issues did not. The biggest one is the tension. Model 12s have the stupidest most primitive shuttle I’ve ever seen. The bobbin thread tension is controlled by poking the thread through a variable number of holes. Unfortunately, even the least number of hole-threading manageable seems to be too many, as the tension appears to be too high for the needle thread. Teeny little loops of thread on the underside. The situation did not improve significantly when I discovered that there was ANOTHER hole on the shuttle, forward of the other three, which was clogged completely with crud. I’m also having trouble winding the bobbin smoothly, so I don’t think that helps, either.

I’m not quite sure how to adjust the top tension, either—although perhaps I need to take the front off the head and see if it can be adjusted from the inside. That scares me, though, because a bunch of stuff is connected to the part that comes off and it shifts alarmingly when you take it off.

The belt is slipping. I shortened it a bit, but it’s still slipping, so I guess more shortening is in order. This, too, is scary.

On the other hand, it actually sews.

On the other hand, it actually sews.

Possibly related to the slipping belt, but I find the machine hard to treadle smoothly. It tends to klonk and reverse itself after a few treadles, especially as I try to go faster. There doesn’t quite seem to be the kind of easy rocking motion I am used to in other treadles (not that I am a particularly adept treadler, either). I’m not sure if this is just a feature of the more primitive mechanism, or if there’s anything actually wrong. At least it’s not squealing every motion anymore. I have oiled the snot out of it.

And, possibly worst, I can’t find a serial number to date it! It should, apparently, be on the bed at the base of the pillar. Probably right under all that red paint. /sigh.

On the up side, this machine probably hasn’t actually been used in my lifetime, and is almost certainly well over a century old (the Model 12s were produced from the 1860s to 1902). The stitch will be gorgeous if I can just get that damned tension right. I mean, even if I can’t, it’ll be awesome to have it usable for little demos, but wouldn’t it be grand to actually sew, oh, I dunno, my drawers on it?

BUT IT SEWS!

8 Comments

Filed under Sewing

Have you seen this pattern?

20130820-064427.jpg

Kwik Sew 1808

Ok, not actually this pattern, which I picked up for half a buck at the thrift store the other day. It’s unopened, and that 80s style of dress pants with the front pleats and the slash pockets is exactly what my husband likes in his dress pants. But look at the shirt on the guy on the left. Gun flaps buttoning to pockets? Nifty details. Maybe not for everyone, but I can’t help but wonder of this was referencing an actual pattern (maybe another Kwik Sew?) or if it was just a flight of fancy. It seems like it would be fun, if it were a pattern… Although with my luck my husband wouldn’t ever wear it.

17 Comments

Filed under Sewing