Category Archives: Sewing

Summer Essentials Sewalong—The Sundress

Those Summer Essentials

My bro and his GF are here, so computer time is at a minimum and sewing time is nonexistent, but here’s a quick attempt to post something.

I’ve been trying to collect my thoughts for a post about Ali’s Summer Essential Sewalong challenge, which I watched interestedly last year and have decided to actually participate in this time ’round. But I’m afraid I’ve felt a bit boggled, unable to really wrap my mind around the range of suggestions. So I’m going to cheat and tackle them one class (she helpfully divided the summer possibilities into six) at a time. And I’m going to start in the middle, because, well, I feel like it.

Ali wrote:

The Sundress: Need I say more? To me, the perfect sun dress strikes that chord between casual and elegant—arms and collarbones, looking good barefoot or high-heeled. It’s something you can wear to both a barbecue and a summer wedding.

Ok, so I’ve already made one contribution to this category, the Grecian Goddess dress. But I’ve got at least two more possibilities on the brain-pan, so hear me out.

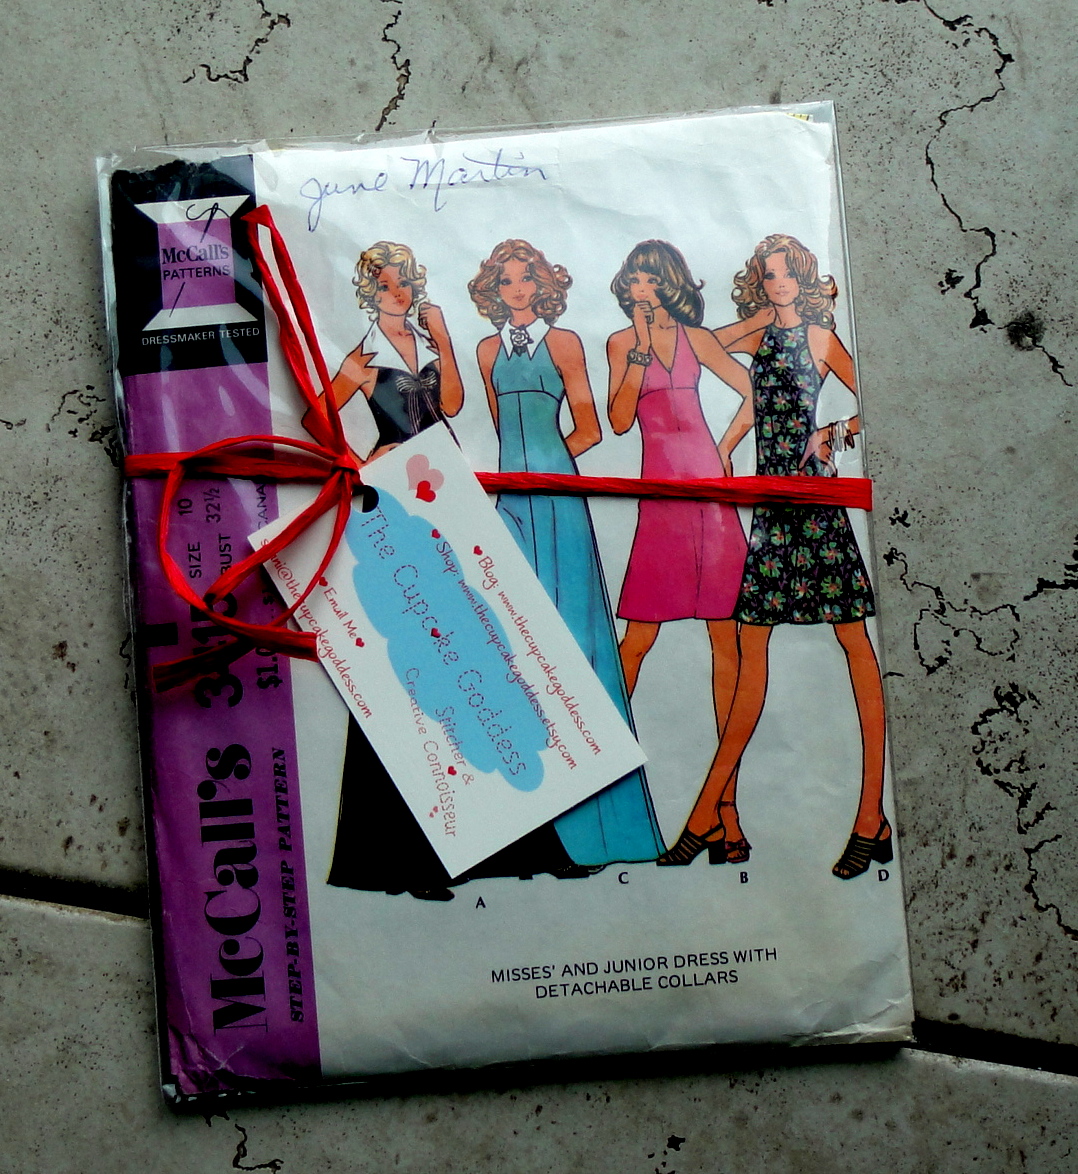
A dress I don't need.

McCall’s 3415, of course, is still on the menu. I’ll get to it one of these days, probably when the temperature creeps above 20C for more than a day at a time.

Dotty Sundress

Then there’s that red polkadot voile from the thrift store that’s taunting me. I think it needs to be a retro, full-skirted, spaghetti-strapped sundress. I’m thinking along the lines of Katjusha, with the back of the bodice shirred for ease of fit and wearing, but the bodice would need to be modified, so the waist is slightly dropped. I’m generally wary of dirndl skirts, but if the waist is dropped it should be ok.

I just can’t be bothered with doing all the links for MMJ posts right now, but I’ve still been managing daily photos in the Flickr group, so check them out there if you like. (For today, I did my contribution to the “ugly background” challenge, with a photo of my once-and-future sewing room. It doesn’t look quite as disastrous in the photo as it does in real life, for some reason.) Maybe I’ll do a week-retrospective when my company moves on after the weekend.

9 Comments

Filed under Sewing

The weird and wonderful world

Assorted notions

Of vintage sewing knickknacks.

Top: Black "Kashmir Jacketing", centre: polkadot voile; bottom: red and black coating

I mentioned previously that after a bit of a hiatus, my most recent Value Village trip was, ah, fruitful. The fabrics shown to the left are all substantial chunks: 2m of the black, four of the voile, and three of the red/black coating. My husband has attempted to claim the black for his frock coat, although there’s only 2m so I’m doubtful it’ll be enough. The voile has me thinking of retro sundresses (gee, bit surprise), inspired perhaps by this Burdastyle pattern.

The red coating… I don’t know, but there’s 3m, how could I resist? It’s quite heavy and might even be wool(ish). I may have a slight “problem” with coating fabrics…

More patterns I don't need

I couldn’t quite walk out without these patterns, either, despite the fact that I’m pretty sure my pattern stash is nearing critical mass (or at least the point where I’m going to have to start organizing it on something other than the principal of superposition*. The kids’ pattern on the right is cute and summery, just the thing. I was a bit more hesitant about the Kwik Sew dancewear, but I’ve been wanting to make myself another pair of yoga pants forever, and I figure it can’t be too hard to reduce the rise, and everyone loves Kwik Sew patterns and says they’re not as awful as the illustrations, so I went for it. And the corsets… well, c’mon, who can resist a “genuine” (or at least passably historical) corset pattern?

some nifty books


I’m pretty sure I’ve heard recomendations of the book on the right… I’ll let you know once I’ve had a chance to peruse it. The book on the left… well, that kinda speaks for itself. I love Art Nouveau.

More fabric-coverable buttons

Coverable buttons. Apparently these ones don’t need a special setter/tool. And there’s a package of square ones! I’ve never seen square coverable buttons. I’m beginning to have rather a collection of these… I must actually try some sometime.

Weird needlepoint buttons

I think the oddest thing, this round, though, is these needlepoint buttons. Have these been on the fabric store shelves the whole time and I just haven’t noticed? I do tend to steer clear of the plastic canvas section. And yet, I’m oddly intrigued. I have a feeling that, if covered with a really nice yarn, they could be quite lovely, especially if you were a knitter and wanted buttons whose texture matched the knit… Or maybe they’re just irredeemably weird. I don’t knit, so I’m not likely to find out, I suppose… I have seen some vintage thread-wrapped buttons that are gorgeous, and perhaps you could get (with a LOT of patience) a similar look with these…)

In Me-Made June News

MMJ 6

Today was a wee bit grueling, culminating in the assembly of a futon so that our impending guests won’t be condemned to the (ever-leaking) air mattress. It was also grey and sprinkly, although I managed not to get actually rained on, doubtless due to the protective properties of the umbrella I actually thought to pack.

My skinny cargoes and frankenshirt. The shirt remains one of my all-time favourite knit projects, despite the fact that the bodice wasn’t quite long enough (so I haven’t hemmed it) and the twin-needle topstitching on the wrists has broken from over-stretching. Also the fabric, another one of those rayon-doubleknit things, has pilled a bit. I still love it.

The skinny cargoes have held up quite well also, albeit not quite as long. The only real problem is that I forgot that the pocket lining I used (the same asian-inspirted remnant I used for the binding in the 70s jacket) hadn’t been pre-washed (don’t worry, I washed it before using it on the jacket). It has shrunk. Not catastrophically, but just enough that there’s a bit of slackness over the front thigh, even though they don’t feel loose. Pooh. These are great pants when I want to feel tough and competent and a little bit edgy. As in, they’re not at all in keeping with the soft-pretty-spring thing I’ve had going on in most of my sewing the last few months. Ah, well. They were just what I needed today.

*geology joke, don’t mind me…

18 Comments

Filed under Sewing

Syo’s Sewing

Syo's First Project

No sewing today—I am moving sewing spaces! Yes, the found table has been wrangled down the stairs (my poor walls) to the basement, and installed in my “sewing room”, so my excuse for keeping my machines on the computer desk in the kitchen—that I had no sewing-room furniture—has evaporated. My long-suffering neat-freak of a husband has issued an ultimatum—all sewing paraphernalia is to be removed from the kitchen before nightfall. The entire process is really highlighting just how MUCH sewing stuff there was crammed in the kitchen… I guess I really can’t blame him for wanting it out.

Pooh.

Ah, well. It’ll be all right for the summer. I may have to invest in another space heater come winter, though.

Strap, with rick-rack and topstitching

Anyway, with the absence of sewing on my part, I thought I’d show off Syo’s “first machine-sewn project”, made up last week. This isn’t her first sewing project—she’s been hand-sewing little cushions and things (although she was not very good at knots), and the shirt/dress/thing she’s wearing in the top photo is actually her own creation, too, although I did the actual (minimal) serging at her direction.

Lined interior

But this little purse was several steps up. We measured out the length and breadth of the strap. We used a pattern for the purse body (actually a sheet of standard paper). I helped with the pinning but she did all the cutting herself. She also chose the fabrics. The exterior is a cream cotton damask, a remnant from this pair of bellydance pantaloons I made a couple of years pre-blog. The interior is a remnant of cream synthetic something that I had at one point started making a shirt for the hubby out of  (the vastly inferior prototype to this shirt, frankly). It was a costume pattern, not full and blousy enough for the look it was trying for, the lace-up front placket instructions thoroughly defeated me at the time, and to put the icing on the cake, I melted the back of the neck ironing just as the shirt was almost finished. Anyway, I was a little hesitant when Syo selected it… while it’s not the worst to work with, it ain’t no cotton, shall we say. But it was the right colour and this project would pretty much take care of the last shreds of that painful memory, so I agreed.

I won’t say I didn’t hover nervously. I also helped with some tugging where the layers required taut sewing (a walking foot would be great for a project like this). Syo has a particularly alarming habit of accidentally pressing down on the foot pedal while attempting to re-position or maneuver the fabric with the presser foot up. But she distinctly improved over the course of the project, and managed not to puncture either of our fingers.

1/4" Edge-Stitching Foot

Also, I think it was Marie-Christine who made the comment once that technology will trump skill in most cases. I must (again) concede th truth of this. This little fellow is a 1/4″ edge-stitching foot that I bought on a whim when I got my marvelous new zipper foot. It set me back a whole five dollars or so. I won’t say it’s revolutionized my topstitching—I’ve gotten halfway decent over the last year—but it certainly makes some things that took a bit of concentration before almost effortless. More importantly, it made it possible for Syo, who can barely sew a straight line, to do almost-perfect topstitching. She also did a really darn good job sewing down her rick-rack, even in the centre of the strap, so it’s not all the little gadget, but anyway. All in all I’m a pretty proud Mama, and Syo is excited to try many future projects…

In Me-Made June News…

My back yard. Oh, and my outfit for June 5

Here’s a slightly more panoramic shot of my back yard than usual, just because we finally mowed the jungle lawn, and the crab-apple trees are absolutely gorgeous right now. This is, of course, Simplicity  6023, the 70s dress pattern I won off MPB. Possibly I shouldn’t’ve worn such a nice dress on a day that included a fair bit of sweating and yard work (yay, heat!), but ah well. It’s washable.

Also, I was a little sad that I missed the twirling on Friday, so I decided to twirl today.

Twirling

It’s supposed to be rainy and cool again tomorrow, but at least we had one truly glorious day! Now, back to the sewing-room-moving…

14 Comments

Filed under Sewing

The Grecian Goddess Dress

Grecian Goddess Dress

I will admit I considered various alternative titles for this dress. The KISS (keep it simple, stupid) Dress. The Shirring Saves (Almost) Everything Dress. I commented in my inspiration post that I could just use a rectangle. I probably should’ve. Instead, I painstakingly drafted a short kimono sleeve, then added fullness for gathering both top and bottom. Even that would’ve been all right, though, if I’d just had this top flow straight into the skirt. But no, I had to fool with an underbust seam. Which of course (because I didn’t muslin anything) was about two inches too low in the front, and not particularly even all around.

In desperation a flash of brilliance, I decided to shir. I stitched up the front and back openings a couple of inches, pulled out my elastic-thread-wound bobbin, and started shirring a long spiral around the dress, beginning at my approximate underbust and continuing down across the bloody “waist” seam.

Front view

This created a vast improvement—instead of a mumu I now had something much closer to the elegant, drapey concoction I had envisioned. By a miracle, the neckline didn’t gape OR fall off my shoulders, and the bra straps are completely covered both at shoulders and at the back.

Back view

But all the shirring in the world couldn’t save that lumpy, uneven waist seam from being lumpy and uneven. No worries, though, I had always envisioned this dress with a sash across the offending area. I had planned to do a self-sash, but found myself desperately short of fabric. My Japonais Mum to the rescue! I cut off a pair of narrow widths ( it was too narrow to do just one), joined them in the centre, and made a simple tube sash.

Because having a seam at one edge and not the other annoys me, I hit on the idea of rolling the seam to the centre of the back-side of the sash. Quite satisfied with how that turned out. Yay me.

Sash closeup

Obviously I need to shorten the dress a fair bit… it’s dragging even in the heels I’m wearing for these photos (and the odds of me actually wearing heels like that out and about in the summer are pretty minimal).

I might try the general idea again, without an underbust seam and with a bit less gathering at the shoulder.

In Me-Made June news,

MMJ 4

This is an older ensemble, meaning everything in it was made last summer and fall. It’s not terribly glamorous and I have a few issues with the fit of the blouse that I didn’t notice when I first made it (too bad since I made like four different versions). Still, it’s warm and comfy on a rainy, chilly day. These remain my single favourite pair of me-made jeans, despite a number of material failures (the pockets have disintegrated and much of the topstitching is failing).

JJ blouse
Knit top formerly known as Lydia
Jalie 2908 Jeans

29 Comments

Filed under Sewing

Thrift Store “Score”—Japanese Edition

After a few fairly dismal visits in March and early April, I gave my local Value Village a break. When I popped over the other day, I hadn’t been since before Easter. I actually wasn’t hoping to do much other than get a bit of excercise, but sadly for my wallet (happily for for my stash) there were a couple of good fabrics, some more vintage notions, and, most intriguingly, a couple of Japanese pattern magazines.

Child Boutique

In specific, two copies of “Child Boutique”, which appears to be a kids’ spinoff from Lady Boutique, which I think I had vaguely heard of before. These are not, however, the sleek, ultra-classy, subtle designs I’ve come to associate with Japanese patterns. I can’t find a date on the magazines but from the fashions I’m guessing late eighties or early nineties. Words like garish, oversized, and sometimes plain odd come to mind.

As a lefty, it makes me happy that Japanese books run “backwards”. This is the way I’ve always filled my sketch books.

That fine line between cute and odd

The magazines are substantial things, more like catalogues. The front portion is full of photographs of the styles, with style numbers and what I eventually (mercifully) figured out are page numbers beside each. Yay!

A few select patterns have detailed illustrated instructions

Next, a few select styles have sized drafting instructions and cheerfully illustrated directions, kinda like the Burda Style sewing course. There are some accessory and hat patterns in this section, too.

Hair style directions

There’s a page or two of hairstyle directions. Some are pretty simple, but some I could probably have made use of when my kids had longer hair.

Measurement chats---thank goodness for diagrams!

There are several sizing charts, fortunately with diagrams so I can figure out which measurements go where. My kids appear to fit quite well within the age/sizes for Japanese children. Good to know.

Obviously this doesn't contain more than a fraction of the couple hundred styles in the magazine. I'm not sure which ones it does.

There is a single, not-terribly-dense pattern sheet included. Obviously this is patterns for only a very few of the styles illustrated. I haven’t figured out which ones, though.

Cute blouse photo

I really like this flowered blouse. I don’t think my kids are quite as enthused with it, though.

Pattern diagram for a cute blouse

This is its diagram. Most of the back of the magazine is full of sketches and diagrams like this; I presume you use their dimensions to draft out full-scale versions of the patterns. Most of these seem to be given in a single size, although it looks like a size-range is suggested. Probably it would all make sense if I could understand the text ;).

This one has crossed the line into odd territory.

I did mention some of the designs are really odd…

Oddly blonde Japanese girl

I like this outfit in the middle, too, but again it’s pretty twee for my girls. Also I feel oddly disturbed by this kid’s bleached-blonde hair. I don’t really feel like you should be putting that many nasty chemicals on a kid’s head. Maybe I’m being prudish, though.

Syo's favourite dress

Syo would like to show you her favourite dress. Somehow I don’t think I need a Japanese pattern magazine to make this one, a simple shirred-top dress with spaghetti straps. Finding such cool fabric, though, may be a feat.

I got a few other nifty things, too, but in the interest of stretching out my daily post material, I’ll tell you about them later.

I did succumb to some japonesque fabric at Fabricland, though:

Japonais Mum

Yes, I bought a print. Picking it was agonizing, too. I was only going to get a metre, to use for pocket linings, but it was on sale so at the last moment I became weak and got three metres. I’m thinking a skirt.

In Me-Made June news

Me-Made June day 3

I think this is a nice outfit but I was having trouble getting a decent picture, and it’s started to rain so I don’t feel like doing any more. But here it is.

Lacy dress
Springy little coat

Despite appearances, I’m not actually five months pregnant. That’s just the way my belly looks when I forget to suck in. 😛

16 Comments

Filed under Sewing

Trial Tunic

Tunic and apple tree

Before I get into the tunic, I just wanted to say thank you for all the wonderful comments on yesterday’s anniversary post. I’m proud of my husband and our family, and of the way we’ve dealdt with the struggles we’ve gone through to get where we are now (not that we are done with struggling, by any means). My favourite quote about love (though I couldn’t name the source) is that “Love isn’t something you feel, it’s something you do.”

Anyway. Tunics.

I have a bit of an ambivalent relationship with tunics. You may not know this, except, perhaps, by their total absence from my sewing so far. Basically, I have what can charitably be called a “boyish” figure, and I have generally figured that the purpose of clothing should be to emphasize what little I have in the way of curves, rather than skim over them. Also, I’m still recovering from a long-time perception that the tighter, shorter, and skankier an outfit was, the better it looked. So I’ve always tended to give tunics a pass.

But, in their massive popularity over the last few years (possibly in abatement now, but the trends can kiss my ass), I did wind up trying on a few here and there and, to my surprise, discovered that I really liked at least some of them. Who knew?

Anyway, one of my favourites has been a specimen with a wide hip-band, scooped, gathered neckline, flutter sleeves, and a keyhole opening in the upper back. And ever since I worked out my knit sloper over the course of last fall, I’ve been wanting to attempt to immitate it. How hard, after all, could it be?

Closeup

This is not the ultimate version, by any means. Most egregiously, this version is about three inches too short, so that the hip band falls above my hips rather than at my widest point, especially after several minutes of wearing. I can blame this on nothing but myself, though, as I took the existing length of my knit sloper rather than actually measuring the original tunic. My keyhole opening in the back is quite a bit smaller than the original, too, for much the same reason, although this is less upsetting.

Neckline. Meh.

The hardest part of this entire project was binding the neckline. I have a really hard time producing nice bindings in thin, wriggly knits. I’ve sidestepped (or at least minimized) the issue in the past by using a lot of cowl-necked patterns or other alternative neck finishings for the thinner knits I’ve sewn up, but for this pattern I really needed to bind the gathered neckline. I achieved it, by dint of much fussing, cussing, and the flagrant application of both Steam-a-Seam and Wonder Tape, but it’s not especially pretty or professional-looking. Also keeping my gathering from squooshing under the machine foot was nearly impossible. It’s not perfectly even, but at this point I’m not going to complain. Sadly, I’m not sure I can do a lot better with the equipment at hand.

Back view

Other than that, and a bit of futzing with the back closure (between the neckline and the keyhole), I’d say it’s a reasonably successful first attempt, though. V. 2 should be much more satisfactory, or at least longer. The downside of taking your own photos with the timer is there’s no one to tell you your shirt is hiked up at the back. On the other hand there’s a pretty good chance this is the way it’d look most of the time when worn, anyway.

In Me-Made June news,

MMJ 2

today I am wearing the 50s shrug (pattern here), blog post here

Cowl-neck shirt

skinny jeans.


As you may have guessed, it still isn’t really warm, although at least we’re in no (immediate) danger of snow. Still, I shan’t complain—sun and mid to upper teens (C) is decent enough.

It does appear that someone’s been working some arcane rituals in the back yard, however. Maybe that will be more effective in bringing on the nice weather than all my hopeful sewing.

Someone's up to something...

20 Comments

Filed under Sewing

June First

Me and ma bro, Cambridge, UK, 2009

Enter Me Made June. June is always a crazy month what with the kids’ birthday parties, their school wrapping up, and to top it all off, my brother and his girlfriend are arriving from Australia next week (ack! Must clean house!). Although I’ve managed to see him twice since he shook his native soil from his boots almost four years ago, the kids haven’t except via skype. Syo is literally twice the age she was when she last saw her uncle. And we’ve never met his girlfriend, whom he met while working in Edinburgh and who enticed him back to her homeland down under when their visas were up. So excited. So much to do.

And take daily photos. Gawd.

I miss my little brother.

When we were very young (July, 2000, in our first apartment)

In other non-sewing news, today is also my hubby and I’s anniversary. 12 years, to be specific. Yup, twelve years ago to the day I picked up a boy at a 7/11, took him back to a friend’s pad, and…

Wait, my mother reads this blog. Scratch that last line. Anyway, if you’d told me at, oh, sixteen, that I would meet The One For Me when I was 18 and be a mother not much more than a year later, I would’ve told you to go soak your head. And that it was a ridiculously bad idea. Which is was, objectively, although it never felt that way at the time. Hard, yes. Ridiculously, grindingly, hopelessly hard. But never a mistake. Our first year together was the most insane roller-coaster—a dizzyingly wonderful, irresponsible adolescent summer, an autumn of emotional drama barely patched up in time for me to discover I was pregnant shortly before Christmas, and the insane, irrevocable decision to keep it and make it work. More emotional drama later, largely due to my pregnant hormones and his choking, unspoken terror. Thank goodness for youthful stupidity and family support; I don’t think we would’ve made it without a major dose of both.

The rest, of course, is history.

We’re not perfect. We’re certainly not perfect for each other. But at our best, we complement each other’s strengths and shore up each other’s weaknesses (at our worst it feels like trying to force the round hole into the square peg. The fights, though rare, can be epic). Above all, we keep on loving and laughing. I think that’s the most important thing of all, that after all these years we still entertain each other, and show each other our love in a jillion little ways.

Posing with new sewing table and shabby back fence

Oh, yes, Me-Made June, right.

Hmm, I wish I could convince myself that my back fence looks edgy and urban, but no, really it just looks crappy. Which it is… this is a good house, but you can tell it’s been a rental for a while.  Also, during last week’s torrential rains the lawn went from barely-green to OMG-it’s-a-jungle, and it still hasn’t dried out enough to cut with our crappy-ass mower.

However, of chief note is this highly classy table I’m leaning on. I found it in the alley this morning so, like any good dumpster-diver I brought it home with me. My mommy would be proud.* The base is a solid wood antique kitchen table, not unlike the one I grew up with (and it is heavy!!!). The top has been replaced with laminate particleboard, that’s not in particularly good shape, but it should suffice for cutting and/or holding up sewing machines. If it’s too chipped and rough I will just have to saunter back to Value Village for some old blankets to pad the surface, a la Beangirl only less awesome. It’s not a great height for cutting, but considering the alternative I usually use is the floor, I think it’ll be an improvement.

MMJ day 1 (without topper)

Anyway, today I am wearing the Skinny Jeans, the winged cardi, and a new tunic I’ll tell you about tomorrow. I know, it’s hard for me to put off posting stuff, but posting every day it gets hard to come up with something for content to justify the daily outfit post, so I better drag things out. I also have some great VV finds I’ll be sharing later on…

Anyway, happy first of June, and enjoy your day, wherever you are! 🙂

*I am not even being facetious. Finding thrifty treasures is one of my mom’s favourite things in life. We had an exquisite antique bridge-lamp in our livingroom when I was growing up that she had rescued from a landfill, yes, an actual dump, and re-wired.

43 Comments

Filed under Sewing

The Perfect Sundress

The perfect sundress

This is all Oona’s fault (yes, it’s an old post, but she linked it to me recently). Or maybe Patty’s. I haven’t decided. The Sew Weekly challenge this week is “The Perfect Sundress,” too, which isn’t helping. I haven’t done any of their challenges thus far, but it seems like a nice little community (though the site layout is still a bit puzzling to me), and since this week’s challenge coincided with something I’ve been wanting to sew anyway, I figure I’ll give it a bash.

So here it is. This fabric was part of my Easter thrift store haul. I wasn’t sure what I was going to do with it—that strong, woven stripe is a bit limiting—but when maxi-dresses started being dangled provocatively in my face (see above links), I knew.

Maxi dress option 1

Maxi dress option 1

Now, it’s not as if I have a shortage of maxi-dress pattern options.

Maxi-dress option 2

But, I may be stuck on this sketch I doodled out the other night. The neckline is like Oona’s, the sleeves more like Patty’s. It could be as simple as a rectangle cinched by an under-bust sash, but I’m thinking a bit more shaping would probably be flattering.

Maxi-dress option 3

I guess if I’m going to make this up this week, I’d better decide, though.

Maxi-dress option 4

So many maxi dresses, so little time…

18 Comments

Filed under Sewing

The Bell-bottoms

Vintage wranglers (with accessories)

In about 1997, I stumbled upon two pairs of bell-bottom Wranglers, presumably vintage but more or less pristine, at a garage sale. They were a little big, but at least that meant they sat a bit low on my hips. In those days, stretch denim and low-rise pants had not yet penetrated to my little backwater… I was still wearing my Levi 501s and trying to figure out why anything that fit at the waist had huge flaps at the hips.  At seventeen you don’t really have a clear sense of your body… all I knew was that the look I was seeing wasn’t quite right. I was also still wrestling with my 80s-bred distaste for any pants that flared at all. The wranglers hung off my hips at the perfect level, though, and if they didn’t hug or skim anything, well, as long as I could show off my tummy, at that point I didn’t much care. I wore them with boho shirts and a metal-link belt that had belonged to my mother in the 70s, if not the 60s. I didn’t realize it at the time, but I would be wearing bell-bottoms more-or-less exclusively for the next decade.

Ellen Bellbottom Jeans

Although I was never a serious devotee of the flare (I don’t have the hips for wide ones), I was a late adopter of the skinny jean, as well—I got my first only a little over a year ago.  But I haven’t had non-stretch, old-school flares since I ousted those Wranglers, round about the birth of my first child.

Then, Joy’s Bellbottom Challenge cropped up and, coincidentally, I wound up with two metres of absolutely gorgeous dark-indigo non-stretch denim. Obviously the two would have to combine into some seriously retro bellbottoms.

Not, however, as huge and sloppy as my old wranglers, however. So, I went to my handy-dandy Ellen pants pattern, which is my only non-stretch pants pattern (that I know fits, anyway…), traced it off, made the adaptations for jeans (back yoke, front pockets), brainstormed a couple of different ideas for the closure and the pockets, and got to work. Ellen is a great pattern for mods like this because it’s completely free of style details if you leave off the pockets.

I opted to have the legs flare from about mid-thigh. I probably could’ve gone a bit lower, but I wanted, for whatever reason, more of a wide-legged look than a hip-hugger look. I added what seemed like it would be a modest, but definite, flare.

Front lace-up fly

I decided, for no particular reason, to make a corset-closing front rather than a traditional fly… I had a pair like this shortly after Tyo was born, and I always loved the feature (I have a bit of a weakness for things that lace up.). I haven’t decided whether to add grommets to the waistband itself, or buttons with a tab stretching between them. We’ll see. Although inserting grommets is always a little nerve-wracking, this was still simpler than a fly, for those of you who are chicken of flies and not afraid to look a little out there ;).

Bound waistband interior and flat-felled seams

Bound waistband interior and flat-felled seams

I did my new favourite waistband-finishing technique, binding the inside with bias tape (this time the blue satin left over from my springy coat facing), and, since the Ellen has 1.5 cm seam allowances rather than the 1cm of the Jalie pattern, I decided to try my hand at (ulp) felled seams.

They were… ok. Definitely not perfect. In particular, although my yoke seams lined up at the seam-line, the way the seam-allowances interact in a flat-felled seam means that after they were folded over, the yokes look offset. Boo. On the up-side each seam is only stitched twice, instead of three times, and there’s less swapping back and forth of threads. The trimming and pressing takes a lot longer, though, and I think I get more even topstitching with the “cheater” method. Hmm. We’ll see. A big part of me is still convinced I’m not making proper jeans if they don’t have felled seams. Hmm.

Bellbottoms

Bell-bottoms: back

I hemmed them LONG. If they don’t shrink up in length, I may have to shorten them. That’s ok. I’ve been traumatized by too many too-short pants over the years to mind a bit of extra length. And it’s fun to put on heels and still have only my toes peek out.

So... much... leg...

Click through to the full-size rear photo to get a better view of my back pockets… I made them shield-shaped to echo the corset-fly.
My hubby, a diehard child of the 80s, has already expressed his dislike of them. I explained that I think I’m allowed to own one pair of jeans that he doesn’t like. He countered that he doesn’t own any jeans that I don’t like. I pointed out that’s only because he won’t go shopping without me. I think this means I win, don’t you?

It really doesn’t show in the pictures, but I also did one vintage thing that I’ve never before attempted on jeans.

I pressed creases front and back in them. I think they look very smart.

Now all I need is a 70s blouse to go with them… 😀

(I think I’ll have to do a 70s week in Me-Made June, what do you think?)

51 Comments

Filed under Sewing

Capri-cious Camo

The Capri Girl

Tyo’s camo capris are finished. It’s been rainy so I’ve been carless* and hence unable to make it to the fabric store for the finishing touches (buttonhole elastic for the waistband and twill-tape for the leg drawstrings), so I had to improvise. I found the missing black thread under the couch, bought shoelaces at the grocery store for the drawstrings, and liberated the buttonhole elastic from the fishtank, where it has been holding down our improvised fish-tank-cover** for the last several months.

I must say, these were really fun to make. The fabric was cooperative, and just the right weight—heavy enough to feel sturdy, without being so bulky as to give my machine fits.

The pattern, as I mentioned before, is from a 2009 Patrones children’s issue. It features five pocket styling (I made six by putting a change pocket on each side… oops!), funky-shaped rear pockets with nifty-shaped flaps, and a waistband designed for buttonhole elastic.

Elastic back waistband

Now, adding buttonhole elastic to a kids’ waistband is easy as pie, but it’s kinda nice to have it marked on the pieces so I don’t forget, since you have to work the buttonholes and ideally attach the buttons before putting the waistband on.

Look, ma! Rivets!

I used my triple-stitch (aka straight stretch stitch) for the topstitching. This is nice because it doesn’t upset my machine the way topstitching thread often does, but it can be a little feisty and you have to pay attention to where you are in the three-stitch cycle when turning corners. It worked quite well on this fabric, though. If you click through to the full size photo, you will also see that in addition to double-topstitching the inseam, I did a single row of topstitching along the outseam! This is much trickier, as you have to do it once the pantlegs are already tubes, and involves sewing down the inside of the inside-out leg, bunching the fabric up around the needle as you go. Slow and fiddly, but I figured these were short and loose enough that I had better try it here, as I might not ever try it again. 😉

Interior waistband finish

Another touch I tried is a bit of a cheater finish—I used some of the bias left over from my 70s jacket to bind the inside of the waistband. I feel justified in this finish because I recently got a pair of (thrifted) RTW jeans that have the same finish. It makes for a super-easy waistband; you just topstitch from the right side, not worrying about catching the underside at all because there’s plenty to catch. Also this is the same fabric I used for the pocket-lining and the underside of the flaps.

Of course, it's all about the shoes.

I cut a Patrones size 10, the smallest the pattern came in. According to her measurements Tyo is a Patrones size 8 on the bottom and six on the top, but with the wonders of  buttonhole elastic, they fit fine. The pattern is cut very wide and flat on the backside, relying on the elastic for any fitting. I took it in a couple of cm at the CB seam, to give Tyo a bit of extra shaping in this area.  My only complaint is that the rise is quite low. Really low, for a kids’ pattern. Especially considering Tyo, ah, needs a bit more coverage in the rear. If I make this again, I’ll add a generous wedge to the CB.

Back pocket with patch

Although I made buttonholes in the rear pocket flaps, I haven’t cut them or attached buttons. We’ll see if I bother or not. I did decorate one rear pocket with an embroidered patch Tyo had purchased at a street fair last summer. It was originally intended for her jean-jacket, but since that’s still sporting its punk/zombie patches from last Hallowe’en, we decided to use it here. I like contrast of camo fabric with hippie/Buddhist patch.

Have I ever mentioned my daughter is way cooler than I ever was?

I can’t wait until these have been washed about a dozen times and get that worn-in-faded-camo look. In fact, I like them so much I might have to think about making myself some. I haven’t worn camo regularly since my feminazi/survivalist-lookalike phase back in Uni.

Tyo's Toque

Also you may have noticed one other hand-made item in these photos. The blue tasseled toque Tyo is wearing was knitted by my mother, for me, when I was about kneehigh to a grasshopper. Isn’t it cute? It has a matching sweater somewhere, too, although that was only finished in time for my little brother to wear it.

All righty, I think that’s more than enough sewing for the house apes (thanks, Katie, for that one!). Time for something for me!

*Our second vehicle is a motorcycle. This is not nearly as practical as a second car (especially in our climate) but is definitely WAY more fun. Except when it rains.

** Instituted after the tragic leap of the much lamented One-Eyed Jack. (scroll down)

18 Comments

Filed under Sewing