Tag Archives: Jalie

Tulips and Tears

Tulip Pockets

When I could finally pull myself away from stitching random scraps on my new Featherweight, I settled down to start work on my cream capris. Same old pattern (Jalie 2908), hopefully a few new details.  I was SO excited to be able to thread the Featherweight up with topstitching thread and a) not have to re-thread every other seam and b) not have to jolly my Janome along (she will sew topstitching thread… with some careful finagling).

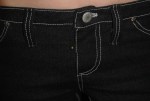
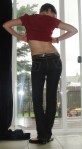
These pants are inspired by a couple of pairs of my kids’ jeans (kids’ jeans get the best little touches!), with piping and what, for lack of a better term, I’ll call tulip pockets. Using some of my japonesque-print fabric for the piping and pocket lining.

While I maintain that the idea is sound, the execution could use a little tweaking. In particular there’s three layers of denim and four layers of cotton at the bottom of the pockets, making folding and topstitching a little, ah, haphazard. I may have to go back and redo some of the topstitching. Bleh. That’s what I get for trying to cram everything in to an evening.

Three pocket pieces

Anyway, aside from the piping, I used three pieces for the pockets—well, two pattern pieces. The overall shape is based on the shield-shaped pocket I used in the bellbottoms; I traced it off, drew in the curve to make a half-piece, and used a slightly shortened version of the original piece for the backing. I was originally going to just overlap the two “petal” pieces and topstitch them together, as in the inspiration pants, but unlike my children I tend to actually stick stuff in my back pockets, and I wanted to make sure it would stay there, so I added the third piece (rightmost in the photo). Really I should just have used a tiny triangle to fill in the top of the tulip a bit, but the full backing piece was really nice for getting the overlap of the tulips (sorta) symmetrical. I say sorta because I think I inverted two of the pieces by accident when I was piping so the curves aren’t identical. Fortunately, I was able to make the two slightly asymmetrical pockets mirror each other, so it worked out.

Stitch in the ditch

I stitched in the ditch at the edge of the piping to attach the various pocket pieces together, using washable glue-stick to hold things in place. I used the adjustable zipper-foot on my Janome set up as a straight-stitch foot (with the needle going down the middle), so I could see the “ditch” to stitch in it. This helps a lot. Although the feed-dogs on the Janome are definitely not well-positioned for use with a foot this narrow when it’s centred.

Swapping machines during the same project is a new experience to me (the serger doesn’t count, that’s an entirely different beast). The Featherweight is so slow (actually a good thing, especially for topstitching!) and quiet, the Janome is much louder and sews much faster. Also it’s taking some adjusting to remember which hand to use to raise the presser foot. As a lefty, I loved the back position of the presser-foot lever on the Grand Old Dame, and it took quite a while when I got the Janome to get used to lifting the presser foot with my right hand, as the lever is tucked on the inside under the harp. Now, of course, it feels weird to use my left again. You can of course reach under the harp and lift the back lever with your right, but my battered inner lefty is determined not to give in to the right-dominated world in this one small thing (I already use scissors and a computer mouse with my right hand, dammit)

Cuffs

I also made little cuffs for the bottom of the jeans, lined with the japonesque fabric, and hopefully they will look cute turned up or down. I picked the pink topstitching thread as it matched some of the pink in the print, but I’m wondering now (of course, too late) if the somewhat darker blue I was also considering would’ve been better (to make the piping seem a little less stark.)

You can see in the very first photo that I piped the outer seam on the leg. This took some deep breathing on my part, as that’s the place I like to twiddle with the fit, which varies from pair to pair based on the stretch of the fabric. With piping, there is no fit twiddling. But it seems to have worked out, anyway.

My poor baby!

Readers, I have sinned. It has been… two days since my last confession, I guess. Tragedy struck while I was topstitching the fly with the Featherweight. I very carefully marked my curve so I would miss the bottom of the zipper underneath. In my (not undeserved) paranoia, I even hand-cranked through that area. Then, being safely past the bottom of the zip, I went to finish the last inch of the topstitching and—I broke the needle. My guess is I was pulling on the fabric and pulled it off centre with the needle in it, hitting the edge of the needle plate instead of its nice little hole. And after I replaced the needle, it wouldn’t stitch! Or, it’ll stitch once or twice, and then skip five, and then catch one… and… and…

I have a feeling I’m going to be stalking the Featherweight forums this weekend.

Forgive me, Sewing Gods! I have damaged my beautiful, new, vintage machine.

In penance, I shall do five pieces of mending and one full unselfish garment.

I guess that’s one upside of new machines. I wouldn’t be nearly so distressed if I had screwed up my Janome. Of course, I’ve broken probably a dozen needles in her in the exact same way. She puts up with my crap marvelously. Obviously I need to be a little more careful of the Featherweight. She is even older than my mother, after all.

And to make things worse, I have to finish the pants ALL on the Janome.

I’m going to go cry now. And put some belt-loops on the capris.

But mostly cry.

34 Comments

Filed under Sewing

To Do, To Don’t, and What do I know?

The latest jeans

So after my great Skinny Cargoes affair, Claire of Sew Incidentally asked if I would consider putting together a do’s and don’ts post for jeans. Since I’m such a master at them, and all that.

Erm.

So, aside from the fact that she must be confusing me with some other blogger, I thought I’d give it a shot. Especially as I decided to crank out one last pair of denim to get me through Me-Made March.

Now, it didn’t take me long after deciding to “take my sewing to the next level” last spring, to decide that I wanted to tackle jeans. Yeah, I’d successfully managed to make my first blouse, what horrors could denim possibly hold?

This was spurred on by a number of factors. The biggest one was probably stumbling on the Jeans sewalong thread and summary thread on Pattern Review. I read literally every post of that 85-page thread. The idea of making my own jeans really appealed to me. First of all, I live in my jeans. Second of all, I’m picky about my jeans and how they fit. Third of all, I have pretty darn long legs. All of those factors combined means that I have spent a LOT of money over the years on jeans. Buffalo. Guess. Rarely under $100 for a pair. You get the idea. And always with that terror—will the fit I like go out of style? Will they be long enough? Even if they seem to fit when I try them on, will I wear them for a day and realize that they’re too short and too loose? Will I tear through the “artfully worn” knee within the first half-hour of putting them on (that pair was Guess, I returned them)? Speaking of which, when is that pre-tattered look going to go out of style? It was in style when I was in high-school (mid nineties). It was in style five years ago when the hubby and I went to NYC (and shopped at Gap. I know, we should be shot.) And it was EVERYWHERE last time I was tying to buy commercial jeans, which was one year ago. I haven’t really looked since, maybe it’s gone away?

Despite the wonky stitching on the pockets (I suck at free-motion embroidery), these are probably still my favourite self-made jeans.

Now, I have a very clear list of things I’m looking for in my jeans. As far as I’m concerned, stretch-denim is the greatest invention of the 20th century (ok, after the birth-control pill). I like them low-rise, with a very fitted leg. I’m flexible on the degree of flare, although for preference I’ll go with what I tend to call a “stovepipe” leg, which is fitted in the thigh but absolutely straight below the knee; I’ve only ever once found this style in RTW.

If your list is different (as it doubtless is—few people are as fond of I am of the low rise, for perfectly good reason), some of my methods won’t apply, especially if you’re not looking for snug-fitted stretch-denim. (What, not everyone wants their jeans to look like they were sprayed on?!?) But I do hope you’ll be able to glean some nuggets from the dross, or at least be encouraged to tackle your own.

Incidentally, based on the PR thread, I used the Jalie 2908 pattern, with an assortment of modifications to make it suit my taste that are mostly detailed here. I like this pattern, but then I’ve only ever sewn two pants patterns, the Jalie one and the Burdastyle Ellen pant. Both were pretty painless, doubtless due to my minimal curvatures in this area. So I wouldn’t consider my endorsement to be the be-all-end-all in this area.

Anyway, without further ado,

DO:

  1. pay attention to the % stretch, not the % lycra; expect to resize slightly depending on the individual stretch of your fabric.
  2. buy enough fabric for two pairs of jeans—the first one can be a hopefully-wearable muslin, and you’ll know what to expect from the remaining fabric stretch-wise.
  3. wash and dry your fabric on hot at least once; then let it sit or hang (“relax”) for at least a day or two, as the heat can bunch up the lycra fibres, creating fabric that will stretch too much after wearing.
  4. My foot for topstitching. Not necessarily the best, just the best from my limited selection.

  5. do figure out which sewing-machine foot works best for topstitching. A lot of people prefer a straight-stitch foot as the sides are narrower and you can see right up to the needle. I don’t have one, but I find my rolled hem foot (of all things) works the best. An edgestitch or possibly even blind-hem foot are also good options.
  6. play around with your topstitching options. There’s jeans

    I wrap my topstitching thread around the bobbin-winding doohicky to increase the tension (AKA cheat)

    thread, topstitching thread (really heavy), upholstry thread, or even regular thread in a stretch straight stitch (triple stitch) if your machine does it. You will probably need to raise your top tension if you’re topstitching with a heavy thread, and may even need to cheat.
  7. be prepared to baby your machine over the thick parts (at least if you, like me, have a wussy modern machine. Sometimes I need to just turn the hand-wheel for several stitches. Or hammer the crap out of the seams (preferably with a rubber mallet. I use a regular hammer or even my rock hammer and if I’m not careful the edges will cut the fabric)
  8. construct the front first, then the back. Have another pair of jeans around for reference. Attach the pockets after sewing the two sides of the back together, and centre them relative to the topstitching, rather than the true CB.
  9. If you’re doing anything other than the simplest of pocket-embroidery, you will want to stabilize the pockets, either with wash-away or tear-away stabilizer or even interfacing. I recommend the removable stabilizer, though; permanent interfacing interferes with the pocket’s ability to stretch and causes butt-flattening. (Ask me how I know 😉 ). Use a cardboard template to press your pockets’ seam-allowance under. Speaking of pockets, I use a size-K pocket on my size-Q pants. My derriere is compact, and I don’t like the bottom of the pockets to go below my actual bottom. YMMV.
  10. Look up your favourite fly-insertion method EVERY SINGLE TIME. My

    What passes for a successful fly around here.

    favourite is Debbie Cook’s; a lot of other people recommend Sandra Betzina’s video. (I have a hard time following video instructions, for some reason.) Also take a long, hard look at some RTW flies while you’re doing it. It will help. Oh, and interface the fly, too. (The fly isn’t actually hard. It’s just really easy to do the wrong way around, which is mildly annoying. The topstitching is a bit tricky, too, but you can manage.)

  11. once you have your jeans stitched up the side, before applying the waistband, do put them on and wear them around the house a bit (preferably for a few hours). This will give you an impression of how much the denim will relax with wear. You may also want to do a trial wash (serge the top edge first) at this stage, as washing and drying are another wild-card for stretch fit.

DON’T:

  1. be afraid. You can totally do this. Denim is heavy, but lovely to sew.
  2. use a pattern or fabric you don’t like. Remember that *perfect* pair of jeans you’ve been mourning since the day went to that great warehouse in the sky? Those are the ones you’re trying to re-create. You won’t, of course, but with any luck you’ll make it into the right ballpark.
  3. cut your waistband on the bias. I use a contour waistband on mine, stabilized with a light-weight interfacing. If I had to go with a straight waistband, I’d cut it on the lengthwise grain, to reduce stretch. My RTW jeans often have about 50% stretch in the fabric, but only about 10% stretch in the waistband (how do they do it?)
  4. sew over the bottom of the zipper when you’re topstitching your fly. Instant recipe for broken needles flying into eyes.
  5. add or remove length at the hem. Unless your jeans are drafted perfectly straight, there’s shaping between hip and knee, and knee and ankle; you need to measure your length to the knee and add (or remove) both above and below to keep the proportions right.
  6. add a wedge to the side back rather than the centre back because you weren’t paying attention. (yes, I did this once.)
  7. if you’re making skinnies, don’t narrow the leg so much you can’t get your foot through (unless you’re adding zippers!)
  8. freak out about wrinkles below your butt. These are not trousers that are supposed to fall straight down from the widest point. There will be wrinkles.
  9. try to finesse the slightly-too-tight waistband fit by putting your button too far over. You’ll just end up with a gapy fly.
  10. feel self-conscious about your wonky-topstitching, or those almost-invisible darts in the yoke. No one is looking. Seriously, they aren’t.

I extend my pocket-linings all the way to the front fly. This interfaces the fly while stabilizing (i.e. slimming) the front, and is super-easy to draft.

I have to admit I feel a bit bad about these lists. They’re tailored so specifically to my “jeans ideal”, which I know is not everyone’s cup of tea. I don’t have much to say about fitting—other than curving the back yoke and taking in the outseams a little bit, and of course the inevitable length adjustment, I haven’t done any (stretch-denim is fairly forgiving). Certainly no messing around with crotch-curves as the intrepid Patty does on a regular basis these days. While I’ve made a crapload of adjustments to the pattern, the majority have been for style or personal preference (pocket linings that reach all the way to the fly to interface it, contour waistband, smaller pockets, etc.)

Coming up with the top 10 was hard (as you can see since so many of them are actually two or three suggestions!). There’s lots of other little points that I could’ve thrown in there.  I didn’t even mention the buttonhole, which has been my waterloo. Mostly, I resort to doing them by hand—not too bad since there’s only one—but on this most recent pair I eased up on the waistband interfacing and was able to work it by machine. My machine can’t do a nice keyhole shape, sadly, but no one else is going to notice anyway.

New skinnies---rear

And I still haven’t really showed you photos of the new pair! So I’ll be quick: this is my first “truly skinny” pair of jeans (the other ones all have stovepipe legs). I made them to replace this pair of RTW jeans that are beginning to bite the dust, and are verboten this month anyway. As you can see (You might have to click through to the full-size photo), I included the same cute little top-stitched dart on the lower leg as in Syo’s pair.

As I doodled out my pocket detail, I

A subtly naughty pocket

realized I’d created an homage to Mary-Nanna’s white knicker jeans (and Steph’s tribute… and of course this alleged Japanese fashion trend which I’m happy to learn is indeed a hoax. I thought it was a bit fishy when I first saw the pictures a few years back, but you never can tell with the Japanese. 😉 ) Mine is a bit subtle, but those of you in the know… well, now you know! ;). If I ever find some white stretch denim, I promise I’ll do full out undies-pockets. The nice thing about making my own skinnies is I can keep the calf-width where I like it and just narrow below; so many skinnies are made for those toothpick-legged adolescents with no calves.

New skinnies, front view

Beyond that there’s not too much to say about them. I used much the same procedure to narrow the bottoms as I did with the skinny cargoes (except I only had two seams to work with, not four). I kept the full length this time, to get that “legwarmer” bunchy look around the ankle that I crave so badly (yes, I like my pants and my sleeves to look extra long. It’s such a rarity for me). Since there’s no zippers in this pair, I had better hope they don’t shrink at all in the wash or I may not get my feet through them next time ;).

So, this is officially my first pair of truly skinny (self-made) jeans… and I hear that apparently the bootleg cut is coming back. If it ever actually left. /sigh. I’m so non-trendy. Oh, wait. That’s a good thing.

I still think I like the stovepipe leg the best, though…

Oh, and this would be my first outfit for Me-Made March. Not terribly innovative, I know, but it’s far too cold out right now for the frillies and the pretties. Hopefully that will change over the course of the month…

34 Comments

Filed under Sewing

Skinny cargoes: a tale of obsession

We won’t go into the state of my house or how neglected my children are, all right? I promise I’ll stop. Ok, slow down. Real soon. Really, really, soon.

But in the meantime, while I was only planning to show you this:

A good start on the skinny cargoes

it turns out that I couldn’t tear myself away, and now I can show you this:

Skinny cargoes

Yup, they are finished. Pretty much. I’m still debating opening up the inseam again and adding topstitching all around the big cargo pockets. And there’s some issues with the topstitching around the top of the zippers having to do with me picking a crappy construction order and not noticing I grabbed separating, not regular, zippers.

Very, very skinny cargoes

Anyway, process, right?

As you may recall these pants were inspired by both Yoshimi and Amber’s recent takes on the skinny cargo. Amber, in particular, went into great detail on the construction of her knock-offs, and mine are essentially knock-offs of her knock offs.

I started, natch, with my particular version of the Jalie 2908 stretch jean pattern. Now, I feel a bit bad pimping this pattern (not that it’s a bad pattern, or doesn’t deserve pimping) because my version is distinctly altered. In particular, I went down a size, lowered the rise, darted the yoke, narrowed the leg to straight below the knee, and replaced the straight waistband with a contour one originally cribbed off the Ellen pants. Also added five inches or so of length, but that sorta goes without saying. So if you see my jeans and decide to order the pattern, well, you’ll have a bit of work ahead of you.

Anyway, I have previously produced at least four versions (for me) from this pattern, all of which are staples of my wardrobe (except for the capris, which I can’t wear right now due to weather, and the red-topstitched ones, which were out of commission after I pulled the pull of the zipper a month or so ago. I hate mending, but finally got to it earlier this week.)

Now, turning this jeans pattern into a skinny-cargo pattern required a bit of work. First

Skinny cargoes: rear view

off, as I traced out a version of my Jalie pattern, I had to figure out how to replace the yoke with a regular back with darts. I sorta winged this, and thanks to the mercy of stretch denim it seems to have worked. I also had to figure out how to reconstruct the front pocket area, but that was pretty straightforward. Then it was a matter of deciding where I wanted my seams to run (much referring to Amber’s post on the matter), hacking up this version of the pattern, labelling where I needed to add seam-allowances (not to mention up, down, inseam, and outseam), and re-tracing all my pieces with their proper seam allowances. Whew! I took the opportunity to incorporate my rear darts into the back seam, as well as adding a bit more butt-shaping, although I can’t really tell if that was successful as it is covered by the back pockets. I removed one cm off each side of each seam at the ankle, for a total of 8cm around the whole ankle, which made it pretty narrow, although I suspect I could still get my foot through without the zippers. The zippers make them VERY easy to put on and take off, though.

I can’t decide if having the pattern in so many itty bitty pieces saves fabric or not. Jeans are pretty economical at the best of times, so with the added fabric required for seam-allowances, maybe not.  Plus there’s those big pockets eating up fabric.

Because there were so many pieces and in particular the lower leg pieces are almost identical, I opted to cut and assemble the entire front and then the entire back. This is fine, except that I should’ve incorporated the side zipper in the lower leg into the original construction of the front instead of ripping out topstitching to fit it in later. But, we live and learn. Seeing as it’s only been a few days since I last installed a fly front zipper, I didn’t even need to look up the tutorial on it! It helps when you’re wearing jeans while sewing… I find I look down a lot to reference which side the stitching should be on ;). I opted to make the fly angular to echo the slanted hip pockets. Nothing to do with it being easier than a curve. Nothing at all.

Side-seam zipper

Once I had the front and backs assembled and topstitched, I had to do a bit of thinking. I couldn’t find a good reference on how to insert exposed zippers into a seam (though I didn’t look terribly hard). I decided for simplicity’s sake I wanted the zipper to fall in the front part of the pants, not straddling the seam evenly. Then I discovered that the cute little zippers with the nice little bauble at the end I picked up last weekend were, in fact, separating zippers.

I toyed with the idea of going back and getting different zippers, but I really like that bauble. I do wish these zippers came in silver (to go with my topstitching thread), but the selection at Fabricland is a bit limited. /sigh. Maybe I should’ve topstitched along the edges of the zippers, too? I think I was having topstitching fatigue by this point.

Because of the cargo pockets, I figured I needed to construct the outseam before the inseam. This is not as good for fitting as the reverse, but I was reasonably confident these would fit, due to the TNT pattern, so I went for it. The pockets were rather terrifying, I will say, especially getting them positioned and topstitched. Which is part of why I chickened out on most of the topstitching on the thigh pockets. We’ll see how much that irritates me in the days to come.

I almost always hit a point right before I’m able to try on a garment where I’m

You know black cargoes need biker boots and chain mail.

absolutely convinced it’s failed. It’ll be too big, too small, or just wonky looking. These were no exception—it was with immense relief that I wriggled into them the first time, discovered that the narrowed legs did indeed fit and that I could, in fact, zip up the zipper. Phew! This anxiety repeats again once I’ve attached the waistband. I tried a lighter waistband interfacing this time around, which was nice if only because it means I could make the buttonhole on the machine. On the upside, this iteration of the waistband is a nice width (some of my previous version were a little narrow) and doesn’t gape at the back. Yay!

Styling these is… interesting. My first effort, with the white cowl-neck top and the heels, is fine but a little, ah, mainstream? Doesn’t really feel like me. Nothing some biker boots and a little goth gear won’t fix. Ah, yes. Much better.

Stylin'

And I mustn’t forget to credit my delightful photographer:

Me and my photographer

In exciting men’s sewing news, my hubby has consented to having the shirt muslin finished for a comfy wear-around-the-house shirt, now that I’ve enlarged the collar. Which means I might actually get photos of it at some point… though probably not for a few weeks as he leaves tomorrow.

25 Comments

Filed under Sewing

The jeans of many sizes

Possibly subtitled “the best laid plans…”

Instructions: "Look cute."

In a fit of obsession yesterday afternoon, Syo and I decided to tackle her jeans. The project was simple; all the materials were on hand: one traced version of Jalie 2908, size K (aka 7); one metre of dark blue stretch denim; gold jeans topstitching thread, and a little metal zipper.

The pattern is the same size I traced out for Tyo’s jeans last spring, which she had outgrown by August. Syo is now wearing these jeans, quite comfortably, so I was feeling pretty confident about the fit. They would probably be a bit long, but otherwise shouldn’t be problematic.

Syo required only one, simple alteration. Tyo’s jeans had been flares, the pattern’s basic shape. Syo’s must be skinny. Yes, my seven-year-old is much more on-trend than my ten-year-old. Which probably says everything you need to know about their respective personalities. So I measured what seemed like a reasonable distance out from the midline of each ankle, drew a line that angled out to the knee, and we folded the pattern in along that line. Just in case Syo wants a pair of flares in the future (not likely, but this is how I roll). Oh, yeah, I double-checked my reduced width with the circumference of her pointed foot, to make sure she could still get her feet through. All seemed good, so we set to cutting it out.

Syo really wants to be able to sew. And cut out fabric. Unfortunately, the fabric shears

The back

are still too big for her little hands. This didn’t stop her from doing her best with the embroidery scissors on the pocket lining, and she actually did an excellent job, but man, it took forever.

Pocket closeup, with fancy stitching.

After much discussion, we settled on stars for the back pockets. The first pair I made Tyo has stars on the back pockets (stars are nice and easy to embroider on stretchy denim when you don’t have an embroidery machine and are too lazy to stabilize your fabric).

This is the first pair of jeans I’ve made since I got my serger back in order, so it was my first chance to remember to serge seams after sewing, but before  topstitching. I mostly managed this. (Note: this pattern only has 1 cm seam-allowances, so you need to serge without cutting anything off or your second row of topstitching may not catch the seam-allowance.)

I like the Guterman jeans thread; it’s not as heavy as their topstitching thread, so

Side view

doesn’t require dirty tricks to get the upper tension high enough on my machine. Still, I can tell that my newish Janome doesn’t quite have the balls of the Grand Old Dame when it comes to stuff like this. The Dame would eat projects like this for breakfast—the Janome I have to baby along here and there. And this is with really thin denim.

I only hit one hitch in the construction, when I realized I’d cut the size Q back yoke (my size) rather than the size K. I think the size K yoke piece may have evaporated… oops. Another reason why I love tracing my patterns. However, I was pretty sure the outer width of the yoke was pretty close, so I just trimmed the wide, inner portion to fit. If there is any actual difference in the size, it’s well within my usual cutting-inexactitude; the side pieces went together just fine.

Calf detail

Oh, yes, and I added in a detail on the back lower legs ripped off from some RTW skinny jeans owned by one of Tyo’s trendier friends: basically a long, thin topstitched dart with a stud at the top of it, forming a very small amount of shaping below the calf. I keep meaning to do this on jeans for myself, but forgetting as it has to be done quite early in the process. It wasn’t as hard as I thought it might be, though, though I suspect my studs are not perfectly aligned.

With the aid of Debbie Cook’s tutorial, I once again achieved near-perfect fly insertion. I actually had double-sided wonder-tape to use to stick the zipper down this time, and it was very nice indeed, although using pins instead really isn’t that terrible either. I did manage to put it in backwards (so girl-version, as opposed to boy/jeans version), but in my defense this is because I was matching the topstitching direction of the crotch to the one I’d already done on the rear of the pants, and I find it pretty much impossible to think that far ahead. The moral of this story is that I should probably construct the jeans front and fly before the back.

My straight-stitch topstitching is getting so good!

Fly... almost perfect.

My around-pocket and around-fly stitching… not so much. Perhaps I am sloppy because they’re for the kid… I’d like to think I wouldn’t wear such shoddy work.

I can’t promise anything, though. I’m pretty lazy about un-picking.

I sewed up the outer sideseams, and Syo came to try them on…

and they were HUGE.

Now, I don’t want to repeat my mistake with Tyo and make pants she’ll outgrow in three months. But these are supposed to be skinny jeans, not tapered-but-baggy jeans. I took in the side-seams by a cm on each side (so 2cm off each leg).

Better, but not perfect. Take another cm off. Hrrm. Well, maybe that’ll do. Keep in mind this is the same pattern as the other pair she’s wearing that are actually getting a wee bit tight. The only thing I can think of is that the first pair shrunk, which isn’t impossible, but I have a pair of my own out of the exact same “denim” that I’m still wearing just fine, and I promise you I definitely haven’t shrunk.

CB belt loops. Can you spot the booboo?

Putting waistbands on kids jeans is so much more relaxing than putting the waistband on a pair for me. For one thing, I use the pattern’s straight waistband piece, instead of my own contour band (coopted from the Ellen pants, if you must know). I also didn’t bother with interfacing. The only thing to remember was to put in buttons and buttonholes for the attaching of the buttonhole elastic. I did have one problem with the sizing, as my waistband wound up being too short to centre the CB seam on the back and cover the fly-extension. Maybe I’m doing something wrong with the fly extension, although what I end up with seems to be the same as what I see on my storebought jeans, so I don’t know what. Rather than fuss around, I gave in and put the CB seam of the waistband about an inch off of the true CB seam. It’s a problem, but it’s mostly covered by the belt-loops anyway.

Her coolest pose.

Finally, all that was left was to hem them to an appropriate length. This is always dicey with children, and skinny jeans are even worse than flares in this department. In the end I opted for a length that would be floor-brushing in socks if they weren’t being pulled up by the front of her feet, and just folded the excess 2″ of fabric under, topstitching three times to make sure it’s well in place (this mimics the three rows of topstitching on the top of the pockets, so it’s a design feature, right?). In theory this means that when she hits her next growth spurt and grows three inches by summer, I can let out the excess length. In practice, we know this’ll never happen, but hey, allow me my fantasies, all right?

Also, Syo was very helpful in the hammering of rivets, and only hit my thumb once. And Steph, the awl from your sharp and pointy giveaway kit is divine. How on earth did I live without it?

So that’s one more project down on the “madly off” list. Which leaves, mainly, shirts for my hubby and those skinny cargoes! If I can get the neck alteration figured out for the hubby’s shirt before he abandons me, I can putter away at that until he gets back. And I think I’ll take a stab at the drafting for the cargoes this weekend, if I can find paper I like for it. I’d rather use craft paper than tissue paper for stuff like this.

14 Comments

Filed under Sewing

Winter sucks

Or, The trouble with photographing black jeans indoors.

Jalie Jeans, v. 4

Most of the following pictures are lightened. Severely lightened. The jeans in reality are a dusty black , although the ones I made last summer, of the same material, have faded, not unexpectedly, to a dark grey.

First up, I have apparently gotten fat. Well, rather, when I first went to try them on (before attaching the waistband), I could get

Jalie jeans, v. 4: front

them on but couldn’t get the fly closed. Keeping in mind that I have made this pattern in this size three previous times, including once in this *exact* fabric. WTF? I went and narrowed the seam allowances just at the hips—letting it out about .5 cm (they are only 1cm seam allowances, after all) for an added 2cm around the hips. Phew, now I can close the fly. Also keeping in mind that the first pair in this fabric mysteriously grew about 2cm around after I washed them the first time and I had to take them in. So I’m kinda hoping these ones do that and then I can at least restore the seam allowances to where they should be. But jeez.

Pockets and belt-loops

Otherwise, there’s not too much to say. I was quite happy with the wash-away stabilizer on the pockets. My topstitching is not nearly as porn-worthy as Peter’s. The fly topstitching sucks. The nice thing about using the same thread top and bottom is that you can do the pocket embroidery from the wrong side, and so draw your design right on the pockets. I free-handed this particular one, and had a bit too much fun with the smocking stitch, which is the only decorative stitch my machine does that I actually like.

I decided to go a bit wild with the belt-loops. They’re

Belt-loop closeup

extra wide, with extra fancy stitching. Hopefully this will mean they’re extra sturdy, too, especially the three at the back (I’m really liking a triple-loop at the back, although maybe not as much for these wide ones. Oh, well).

The leg length is okay but I could probably still lengthen it a little. If these were flares, they’d be driving me nuts with their shortness, and I’d still kinda like that “slouchy around the ankle” look. Something to think about for next time. Or maybe next time I should do real skinnies… I could even stretch myself and attempt an exposed zip in the lower leg. Wouldn’t that be fun?

In other news, we re-watched the Teen Wolf movies last night (gotta share the eighties with the next generation, after all) and I was struck by how tight all the girls’ jeans are. About as tight as mine, really… without the benefit of lycra content. It makes me wince just looking at them. Although if I’d been a teen in the eighties, I’m sure I’d have been wearing them that tight. And wondering how to get rid of the big flapping wings and the hips. And why the waistbands were so flipping tight.

… anyway. One more pair of pants for the rotation, check :).

Now, do I have the energy to put gussets in Tyo’s coat…

17 Comments

Filed under Sewing

Back to the Future, Jalie Style

Despite my inclination to plunge headlong into another coat—my long-neglected Lady Grey, say (I bought hair canvas! I bought hair canvas!)—I need to do some practical sewing. My favourite pair of Jalie jeans has developed some issues (mostly due to my own shoddy construction decisions… the sort of thing, it appears, I have to learn for myself, because no amount of good advice seems to get through my thick skull), rendering them currently unwearable, though a bit of mending should get them back in the rotation. Am I the only one who’d rather  make a whole new pair of pants than sew a belt-loop back on? Well, that and the pockets (which I made out of cotton from an old duvet I’d retired because of all the holes it was developing… stupid, stupid) are full of holes, which is causing stress in the pocket topstitching, which has broken some of the topstitching threads… so yeah, they are in some trouble. Not to the point of being unwearable (at least once I get the belt loop sewn back on… this is why you attach them with zigzag bars, not just straight stitch). For those of you who weren’t around back in the summer when I began my Great Jeans Odyssey, my pattern of choice is the infamous Jalie 2908, altered based on becca a’s instructions into a low-rise, straight-legged jean and tweaked for maximal skinniness.

Embryonic jeans

Anyway, yesterday I laid out my remaining length of black stretch denim. Apparently I had enough left for two pairs of pants, instead of just the one I’d thought. 3 pairs of pants from 4m of fabric, not bad. If, y’know, I needed three pairs of black jeans… but anyway. I cut merrily away, even remembering to undo my disastrous alteration of last summer.

Pocket closeup

I made some construction breakthroughs. I “fused” washaway stabilizer to the wrong sides of the pockets so they wouldn’t stretch out when I did the embroidery on them. I’m really happy about this… not only does it keep the pocket stable, when you fold the sides under and press them, it melts just enough to really grip the edges in place, so they don’t pop up! And unlike the interfacing I’ve used before, they’ll wash away so that when I finally wear my pants the pockets can stretch with the rest of them! And it didn’t even stick to the iron, which was my main fear.

I remembered to sew the yoke pieces on in the back before the centre seam. I did my topstitching in a regular red thread, using my triple-stitch (the straight stretch stitch) like I did in Tyo’s jeans. It looks great! So much more relaxing than wrestling with the topstitching thread, and I can use the same thread for constructing the seams, plus it slows the machine right down, which is good for topstitching (my Janome does not like to go slow, normally)

And then… I realized… I had sewn the yoke pieces on the wrong sides. The narrow ends were in the CB, the wide ends at the sides.

I had to pick out… two rows of stretch topstitching, the regular stitching, AND my triple-zig-zag seam finish. Yes, I was being all fancy and finishing my seams for once!

This kinda set me back.

then, having recovered from that, I went merrily on my way starting the fly construction…

And forgot that I need to attach the front pockets, first, since I’ve drafted pocket extensions that run into the fly. This makes for a nice, smooth finish on the front of the jeans and helps stabilize the fly… but only works if I actually remember to do it *before* I sew up the CF. So now I’m on the fence whether to rip that (probably only the basting where the fly opening will be, and a single bit of topstitching, need to come out) or just cut off the pocket extensions. Grrr.

This is why we follow instructions, /sigh.

Tyo’s coat continues to elude photography, mostly because with the grey weather we’ve been having, by the time she gets home from school the light’s already going. Hopefully we can get some good ones on the weekend. The sleeves are a real problem, though. With a sweater underneath, she can’t even bend her arms enough to button the thing closed. I’m going to have to open it up and pull out a layer or two in there. *headdesk*

On the up-side, it was -20 this morning and my coat performed adequately, at least for walking the kids to the bus stop. I was getting a mite cold by the time I got home, but nothing that long-johns and a proper hat (I just had my sweater hood up, silly me) wouldn’t’ve fixed. So I think it will be adequate, at least. The next test, of course, will have to be wind chill.

I still want a winter coat that’s both stylish and -50C-worthy. I have a feeling it’s going to take a) a less fitted style, b) a lot of research into materials, and c)more money. Not that this one was cheap, by the way.

In other news, I splurged and took my long-ailing serger in to get serviced (finally… it’s been about two years). The guy at the sewing-machine place confirmed my thought that the problem is the timing, and hopefully nothing else is wrong with it. It still runs fine… the loops just don’t form.

So in a couple of weeks I may have a serger again! Yay!

11 Comments

Filed under Sewing

Fall Re-fashion

Former capris

Is it still a re-fashion if it’s an alteration to a piece you already made, and never fully finished?

These are my first pair of Jalie jeans. I made them capri-length, but never got around to hemming them. But I have since made another pair of capris that I like better, and I had just enough of this denim left to piss me off (without being enough to do anything with unless I want to make another  Kasia with denim hip-inserts 😉 ), so I made panels and sewed them to the bottom and now I have a pair of (hopefully) interestingly-seamed full-length jeans. I may actually have hemmed

Crappy topstitching.

them a little short… we’ll see. I should probably re-do the topstitching (something went wrong with the bobbin-thread), but I may be too lazy too. It’s not like the rest of the jeans are a great piece of work to begin with. There’s a slight difference in colour between the jeans (which have been washed a few times) and the new fabric, but that’ll either fade or not… either way works. But they will be much more useful to me during Self-Stitched September as full-length pants than as capris.

I still want to make another proper full-length pair, though :).

How they would actually look

The back view

4 Comments

Filed under Sewing

Not So Awesome

New Jalie Jeans Capris

But they’ll do.

They’re finished except for the studs (which I won’t put in this time until at least one more wash). Nothing special, but considering my spectacular fail on the pattern front, I’m not going to complain as long as they’re wearable.

I’m still having issues with the waistband gaping at the back (probably not helped at all

Rear View

by the pattern goof), so I think I’ll twiddle with the waistband pattern piece a bit. I’m a little scared of how much worse it will get after I wash them. Also I think I should go back to the original width of the waistband pattern piece (I had shaved it down about 2cm) as I think I actually like the wider waistband better. This one’s wider than my last (I used the same pattern piece but 1/4″ seam allowances instead of 1 cm), so it’s a good width, but wider would be nice, too.

One of these days I’ll do something actually interesting with

Belt loop and pocket detail... OMG is that pocket ripping?

the jeans I make. Maybe for the next black pair. I may go back and put a little slit at the seam in the outer side leg just below the knee, too, if I get ambitious. We’ll see. In the meantime—another boring, not entirely quick piece. Now to pray for good weather in September so I can actually use them for my SSS wardrobe.

Front Fly---good installation, less good topstitching.

OMFG, the back pocket’s ripping loose! Did I remember to tie those topstitching strings or did I… just… cut them. Yup, I think I just cut them. *facepalm*

There’s the fly, which is my first actual proper fly installation. The topstitching’s not so good. I think my buttonholes are getting a wee bit better, although still nothing like the amazing tailored ones I see pictures of. Also a cute 10-year-old invaded the picture.

Well, for my first finished project in two weeks, I’m not going to complain. Any more.

11 Comments

Filed under Sewing

I F#%@ed up

Adjustment intended to raise the centre back of my jeans.

So after the last time I made up the Jalie Jeans, I decided the back really was too low and that I should raise it. So I took my pattern and slashed and pivoted to raise one side.

Observe, please, my adjustment.

Those of you who are keener observers than I will realize that the side I expanded is the side seam, not the centre back seam. Therefore it does nothing to the centre back, and plenty to throw off the side seam. Aren’t I brilliant?

I think I’ll be able to make it work by shaving off the top of the yoke, but man… I am severely choked with myself.

On the other hand, by following Debbie Cook’s tutorial step-by-step, I managed to install my first “perfect” fly. I really don’t do well with video tutorials like the Sandra Betzina one, oddly. I think I find it harder to keep my place in the process, or I miss steps as my mind wanders.

Redemption is a perfect fly?

Unfortunately it’s adorned by some of my least-perfect top-stitching, but ah well.

chalk-transferred pattern

I rather like my pocket design. I don’t have any real transfer paper, so I improvised with sidewalk chalk on a sheet of regular paper. It was rather messy, but worked well enough for my simple pattern, and it seems to have all come out. I also experimented with one of my few fancy stitches.

Embroidered pockets---fancy stitch!

I really like this denim, though—it’s both heavy and stretchy and soft, a good combination, I think. Now if only I hadn’t f#$%ed it up!

5 Comments

Filed under Sewing

Just in case you’re not sick of them yet…

Here’s a few more of the fully finished jeans.  I wound up hemming them the full length; the physical inseam measures just over 33″. It would be perfect for a boot-cut with flats, too short for a boot cut with heels, and is maybe a teeny bit long for skinnies.

6 Comments

Filed under Sewing