Simplicity Blues, or, ElleC’s Revenge

Hmm.

Remember this pattern, Simplicity 6710? No? I don’t blame you. I probably wouldn’t either, except that it’s been kicking around the corners of my sewing room, leering at me, for three months. Well, in the wake of the Fishing Vest, I’ve been in a light-weight, puttery sort of mood, so I’ve been trying (in my half-ass way) to tidy and clear some things out in the sewing room. I finally stitched up the Young Image racerback tank in Syo’s size, which I cut out (at Syo’s request, I will emphasize) weeks ago. I’d blog about it but it looks basically identical to Tyo’s. Tyo is not pleased about that, by the way.

So, why did this project slip into UFO-dom? Well, it was a combination of factors. The single biggest is that, when I decided to make it up, I wanted a mini-dress length. I figured adding a couple of inches to the tunic length on the pattern should be good. When I got to the point pictured above and could actually tried it on, I realized we were still well within tunic territory, and at lest three or four  inches shy of mini-dress length (and that’s without considering hem allowance.) All of a sudden my excitement for the project went down the toilet.

Expecting, much?

Aside from that, this is that poly crepe and holy &*($ does it piss me off. It’s got gorgeous drape and I love the colour, but damn—it shifts, it wriggles, it slips, it frays, and it DOES NOT PRESS. Urg. Obviously there was a good reason it was at the thrift store. Also, while the drape is beautiful, it has a bit too much body for the gathers on the front (the photos are after I pressed the crap out of the gathers to flatten them). Anyone looking for a gorgeous 70s maternity dress, I think I have just the pattern for you. Which is probably at least partly the pattern’s fault—I’m thinking this is a case of excessive gathering.

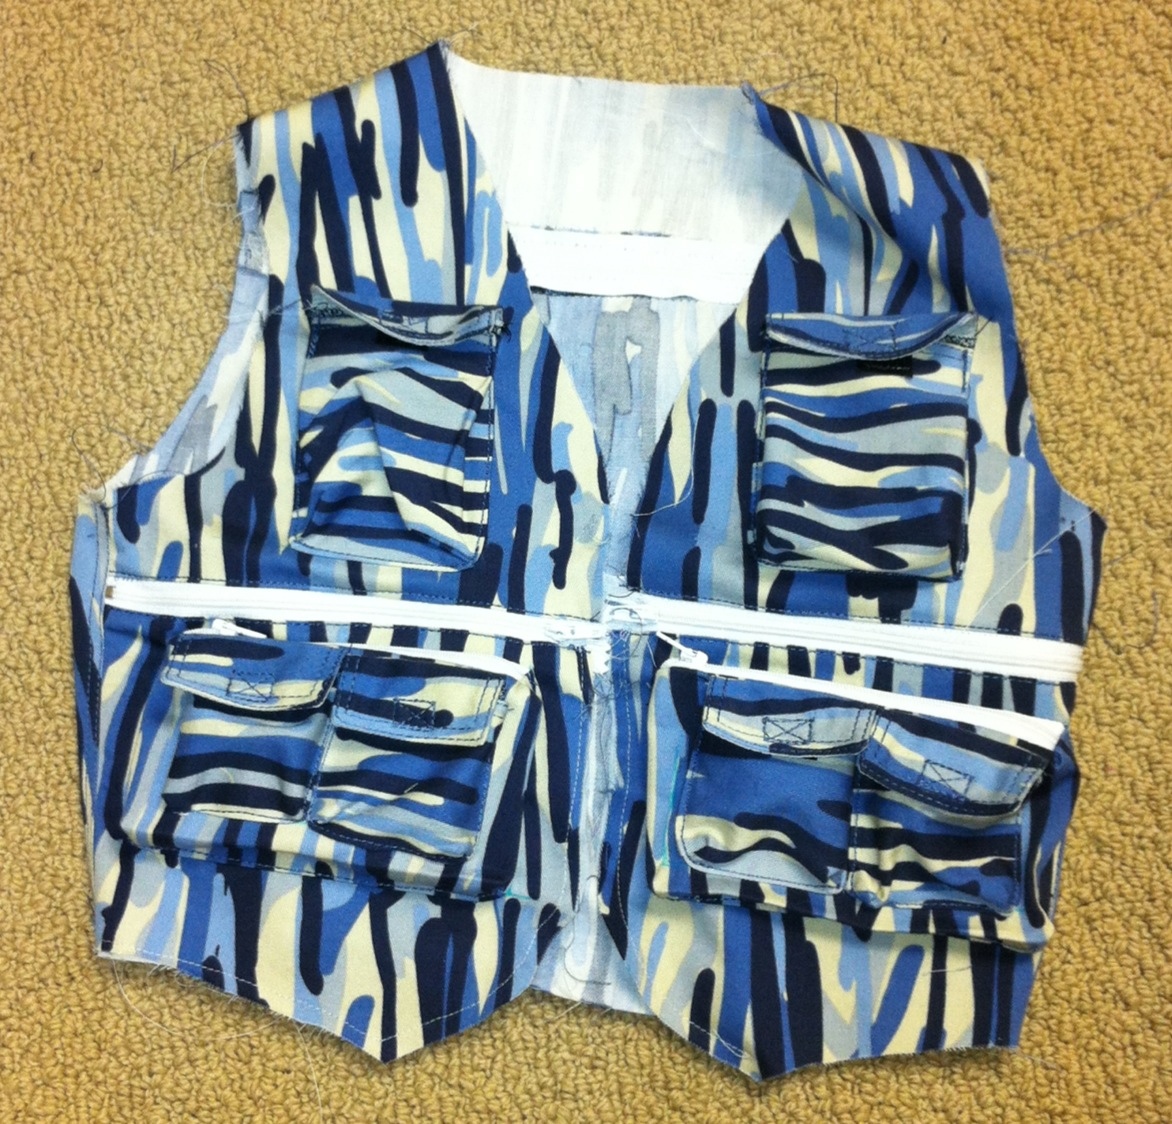
And then there was the zipper. Part of a gift from ElleC this spring (I also got the pattern from her, way back when. Do I sense a pattern? ElleC, are you out to get me? Wait, don’t answer that.), it was the perfect colour, so I figured it was kismet. Or some other mythical force. Anyway, I already knew I could wriggle into the dress top sans zipper, so obviously I was just looking to make my life difficult. It was a disaster. It’s been a while since I tried to insert a centred zipper, and the crepe wriggled and slid and bubbled and bulged and, well, by the time I got it all unpicked I was thoroughly pissed off and chucked the whole thing in a corner.

The good?

But now that I’ve whinged thoroughly about the bad, let’s move on.

I made my usual changes for fit:

  • petite bodice (1.5 cm) (this required petiting the sleeves as well, which I did by just taking a fold out of the middle, on grain.)
  • square shoulder (1 cm)
  • swayback (2 cm straight across the CB piece, angling from 2 cm to nothing in the side-back piece)

That vintage look (courtesy of Picasa filters)

I even remembered to add the length I took off the back in the swayback adjustment, back on to the hem of the back pieces. Now if only I’d added a few extra inches of length all around. (And even more in the back…)

Apparently my square-shoulder adjustment was, for once, unneccessary. *headdesk* There’s some distinct drag-lines from the shoulder that go away if I pull upon the outer edge of the shoulder. I blame this at least partly on where the pattern (which has really narrow shoulders, as you can see) sits—right at the base of the neck, over my trapezius, which is the one part of my shoulder that does slope.

Back view. Definitely not dress length.

I wasn’t convinced about the sleeves, but figured I’d give them a try, and it turns out I quite like the long, swingy flutter-shape, and how they’re inserted forward of the side-seam, which I think is rather slimming. There is possibly a bit of the linebacker look happening.

Linebacker look?

I opted to line, carefully modifying the front panel so as not to add bulk, but the  broadcloth I used (because it was the right colour and handy) was not a good choice, either. A remarkable number of bad choices for one garment, don’t you think?

Not feeling like messing with the rolled hemmer, I used Sherry’s handkerchief-hem method, which worked astoundingly well aside from the fact that my hem edge was distinctly uneven and very ravelly after three months on the floor. If I had trimmed it first so it was nice and even, it would’ve been awesome. As it is, like so much of this project, there’s room for improvement.

So, in the end? Not sure how I like it. There’s a lot of little  things that annoy me, which may or may not fade after some time in the Magic Closet. But a lot of the issues were self-inflicted. With the right fabric (a scrumptious lightweight silk or rayon or even cotton gauze, maybe) and a bit less fullness in the front, this could still be an awesome dress.

31 Comments

Filed under Sewing

My baby

Those of you who come here just for the sewing, feel free to skip this one. I’m taking a moment to mush out.

Tyo

Dear Tyo,

When you were born, I looked at you and was overwhelmed by how much love there must be in the world, if every mother feels this much looking at her baby for the first time. I was young, and scared, and excited, and uncertain of just about everything,  but my love for you was instant and immense and unremitting, and being your mother has been, and continues to be, the most exhilarating adventure of my life.

Today, you graduated from grade six. In a few weeks you’ll be twelve. You’re not yet a woman, but the shape of your childhood is changing, and everything about you hints at the changes that are coming. You amaze me, challenge me, and drive me nuts every single day, and the privilege of watching you grow is the most amazing gift you could ever have given me. You are strong and confident, passionate and compassionate, vulnerable and astounding. I know you’re going to have to work hard in life—as you already do—to overcome your particular challenges, but I also know that you have the will, determination and, yes, the charisma, to do just that. You are already becoming  the person you dream of. And I can’t tell you how excited I am that I am privileged to watch you, be there for you, and probably even get in your way from time to time, on this journey.

I love you to the moon.

I know you’re sad to be leaving your school and moving away from so many friends—and you have wonderful friends—but I am so excited for the things that you are doing, the person you are becoming, and the adventure that lies ahead. I know that wherever you go, whatever you do, you will shine like a beacon. You are one of those people who lights up a room, whose smile gets under the skin, who inspires us just by breathing, and if you choose, I know you’ll change the world, just as you’ve already changed all of us who know you.

As the story says, I love you to the moon

and back.

***

Ok, I’m going to go blow my nose now. I’ll be back with some sewing stuff later…

PS, if anyone asks, I’m blaming this whole post on K-Line.

44 Comments

Filed under Sewing

Inordinately Pleased With Myself

Smug.

Yeah, that about sums it up.

Which I suppose is why I take on these ridiculous, intricate projects. Especially at times when I’ve been claiming I need all my sewing to be brainless and easy because my brains are occupied elsewhere.

The Fishing Vest is finished. (For those of you paying attention, the missing front lining piece showed up on the cutting table, underneath about three layers of other crap that I swear I went through twice before)

Back & Front

So, as fishing vests go, this one is fairly simple, meaning there’s only eleven pockets instead of umpteen bajillion. And I forgot to pick up D-rings, so there’s no little D-ring doodads, and there’s only one snap tab because apparently I only had one heavy-duty snap left (well, I had 3/4 of the second one, but that last 1/4 is kind of critical. Osiris had asked that the back pocket be deep enough to hold a water-bottle, and I think it probably isn’t. I interfaced the upper back yoke for a bit of extra strength, and possibly I should’ve interfaced the front of the vest as well, but oh, well.

Bias tape “maker” (actually folder)

I waffled back and forth about how I was going to finish the vest, but in the end went for a bound finish, which is common (yes, I’ve spent a depressing amount of time in the last several weeks looking at pictures of fishing vests online) but not universal. I tried to convince myself this was a perfect opportunity to use pre-made bias binding, but couldn’t quite make myself go there. What is it about pre-made bias binding? I have a shitload of the stuff, and every time I go to use it I talk myself out of it. So I made my first denim bias-binding. Fortunately, it’s a pretty darn light-weight twill. I used my jumbo bias-tape maker, possibly for the first time, and it went better than expected, especially considering I totally eyeballed the width of the tape when I was cutting it out. The application went relatively well, as well, despite not always remembering which side I should start on. And after stitching on four cargo pockets (albeit teeny ones) I feel much more comfortable with them than I did last time. The exposed zippers are still a little rough, especially the ones on the pockets.

Details (view at own risk as there’s at least five screw-ups visible in these photos alone…)

Actually, the whole project went better than expected. There were a few inevitable snafus, like forgetting to sew the velcro tabs on the upper pair of pockets before attaching them (actually the hand-sewn finish looks much better, if only because I use black thread to match the velcro that time) and forgetting to make the two zippered cargo pockets on the front mirror images of each other, and there are minor imperfections at every single point along the way, but I’m not going to dwell on them too much because, y’know what, it’s DONE! And, what’s most important, it’ll work. And it’s pretty cute from even a foot away

Oh, and the playing with the grain of the stripey almost-camo-print on the pockets was intentional. I’m kinda proud of that.

Comparing fit

It fits Tyo snugly and Syo more loosely (I did mention their shoulders are almost identical…), so I think the next one should be a little larger. It won’t be hard to grade the vest up a bit (and maybe do a teeny FBA  with the dart incorporated in that horizontal seam above the zipper), and I think I’ll just use the same pockets.

But not yet—I’m going to wait until they have a chance to road-test this one.

29 Comments

Filed under Sewing

So close…

20120623-221450.jpg

And yet so far away. I manages to keep track of the eighty million tiny pocket pieces, (and even velcro bits) and have managed to mislay the front lining. So close…

17 Comments

June 23, 2012 · 10:17 pm

A pain worth sharing.

I know most of you care about as much about the intricacies of making fishing vests as you do about, oh, sewage treatment plant design.  Nonetheless, if I’m stuck with it, I’m bloody well going to share.

Cargo pockets and back piece


I made some pretty good progress a couple of nights ago when Osiris’s best bud called him out for an airport-layover hangout, but then stalled out over lack of zippers. The vest requires five zippers. Fortunately (?) for me, Fabricland had their Canada Day sale early this year, so today I headed out there with a friend.

I got zippers.

I also made the mistake of looking in the clearance section. Which was fifty percent off.

Stuff that’s just kinda cute at $3, becomes really irresistible at $1.50/m.

Fabrics!

And then the awesome cutting-table lady kept getting to almost the end of the bolt and going “Ah, that looks like two metres to me…” when it was really, ah, well, let’s just say the cuts were generous. Er, so the spiderman print I got at Value Village a wee bit back, but I figure it was worth sharing (and it’s actual fabric, not an old bedsheet!). It probably cost more than any of the other fabrics, which are all fairly thin but really nice-feeling knits. And, polkadots!

Pink & green camo lycra

Oh, yeah, I forgot to photograph this one because the children had absconded with it. This was also like $1.50/m, and it was worth it just for the squeals when they saw it. Few things make my kids happier than slightly-girly camo. It’s lycra. Not good quality lycra, either, but thin, run-prone, easily snagging lycra. Ah well, they’ll be over the moon for the five seconds that it lasts…

New Look 6789

My friend bought a couple of metres of the black polkadot, too, and we spent a little while this evening altering the the pattern for New Look 6789, which will be her first “real” attempt at sewing a dress. She’s one of those short, round shapes that can never, ever find anything to fit off the rack, so I really have hopes of getting her hooked. Assuming I can figure out how to fit a body that’s about as different from mine as possible while still being the same species. We did some tissue fitting, and I made my first ever attempt at an FBA.  We won’t be able to try actually sewing for a few more days, though—but here’s hoping it works! (And since the fabric was a whole $2/m, no, we’re not making a toile. And no, the pattern’s not for a knit, but it’s a pretty stable, not-very-stretchy knit and I think as long as we interface the upper band and shoulder-straps it’ll be fine.)

I really like this pattern. I’m kind of jealous she’s going to get one before I get a chance to sew it up…

19 Comments

Filed under Sewing

For science!

Waist to Hip Ratios

Ok, so I have nothing at all of my own to blog about today since yesterday’s down-time was spent exclusively playing Dragon’s Dogma (which is not as awesome as Dragon Age or Skyrim or Kingdoms of Amalur, but is at least in the right ballpark if you are, as I am, a sucker for an open-world fantasy RPG), so instead I’m going to throw some links around.

First off, this is a neat article on some body-proportion research that I totally cribbed off Ali of the Wardrobe, Reimagined. Can I just say it really drives me nuts when news articles report on some kind of “scientific finding” and then don’t include a reference to the publication? Other than that it’s a fun read, however. Spoiler alert: apparently almost half of us (at least in the UK, which is where the majority of my genetic material and cultural traditions come from) are “rectangles.” But my “rectangle” shape also fits their parametres for a “spoon” (aka pear) shape. Hmm.

In a similar vein, Steph of 3 Hours Past the Edge of the World is collecting waist/hip measurements for her own arcane pants-fitting research, so if you haven’t already, please grab your tape measure and bop over there with your measurements in cm. It’s anonymous, so don’t duck out because you don’t like your own ratios! (I know I sure don’t. 😛 ) So go contribute!

Oh, and Sigrid of Analog Me wrote this neat post on the history of measurements used by the pattern companies. Not reassuring, that’s for sure.

Anyone else know some cool links on body proportion research? Or just a good RPG?

25 Comments

Filed under Sewing

And now for something completely different.

The pattern.

I am a busy woman. I have made promises.

Commitments.

And I have been reminded of them.

Vests kinda like this.

Namely, I said (oh, back in April) that I’d make my kids fishing vests.

Yes, fishing vests. Those things with all the zillion cargo pockets. No, I wasn’t thinking it through. On the other hand, the kids’ ones are insanely expensive.

Vest pattern

So last night, rather than working on yet another dress, I hunted through the box of kids’ patterns and eventually settled on the vest from this one. It’s a size 8, so technically it will either be big on Syo or small on Tyo. I’m vaguely hopeful it’ll fit both*. We’ll see.

The rough pattern

I traced out the pattern along the stitching lines (hooray for one-size patterns!) and started laying out my extras: zipper inserts, pockets, bits and bobs. Then I traced all the individual pieces separately, added seam-allowances, and tried not to flake out about which pieces I need to cut two, four, or eight times. Fabric of choice (at least for this version) is a lightweight not-actually-camo-print twill originally purchased to replace these capris of Tyo’s. Hopefully I’ll have enough for the vest and the capris, because heaven and earth will tremble if I don’t. Before I start assembly I need to pick up a few more zippers (my plan calls for five or six, depending on whether I can locate 6″ separating zippers) and maybe some other fun bits of hardware—a few D-rings, at any rate. I have also written myself out a construction order, otherwise I’ll never remember things like adding velcro to the pocket flaps.

The drafting actually went pretty quickly. We’ll see how I do with the actual construction.

*I should point out here than until Tyo’s recent, um, developments, she and Syo had almost the same ribcage measurement. Tyo is three years older and plenty taller, but she takes after the pear-shapes in her father’s family, with a narrow ribcage. Syo, on the other hand, is leaning towards my kind of broad-shouldered shape.

11 Comments

Filed under Sewing

Needing no introduction…

You know what this is.

It should come as a surprise to no one that I’ve made a Sewaholic Cambie. I fell hard for this dress from the moment it landed in my inbox (and it made me very jealous of the pattern testers who got to see it first…) In fact, the only reason it took so long to make up was figuring out whether I wanted to do the full-skirted or A-line version first, and whether I wanted to make it a part of Project Drop Waist or not.

Unsurprisingly, the answer was full and yes.

So, some deets:

The fabric is a navy seersucker from the thrift store, whose purchase I agonized over way back when. (You guys are such enablers, I headed back and got it). I actually had to give in and go buy some poly-cotton broadcloth for the lining, however, which wound up costing rather more than the fashion fabric. /sigh.

Click to enlarge

I used the bodice pieces from Simplicity 3965 to extend the Cambie bodice to hip length, which worked fairly well and even seemed to correct the rear-trending side-seam issue. I also wound up removing a fair bit of length through the bodice above the waist, plus my usual square-shoulder adjustment. I did a muslin but didn’t bother photographing it—sorry. I started with the size 6 (the same size I made for my Lonsdale last summer), though technically my measurements are a bit closer to the size 8; the finished measurements Tasia so thoughtfully includes on the envelope cover seemed to suggest that it would work, however. Initially the muslin seemed perfect through the bust but a bit snug through the waist and hips, so I added a wee bit—however, when I tried on the finished bodice, I wound up taking off what I had added to the hips. I think when you add the weight of the gathered skirt at the hips, the downward pull on the bodice smoothes out a lot of the wrinkles from close-fitting, and also spreads out the shape so it looks kind of boxy if it’s not snug. Or at least, that’s how I have felt about both this dress and the Star Wars dress. Either that or my fashion fabrics have more give than my muslin fabrics, except that in this case both involved broadcloth, and I don’t think bedsheet has a lot more give, either…

Underlining & fusetape

The pattern pieces for this pattern are really curvy—curvy sweetheart neckline, curvy shoulder on the back piece, curvy armscye. All the curves prompted me to do a lot of reinforcing with narrow strips of interfacing. Maybe it was overkill, but it feels nice and sturdy. Once again I underlined the bodice (with some remnants of black cotton voile I had kicking around). Unlike the Star Wars Dress, I did a separate skirt lining.

I used the original length from Tasia’s skirt pattern, but then the waist is dropped, but then the bodice was also shortened—so I think I’m in the realm of maybe an inch longer nape-to-hem than the original pattern, but maybe not. I think I’m a bit taller than Tasia, too. I like the knee length it turned out, anyway. Because I’m too lazy to trace rectangular pattern pieces, I just ripped strips across my fabric the right length. An interesting feature of this pattern is that there’s roughly twice as much skirt in the back as the front. I decided to just use the full width of my fabric (45″ or 115 cm, roughly) for the skirt panels, so there’s one panel gathered across the front and one for each side of the back.

My only issue, at the end of the day, is that with all the bodice shortening, the dropped waist wound up being not quite dropped enough—at least at the centre front. I haven’t attempted to add shaping to the dropped waist in this area (though that is a gorgeous look), kind of as a “keep it simple, stupid” measure—but I think the next time I do this I will, because I really wish I could drop the front waist seam just a little more. It doesn’t quite sag to the sides, but it comes very close. And no, there’s not enough seam allowance left to let it out.

Also my bust darts are still kinda pointy. I stitched them as drafted, basically. I really should spend some more time figuring out how to make a perfect, non-pointy dart.  D’you think if I keep saying that often enough, I’ll actually do something about it?

I did not forget the pockets (hooray!) but I did forget to take a picture using them. Anyway, pockets are, of course, awesome. Also, do follow Tasia’s directions for attaching the front strap/sleeves. I tried to go my own way and it was a disaster. Hooray for seam-rippers.

Hems!

And, as you saw yesterday, I finished the hems with navy hem lace (it matches much better in the non-flash photos, by the way). Just because I could. No fancy horsehair braid or anything this time—the seersucker has plenty of body. And I don’t have enough horsehair braid left from the Star Wars dress.

deflated skirt

Most of the pictures were taken wearing my super fluffy square-dancing petticoat, which definitely notches things up to full fifties-crazy-skirtness. In the theme of honesty in blogging, the above picture is without a petticoat—just the skirt and lining to hold it up. For most everyday wear I’ll probably wear my fluffy petticoat, which, while not as spectacular as the crazy one, is a lot less obnoxious and doesn’t hit both walls at the same time when I go down the basement stairs.

I think my fluffy dress itch *may* have been scratched. It’s just possible—just barely possible—that I can move on to less ridiculous projects now.

Well, maybe. I make no promises.

58 Comments

Filed under Sewing

To Do

Navy seersucker

3.5 m of lace hem tape to go, two more seasons of “The Guild” to watch. Which one will I run out of first?

9 Comments

Filed under Sewing

An Odyssey in Denim

Inspiration

Inspiration

Back in the late nineties, I was a high-school student exuberantly indulging in exploring my own style, limited only by my budget and what I could find at the thrift store. I had settled, somewhat reluctantly, on Levi’s button-fly 501s for jeans—they were a decently close fit, didn’t have the hugest saddlebags at the hips, and were comfy. They had one major drawback, however—the waist was quite high and, me being as rectangular back then as I am now, rather snug.

Yes, this was the beginning of my quest for the low-rise jeans. At the time, at least in my backwater corner of North America, stretch-denim was unknown, and waistbands still hovered just below the navel. 80s-tight was out, but I was so done with oversize-grunge, and the 70s revival was only just beginning.

One day in gr. 12, probably during Creative Writing class, I had a brainwave. If I removed the waistband from my Levi’s, they would be lower-rise, the waist would no longer be uncomfortably tight, AND it would be a cool inversion of the omnipresent cutoff denim shorts everyone wore. And because of the button-fly, they would still stay closed.

I have rarely been so pleased with myself for any fashion innovation. I wore my reverse-cutoffs proudly. With crop-tops, of course, to maximize the amount of tummy-tan. (I tried to find a lingering crop-top to pose in, for posterity’s sake. Apparently the last of them have been purged from my wardrobe, although it occurs to me that I do still have one cropped boho gypsy blouse in the basement that I bought when I was 14…)

Mariah’s cut-off jeans

A few weeks later, I first saw this Mariah Carey video* (also a nifty article about the waistbandless-jeans phenomenon, which I have to say, in my area, was a phenomenon consisting of me and only me). I don’t think I can properly convey how crushed/angry/amused I was, to have been scooped on my fashion innovation. This did not, however, stop me from wearing my very first low-rises proudly. Two or three different pairs got the treatment.

Anyway, fast forward a year or two, and one of my pairs of hacked-up Levi’s was on its last legs. I had moved on to other jeans styles at that point—notably vintage Wranglers—but I wanted to give my “innovation” one last hurrah. So I hit upon the idea of having a plethora of friends sign, draw, and write all over them. Sometimes while I was wearing them, mostly not.

Anyway, having created this unique piece of apparel, I realized I couldn’t really wear the (rather tattered) jeans anymore. I hadn’t heard of the idea of setting Sharpie marker with an iron, and after the first or second wash the text was showing significant signs of fading. So I retired them, and proceeded to cart them around with me in the “sentimental” box over every move (and there were a lot of them) of the next dozen years.

Sometime this past winter, Tyo found them.

Fortunately for me, she’s not quite big enough to steal my jeans yet. But she did like the idea. As she and her classmates are graduating to middle school this year, and we’re moving away, so naturally she’s been feeling sentimental all around and wanting a way to commemorate her class. Not long after finding my jeans, she hit upon her solution—a messenger-bag, made out of old jeans, that she could take to school and have everyone sign.

Stitching the bag.

Now, ever since I saw these jeans of Yoshimi’s (back when I was brand-spanking-new to the world of blogging) I’ve been hoarding old jeans in the hopes of someday making my own pair. Well, that hasn’t happened yet, but the old pairs finally got put to use for this project, so I feel less guilty about the hoarding. Three pairs of my husband’s old pants (two jeans and one pair of khakis, if anyone cares) went into the making of these, plus the strap which was made from the cutoff legs of a pair of Tyo’s jeans which recently became shorts.

The bag

We made the main part of the bag from the butts—lots of extra pockets this way. The flap was from a leg area, the patch having been in use on the jeans. Tyo did the majority of the stitching, although I did a bit of additional patching as necessary, and the final stitching around the top of the bag, which was through the lining plus jeans waistband and belt-loops—pretty heavy-duty with some major changes in thickness. The featherweight handled it like a champ, although I still prefer to hand-wheel the really thick parts. I did a bit of re-stitching around the crotch to get them to lie flatter (the same thing you’d do if converting a pair of jeans into a skirt), and Tyo stitched across the bottom corners to give it a bit more of a 3D shape. And an interesting cutout in the corner of the flap. Just because.

Bag, open.

And Tyo took it away to school with a big, fat sharpie. Apparently her replacement teacher (who has been the source of much angst the last few months) was not impressed. Ah, well.

Happy Tyo

Tyo, at least, is happy.

Now I just have to manage to iron all that sharpie.

*This is one of those Lessons On the Fallibility of Memory. I would swear that I cut my waistbands off in Gr. 12, and saw the video shortly thereafter. I graduated high school in June 1998; the video apparently came out in 1999. Am I transposing my brainwave earlier? Or was the gap between my waistbandless jeans and Mariah’s longer than I remember? Who knows…

24 Comments

Filed under Sewing