French (Bonnet) Connection

It’s time. I’ve avoided it for almost a decade of costuming now: Victorian hats.

No Victorian lady’s outfit is complete without a hat. If you left the house, you wore a hat (and gloves, but, one problem at a time). The illusion can never be complete without it. Since I don’t have the right hair anyway, and my illusion was more of an impression, it didn’t seem too urgent. But I’ve dawdled long enough.

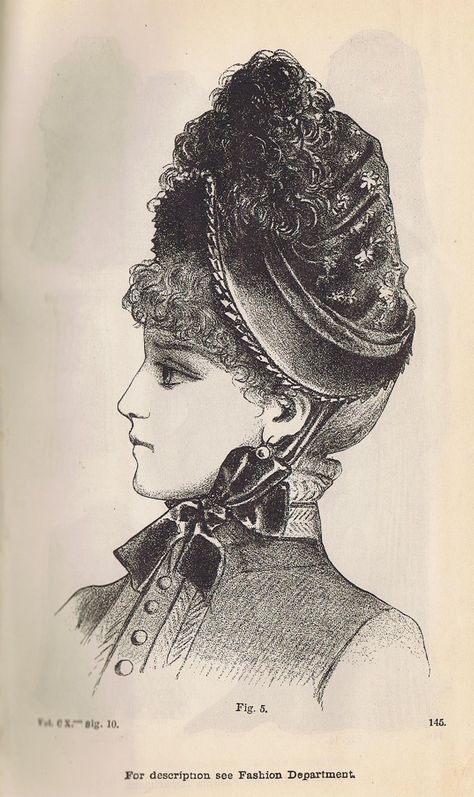
There seem to have been a wide variety of women’s hat-styles in the 1880s, from close-fitting frames to “flowerpot” hats to wide brims approaching, though not reaching, Edwardian levels. But in looking for something SPECIFICALLY 1880s (maybe not the wisest choice), you can’t really beat the distinctiveness of the weird peaked-brim style called a “French Bonnet”. (Or “Conquistador hat”)

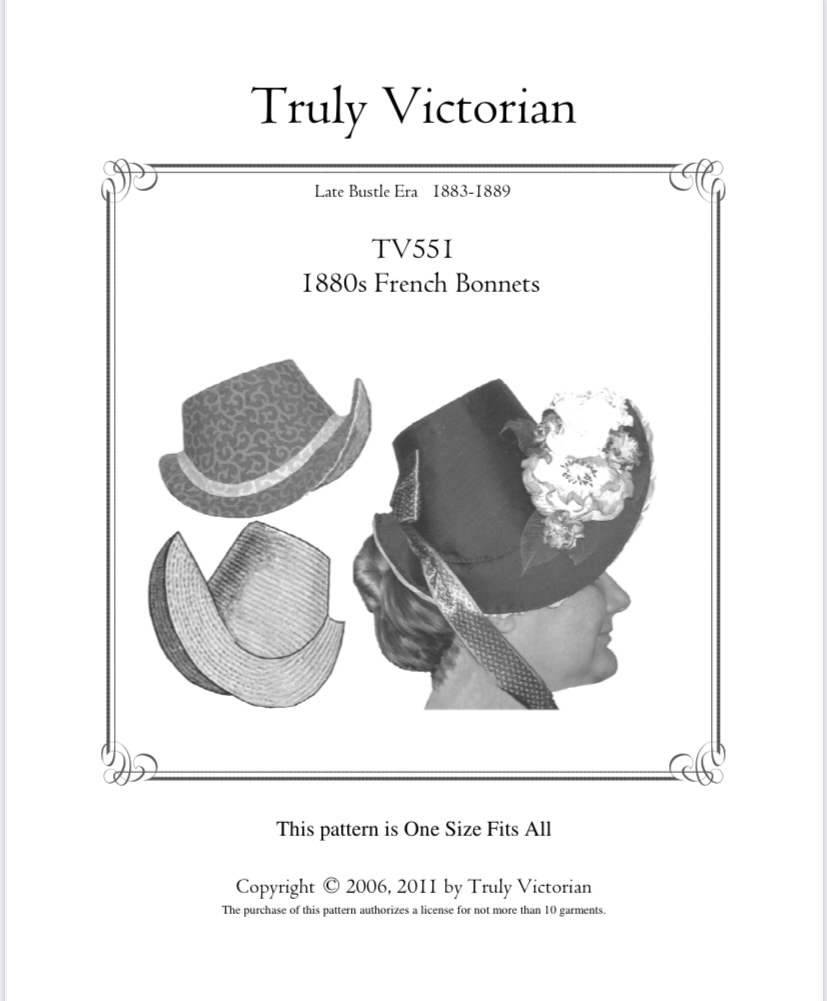
I spent a bit of time messing around with a simpler, almost fedora, shape, before deciding to bite the bullet and purchase the Truly Victorian pattern. It was nice to have the instructions on construction to follow, since I’ve never done anything even remotely like this before.

I was hoping for some pointers or suggestions on trimming, the real wild card of hattery, but no such luck.

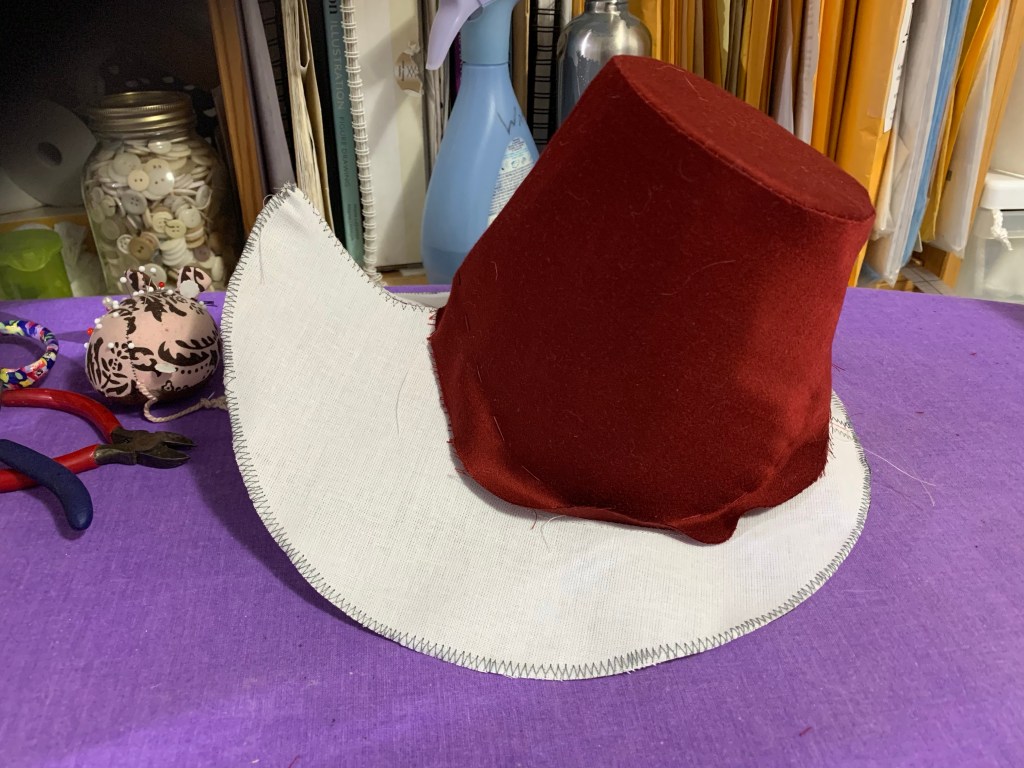
The hat is cut and sewn using buckram and wire, which shouldn’t have posed much of a problem as I have both in stash. Unfortunately I couldn’t find either. Syo was good enough to pick me up some (more) buckram, and I wound up harvesting the wire I had used in the twins’ mushroom capes last year. (It didn’t work super well there and I think plastic boning would probably be a better solution in their capes anyway). The new buckram from Fabricland was pretty floppy so I used a double layer, and I did take advantage of that to sandwich the vertical wires in the crown between the two layers. Otherwise I followed the instructions pretty closely, or regretted when I didn’t. (For example I somehow neglected to have a wire at the CB seam, and there is a bit of an indent in the back portion of the crown because of this. Oops.)

Other than attaching most of the wire by machine, the whole thing is almost entirely hand-sewn. I don’t mind a bit of hand-sewing but i definitely didn’t love trying to hand-sew so many thin layers on a rigid frame. Possibly a curved needle would’ve been helpful?

I tried out layering some quilt batting underneath the top of the crown and I like how it smoothed the look of the hat. The wire frame kind of leaves dints between the wires and this filled that in. However, I also wanted a light summer-weight bonnet, so I didn’t do any more. But if I try this again I will definitely consider it, or at least a flannel underlining or something.

Also, sewing the butted seam at the front of the brim to create the peak was a bit of a trip, and I’m glad I had sewn butted seams before as it’s a completely counterintuitive action.

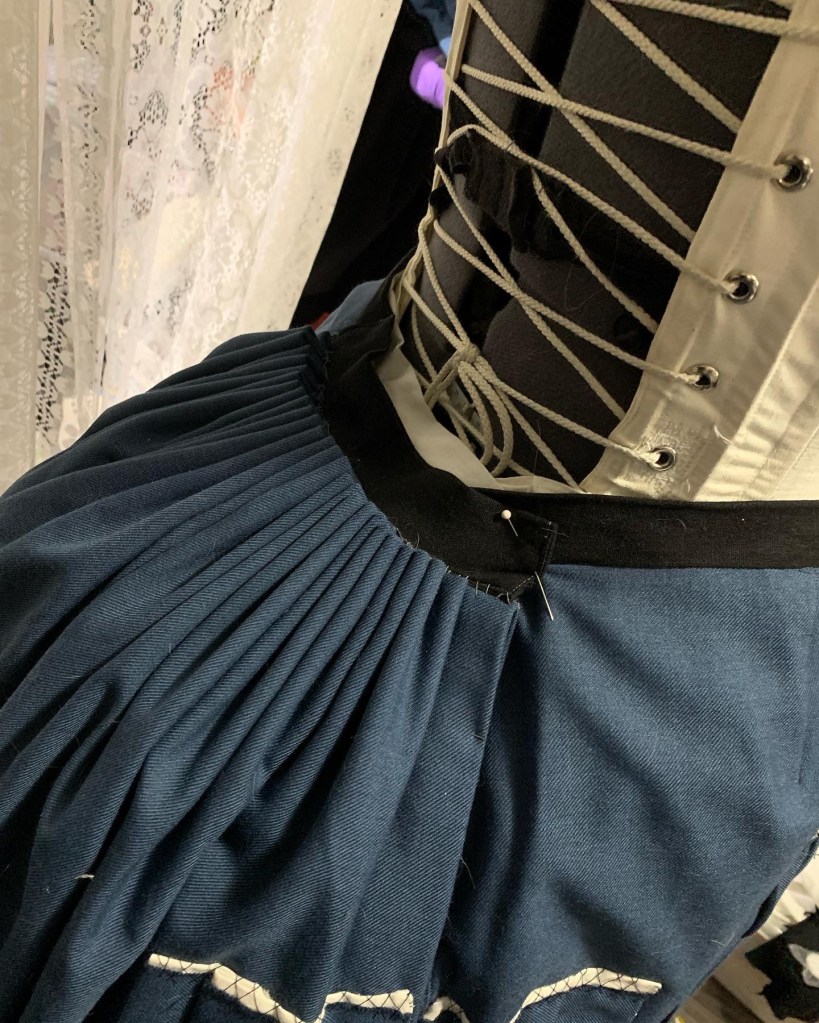
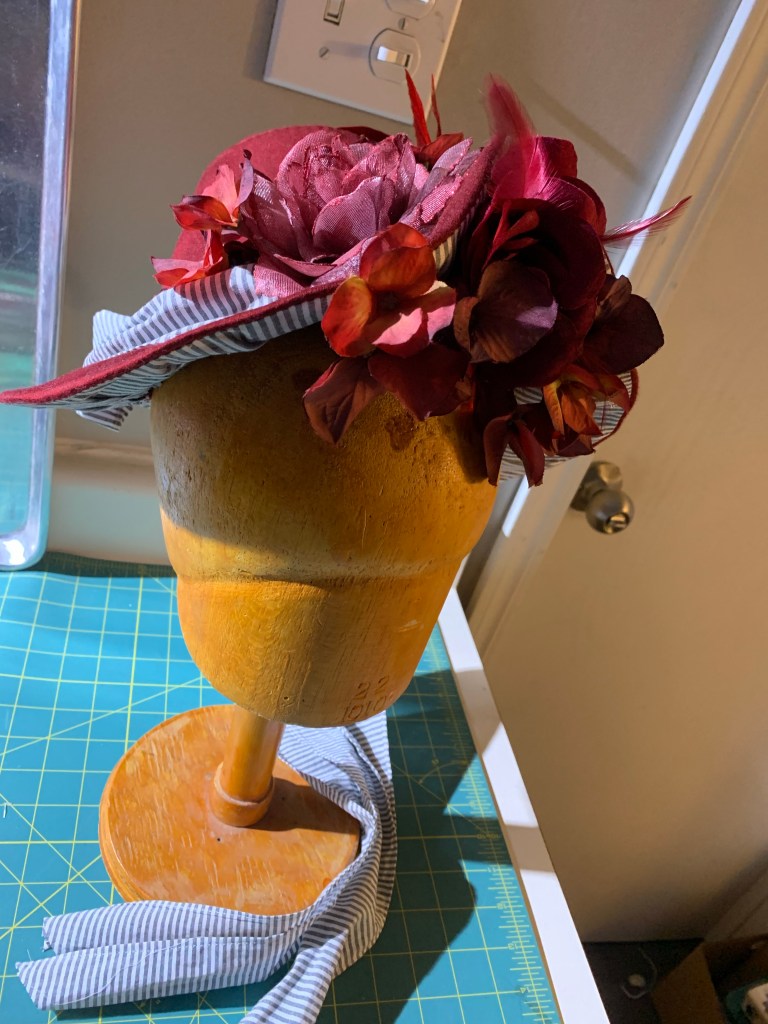
For the brim, I departed from the instructions slightly and used a straight strip of fabric to line the underside, then pleated it towards the middle, because I’ve always liked this look in bonnets. It didn’t take quite as much pleating as expected.

I was a little stumped about how to put a band on the hat (necessary to cover the hand-stitching that attaches the brim to the crown, at least when following the instructions as written.) The sides of the crown curve down dramatically, making even a flexible bias band impractical. There seemed to be two options—either cutting a shaped band using the same pattern piece as the crown, or using a soft, draped piece of fabric like a sash.

Early test of trimmings. Somehow I didn’t get any pics of just the “hat sash”

I went with the latter, which seems to be what most of the internet has opted for, and I do like the soft, whimsical look for a soft, whimsical bonnet. Somehow, despite the fact that the hat sat around with just the sash on for over a week, I didn’t take any pictures of that stage.

Needs curly bangs.

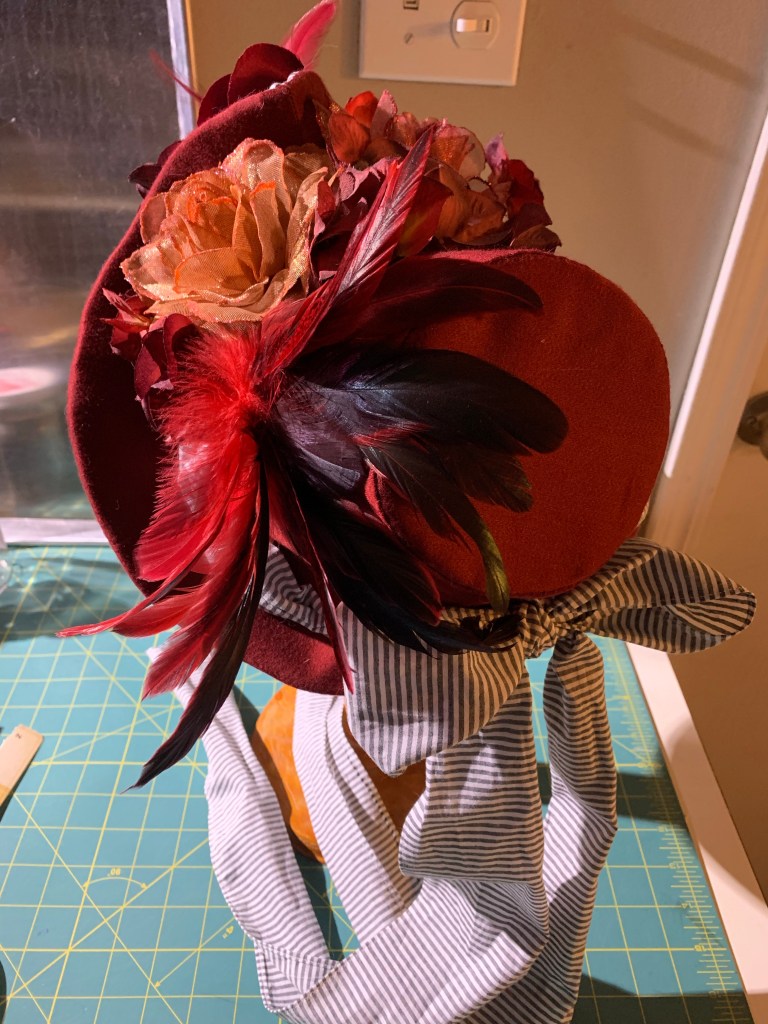
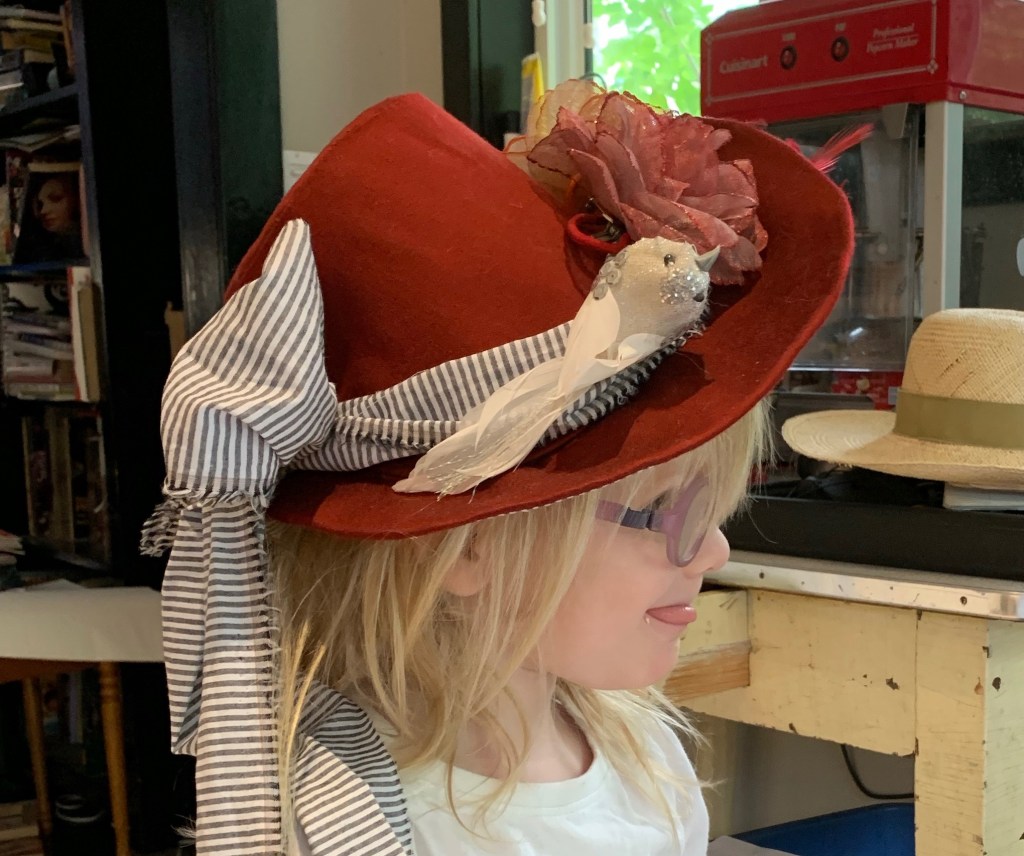
My mother was kind enough to provide a selection of fake flora to help trim the hat. There is one big rose under the brim and two above it, nestled amongst a bunch of other little floral bits. I’m thinking the back bow may need some floral additions. I’d dearly love to add a feathered bird wing, or entire bird if I could find one that doesn’t look quite as derpy as the little one in the pic where Tris is wearing it. (So far no luck, all the fake birds at Michael’s looked just as derpy.)

I actually kinda hated this thing during most of the construction. The shape is just weird. Very far beyond my comfort zone. And not in a way I expected to find cute. Although I don’t think I can quite convey to you how much Tris loves it, so that’s something. It apparently hits exactly the right vibe for a not-quite-four-year-old obsessed with looking like a princess. However, it has weirdly grown on me, particularly as I got more of the trimmings in place. I’m particularly fond of the flowers under the brim.

I eventually made it to Michael’s to look for ostrich plumes. They had exactly one, however it was bright white and I wasn’t prepared to mess around with trying to dye it. I did find a little spray of coordinating feathers, though, so I got that, and I think it finishes off the hat nicely, at least for now.

I will say, it’s growing on me, weird shape and all. It stays on the head surprisingly firmly, although I suspect a hat-pin or two would still be wise, at least if I had the kind of hair one could anchor stuff to with a hat pin. It will make more sense, I think, if I can ever manage a proper hairpiece, since it should really sit over a chunky braided bun, and have curly 1880s bangs to help fill in the top front. Apparently 1880s bangs have a lot in common with 1980s bangs. Who knew.

Now I just need to get the rest of the outfit to go with it finished!

Comments Off on French (Bonnet) Connection

Filed under Sewing

Pixie’s Blouse

I’ve been needing, of course, a blouse to go with my ten-gore princess skirt. But if I’m going to make an Edwardian blouse, of course I want to make a lingerie blouse version. I doodled these concepts back in the winter, and while they aren’t exactly what I ended up making, I think they convey the idea.

While I won’t say my Victorian Sewing Circle has exactly rocketed to widespread renown, we have accumulated a couple of donations over the years. This blouse pattern was donated by a vivacious lady who goes by Pixie. She’s apparently well known in the local Society for Creative Anachronism, but slummed around with us for a little while. As I recall, she took the pattern from an original she had the opportunity to study while working at a museum in Prince Albert (a smaller city nearby). I had the opportunity to try on her version, so I thought it would roughly fit (give or take needing to add a bit to the waist these days.)

It’s a fairly basic shirtwaist pattern of its era, the main features being a dramatically V-shaped back yoke and some long, tapered cuffs on the full sleeves.

After some digging in the stash I turned up this white cotton with woven-textured stripes. It was a remnant from some other project, but I confess I can’t for the life of me remember what I made with it the first time. It’s perhaps a little heavy for a proper lingerie blouse, but deliciously soft and since I hadn’t remembered it existed, I was prepared to not be too precious about using it.

For the lace, I tested out some cotton lace, but in the end opted to use a not-completely-horrible (and much more sheer) nylon option I had a buttload of in stash. I don’t remember where it came from, but it’s always nice to have plenty to play with when tackling lingerie styles.

I wanted to make the pattern more or less as-is for this first go at least, but I really love the look of a faux-yoke in the front created by stacked lace (see the sketches) and carried on in the tucks beside it.

Now, fitting the entire shirt pattern on my limited fabric was an exercise in and of itself. So I was really excited to be able to add a couple of extra inches to the fronts to add some pintucks. Partly because would it even be an Edwardian blouse without pintucks? And partly because a fabric like this basically measures the tucks for you. And also I thought a couple of extra inches in the front wouldn’t be a bad idea since my bust is, ah, a little larger than when I tried on the original. I did have to cut the inner parts of collar, cuffs, and back yoke from different fabrics, but I’m not exactly short of small bits of white fabric for this.

I wasn’t sure whether to line the back yoke. On the one hand this reduces the overall transparency and delicacy of the lingerie blouse. On the other hand, this is a fairly high-stress part of the blouse. A quick scan through a couple of period texts didn’t cover yoked shirts. In the end, I went and lined it, for the stability.

After adding the lace “yoke” in the front I decided I wanted a fully lace collar. The lace I was using was just perfect for two widths to make the finished width of the collar as drafted. I did run into one or two hiccups though.

Firstly, I needed the collar to be a good couple of inches smaller than drafted. (Perils of skipping a muslin.) I attempted to compensate for this by adding a third tier of lace to the bottom of the collar, carefully eased to fit.

And secondly, I had to decide how to handle the front-buttoning placket. Most of the all-lace collars I’ve seen in originals had back buttons. And while the width of the placket fits nicely with the width of my lace, it’s pretty wide, which seemed a bit heavy-looking on lace alone.

In the end, I decided not to make buttonholes in the collar, but just to pin it in place; tiny snaps would be a good more permanent option.

While the blouse is lovely, I really think it is just a little bit too big all over. The collar is still pretty big, I had to hack a huge amount off the shoulders, the back length seems a bit long, and I think I would like the overall amount of volume if I took a solid couple of inches out from each side and beneath the arm. Partly this is because I’d added that extra volume with the released tucks in the front—but the back also seems oversize. Maybe I am just not good at dealing with puffy things. But that’s what you get when you skip making a muslin, even when using a pattern you had tried on (once many years ago). So the moral of the story is—make a muslin (or at least measure your pattern) even when you think you know.

And yes, I haven’t even managed pictures with my Edwardian skirt, because it’s wintery wool and it is no longer winter. I’ll try and post about it again once I take those pictures… and maybe figure out how to make the fit a bit more what I wanted.

3 Comments

Filed under Sewing

Summer Jammies

It’s summer. It’s hot. We don’t have AC. And the twins are convinced it’s not bedtime without jammies… so we need jammies. All their jammies are, well, winter jammies. long sleeves, long legs.

We were going to buy them. But all the summer weight jammies at the second hand store were, well, underwhelming. A lot of pilled up polyester.

So when I had a couple of unexpected sewing hours this past weekend, I decided to try whipping up a couple of nighties. The twins each selected their favourite fabric from their fabric bin, and for a pattern I pulled out McCall’s M9565, which is apparently in my stash although I have no clue where I got it. My envelope tops out at a size three, which is technically the twins current size. McCall’s kids patterns tend to run big, but on the other hand the twins are almost four and starting to outgrow their RTW size three clothes, especially Tris (who is over 2” taller than River at this point). I also considered Jalie 3245, which would make a great raglan summer nightie in the tunic view, but I didn’t really want to trace and was comfortable just cutting out the size 3 of the McCall’s pattern.

Well, I needn’t have worried about the size. They came out HUGE. Falling off River’s (admittedly narrow) shoulders. Even Tris’s I took in at the side seams 5/8” on each side. For River’s, I had to cut off the original neckband, take each raglan sleeve in 5/8”, and then take in the side seams even more. And it’s still not exactly snug—they’ll be wearing these for a while.

They are also long. You’ll notice the pattern cover shows a ruffle at the bottom. I wasn’t sure about adding it, but when the dresses turned out just shy of ankle-length it became obvious that was not going to happen. Which is fine. River has been on a kick about long dresses lately.

The pattern was for a long-sleeved nightie, but obviously I wanted short sleeves for summer. I picked a fairly arbitrary length that wound up being just above elbow length. River liked this but Tris did not, wanting them extra short. So I modified hers into more of a cap-sleeve style.

There’s not much more to say. They were sewn very quickly on the not-so-good serger, and several times as I sat down I had to readjust all the tension settings because the twins just can’t resist fiddling with that. I hemmed them with the coverstitch and they’re certainly not my tidiest but also whatever—they’re summer sleepwear. At least the twins were excited and happy about them, which is better than those mermaid tails I made them, that they’ve played with all of twice. A new challenge did arise this time: keeping each twin from throwing shade on the other’s choices. Tris didn’t like River’s fabric. River didn’t like the white sleeves on Tris’s (a necessity since we didn’t have much of Tris’s fabric, but I always think contrast sleeves look better on a raglan sleeve). But both are happy with their own dresses, which is the most important part.

Not that I could convince them to pose together.

9 Comments

Filed under Sewing

Ungrateful Mermaids

Sometime around Christmas, Tris became obsessed with being an “Elsa Mermaid.” And, of course, convinced that I could help her with this transformation.

I was… less enthused. Partly because I was worried she expected me to make her a literal mermaid (and probably then provide a suitable ocean to explore). Mostly because I was pretty sure the confinement of the legs inherent to a “real” mermaid tail just wasn’t going to feel great after a max of five minutes.

So I dragged my feet.

River got in on the excitement, requesting a Rainbow Mermaid tail with only slightly less urgency.

After a fair bit of cogitating, I hit upon the (I thought) brilliant idea of a tail made as a wrap-around skirt, allowing the mermaid look while still running and playing. I even drew up a sketch to try to sell the idea to my three-year-old clients.

They were cautiously receptive, at least once I assured them I could make a pocket in the fin so they could also put their feet inside. So I took some measurements, drafted a couple of rough pattern pieces, and dug through the stash for suitable fabrics. Rainbow was easy, as my aunt gave me a couple of pieces of cheap rainbow-printed satin to make stuff for the twins. Ah, the gift of getting to sew one’s least favourite fabric for someone else. I also had some low-stretch slippery knit with an indistinct white and blue and silver pattern that has always reminded me of the Frozen aesthetic. For the tail fin itself, I opted to use the last of a spongy purple polyester sweater fleece that I had made into baby sweatpants at one point. Actually both fabrics featured in other projects on this post here. But I overlaid the fleece with translucent fabrics to get that iridescent fishy feeling.

For the rainbow tail fin, I picked a purple-y tulle with a bit of a silvery fish scale pattern to it, and intermittent clusters of beads. It had been kicking around stash for several years since one of Syo’s friends deconstructed a ball gown in our basement to make a Hallowe’en costume, and left giant swathes of shorn tulle behind. For Tris I chose a blue organza with random silvery dots, also from my aunt. I then quilted these overlays to each side of the tail separately, creating fish-tail rays. This was far and away the most time-consuming and annoying part of the whole thing.

I completed River’s tail first, as I figured she was going to be less devastated if she didn’t like the result than Tris was, and I could perhaps use its example to manage Tris’s expectations.

River was quite excited, and eager to put it on. However, she was completely unwilling to wear it as a skirt, only as a full tail with her feet tucked into the tail fin pocket.

And the frustration of being unable to walk properly like this got to her fairly quickly, so she hasn’t really worn it after the first day it was delivered. (Oh and I still should topstitch around the tail-fin so it holds its shape better, but my motivation is… low.)

Tris was distinctly lukewarm to River’s tail, and I contemplated just making it as a basic step in tail, but the pieces were already cut out and taking up room in the sewing room. So, eventually, I decided to finish sewing it up, if only to move them from the sewing room to the dress-up box.

When I showed it to her, all completed. Tris said, “no thank you, I’m a princess, not a mermaid.”

Anyway, while I take some deep breaths, I’m going to make something for me now.

19 Comments

Filed under Sewing

Black underneath

I obviously needed a petticoat to go with my Edwardian skirt (the 1880s ones just don’t quite work). And I’ve been a bit obsessed with the idea of an all-black set of underthings (hence the black corset, and there’s a black chemise cut out and living in limbo at the moment, too.) So, why not a black petticoat, particularly since I had a nice chunk of black batiste in stash for just such a purpose.

Now, what to use for a pattern? Well, I could have gone with the same as my skirt, maybe just omitting the above-waist extension. And I might still make one like that.

But I ran across the following draft in the “Art of Dressmaking,” copyright 1903 by Madame Marie Boudet, one of an assortment of historical sewing manuals I’ve collected digitally. In particular, I liked that she works in metric (being French), and also that it’s designed to be drafted directly on the fabric. It’s also extremely economical and low-waste, requiring only two skirt-lengths of fabric, and only a few bits are cut away to form the curves at hem and waist.

Now, working out the pattern was not quite as simple as I might have liked—there was a lot of on-the-fly calculation I would rather have worked out beforehand, and her order of describing what to do left a bit to be desired. I also realized partway through that her calculations seem to assume a fabric width of about 32”—not surprising but I had to make some adjustments for my 60” wide fabric. But aside from some issues (mainly losing track of some of my measurements) I still do really like the draft. Even if it does consider 60 cm (23.6”) an “average” waist size. Because of my wider fabric, I had to make my flare a bit more extreme, and I have more gathering at the back waist than is probably intended. On the other hand the draft does mention that a more full petticoat might be desired, requiring three lengths of fabric, so I don’t think my version is beyond the realms of the possible.

I added about a 6” ruffle at the bottom, which was what I planned for, but I really think I do prefer the wider ruffle I used on my earlier petticoat. Although maybe I just need to press it more. I also would’ve liked a nice black lace at the bottom, but I definitely don’t have that much of anything suitable in stash.

For the waist finishing, I used a method from Sew Historically, which I’ve also found described in period sources (isn’t it nice when we’re all reading the same books?). It’s basically two drawstrings anchored at the side backs, that run opposite directions through a casing and emerge from eyelets to get tied together. Although I didn’t follow it quite right and I think I have a lot more gathering at the waist than might be intended due to my overly-wide fabric, so for me it works best to pull the drawstrings around and tie them in the front. Otherwise it looks a bit wonky, as below:

There isn’t much else to say, other than the obligatory complaints about photographing black. So I’ll just let it be that.

1 Comment

Filed under Sewing

Fluffy up front

So now that I have an Edwardian skirt, obviously I need a proper blouse to go with it. You know the kind—the ones that are mostly lace. But those are, y’know, notably sheer, and my current corset is, y’know, black, so a corset cover is kind of in order.

Now, ever since I started the Victorian Sewing Circle I’ve been collecting “resources” for attendees. Mainly some reproduction catalogues and a couple of original sewing manuals, some older Folkwear patterns my mom had kicking around, and of course the relevant Janet Arnold book. But we’ve received a few donations as well of odds and ends people have collected—including an Edwardian corset-cover pattern someone had painstakingly hand-traced from a magazine article, and photocopied the instructions, I’m guessing in the 90s if not 80s, allegedly based on a 19-aughts original. It’s also, by the way, the exact opposite of size-inclusive. I sewed up the largest size, which was intended for a 40-42” bust.

Inspiration: Random Pinterest photo with a broken source link.

So since I had that on hand, I used it. But, the pattern is designed for vertical pintucks and lace insertion as decoration, and I wanted the horizontal lace ruffle (bust improving) version.

TVE02

If I were buying a pattern, this Truly Victorian one would be the one. View A, right there.

My pattern is a little different as it goes below the waist and has gathering at the neckline as well, but the ruffle layout was the same.

I also wanted to take this opportunity, because I’m kind of messing around here, and the result won’t be visible, to use up some of the massive stash of questionable lace I’ve somehow accumulated.

Now, on digging through one of the bins of random white fabrics, I settled on a piece of stretch cotton sateen. The stretch is a bit unfortunate, but I already knew I wasn’t going for high historical accuracy here. It’s also a bit on the heavy side, but I figured that would be a bonus for the bust-volumizing I was going for. But most importantly, it was a tiny remnant that was just exactly big enough for a sleeveless pattern like this.

Of course, I didn’t begin diving through the lace stash until after I had cut out the main body pieces. Turns out the wider, ruffled laces I remembered were all beige, rather than white. And I really did not feel like gathering up a flat, nasty polyester lace for this purpose.

So, I wound up going with the nicest, and lightest coloured, of the off-white pre-ruffled lace. And this one is very pretty, not too nasty-feeling, and there was enough for the two ruffles I wanted, with very little left over. It’s a weird lace, with a ruffled top and bottom joined to a flat kind of connecting piece, but I think it will serve its purpose. And if I want to run ribbons through the joining I can.

If I had realized I would end up using the off-white lace before I had cut out the main fabric, I would probably have tried tea-dying the fabric to be a closer match. I might still try with the whole thing, after I test how the lace reacts to a tea dye. (Polyester won’t be affected but if it’s nylon it will take up the tea stain too and might end up even darker). But, I’ll survive either way. The binding I used for the neckline and armscye, and the drawstring casing at the waist, are all ivory, so the whole thing has a tone-on-tone vibe, in theory.

I REALLY wanted beading lace (the flat kind you thread a ribbon through) to finish off the neckline. However, that’s the one kind of lace I do not have in stash, and I just couldn’t make myself spring for the polyester stuff at Fabricland, even if the ruffled lace is already polyester. So I bound the neckline, then realized I had JUST enough lace left to do a third tier right at the neckline. Which solved the issue nicely.

A lil bit goofy all on its own.

Now, on looking at the finished creation, I think my lace might be just a little bit too wide. The ruffles are VERY full-bodied, even allowing for the part where the original inspirations are a little compressed after over a century.

In an attempt to tone them down a bit, I shortened the bottom row of lace, so that doesn’t reach all the way around to the side seam, as it just seemed to make the whole thing look huge.

I kept the pintucks in the back, but I think maybe they should have been 1/8” instead of 1/4” tucks. Also this is the only photo I got of the back, because obviously this piece is all about the front. This is the first time in a long time that I was working with a pattern with pre-marked tucks (as opposed to making the tucks before cutting out the pattern piece, or just doing some calculations and I have decided I much prefer marking my folds one at a time and measuring from each fold to the next. But also this fabric was a bit heavy for all those tucks.

I’m not 100% sure I’m in love with the below-the-waist ruffle created by the drawstring as it’s pretty pronounced in my heavy fabric, but I guess if I hate it I can cut it off later. It was on the pattern, and would be good to have if your skirt didn’t have an above-the-waist portion like mine.

While I’m not so sure I love the piece itself, I THINK I do like it with my skirt, and that it will work well for it’s intended bust-improving purpose. Part of me wants to take the entire bottom row of lace off, but I’ll leave it at least for now.

Because now I can make a blouse!

(Or. Y’know, make the twins that “Elsa mermaid” costume they’ve been desperate for since before Christmas.)

2 Comments

Filed under Sewing

A long awaited party (dress)

Back in the day…

Way back in 2015, I started coordinating a little monthly get-together I like to call the Victorian Sewing Circle, based out of the Marr Residence, the Oldest House in Town* that the City operates as a sort of mini-museum. I was hoping to indulge my latent interest in historical costuming, meet some like-minded people, and give myself a venue to WEAR at least some historical stuff. Since the house was built in 1884, a mid 1880s outfit seemed like a good goal.

Inspiration dress

I picked an inspiration dress from a reproduction of the 1886 Bloomingdale’s catalogue, acquired a ridiculous amount of discount wool blend suiting in my favourite muted blue colour, and ordered two Truly Victorian patterns for the bodice and overskirt, TV462 and TV368.

I started work on the skirt in October of 2015. Later that winter, I got sidetracked and made a “quick and dirty” version to actually wear to our little meetups… and then my progress on the blue “good copy” slowed to an utter crawl. And then when I got pregnant early in 2019, it stalled completely. And what started as a planned hiatus of a year or so turned into three, and I didn’t dust things off until this past fall.

At which point pretty much every measurement on my body had gone up 4-5”. And the “quick and dirty” outfit (the first pic in this post) no longer even remotely fits, so making the blue version wearable became a lot more urgent.

I was pleasantly startled, actually, when I pulled everything out again, at how close to complete it actually was. The skirt just needed the waistband finalized. The bodice just needed boning—but it also no longer fit, and I had accidentally used a very rigid ticking for my underlining, which wasn’t ideal in any way. And (which I had completely forgotten), the overskirt was complete, just needing a way to connect the back tails to the front apron. And perhaps some trimmings.

New waistband, new waistband pleats

Adjusting the skirt wasn’t going to be a big deal—I had only basted on the waistband, and it needed length taken out at the top. I marked the new length on the front, basted and trimmed down to it, but then for the back I folded the extra down and just stitched the edge of the pleats to the waistband, so the seam allowance doesn’t add bulk to the waistband. This is a technique I’d read of in both historical sources and costuming articles, but never actually tried before. The transition from “seam allowance in” to “seam allowance out” is maybe not perfectly smooth, but every original Victorian skirt I’ve examined (which isn’t a high number, granted) had the most half-ass slapped on waistband, so I have a hard time being too fussy over it.

I had made a whole new corset, back at the end of summer, so all I had to do now was adjust the waistbands of both petticoats. For one petticoat this was no big deal as I had originally made it far too big and had to put in two large tucks in the waistband to make it fit. Ripping those out took about 30 seconds and it was good to go.

The second, on the other hand, was snug even when I first made it, and by the time I last wore it in 2019 I had already added a hair elastic looped through the buttonhole as a makeshift extender. But that no longer did the trick so the only option was to unpick the gathered back portion of the waistband and attach a substantial additional piece, then re-attach my painfully stroked gathers one by one, just spread out over a larger space.

It’s definitely an improvement though. I think even my hand-worked buttonhole is better, not that it’s a thing of great beauty.

And then there was the issue of the bodice.

I had steeled myself, frankly, to make a new bodice from scratch. The seams were only 1/2” and already somewhat frayed from a ridiculous amount of handling, and the rigid ticking underlining made the whole idea of altering just seem unpromising. I had enough fabric left over, just. But every time I went to start tracing out a new size of the pattern, a wave of exhaustion struck me.

I decided to try, just try, and see what happened if I let all of the back and side seams out as much as possible. Some of them, especially the waist, had been taken in quite a bit in my previous fitting adventure. And while 1/2” seams don’t allow for a lot of letting out, there are quite a few of them. I tried the bodice on again… it wasn’t enough. In particular, actually, the BACK just didn’t seem wide enough. Not at the waist, but the upper back, and there was still a stubborn 2” gap all along the front. I did toy with a plan where I could add a panel to the centre front, creating an “open jacket” look that is pretty common for the era. But the back still felt uncomfortably tight. If only I could just add more fabric, right at the centre back seam.

Well, why couldn’t I?

So I ripped open the CB seam, from just below the collar to about mid back. Try on. Rip a little further. Try on again. And lo and behold, after ripping it all open except for about 3” at the bottom, it closed in the front.

So I pulled out my scraps, cut a long, tapered spindle-shape, and set about stitching a panel into the back.

It’s not an ideal fix—it’s added some of its own fit issues and ripples, and makes boning the CB of the bodice difficult. But it’s also saved me an immense amount of work. Which these days, I’ll take.

My joy when the alterations actually allowed me to close the bodice!

After all that, all I had to do was add all the boning to the bodice, which I wound up doing by stitching the casings on by hand since my seam allowances were both narrow and quite irregular. Unfortunately, I also had to pull off the bias facing at the front hem to add the bones to my darts, because past me got ahead of herself in the finishing department. Mistakes like that played a huge role in why this damn thing took forever to make, by the way.

I swear in real life the hem looks symmetrical.

Anyway, the bones definitely help smooth out the look, though I might need to redo my buttons to get a truly smooth front. I’ll face that some other day.

After a fair bit of waffling, I decided to attach the tails to the overskirt apron the same way I did with my first version, with elastic loops and large buttons. It’s not historically accurate, but it’s easy, comfy, and highly adjustable.

And, at last, I finally got to wear it!

There are a few more tweaks that could be made. The back of the skirt, where I had omitted one of the overlay panels, looks a little plain. I’m not sure that my draping of the bodice tails or the back of the overskirt is finalized, and I do have some black tassel trim that might look good there.

But after a saga like this, wearable, in any degree, is a huge step forward. And for the first time in ages, I can actually say to myself “what’s next?”

(Actually, I finished this back in early December, so what’s next was the Edwardian skirt. But I really wanted some pictures that weren’t taken in my hallway. Thank you to my mom for digging out her good camera to take most of these, and for braving the technological minefields of iCloud and Dropbox to get them to me.) Next up… an Edwardian-style blouse to go with the skirt. Unless I get highjacked by one of my children, anyway…

2 Comments

Filed under Sewing

Truly Edwardian

K I’m on a bit of a costuming binge, though a lot of it hasn’t hit the blog due to waiting for pictures (never a smart thing for me to do). Maybe I just like wearing corsets right now, maybe I’m just not feeling mainstream sewing fashion, maybe I actually have enough clothes… anyway. I bought the Truly Victorian 1906 Ten Gore Princess Skirt back in the fall, probably like everyone else who watched Bernadette Banner’s video around that time. I finally got it printed in early December, and over the holidays began very, very slowly poking away at it.

The process began with an epic hunt through the fabric stash. I had a feeling, not even a memory really, that I should have an appropriate length of black suiting somewhere in stash. My (arguably excessive) stash these days lives in a series of clear plastic bins stacked along one wall of my sewing room, and while this isn’t an ideal setup by any means it’s space efficient and protects the fabric from at least some of the hazards of a basement storage space. I usually have a rough idea of where most things are, but in this case I wasn’t even sure that the fabric I was looking for existed.

Anyway, my quest wound up taking me through approximately three quarters of my bins. I (re)discovered a half-forgotten length of black linen, several suiting pieces that would’ve been appropriate except for size, a VERY large length of brocade I had completely forgotten about that wants to become a tea gown of some kind, and several other pieces that would make nice skirts. But then finally, after a couple of hours and creating an impressive amount of mess, I reached the bottom of the last stack of bins (well, technically there were two other stacks, but no way I was tackling them that day)—and there it was. Five metres of soft wool twill suiting, light and drapey and utterly perfect. I can’t describe my exultation.

Anyway, once the fabric was located (and at least some of the mess tidied) the work could begin. I steamed the wool in the dryer. I muslined the lining/corselet pieces for the upper skirt, after doing a small swayback adjustment on the back and side back pieces, and determined (as I expected from the pattern measurements) that I needed to go down a size in the waist. In hindsight I wish I’d gone up a size in the hips, too, because it’s quite fitted over the hips and I always like more room there, but I should probably just let the hip seams out a bit anyway. A small adjustment gets you a fair bit of room when there are ten seams. A slightly larger swayback adjustment might be in order for the next version.

Centre back section with satin lining and hooks applied.

Like most of my sewing this fall (or the last few years) construction has proceeded in incremental fits and starts. I spent a lot of time researching my construction via a number of original sewing manuals, both electronic and paper. Not that there’s anything wrong with the methods the pattern describes, they are historically accurate and in the end my deviations were quite minor.

My biggest curiosity was on how to do the lining. I’ve sort of had it drummed into my head that historical (Western-style) clothes were flat-lined (aka underlined.) This is how Bernadette Banner constructed her lovely version of the skirt. However, that’s not the directions for the pattern, and I was curious about the disparity.

It turns out that in the 1890s, a new method of lining skirts started to gain popularity—the “drop skirt.” This is made by sewing the lining (and materials like taffeta and “lining material” are mentioned rather than cotton) entirely separate as its own skirt/petticoat, or sewing separately then sewing both skirts into the same waistband—aka a modern, free-hanging lining. By the early 1900s, the separate lining is considered the preferred method with flatlining being distinctly old-fashioned, and my 1908 copy of the American System of Dressmaking states the following:

Anyway, eventually I settled on an unlined (except for the waist area) skirt, and hopefully I will make the appropriate “drop skirt” eventually.

To line the waist/hip area I used a heavy crepe-backed satin. A lightweight coutil or heavy cotton might have been better—I thought the black denim I used for my corset was too heavy, and most of the other black fabrics I had around seemed too light. We’ll see how it wears, I guess. On the other hand, having a slippery surface on the inside may come in handy since it’s pretty hard to hook up the back placket behind myself so I often end up turning the skirt around backwards to put it on. I added a tiny red tag to the inside of the front to make it a bit easier to make sure I end up with the right seam in the right place.

I considered binding the seam allowances, as would have been period appropriate. Then I serged them. I didn’t make a lot of concessions to speed in this project, but I feel like I’d still be binding seams if I had take that route. Sometimes speed is just what you need.

I added piping to the top edge as I thought that would be a nice touch, and it is, except for the part where it’s almost invisible since it’s black and this will probably mostly be worn with blousy tops that will cover it anyway. There is a narrow bias facing sewn on the inside of that to finish the top. Potentially it might have been easier and less bulky to just use a wider bias tape for the piping and use that for the facing, but having a bit more structure at the top of the skirt also doesn’t hurt. It is VERY bulky right around the top hook, though, despite some very aggressive trimming of the seam allowances in that area.

I added a piece of spiral steel boning to each seam, more or less the length of the inner corselet/waist lining. This keeps the portion of the skirt above the waist from folding down, and smooths over the upper hips, but it did also cause the skirt to stand out from my corseted waist in a way that the un-boned skirt hadn’t. I added a waist stay to combat this effect, but I’m thinking that either the waist shaping wasn’t an adequate match to the corset or my fabric + lining combo still has too much give. On the other hand it means that even though the skirt was cut with corset-wearing in mind, I can wear it uncorseted as well.

The pattern calls for a bias hem for the facing, made out of self fabric. I wanted to add a velveteen binding to the bottom of my skirt. long story, but basically velveteen seems to have been a material of choice for this purpose. Or braid. I do actually have a length of vintage braid that I think must be similar, but it is only about 3m long and the skirt requires over 5m, so that won’t work. But I did have a lovely little remnant of black velveteen, that turned out to be just enough for what I needed.

Most of the descriptions I read of the velveteen have you apply it after creating the hem, faced or otherwise, but one from 1903 mentioned how the velveteen could serve as a facing. Since the pattern calls for facing the hem anyway, that’s what I went with. And also I’m a lazy 21st century person disinclined to hand stitch around a hem like this three times, which seemed to be what most of the descriptions called for. I will say, intentionally rolling a facing out so that 1/16” of velveteen showed at the bottom of the skirt felt VERY unnatural, and there are definitely places where it doesn’t show as much as it probably should. Will I go back and fix that? I’d like to say yes but, um, probably not.

I wasn’t sure how to finish the top of the velveteen, but eventually decided I didn’t want the bulk of folding over the hem. I didn’t have 6 yards of black seam binding in stash, but I did find a rather lovely red vintage rayon seam binding, so I went with that. It did NOT like being sewn to the velveteen, and stretched it out terribly, despite my best efforts, so it’s incredibly wrinkly and gathered in the final skirt, but I don’t hate the effect.

So the pattern is drafted to have a finished length of 41” at the front, from the waist down. My measurement was 42”, so I added 1” to the skirt length all around when cutting. Now I’m not sure if it’s just that my soft wool fabric is prone to stretching, but when it came time to hem I wound up turning up close to 2”… so I could most likely have saved myself that added effort and fabric. Oh well.

Anyway, I’m super happy to have this in my wardrobe, hopefully bridging the (ever diminishing) gap between costume and everyday wear. Before the twins I had a black wool gored skirt made from a 1970s Burda pattern that was an absolute workhorse, and I have missed it sorely. The only thing this skirt is lacking is pockets, which I may yet decide to add… I don’t want to interfere with the gorgeous line of the hips, but I really, really like to have pockets at work. Next: definitely need to start planning a lacy blouse to go with.

10 Comments

Filed under Sewing

Redundant but cozy

A couple of years ago I acquired 2m of this waffle-knit in my favourite muted blue colour

I then waffled (hah!) about what to do with it. I should maybe have gone for 3m as that would’ve given me more options for cozy-wrap-blanket-clothing, but it was full price and I’m cheap so I didn’t.

Anyway, since the twins started preschool this past fall, they and I have basically been sick the entire time. I think we have this in common with most of the country (don’t get me started on the great Tylenol shortage of 2022), but it really highlighted the limited nature of my casual/comfy wardrobe. I’ve run into this issue in the past, because frankly I’d generally rather sew (and wear) fancier stuff, and I haven’t really spent a lot of time at home lounging around in the last decade. Except for my maternity leave three years ago, but I didn’t have a lot of sewing time at that point.

So I was determined to get this fabric sewn up. To do so I finally caved and went the easy route—my much beloved McCall’s 7622. I have made this pattern at least five times before, and it does nicely straddle the line between cozy comfort and the drama that I crave in my wardrobe. Even if I almost always make the boring scoop-neck-and-long-sleeve version.

I should mention that my main hesitation in using this pattern for this fabric is that I already have a version of this pattern in a stretch velour of the EXACT SAME COLOUR. So technically I don’t need another one. But that version has some issues around the neckline that keep me from wearing it for much except bumming around the house, so, um, still justified?

Anyway, this pattern is a bit of a fabric hog and I wound up needing to add a narrow yoke to the back piece to get everything to fit. I also used a lightweight cotton spandex knit in a complementary blue to do the neck binding and make the pockets.

Pockets, incidentally, aren’t the best idea in a knit dress of this style, as they inevitably pull and drag on the side seams—but this is also clothing for function and I require pockets in pretty darn near everything these days. I did use 1/4” clear elastic to try to minimize how they stretch out the seam, which does help a bit but it’s pretty easy to go the other way and get wrinkly side-seams. So damned if you do, damned if you don’t. I shall wear it regardless.

I am quite happy with how the Euphoria handled coverstitching the hems, which I was a bit worried about. I just turned up the differential feed, and then the pressing after took care of the small amount of rippling. I haven’t actually used any seam stabilizer for hemming since I got the Euphoria!

Oh, and I had just enough scraps left to squeak out some matching Rosalie Stockings, cut down to knee length. They are cute and comfy, and adding more clear elastic to the junction of the cuff seems to keep them up. I could maybe take them in around the ankle a bit, but I probably won’t

So yeah, not much to say, but it’s warm and cozy and exactly what the winter has called for.

3 Comments

Filed under Sewing

Tiny Princess Highjackers

Lately, the twins have had a breakthrough realization—Mommy MAKES clothes.

Which means she can make dresses

All dresses must be PRINCESS dresses.

Which means she can make PRINCESS dresses.

Tris in particular is super keen to sew by herself, diligently selecting a fabric (anything pink… yes, we’re in THAT phase) and shoving it through the under-arm space of the sewing machine in the hopes that it will magically come out the other side a dress. I also need to double check all my machine settings every time I sit down (we won’t go into the time she somehow changed all my server’s tension settings to 0 WHILE I was sewing with it)

Anyway, the result is that instead of a measured progression through my sewing queue, I keep getting side-tracked by adorable and insistent requests to make dresses out of THIS fabric. And they’re so excited it’s difficult to resist, and all of a sudden I’m highjacked.

It doesn’t help that my friend Temperence Swimwear Intimates, gave me a bunch of kid-print knit remnants, that I really need to use promptly lest they linger in stash beyond the twins’ interest in them.

Of course, the twins’ sense of what a suitable amount of fabric for a princess dress is a bit, ah, flexible. There was the day Tris was determined to make herself a pink princess dress out of a single small mitten. I was able to divert her only by digging out some of the fabric for Temperance (and I don’t have a lot of pink fabric at all, by the way…) It was really just scraps I think were supposed to become undies.

That resulted in the first highjack dress, a revisit of the same pattern I used for the little ghost girl dresses last summer. If this version looks more like a shirt in flat-lay, it’s because I decided to use a band for the neckline and then, instead of gathering the neckline and sewing it to the band, tried to rely on the band’s own recovery for the gathering. It’s a pretty beefy cotton-spandex with great recovery, but even so there are limits. As a result, the neck is pretty large. But she’ll be able to wear it as a shirt until she’s ten or something.

I did irresponsibly dodge my parental obligation to make River a dress next, well, until a couple of days ago when they were digging through the fabric again and she spotted this tool print cotton interlock… of which there was a scant half-mètre or so.

I did, however, also have plenty of plain white interlock, purchased in the days when I was fantasizing about making my husband T-shirts. I figured I could eke it out.

Now, long and long ago I made these cute little dresses for the twins, which are basically just a long-sleeve tee pattern, slightly cropped, with gathered skirt attached. And I really think that’s the best basic style for making a winter-friendly dress for a smallish kid. These are long since outgrown, and frankly were outgrown far too quickly, so I didn’t want to make anything that fit “just right”. My go-to pattern for kids tees is Jalie 2805, but I didn’t really want to use the size I traced out for these tees last year and I was much too lazy to trace a new size, so instead I dig through the mass of un-filed patterns sitting on my basement counter until I settled on the fairly forgettable McCall’s 3315, which stood out only in that it was a single size, 3, and was “for unbonded stretchable knits”.

Actually it’s a pretty cute, slightly flared turtleneck dress pattern with a non-knit jumper to go over top, but it’s also an early 70s knit pattern—designed for stuff without too much stretch, and with way too much ease in the sleeve cap. But, I wanted roomy, and a bit of a puffed sleeve cap just adds to the princess cred of the dress, so I went with it, or at least the portion above the waist. Since I didn’t want a turtleneck style, and did want to add a band, I cut the neckline down a good 3/4”. I ended my use of the pattern at the lengthen/shorten line, which created the slightly cropped length I was going for, and omitted the CB seam since no I’m not going to put a zipper in a knit.

For River’s dress, we had extremely limited print fabric. After I had cut the sleeves, I had wanted to use the remaining print for the square skirt, but it would’ve made a very scant, not very twirly princess skirt. So I cut the piece in two to make a bottom tier, and cut the upper tier out of the white interlock. I added a print “waistband” to the top, too, to break up the white, using a bit more of the stuff I had cut off for the band at the neck. I had been envisioning two gathered tiers, but it turned out that my two lengths of print put together was only slightly longer than the single length I had cut of the white. I could of course have reduced the amount of white in the skirt, but instead I just eased the two together. You can see that it gives a slightly more flared shape to the skirt. The most important part is that it twirls, though. I used a fair bit of coverstitch topstitching to flatten down the extra seams in this dress; this worked well for the tiers of the skirt, but I don’t like how it turned out on the waistband so I will likely rip that out.

I asked them for Princess poses. Apparently this meant standing on one foot.

Tris’s second dress was made after (trying to take turns) and under no such fabric limitations as I have a full 2m of this abstract rose print in stash, purchased way back when my nieces were small enough to enjoy it. I’m happy to get to use it on the twins, though this project didn’t come close to using it up. I did want to harmonize with River’s dress, though, so I asked Tris if I could make the bodice white like River’s, and she agreed. Part of me wishes I had done the tiered skirt part as well, but also that adds a butt ton more time to the project and this is cutting into my me-sewing time already, dammit. As it is, Tris’s dress came together in just over an hour thanks to all the machines being already set up (give or take having to check all the settings and occasionally rethreading things, thanks to my very helpful helpers.)

In the end, it was pretty fun to see these come together quickly and how excited the twins were by them. I didn’t really sew when my older girls were in the twirly-dresses stage; I did sew a few twirly dresses for my nieces when they were young, (like this one) but they were done as presents, not collaborations where they got to pick the fabric and “help” with the sewing.

I’m also wondering if this is the end of the era of twinning outfits. Since starting school the twins are much more vocal about their sartorial preferences, and they’re rarely wanting to wear the same thing at the same time. I already mentioned how Tris wants EVERYTHING pink right now. And thank goodness for the plethora of hand-me-down tights they’ve finally grown into because it’s all dresses all the time right now, so their adorable overalls and jeans and flannel shirts are getting less than no love.

Ultimate Princess Level unlocked.

So now I can get back to finishing boning my Victorian bodice. Except, um… I stumbled on this Butterick pattern while looking through the mess. Have you ever seen a more ultimate princess dress??? I’m loathe to give the decade of my birth credit for much, but they could do a princess dress like nobody’s business. Anyway. I’m exhausted just looking at it… but also… can I not? Maybe I’ll just read the instructions…

18 Comments

Filed under Sewing