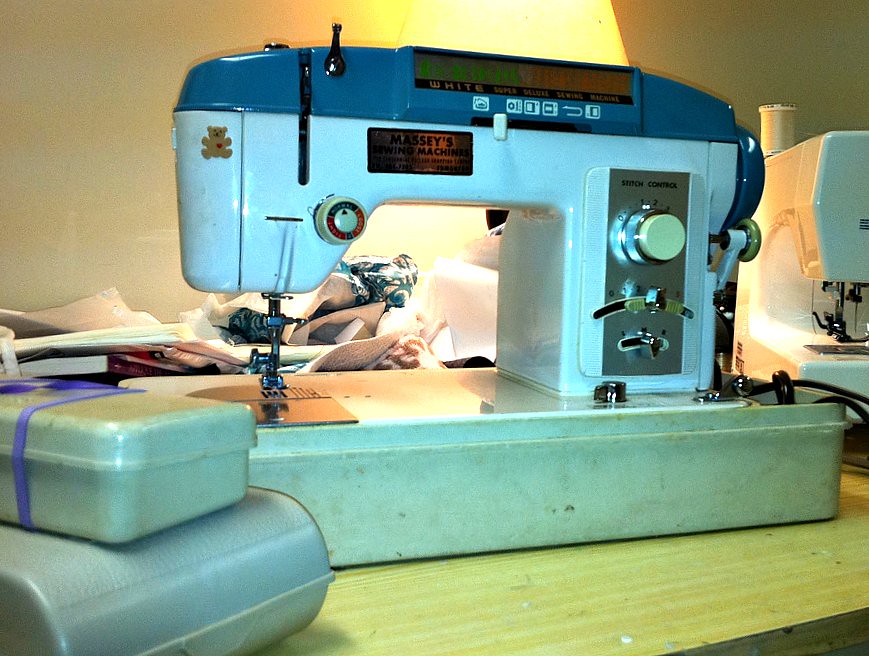
Category Archives: Sewing

All Machines All The Time!!! (Part 1)

Are you bored yet?

All shined up

Sorry to witter on (I LOVE that word, it’s not part of my native vocabularly but I am totally stealing it) about my new/old machines. I’ll get back to the actual, y’know, making stuff pretty soon.

With its very own bobbin case!

I swung by Sewing World a day or two after I brought the White home, and they did indeed have the kind of bobbin case I needed. For the low, low price of $14. Yup, half again what I paid for the bloody machine, and two to three times the online prices (although those would’ve had shipping added on. Thanks to everyone who made suggestions!). But it was in my paws instantly (as opposed to some random time in the next month) and supports my local sewing stores, yadda yadda. The manual is available for a download for another $10, which I may get around to shelling out at some point.

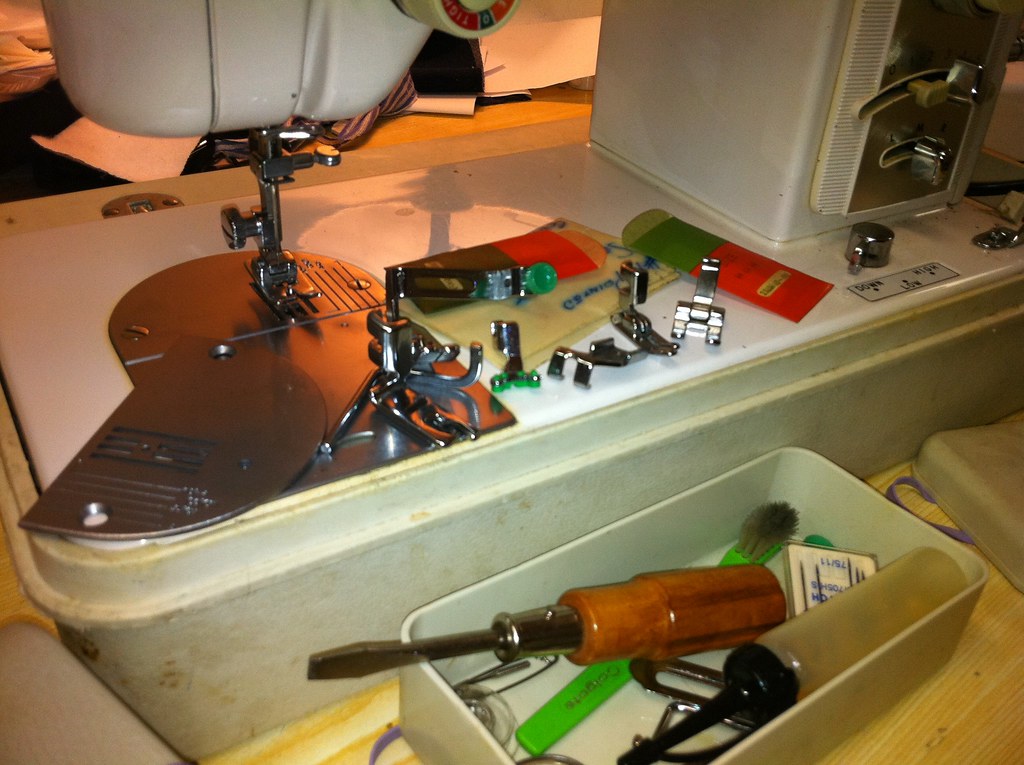
Anyway, with bobbin in hand I sat down to give her a basic clean. I’m no JillyBe with the full sewing-machine spa, although I wish I was. I just pulled the machine off her base, took toothbrush and kleenex and cleaned out the dust, broken needle bits, pins, and chunk of waistband elastic that were inhabiting it. Then I set to de-fuzzing all the bits of machinery I could easily reach. There was a moderate amount of lint, but not terrifyingly so (I’m sure my Janome was worse off when I took her in for her tune-up last summer). I oiled the moving bits—the previous owner(s) seems to have been fairly heavy on the oil, so there’s a fair bit of sticky residue, but that’s probably better than the alternative, right? More fuzz came out when I swapped the needle-plates to try out the straight-stitch, so I now feel like I have a pretty well-cleaned, well-oiled machine. That and a bit of judicious adjustment of the bobbin tension, and the stitches have improved to the point where the straight and plain zig-zags are almost as good as my Janome’s, although the straight stitch still has a bit of zig or twist to it or something, even using the straight-stitch plate. This is why people love their straight-stitch machines, folks.

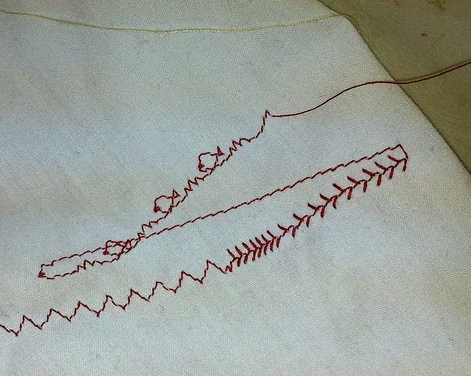
Stitches and zigzags and buttonholes, oh my!

While playing with the various fancy stitches and figuring out how to do a 4-step buttonhole (not so hard as I’d feared, especially on plain cotton 😉 ), I determined that the main issue she has is that the reverse stitches aren’t the same length as the forward stitches. The reverse (left) leg of the buttonhole is a long, loose zig-zag if I let the feed dogs do as they will, while the forward leg makes a perfect satin-stitch. (My Janome has a similar issue, although not this extreme) In a buttonhole you can compensate for that by man-handling your fabric, but it also affects the neatness of the fancy stitches. I’m not sure if this is something a tune-up would fix (I’m not super keen to give my $10 machine a $100 tune-up…) or if it’s just something I have to live with. Further sleuthing around the sewing-machine-repair sites/groups may be in order.

The feet that came with her are fairly basic—straight stitch, narrow hemmer, standard zig-zagger, wide-toed zig-zagger. There is this adjustable zipper foot with quilting guide (I’m as confused as you)

zipper foot with quilting guide

And this teensy little guy. I thought it was some kind of quilting foot, but the plastic bit on the bottom is textured and makes it really hard for fabric to move underneath it, so I’m kinda at a loss about how it should work.

Weird little foot

bottom of weird little foot

So that’s where she stands, folks. I’m going to be trying my hand at (ulp) applique again fairly shortly here, and I think I’ll use this machine as the zig-zags seem a little nicer than my Janome’s.

I'm scared. Are you?

25 Comments

Filed under Sewing

Yup, I officially have a problem

Look what followed me home...

Hello, my name is Tanit-Isis, and I have a thrift-store sewing machine problem. I made it one whole week without buying a machine.

The evil masterminds at Value Village had this out to tempt me. What really put it over the top is the little box of accessories—hemmers! binders! RUFFLERS! not shown in the picture because it was in my hot little hands waiting to be pawed through. Also, it has its bobbin-case and everything in place.

Wish me luck. The motor runs and things go up and down, but I’m not convinced I can even thread this one. I’ve found threading diagrams for older Domestic models but none exactly like this.

Tyo has dubbed it the “Army Sewing Machine,” and despite giving me well-deserved crap when I showed it to her, spent the rest of the evening opening it up and cleaning it out. Perhaps I can train her to be my very own personal sewing machine mechanic?

I got a new bobbin case for the White, as well. I’ll give an update on her pretty soon.

This has to stop. Now.

Unless a nearly-new, fully-functional serger or coverstitch shows up, anyway…

58 Comments

Filed under Sewing

On the Vogue Front

The next stage of fitting…

Sleevage. Fitting.

So, I slapped some sleeves onto my bodice-muslin of the Zoe coat, Vogue 7448, to see what they did to the floopyness around the front armscye. And also where the shoulders actually sit and things like that. Oh, and I added facings and the collar.

I think I should just suck it up and do the square shoulder adjustment.

I also think I’ve decided the front floopyness really boils down to my SBA being insufficiently agressive. If I stuff a fist in the side in front of my breast, it fills out the space quite nicely and the wrinkles disappear. (Incidentally, I took this photo wearing my padded bra, which does bring my bust measurement up to a proper size 12—34″. And it’s still floopy.

The only other thing (which doesn’t show in these photos) is how much the low armscye makes the arms bind when I put my hands on my hips. I’ve been trying to talk myself out of fixing it, but I just don’t think I can. Even the front floopyness doesn’t annoy me as much as that binding at the arms. I promise I’ll only raise it a centimetre or so. I’m sure I’ll still be able to get most of my sweaters underneath.

And the wearable muslin…

Vogue 7448 Sweater

Despite the fact that the fit is so-so and the internal finishing is abysmal, I really wanted to get something usable out of this. So, I grabbed some cream rib-knit that just happens to match the cream sweatshirt knit, cut a 3″ wide band (doubled), and added it to the bottom and made cuffs for the sleeves.

Buttons

Although I often really like cropped jackets, something about the position of the band has me not entirely convinced that it’s terribly flattering (maybe I’m just feeling muffin-top-conscious due to winter slothfulness and the depressing length of time since I’ve done a pretty, glamorous basement photo shoot. Oh, well. At least the jeans look good.)

I do quite like it hanging open, which is unusual for a double-breasted garment. The way the front hangs open reminds me faintly of those floppy-front cardigans.

Facing and under-collar

The buttons are cream, leather-covered buttons from one of my old-button thrift store hauls. The leather is pretty dinged up and dingy, but the colour was nice and I was willing to go with it for this particular garment. I decided to bind the inside of the facing and the undercollar with some nice patterned bias binding, which would be a lovely touch if the rest of the seam-finishing wasn’t so godawful. (er, nonexistent.) (Erm, buttonholes in rib knit. Bad idea, basically. Some kind of stabilizer would’ve been a VERY good idea. I thought of it just after I started the first one.)

I’m glad I made the full collar, though. This is the first time I’ve tackled one of those collars with inner corners, and it was a bit brain-breaky and nerve-wracking. I had to actually read the instructions. Definitely worth practicing.

So I guess this is one of those “time will tell” garments. I’ll probably wear it a bit, because I do need sweaters, badly. I may fall thoroughly in love with it… who knows.

20 Comments

Filed under Sewing

All I want for Christmas is some sewing time…

Ghosts of Christmasses Past

Oi.

I haven’t, in the past, felt a huge urge to make stuff for Christmas presents. Time is one reason. The necessity of finding out the person’s measurements and even fitting is another. The furthest I’ve gone is an occasional card extravaganza. This year of all years is not the year to start.

Predictably, this is why the list of presents I’d like to make this year keeps getting longer and longer.

I’d like to finish Mr. Isis’s Frock Coat (no modeled shots required). This is the one I’m most likely to actually do, I think. Although it feels a bit cheesy because he knows about it—but I asked him and he seemed to think it’d be an awesome Christmas present. I have a shirt cut out for him I could finish up, too. (Begun and then abandoned in my snit-fit when he declared he’d rather go without than have to model something I made him for the blog. So the real Christmas present is me forgiving him for that…)

Tyo's Too-Tight Shirt

I’d like to make Tyo a version of this shirt that actually fits. This would require actually paying for a Lekala pattern, but y’know, considering all the mooching off their freebies I’ve done, I shouldn’t begrudge them a couple of bucks. Of course what Tyo really wants is a kimono-style housecoat, with lotus applique, like, STAT. (This pattern is in stash; my MIL made it for a Hallowe’en costume for Mr. Isis c. 197) And a chemistry set. Do they still sell chemistry sets? Do I really want my 11-year-old blowing up the kitchen? (Or covering it with green goo…)

My Dad is coming up for Christmas again this year (bonus of being the only child in the country), and while he is perpetually the single. hardest. person. to. buy. for. EVER, it occurred to me that he wears dress shirts all the time, and I could totally make him one of those.

And THEN my brain went crazy. You can’t just make your father a plain dress shirt. No. He’s an archaeologist. He totally needs a Spoonflower fabric shirt, with an arrowhead or pottery or rock painting print. AND THEN I realized I need to trawl through his old publications to find some illustrations he’s published that I could use as the basis for a design… and…

Yes, it’s already almost a week into December. Odds of getting all this pulled together are, like, nil. Although maybe instead of fully printed fabric I could do a stencil or something…

But seriously, it’s the first, only, ever good idea I’ve had for a Christmas present for my Dad in my life.

Of course, I’d still need to find out his measurements…

And Tyo wants to make rice bags (you pop them in the microwave for a few minutes and they work like a heat-pad) for everyone (and the definition of “everyone” gets longer every time I talk to her), and something for her cousins (which I should probably do, too) and and

And and and

You may all now officially tell me I’m insane.

46 Comments

Filed under Sewing

How much is that bobbin case in the window?

Reckless seamstress behaviour

Hello. My name is Tanit-Isis, and I have a problem with sewing. It’s been 15 minutes since I last sewed a stitch…

So, I just did a slightly reckless and potentially self-destructive thing.

I was at the thrift store tonight (killing time during Syo’s dance class). The supply of fun vintage notions that kept me entertained over most of last winter seems to have dried up (I hypothesize that it was all part of one big stash) and I’m trying to be good on the fabric front, and the patterns have been abysmal since they purged a bunch before Hallowe’en. But as I wandered in a half-hearted manner through the electronics section (and there are few things sadder than a thrift store electronics section, I have to say) I realized that there were, not one, but two sewing machines.

Ah, you see where this is going.

The first machine, a middle-aged Kenmore, didn’t thrill me. I was unenthused by a Kenmore as a child (yes, I was a Pfaff snob at the age of nine). But the other caught my eye.

First, there was the blue. A splash of colour on a vintage machine always warms the heart. The price, $10, didn’t hurt. The visual depiction of 24 stitches across the top showed a nice array including plenty of pretty decorative ones that my almost painfully basic Janome doesn’t have, as well as proclaiming her a “White Super Deluxe Sewing Machine.”

There were the two mysterious boxes tucked under the harp arm—accessories! Now I was really getting excited.

I am not a complete rube. I have been around the vintage-sewing-machine block before (possibly even twice). I ducked around the shelves until I located a plug-in and plugged the machine in. Hesitantly, I gave the pedal a squeeze.

Whirr! Motor purrs (and doesn’t sound bad, actually). Needle goes up and down!

Sold. I slapped the carrying-cover back on and sauntered off to the checkout.

Machine footies!

Ensconced with my prize in the car (but still killing time), I dove eagerly into the accessories. A modest but nice array of feet, including several kinds I don’t have. They are low-shank feet, the same as my other two machines, which is nice. Most niftily, there’s a separate straight-stitch throat plate. (Also, the feed dogs drop! This is my first machine with drop-able feed-dogs. They have three settings, down, low, and high.)

Cams

The second accessories case turned out to house the cams for all those fancy stitches. Good thing they’re there! I would’ve been seriously choked to discover the machine could only do straight-stitch because the cams were gone.

No manual. Ah, well. I’m sure I can find one online if I need it.  And no spare bobbins.

It occurred to me to wonder what kind of bobbins the machine might use. After a bit of fiddling, I figured out how to slide back the metal panel that covers the bobbin area.

And discovered just why the machine was probably at the thrift store in the first place.

Bobbin housing---empty

No bobbin.

No bobin case, either.

Um.

So it looks like I’m going to be hunting for the bobbin case for a White 967. Presumably they can be found. I’m guessing eBay*, though I’ll check if my local sewing-machine/repair/expensive scissors crack-store deals in Whites.

So here’s the thing. Looking at the bobbin housing (y’know, the part where the bobbin case fits into), I thought it looked pretty much exactly like my Janome’s. So, being an experimental kind of girl, I pulled out the bobbin case from my Janome and popped it in the White.

It fits. I don’t know if it fits perfectly, but it works.

Stitches!

So I got to test out my new machine after all. I will still need another bobbin case, since having to switch it back and forth between machines pretty much defeats the purpose of having two machines, but in any case. Stitches are formed. Fabric moves around (once I remembered to raise the feed dogs). I won’t say they’re the best stitches I’ve ever seen, and I still have hardly pushed the envelope on how the cams work (though I did figure out how to switch them in and out properly.) Not to mention I haven’t done any of the basics like cleaning out the lint and oiling. But at least she sews.

So if three makes a collection, I now officially have a collection of sewing machines. Oops. I can’t help feeling like I’ve crossed some invisible threshold… that now my sewing machines will begin multiplying, until my sewing-room is overrun with archaic, half-functional machines and my husband leaves me because he can’t stand their looming presence spilling out into the basement…

Ahem. I got a new machine!

*After I wrote this, about 30 seconds on eBay determined that “Kenmore White” bobbin cases that at least look right can be had for under $10. Should be doable.

58 Comments

Filed under Sewing

The perils of tissue fitting

And other good ideas

Tissue-fitting

Baby steps continue on Vogue, 7448, henceforth to be known as the Zoe Coat. I am *this* close to convincing myself that I can splurge on some really nice wool and thinsulate to make an uber-winter version as my prezzie from Santa, although if I have to order anything online the time-frame is getting iffy. We’ll see.

So, I decided to try and tissue-fit my altered pattern pieces on my theoretically-me-shaped duct-tape double.

Now, I do not wish to completely malign duct-tape doubles. I suspect when done really well, and stuffed with a lot of attention to detail, and treated with appropriate respect thereafter, they can probably be pretty useful. Mine is a bit lacking. Another layer of duct-tape to stabilize would probably have not gone amiss. I should’ve been a little more careful in the stuffing, especially of the shoulder region. The fact that my kids think it’s the cat’s miaou and have had oodles more fun with it than I ever have doesn’t help, either. But it is still generally me-shaped.

So. I pinned my pattern pieces, noting centre front and centre back locations, and tried them on the double.  As you can see above (please ignore the awful background) the main issue seemed to be that the waist (which is supposed to be slightly raised—from past experience this is about 1/2″ above the natural waist) still appeared to be a couple of inches too low. There was also a lot of room in the bust (or rather, a lot more room in the bust than at the waist), so I added another tuck to shorten and did a modest Small Bust Adjustment. This is actually my first formal SBA with a dart, although I’ve smoothed down princess-seams in the bust area plenty. I tend to wear a bra with wovens, and my bras are all psychotically padded, so I’ve mostly been able to get away with the bust as drafted.

For good measure (considering all the height I’d taken out at this point), I shortened the bust dart by a centimetre or so.

Muslin---Stage 1

And moved on to muslin (stage 1). Apologies for the fuzzy photos, I am far too lazy to re-take them. This is what happens when you let your fingers or arm come between the camera and your photo-spot when setting up the self-timer. 😛

Several things became instantly obvious.

Firstly, I had taken out too much length. Obviously my duct-tape is not quite so double. (I suspect she’s compressed in length from being left standing from time to time.) I actually pretty much like where the bottom of the pieces is, but of course there needs to be a seam-allowance below that. /sigh. When I tried it on I thought the back was too short (remember I took 1 cm off the bottom of the back as part of my swayback adjustment), but actually as worn it hangs straight, so that’s a win.

There’s a lot of gaping in the back, at the neck and in the sway-back area.Fairly easy to fix by tweaking the back seam. I’m wondering if the neck-gaping is exacerbated by the need for a square-shoulder adjustment, though. I had hoped that since the pattern is designed for shoulder-pads, I wouldn’t need one, but it would probably have helped.

The front waist seems about right, and shoulder and side-seams fall in pretty good places. The point of the bust dart is high, but I think not problematically so. The big issue in the front is that folding in the front armscye. Those of you who are fit-gurus, please comment! My Singer Sewing Reference Library volume “The Perfect Fit” suggests two fixes for this, a minor one which is basically the same as a sloping-shoulder adjustment on the front bodice piece only(which is pretty much the opposite of what I need), and a major one where you take a dart out of the pattern at the armscye and then kind of smush it flat so there’s no dart there on your final piece. This seems annoyingly imprecise, but would probably work. Of course, these armscye issues are also affected by the sleeve, so I’ll be setting in sleeves before I make a final decision. I find it particularly interesting that the “fold” doesn’t point to the bust, but rather beside it

EDIT: Just a random bit of life I can’t resist putting in. Yesterday our area was in the grip of a fierce chinook windstorm. The wind was breathtaking, but even more amazing was the temperature—even with all that wind, it was WARM (comparatively) outside. Being good Canadians, we promptly kicked the kids out of the house to enjoy the weather.

This morning we turned on the Weather Network and learned that our area had received hurricane-force winds yesterday and that people had been urged to stay inside and away from windows.

Oopsie.

Well, at least they were away from windows…

24 Comments

Filed under Sewing

Do Over

Mom, you can't expect me to pose with my sister!

Although I love the idea of the Sew Weekly challenges—how fun, to be sewing something on the same theme as people all around the world!—I hardly ever actually do them, partly because I already have too much on my own list of projects, and partly because it usually takes me a lot longer than a week to go from theme/inspiration to an actual project idea, never mind a finished project. But every once in a (long) while the weekly theme coincides with something I’m already working on, and that was the case this week: Do Over.

Now, since I do over a LOT of patterns, this is not such a bit coincidence. But I’m still going to count it, because the project I finished this week, Tyo’s new jeans, is a do over on SO many levels.

Tyo's Ruched Jeans

1) Jalie 2908. Part of the do over is to revisit a pattern you’ve used before. This is easily my most-revisited pattern of all time, not least because it comes in sizes for both me and my kids.

2) I am re-visiting the skinny, ruched-leg detail I used on Syo’s most recent jeans

3) I am ALSO revisiting the cutout/underlay detailing from Tyo’s first, too-quickly-outgrown, pair of Jalie jeans.

… which basically means that there was nothing new or innovative about this project at all, which I think was probably NOT the idea of the theme, but oh, well. I’m still claiming it.

Some final thoughts: I added height to the rear crotch for Tyo’s booty. At the moment it’s a bit baggy there, so this wasn’t really necessary. On the other hand, she still has a fair bit of room to grow into these, so I’ll get back to you on that in another six months or so. Remember how I had pieced the waistband? I wound up only needing a small portion of extra and it works fine, but I’m a little puzzled that I needed any at all, since if anything my yoke tucks should have made the waistband too long for the jeans. Tyo’s jeans aren’t as strongly ruched at the ankle, mostly because I was trying to squeeze them out of a small amount of denim, so I could only extend the leg a small amount.

All right, I GUESS I can pose with my sister...

25 Comments

Filed under Sewing

Baby Steps

Vogue 7448

The other day I stole a few minutes to sort through Vogue 7884 and extracted the bodice front, back, and sleeve pieces. This is not as easy at it sounds, as there are separate, and confusing, interfacing and and lining pieces. I had to actually read the writing on each piece!

As is this my first take on a Vogue pattern, I had some thinking to do.

It’s a size 12 pattern, which is pretty much my standard size, aside from that whole waist issue. Which shouldn’t be a problem in a coat, really.

The back length Vogue lists for the size 12 is 16 1/4 inches. My back length is an even 15″, so that’s the first issue. The coat is drafted to have a “slightly raised waist”, which is a look I love, but I still want the waist to be raised on ME. So I figured I would need to take out at least an inch in height. The question was, where? Typically I’ll take height out through the armscye, as I like a high armscye anyway, but I thought losing a whole inch in that region on a coat might be a bit much.

Armscye comparison (back) (remember the white pieces have no seam allowances)

For comparison, I dug out my tweaked Fitted Jacket block, from Built by Wendy: Jackets & Coats, the base pattern for my wonderful run of little jackets last spring: the cowl-shoulder jacket, the cropped jean-jacket, and the springy coat. Interestingly, while there is indeed a full inch difference in the armscye length (height?) on the back piece, there was considerably less difference on the front.

Front comparison

For a compromise, I decided to remove 1.5 cm through the armscye, and 1 cm at the lengthen/shorten bodice here line. We’ll see how that works out. I also did my usual swayback alteration (1 cm above waist, to be matched by 1 cm below when I get to the bottom pieces), and lengthened the sleeves by 2.5 cm. (It’s my blog and I’ll hop randomly between measuring systems if I want to)

Erm, all these alterations were done as part of the tracing process. Hacking and tucking a vintage pattern (even 70s vintage) horrifies me at a visceral level.

There is a substantial bust dart. It terrifies me.

I am torn between trying to muslin the bodice out of some cream sweatshirt knit I have on hand in the hopes that I’ll be able to wear the result as a sweater, or using some of the awful 80s sweatshirt knit from my aunt and turning that into underlining for the final version (should it work.) I like the idea of a semi-tailored jacket topper made out of a stable knit, but I’m a little worried this outerwear pattern will have too much ease built in for that. On the other hand, Tyo and Syo both adore the godawful 80s knit, and far be it from me to deny my children the opportunity to repeat the fashion disasters of my youth.

I’m also torn on what to aim for for the final project. Me being me, I am powerfully drawn to view A, the crazy long length (which the pattern envelope assures me has a finished length of 57″!), although probably beltless as in view E because me and cinching don’t get along so well. Though it might require a back vent, as the skirt doesn’t seem overly full. However, I only have one or two pieces of coating fabric in stash that would be long enough, and neither are particularly wintry—I feel like a shorter length would be appropriate for a spring-weight jacket. Speaking of which, winter has arrived here, although we’re still a bit scant in the snow department. Last weekend temperatures dipped below -20C and the windchill hit -30C, which to me is legitimate winter weather. It’s warmed up a bit since, but my psyche has officially been switched to Winter Mode. Which means my desire to make a light, springy jacket I won’t be able to wear for months is limited right now. And if I’m going to try to outdo my Great Winter Coat of last year (which is great, but not quite as warm as I’d really like) it will require a significant investment of materials and thought that I don’t really have the resources for right now.

It’s enough to make a girl want to just go sew quick projects for her kids.

17 Comments

Filed under Sewing

Make me one too!

Tyo's jeans, Version II

Or, a further failure of selfishness.

The first pair of jeans I made, a year and a half or so ago, were from Jalie 2908, and were for Tyo. They turned out great (better, in hindsight, than the pair I made myself next), and fit Tyo like a dream.

For approximately a week before it got hot and they were abandoned for the summer, and by the end of her usual summer growth spurt they were thoroughly outgrown. I grumbled, re-measured, traced out her new size, and went on making any number of jeans for myself. In the intervening year and a bit, Syo got two pairs of jeans made just for her, and inherited Tyo’s original pair. So, really, Tyo had a fair bit of leverage going on when I finished Syo’s ruched jeans last week, and she instantly demanded her own pair.

In my defense, I already had these cut when the coat pattern from Zoe arrived. So really I had to finish my currently-underway project. I really did. And given that my sewing is currently of the one-seam-a-day variety, I’m doing pretty well to have these as far along as they are.

As per Tyo’s specifications, I combined the ruching from Syo’s recent pair with the same cut-out-over-plaid detailing of Tyo’s original pair (which was inspired by a RTW pair belonging to Syo… yeesh this gets confusing). And they’re skinny-ish. The plaid is the leftovers from Tyo’s purple shirt, which I also need to re-make in an appropriate size.

I re-measured Tyo and went up a size from the one I’d traced out for her last fall. She’s still closer to the smaller size, but I am not making another pair to be handed down instantly. So they’re not as snug as the RTW skinnies in Tyo’s wardrobe. The length isn’t quite as ample as I’d expected it to be, however, which may be a problem in the “growing into” department.

Anyway.

Pockets

I interfaced the plaid flannel with Armoweft to give it a bit of extra support without having to add a whole ‘nother layer of denim behind it (as I did in the first jeans). I think it’s a good compromise.  The yoke has a layer of flannel sandwiched between two layers of denim (even the Featherweight wasn’t happy stitching that), and once the waistband is in place I’ll snip around the top layer of denim. Once it’s washed a few times it’ll have a great fun frayed look. I suspect some distressing will be in order as well.

Pieced Waistband

As I was trying to squeeze the pair out of a denim remnant (I tend to buy 2 m lengths to make a pair for myself, so this is what’s left of that after I made my own jeans) I cut the waistband on the lengthwise grain (no stretch) and in two halves; again due to fabric shortage, I opted to face it in the flannel. Unfortunately, a quick fitting around Tyo’s hips on the weekend suggested that it was going to be a bit short, so I pieced a further bit on each end.  On the top left corner you can see the buttonhole where the buttonhole elastic will emerge from. At least this time I remembered to bind the edge of the waistband before attaching it. Much easier this way.  I feel like this is going to be a much more substantial waistband than the one on Syo’s pair… we’ll just have to see.

Darting yoke pattern piece. Only with two darts.

I made a couple of fit adjustments, although it’s not entirely clear how successful they were (I’ll get back to you once the waistband’s on). I curved in the yoke by a couple of cm (standard on Jalie 2908 unless you have a really flat butt, I think), and I increased the rear crotch length (height? depth?) by adding a wedge 1 cm wide at the CB seam, tapering to nothing at the side-seam. In theory, this gives Tyo a bit more (much needed) booty coverage.

It’s been nearly a week since my last post. I hate posting so infrequently, but that’s the state of things right now, and not likely to improve until later next year. I’m going to try to keep the blog limping along as long as I can, but at some point in the next few months the thesis s$&t will really hit the time-crunch fan, all semblance of a balanced, healthy lifestyle will go out the window, and I will be reduced to a twitching, zombie-like being stumbling around the house mumbling “cladistics is the answer and the problem!” and “intersubjectivity as a substitute for objectivity is flawed!”.

But in the mean-time, there are jeans.

And, hopefully soon, a coat.

18 Comments

Filed under Sewing

La Mode Syo

The cool kid.

Syo would like you to know that she’s far, far, too cool to be posing in her new jeans for her mom.

They are a little big. Not really satisfyingly skinny.

Syo’s mother would like you to know that Syo is going to have to deal, I am so totally done with making clothes that are outgrown a month later.

Now that that’s out of the way, a few final details:

Rear view. Oh, that's the shrug I made here

The pockets look good. I like my feature pocket.

Studs

The waistband is flabby as I didn’t bother to interface (and it’s cut on the cross, i.e. stretchy). However, there are now studs. I bought plain “Bachelor buttons” rather than jeans buttons this time, because I didn’t really feel like spending $8 for 8 buttons when I could buy four bachelor buttons for less than two. The bachelor buttons may be slightly wimpier than the (already flimsy) Dritz jeans buttons, but not too much. Someday when the perfect conjunction of money and motivation coincides, I will order some proper ones off the internets. Until then, my children will suffer. Syo wanted a snap anyway, but didn’t mention this until after the buttonhole was cut.

Fuzzy pockets

She really likes the fuzzy pocket-lining fabric. I’m thinking I should make a future pair lined in something similar… extra warm and extra cozy all in one.

Ruching

That gathered look has been achieved.

Got pug?

There are, however, few things cuter than a pug. Even a stuffed pug.

Also, I got the most awesome package in the mail today.

New pattern!

Yes, it’s that awesome 70s coat pattern Zoe made up last year and then recently decided to give away. I feel totally honoured and squee-tastic that she picked me (not to mention a little apprehensive. What if I stuff it up?). I am so excited. I’ve never made a Vogue pattern before. Bet you can’t guess which view I want to make. 😉

So I guess I know what my next project is. Aside from the pair of ruched jeans I’ve already cut out for Tyo, anyway.


23 Comments

Filed under Sewing