Category Archives: Sewing

Navy & Icing 

DSC08430No sooner do I declare that I like a bit of edge in my clothing, than I make a bunch of things that are super sweet.

2016-03-28 09.21.25-1

Butterick 6321 – Lisette

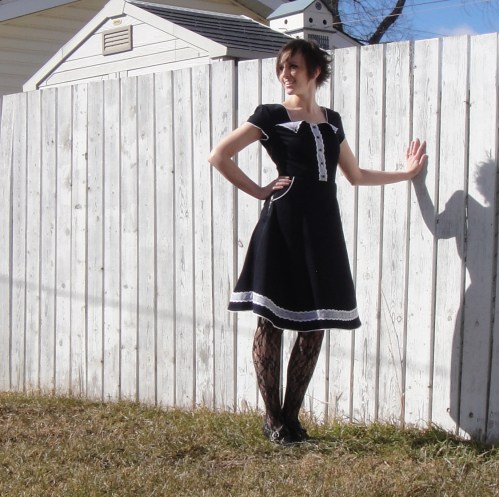
Butterick 6321 is a bonus project—a pattern featured in Fabricland’s current mailer, so available as an extra project if someone wants to do it. And it is seriously cute. And, pockets. But, I had a hard time settling into this project. Sometimes I feel a bit like a stereotype of myself as the girl who makes the pretty dresses. In the end, I like it more than I thought I might a lot of the way through, though.

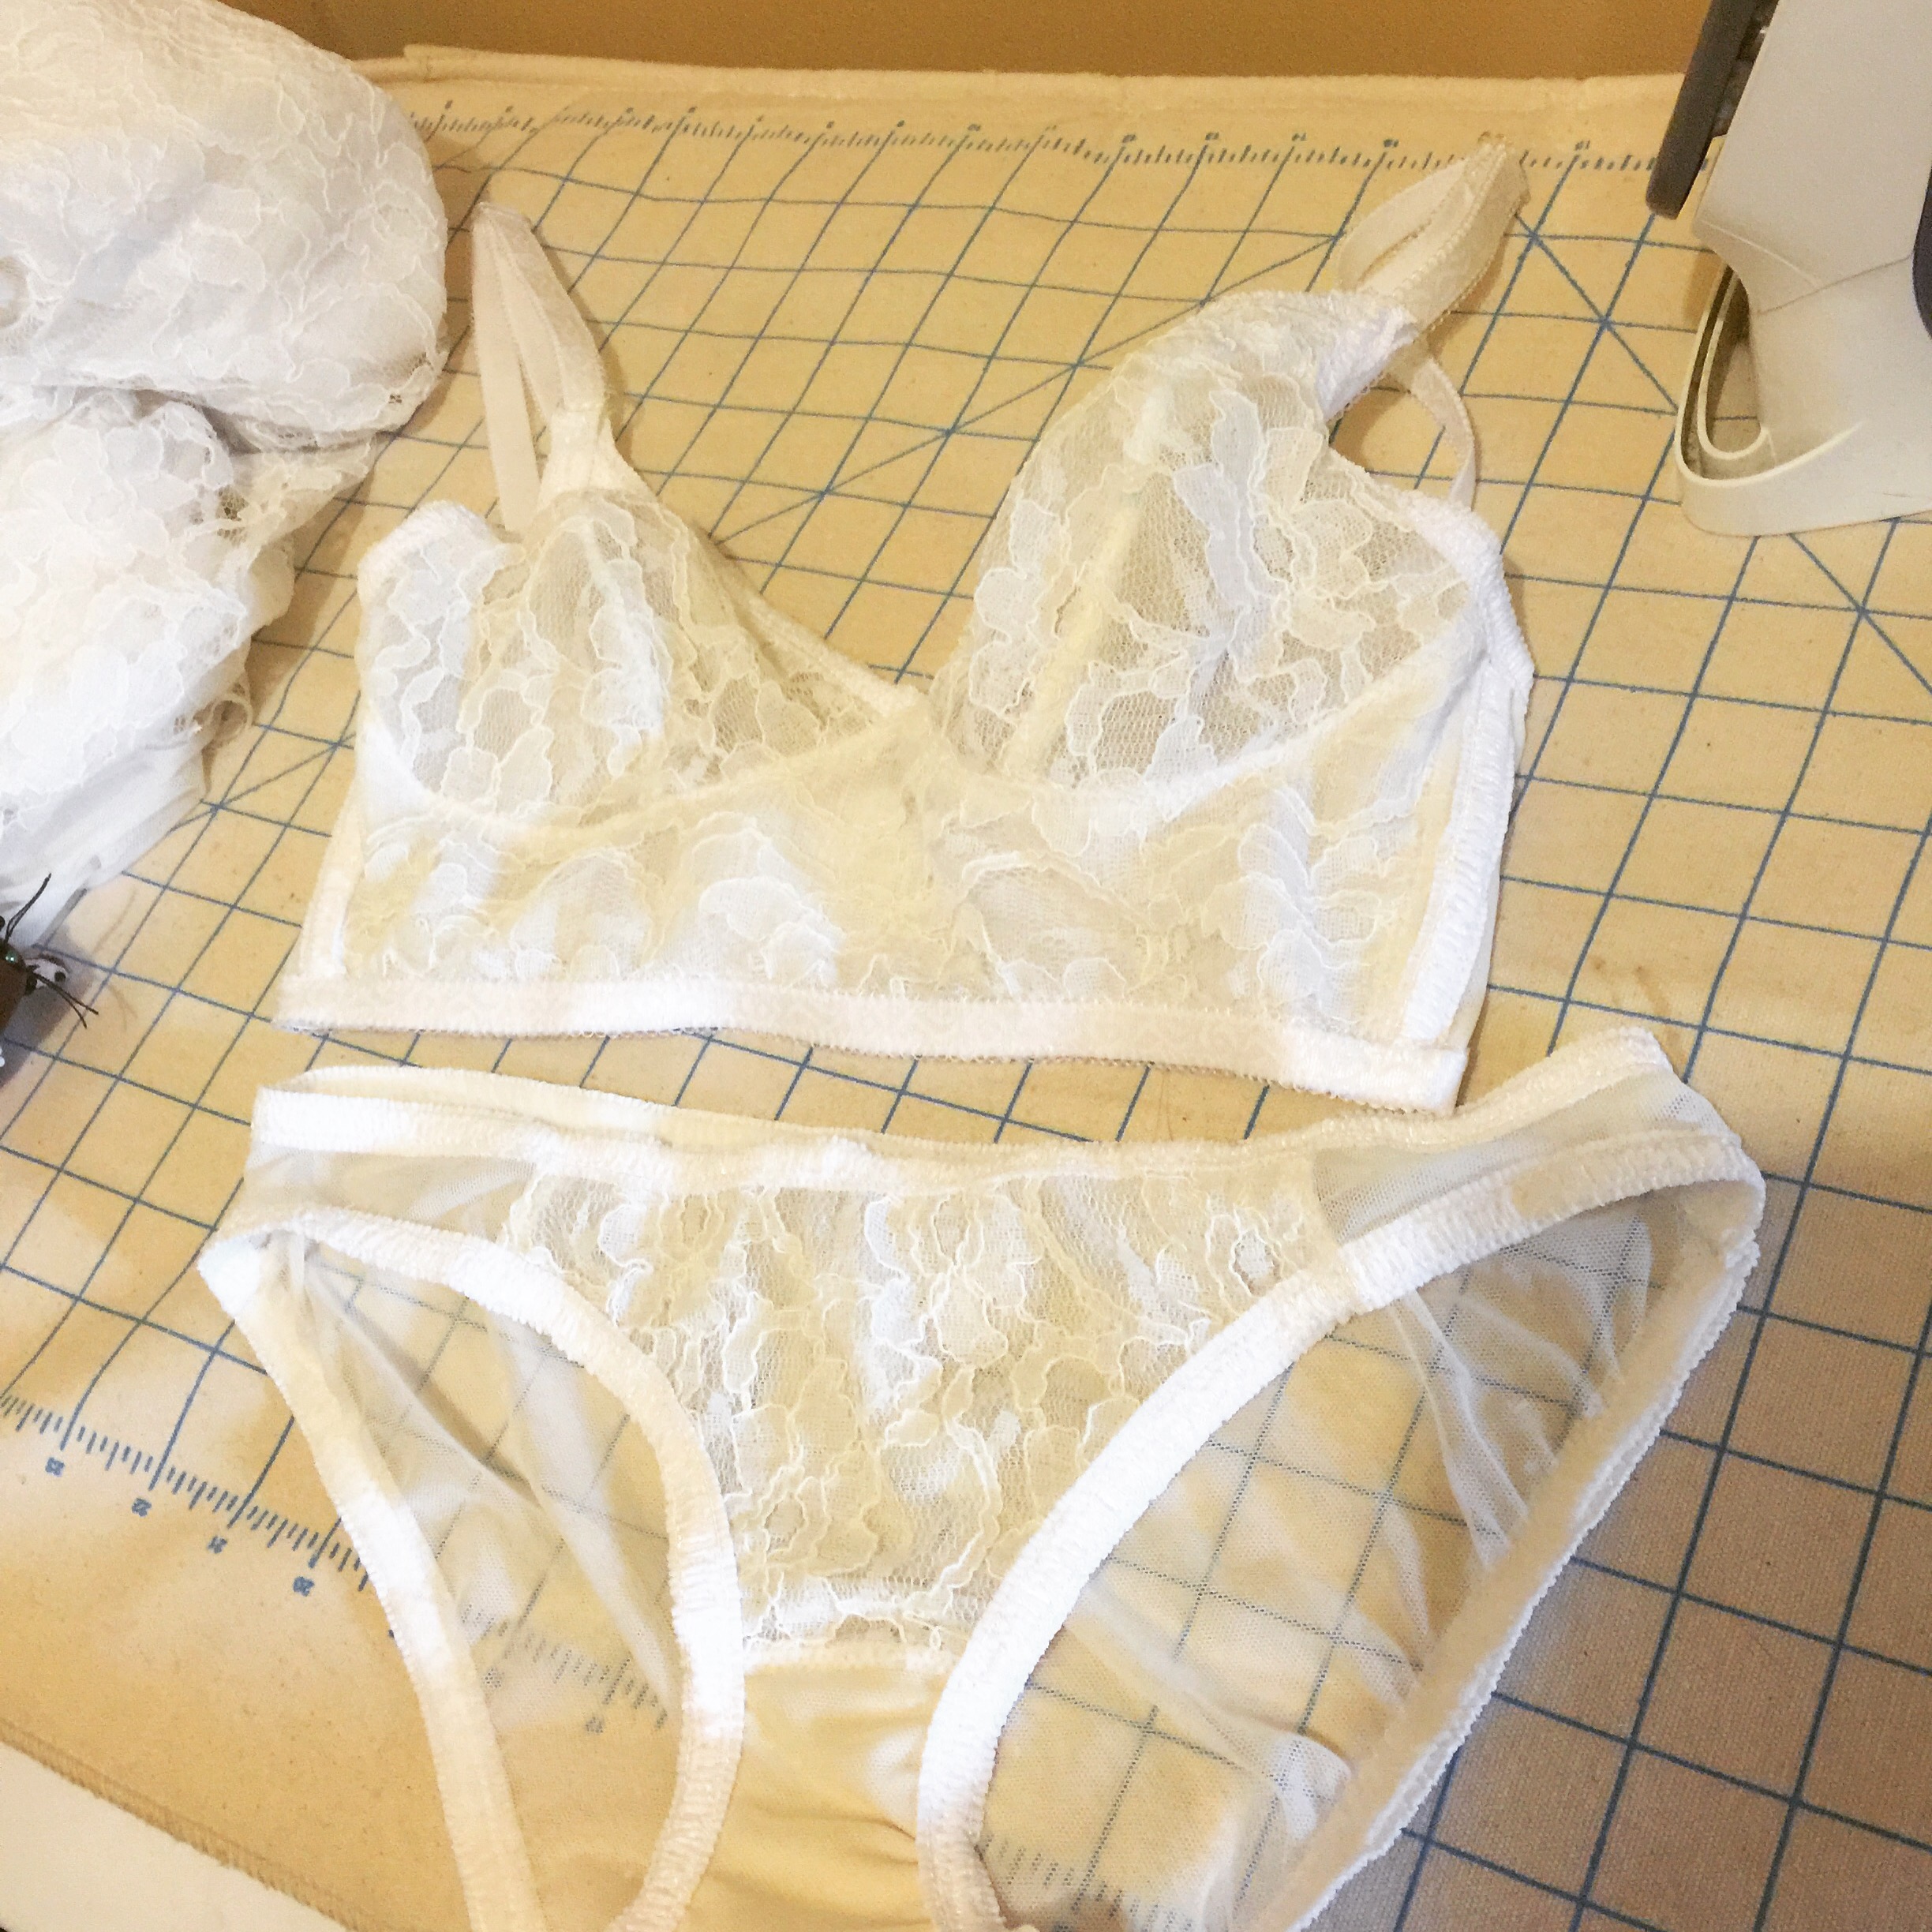
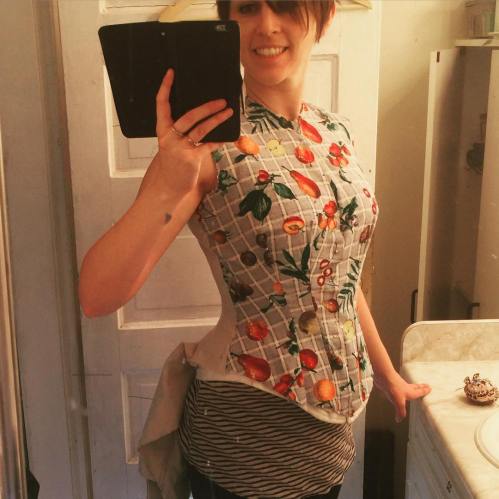
I had a hard time picking the fabric. We have a lot of gorgeous rayons and some nice summer cottons in store right now, but I liked how the detailing looked on the solid version on the cover. Eventually I settled on this pretty and very light-weight stretch denim, and lace for the detailing. I do love this lace, and have been looking for an excuse to use it in a project since it came in.

DSC08438

Instant fuzz collector.

After checking the final garment measurements, and knowing I was using a stretch fabric, I opted to sew a size 10 throughout, rather than grading to a 12 for waist and hips. I am glad I did the 10 in the bottom half, but I could maybe have gone down to an 8 in the bust and shoulders. (Typing that terrified me. I have never in my sewing life been an actual pattern size 8, though I’ve tried once or twice with disastrous results.)

DSC08429

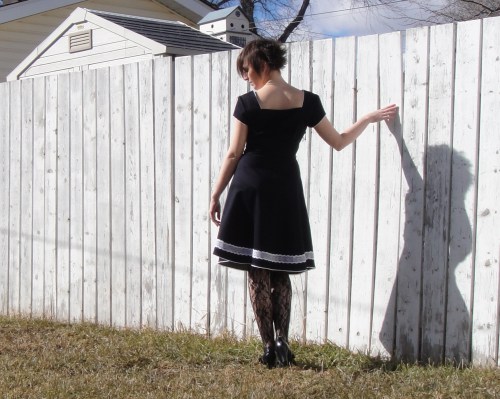
You can’t see it, but my swayback alteration was successful. No back wrinkles.

I made most of my usual alterations—swayback, square shoulder, and petiting along the designated lengthen-shorten line. What I skipped was additional petiting through the armscye. I figured, because of the construction with the seam there, I could adjust at that point later if necessary, and I overdid the petiting on a few projects last fall so I’m a bit gunshy now. Come to think of it, those were both McCall’s patterns, though.


DSC08429-2

Lightened. Nope, you still can’t see it.

Then I went and did my construction in such a way that it would be nearly impossible to adjust anything by the time I could actually try stuff on properly. In hindsight I could’ve left off the bodice facings and the sleeves until everything else was finished, tried on, and then fixed the shoulder height. Hindsight is so perfect, isn’t it? What I actually did was finish every damn thing on the bodice, beautifully, with plenty of seam grading and trimming to make things work in my heavy fabric, before I even had the skirt started.


DSC08428
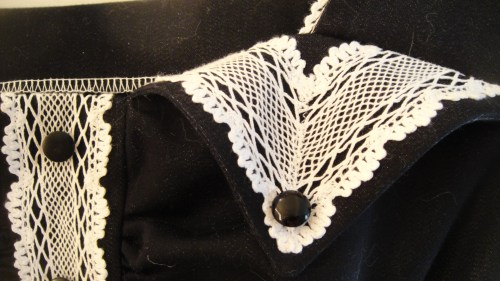
A couple of construction notes: the pattern calls for self-lined shoulder pieces and cap sleeves. I substituted a navy stretch poplin for these pieces (as well as the pocket lining) because of my heavier fabric. I also went a bit off road on the construction, as I wasn’t completely fond of the method described. I am pretty happy with what all I did, even the moment when I had the entire bodice rolled up inside the little front “placket” so I could machine finish it. Just not with the fit. /sigh.

This is another side-zip dress. *headdesk* it’s not so much the physical insertion of a side zip that I dislike, as the difficulty they add to fitting as you go, and then the awkwardness of wearing them after. In this case, we were wary of using an invisible zipper because of the heaviness of the denim… So rather than struggle with the bulk of a conventional zipper or a lapped side zip, I basically went for the nuclear option. Exposed, chunky metal zip.

2016-03-29 19.01.39I’m not sure if this is the wisest style decision I’ve ever made, but I do like the flatness of it. It goes with the denim but seems a bit out of place with the lace. And the fancy pull is gigantic. Oh, well.

At my first try on, before the zip was in, I confess my heart sank. The shoulders were weirdly wide and the cap sleeves came too low under my arms, feeling extremely constricting. I had visions of ripping off the sleeves entirely for a sundress look. Or just throwing it all in a corner.

DSC08431

Too much room in the shoulders.

But, it’s a work project and so no UFOs allowed. Once I had the zip in, things looked a lot better. With the waist sitting where it should, the extra height above the bust is more apparent, but it also forces the bottom of the cap sleeve up to the right height under my arm, so the weird binding is down to manageable proportions. Meaning I won’t be turning cartwheels easily but I can comfortably put my hands on my hips and cross my arms. The shoulders are definitely a bit wide, but some of that might also be the extra height letting things slide around. I don’t have narrow shoulders, by the way.


Extra height makes folds at shoulders.

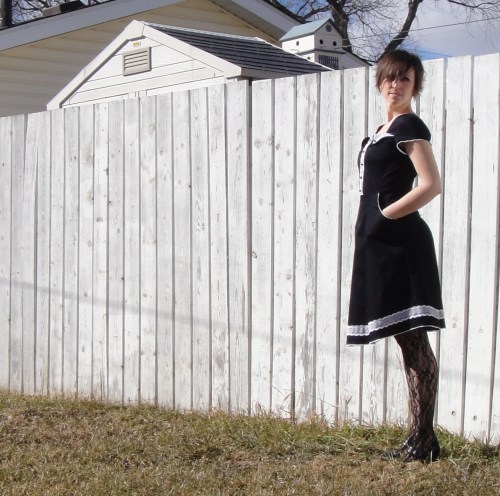
This pattern has a sweet, detailed upper bodice, and the skirt is fairly narrow with some interesting shirt-tail shaping at the hem (although it’s subtle, maybe a bit too subtle to be noticeable. On the other hand if it were more pronounced it would’ve been harder to get my wide lace to curve evenly to match the edge). I like them both—I’m just not convinced they go really well together. I’d love to pair the bodice with a fuller skirt (say, Sewaholic’s Hollyburn, which has the same kind of pockets) and/or the skirt with a little sundress bodice or even as a separate piece. In reality, though, I like the finished object more than I thought I might, and if I can bring myself to rework the shoulders I’ll probably be good with it as is.


DSC08427It does look a bit like a Victorian bathing suit.

11 Comments

Filed under Sewing

Sewing with offspring

  Last Saturday I wound up unexpectedly home alone with my children all evening. Of course I was going to sew (I’m a single-minded obsessive after all) but, rather unexpectedly, they wanted to join in. First Tyo, then Syo, and they both wanted to make… Underwear! 

Tyo, who just completed her first sewing unit in Practical & Applied Arts at Xmas, got her heart fixated on black lace boy shorts. I had some fabric I figured would be perfect—a hefty stretch lace with decent recovery, that I made a great pair of leggings from last year sometime (and didn’t blog, apparently). After a lot of googling I convinced her that not only did I know what boy shorts are, but that the Rosy Ladyshorts were, in fact, a boyshort pattern, and she agreed to make a slightly modified version—modified by adding to the bottom edge so that when she sewed on the stretch lace edging she could line its outer edge up with the fabric, and trim the excess away later. Considering she’s never sewn anything stretch before, never mind applied elastic by feel, I think she did awesome. 

  The crappy part is that since she has a pair of this fabric, I can’t make myself one, and it was a really great idea!!!!

  Syo wanted an aqua pair to match two of her bras, and we managed to find a lace in stash that was almost exactly the right colour. And fabric, but that’s less astonishing. Unfortunately not a stretch lace, which took some explaining, but we used it for the side fronts of my hacked Watson pattern. Now for some reason I feel a wee bit weird about showing you photos of my preteen’s underwear so I’m just showing you the fabrics.  

img_3115
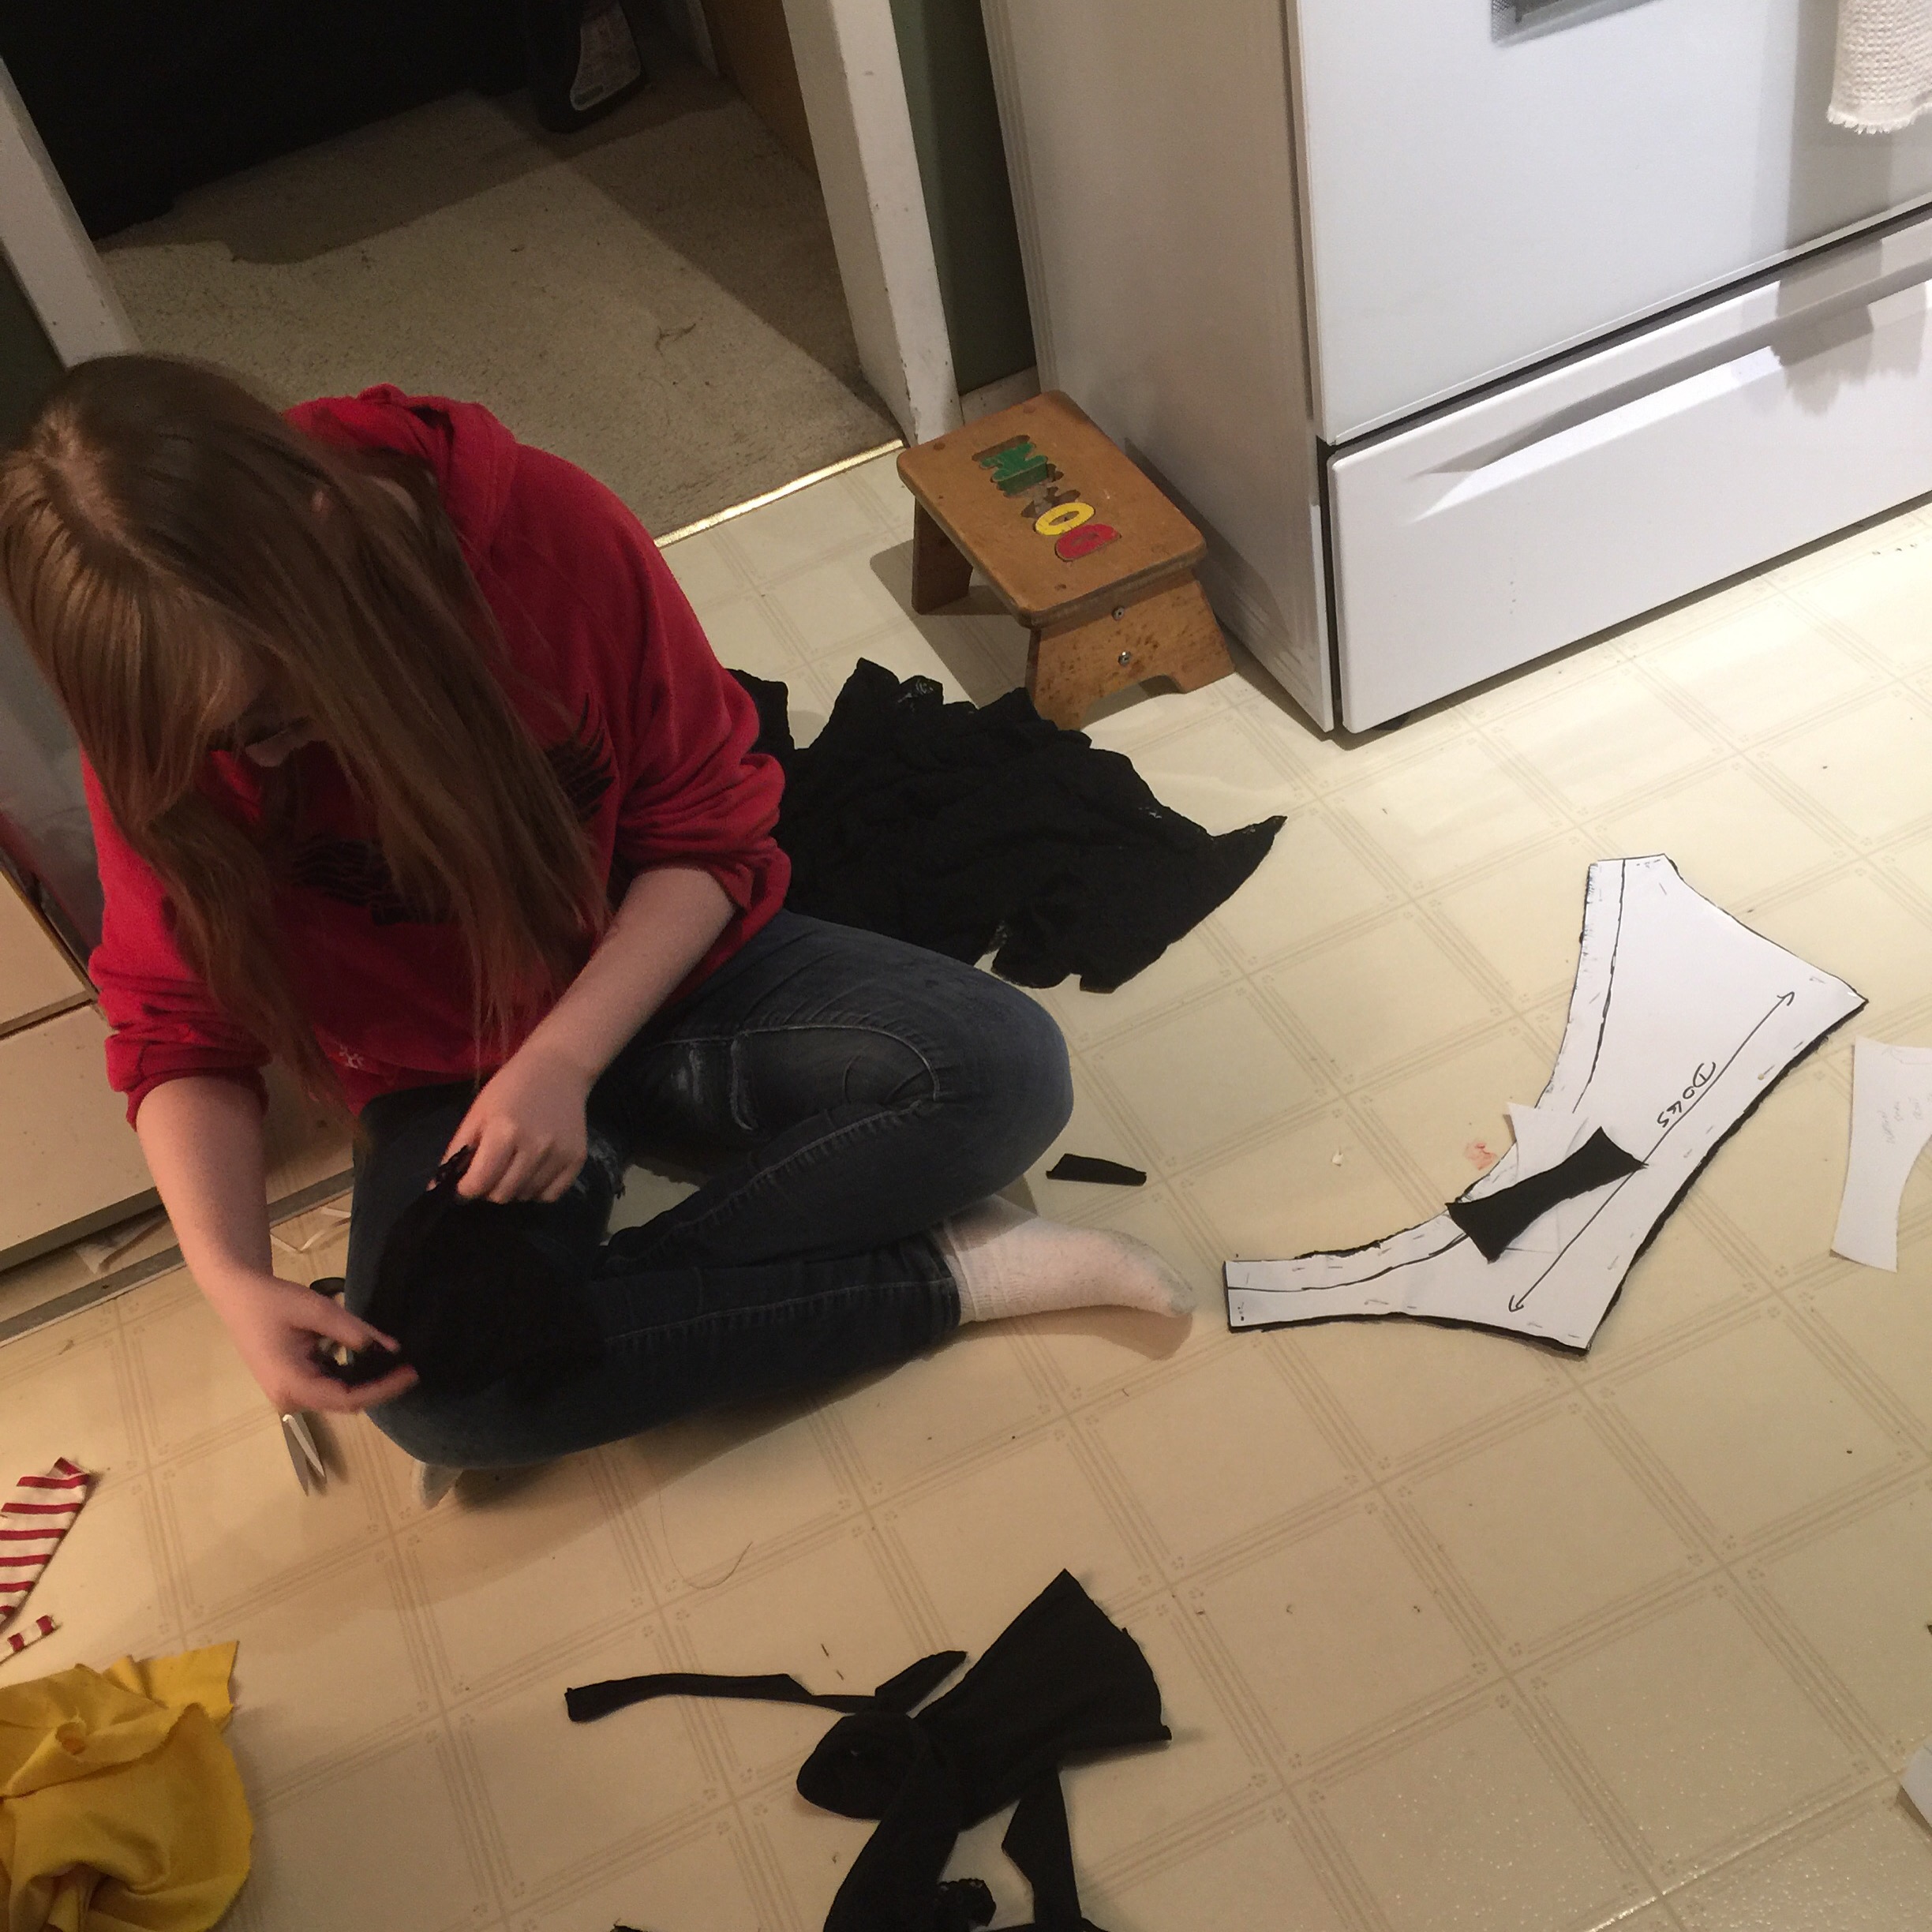
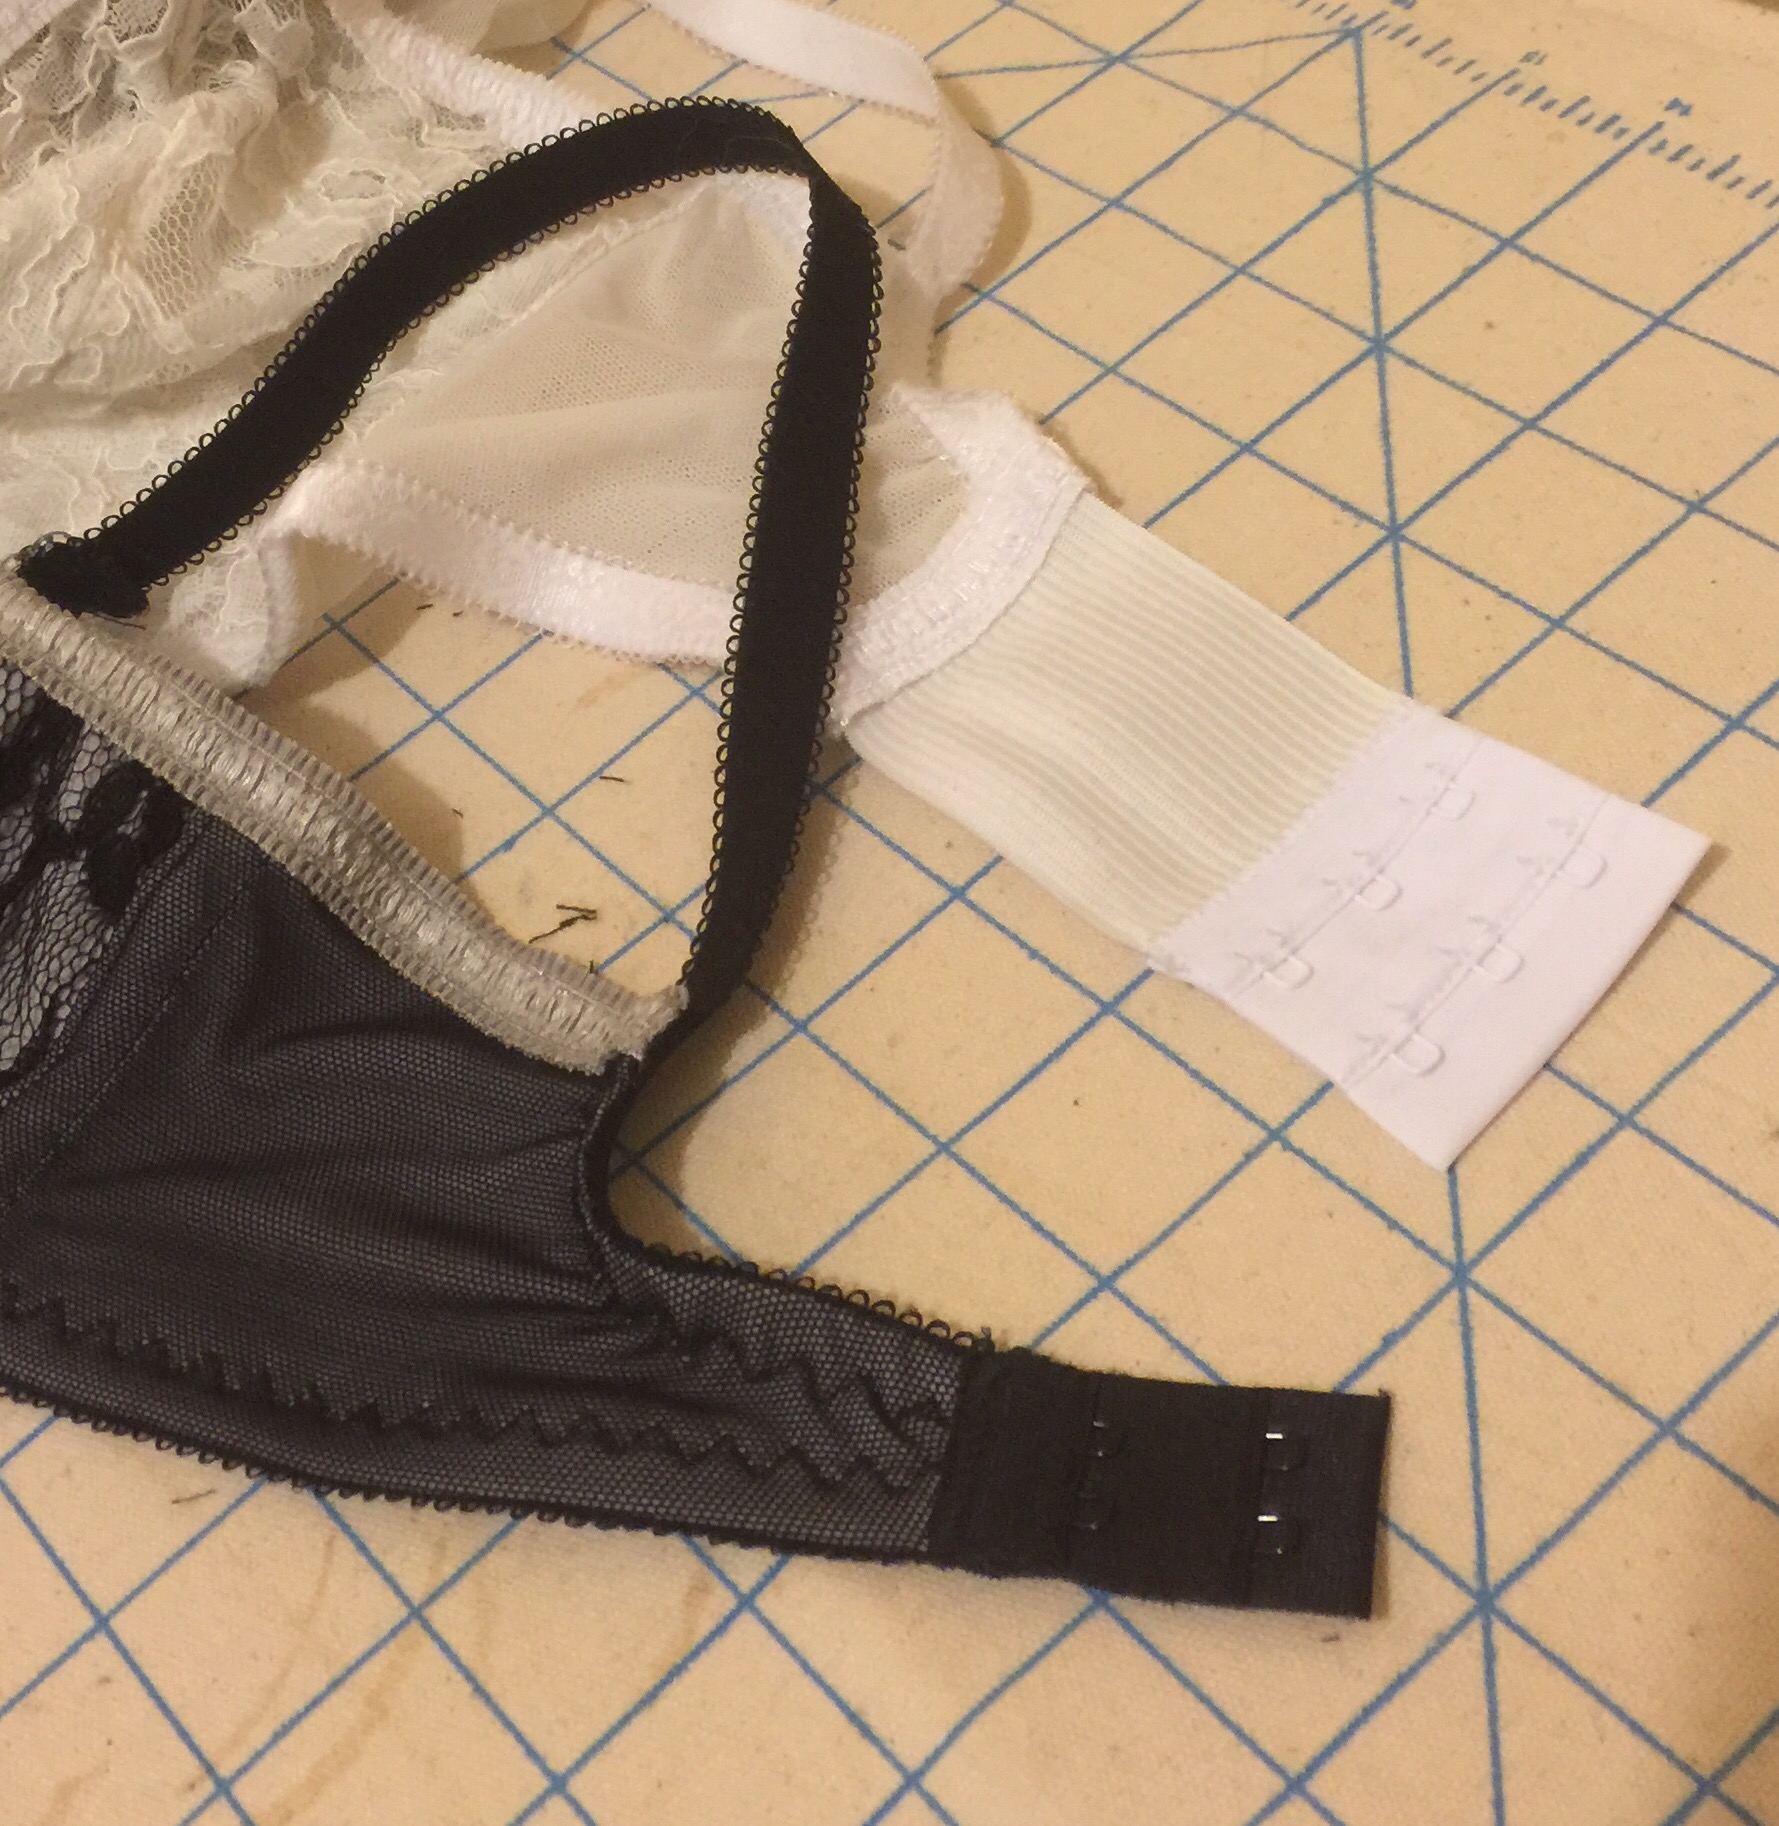
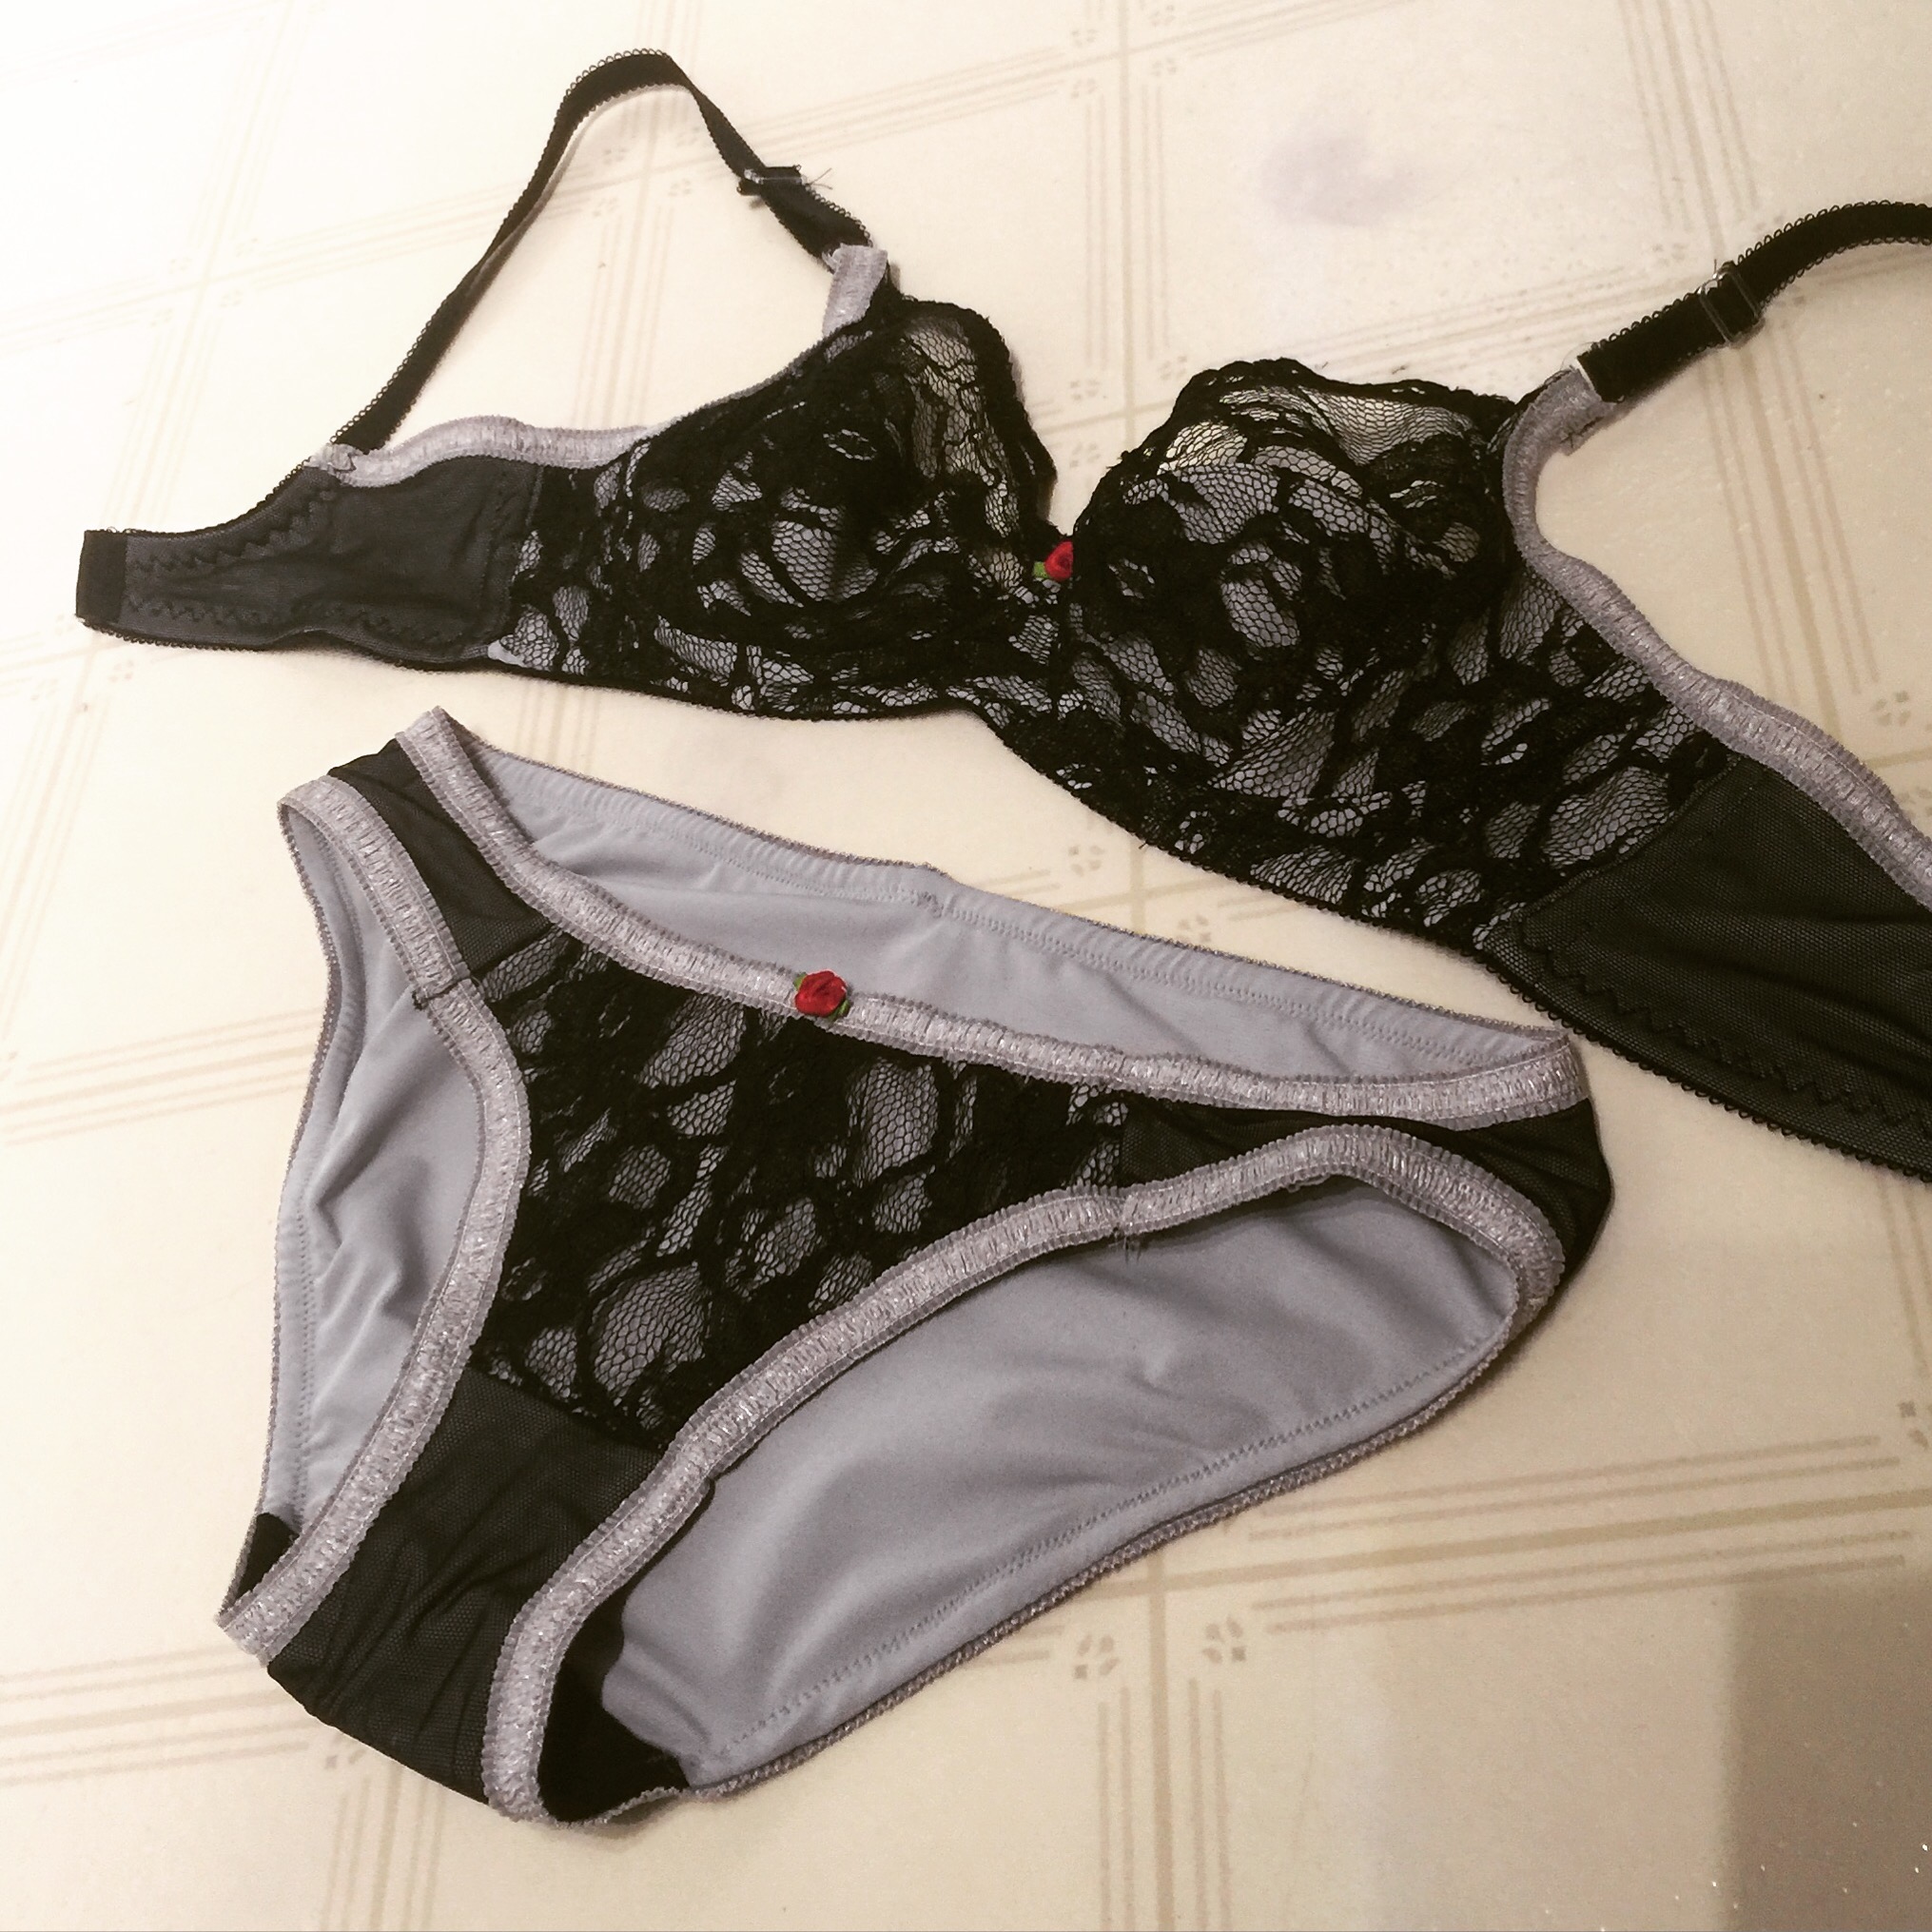
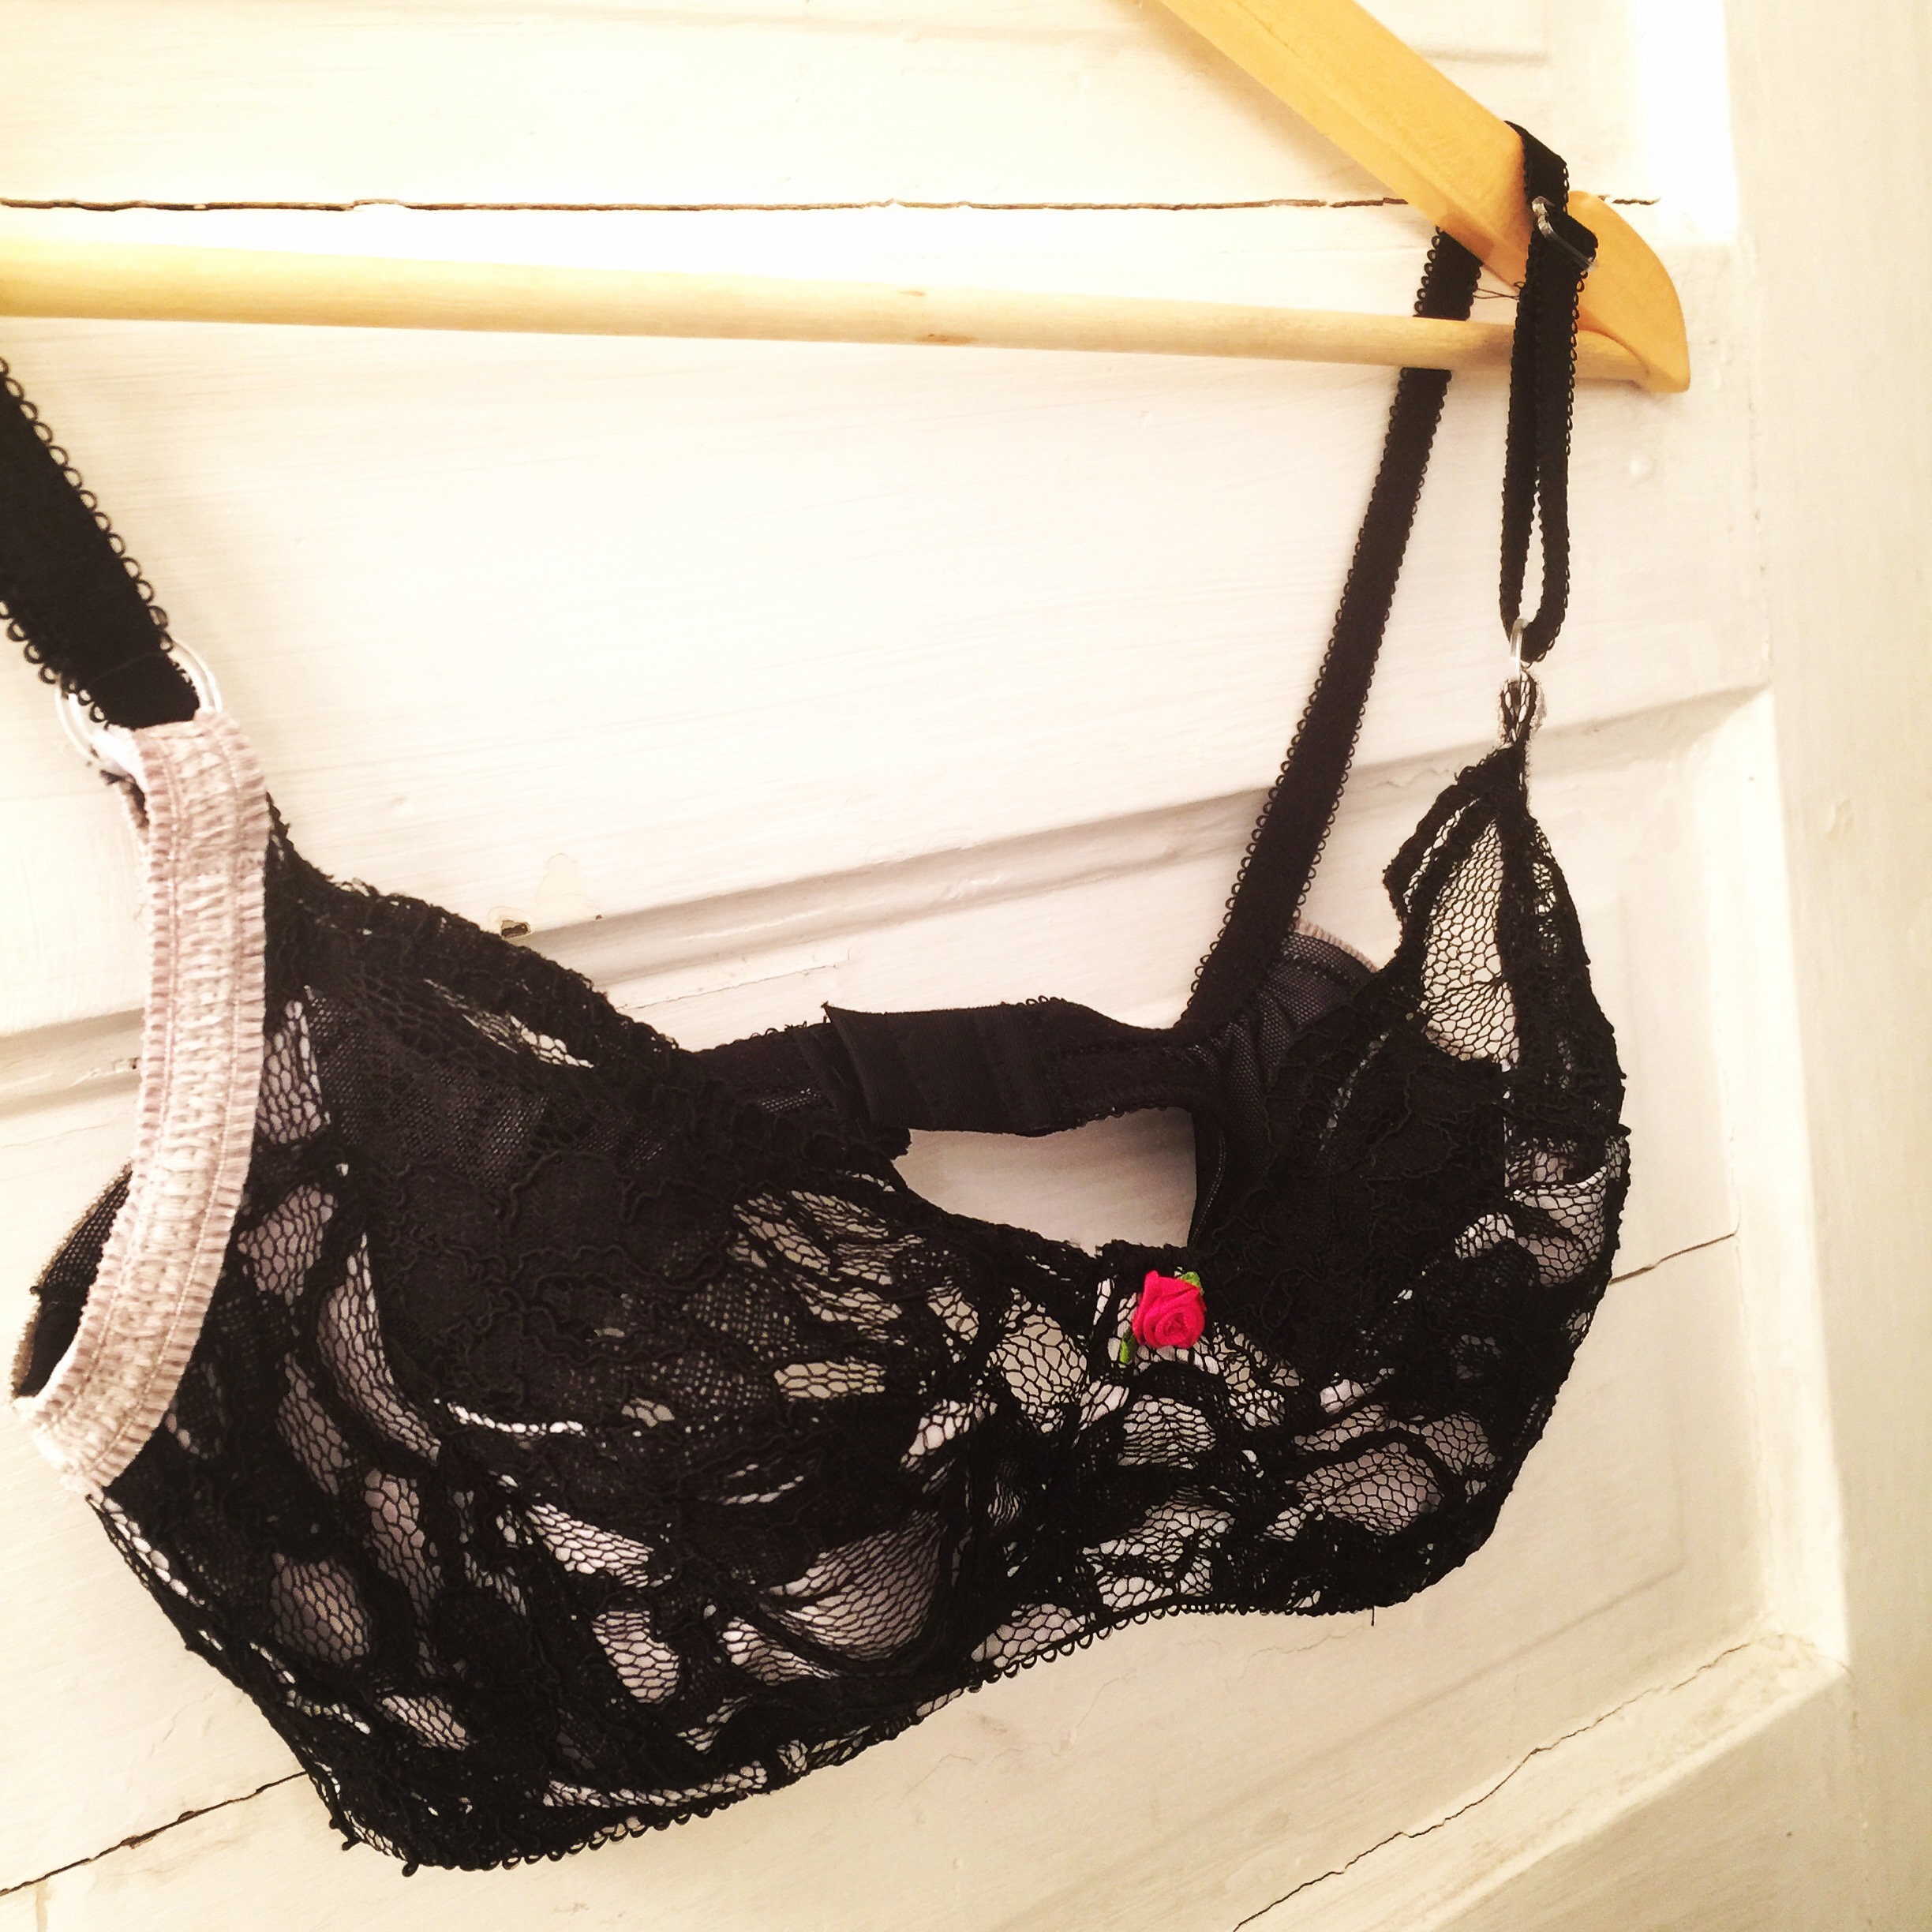
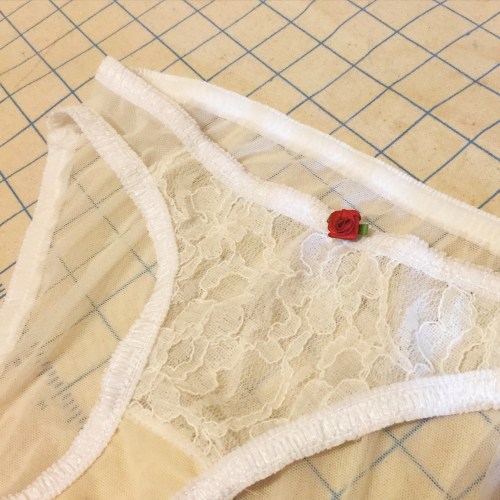
So imagine this pair but made of not-see-through aqua knit with the lace at the side rather than centre front. I wound up doing most of the construction as it was a bit more complex than was probably a good idea, but Syo cut it all out on her own. 

The convenient part about all of this is both children pretty much wear my same size right now in horizontal measurements, so there was little to no adjusting of size. Although that may also be saddening. /sigh. 

  And me? Well, I made up this very smart pair  of Ladyshorts in a camo mesh and got all excited…

And, for you camo haters out there, you have a win. This pair was a total fail. The lace was perfect but the mesh has way too much stretch in one direction, little recovery,  and absolutely none in the other, and they were BAGGY! And no amount of taking them in would fix it. UGH. I feel like the Rosy Ladyshorts, more than any other underwear pattern I’ve made, really depend on the fabric having just the right amount of stretch and recovery. When I nail it, they’re amazing, but when they don’t work, the fail is epic. Ah, well. It’s not like I don’t have lots of other underwear in my drawer…

I really want a black lace pair like Tyo’s, dammit. 

14 Comments

Filed under Sewing

Victorian Romp

_MG_0155My ersatz Victorian dress is finished, or at least as finished as it is likely to get, which is to say there is trim of some kind on all three main elements. (Waist, aka bodice, skirt, and overskirt.) I’m actually reasonably comfortable that it falls within the range of Victorian “normal” and isn’t too weirdly stripped-down, which is actually the biggest thing that often seems off about costumes (at least to me). Well, the skirt is probably a little too plain. And the whole thing is on the plain end. Just, hopefully not too plain. (And my neckline is completely inappropriate for a day dress as far as I can tell, while my suiting fabric would not be a good choice for evening wear… but this was my “fun” project and I don’t personally like high necks, so I picked the neckline I liked.

Button Fixin

While getting dressed, I lost a button. A significant amount of the editing involved photoshopping the button that popped off when I was getting dressed.

The bodice has a pleated ribbon trim; the overskirt has the same ribbon, but unpleated. For the skirt I took all the remaining bias tape from my main fabric and folded the edges under to make a trim I could stitch down. This was the least successful trim as the bias is somewhat rippled (even though I stitched both edges in the same direction). I wasn’t convinced the placement was any good, either, but actually looking at the photos I don’t mind it. I don’t feel inclined to rip it all off, in any case. If I had more of the red fabric I would add a pleated trim around the bottom of the skirt, but I don’t, and at least at present I don’t feel like buying more.

_MG_0132Anyway, this completion happily coincided with a couple of things. With my most recent Victorian Sewing Circle afternoon. Also, my sister-in-law, who has always dabbled in photography (and even worked as a portraitist a few times) has decided she wants to really get into the game. Photographer with a Real Camera who just wants some serious practice? Sign me up! So I got her to meet me at the Marr Residence that morning for a fun (almost*) period photo shoot.

_MG_0026ad_1

We started with boudoir shots.

It’s been a really long time since I did a real photo shoot with, like, an actual photographer. It was really fun.


with book light playing 2
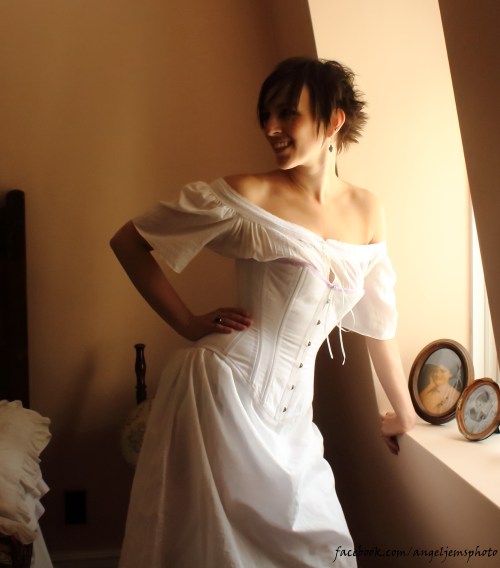
We bounced around the house, playing with the light.

At the firexcfEvery room was different.

With Tree

The Marr Residence has a great little double-lot park, and the day was warm enough that it wasn’t a huge sacrifice to run around in the snow—although the tail end of winter is not the most scenic time of year anywhere.

Angie was good enough to let me have at the electronic files. It’s also been a really long time since I took the time to seriously edit photos for anything. I am not on the Better Pictures Project. 😉 most of my blog photos are quick snaps with my iPhone, occasionally tripod shots on my point ‘n shoot, and the editing I do is only basic straightening, cropping, and a wee bit of contrast & exposure. Mostly via the built-in iPhone editor. It’s a hard reality that I have accepted—if I wait for good photos before I blog, there will be no blog.

26018139361_aecb868b5a_o

But it was sure nice to actually take some time with these, both the photo shoot and the editing. And I even had RAW to play in! (I am not a good enough photo editor to tell you if RAW actually makes a difference in the final photo, but it sure is FUN!) though most of these were done from the jpeg as it’s just faster for me. RAW is like a rabbit hole from which there is no return.

Water sepia glow (2)

I can’t help it. I love me some cheesy filtering sometimes.

I did most of the editing in GIMP (the GNU Image Manipulation Program) which is photoshop’s slightly awkward but most importantly free little brother. It can do pretty much whatever photoshop can, and doesn’t cost a dime (and it took about three seconds of googling for me to find and download the add-ons for processing RAW format and batch-editing. I do find it difficult to bounce back and forth between the two programs, as you have to remember two different ways to do everything, but if you don’t want to shell out for Photoshop it’s a pretty awesome alternative.


Laughing on the path redI may have had a bit too much fun with the editing process, making sepia and low-colour versions. Oh, well. They’re my photos and I’ll cheese ’em up if I want too. I also lost the cover off one of my fabric-covered buttons while getting dressed, so that had to be photoshopped out of a bunch of pics. I will warn you, I also took the liberty of some SERIOUS Photoshopping once or twice—so if you catch yourself wondering “is her waist really that small?” The answer is probably “no, not even in a corset.” PICTURES LIE!!!!

Outside house tight red

PS, should you have the inclination, you can find my photographer at Angel Jems Photography—facebook page for now, hopefully a real website at some point. Also I’ve uploaded a few more photos on my Flickr page:

Victorian Romp

and:

Victorian Romp Sepia

What we didn’t get were any shots resembling an actual Victorian portrait, standing stiffly against a backdrop and not smiling. These pesky modern photographers and their action shots and candid snaps. Maybe next time.

Outside and pensive*you’ve seen my hair, right? Short of concocting a story about how I cut it off and sold it to buy a chain for my husband’s prize watch, which he sold to buy me a comb for my beautiful hair, we’re kinda stuck. I don’t have an appropriate wig, and I’m disinclined to go out and buy one at the moment. I also don’t have a period hat for the outdoor shots.

Tree hug contras

Ok, I’ll stop now.

10 Comments

Filed under Sewing

So not cool.

img_3410So a crummy thing happened last Friday. Not a tragedy, exactly, but a bummer. And I’m not mentioning it to condemn humanity, or even as a plea for sympathy (though I’ll take it), but just because this is my record of things to do with my sewing and nothing like this has actually happened with any of my sewing before.

Remember this green dress, Burda 6686, made for a work project a couple of weeks ago? Well, like a good little employee I hung it up at Fabricland, nice and front and centre on one of the little plastic half-mannequins we have for such display, and boy did it look cute, if I do say so myself. (I think my Courtney Love reference was a bit lost, however—it just looked like a sweet little sundress.)

Well, during the busyness of last weekend’s half-price sale, somebody seized a moment when no one was looking, pulled the mannequin down, pulled the dress off it, and walked off with my dress. It was such a little thing it would have fit easily in a pocket…

img_3425So yeah. Kinda bummed. 😦 Which I already whined about thoroughly on Facebook, but anyway. One nice thing did happen since then—my management was approved to replace my materials, so I can make the dress again.

2016-03-23 22.09.10-1Plus they threw in a little bonus of comp goods of my choice as a partial comp for my time—so I was able to pick up some trims for my next Victorian costume. Because, y’know, priorities. 🙂

So really I should just buckle down and make the damn dress again, because the last thing I want is the fabric sitting there in stash mocking me. I really, really, really should…

img_3427

34 Comments

Filed under Sewing

Rinse, lather…

Repeat. 

  I made Burda 6686 again. 

Not even a different version. Just longer. And with no edge to cut the sweetness. This one is sugar all the way. 

The fabric is a scrumptious cotton gauze that came home with me as a splurge after Christmas. I wasn’t sure what it wanted to be, but I was in love. (That kinda happens a lot.)

  It’s pale grey shot with blue, though I can’t seem to get the blue to photograph. While I was surprised how opaque my thin rayon was in the first version, this version is definitely sheer, and the straps on my long slip show around the wide neckline. Oh, well. 


It was probably at its best in this mirror shot before I went and wore it all day…


I added lace at the neck again, and a bit more along the underbust seam. This version pulls up a bit during wearing, more than the green one seemed to. I’m thinking it’s that the gauze has a lot more give than the rayon. I tried loosening the elastic at the neckline so there was less pull up, but it just got floppy and gapey. I could add elastic at the underbust but I’m wary of gathering on the skirt portion. 

  I shall wear it anyway. 🙂


Swayback adjustment win: Perfect wrinkle-free back! Well, aside from the wrinkles from sitting in it all day.


 I lengthened the skirt and added a bit more flare than as drafted. I was worried it was too long, but now that I hemmed it up 2″ (machine blind hem this time 😉 ) I actually think it might be a bit short. Certainly too short for the heels I’m wearing. I can always let it out if I need to. 


Did I mention how much I love this fabric? Almost as much as I love that I managed to squidge across my soggy backyard to take outdoor pics in the snow-free part. Snow is back today, of course. 


In my imagination this is the perfect combination of a Regency historical silhouette with modern wearability (for a given level of wearable. 😉 )

Definitely needs ballet flats rather than heels, though. 

15 Comments

Filed under Sewing

Sweet n’ skanky

img_3424
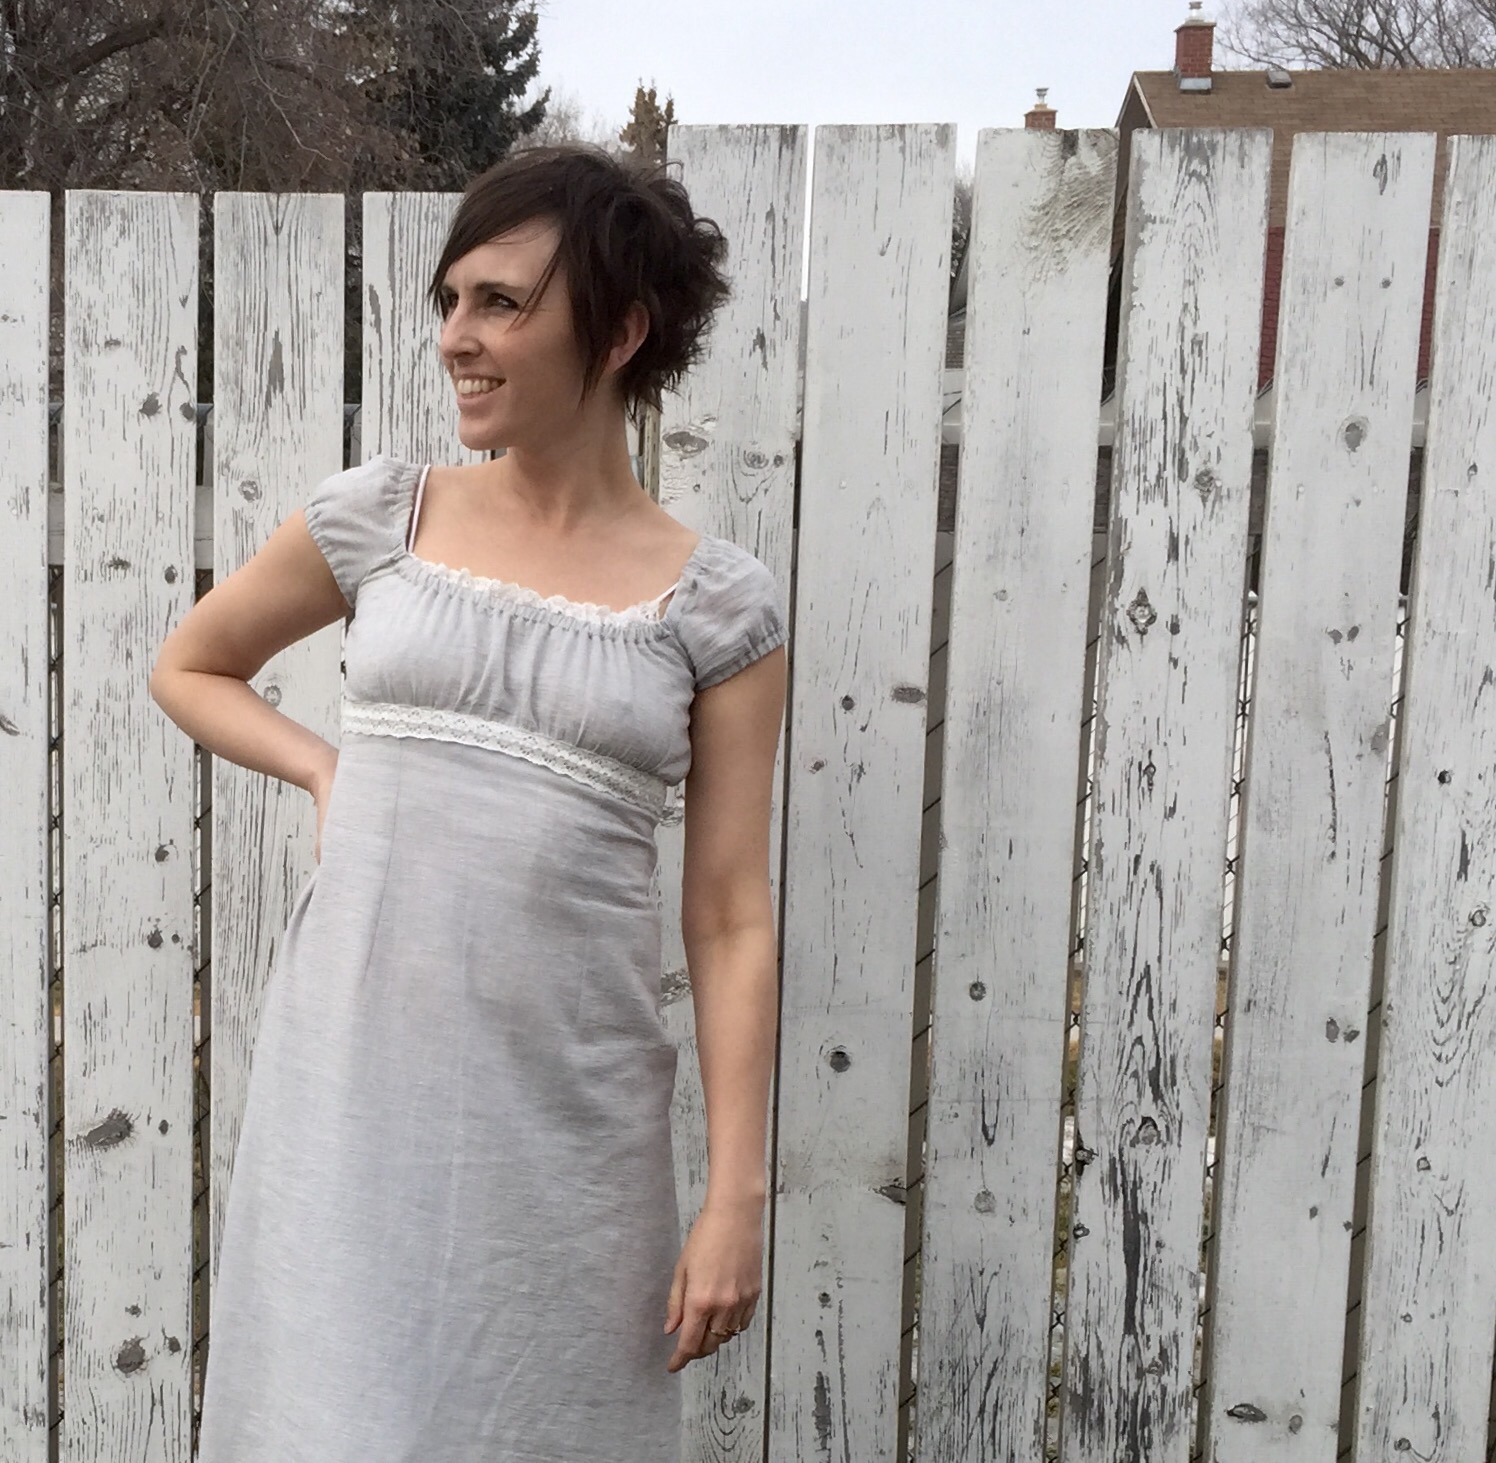
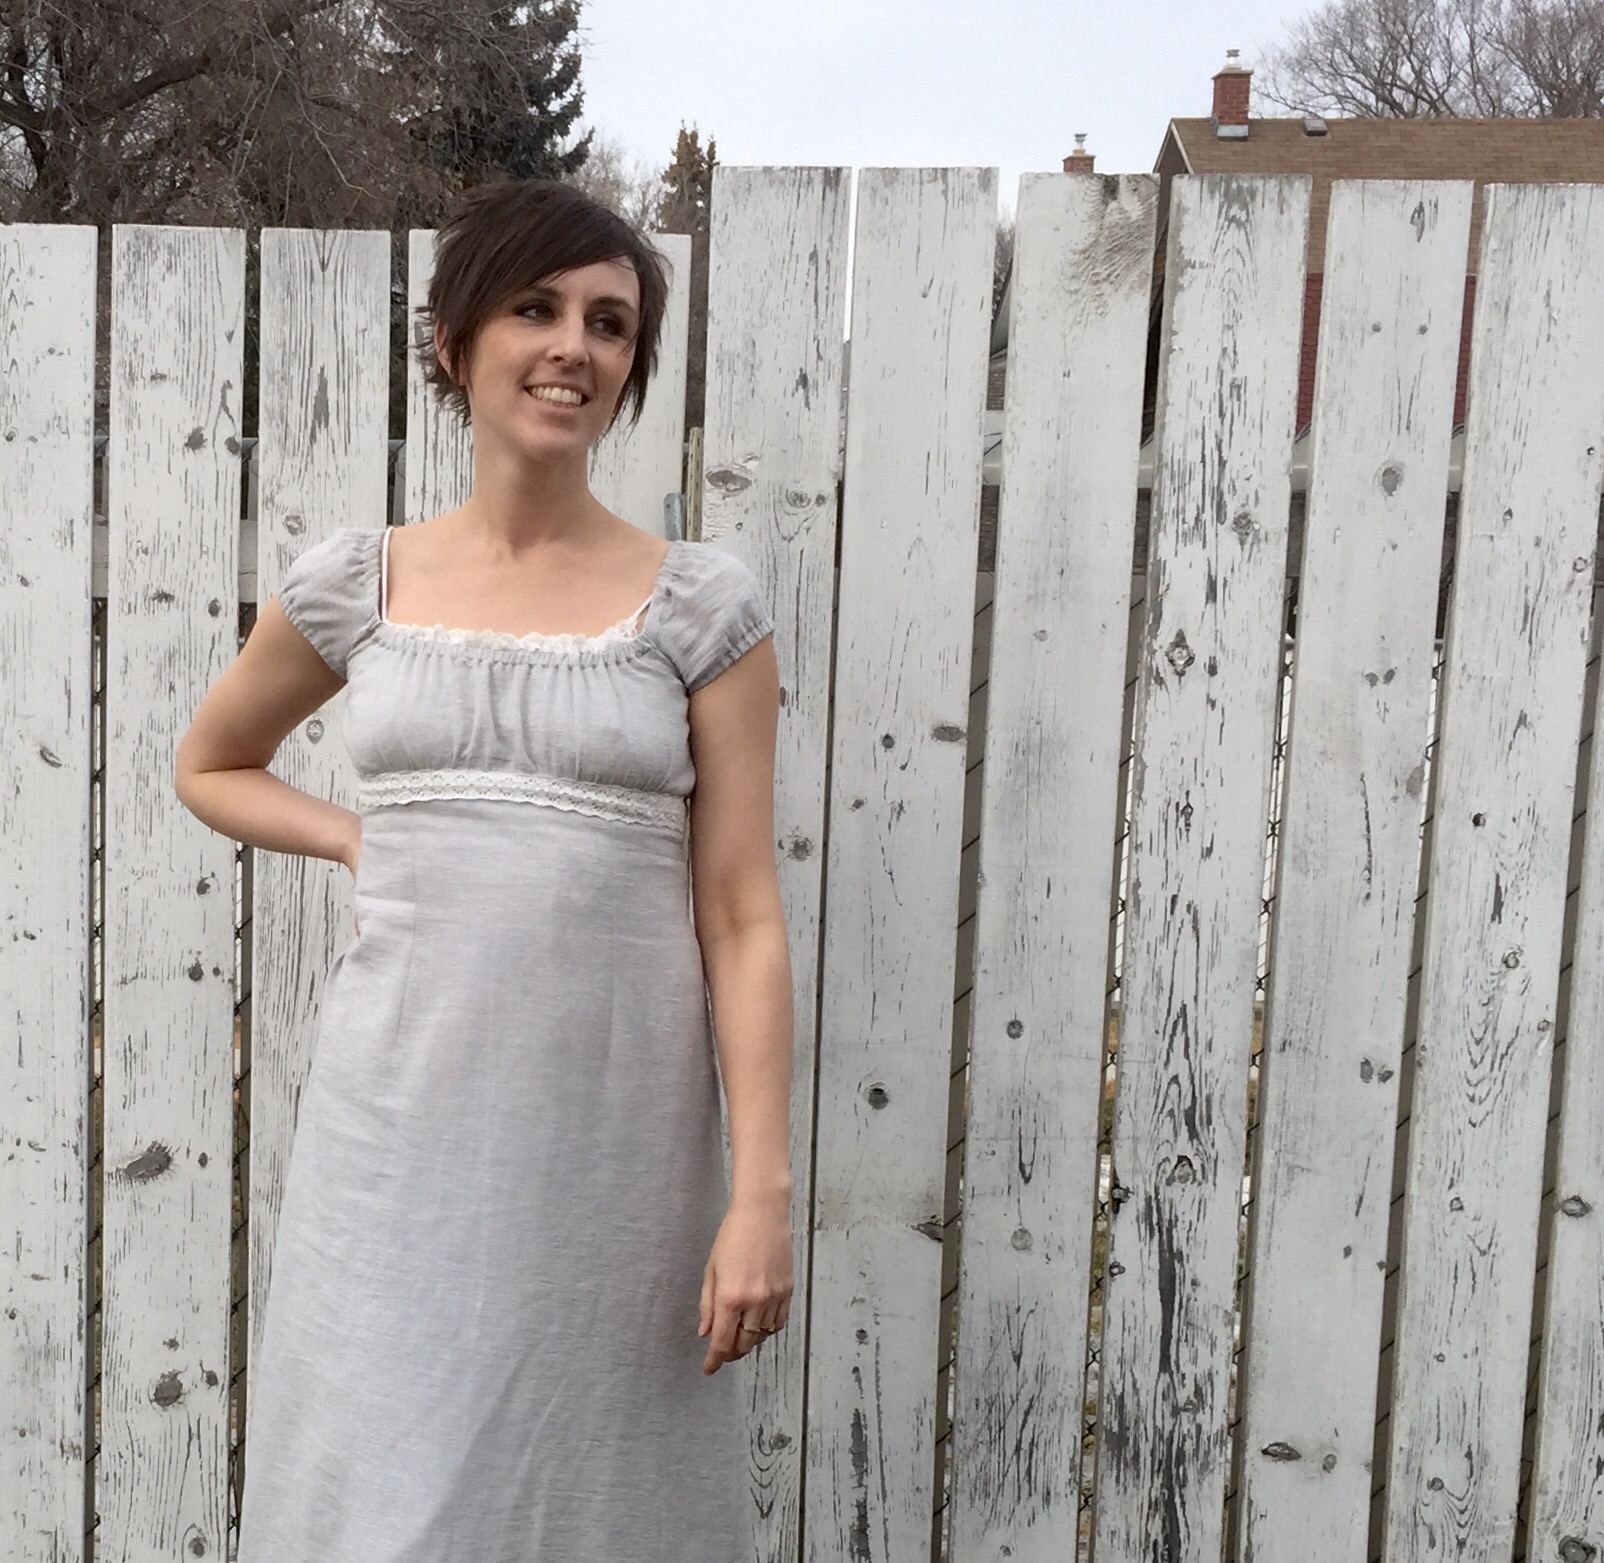
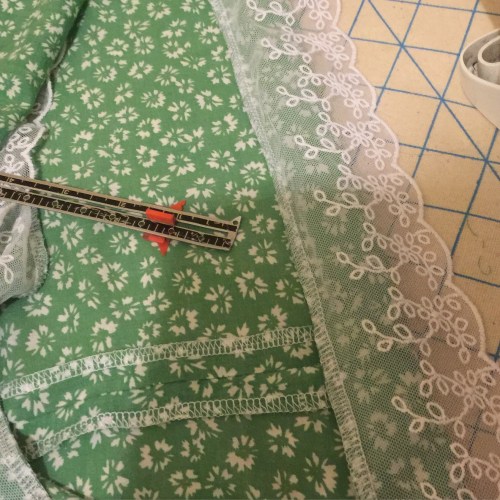
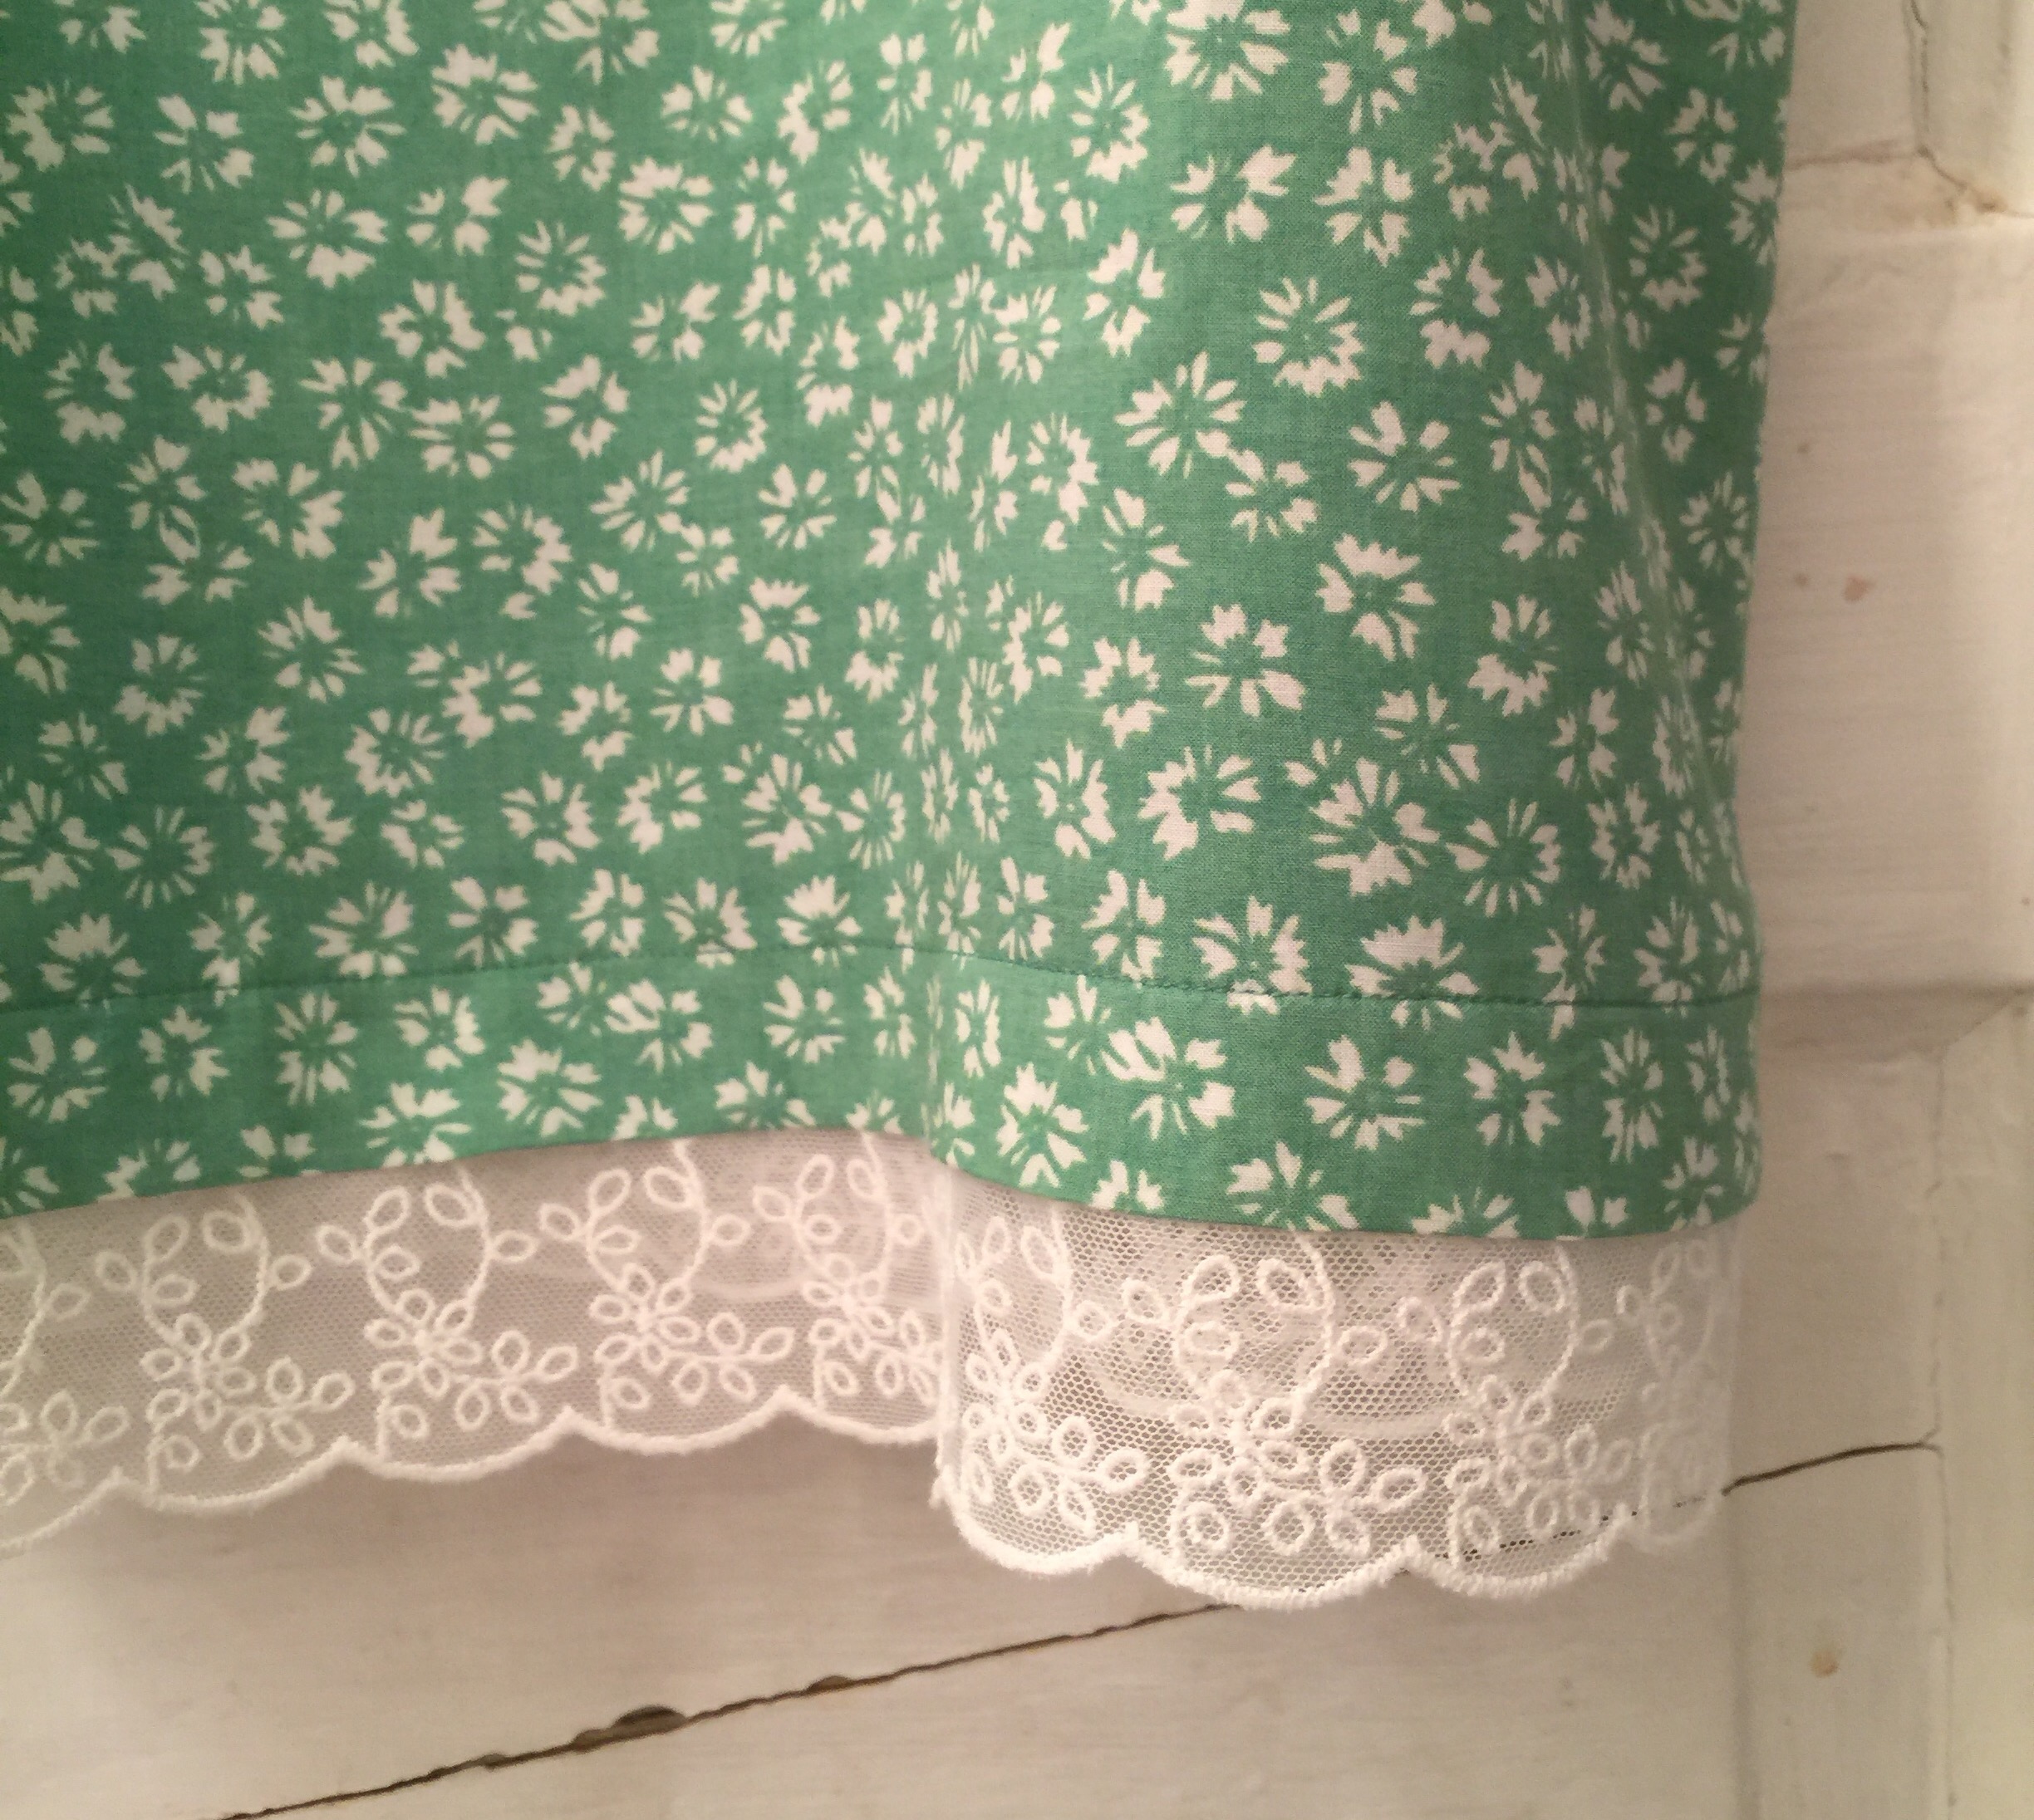
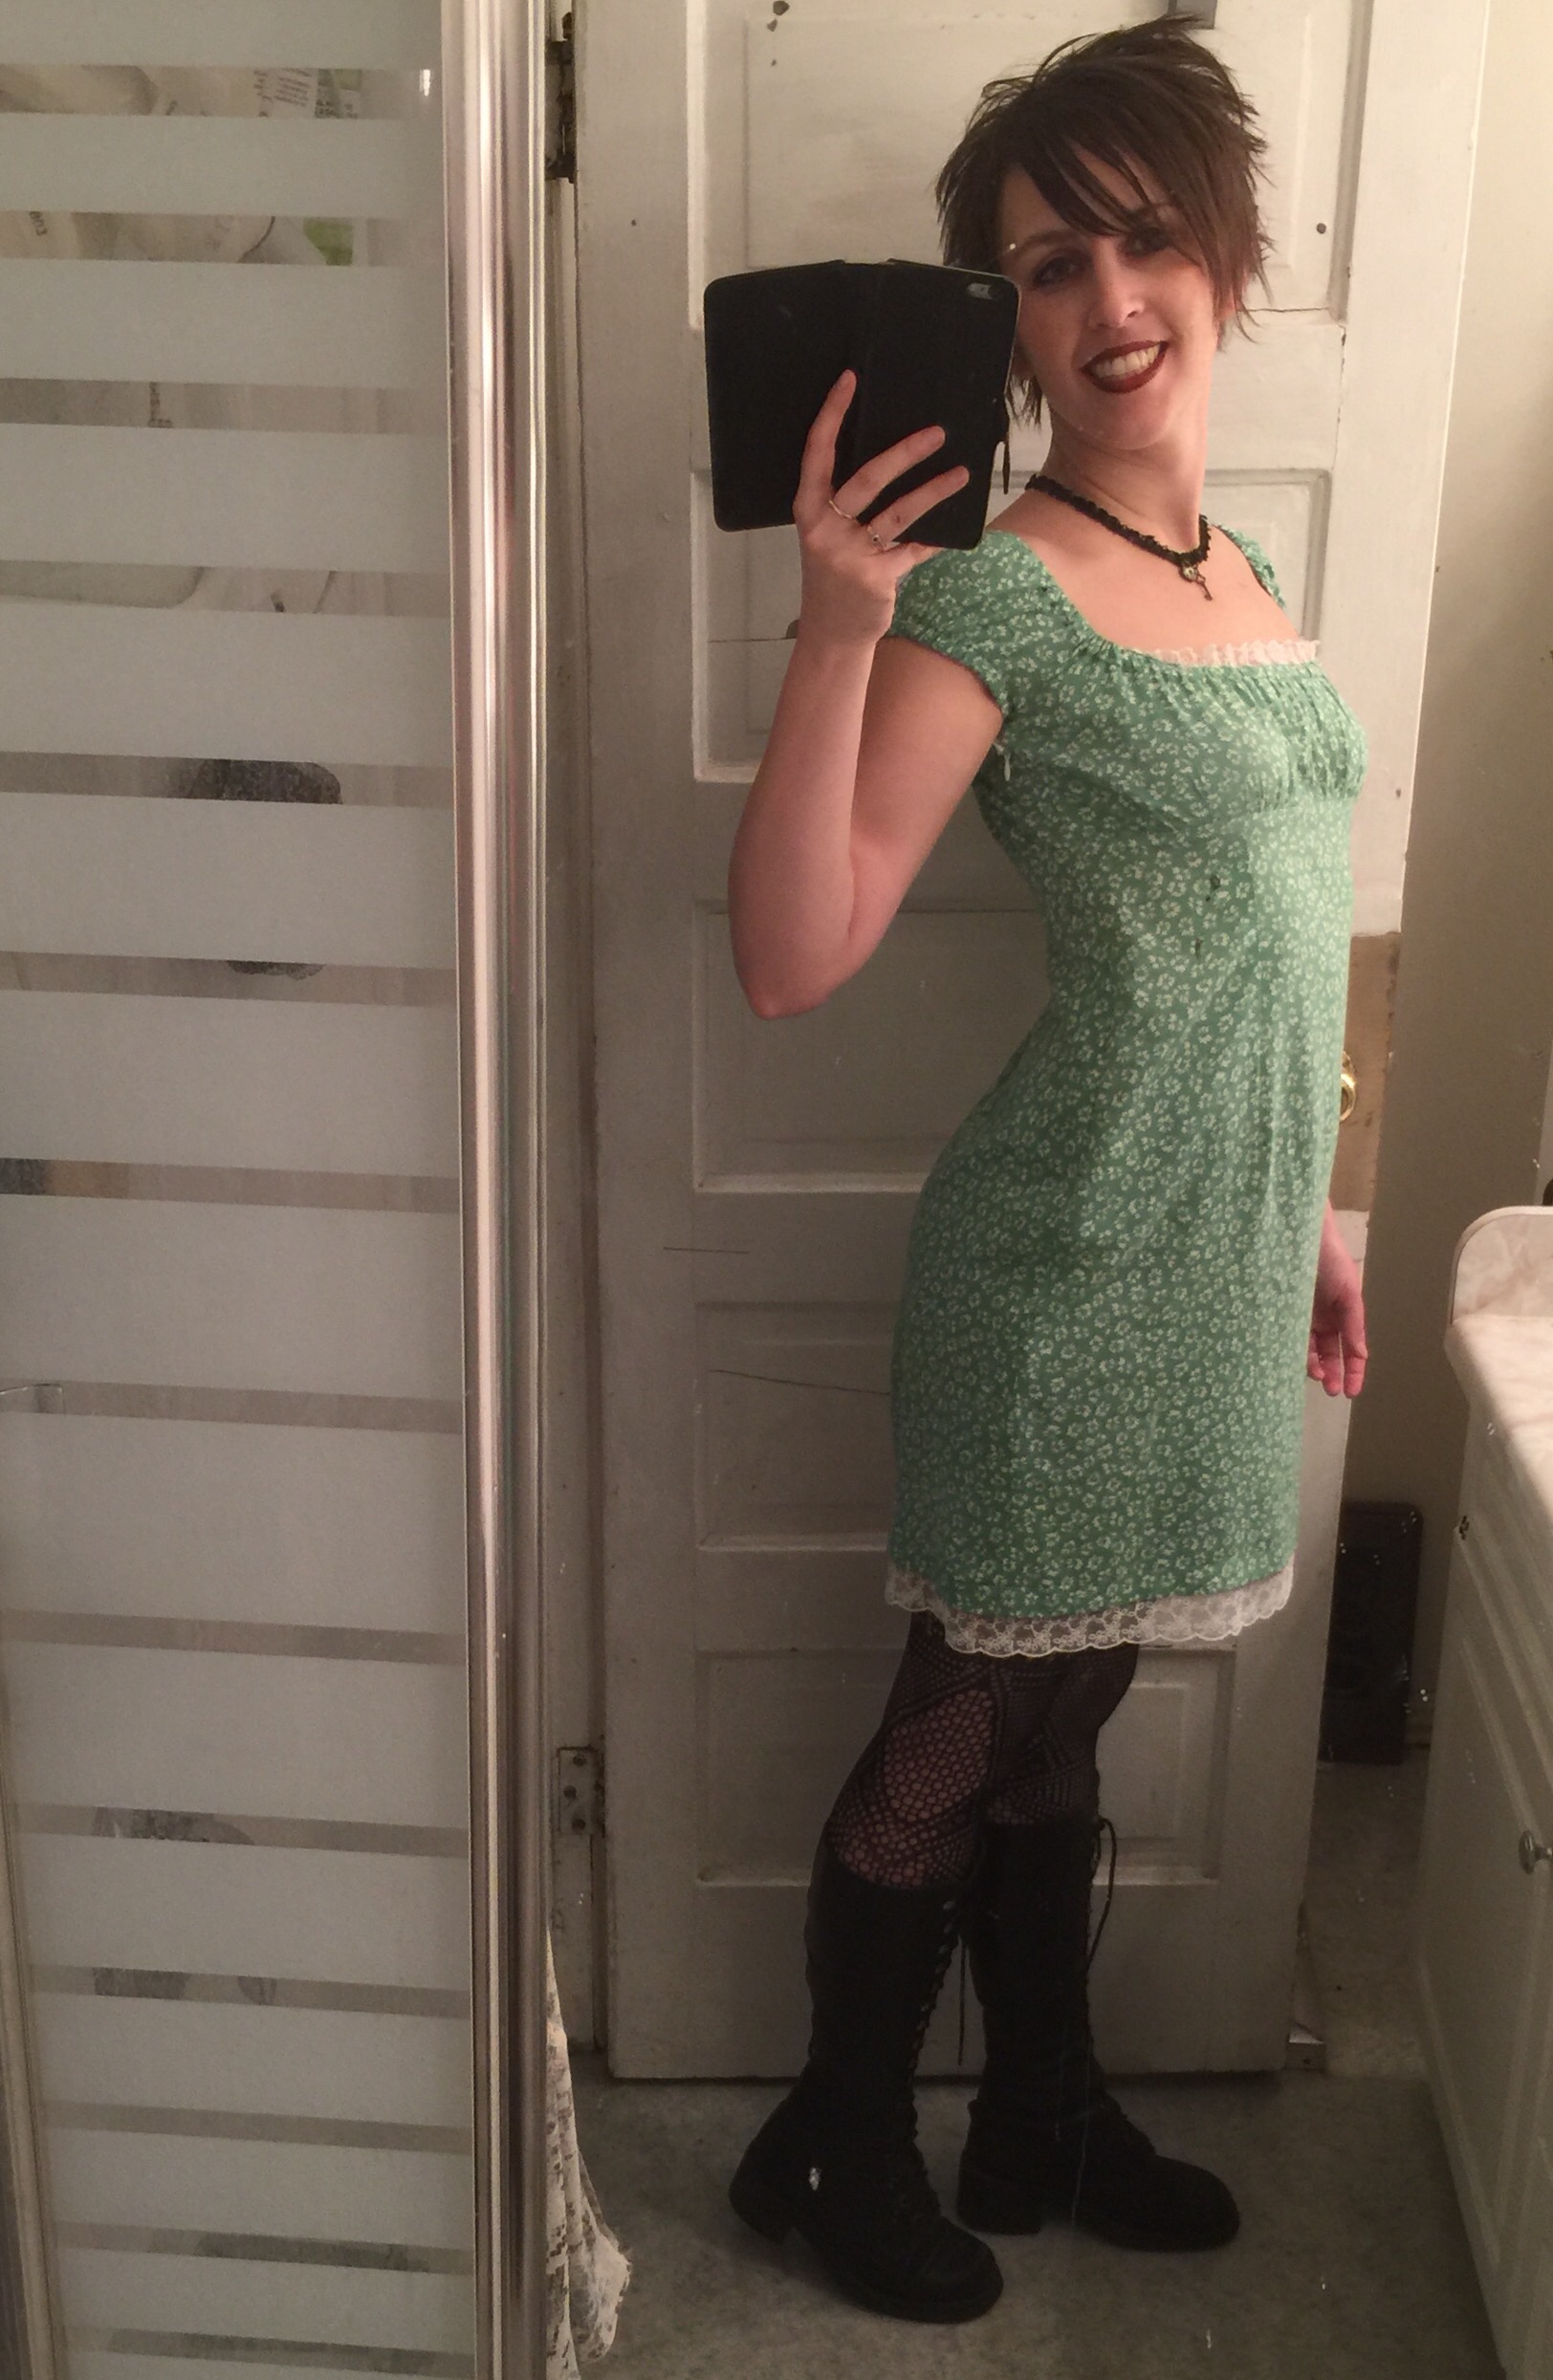
So a little while ago, I fell in love with a fabric at work. Because that doesn’t happen like every two seconds. This was a sweet rayon with a print that felt very vintage, in a soft green that is not at all my usual palette. And then we got this adorable embroidered net lace, and the pairing raised the delicate sweetness to soaring heights. Completely in love. But a little worried about making something from it that I actually want to wear. I generally like a wee bit of an edge to my sweetness, and lately I’ve been feeling that a bit more keenly. This rayon seemed like it wanted to be a drapey 30s or 40s style dress, which are sweet but not really edgy. 
Which got me thinking about how to take such a dress and make it feel like me. Which led to some quality Pinterest trawling featuring loads of classic Courtney Love. /sigh. Sometimes you just never escape your inner fourteen year old. 

  After a little more browsing, the fabric and I compromised on Burda 6686, which appears to be the current incarnation of Burda 8071, which Handmade By Carolyn has made about a billion lovely versions of. 

    There isn’t a whole lot to say about the dress otherwise. Construction is pretty simple. I shortened just above the waist, and added a bit of a swayback adjustment, which was largely successful. I cut a size 38 in the skirt, 36 in the bodice, very easy since they’re just gathered together.  Mid-construction, I  shortened the skirt by about 5″ and lowered the front neckline about 2″. Unfortunately I’d already stitched the neckline all down so I had to unpick, lower, and re-sew the elastic casing. Blerg. I’m glad I did, though. 

The dress has a side zipper, which I don’t love, but hate less than I usually do. And this style really wouldn’t work with a back zipper. 

 img_3386
 I added the lace at the hem and a wee little bit at the bust. I cut my lace to match the hem length, made it into a loop, and serged upside down to the bottom edge, so that when I put in the 1″ hem it would hang free from the lace a bit, if that makes any sense. I had originally wanted the lace to hang free from a lining, but the lining was too bulky and the green print wasn’t as sheer as I originally feared. 

   
 I should probably have taken the elastic out before I stitched in the lace at the bust as I caught the elastic in, which kinda defeats the purpose of a casing. Oh, well. I’ll worry about it when/if the time comes to replace the elastic.  

  I added a tag made from selvedge to the back neck since I kept losing track of which was which during construction. The lace will fix that, too, I guess. 

 All that remained was to spike up the hair, throw on some ripped tights and chunky boots, and some dark lipstick. 

  I love how this dress feels barely there. And even the crappy bathroom mirror photos seem perfect for the grungy look. 😉

   
 Perfect for pouty selfies. 

  By the time I get this back from display it may even be warm enough to wear it!

27 Comments

Filed under Sewing

A draped overskirt

Last weekend I continued to futz with the Victorian outfit. The waistband is still a mess, but I hemmed the skirt. And hemmed. And cried. And hemmed. And it’s not perfect but it’s hemmed (not pinned!) and doesn’t look too terrible from a safe distance, so we’ll go with that.

 The next (almost final?) phase of the half-assed Victorian outfit is the draped overskirt. They’re not quite mandatory for 1880s outfits, but pretty darn close. My texts say either “these things are crazy, go get a pattern” or “use about this much fabric and go to town.”

And of course, “But be tasteful.” The Victorians were big on taste, apparently. But also sure that basically no one had it. Personally I’m pretty sure I will fail at taste, so I’m not going to sweat it.


I did, in fact, buy myself a pattern, last summer, Truly Victorian 368, the “Waterfall Overskirt”. I wanted to see a basic idea of how they went together. It was very interesting, and also very simple, once you had it it laid out for you.

I’m planning on using the waterfall version for my blue dress, so I wanted this one to be different.  I had a vague mental image of the overskirts that leave one side ungathered so there is kinda a point at the bottom. 

To start, I eyeballed what I had left of my grey suiting (around 2m) and estimated what I wanted to drape over the front, and cut that much off.

After some experimenting, I took my general shape (a rectangle with a bit more length on one side—mostly to do with the shape of the fabric I had remaining) and added the lining and an interlining of some random stash drapery sheer that was thin and a little crisp, on the theory that it would give my thin and drapey suiting a bit more body.

img_3279-1
I was all set to put in darts when I decided I didn’t want the disruption in the stripes, so I cut a curve out of the top instead to go around the waist. There followed a lot of futzing with pins and playing with pleats until I had it arranged to my liking. I’m very glad I took the time to adjust the dress form for wearing my corset—it took a fair bit of wriggling and padding but with the corset it actually approximates my corseted shape quite well—kind of like those skin-tight covers they talk about making when you pad out a custom dress form. Unlike anything it has ever done for my un-corseted shape.
But doing this kind of draping without a form would be tricky.

 The back drape I cut into some shallow points at the bottom, finished the edges (it’s just lined and turned, with the same interlining as the front), and then started pleating and pinching and messing around.

 I ran a piece of grosgrain ribbon down the inside of the back to anchor the central tucks onto. On its own I actually liked it better without it being all tucked up in the middle, but once I layered the bodice tails over I added some more tucking.

 I had messed around with pinning up the tails before, but I think I have a much better arrangement now.

 And I like the button. I think I need to move my waist stay down a bit in the back, so the bodice hugs the back a little better.

2016-02-16 06.02.37And then I need to bite the bullet about trim. I have a ton of 5/8″ satin ribbon in the right red, some pleated, some not… But what, where, and how much is enough? Or too much. Is it possible to have too much of anything on a Victorian getup? I think we’re straying into “taste” territory again…

10 Comments

Filed under Sewing

A Half Ass Victorian

tv462-01

Truly Victorian 462 – 1880s tail bodice

Since the next Victorian Sewing Circle was coming up, last weekend I decided to muslin the bodice for Truly Victorian 462. In my memory, back in the fall I had calculated my size via their weird-ass method (basically you select your back size based on on the width across your back and your front size based on the difference between your back size and your full bust, and then twiddle the shoulders to fit. It’s meant to help you skip the FBA, I guess, not that I’m usually an FBA candidate…) and traced out the pieces. Well, it turned out on inspection that I had picked my size, traced out about half the pieces, and then completely not written down what size I was tracing. >_< Thanks, Past Tanit.

Comparison of my traced pieces with the original pattern and some cryptic notation I had left on the instructions eventually led me to conclude that I had been tracing size C for both front and back. Great! I finished tracing it out, made my most basic adjustment (removing 2cm total length, 1cm above the bust and 1 cm below) and cut my first muslin out of some old curtain last seen in a pair of Ellen pants, if anyone remembers what those are. Um, that was over five years ago. Wow. Blog is turning six pretty darn soon. Who knew?

ANYWAY.

12728470_1680000438917642_506480939_n

Version # 1

Muslin version 1 revealed some problems. Um, TOO SMALL, much? I re-took my measurements. Apparently, with the combo of corset and bra, my bust is closer to 38″ than its actual 34.” And for the Victorian silhouette I do want the boob paddage. ALL THE BOOBS. However, everything else seemed really good—back size was great, shoulders maybe needed just a little tweak for squareness—I just needed a little more room in the front. Perfect candidate for an FBA, thought I. Never mind I’ve never done one before. How hard can it be?

Hmm.

Yeah, you can stop snickering now.

So I slashed and spread and ended up actually with quite an improvement, except that there was a bunch of extra fabric right along the CF line—like enough to take out an almost 1″ dart. So I did, and rotated that fullness into the two waist darts.

12751078_727498647386336_1294718553_n

Version 3

This seemed like it did the trick. V. 3 fit basically like a second skin. Although looking at them now, I think the darts could maybe be spread out a little more evenly across the bodice front—they are both very close to the CF after all my futzing.

But. I wasn’t ready, after all that messing around, to jump right into my good fabric. So I went deep-stash-diving, looking for a suitable fabric that I had enough of that wasn’t otherwise earmarked.

Eventually I settled on this striped suiting. The fabric is some completely non-historical, soft and drapey thin suiting, mainly rayon by the feel. I have absolutely no memory of where it came from except that it must have been a gift. If it was from you, thank you! Anyway, it looked good and felt nice and there was plenty of it.

The deep stash also provided an underlining, in the form of this bublegum pink almost-light-canvas-type fabric (much less drapy) that I was quite happy to find a use for.

12729550_1003650139696488_884951134_nEspecially once I discovered the fabric tag. Yup, this fabric was received at Fabricland on 06/05/85. Over thirty years in stash, people.

I wasn’t overly concerned about authenticity at this point—just going for a fit test here. I didn’t bother with seam finishings (in hindsight I should’ve just serged my underlining to my fabric as the inside is fraying like crazy.) But despite that I was still going for as much “authenticity” in my construction methods as I could handle—so there’s boning, and the edges are faced with bias tape, and I generally tried to follow the method described in Plain Needlework and Amateur Dressmaking. To the best of my limited comprehension and/or patience, anyway.

2016-01-29 19.23.58It felt like it took basically forever, though really I got it done in a week so that’s actually pretty fast.

2016-02-21 18.51.53

Guts

The guts aren’t pretty but they are complete—boning in channels, plus a waist stay. I think that’s a good idea with the long tails on this pattern. My materials range from vaguely plausible (cotton twill tape for the bone channels) to completely inappropriate (poly grosgrain ribbon for the waist stay. Rayon suiting)

2016-02-13 21.05.18

Bodice interior from Plain Needlework and Amateur Sewing

And then there were the buttons. Plain Needlework suggested 1″ between buttons. In hindsight (funny how perfect it is) this was a bit much for the size of button I ended up with—I think 1 1/2″ between them would’ve been adequate.

2016-02-15 22.01.37-1

Fabric-covered buttons!

Still determinedly stash-busting, I settled on some smallish coverable buttons that I had three packs of for some reason. I’ve never had much luck with covered buttons before. These went really well, in that I could easily pop them on to their bases once they were fabric-covered, but less well in that they tend to pop back off again quite readily.

2016-02-20 21.58.59

Lots of buttons. Also, a possible neckline trim.

They look nice, though. I did have all the stripes lined up, but as the tops kept popping off it was too annoying to try and get them back on straight. I made the buttonholes on the machine. I’ll drive myself nuts with the hand ones on the Good Copy.

(Oh, the pattern itself has a curve out at the CF bust area. This is a bit of an odd feature, but I gather is period. I had reduced it a wee bit with all my dart-moving, but I wound up making it completely straight for this version due to the stripes. Will I keep that for my “good copy”? If I don’t, my whole test fitting idea becomes kinda useless… if I do, my authenticity quotient goes down (not that I am expecting this to be overly high, mind you…)

2016-02-20 21.33.25

Sleeve with bias facing.

I muslined with long sleeves and (gasp) didn’t even add any length. I did take some width out of the sleeve, especially around the elbow curve, and tweaked the hell out of the sleeve-cap/armscye. It’s still not exactly perfect, but I have a pretty decent range of motion. The sleeve as drafted came just above my wristbone—which, actually, looking at my pinterest boards, seems to be accurate for the period, but would drive me absolutely batty. So I cut back to 3/4″ sleeves. Those I can handle. As per Amateur Dressmaking instructions, I faced both sleeves and bodice with bias tape made from the fashion fabric.

2016-02-16 06.02.37Back in the fall I was playing with some satin ribbon and my ruffler and made this pleated trim. The slightly rusty red colour is perfect—I’m a bit torn about whether to use it or not. I actually like the simplicity of the plain bodice with the menswear-type fabric, but the lower neckline I chose is more of an evening style (which does not go with the menswear fabric at all, by the way, but it’s my party and I’ll show off my upper chest if I want to) and should probably be adorned. We’ll see how I feel once the skirt is gussied up a bit more.

2016-02-21 00.09.06
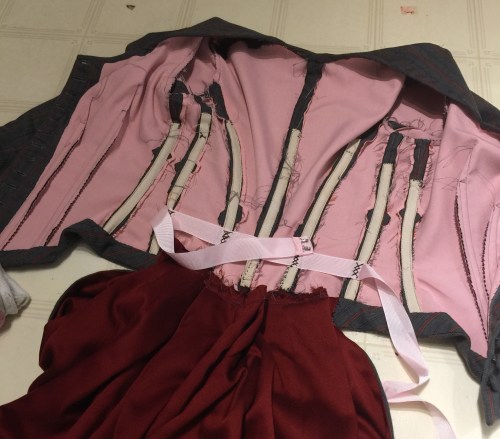
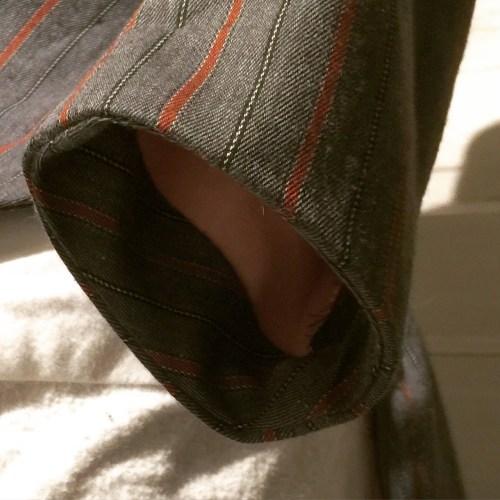
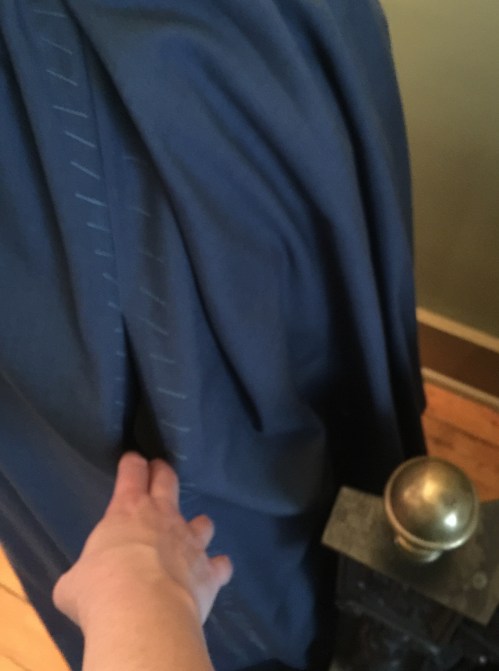
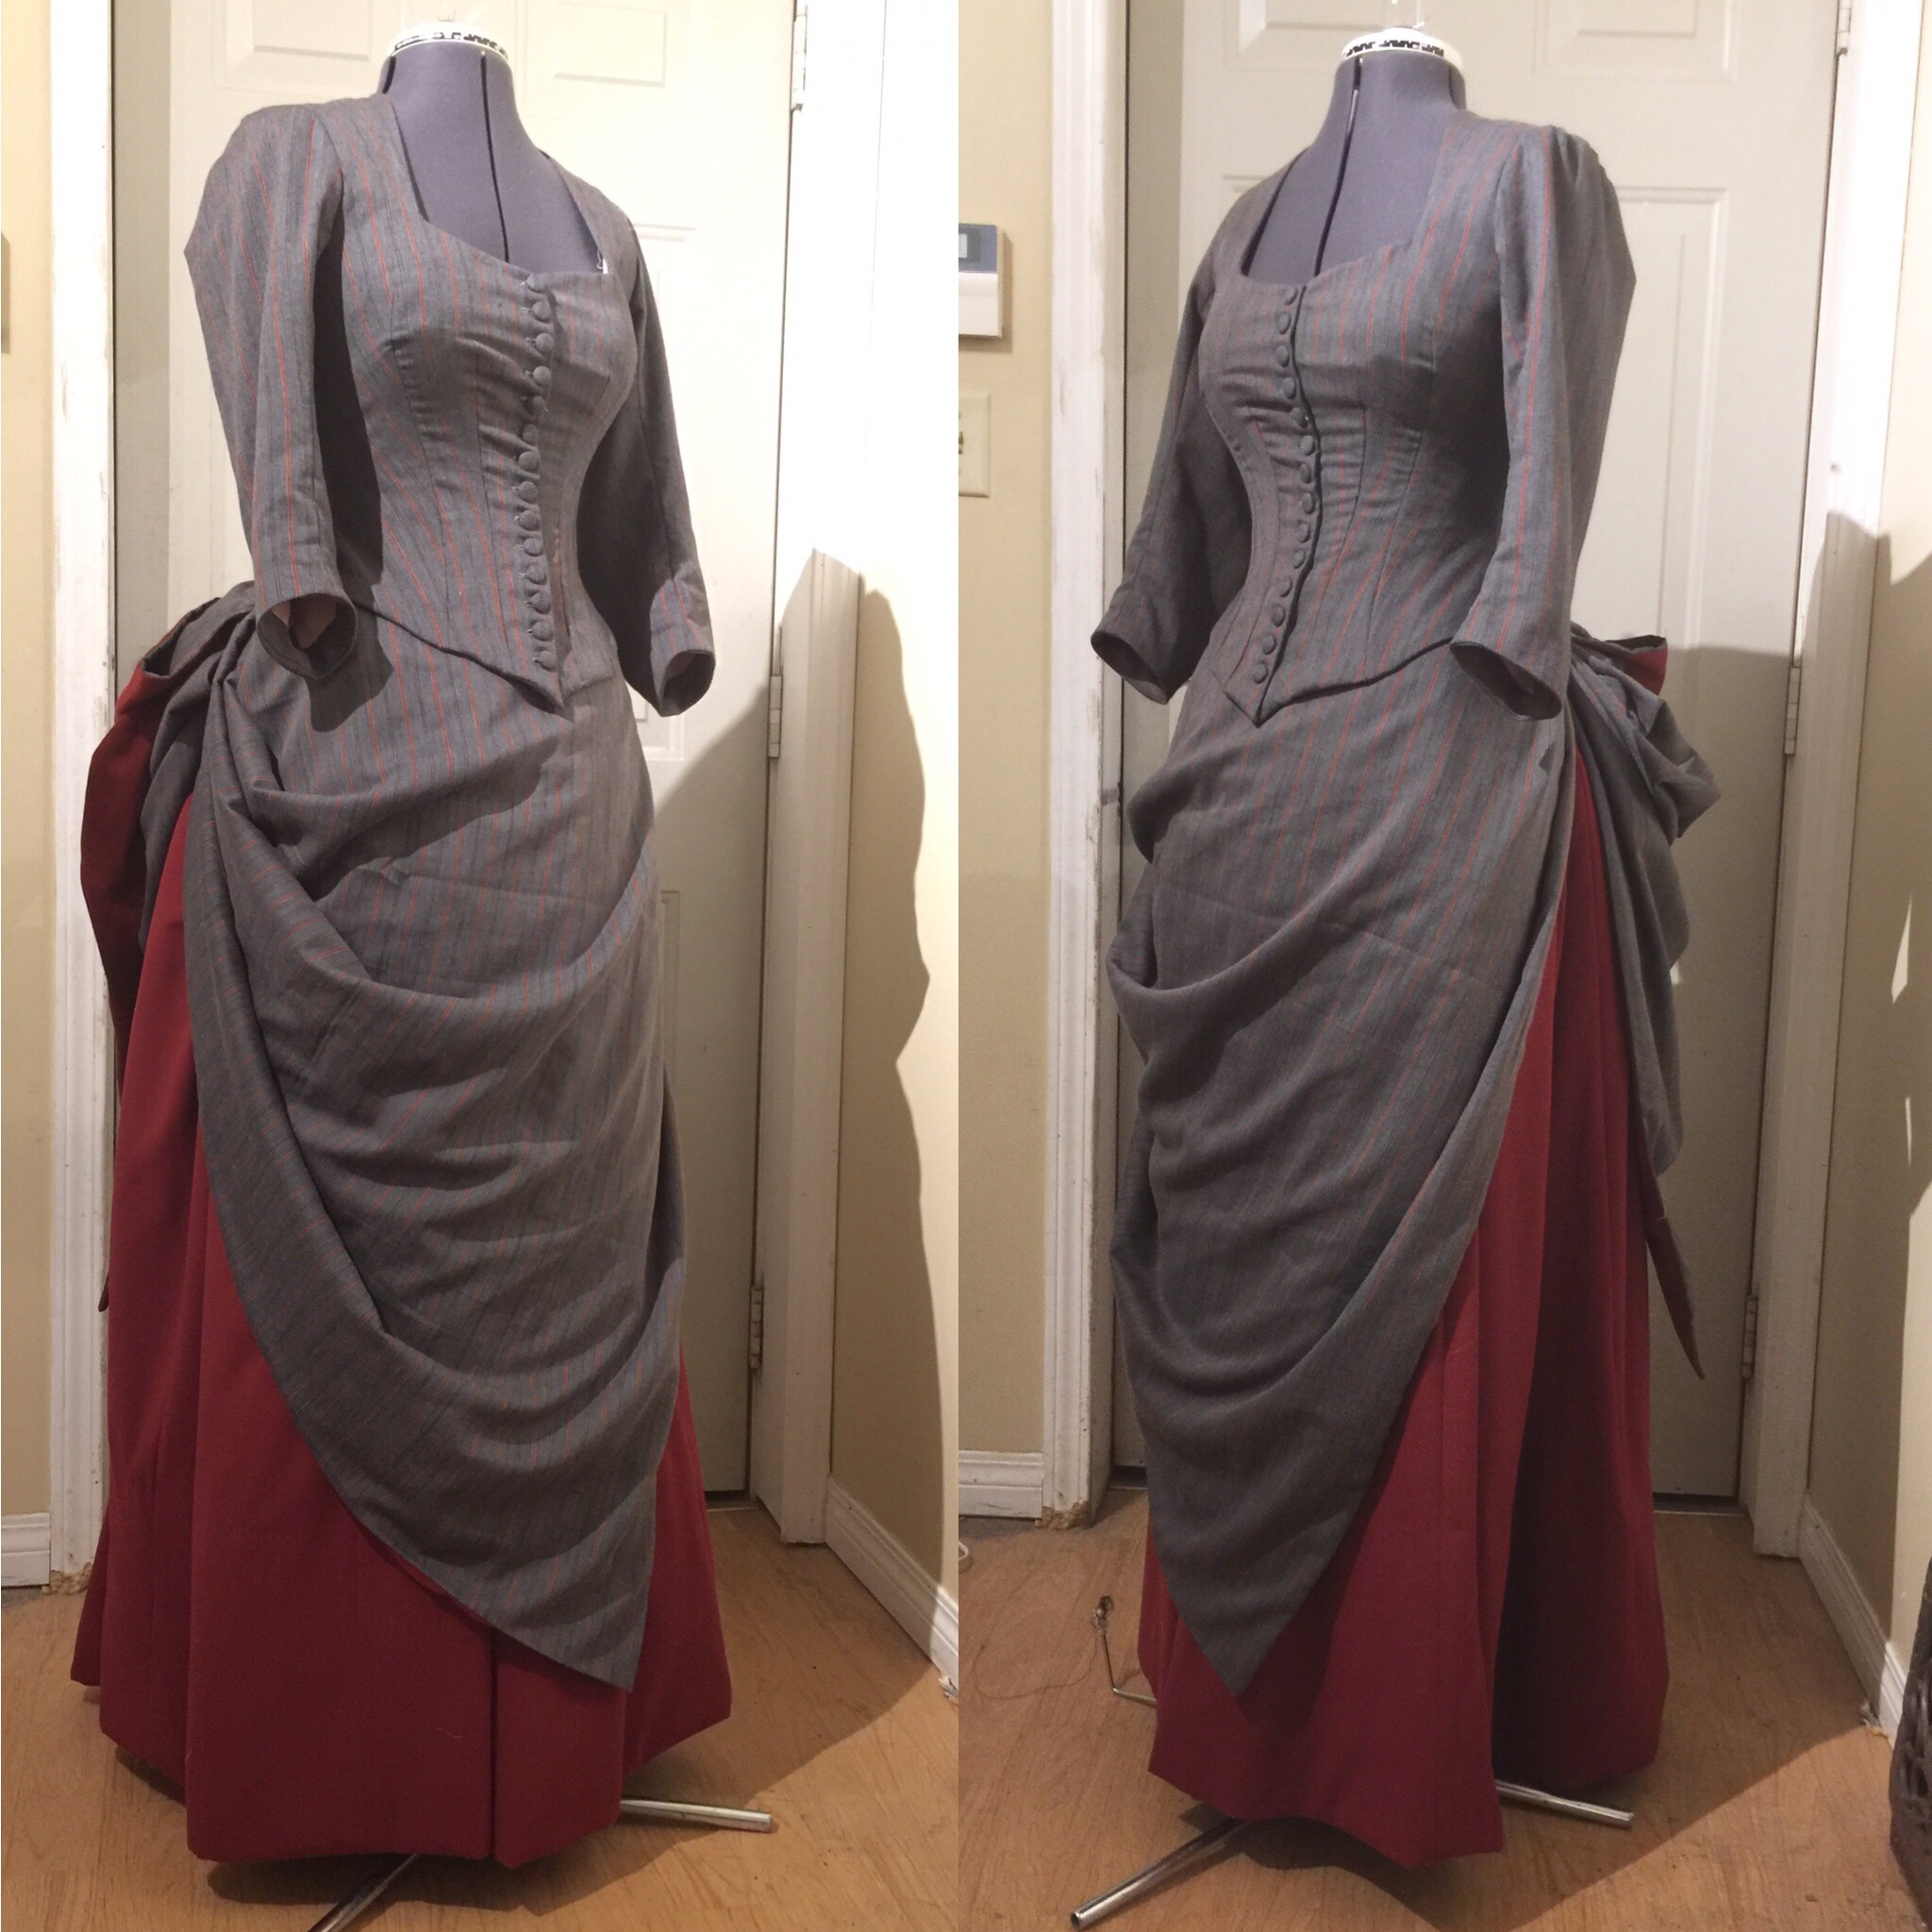
Which brings me to the skirt. Um, yeah. I didn’t have quite enough of the striped suiting for the skirt, or at least not for the skirt plus whatever overskirt draping I might eventually want to do. So I ended up breaking my stashbusting streak and picking up a few metres of this rusy red “wool crepe” (allgedly 65% wool… I am dubious). It was cheap, though, so it’s ok? Anyway, right down to the wire I managed to get it cut into gored panels, mounted on some black broadcloth underlining (salvaged from the same curtain as the cuffs for my blazer, so the walk through Deep Stash was not entirely finished). At 10:30 am Sunday morning, I had to admit, even as I finished pressing the hem facing, that it wasn’t going to be stitched in the hour I had left before I had to leave the house (and be showered and costumed), so I reluctantly but effectively broke out the safety pins. And I won’t even show you the joke of the waistband (more safety pins), but it covered my bottom half adequately, at least once I managed to half-ass a bustle for it.

12568249_927885433970011_304858319_n

Bustle, otherwise occupied.

(I made a perfectly good bustle already, but it’s adorning the mannequin that is holding my half-constructed blue skirt at the Marr Residence, so not actually accessible for wearing to said residence. I never said I had good planning skills. (Incidentally, yes, this does mean that I got further on my red skirt in approximately three hours of work than I have on the skirt I’ve been working on since October.)

2016-02-21 11.00.35
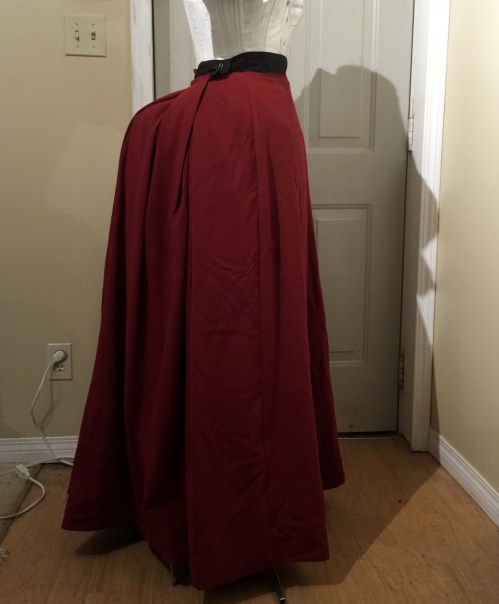
I did have a teeny little bum pad I made last spring, fairly softly stuffed—probably perfect for an 1890s “figure enhancer,” but not what I was looking for here. I decided to amp it up with a bigger cousin to get something a little more satisfactory; I stuffed it with fabric scraps (serger offcuts work well as they’re so teeny) from the sewing room garbage bag and had to largely hand-stitch it to the other as I couldn’t get the seam allowances anywhere near the sewing machine’s presser foot. This is a much heavier and less convenient option than the collapsible wired bustle I made before (especially for driving) but it was definitely functional, and didn’t collapse much, which I’m a bit worried the wired one will.

2016-02-21 17.04.12

1880s outfit!

It made for a very plain ensemble, but at least the silhouette is there! Well, as close as I am likely to get to it, anyway. I meant to get some pics while at the Marr because DUH, but of course completely forgot. So rather than a beautifully restored period setting, you get narrow-cropped kitchen shots of my bathroom door. Which is probably close to period (well, early 1900s, anyway, and the only original door in our old wreck of a house), but not exactly gorgeously restored.

2016-02-21 16.38.19

Back view. 

I thought the plain tails of the waist (aka bodice) were a little, well, plain, so I tried pinning them up. I think the general principal is sound, but should probably be done by someone who can actually see what they’re doing, and not by me just randomly grabbing bits and pinning them blindly behind me while already dressed.

And just in case you aren’t thoroughly sick of this half-ass outfit yet have some mannequin shots of the half-finished skirt!

2016-02-23 19.07.00

Skirt, front

Why did I let it sit wadded up on the ironing board for two days before I took these?

2016-02-23 19.12.11

Side view. I think my other bustle definitely has a nicer shape (the fluffy petticoats would help, too.)

Pleats in the back. Also, the half-ass waistband. It’s just the black broadcloth (thin yet strong) basted quickly to the inside, and held closed with safety pins. I’ll do something better for next time.

2016-02-23 19.11.54
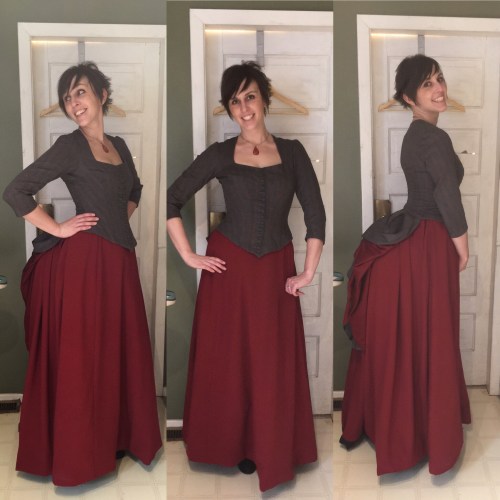
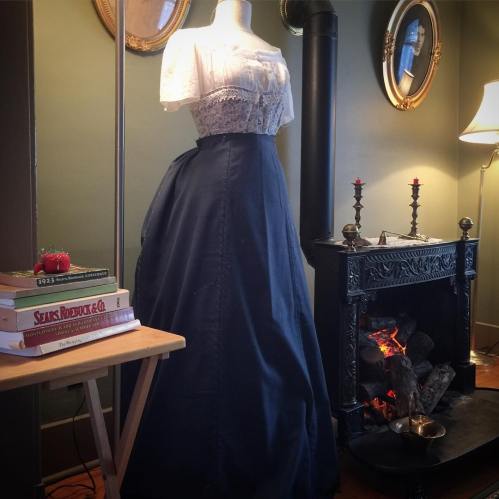
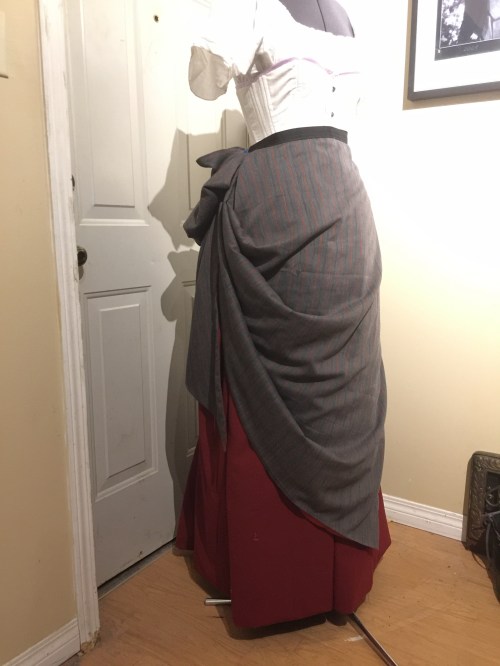
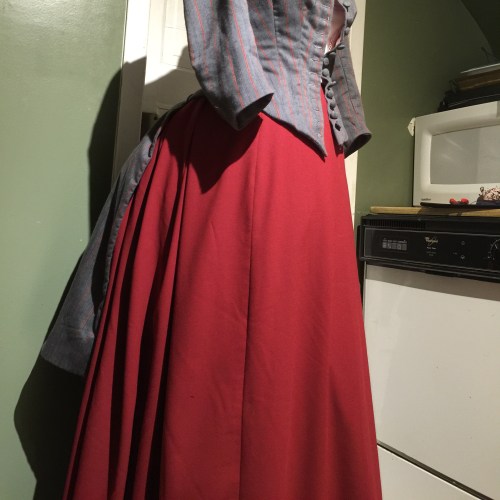
Why yes, there’s a dress form beside my front door in half-Victorian costume.

2016-02-23 19.12.29I’m kinda tempted to leave it there all month.

20 Comments

Filed under Sewing

Lacy

  For my February project at Fabricland I took out a double project of lingerie: the plan was for one Watson set and one Marlborough (ulp!) + underwear to be determined set (ended up being another Watson bikini, because why mess with perfection? 😉 ).  

This was prompted mainly by timing—it’s a season where they don’t really want you to take out projects in last fall’s fabrics, but we didn’t have much in for the spring fabrics yet—so the selection is limited to the “regular”, non-seasonal stock. This lack of options made me finally buckle down and get around to doing something I’ve been procrastinating at for years now. A lingerie project. 

My fabrics of choice were from the bridal section, stretch mesh and non-stretch lace, and the main inspiration: some really gorgeous ruched elastic they carry at a ridiculously inflated price, that only comes in these stupid little one-yard packages.  Way too annoying to spend my own money on—perfect for a project. Part of the problem with sewing bras based on Fabricland stock is that things are a little hit and miss—the strap elastic doesn’t match the band elastic, there’s underwires but only one style and there’s no actual power mesh. So in many ways these projects feel very ad hoc. However, having done this I’m feeling a bit more comfortable with that—it’s not like I have significant support needs requiring industrial materials. 

   
I started with the familiar; I’ve made the Watson set before, so you’d think it would’ve been a breeze. Well, blame passing time or being still sick, but I managed some pretty good stuff ups, despite the previous experience. The stretch mesh I was using for the back band has a LOT of stretch, so I downsized the band. And the first version of the cradle I cut out, I didn’t realize that apparently a large corner had torn off the pattern piece. So I had to recut all that (in three layers), after I had basted everything together and then realized my cradle didn’t match up with my band piece. D’oh. 

  Then, when applying the elastic to the panties, I used too much elastic on the first leg, leaving me short for the second leg (remembering my elastic all came in 1 yard packages)—so the elastic for the second leg is significantly tighter. Either looks fine, though I suspect they will feel a bit weird on, but the bikinis look rather weirdly lop-sided. Bleh. The project must hang. 😉 one thing that did work out was adding a panel of my lace to the front of the bikini—this turned out super cute. I basically just traced off the front pattern piece, sliced where I wanted my panel to end, and added seam allowances. 

Once I recut the cradle, the construction of the bralet wasn’t bad, but a couple of things bit me in the ass. First was my decision to downsize the band. BAD idea.  Especially when I had also decided to double the mesh in the band. Too tight. Way too tight. 

  Fortunately (?) the bra backs Fabricland sells come with this weird chunk of elastic attached to one side, which I was able to use to extend the back. So it will go around, even if it’s a bit fugly. 

  My biggest problem with my first two Watson bralets is that the wide long-line bands don’t stay in place. My ribcage flares at the bottom, and they just wriggle their way up. So to try to ameliorate that for this one, I added boning channels (with some scraps of my fancy elastic) over the side-seams. This seems a bit overkill for what’s supposed to be a soft bra, but if it works, it works, right? Mind you the jury is still out on it working. Because:

When the great try-on moment came, it became clear that the cup size that fits me in a cotton spandex jersey, does not fit me very well in a non-stretch lace. Lots of cutting in. Pouting, I got Tyo to try it on, since her bra size is about one cup letter smaller than mine these days. Yup, great fit. But, it’s a sweet off-white lacy bralet with rosettes… Not really her style. At all. Syo, on the other hand, seems to like it. Oh, and it fits her, too. So I think it will have a home. Maybe. Both my kids, like me, are foam cup types, so I’m actually not sure anything else will get worn. 

  And then, with the warmup done, it was time. Marlborough time. A scroll back through Instagram informs me that I muslined this pattern a mere 76 weeks ago! Yikes. At that time I was pretty impressed with the fit, which seemed to need only a minor tweak to the side seam. But in the meantime plenty of sewing anxiety had set in, and I stalled and faffed over not having the right notions and wrang my hands about what colour my first bra should be and generally just avoided the problem. So really, taking this out as a project with a deadline, was pretty much perfect for cutting through all that avoidance. 

  And now, having done it up, I’m not quite sure what I was so nervous about. Yeah, there are lots of little pieces and I wish there were maybe a few more notches to help keep track of which way the pieces fit together, but I love sewing with 1/4″ seam allowances, and by hopping back and forth between my 1/4″ foot and my edge stitch/stitch in the ditch foot the sewing itself was pretty slick. And the Instagram peeps were there to hold my hand while I panicked over my half-ass channeling, arguably the scariest part of the whole process. 

For this set I layered the stretch mesh and non-stretch lace over a thin grey poly spandex knit. I kinda wish the grey showed more, actually, and maybe that I had used mesh over the power bar rather than lace, so it would show more. And maybe stretch more. 

  Because the biggest problem, again, is that the non-stretch lace is less forgiving than the stable-but-with-some-give earlier version. The power bar—the vertical piece at the side of the bra—actually kinda cuts in at the seam to the other pieces, not a nice look, though also not evident in the pictures, so it probably isn’t as bad as I think it is. And the shape is more pointed in the lace than it was in my scuba first version. Not a bad shape, but a little different. 

 For my own information, I’m going to add that the underwire I’m using is about two sizes larger than the “right” underwire for this size. This means it’s wide enough not to cut in at the side of my breast, which is one of my biggest complaints with store bought bras. I also had to shorten them significantly on the cleavage side to fit this pattern, which is fine if you have the tools for that but less fine otherwise. 


At the end of the day, though, the biggest issue, which has nothing to do with the pattern or fit itself. This is a soft cup bra. I’m a foam padding & push-up girl, if I’m going to actually wear a bra. The last time I wore a soft cup bra was over a decade ago. In particular, the right padded bras mean I don’t need to worry about small bust adjustments in my sewing. So that, more than anything else, might be what keeps me from using this bra much. But I am curious. It wouldn’t be the first time sewing has coaxed me to experiment outside my comfort zone. 


6 Comments

Filed under Sewing

A Victorian Skirt Pocket

12568249_927885433970011_304858319_n

Almost skirt!

I haven’t blogged it much, as there hasn’t been much progress, but the skirt for my 1880s ensemble is coming along, finally
. I kinda stalled out before Christmas as I needed to put in the placket and pocket, and I was skeered. But this past session at the Victorian Sewing Circle, I tied on my big-girl apron, did the research (two whole paragraphs of it, as it turns out), and put the pieces in.

I found a quick description of what I was looking for in “Studies in Plain Needlework and Amateur Dressmaking” by Mrs. H. A. Ross. (Published 1887)


 Here’s my source documentation. P. 11 from the above.. It does seem to require a little bit of decoding, however.

“Skirt pockets are cut from. the lining”-ok, check.

“And are heart-shaped when opened flat. Twelve inches long by six wide is a medium size, leaving one side double and straight on the fold; the other wise rounded to a point on the top.”

There are definitely times when a picture is worth a thousand words, and the downside of the old sewing texts is the further back you get, the more scant the illustrations become. It sounds like what she is describing how you would cut out a paper heart for a valentine, but upside down…


Victorian pocket diagram

Pocket, cut on fold

“Sew around the bottom and five inches of the rounding side, leaving the remaining space to be sewed in the skirt seam. Unless covered by the drapery the pocket should be faced. Leave three inches of the pocket at the top, above the place for the hand.


She does like to leave the important bits for last. So the opening for the hand is on the curved side of the half-heart, towards the point, but at least 3″ down from it so the pocket isn’t too narrow for your hand to get into. Also, the pocket opening is sewn into a gap in the side seam, after it’s all complete.

“A tape must be sewn to the point and jointed to the belt (waistband). There is danger of the pocket being so narrow at the top that the hand cannot be inserted, though the pocket was cut plenty large enough.”

pocket and facing

Pocket, unfolded to show facing

“All pockets are sewed in double seam. first sew the seam very narrow upon the right side, the pocket turned and stitched again on the wrong side in an ordinary seam, without taking in the seam first sewed. This makes a strong seam and required no overcasting.” (AKA French seamed. Got it. Except that it’s the last bit and I didn’t read it before I sewed the actual pocket. Oh, well. Overcasting edge it is.)

2016-01-17 16.48.05

Pocket in seam.

Unfortunately I didn’t actually think to get any photos during construction, and I’m a smidgeon too lazy to make another one for demo purposes. 

As implied by the rather terse instructions, I left a gap in my skirt side-seam the length of the pocket opening (and hopefully in about the right place) and stitched the pocket to it after the fact. This wasn’t as slick as a modern inseam pocket but wasn’t as cumbersome as I originally feared it might be.  I think as a method it makes more sense for something hand-stitched, where the fold would decrease the time it took to sew while the stitching it in afterwards wouldn’t be nearly as cumbersome by hand as it could be by machine. (Though as I said it wasn’t as bad as I thought it might be.)

I also did the placket for the skirt opening, which I was also kinda dreading for no good reason. The page above describes about four different methods in about 20 words each; I used the instructions for making the slit version for this petticoat, but for the skirt I planned to have the opening in a seam. In the end I just cut a rectangle of my cloth and used it to face/lap the opening in one piece, down one side and up the other. Not quite what was described, but simple and it will function just fine. It needs hooks, and of course the whole thing needs the waistband, and then I’ve got to start thinking about trim. 

This is where shit gets exciting. Or intimidating. Oh, hell.

  I’m thinking about using the middle skirt for my inspiration, though I also really like the one on the left. This is a picture from a reproduction of an 1886 Bloomingdales catalogue, belonging to my mom. I love the online resources but it’s so amazing to flip through the catalogue. Anyway,  I definitely want an overskirt reminiscent of the two In the picture—I have TV368 (below) for a pattern. 

  Getting mighty ambitious, aren’t I? 😀

And then I will have to start muslining the bodice, I mean waist. O_o somehow compared to that decorating the skirt doesn’t seem so intimidating…


5 Comments

Filed under Sewing