
The final installation in a great (?) Sewing trilogy!
 A long time ago, when I was new to sewing and really excited about coats (I made at least five that first year), I bought quite a lot of this pretty purple bouclé, more or less with my children in mind.
And then suddenly my children were no longer into girly pale purple anything, and I kinda missed a similar window for my nieces.
But when my dear friend Ada finally caught up to me in the reproduction department, I finally got on the ball. I made a teeny tiny jacket for her infant daughter.

Then I made another a couple of years later.
And now, as her daughter starts kindergarten, I felt like it was time to use up the last of this fabric. It’s felt like a fun tradition, at least on my end, and I was ready to make the third installment in the trilogy. I just needed to decide on a pattern…
And then I got the mystery pattern.
Back in the summer, I got a donation of about a jillion vintage patterns from a friend of my sister-in-law’s mother. Many of them were old mail-order patterns , with the recipient’s name on them. The surname was the same as one of my co-workers at Fabricland. I asked her and, yes, these were her grandmother’s patterns! (Because there are seriously like five people in Saskatchewan.) I also asked if she wanted them, which she declined. So there.
 Anyway, amongst the Simplicity and Advance and mail-order Marian Matin Patterns were a few more idiosyncratic bits. Pattern pieces traced out on newsprint, old flyers, and even some old government land-grant paperwork. (I showed that one to my co-worker, she said, oh, I know what land that was!)
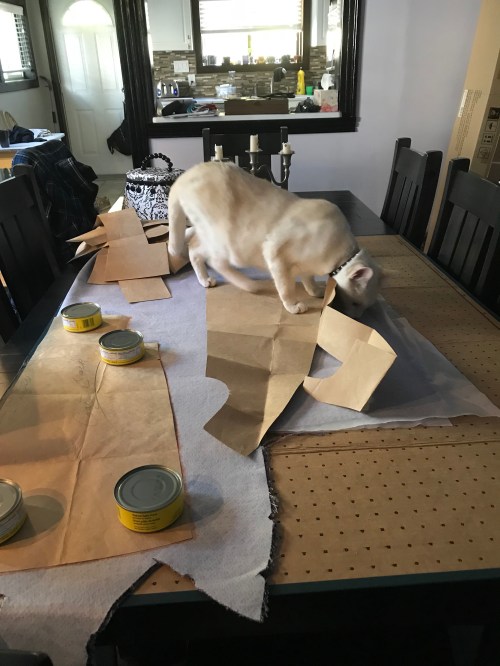 And one stuffed in this envelope that had something to do with an old water heater, for a child’s coat, traced out on a brown paper so heavy it might as well be oaktag.
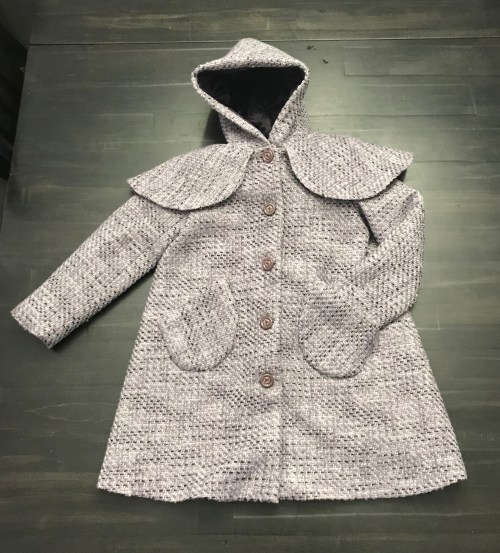
I must admit, patterns like this fill me with a burning curiosity. What did it look like? Who was it made for? The traceout doesn’t include any company, pattern number, or for that matter size, information. I’m guessing it’s about a kids size 6, maybe 8. It’s a straight, A-line coat, and includes both a hood and a little capelet for the shoulders. There were lines drawn for pocket placement, but no actual pocket piece, so I created one.
My co-worker assured me that her grandmother was unlikely to create a pattern entirely from scratch, so it’s presumably traced off a commercial pattern—maybe a much loved one that was falling apart, maybe one that belonged to a friend.
There are a few helpful notes on the pattern, showing where to ease and details like a zipper for the top of the hood (that one I skipped). It’s a nicely drafted pattern—two piece sleeve with easing at the elbow, shaping on the facing for turn-of-cloth at the roll line.
 For the previous two coats I used an ivory Kasha lining, but if I have any of this left in stash I can’t find it at the moment. I could, however, find a nice big chunk of this dark purple. It seemed like a nice option for a slightly more grown up little coat.
Another feature of the previous coats, that I didn’t want to skip was the quilted lining. In the past I used flannel, but the quilting doesn’t really pop, and I had some leftover bamboo batting that I wouldn’t mind getting out of stash, so I used that. It turned out a nice weight.
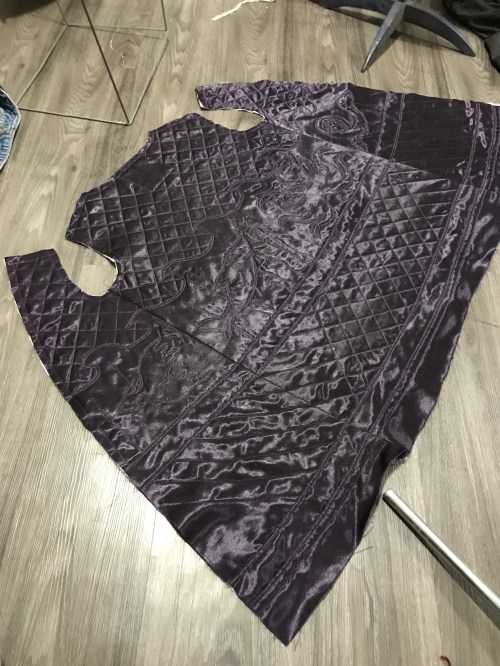 This is where production really slowed down. I’m not going to say I put a TON of thought into the design, but I did have to stop and think about what I wanted to do where—which areas were going to be standard quilted, which ones were going to be free-motion quilted. FMQ is not my strong suit, but it’s the most fun there is in quilting, IMO, and it is well suited to creating the motifs I wanted.
 As with the last coat, I went with ocean imagery, as I knew this would tickle my friend and her husband’s fancy (and let’s face it, this is really about pleasing the parents, not the kids.) I wish my line-echoing was not so terrible, but it’s fairly fun doing it, at least.
 And I quilted. And I quilted. And I sewed a couple of bits together, and I quilted some more. I’m glad I was able to get the waves mostly looking ok.
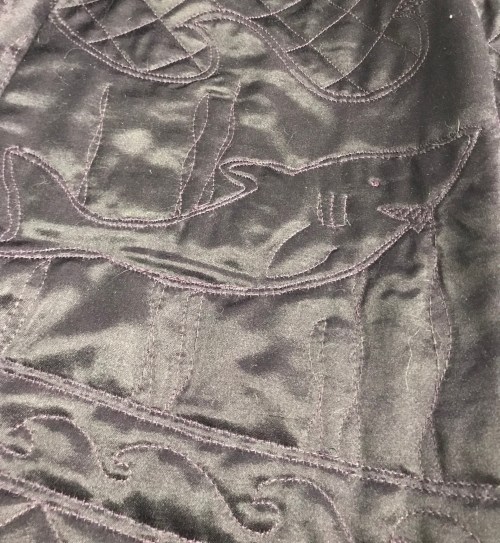
 This fancy fish doesn’t really look like a proper wild sea creature.
 I was going for eel, but I ended up somewhere near Loch Ness Monster, I think. Oh well. In hindsight I should’ve done a killer whale, for these west coast people, but I wasn’t sure my skills would’ve been sufficient to keep it distinct from, say, the shark. The art of the possible, right?
 Other than that, the construction was pretty unremarkable. All of my fabric was blockfused, so I forgot to add more interfacing to the facings, so they’re a little floppy. The buttons are a little boring, but they’re vintage and, more importantly, from stash.
 I hand-stitched the hem, the pockets, and the inside opening of the bound buttonholes. The latter, especially, took forever but it’s much less terrifying than trying to mark and machine squares and hope that they’re in the right place.
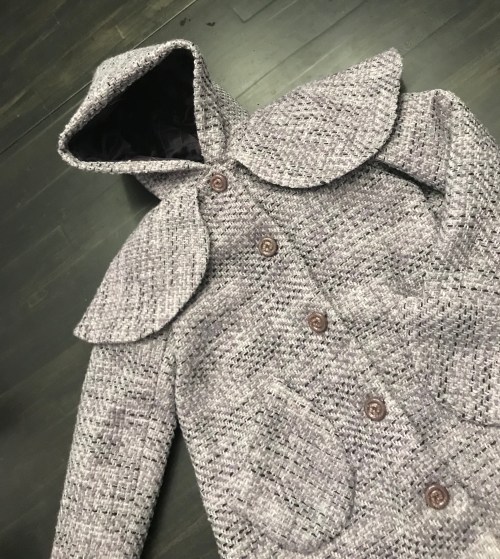 I haven’t said much about the capelet as there isn’t much to say—it’s part of the pattern and cute, one piece fitted with darts at the shoulders. It plus the hood, which is gathered to fit, made for some seriously bulky seams at the neck, and I have never been so happy with my Janome as the way it chugged through them effortlessly. There was much, much grading of those seams.
 At the end of the day, there are some rough spots, but I’m pretty satisfied, and I know Ada is over the moon. I just hope it fits, or will fit fairly soon.
 It wasn’t a speedy make, but it was fun to pick it up when I wasn’t sure what else to work on, and then put it down again when I needed to ponder something. And it’s done, with plenty of time to ship it out there for Christmas!
Except that I suck at shipping things, so we’ll see how that works out.
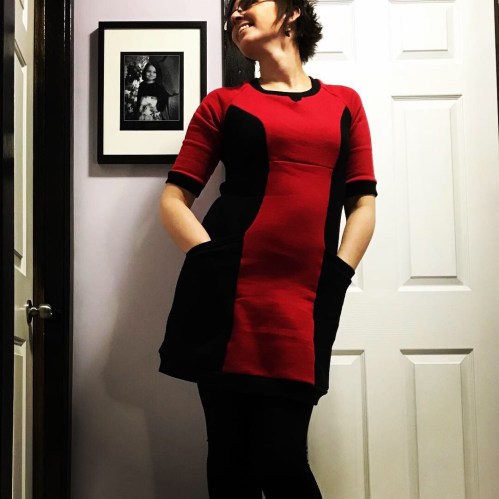 I think the Lola dress by Victory Patterns was one of the first indie patterns to seriously sink into my psyche. I’m thinking of
  Yet somehow, I never quite bit. Even last winter, when I made all. The. Sweater. Dresses. But at some point in the spring, I found myself back on the website, and clicking the purchase button.
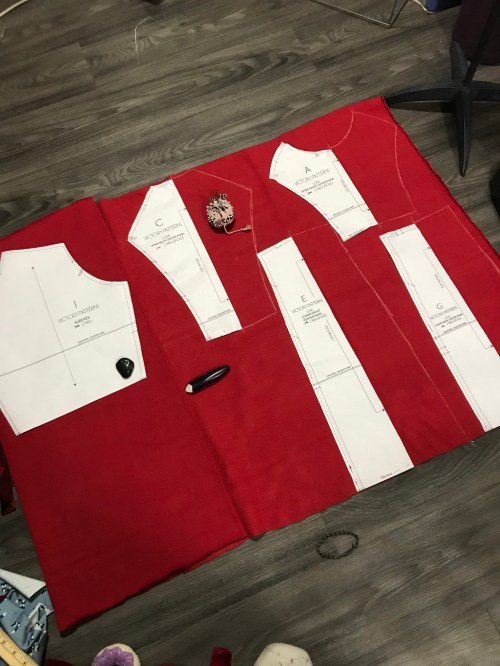 And it worked!
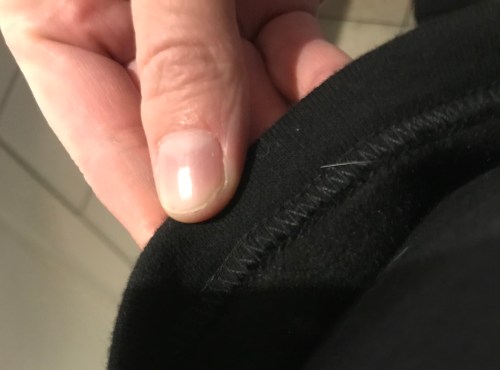 And she let me use it, to hem the pockets of the Lola. My very first coverhem! It was more or less flawless (sweatshirt fleece being a magical fabric) and I want a coverstitch machine even more badly. Maybe with next spring’s tax return. Sigh.
 The right response would’ve been to grab a seam-ripper, but after some flipping the pattern piece around I decided the subtle shaping was almost entirely within the range of the seam allowance, and that with a little careful fudging I could just flip the piece around and proceed. So, being a lazy sort, i proceeded. Everything else about the construction was very straightforward, especially with eighty million notches to line up.
 I cut a size 6 on the top, eight on the bottom, and I could’ve sized up more. This might be down to my fabric—sweatshirt fleece is pretty stable—or maybe I was just looking for a moreoversize fit than it’s designed for? It’s also possible that my serger takes off a wee bit more than the 5/8″ it’s markings indicate. Anyway. It’s quite close-fitting. Not uncomfortably so, but definitely not roomy. And the sleeves feel a little short, ending distinctly above my elbow. Monkey arms strike again, perhaps. I would probably lengthen those next time.
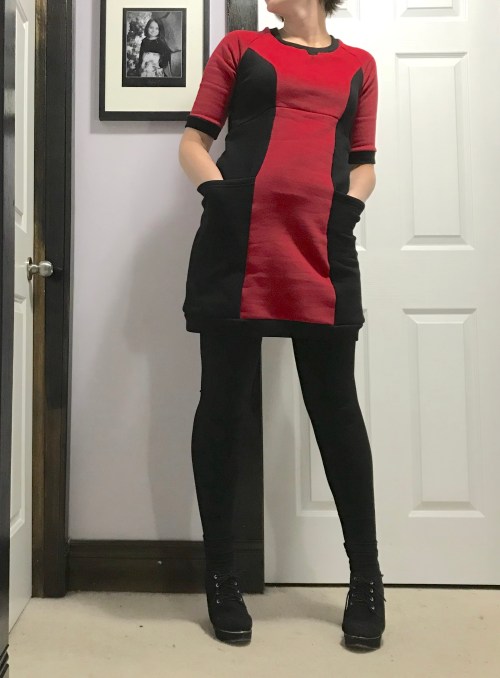 Although I made no fitting alterations other than the size gradation, I did sew the underarm seam a bit narrow, as I often have to raise the underarm. However, this wasn’t needed and I’ll probably go back and normalize it.
 On the whole I’m pretty happy, especially with the pockets. The only problem is, my children have informed me that the red-and-black colourblocking makes me look like an employee at Sephora. The other option is a Star Trek reference, which I gotta say I prefer. The key point is that this dress brings my sweater-dress count up to five, which means, if I so desired, I could do an entire week of sweater-dresses.
 It’s a good sign when you feel the need to repeat a pattern right away, right?
 This year, they’re largely doing their own thing (a tulle-skirted gown got butchered in my sewing room while I was absent, but I’m maintaining plausible deniability and not asking) so I’ve been free to sew my own. And of course this fabric was always meant to be a classic fit ‘n flare dress, so why not repeat my success with the Betty Dress? Especially when
  There’s not much to say about the construction, except that I added a “sash”—attached to the front bodice at side and waist seams, with ties inserted I to the side seam so they can wrap around the back and make a bow in the front.
 Last time I did this was the Star Wars dress, but I didn’t do the front under-sash piece, and I think I like the extra solidity it gives.
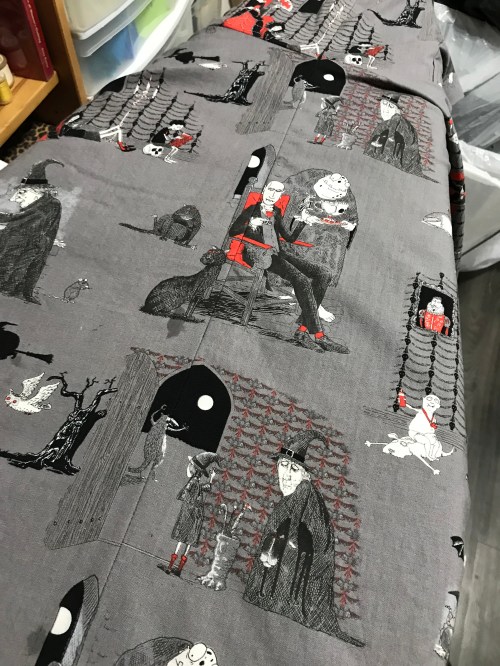
 In this case, the two seams I really wanted to match were the CF skirt seam, and the CB seam. There’s not supposed to be a seam on the centre front skirt, of course, and the pattern expects you to cut the skirt on the cross-grain to allow it to fit on 45″ wide fabric. That wasn’t a go with this strongly directional print, so seam it was.
 After my careful cutting (one piece at a time, folding the seam allowance back on the first seam to align the second piece), I pressed the seam allowance under on one piece, lined it up, and marked on the second piece where the seam should go. I pinned my major match points, making sure the pin went through my marked lines both times, and then I sewed. I did not break out my walking foot, though I thought about it. This succeeded in making my horizontal match points reasonably aligned. I did have to take in or let out the seam minutely in a few places to get things lining up more perfectly—a mm makes a difference!—but on the whole I’m really pleased with where I ended up.
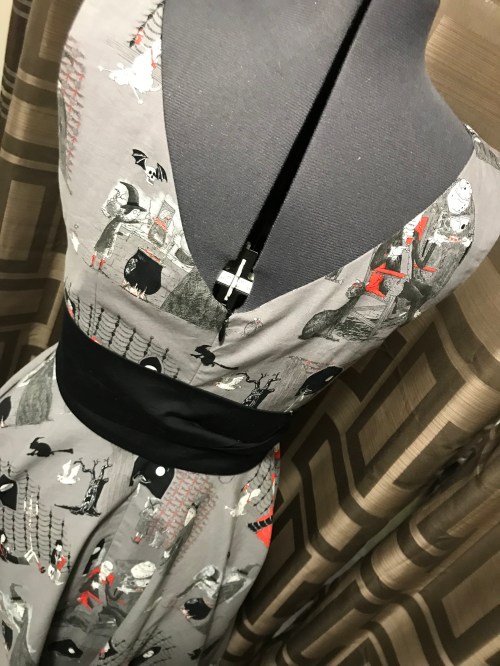 Especially across the back zipper. This is the trickiest part, since you have to align everything to points on the zipper, not to the other fabric directly. Again, I marked my seam-lines and marked match points with pins. Wash-away wonder tape would probably have been helpful, but I haven’t got any at the moment.
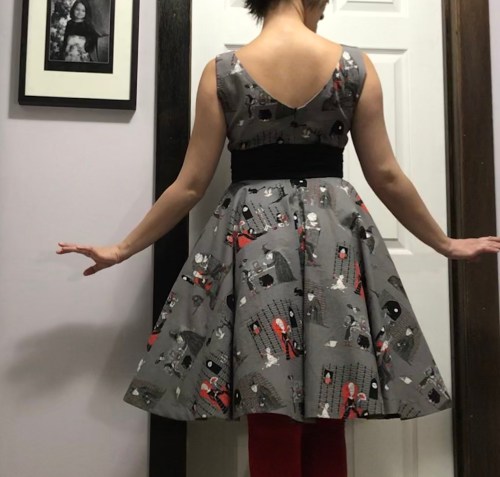 I set my zipper stitch long and first just basted it in, concentrating on getting the vertical locations to match without worrying too much about sewing too close to the teeth. (I DID worry about keeping the teeth aligned over my marked seam-line) Then, once I had things more or less aligned, I went back to stitch closer to the zipper teeth. Oh, and I remembered to stabilize the fabric along the zipper. I think this helped, too.
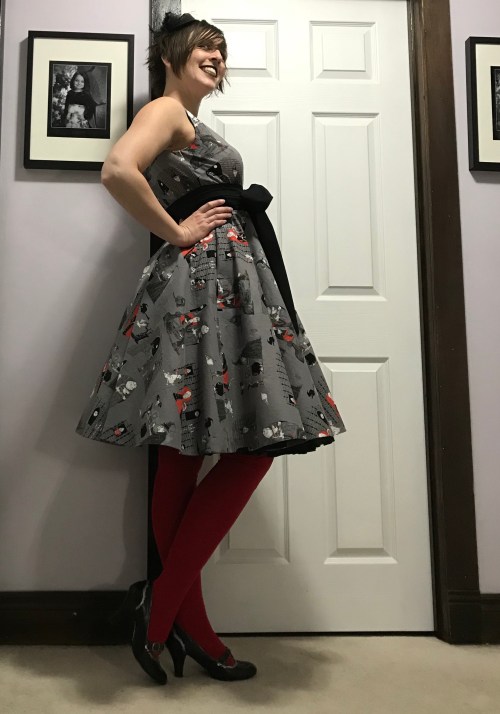 I made a couple of minute fitting tweaks to the pattern this second time—squaring the shoulder slightly and doing a very small swayback adjustment on the bodice back.
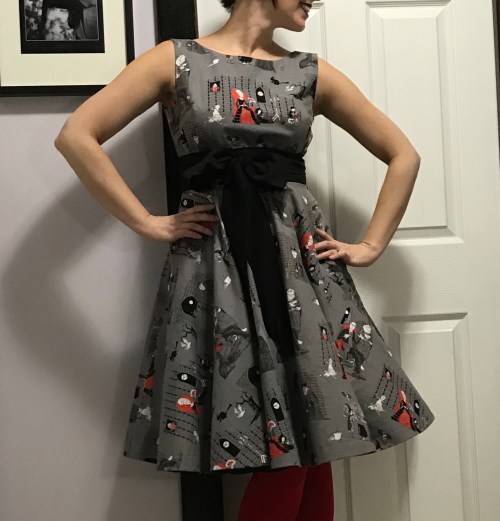 The black fabric for the sash is a lightweight cotton satin from Fabricland a few years ago, leftover from another project. It’s one of my favourite fabrics ever. I had pulled it out when auditioning fabrics for something else last week, but I’m so glad I didn’t pick it because it was perfect for this.
 It’s certainly not my most outlandish or intricate Hallowe’en costume ever, but I was pretty happy with it—glad to get it made, but most especially proud of my construction. And my print matching. I might be crowing about that all month.
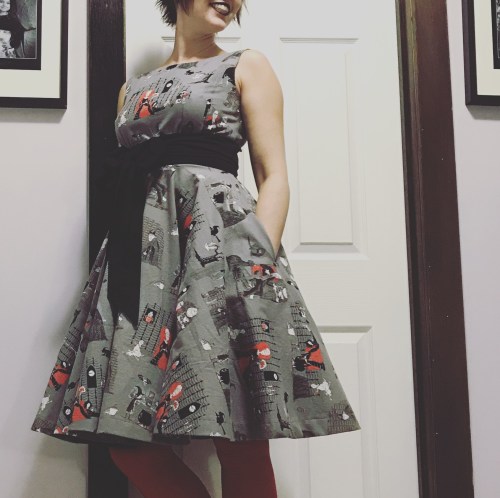
 I wanted to do a class for a classic fit’n flare, fifties style dress. Well, really, I wanted to do
  On trying it out, a few subtle differences showed up. For one, it’s finished with facings rather than a lining. This was neither here nor there for my purposes, though lined might’ve been better in a white fabric. The most interesting thing is that, while the skirt is indeed a full circle, it’s not evenly divided front and back. The front portion of the skirt is somewhat larger than a half circle, while the back portion is somewhat smaller. I’m not sure what the consequences of that are, but it seems to work out.
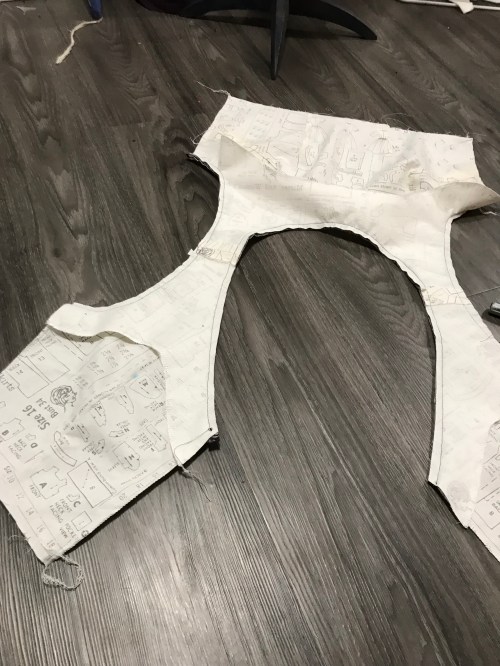 I altered the construction for my favourite sleeveless method, where you stitch the facing to both neck and armscye, then turn it right side out before sewing the side seams.
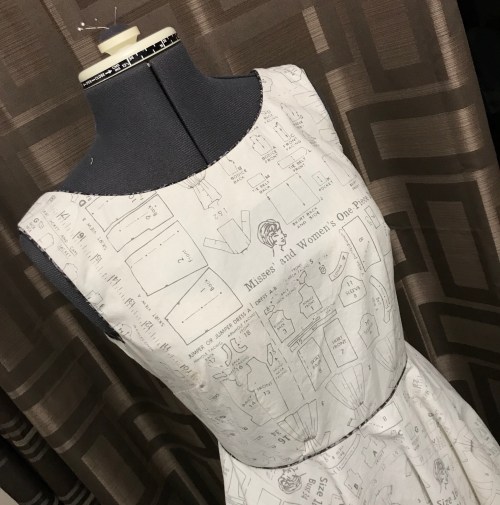 And added piping to give at least a tiny pop of colour to my white and grey fabric. It’s purple, though I’m not sure you can tell. Isn’t this fabric fun though? I had wanted something colourful and novelty for this sample (something about these fit ‘n flare dresses is perfect for a novelty print quilt cotton). I didn’t find colourful, but the novelty was too perfect! I’m very tempted to take some fabric paint to some of the outlines, but I’d hate to blow it at this late stage.
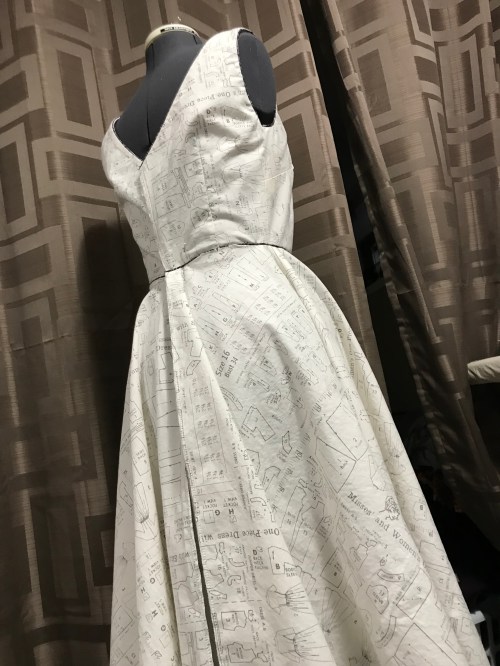 The back is a smooth V
 I added pockets to the side-seams, which worked out well except that I appear to have mis-traced the notches I was using to align the pockets to. So I had to unpick both back pocket pieces (including understitching and serging) and move the pieces up. I’m pretty sure this is a tracing error—it was not the easiest pattern to trace, I will say that, as the lines are all the same solid line, without different dashes for different sizes.
 I tried it on after the skirt was attached, expecting to need to do a swayback adjustment, and to my surprise it didn’t seem to be needed. Looking at the photos, I think a very small adjustment might’ve been good (1/4″ or so?) but it’s still a remarkably good fit right out of the envelope.
 That fabric is such a lot of fun!
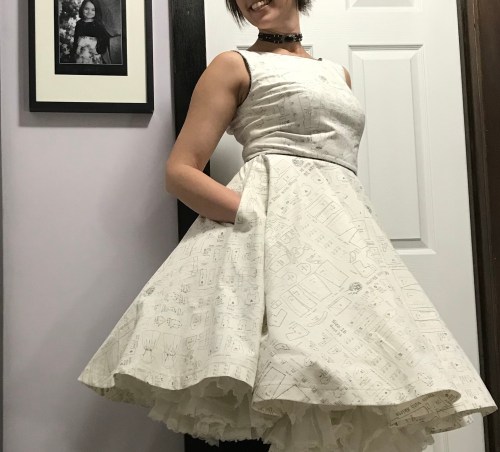 I am a little disappointed it didn’t come with pockets, but they aren’t at all hard to add, and I’ll be happy they’re there every time I wear this.
 I took a lot of these pictures with my Very Fluffy Petticoat, which is an old square-dancing petticoat and way too ridiculous for normal wear but makes great photos! The less insane photos have my black “everyday” petticoat.
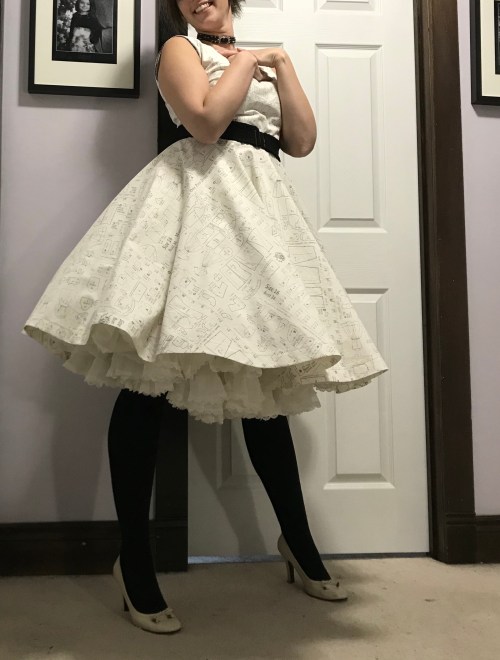 So all in all, I’m really happy with the pattern. It’s basic but a great backdrop for fun fabric, and I can imagine lots of fun mods. I’m still not totally sure about the unequal circle portions in the skirt (it just seems untidy to me) but I didn’t notice any issues once it was together—presumably the side seams fall towards the back a bit, but you’d have to look really hard on a circle skirt to notice that. And I’ve got some novelty Hallowe’en fabric in stash that would be just perfect….
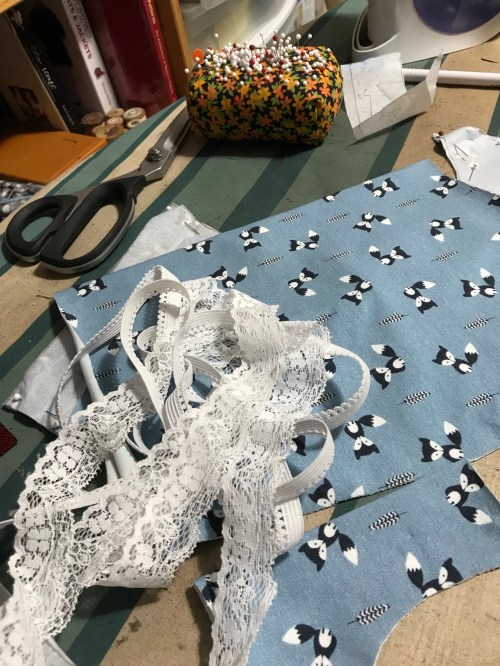 I’ve wanted to do an underwear class for quite a while. It’s one of my favourite things to make, it’s fast, the materials are minimal, but there are lots of little helpful techniques that can be hard to pick up on your own.
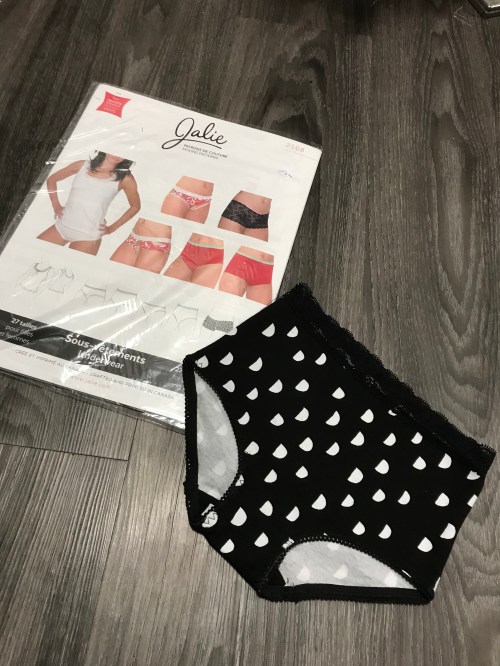 Finally, I decided to go for an oldie I’ve been curious about for a while,
 And with the range of styles (basically high cut and hipster cut with both high and low rise options for each. We won’t go over the tanga pantie view if I can avoid it), I’m hopeful everyone will at least have something in their ballpark.
 The camisole is cute, too, although I don’t love how it’s drafted specifically for the wide lace at the front neck. I do like how they use the same techniques for finishing the cami as for the underwear, at least from a teaching perspective.
 My one disappointment from a construction perspective is that they’re single crotch seam underwear. While I do like this look, I prefer the sewing and finishing of an enclosed crotch. Not that it’s hard to convert one style into the other, of course.
 I am teaching a class next month (at
  Spoiler: it turned out ok.
 Actually, it depends on your metric. Technically, this is a work of freaking art. Style wise, it’s fun but plain—which goes with the Merchant & Mills aesthetic, if not so much mine. Fit wise, it’s ok but not spectacular. More on that in a sec.
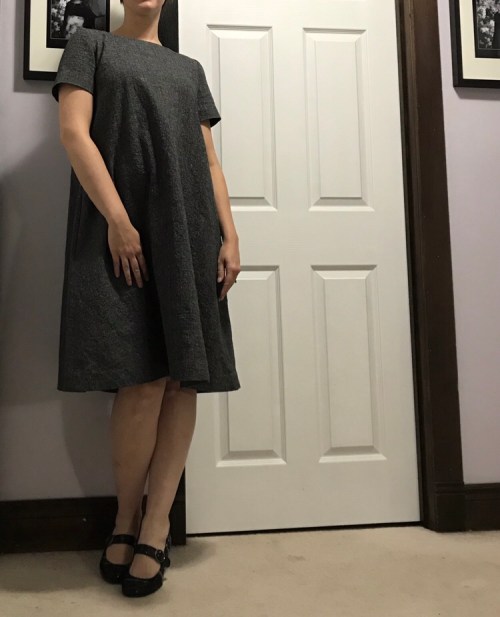 It’s a pretty insanely simple pattern. Ok, I didn’t make the long sleeve version with the funky little inset. That’s a neat version but I didn’t think I’d actually like wearing it. This is what I struggle with with these class samples—balancing what I want in a wardrobe vs. what students need in a class. It is a nice pattern, though—there’s some subtle shaping at the side seam, and the amount of flare is just perfect for a crisp woven.
 Anyway. The sizing is British, apparently. I’m in between a size 10 and a 12, but closer to the 10, so I went with that. However, the shoulders are a little binding so perhaps the 12 would’ve been better.
 On looking at the pattern pieces, I made two of my usual adjustments: I squared the shoulder, and I raised under the arm. Possibly I should’ve just petited through the armscye, but the effect is pretty similar, except that I think raising the bust might’ve been a good idea too.
 The square shoulder was definitely the right call. I think I could’ve raised the underarm a bit more, because my squaring of the shoulder involved raising the outer shoulder, which counteracted raising the under-arm somewhat. Usually I handle things a bit differently, by dropping the inner edge of the neckline when I’m tracing, or just grading to a smaller size in the neck—but I didn’t decide to do the changes until after the pattern pieces were traced. Anyway, it looks nice until I move.
 After some sampling I went with this dusty punk rayon binding left over from a version of
  As you can see, I added pockets. There’s plenty of room in this style, and these days, with key cards and cellphones, I’m much happier if I have pockets. Oh, and when binding the hem, I stretched the hell out of the bias tape as I went, which caused it to gather the edge a bit, making it much easier to do a nice, deep hem on the curved edge. I did end up serging the armscye seams, as it was just better to reduce bulk and narrow the seam allowance there.
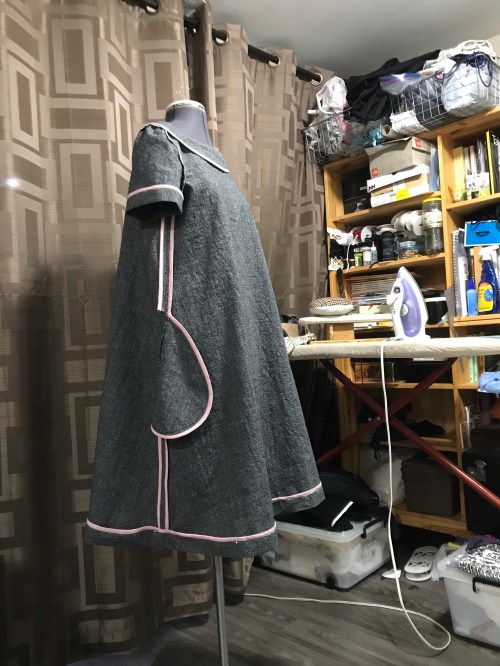 The whole Merchant and Mills philosophy is of the “slow down and make something carefully and well,” variety, which I respect even if I hate their arty envelope photos. And I really did enjoy this process, with exquisite materials and minimal fitting. It still took less than eight hours of sewing, so it’s not that long of a make. That includes hand stitching all the hems.
 You can see how the smooth shoulder fit goes all to hell when I lift my arm even a little. Some of that is unique to my body but some is the draft, which has a fairly high, narrow sleeve cap—the kind that looks perfect while stationary. To make it again, I would remove .5 cm from my raised underarm, but then petite through the armscye 1cm. If I need to make it again, which I probably don’t. I think I’ve mentioned my overstuffed closet.
 I almost wanna make a little pink bow for the outside. Probably too twee, right? This pattern is all about class, right? But I really do love those seam bindings.
 maybe I should just wear it inside out?
 I decided for my birthday this year I wanted to have a sewing day, since I now have a (moderately) spacious house and a gigantic dining room table. I invited a few friends (ok, mainly former co-workers), laid out my giant cardboard cutting mat on the dining room table, and brought my main sewing machine and serger up to the kitchen table.
 I even cleaned my iron, which was a whole other adventure as I nearly killed it in the process. But the sole plate hasn’t been this clean since a month after I got it, so that’s good. (The process involved vinegar, salt, toothpaste, a little bit of heat, and a LOT of scrubbing. The near-death happened when I was trying to rinse all that guck off. I think water got inside somewhere it shouldn’t’ve. But it seems to be working again now so fingers crossed. )
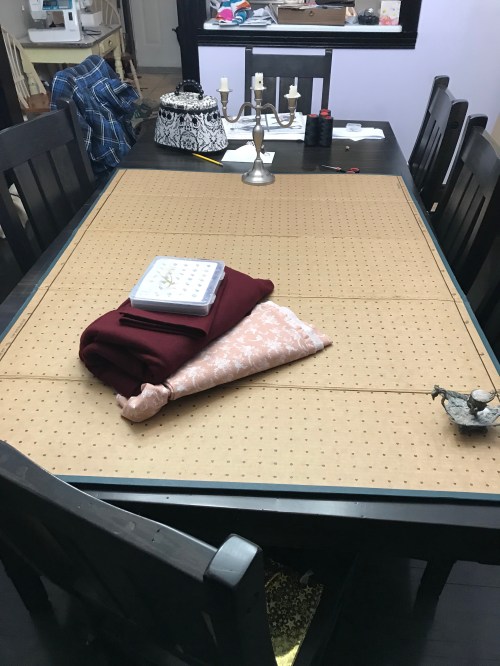 My friends brought various projects, mainly handwork (one seam ripping), and I displayed my lack of millennial skills by getting absolutely NO pictures of everyone. So have some dark after shots instead. (Dawn, if you’re reading this, you forgot your fabric!)
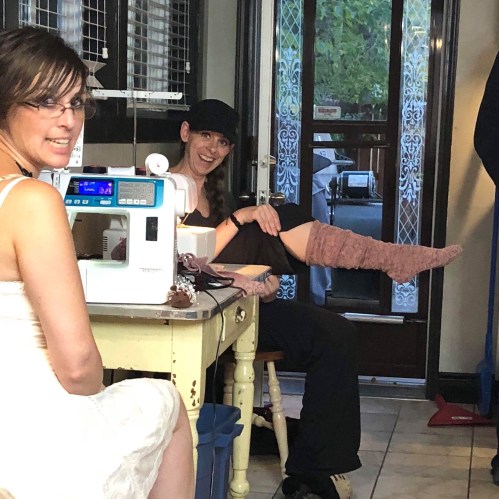 There is one shot of me and Cee at the machines, taken by a friend, where I have a derpy face.
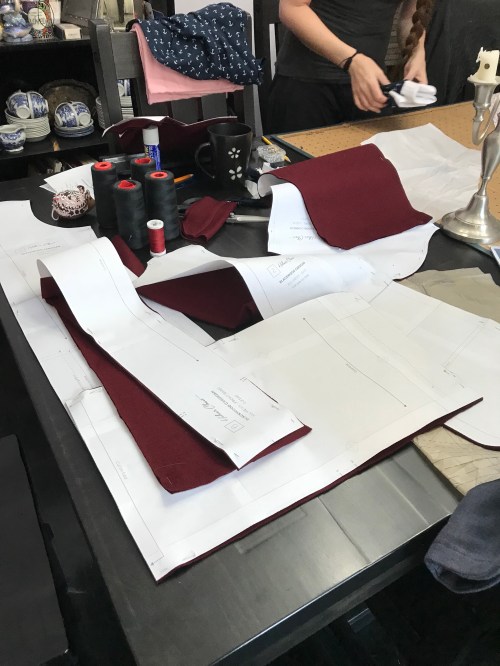 I decided, at long last, to tackle the
 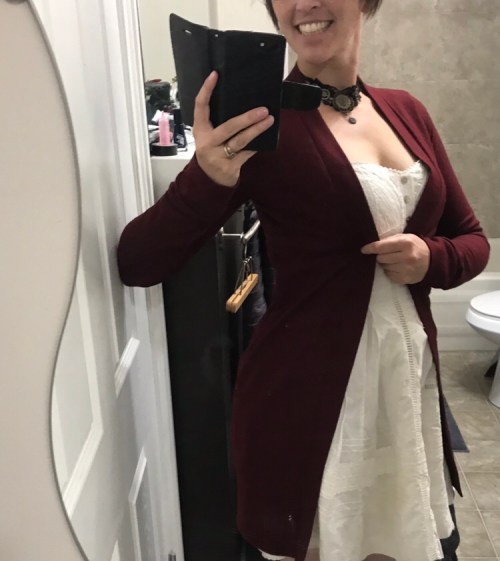 Of course, once you own the pattern, you might as well try it out, right? Save yourself redrafting all those rectangles and figuring out how much shorter to make the neck-band so it doesn’t gape.
 My fabric is technically a mystery jersey from a random group at Fabricland last spring. I got it because I was pretty convinced it was wool or a wool blend, and now having ironed it I’m pretty sure I’m correct. (I love the sheepy smell of wool when you steam it.) I thought it would be a good choice for a cardigan since it won’t need to be laundered as much. I steam-shrunk in my dryer, which is my preferred method of pre-treating wool although I confess I can’t completely recall how much subsequent laundering any of those things have had.
 Anyway, I’m pretty thrilled with my result. I love the slim fit. I love the longer length. (I may have to make a floor-length version) I love the pockets, although I’m not totally in love with my application of them—but that’s a separate issue.
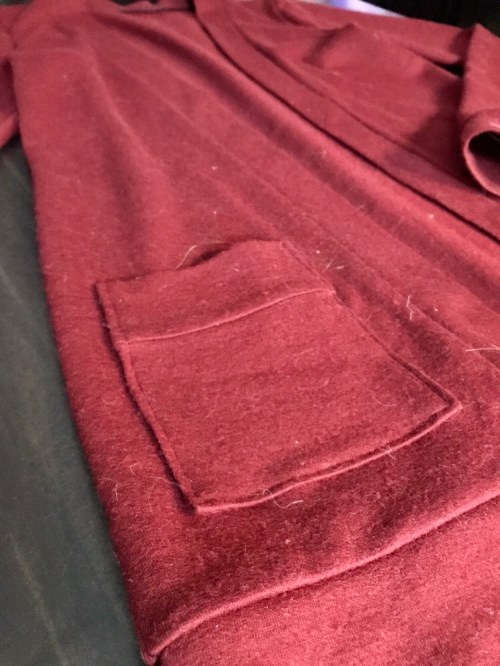 I do still wish it closed. I might add some kind of a loop and button, like the
  But especially, I really, really, really like sewing with friends.
 This post is inspired (just a little past due) by the Sewcialists blog theme for August: your
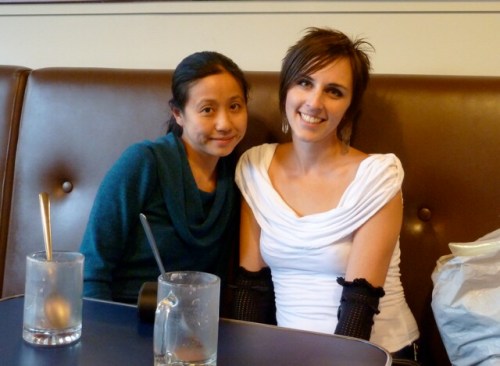 The day that changed was August 27, 2010. The day the
  She was notoriously vague about her location, even to continent, so I wouldn’t have ever expected to meet her. Except one day earlier that spring, she had posted about an unseasonal snowstorm, and I had commented that we were having the same crappy weather where I was. A private message followed and by some miracle it turned out that we were in the exact same city!
 Back in those days, before people figured out you could charge for it, it was pretty common for sewing bloggers to slap together a free pdf pattern to share with the world (mine are still linked under the pattern tab here). The one Selfish was most famous for was her iconic
  I had always meant to make it but never quite got around to it—but as I started thinking about Sew Style Hero month for August, I kept coming back to The Selfish Seamstress and the dress.
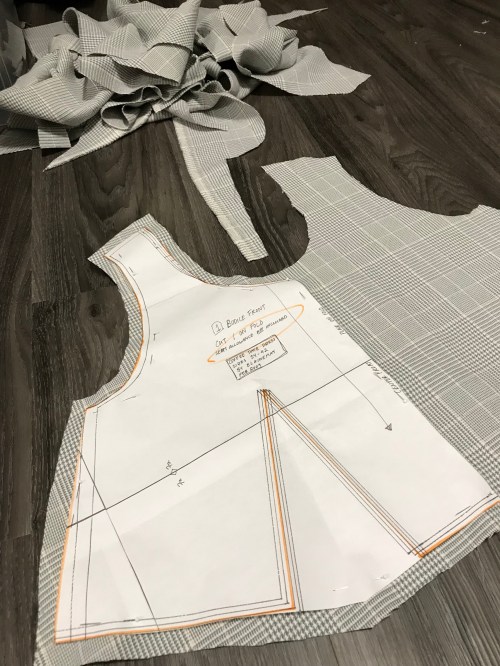 And by a miracle I remembered to add all the seam allowances when I cut it out, whilst paying a ridiculous amount of attention to matching the plaids.
 This fabric is a mystery suiting that has been in the stash almost since the last time I saw Selfish. It’s a grey plaid/houndstooth with little threads of pink that I can’t seem to get to photograph. It’s almost certainly polyester. In any case, it makes a good wearable muslin if nothing else. Because it’s a bit on the heavier side (and plaid) I cut the ruffle as a single layer on the bias. Time will tell if that was a good idea, I guess.
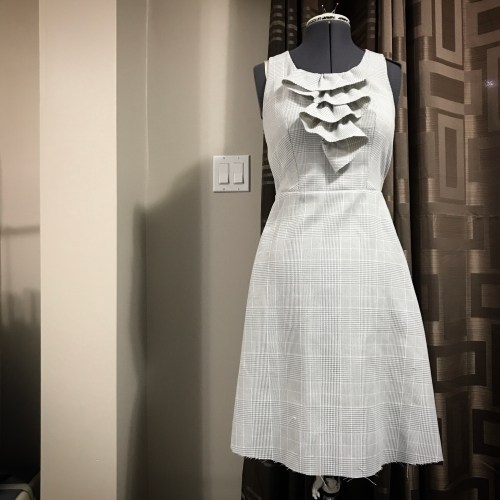 I did my “usual” grading between sizes: 36 shoulders and bust, 38 waist, 40 hips. I should have remembered that this is essentially an indie pattern. I should’ve cut the whole bodice a size 38. For that matter I could’ve cut the skirt size 38, too, but it’s easier to take in than let out. What really sucks is that I kept thinking (since this fabric has a lot of give) that it would work out, so I kept going, and by the time I had the zipper in for a full try-on I’d already aggressively clipped my seams at the underarm facing, only to discover I couldn’t even zip the damn thing up.
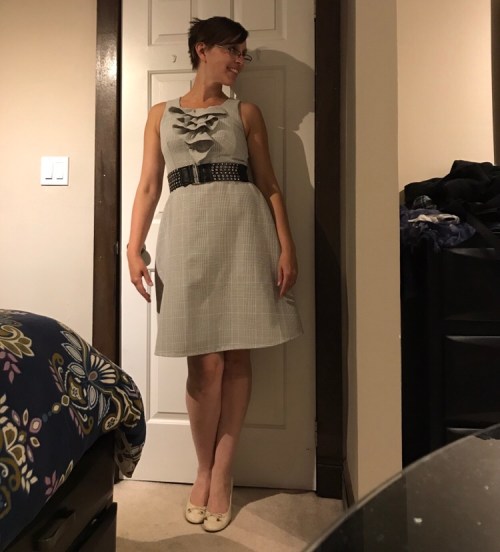 Then I sacrificed my careful, impeccable plaid matching at the back seam, ripped out the zipper, and re-sewed it in with minimal seam allowances. This gave me the extra inch or so I needed at the bust, but I had to take quite a bit out at the waist. That’s ok though. Taking out is ok.
 All in all, the dress is cute but I don’t feel fabulous in it. The bodice is a bit short (a known feature of this pattern, but I tend to have a short torso so I wasn’t too worried) even on me. Mainly I think I don’t love the fabric–it’s pretty but doesn’t feel nice, and gets really staticky. I guess there was a reason it had been in stash seven years. In any case, almost more than the dress itself I enjoyed posting about it on Instagram, revisiting and sharing memories of the Selfish Seamstress with people I’ve known since the “old days” of blogging, and many more who I didn’t know back then. Check out the posts under #selfishseamstressfanclub on instagram if you’re interested. Or share some memories here, especially if you made this dress back in the day!
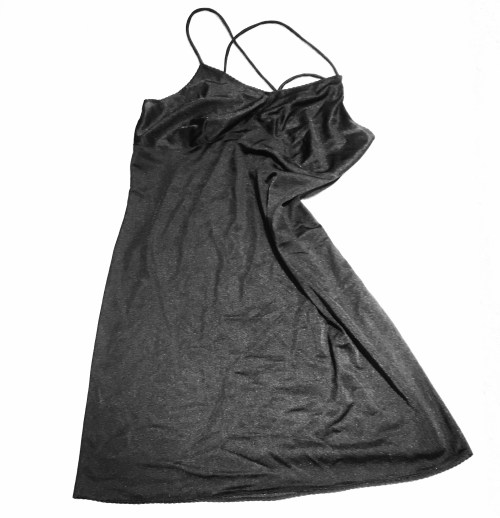 While I didn’t accomplish a lot on my summer vacation this year (other than
 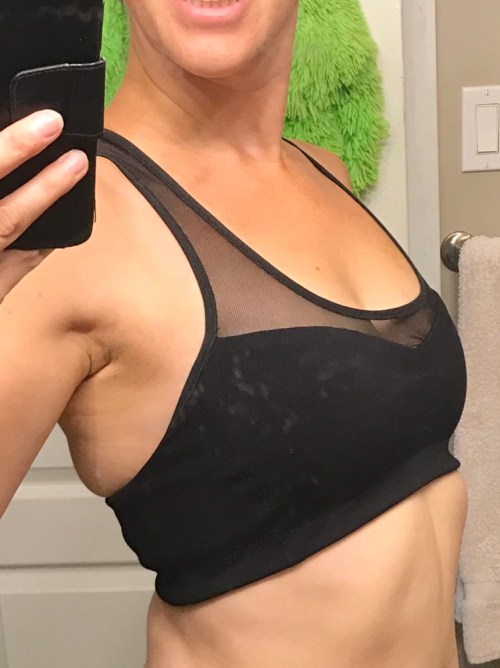 The oldest is this Sewaholic Patterns
  This is too bad because when I finally did sew it up it only took about an hour. And it’s using some really nice fabrics—a wicking activewear, some proper power mesh for lining, with a lighter mesh for the sheer part.
 The construction was complicated compared to the other sports bras I’ve made, which is not actually complicated in the grand scheme of things. The lining seams and the outer seams don’t line up because the outer layer has the side panels. This is actually nice because you don’t have as much bulk at the seam lines, but it confused the heck out of me (especially picking up the pieces years after cutting out.) I skipped the optional pockets for foam inserts, which made my befuddled brain happy but made me a little disappointed in myself since I had cut the pieces and everything.
 The only other tricky bit was figuring out whether the top and bottom edges had seam allowance (they do), which I trimmed off from the top because I wanted to use fold-over elastic.
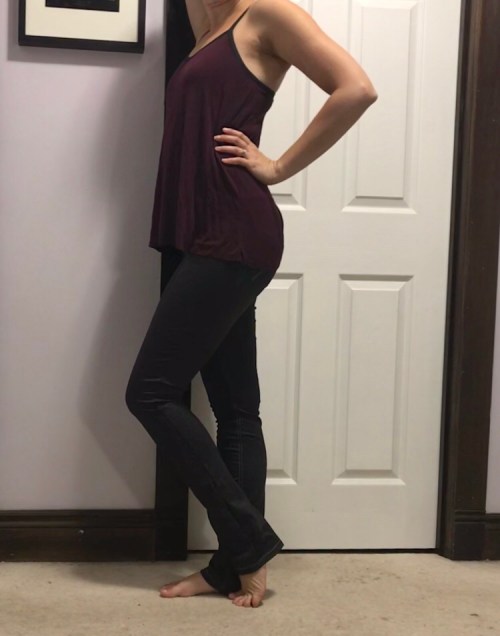 Last fall I had cut out a pair of Eléonore pants from a black denim-print ponte. I had issues with the topstitching and wound up stuffing them in a bag in frustration. Well, I finally put on my big girl pants and took another stab at it. I had to abandon the actual topstitching thread and use a triple straight stitch with regular thread instead. The only problem is that none of my machines will do a long stitch on this setting, which annoys me. But at least it’s done, and you have to look pretty close to notice the difference.
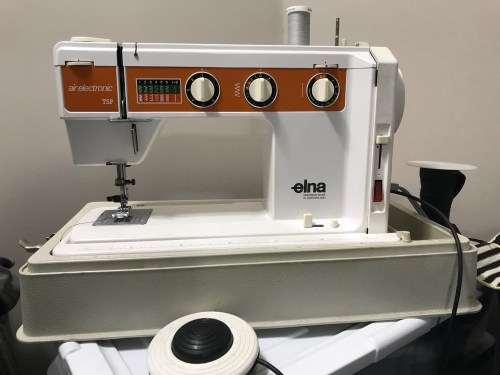 I have been doing all my topstitching lately on an old (80s) Elna a friend gave me. It doesn’t blink at topstitching thread (except with this stretchy fabric) but more importantly it’s got this weird air-bubble foot pedal that gives amazing control—the best I’ve had in a non-computerized machine—and an adjustable speed that goes from painfully slow (perfect for topstitching) to so fast you have to adjust the tension because the thread is getting pulled so quickly (perfect for topstitching with a triple stitch, which seems painfully slow otherwise)
 They don’t stay up terribly well; I should probably put belt-loops on.
 After getting those out of the way, I stumbled upon a remnant of black lingerie knit (nylon tricot) I picked up shortly before the store closed down. I’ve been meaning to make a black slip for a while—basically since I made
  I’ve had this vintage Basic Knits pattern in my drawer of “patterns I’d like to make” for, well, quite a while. And, of course, I went with the version that’s almost identical to the Kwik Sew 717 I made before. Actually because I was lazy and didn’t want to have to trace and cut out two separate cup pieces for the princess seam version.
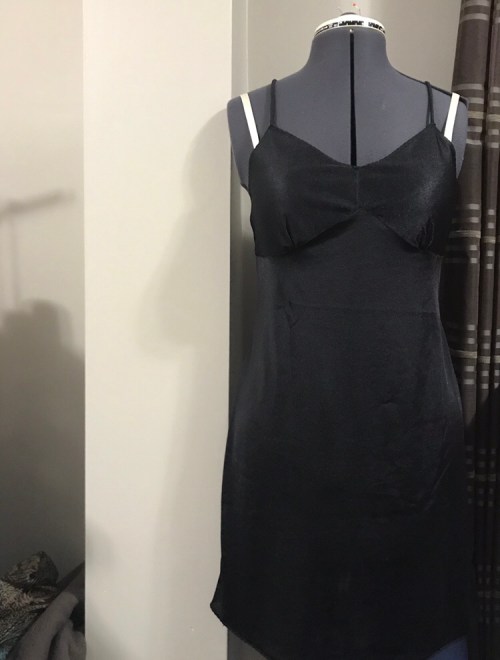 I cut the 36 bust grading to the 38 in the hips, and I took the bust in a tiny bit at the side seams. I could’ve gone another size larger in the hips. I’m not sure how I turned into a pear shape but apparently I have. I think I like the bust shape in the Kwik Sew pattern a little better, but this one will be perfectly functional, and I’ve needed a basic black slip for a long time. Oh, and I shortened the skirt by about 6″, because as drafted it would’ve been well below my knee.
 That may have been a bit excessive, as it’s pretty short, but it’s easier to wear a short slip under a long dress than the reverse. Anyway, I’m pretty sure it’ll be a good addition to the wardrobe come slip season… which is getting distressingly close here.
 Anyway, so looking around for something else, I spied this fabric, which I bought my girls for Christmas presents last year. (This is what happens, teenagers, when you make the mistake of showing interest in your mom’s hobbies.)
 After a bit of digging I decided Kwik Sew 2893 seemed like a good place to start. While it’s styled like a baseball tee, it’s roomier than
 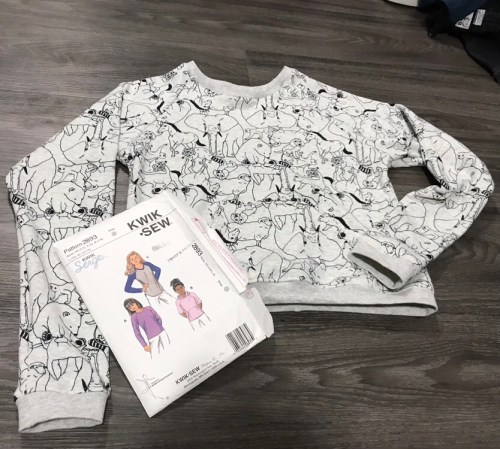 It’s a kids pattern but the XL is a size 12-14, which is about the same chest measurement as Tyo, and I figured if it didn’t fit Syo it would fit Tyo, and if Tyo didn’t like it it would work for Fyon, who is a very skinny eleven now. This is the convenient part of having multiple girls in the family, even if they don’t stairstep quite as neatly as they used to.
 I wanted a slightly cropped length, partly just to use less fabric in this tester version, so I made it the length of the Extra Small size. This is still significantly longer than the sweater at the top of the post, and as it turned out, while it makes a short sweater, it’s not what I would call cropped.
 At the last moment I decided to include the pocket, also in a size XS, because it’s nice for teenagers to have somewhere to stuff their phones. This was pretty simple, although more stabilization might’ve been nice. I did knit interfacing strips along the opening parts.
 None of the grey ribbings I have in stash were a perfect match, but this one was the best. I could also try black at some point, that might be fun.
 Anyway. While I was sewing it up I was convinced I was making a sweater for Fyon, but Syo tried it on and it fits her. It also fits Tyo but the length is awkward—longer than cropped but not as long as she’d like a normal length sweater. On the other hand she didn’t take it off and went on to sleep in it, so I guess it’s not that bad.
 And it’s one tiny piece less taking up space in my stash.


