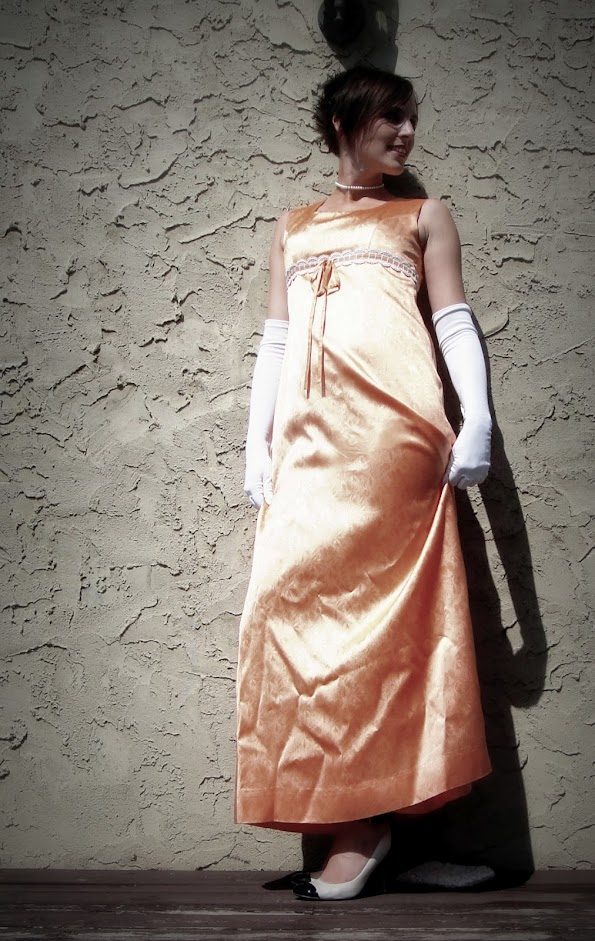
Monthly Archives: August 2012

The Black Leather Dress

Black leather dress.

Once upon a time, in the dying days of the 20th century, I bought, at the local vintage clothing store, a dress that was not vintage, nor really classic any way at all, but that was homemade.

Far more important to me at the time, of course, was that it was black and it was leather. Looking back on it, I have the sinking feeling that it was someone’s idea of a costume for Xena, Warrior Princess. Either that or it’s fetish-wear escaped from someone’s personal dungeon. Regardless, it was an absolute delight to my teenage sensibilities, and has never lost its place in my closet since, despite the situations calling for it being about as common as hen’s teeth in my life these days.

C’mon, you can’t model a Xena dress without a sword.*

I keep trying to come up with a quick description, you know, such as might be printed on the pattern for such a dress. Halter-type, open backed dress has princess seams, boning, and Roman Legionary skirt?

Like so many of our home-stitched garments, it has a few quirks. Although, it’s hard to say where design ends and quirk begins, and then there’s the issue that it was probably perfectly-tailored to the original wearer. Or maybe not.

Repurposed?

So, the obvious: plenty of interesting seaming, perfect for using small scraps of (possibly reclaimed) leather. At least one of the gladiator-strips at the bottom has a previous stitching line crossing it, suggesting it has been repurposed. I do wish these bottom strips were a bit more substantial—double-layered or at least topstitched. They look kind of unfinished and cheap.

Unzipped

The straps are an odd combination-halter-type I’ve never seen elsewhere: the main strap is a simple halter, snapping behind the neck, but then there’s this accessory strap that rungs from under the arm up the back of the shoulder, and attaches to the halter just on either side of the snap.

Back view

This strap sits at a bit of an odd angle, and has always folded a little awkwardly on me at the back of the arm, unless I slouch significantly. Does this mean that the original owner had a more rounded, stooped, or slant-shouldered posture than I? Or was it just some quirk of imperfect or inexperienced drafting?

Snap and straps

The snap is not exactly perfectly-applied, but is less mangled than mine usually are, and let’s face it, anyone who sets snaps through that many layers of leather by hand has my kudos.

Back zipper.

The entire dress zips open at the back with a separating zipper that, oddly, opens from the bottom. Was this planned, or did our seamstress mess up and then decide to keep it since, well, unpicking leather? I can’t say it makes the dress any easier to get into, although it’s certainly quick to get out of. Hmm. Is that another point for the fetish-gear argument?

Lining

The inside is lined with a thin stretch lining of some kind, with all the same piecing as the outside. I think I would’ve wanted to simplify for the lining, personally. It is very short. In fact, I hadn’t quite appreciated just how short the whole thing is from the back until taking photos this time. Which is why the back view photo is only from the hips up. Hmm. And this is not the dress that caused my mother to declare I looked like a hooker when she first saw me wear it.

Lining attachment

The lining appears to have been hand-stitched in place all along the top edge, where there is a narrow leather facing; the hand-stitching continues up the insides of the narrow straps, which also kind of makes sense—I think turning straps in leather would be a pain in the butt.

Boning in front.

Something I only noticed just now (now that I’m finally looking at it with a stitcher’s eye is the presence of two pieces of flexible plastic boning stitched to the seam-allowances in the front. Along only one edge of the boning, since the seam allowance isn’t wide enough for both. They took the time to tip the bones with leather, though, so they wouldn’t poke through.

There’s no internal seam finishing on the leather or the lining, not that anything’s in danger of ravelling, and the hem on the lining is made with a simple zig-zag.

Luv

/sigh. For all its weirdness (and impracticality), I still love this dress.

Back in the day.

And, just to prove its antiquity, here’s a shot of it in actual use, from New Years Y2K itself. With Osiris, and though you can’t really tell, an itty-bitty Tyo bump.

*What, you mean you don’t have swords lying around the house? C’mon. I mean, some of you probably have guns in the house—now that’s whack.

45 Comments

Filed under Sewing

Rolled hemmer triumph.

20120811-131701.jpg

The war is not over, but a small battle has been won.

I trimmed the seam allowance from the hem area just before stitching across it. SO MUCH easier.

17 Comments

August 11, 2012 · 1:19 pm

Wads of wadders.

Wadders can be cute, too.

I’ve been trying to make myself into a better skeptic, the last few years. Critical thinking and all that. Evidence. So generally, I’m skeptical of the idea of curses.

But right now, dear readers, my (admittedly anecdotal) evidence is that drapey, clingy, stretchy red jersey is, indeed, cursed. This is the second piece I’ve thoroughly demolished (the first was briefly figured here, which top never really grew on me, and the one I made from the rest of that piece was so horrific it never even got blogged.)

So, this is not my favourite kind of knit. But it is one I’ve successfully worked with on occasion. My cowl-neck shirt, for one. My friggin tunic top I made the pattern for, for another. The slinky maxi fabric I used just recently was a little beefier, but not much.

So why did this fabric defeat me so?

Closeup. Aieee.

Partly, I guess, the answer is laziness. What I wanted was a quick knit top to whip up in the hour or so I had before bed. And to trial Jalie 2788, the twist top. Not so much for it’s own sake (although it’s cute), but because what I *really* want to make is a cute dress like this Burda one, but I don’t want to pay five bucks for a download pattern when I already have a twist-front pattern on hand. Albeit  a slightly different twist, but anyway. Yes, I’m a cheapskate. Anyway, because I wanted quick, (and I had cut out the shirt before and tossed the scraps) I didn’t want to sit around practicing neckline finishes.

(More blog shoes)

Sometimes, I manage to get away with this kind of half-assery. Just, not this time. The pattern suggests folding over and topstitching. I first attempted to do this straight; Not going to happen. Cut that off,  put on my usual binding, but it was fiddly and wound up stretched not enough in some spots, too much in others. And I think it’s really a bit heavy for this style of top.. Then decided to use Steam a Seam for the arms and hems. This worked much better, and is what I should’ve done for the neck, too.Why didn’t I? Well, partly because I’ve run out of (or misplaced) my Steam a Seam strip/roll, so all I have left is the wide stuff for applique, and I get really tired of just cutting little slices off of it. I need to get another twin-needle for topstitching, too.

Back view. Could use more swayback adjustment.

And then when I got it to try-on stage, it was too big—baggy and saggy in unflattering ways. The measurements for my size are, seriously, *perfect*—the only alteration I made was to add a little swayback adjustment, since there’s already a back seam. But, the fabric is pretty darn stretchy, so I’m going to blame that on the fabric. So I took it in a couple cm on each side and at the shoulder seam. Now the length to the bust is pretty good, and things are a lot less saggy-baggy except right around the neck binding,  Except apparently I should’ve kept the ease below the waist, because AIEE that is too tight to be flattering. Not my best area, there, upper hips and lower belly. /sigh. Must work on that, soon.

And then I tried to make panties, from a pattern traced off one of my fave pair of boy-cuts, from the remnant

Undies. Fail.

Also fail. Partly for shoddy construction, but mostly because this elastic, which I bought more for its cuteness than any practical plans, is not nearly stretchy enough.

Just for the record, this is probably the third pair of underwear I’ve attempted that didn’t end up wearable.

I’m going to bed now.

25 Comments

Filed under Sewing

The Last Sundress

Style 3653

I think this will probably be my last sundress for the summer. I’ve been making them kind of compulsively, but let’s face it, the Canadian summer is short. And this one is REALLY summery, not something like the Funnygrrl dress that can be warmed up with a shrug and tights. I mean, you could warm this up with a shrug and tights but it would look pretty silly. Really, this is not much more than beachwear. But considering the forecast right now, it’s purrrrrfect.

Style 3653

The pattern is Style 3653, all the way from 1972. I won’t lie to you, I fell hard for these bathing beauties whenever it was that I picked them up. What a gloriously young, summery pattern. Not the most practical of items, certainly, but delicious.

So I’m not sure if you’ve noticed, but I’ve been making a lot of woven dresses in the last several months. To the point where I’ve really been blowing through the portion of my stash (never terribly large) dedicated to light, summery dress-type fabrics. When I decided that this was going to be the next project, I confess I was a bit dismayed when it came to picking fabric. This pattern seems to call for something fairly crisp—yes, for once, quilting cotton would be perfect. Crisp, I did not seem to have. (Well, I have lots of broadcloth, but while that’s great for summer linings, not so much for fashion fabric.)

Front

So I dithered, and tidied, and put stuff in boxes, and eventually settled on this pink linen. A little reluctantly, only because when I bought it (from the thrift store) it was in company with a luscious eggplant-purple knit that complemented it perfectly, and I’ve been envisioning  a top and skirt combination. Although, considering how often I wear skirts (even the ones I like), I’m likely to get more use out of the dress, frankly. Even if there’s only three days a year hot enough to wear it.

So, I have quite a few Style patterns, but I think this may be the first one I’ve actually made up. What a crime! Anyway, I didn’t think I’d have too much trouble with it, but I whipped up a quick bodice muslin just to see if things were in the right ball park. Well, they were, except—um, ease, people? There was not much. Interestingly, I didn’t actually need to shorten the shoulder straps. This might be a first. I didn’t want to bother muslining a skirt, so I pulled out the pattern pieces from Simpicity 5549, which has a similar narrow A-line skirt and dart shaping, at least in the back, and used them for comparison. I basically determined that yes, the same alterations I always do would be in order, and, y’know what, although the Style dress is drafted without a back seam (butting in the front as it does), I really wanted a back seam. I really, really, really liked the smooth back-and-butt fit I got in the Funnygrrl Dress, and I just didn’t want to sacrifice that. I also added a bit of width to the hip in the back piece, just widening the flare of the A-line, again based on comparison with the other pattern. Apparently, I have booty. I know, it’s news to me, too.

The only other alteration I made was to use a separate facing for the lower part of the button placket on the front, rather than the cut-on placket the pattern suggests. This was solely because I wanted to use piping (I may have a Problem).

Now, this linen is soft. When they talk about soft, wrinkly linen, this is what they mean. I’m kinda glad I didn’t try and turn it into a crisp officy pencil skirt, actually. It would’ve been wrong. This is the sort of fabric that wants to be a slouchy beach caftan.

Front with placket.

So, interfacing. I stayed all the edges of the bodice with interfacing strips (like I did here), and interfaced my button placket/facing pieces for the skirt. I tried really hard to give my fabric the structure it needed (well, everything short of block fusing, anyway.) You know how they say you should match your interfacing to the fabric? Well, I must have succeeded because the whole thing still looks soft and schlubby. Ah, well. On the muslin, there was a bit of gaping in front of the arm. I forgot to take a tuck in the pattern to try to fix it, so when it got to the interfacing (and then the piping), I stretched the interfacing a bit while going over this area. This seems to have done the trick—the fabric’s rumply, but not any worse than it is anywhere else along the piping, and there is no gaping, unlike my last dress. Win.

ANYWAY.

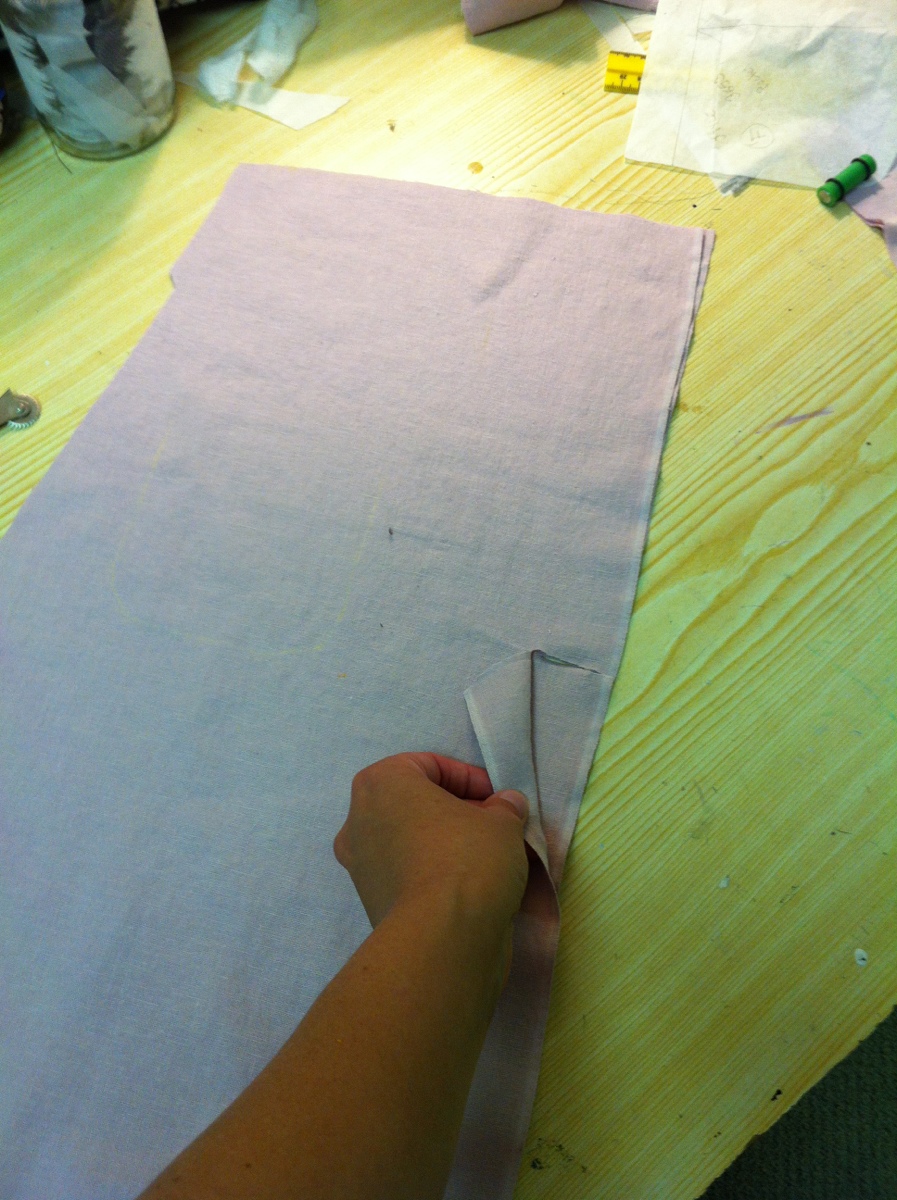
Then I started working on the pockets. Generally I avoid patch pockets except on jeans—they’re just not a detail I care for—but I really like having pockets and there was no way inseam pockets were going to work on this dress. As per usual, I traced the seam-lines onto some cardboard cereal box, and began cutting it out to make a template for pressing them.

On my cutting table.

Where the front skirt-piece was still laid out.

And since you have to cut pretty hard to cut cardboard, it’s easy to miss the difference in feel caused by the two layers of fabric being caught by the scissors, too.

And then I post anguished pictures like this one, about how I cut a 4cm slice in BOTH FRONT SKIRTS and no way is there enough fabric to cut a new one.

And then I wound up not even using the pockets, because everytime you look at this linen it shifts into a different shape and I couldn’t get them to stay in shape even long enough to press properly. Some starch might’ve been in order, but I was already pissed with the pockets.

So, back to that slice in the front. I cogitated. I considered. I  contemplated.

And then I decided, since I had already planned the separate facing for the button placket, why not put it on the outside, and pipe the snot out of it?
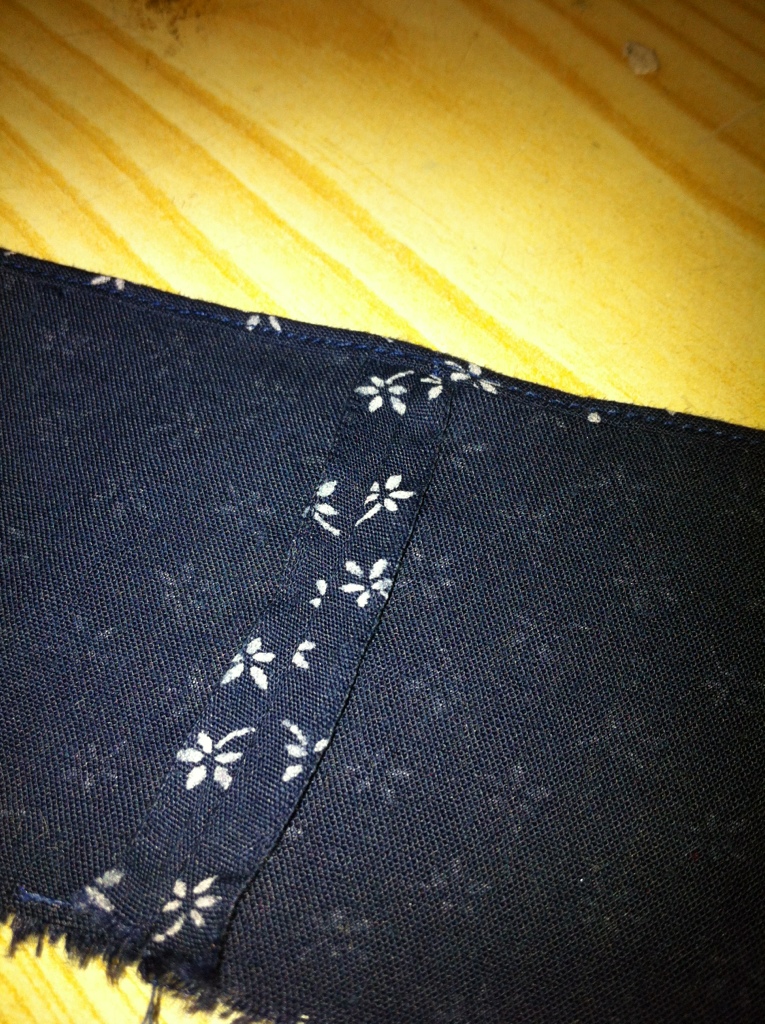
Mending the slice

So, to repair the slices, I fused a small bit of interfacings to right side of the fabric, then reinforced by darning with a triple-step zig-zag stitch. This made for a fairly neat, unobtrusive repair, something I was fine with for the inside of the garment, but would not have been happy with on the outside. It would’ve been more invisible, of course, if I’d had thread to match my fabric, but since when do I do that? Ninety percent of my projects are fine with black, white, off white, or red, so I must admit my selection of colours outside that is pretty limited other than a couple of shades of blue. And the piped facing/placket would cover the unsightly interfacing on the exterior of the dress.

Needless to say, I felt kinda triumphant. Then I had to figure out how to attach everything.

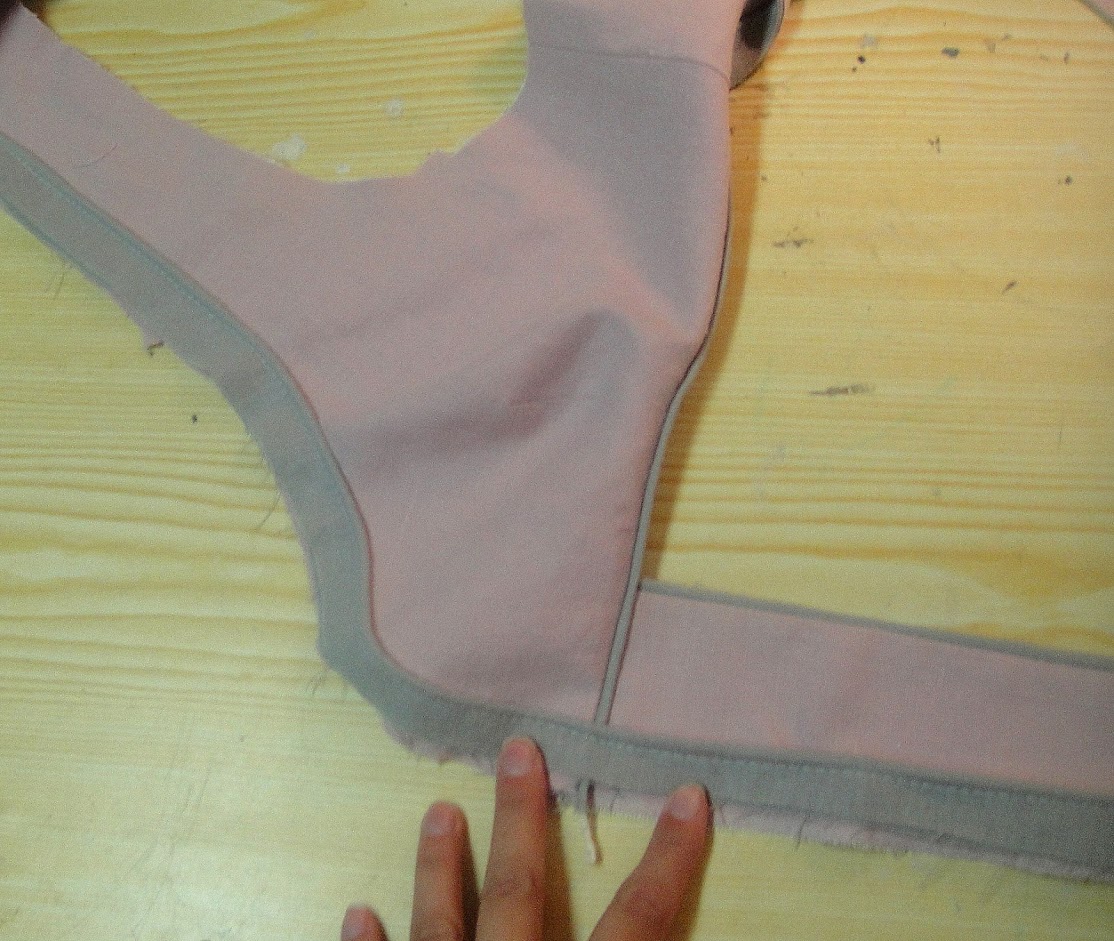
Attaching the placket on the outside.

It would’ve been simplest to just stitch the placket to the front of the skirt and then attach the skirt (with placket) to the bodice. But then I wouldn’t’ve been able to have a continuous line of piping running down the front of the dress. So instead, after a little bit of brain-busting, I figured it out: attach the placket strips to the exterior of the bodice (after piping the bottom of the bodice), and attach the skirt to the lining of the bodice. Then stitch the edges, and topstitch the bottom of the bodice and the inside of the placket down after. Hmm, does that make any sense? I took photos. Y’know, just in case anyone else ever does something this boneheaded and needs a recovery strategy. Design feature. Thingy. Key point: the bodice lining and the skirt go together right side to wrong side, because in the end they end up facing different directions. Like I said, brain busting

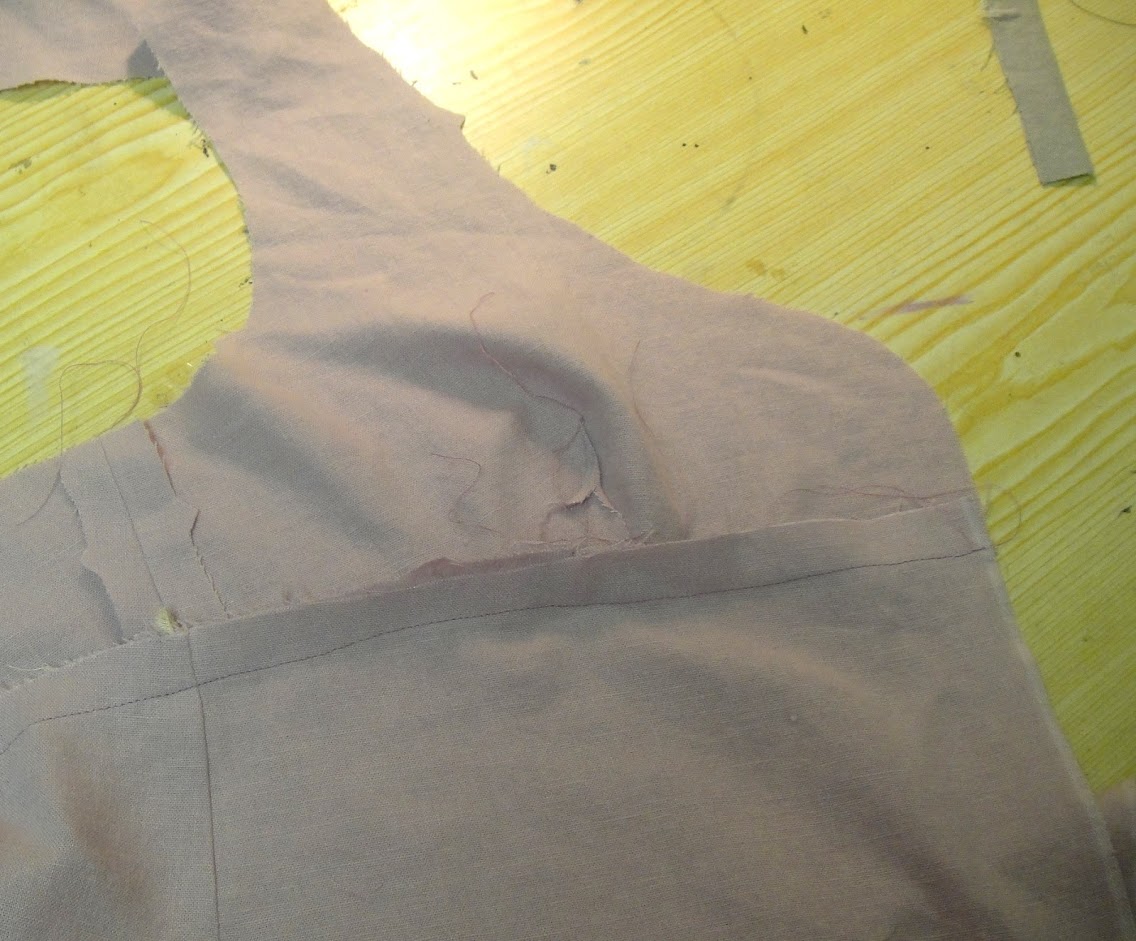
Attaching skirt to bodice lining, right side to wrong.

To my astonishment, it worked. And finally, after all that work, I could try it on!

The darts. The darts, my children.

I’ve been trying to work on my darts the last few dresses. Since my complaints back on the Star Wars Dress, I’ve been tapering and tweaking the tips a little more subtly, and while I haven’t achieved perfection, I’m getting a lot better. So I’m going to blame this on the soft and stretchy and shifty linen. As soon as I tried to try on the dress, the darts sagged in soft, rumply puddles under my breasts. Argh. Part of the problem seemed to be that the lining was tighter than outer fabric (not sure how that happened…), so I picked out the stitching on the lining darts (this is why they sometimes tell you to sew tucks in a lining instead of darts). This helped a little bit, and pressing aggressively over my tailor’s ham helped a bit more, but they’re still rumply. However, with the addition of the buttons and my little bra, it’s looking much better, so I don’t think the horror will keep me from wearing it.

One of the cutest features of this pattern, although you have to look close to notice it, is that the buttons are arranged in pairs. So cute! However, I knew that with the snugness and softness of the dress on me (not to mention the amount of tension I was going to need to keep the darts smooth-ish), that little button pairs with three-inch gaps between them were not going to work. So instead of eight buttons in four pairs, I used twelve buttons in six. Yes, it was a lot of buttons to make holes for. And there’s still a little schlubbiness between the pairs. But I think it works (or I like to think it works), and hopefully the groupings are still distinct enough to look intentional, not just sloppy.

It works.

I used the longer of the two lengths; it’s still pretty short. So here’s the thing. I’m not averse to showing my legs. I like my legs, and I like to show them off. But I am averse to showing my underwear, and I’m particularly averse to wearing clothing where I spend all my time worrying about whether I’m showing my underwear. Which, I’ve discovered through almost two decades of trial and error at this point, is any skirt shorter than just above my knee. Unless it’s a skort, in which case, bring on the minis. This is, obviously, not a skort, nor do I have enough fabric to make the matching shorty-shorts for underneath even if I wanted to. So we’ll see. It may drive me nuts.

I’m also not convinced this rather cool pink is the best kind of colour for me, but it’s still pretty.

35 Comments

Filed under Sewing

Funnygrrl’s Dress (the Making Of)


Pattern & Fabric

Whew! That Promaballoona really took it out of me. I need a weekend after my weekend.

Ok, so, finally, here is the actual post about the making of  Simplicity 5549, view B, otherwise known as the Funnygrrl Dress.

This dress was perfect for several reasons—cute, shaped empire waist, relatively straight hem, and, most importantly for this project, it would fit on the 1.5 m of fabric I had at my disposal. WIN.

I made the size 12, with all my usual alterations—petite (both at the shoulder and 3 cm  removed above the waist in the skirt), square shoulder, and swayback. Lots and lots of swayback. I probably could’ve gotten away without the square shoulder—I’m beginning to think I shouldn’t bother with that one for strappy, narrow-shouldered patterns. Other than that, the alterations worked great!

I cut out the bodice in my “lining fabric” (aka white bedsheet from the thrift store) and basted it up quickly to check the fit, making a few minor tweaks. The most significant was to lower the neckline. I dropped it 2 cm, and widened a little bit as well—3 or 4 cm would’ve been fine. It was very, ah, demure. I should probably have paid a little more attention to the length of the “shorter” skirt on the model, as well. It reaches easily to the bottom of her knee, which is a good two or three inches longer than I like. I don’t usually pay attention to skirt lengths since I always figure I’ll just hem it at the end, but of course that’s not how it works with a border embroidery motif. D’oh.

Piping

Obviously, the dress needed black piping on the bodice to go with the black embroidery on the skirt. Pipe, pipe pipety pipe.  I am pleased to report that not only has the last of the black piping Claire sent me last winter been used up, but it was used up with only inches to spare (as you can see in the photo). I tried to be very careful not to stretch the piping while sewing, this time, lest I end up with puckery fabric. This worked well, but since I ended up with a fair bit of gapiness at the underarm, I’m thinking some pulling might’ve been in order, at least there.

Gapsies

I confess, I did not even look at the instructions for this dress. I promise when I have a little more time for sewing, I will start reading instructions again. In this case, I figured a construction order just like the Sewaholic Cambie would work just fine (only backwards)—and it did. Did I mention I really like the back of this dress? The straps widen and angle in towards the middle and it’s REALLY CUTE. Not to mention bra-strap covering, for those of you for whom that is a major issue. Also, unlike the Spiderman Dress, I think I nailed the swayback adjustment this time. WOOT! Having the extra darts for shaping certainly helps, too.

Look at that back fit!

Halfway through construction I realized I had no idea if I had any kind of suitable zipper or not. Some diving through the stash produced another vintage, metal-toothed invisible zipper in an off white colour. Not perfect, but close enough for an invisible zipper, especially if the alternative was delaying construction until I can visit a fabric store. I am trying really hard to avoid fabric stores right now. I’ve started packing up my stash for our pending move, and it’s, ah, traumatic.

Full length

I did zero matching of the embroidered motifs. I considered it for about half a second, but frankly, I was lucky to get the dress out of the amount of fabric I had period. There was only about 3″ of wiggle room along the width of the hem, not enough to match anything

Wiggle!

I gotta say, it’s easy to quibble about little things like the gaping under the arm and the length of the skirt, but really—I am so stoked over how this turned out. The back is AWESOME. The fit over the hips is close but good. It’s cute, not too over the top, and easy to wear. I love the back, not something I usually get to say. So yeah! I’m going to call it a win. 🙂

Nothing procrastinates like procrastination…

Thanks, Funnygrrl! 

31 Comments

Filed under Sewing

Promaballoona, Vintage Edition

Vintage Grad Dress

Now, it is a sad truth that there was no way in hell I was going to have time to make a whole prom dress for Promaballoona, Oona’s fantabulous birthday bash this year. And, well, I hate to say it, but it’s not as if I really need another prom dress.

But, it is equally true (and considerably less sad) that there was NO WAY IN HELL I was going to be left out. Especially not when I just happen to have a vintage handmade prom dress handy. You saw the pre-digital-camera shots from my original grad  here—now you get the full expose.

Confession: I have written about this dress before. But. a) I didn’t have it on hand to take closeup and detail photos, and two) many of you weren’t reading back then and, inexplicably, may not have obsessively gone over every single post in my archive. So I’m going to indulge my inner brat Oona and write about it again. This time with brand-new, modeled shots courtesy of my glamorous back deck, and even some detail bits.

Full view. Yes, I should’ve ironed. I did not. Hush.

Now, as you have no doubt seen (and if you haven’t, go! I’ll wait.), I wore this dress, which my mother made, back in 1998, to my grade twelve graduation ceremony and subsequent dance and dinner. 1998 may not seem old enough to some of you to qualify as vintage, and indeed, you are probably right (except possibly by my daughters’ standards.) But this dress wasn’t made in 1998. My mother made it in 1970, for her Grade 12 graduation. (And while that still may not count as vintage for some of you, well, this is my blog and I’m counting it.) In particular, she received some kind of 4H credit for completing it. (Sadly, my efforts to acquire photographic evidence of my mother wearing it were in vain. Neither she nor my grandmother were able to lay hands on my mom’s grad photos in the time-frame I gave them. When I have the leisure to dig through their houses myself I will try and hunt one up and force you all to read about this dress yet another time. 😉 )

Inside

The fabric is a peach polyester brocade. My mother is no more of a peach fan than anyone else, but the fabric was on sale, and this was a Factor in its selection. Unlike the Teal Bombshell dress (which is a similar vintage), this one is fully lined, but, I must say, from the construction I suspect that the lining was my mother’s addition rather than an integral part of the instructions. She constructed the lining exactly as the pattern, and attached the facings overtop of that, with the inner edges (very nicely finished, I will add) free. The neck and armhole facings are separate and overlap at the shoulders, which I think we all agree is unfortunate, although probably easier to sew.

Trims

She went the extra mile for the trim—lace and ribbon—along the bottom of the bodice, which I think really finishes off the dress.

Zipper and facings

The zipper is a simple, centred application. The lining and facings have been stitched to the zipper tape by hand along the CB on the inside. There is interfacing in the facings, but it doesn’t seem to have been caught in the fold-over finishing of the facings. Not sure if that was intentional or not; it might also have originally been caught but frayed itself loose over the years.

Hems

Aren’t those pretty hems? Seam binding, hand-hemmed on the fashion fabric, a machine stitch on the lining.

Original 1970 accessories

These are my mom’s original accessories—long evening gloves, sequinned handbag, pearls, and wrist corsage, although the corsage, I fear, has not really enjoyed its time in the box. My corsage was real flowers—it didn’t even survive the first night, although it was very pretty while it lasted.

My accessories (then)

I wore the evening gloves and carried the handbag, but for whatever reason supplied my own pearls (although I do think my mom’s are nicer). And my own shoes, not that you can see them. And my own Big Meaningless Trophy. 😉

My accessories (now)

(It was the Art Award, if I recall correctly…)

Back view

A few more pics, just because.

Vanity

There are not many things more enjoyable than a good prom dress.

And further vanity

Happy Birthday, Oona!

Oh, rats. I forgot the booze.

16 Comments

Filed under Sewing

D’Oh

20120804-141931.jpg

Skirt front. Aaaargh.

13 Comments

August 4, 2012 · 2:20 pm

Funnygrrl’s Dress—The Meetup

Funnygrrl & I

My fellow Cow Town citizen, Funnygrrl, who blogs at Falling Through Your Clothes, and I first met up (after a LOT of missed opportunities) last spring, for a very exciting fabric-shop and coffee date, where she gave me a bit of rather pretty fabric and I talked her into buying a rather expensive serger.

Now, my fairly intense enabling aside, Funnygrrl first presented two pieces of fabric, both lovely linens with an identical embroidered border motif—one in black with white embroidery, one in white with black. I would take one, she would take the other, and at some point in the future we would have lovely “twin” dresses to remember each other by.

Meeting

Well, as they say, The Future Is Now. A little while back, as the panic of my impending move descended, I realized if I wanted to have the twin dress meetup, as fantasized, before hundreds of kilometres come to separate us, I had better get stitching. So I put on my big girl panties and started cutting Simplicity 5549. By some miracle, Funnygrrl’s head was in the same place, and when I emailed her to let her know I was cutting fabric, we wound up being able to schedule a quick coffee to catch up and photograph our dresses together, as nature intended. Now, I actually have a whole post written up about the dress itself, but when I tried to glom the meetup onto it, it was just getting long, so I’ll post that one tomorrow. Or maybe after the Promaballoona dust settles.

I am an angelic presence, apparently. My camera really did not like the lighting in there.

Funnygrrl and I met up at a local indoor garden (actually the top floor of a mall) called the Devonian Gardens, where us pale, sun-starved northerners can go to pretend we’re somewhere, well, other than the cold and frozen north (which isn’t cold and frozen at this time of year, although it was chilly and rainy, hence my tights.) I was all excited by the name, and while the garden itself is beautiful, I must confess to a teeny, tiny bit of disappointment that none of my favourite transitional fossils were making an appearance.* But other than that it was lovely, especially since it was pretty grey and chilly outside.

Big Wall Of Green. Funnygrrl’s camera handles my dress somewhat better than mine.

Very big. Very green. Very wall.

Fun in the (artificial) sun

It’s probably just as well you can’t see my dress very well—I’d been wearing it all day and was definitely sporting the rumpled linen look, although it didn’t get quite as bad as I had feared it might.

Funnygrrl & Tanit-Isis

Funnygrrl even brought spanky blog shoes to change into for the photos—clever woman! I am wearing my ubiquitous, desperately-need-to-be-replaced ballet flats. In fairness, they didn’t need to be replaced desperately until last weekend, when I forgot my water shoes and wound up spending the whole day wading in the river, wearing them. Oops. Do you have blog shoes? I confess, I have a whole box.

Thanks, Funnygrrl!

Photo credit for these goes to Funnygrrl (except for the one where my dress is looking truly angelic), since a) her camera’s better than mine, and b) it’s silly enough having one person running around working the self-timer, never mind both of us. So I mostly let her do it.

Oh, aside from taking photos like a pair of tourists in oddly complementary outfits, we sat and talked. And talked and talked. Until it started getting dark on us, basically. I love hanging with sewing peeps.

Acanthostega, a Devonian tetrapod with gills, toes, and a tail-fin.

*Er. It occurs to me that that was probably even more obscure than my usual run-of-the-mill science jokes. So the Devonian Period is a stage of geological history that happened roughly between 400 and 350 million years ago. It was marked by the evolution of the first full-canopy forest ecosystems and, most interestingly from a vertebrate-centric point of view, the first land vertebrates. Panderichthys, Tiktaalik, and Acanthostega are progressively less fish-like examples of the fish-tetrapod transition, which happened in the late Devonian and has to be one of the neatest “events” in evolutionary history. And Acanthostega had eight toes. Does it get any cooler than that?

16 Comments

Filed under Sewing

Sewn things in use

20120801-065640.jpg

The fishing vests have been getting some action.

11 Comments

August 1, 2012 · 6:58 am