Tag Archives: Jalie 2908

Fall Re-fashion

Former capris

Is it still a re-fashion if it’s an alteration to a piece you already made, and never fully finished?

These are my first pair of Jalie jeans. I made them capri-length, but never got around to hemming them. But I have since made another pair of capris that I like better, and I had just enough of this denim left to piss me off (without being enough to do anything with unless I want to make another  Kasia with denim hip-inserts 😉 ), so I made panels and sewed them to the bottom and now I have a pair of (hopefully) interestingly-seamed full-length jeans. I may actually have hemmed

Crappy topstitching.

them a little short… we’ll see. I should probably re-do the topstitching (something went wrong with the bobbin-thread), but I may be too lazy too. It’s not like the rest of the jeans are a great piece of work to begin with. There’s a slight difference in colour between the jeans (which have been washed a few times) and the new fabric, but that’ll either fade or not… either way works. But they will be much more useful to me during Self-Stitched September as full-length pants than as capris.

I still want to make another proper full-length pair, though :).

How they would actually look

The back view

4 Comments

Filed under Sewing

Just in case you’re not sick of them yet…

Here’s a few more of the fully finished jeans.  I wound up hemming them the full length; the physical inseam measures just over 33″. It would be perfect for a boot-cut with flats, too short for a boot cut with heels, and is maybe a teeny bit long for skinnies.

6 Comments

Filed under Sewing

Jalie Jeans #2

Jalie jeans #2: Black and silver

Almost done! Just need rivets and hemming (which will wait until at least one more wash, I think.

I don’t know why I can’t stand to wait until after I’ve hemmed these to take pictures and post. It’s like my subconscious considers hemming superfluous.

Anyway, here they are: black jeans with bright silver topstitching, Eye-popping. Maybe not the best choice considering my mediocre topstitching skillz. Ah well. I shall be more restrained for my next pair. I just loved the contrast.

You already heard about the issues with the waistband. All fixed. It still came out narrower than the first

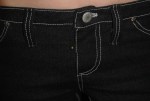
Jalie jeans front: no fly gapage!

waistband, a little too narrow in my opinion. Not sure how that works except that maybe the turn of cloth ate up more width in this pair? Anyway, next time I will either widen the pattern piece or use 1/4″ seam allowances. The narrower SA’s are probably not a bad idea for the waistband, anyway (reducing bulk, yadda yadda)

Getting pictures of these sucked, especially without a handy slave child around to take the pictures. My sweetie would probably do it but he would make fun of me in the process ;). I wish I could find my tripod… I tidied up a few weeks ago and have no idea where I stuffed it.

Other than the too-narrow waistband and the usual issues with my topstitching, I’m pretty happy with these. They feel right. For the next pair, I am going to try lengthening the centre back seam for a bit more rear coverage.

Full length jeans

This fabric was actually a 20% stretch, and I still wound up taking in the size Q about a cm on each side, so I think I should probably just narrow the pattern by that amount, as well. I’m a little torn about the length. If they were a boot cut, the length would actually be perfect. Skinnies, on the other hand, don’t need to be quite as long. And these mostly behave as skinnies, although

Doesn't show the jeans very well, but I liked the pose. So Nyah!

they’re actually straight-legged from the knee. I used someone’s suggestion (I forget where I read it, sorry) to extend the pocket lining pieces to the centre front to form the fly interfacing. I’m really happy with how this worked—keeps the front nice and smooth and no fly puckering! I still can’t insert a fly properly to save my life. It looks so simple when Sandra Betzina does it! But at least no one else will see.

So anyway, one more item down (yes, yes, except for the hemming) on my list for Self-Stitched September. Now, time to work on the kids’ jean jackets!

4 Comments

Filed under Sewing

Jalie Jeans for me!

Jalie 2908 capris!

Yay!

Pair number one is complete! (minus hemming and rivets. Details, details.)

These are capri-length for summer (since I only have one other pair of capris). I used Becca A’s from Pattern Review’s alterations for making an even lower low-rise (thankfully her daughter and I are close to the same size) which worked perfectly. I also wanted a contoured waistband, so I used the one from the Burdastyle Ellen pants pattern (because it was free). This also worked out well, although it still ended up with a bit of gaping… I think probably from stretching during sewing as it fit perfectly when I was trying it on in advance. I converted it into a single-piece band and narrowed it a bit.

So… aside from my usual sewing blunders (I still haven’t quite figured

Jalie capris---front

out the zipper insertion… I got the zipper facing the right way this time but then sewed the fly shield on the wrong side, and the zipper wound up sitting way back from the centre front, which I think isn’t quite right) I’m pretty darn happy with these as a first pair. My attempt to pre-curve my yoke panel worked fine (there was no gaping at all at that stage of the try on, just after the waistband was attached). I think I have finally understood why the original yoke comes so “straight”… it’s very easy to take it in, but it would be somewhat harder to spread it out evenly if you have a flatter bum… so they drafted it to the “flattest common denominator”… at least, that’s my theory. I tried them on right after I sewed the outer seams, and wore them for a few hours to gauge the fit, after which I took each side in about a 1/4 inch. This improved it nicely, though it wasn’t that bad before; I think most of my issues with the “feel” of the pants have more to do with the fabric (which really isn’t very nice. Next time I will splurge on the $18/m fabric.

Original pocket pattern...

... which didn't work out so well in practice

There were some hiccoughs in the production. I spent quite some time drafting a lovely ankh pattern to topstitch on the pockets… and totally butchered it when I tried to stitch it down. Partly I’m not very good at machine embroidery, partly it was the stretchy fabric (perhaps I should’ve interfaced the pockets)… anyway, that was a bust, so I reverted to some boring straight lines. Oh well. I did make the pockets mini (the same size as my daughter’s) and I like the way they look on my less-than-oversized bottom. The

Not-quite-couture hand finished buttonhole

interfacing helped with the “flabby” feeling of the waistband immensely, but thickened it up enough that my machine balked at doing the buttonhole… so I hand-finished that, which is the first time I’ve ever tried it. It’s definitely not as nice as all those couture hand-finished buttonholes I’ve seen photos of ;). I originally failed to heed Becca A’s advice and cut a size Q yoke (same size as the rest of the pattern) rather than a size R as she suggested, and it was too small (since the lowering of the rise widened the seam… I am brilliant, aren’t I). So I had to re-cut that too.

The topstitching thread, as expected, was a little finicky. I found that most of its tantrums happened at the start of the seam, and could be avoided by holding

side view... gaping at the back doesn't really show.

Back view: boring lines on pockets.

on to the top thread so that the end didn’t get sucked down into the bobbin and do weird things, but it was still a bit of a crapshoot. And I managed to shatter my double-needle (perhaps I’m cursed with those) when I went to do a test stitch with it and had the stitch still set to zig-zag. The needle hit the presser foot. The waistband turned out a little bubbly and bulgy, and the fly is still a little gapy; I’ll have to try a couple more fabrics so I can figure out whether that’s me or just the flabby fabric pulling funny.

(artistic photos by my daughter… sorry about some of the wonky angles 🙂

7 Comments

Filed under Sewing

Jalie Jeans test type… 100% complete

No pics of them on the kid (yet… maybe after I wash them) but here’s the final details:

Jeans front finished---rivets and belt loops!

The rivets went in quite well (it’s much easier to hammer metal stuff in now I have a concrete garage floor to work on!). They did need to be shortened, but they seem to hold well (I’ll get back to you about whether they’re STAYING on in a few months). I experimented with not shortening one, and regretted it—it went together and didn’t damage the caps, but the inside cap kind of skewed off to the side, so the inside and outside caps are offset. You can’t tell from looking, of course, and it feels solidly attached… but not desirable.

The belt-loops as measured were kinda long, but that’s fine. I put them on after the rivets… before would have been smarter. I was going to sew them right by the edge of the front pocket, and couldn’t because the rivet was in the way. Not that their current placement is a problem,

Back---finished. Cool belt loops!

but note to self for the future. In the back, I criss-crossed the centre back belt loops. I like. 🙂

Oh, and I finally located and tried out my double needle for the belt-loops and hems! I bought it last fall, just to have a double needle, despite my disastrous results the first time I tried to use one (the bobbin threads got tangled and when I tried to raise the needle one of the tips was getting bent funny and snapped off. This was about five minutes into my first attempt to use it). But for whatever reason this time—better thread, auspicious alignment of the planets—it gave me not a hint of trouble this time. I did take the advice I read somewhere to put the spools on so they spool out the thread in opposite directions (eg. one clockwise, the other counterclockwise). Maybe that made all the difference. No idea. Anyway, aside from the fact that the double needle I have wasn’t purchased with jeans in mind and is a bit narrower between the two tips than the rest of the top-stitching, it worked perfectly. I did the hems with it (the zig-zag from the bobbin makes it stretchy, too, even on a regular straight stitch!). I wound up doing two rows of the double stitching on the belt-loops (the zig-zag underneath does a really nice job of finishing the triple-folded bottom surface), and I was worried that they were too uneven, but once cut into the short lengths they looked fine.

So, verdict? Definitely some loving-hands-at-home going on in the details. But, perfectly respectable from a distance (even I don’t notice the offset pockets unless I look for it) and the kid loves them. Considering her lukewarm reaction to her jacket, I am going to declare these a success. Which is good because I cut out my pair last night…

4 Comments

Filed under Sewing

Jalie jeans, test type

Kid's jeans (first try on)

So, I took the plunge. Well, in miniature. Just putting the finishing touches on a trial pair of jeans… for my daughter. A little torn—on the one hand, they’re very cute, but on the other hand, there’s enough booboos in the construction and fitting issues that I’m a little dissatisfied—more with myself than with the pattern, however. Oh, and the plaid flannel in the cut-outs is the same fabric as the pocket lining, and was a pair of my hubby’s pyjama pants long, long ago. So glad I kept those scraps!

On the plus side:

  • they fit! Like stretch jeans should… which may actually be a little snug.
  • I LOVE the pocket design/yoke and front leg detail. We were inspired by a pair of jeans belonging to my younger daughter, and I think it’s so super cute. I am excited to see how it looks once it’s washed and frayed. The cut-outs on the front leg and the back yoke are both backed with another layer of denim behind the flannel, for strength. The pocket just has the flannel.
  • The red topstitching is super nice, even though it doesn’t show quite as much as I might like. I used the triple stitch with regular thread, and I really liked it for topstitching because it is SLOW…

    Are these not the coolest pockets EVER, I ask you?

    much less chance for me to mess up, especially along short lengths. All in all the topstitching, though not perfect, is a LOT better than my last attempt. My “edgestiching” blind-hemmer foot definitely shows its limitations along longer seams, although that may be as much shoddy construction of the foot (the screw that adjusts the front extension is really loose, so it jiggles out slowly as you go along… this is just as much a problem for blind hems as for edgestitching).

  • I also didn’t have any trouble catching the 1 cm seam allowances in my second row of topstitching; some people had complained about this in their pattern reviews.
  • I added the perfect amount of length to the leg (1″) (at least as long as they don’t shrink in the wash any more)… they should be perfect once hemmed as is.
  • I put buttons and buttonholes on the inside waistband to thread and adjustable buttonhole elastic through the back (a fave feature of mine for most kids’ pants these days). However, my gaposis-fixes were such that I don’t think she’ll actually need it.
  • hammering REALLY helped with a few of the ultra-thick areas. I am impressed.
  • I almost got the fly right on the first tr. Almost.

Negatives:

  • The instructions say to attach the back pockets before you sew up the centre back seam. Despite marking very carefully and gluing the pockets in place so they didn’t shift around, they’re still not even. Next time I will definitely put them on AFTER the centre-back seam is stitched (which is the next step anyway so it’s not like it’s a big rearrangement.
  • the yoke definitely needed adjusting for back gaposis. Now, my nine-year-old definitely has a booty for her age (to her father’s dismay), but on the other hand proportionately I doubt hers is any worse than mine, so I will definitely curve my yoke in a bit before I cut it.
  • I adjusted the yoke at the sides (since the centre back, which would’ve been better, was already topstitched and I didn’t want to take tucks due to the cut-out peekaboo layers at the yoke), which left a bit of a pointy stop at the top side.
  • the waistband kinda sucks. This is for various reasions:

    Kid's jeans: front (finished except for belt loops, hemming)

  • 1) I cut it on the straight grain, non-stretch direction, rather than on the bias or the stretch grain. This is because I like pants that stay up… but I should’ve added to the length because it was a little short.

    Kid's jeans: back (finished except for belt loops and hemming)

  • 2) I didn’t interface it. This might’ve been fine with a heavy-duty denim, but this denim is so light and stretchy, it’s just floppy. My bad. I got lazy and impatient (and forgot).
  • 3) I angled it in at the centre-back seam to further reduce gaposis, which was successful but left it with that little divet at the back. I am definitely excited to try my contoured waistband. Thoroughly interfaced.
  • the jeans button is a little off of where it needs to be; I centred it on the buttonhole, but its post of course needs to go at the END of the buttonhole. And of course since it’s fairly soft and floppy, this makes the whole fly (which IS interfaced, by the way) pull a little wonky. I suspect the solution will be to stitch the end of the buttonhole closed a bit. And next time, position the butotn AFTER cutting the buttonhole. I think for mine, I will hand-stitch the buttonhole so I can do a keyhole, but for these I just did the lone buttonhole setting on my machine. (and it says it all about how thin the denim is that I even COULD do the buttonhole on my machine, which doesn’t like to do buttonholes on thick fabrics at all.)

(sorry about the colour in the last two pics… the camera didn’t like having the black couch in the background. Also the jeans are  rather rumpled in the last couple of shots because she won’t take them off long enough for me to hem and put belt loops on.)

8 Comments

Filed under Sewing

Jalie!

Jalie Jeans Pattern!

The Jalie Jeans pattern came! The joy, the glee…

The crushing realization that I can’t afford to buy fabric for at least two more weeks, despite the Fabricland sale that’s on right now… /cry.

Ah well, at least I can read the instructions, maybe trace out my pattern, and fantasize.

Next question… should I make some trial versions for the kids?

Comments Off on Jalie!

Filed under Sewing

I done a bad.

I just ordered Jalie 2908 (women’s stretch jeans) pattern. What on EARTH am I thinking? Even if I had time to mess around with these, they’re probably WAY beyond my skill set. But… damn it would be nice to make my own jeans.

The plusses:

  • the pattern has REALLY good reviews
  • it doesn’t use much fabric (less than 1.5 m, and if I did capris for practice runs it would take even less)
  • I am really picky about my jeans fit… I have a hard time with ready to wear (and I end up paying A LOT) so being able to make my own (and have them fit… the big if) would be really awesome.
  • I could make them LONG enough!
  • pattern includes kids sizes too so I could make pants for the kids
  • I could finally make the stove-pipe legs I love so much (not skinnies, not boot cut… straight up and down below the knee)
  • I might actually be able to fit into the largest kids’ size (that’s not actually a plus, except to my ego)

The minuses:

  • most of those reviews also mention how much work the pattern was
  • I am not sure if my fitting skills are quite up to the challenge
  • I think my usual low-rise preference is even lower than the pattern’s “low rise” version.
  • I don’t have any stretch denim; I have never sewn stretch denim; I have no money for the foreseeable future to buy stretch denim.
  • nor do I have the time, really, to be messing around with major sewing.
  • they’ll require a lot of hardware I don’t possess (rivets, jeans buttons, zippers etc.)

I am nuts.

2 Comments

Filed under Sewing