Fantastical Fantail

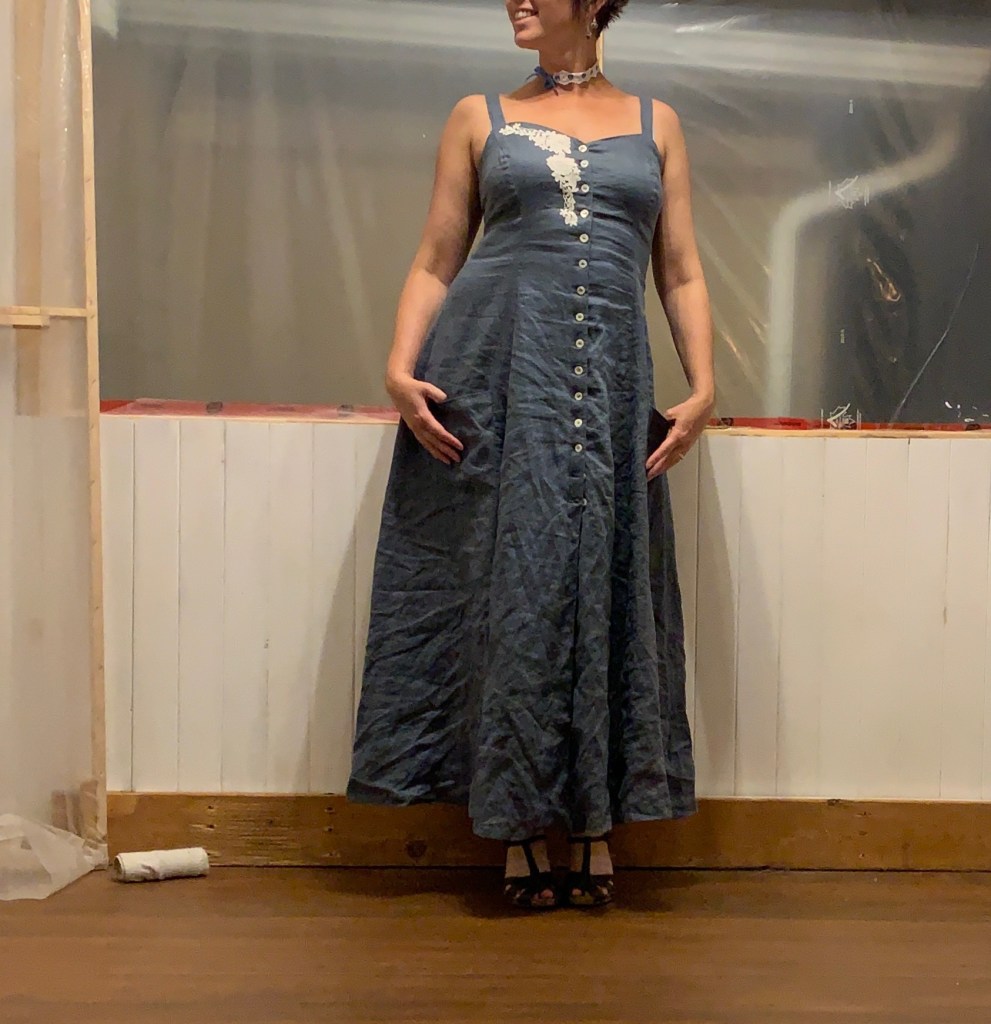
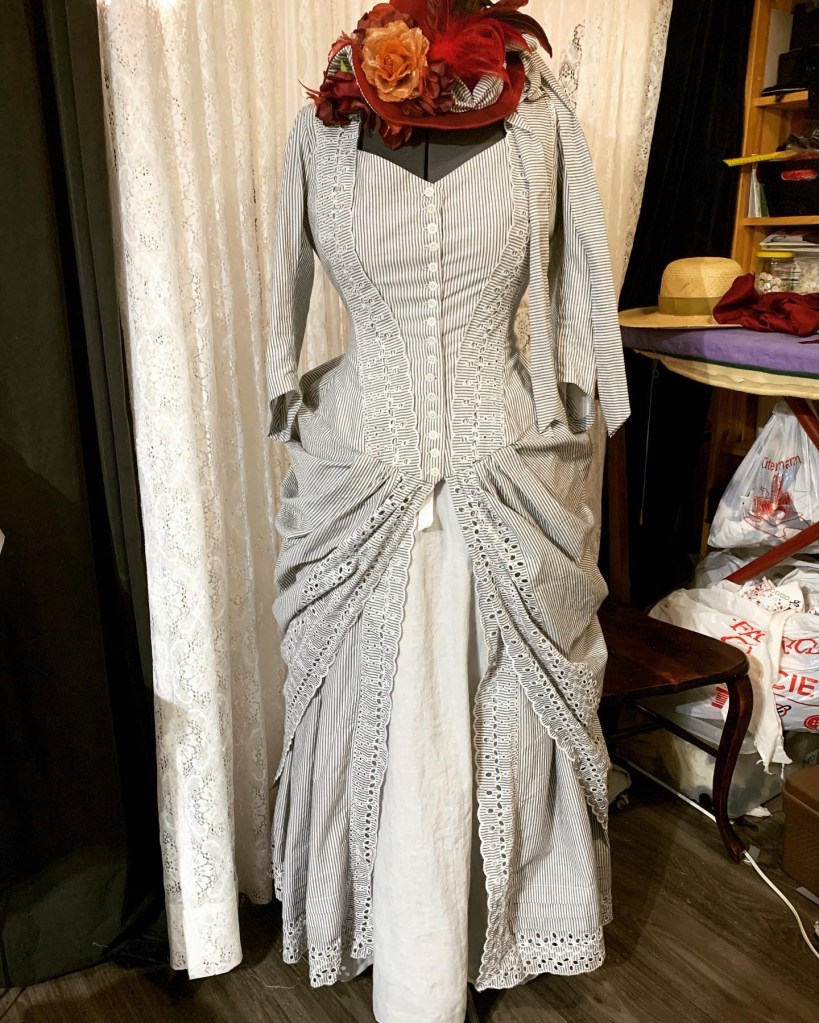
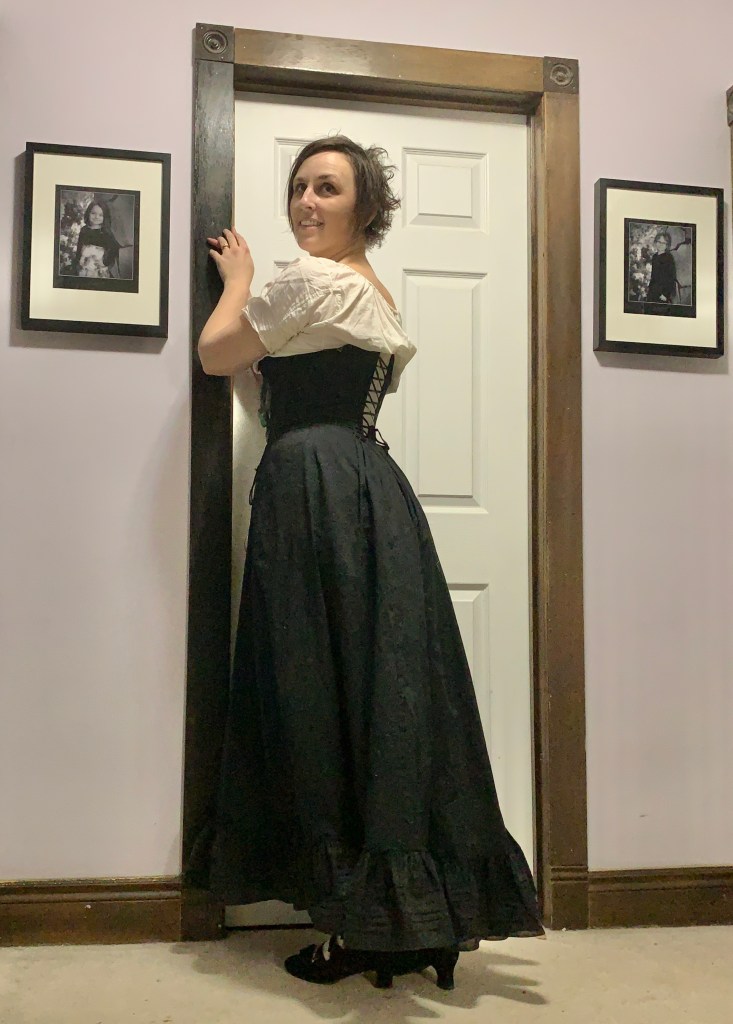
I didn’t technically NEED to make the Scroop Patterns Fantail skirt.

I mean, let’s not get too deep into the definition of “need,” especially when discussing costuming.

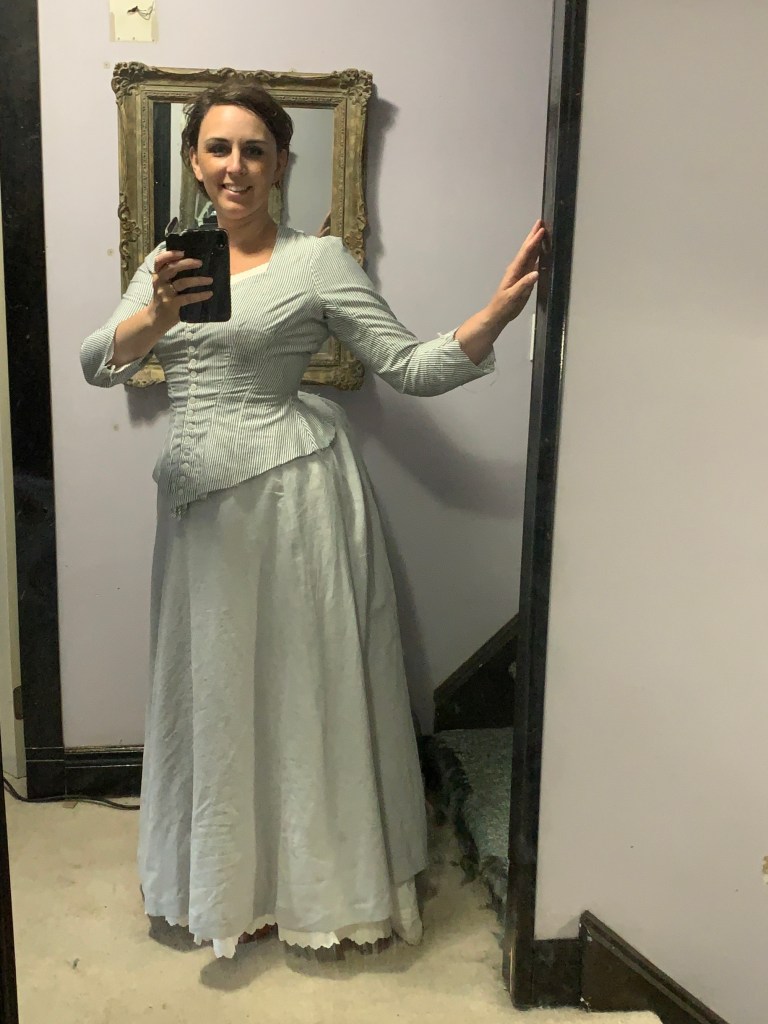
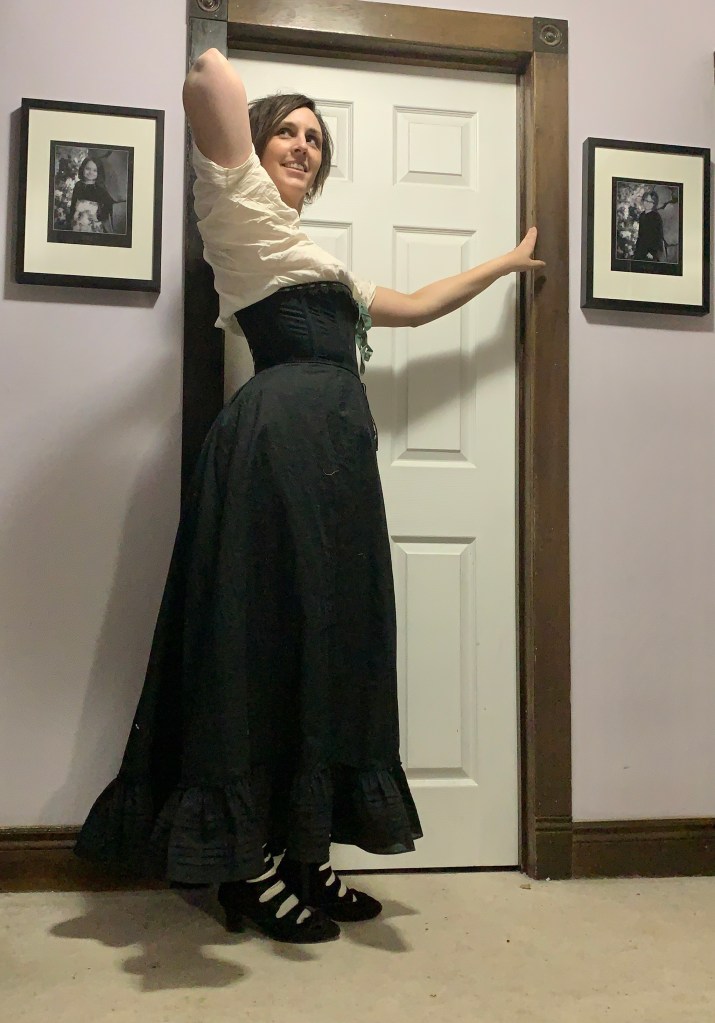
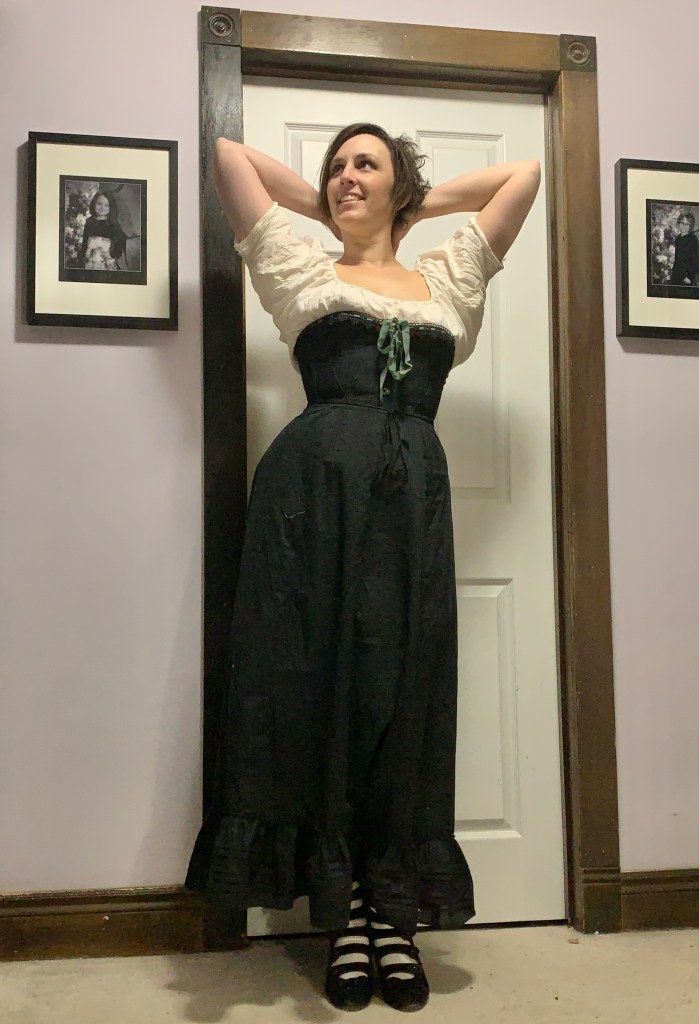
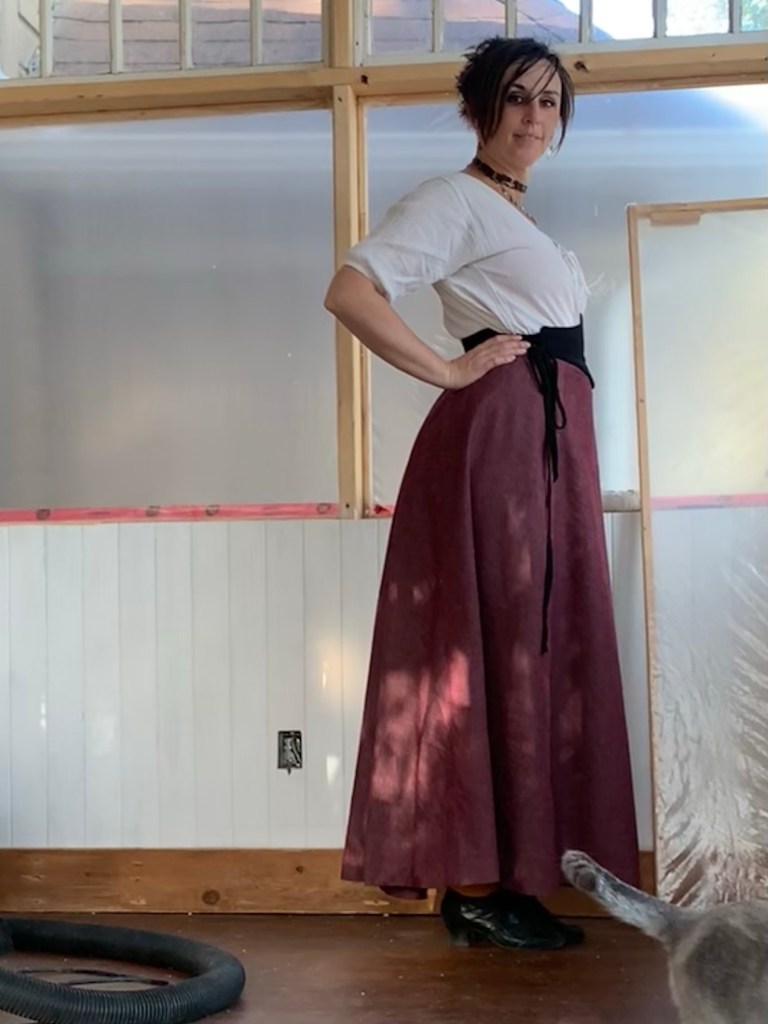
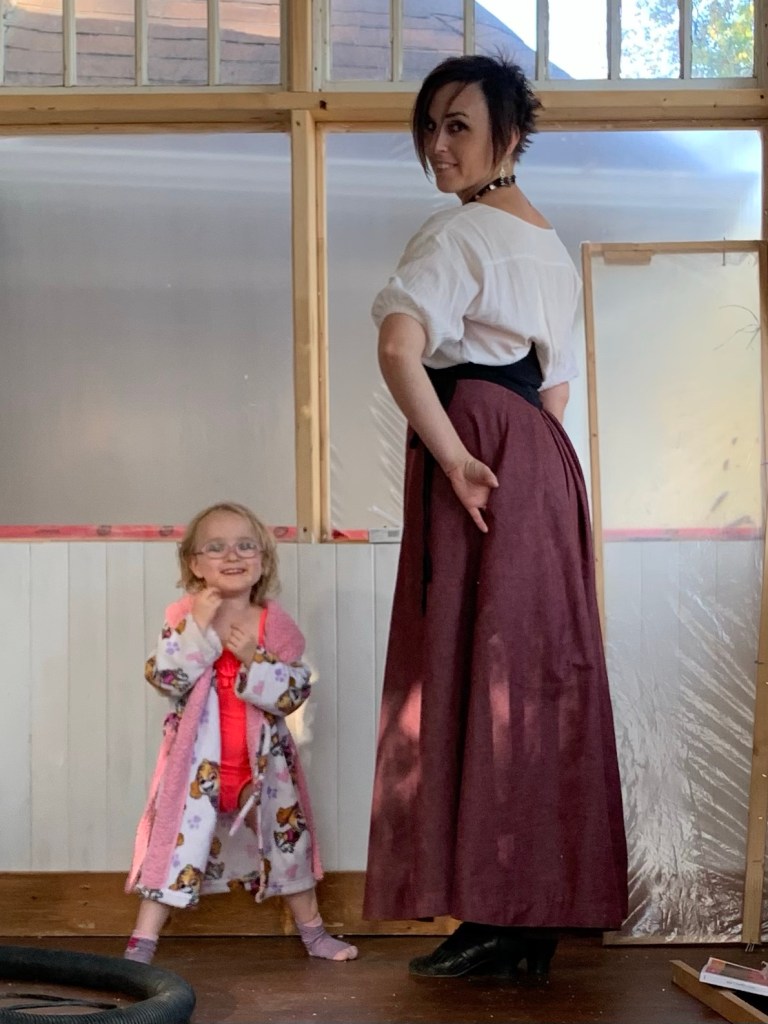
The Fantail is an 1890s-1900s five gored skirt pattern. Which is also totally wearable as an everyday skirt… at least if, like me, you’ve strayed far down the garden path of “WTF is she wearing?”

So wearable, in fact, that I have several others almost exactly like it. The Edwardian Walking Skirt (Folkwear pattern) that my mom made back in the 80s or early 90s, for one. (And yes, i still have the tissue pattern she traced off the original she borrowed from the library.) The grey gored skirt I made a couple of years ago that I wore like crazy last winter, for another. And three or four more long, gored skirts of various iterations.

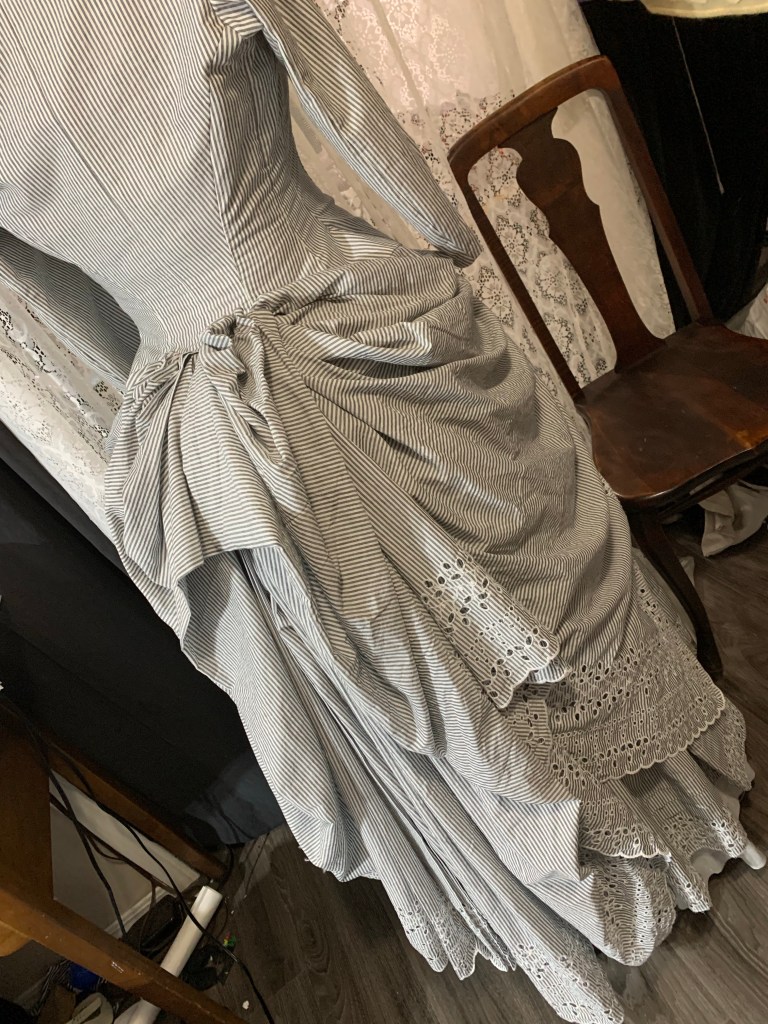
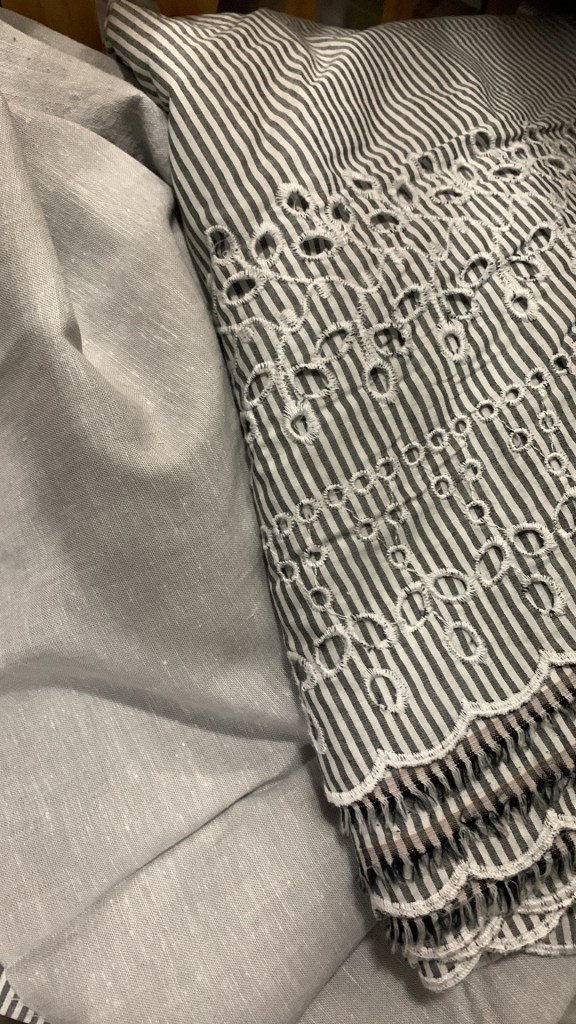
But it is also a skirt style I wore constantly last winter and, well, winter is coming. And I had purchased the Fantail back in the spring when Scroop had a big sale to raise money for some unexpected expenses. And then one of my Victorian Sewing buddies was destashing some this gorgeous twill “denim” (not really denim, it’s fairly loosely woven and very soft. But it does have a twill weave, and white threads in one direction.) And it just really needed to be this kind of skirt.

So, just before my birthday, I got the pattern printed out. I didn’t actually get to work on it for my birthday, but not too long after I started poking away at the project.

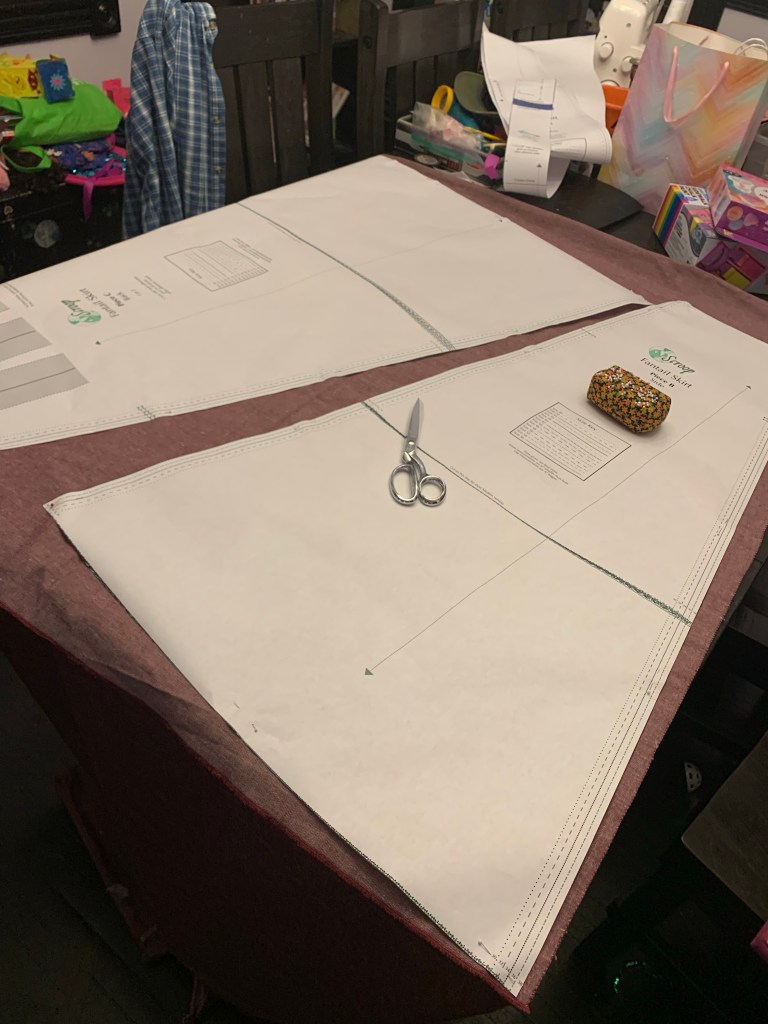
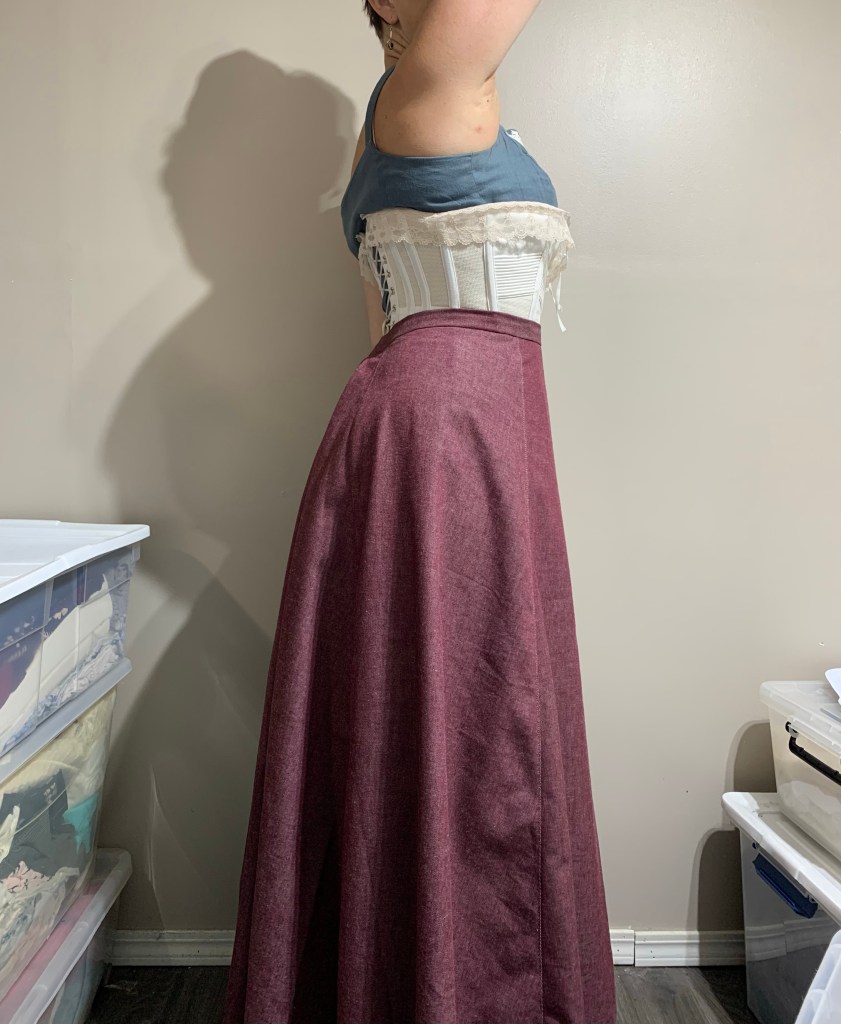
This kind of skirt is really, really simple, and it went together quite quickly. As per the instructions, I graded between my hip size and the waist size I wanted, and I’m glad I did as it meant I didn’t have to fuss with adjusting the perfect pleats to fit a different waist size

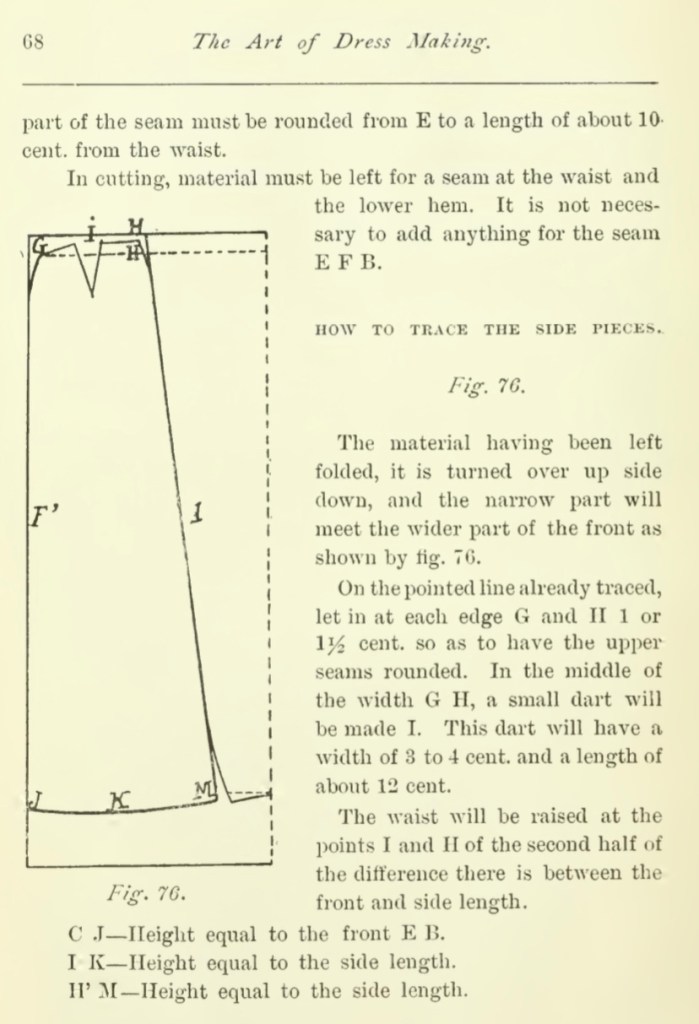
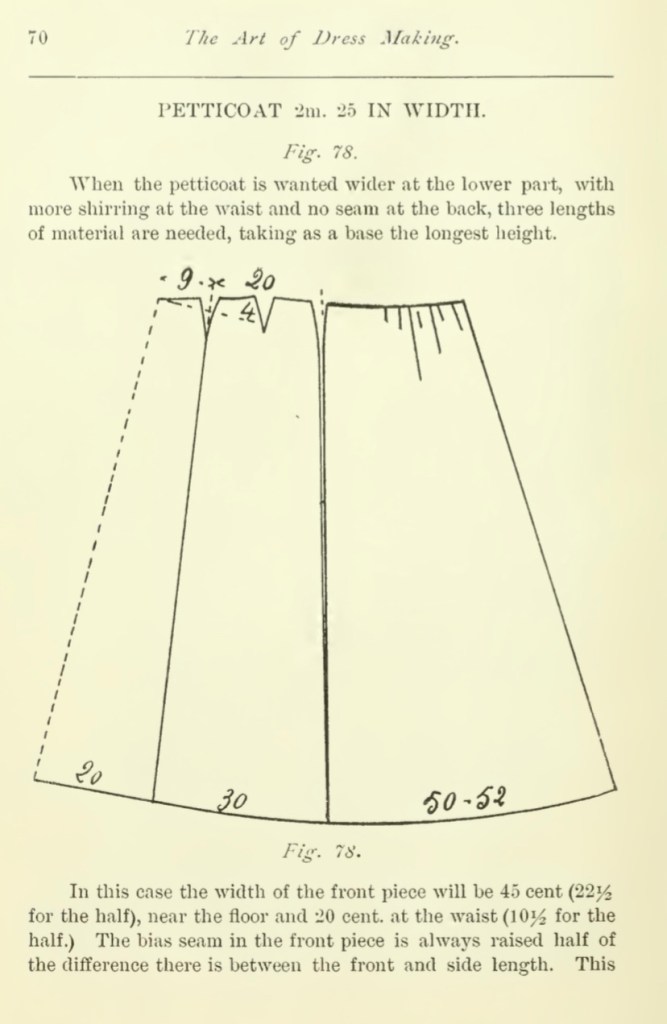
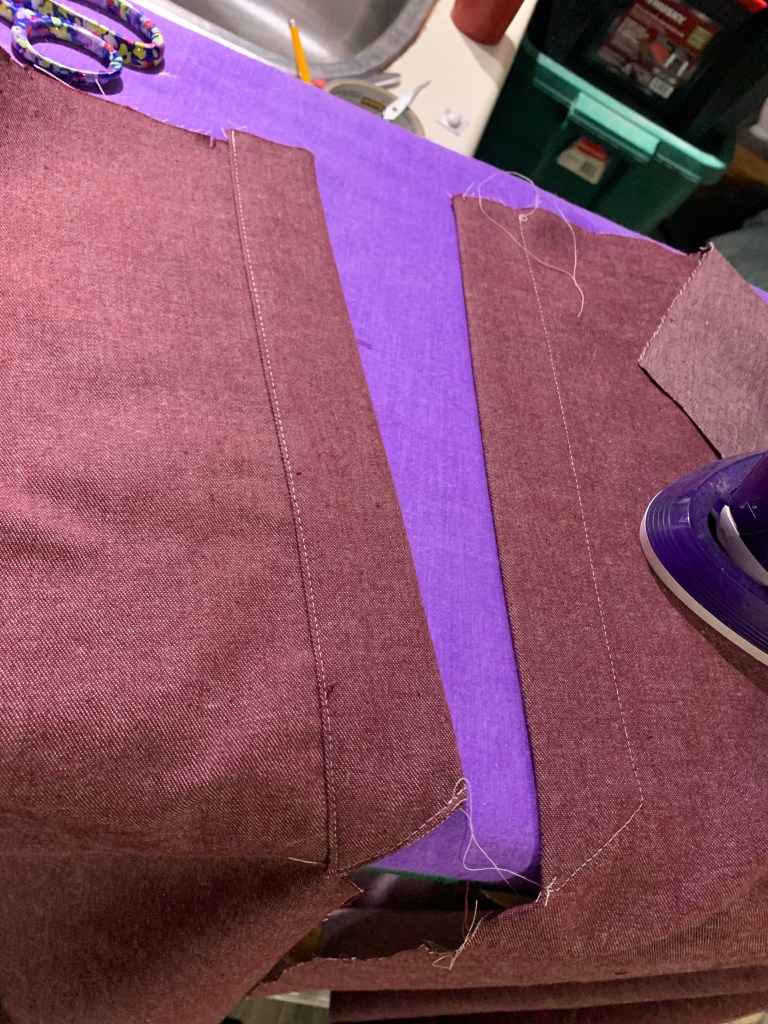
The fabric wasn’t overly wide, and I wanted to use it as efficiently as possible. This style of skirt straddles the evolution of grainlines from the gored skirts of the 1880s where it was standard to have one edge of the gore on the straight grain and one on the bias, to something closer to a modern, centred grainline, to allow the fabric to hang better. Maybe I should care more about the hang of my skirts, but as the pattern says, grainlines are suggestions. So I angled my side and back gores so that they fitted best on the un-folded fabric. No regrets so far. It’s not zero waste, but the amount of waste is minimal.

Back placket, two sides.

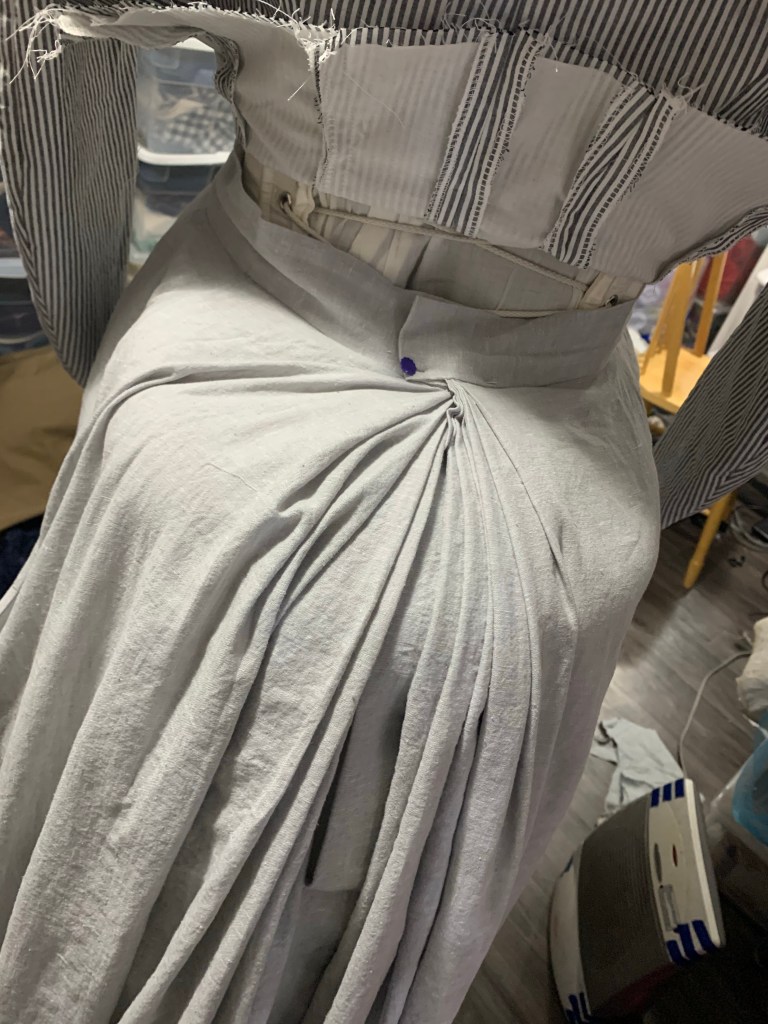
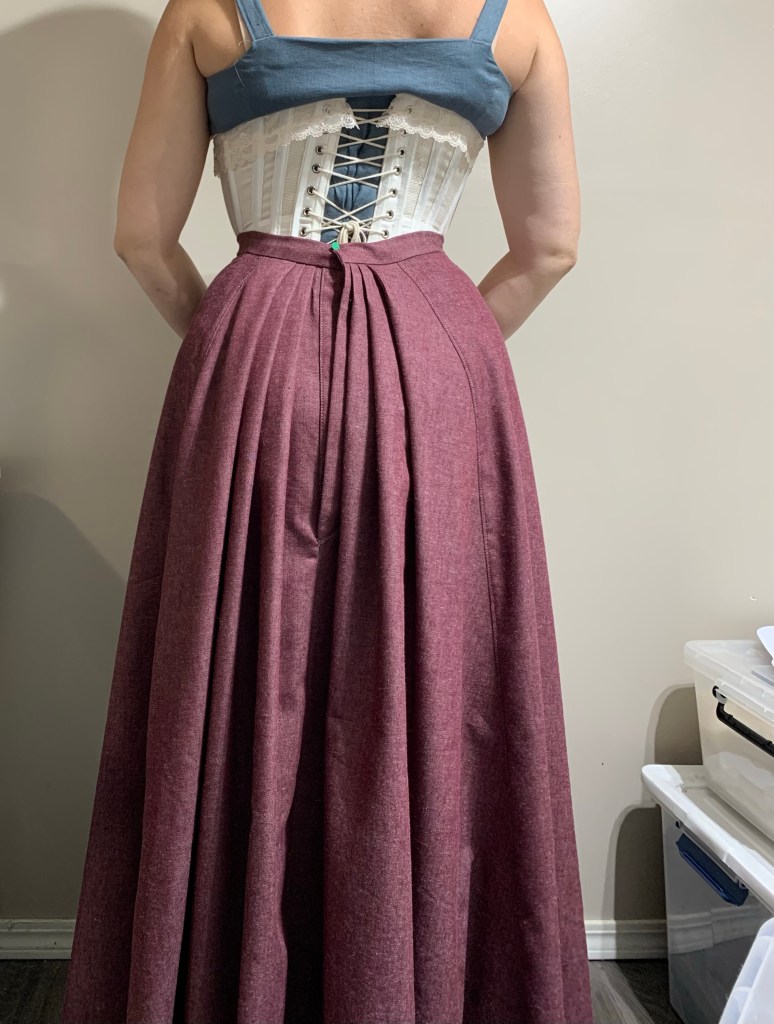
It took me a bit to figure out the instructions for the back placket, and I did manage to cut one of the facings wrong way round (though it’s on the inside so I didn’t bother to recut it). It isn’t hard, or even unclear, particularly, but everything is very side specific and there are some acronyms in the instructions that aren’t instantly comprehensible. Once I understood what they were getting at it was fine.

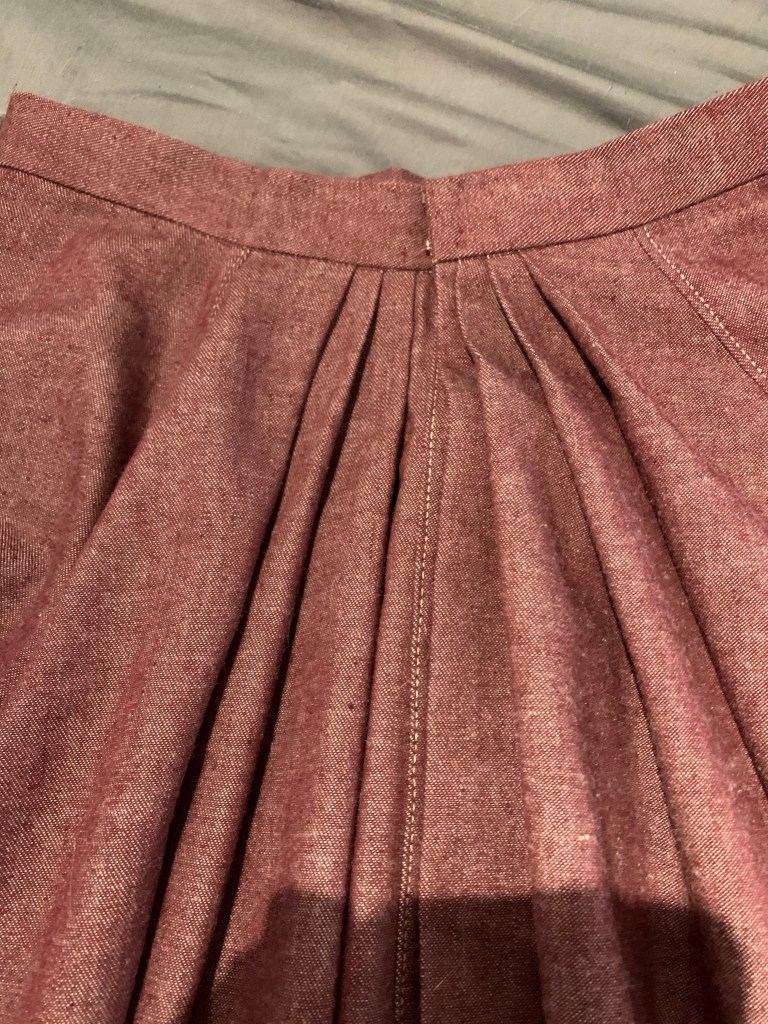
Other than that? Easy peasy. And those back pleats? To die for.

Pinned closed at not quite the right angle in this pic. Still gorgeous pleats.

I did use some very modern construction shortcuts: overlocked seams, machine blind-stitched hem, leaving the selvedge exposed on the inside of the waistband.

We were (are) in the process of moving the whole sewing room, so I didn’t have a lot of bandwidth for authentic detailing.

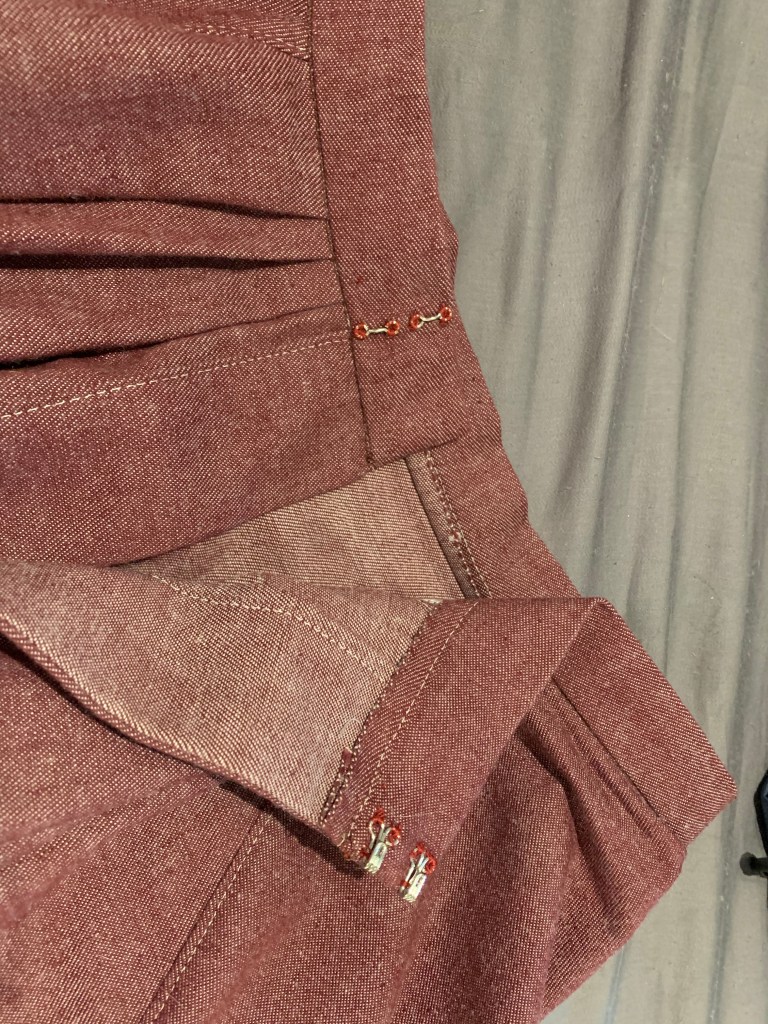
I also couldn’t find the heavy-duty hooks and bars I bought specifically so I would have them around next time I made a skirt like this, but hopefully these two traditional (and vintage) hook & eyes will do the job. I was waffling a bit about adding a touch of topstitching to the skirt, just as a nod to the denim look of the fabric, so when I realized that topstitching was an integral part of the placket, I just went with it, a little line along each vertical seam (except the centre back.)

To hem, I used my favourite trick (when I don’t feel the need to be historical) and cranked up the differential feed on the serger while finishing the bottom edge. This gathers in the lower edge for you, which makes folding up and easing in the hem super easy. Unfortunately (?) I was doing it on the new-to-me serger handed down from an amazing reader, and the differential feed on this machine is a lot more effective than the one on my old serger, so it wound up gathered in a bit too much, which took some massaging. But it made the machine-blind-stitched hem super easy!

One thing the pattern lacks is a pocket. I’m honestly not sure how common they were in this period, with the narrower skirts clinging over the hips, but there’s still room to tuck one under the pleats in the back, so I did. I used the same method I always do, which comes from an 1887 sewing manual—so potentially a bit dated for this skirt’s era but not unreasonable. I didn’t manage the tidiest insertion (particularly when trying to topstitch along that seam) but it’s tucked around back where I don’t have to look at it so it doesn’t bother me at all.

I did forget a couple of little touches I wanted, including the tape that is supposed to go from the top of the pocket to the waistband, and hanging loops under the waistband. So I will have to go back and add those.

I serged off about 1/4” in length and then did a 2” hem, and I’d say the length is an excellent walking length for me, though I perhaps wouldn’t mind an extra inch if I were going for a more formal historical look.

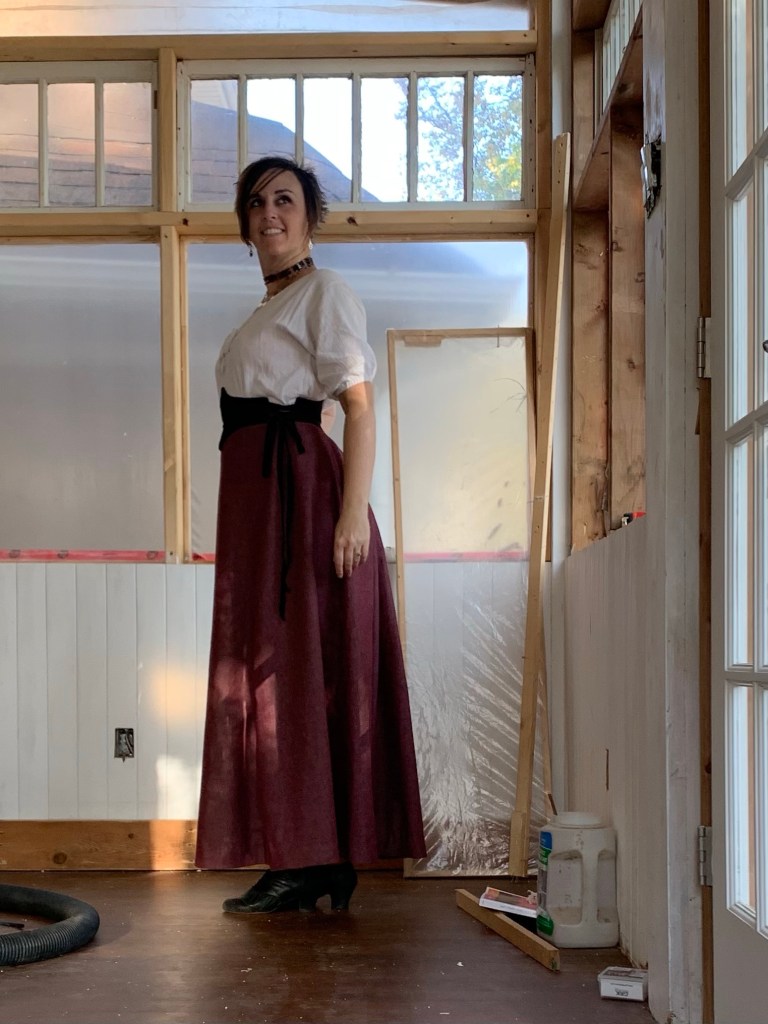
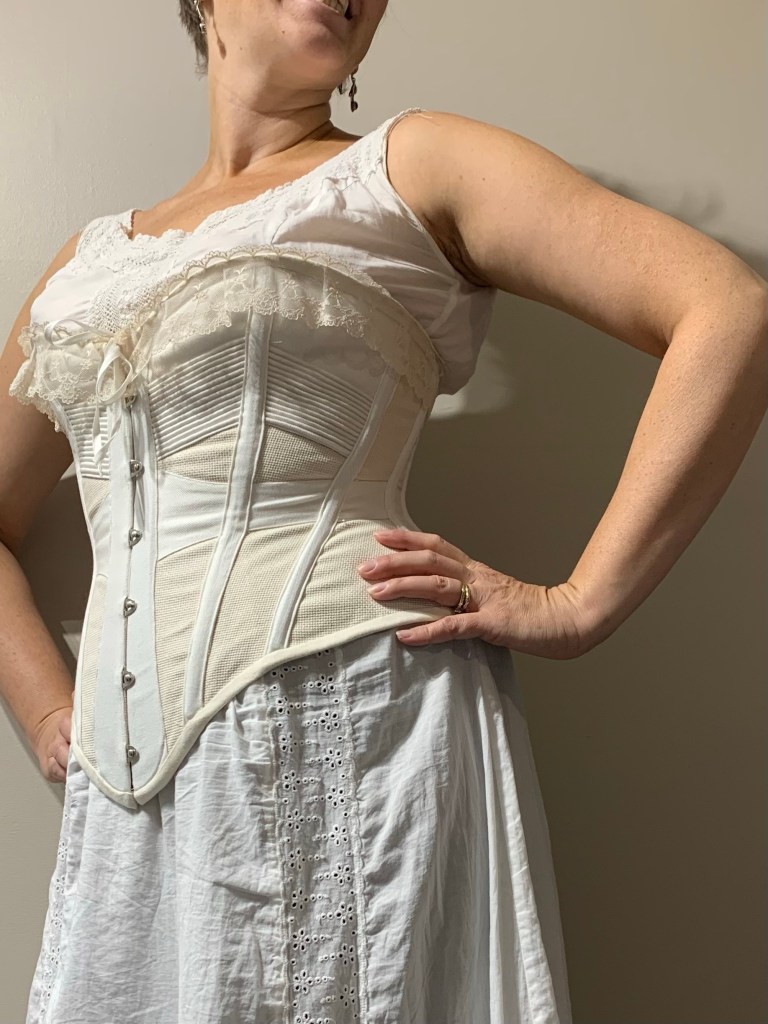
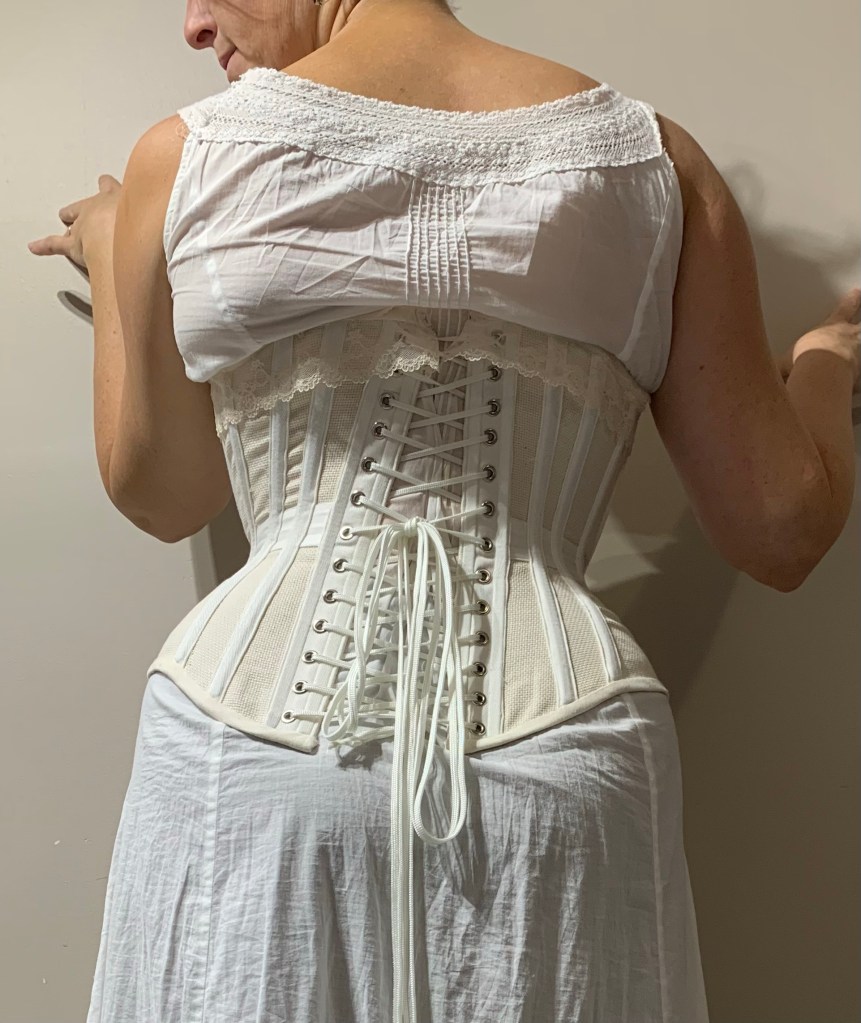
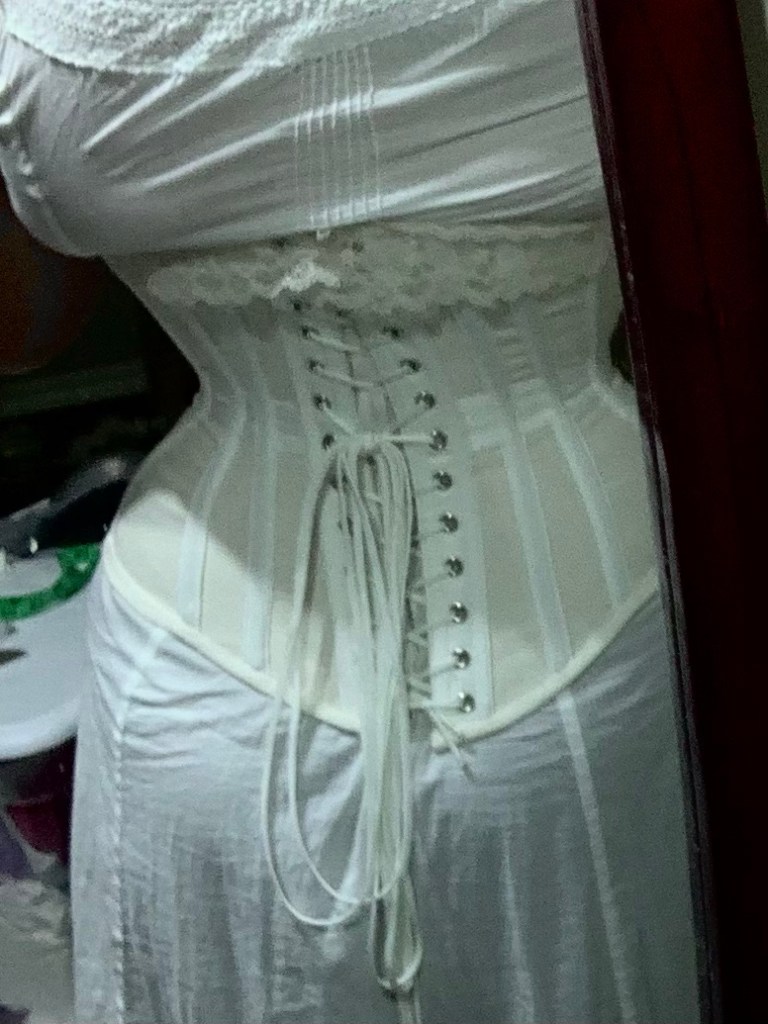
While I was intending this skirt to fit over a corset, it turns out I can also still wear it without, though it doesn’t lay quite so nice and smoothly over the hips. It does mean it’s another thing I can and will wear to work this winter, though, which has me thrilled to bits.

6 Comments

Filed under Sewing

Summer Mesh Corset (in time for Fall)

Inspiration:

Original mesh corset at the V&A museum

I’ve been in love with the idea of doing a summer, mesh corset for a WHILE. I picked up a chunk of Aida cloth for the exact purpose back circa 2015. And when I made my Victorian Sundress (better pictures still pending) it occurred to me that this might also be the perfect time to make a light, aerated summery corset. So I set to work… and then summer blazed past in a blur of everything-but-sewing, and here it is just in time for the weather to turn chilly.

But back to the inspiration: I swear I saw one in a corset book somewhere, but damned if I could find it when I looked recently. This one from the Victoria & Albert shows the features I was interested in, though: solid bits, mesh panels, “waist belt” piece.

Now, Aida cloth (the stuff for cross-stitching) is nowhere near as open as the mesh used in the inspiration corset, nor is it, frankly, particularly stable. It made this an interesting project, and I’m not at all sure how long-lived the results will be.

Auditioning materials

Materials: aside from the Aida cloth, I went with some fairly beefy white denim for the details. I liked the white and cream contrast. Probably coutil would’ve been better for those parts but I was hesitant to sacrifice good coutil when the main fabric was a bit dodgy. I also decided to use my last spoon busk, just to make my life harder; the inspiration piece doesn’t have a spoon busk but it is right for the time period I’m roughly going for. I used 1/4” spring steel boning but given that my boning channels are single and not the double ones I’m used to (and the rather shifty Aida cloth) I’m thinking maybe a slightly wider, more stable boning might have been preferable.

The pattern is a veritable saga of its own. The kernel, as with most of the corsets I’ve ever made, is Butterick 4254 view C, a basic six-panel corset. but over the years I’ve altered, traced off, and re-altered the pattern so much I couldn’t even tell you how much it resembles the original. I still wear my old white corset from this pattern regularly (despite it being technically far too small and, more recently, badly stained with bright blue after an incident involving a gel ice pack and a cat), and the shape is pretty much perfect for me, but I wanted to make sure that the various layers of alteration I’ve added to it over the years were reflected in the pattern I used, while re-sizing to be closer to my current measurements. This involved adding quite a bit of width to the front, and substantially re-shaping the side seam to mimic the effects of a hip gusset I had added to the white corset at some point, as well as an inch or so of height to the top. I had shortened the corset pattern initially, as I’m short waisted, and the top had always been a hair low, but somehow as my bust has gotten larger the last few years this problem got worse (even though I’m pretty sure my bust point is lower than it was). So this latest version aimed to incorporate the added width and side-seam shaping, while adding the missing height to the top.

I don’t think I’ve quite nailed my revamped pattern (and a test in real coutil, or at least ticking, is probably needed to really tell), but I do think it’s a step in the right direction. The bust height is great; the side-seam needs a little more refinement in the shape of the hip flare (which I accomplished in this piece by playing with the seam allowance), and I had to take out some excess width in the back, though I’m not sure if that’s just due to stretching. I might try to adjust the fall of the side seam above the waist forward a little; below the waist it’s perfect.

Construction

  • Original has solid outer on top of mesh inner at corset front/back
  • Overlay solid portions over mesh around busk, lacing panels, and bust area, plus shaped waist belt
  • Seams to the outside, covered by bone casings
  • Cording on bust solid parts (in hindsight the original may just have been quilted)
  • Waist belt added after main seams but before adding busk and lacing panel coverings
  • One bone per seam, in bone casing, applied to the exterior
  • Extra bone just beside the busk for added support (not necessary for spoon busk)

The trickiest part about this project was coming up with the order of operations. (Spoiler: I messed this up, more than once.) I added the “bust cover” patches first, with cording. Then sewed the panels together. Next I should’ve added the waist-stay panel, but instead I did the back lacing area so I could test the fit before I stitched over all those seams. It’s good I did—I had to take the back portion in significantly, and tweak the hip curve at the side seam. I’m not sure if I had added too much or if the Aida cloth just stretched; it definitely wasn’t as stable as would be ideal. But it also meant I had to unpick a portion of the back lacing panel to tuck the waist stay under it.

Cording the bust area wasn’t hard, though it was a tad tedious. I was pretty sure within the first few lines that I should’ve used a thinner cord, as my channels are VERY raised. Looking back at the inspiration piece, they may actually have just been quilted, not actually corded at all. Oh well. If I were to do it again I’d move the entire corded section higher by a good inch, as it mainly sits below my bust. But that was pretty much impossible to determine in advance.

The trickiest part of the construction was wrapping the busk covering panel close around the busk pieces, but still with enough room to edgestitch it down, without breaking a needle. Especially while getting the busk in place over the bulk of the corded patches. I used a fairly thick string for the cording and in hindsight I wish I’d used a thinner one. Those parts are VERY thick and were really hard to sew over, even for my Pfaff 360, and I’m a little worried all the trimming I had to do may have left these seams vulnerable to fraying.

(Laced a little too tight at the upper back. More comfortable when laced more straight.)

Even with the width I removed, the corset is not really “tight”… I can lace it very nearly closed, although I wouldn’t want to wear it like that all day. If it stretches any more with wear it might still become too big. Although, I’ve also lost a little bit of weight this summer; if that reverses come winter I may be glad of a little extra room!

Maximum lacing tightness

I had planned to use the same white denim for my binding, but at the last moment decided to go for a lighter-weight cream twill, for less bulk at the edges of the corset. No regrets, although the texture of the heavier denim would’ve been nice.

I also remembered to add drawstrings in the upper binding, using more of my 1/4” stay tape. Which is possibly my favourite notion at the moment and I may need to just bite the bullet and buy it in bulk.

Anyway, I’m cautiously thrilled with the results, imperfect and experimental though they are in many ways. The shape is very much what I wanted. The bust height is so much better than previous versions. The size is a pleasant change from nearly-too-small corsets. I love the solidity of the spoon busk. How will it be as it breaks in? Don’t know. Will it self-destruct after a few hours of wearing? Could be! Will it be fun to sew? Definitely.

And now… to the fall sewing!

5 Comments

Filed under Sewing

Linen Repeat

Having finally completed, more or less, my Victorian Sundress, I promptly started a corset. Then I realized summer is slipping away distressingly quickly, and I hadn’t even made anything for me to actually wear on the everyday.

So I pulled out some linen I got last year from Pure Linen Envy, spent some time paging through my pattern database, and finally, on a rare full sewing day* during my vacation, got to work.

* fully sewing by hopping between my own project and two different projects for the twins, plus cleaning off the dining room table so I could cut out said projects, oh, and trying to keep said twins entertained, too.

My inspiration was this linen sundress I made back in 2016. Which has turned into a sturdy summer staple, even as the always-dodgy bust fit got worse and worse over the years. So I was excited to give it a companion, but, um, not with that same pattern.

However, perhaps ironically, I went with another McCall’s pattern, M8177. I have a much more successful history with this pattern, though: my blue big-sleeve dress from last year. I have always wanted to make the sundress version, and this seemed like a great chance to do that. Except. I had only three metres of my linen, and according to the pattern the long version called for 4.5.

Now, the long version includes both short, puffy sleeves and a self-fabric belt, so I was pretty sure I could get away with less, but the only way to find out for sure was a fun game of pattern Tetris. Since my linen wasn’t directional, I folded it cross-wise, as this can really help maximize fabric usage for flared-skirt patterns like this. Things weren’t looking good, until I realized that the back piece actually ISN’T meant to be cut on the fold. Suddenly I had enough room even for the facings.

There is a cat under my skirt.

What I didn’t have quite enough room for was the pockets. This pattern comes with inseam pockets, which I thoroughly enjoy on my first version, but either I lost the pattern piece or it’s folded up in with the sleeve pieces I didn’t use this time. Either way, I forgot about it when I was first cutting out, and I didn’t have quite enough fabric left for them anyway (although the nice thing about inseam pockets is you can always substitute something else.)

I did, however, have just enough left for two patch pockets big enough to hold my phone, so I went with that option.

After some contemplation I went with a selection of more-or-less matching vintage shell buttons from stash. It was either that or similar-looking plastic ones, but I’m pretty sure I’ll enjoy the shell more.

I thought the shell buttons gave it a bit of a shabby-chic look, so I pulled out some lace appliqués I’ve been stashing since Fabricland closed and started to play around. I gave them a quick tea dip to take the edge off the bright white, and eventually went with an asymmetrical arrangement on the front.

And that’s about it. Linen is easy to sew. I don’t super-love the process of attaching the facing on this pattern. I think I should probably sew the underarm portion of one seam, then line the straps up against that and stitch them down. But that’s my own issue with the style, not an issue with the pattern.

When I made the first dress I was annoyed that the back facing had a CB seam, as that kind of just adds unnecessary bulk, but given my fabric limitations this time I actually needed that seam, so win?

The straps are as drafted on the pattern (shortened about 1/2”, not surprising for me). They are a sturdy, bra-covering width, but I must admit I’d probably make them a touch narrower next time.

After wearing the linen has stretched out a bit, so I may take it in a touch more. And the front facings do flop around below the buttons so I should really stitch them down before I catch a toe. This linen is a lighter weight, which is delicious but may not be quite the indestructible workhorse that my black linen is. But I absolutely love the feel and colour, and the shell buttons and lace add a slightly shabby elegance that I’m all in for.

Now to just wear it as many times as I can get away with before the weather changes.

1 Comment

Filed under Sewing

A Victorian Sundress (skirt)

This is part 2 about my “Victorian sundress” project. I drew on two main inspirations for the skirt. One was this blog post from the Fashionable Past, about an extant and very lightweight summer dress (unlined skirt!!!), and the other was this pattern from Etsy, the “Étamine Dress.”

It’s one of those “unimproved” ones based on an original from Harper’s Bazar. No grading, no additional instructions. I didn’t particularly care about the bodice, having just muslined my own, but after a few mind-boggling attempts to work out all that layered pleating on my own based just on the illustration, I bought the pattern.

As I had feared, the pattern piece was LARGELY a rectangle. with a very slight curve at one end. So I was basically paying for the marked pleat points, and about two lines of instructions. Ah well. (Actually the terse instructions were really helpful in clarifying the dizzying array of layers on the dress in the image, even if I wasn’t likely to have enough fabric for all of them. )

The Étamine pattern skirt, as written, contains four layers. From the inside out:

  1. The foundation skirt,
  2. A “tablier front” pleated just across the front, visible in the slit between all the other layers,
  3. The “straight breadths”, a straight, pleated layer (probably meant to be applied to the foundation skirt?), and then finally
  4. The swagged outer layer.

The pattern actually includes a piece only for the final, outer layer—which was the main reason I bought the pattern, and which, it turns out, is also basically a rectangle, curving only very slightly on the top front. (And in hindsight that curve probably only exists to accommodate attaching this layer to the bodice, as per the instructions, which wasn’t my plan until I realized that)

But I’m getting ahead of myself. First I needed to construct the foundation skirt.

Based on both my desire for a maximally light weight dress and this blog post from The Fashionable Past about recreating an extant, and remarkably lightweight, dress in her possession, I decided to throw propriety to the wind and make an unlined foundation skirt. The complete invisibility of the foundation skirt in the Etamine dress illustration did little to dissuade me from this course, and actually, if the “straight breadths” and “tablier front” layers were mounted to the skirt as I suspect the pattern intended, it might very well have been a single layer foundation skirt that was intended.

My fabric was about three metres of this grey cotton-linen blend, a long-stashed remnant from this Vintage Vogue dress. The colour coordinated well with my grey striped border embroidery, although if it proved invisible in the final product it wouldn’t matter. It’s not a particularly historical-looking fabric, but it is yummy.

I constructed the foundation skirt in a low-waste gored manner similar to this skirt draft from my 1882 book and this 1903 petticoat draft, although slightly modified to take advantage of my wide modern fabric. I cut both front and side gores from a single length, and then used a further full width to make my back panels. In hindsight the front gore is too flared for this skirt style, making the seams run somewhat diagonally down the skirt. I should’ve cut it narrower at the hem edge, and then had a bit more fullness to pleat in to the back waist. But, see the part about how it’s basically going to be invisible, I’m not too bothered.

For the closure, I made a pleat-placket in the middle of the back breadth, using the same slash method I did for my first petticoat, which according to past Tanit came from Plain Sewing and Amateur Dressmaking (published in 1887). This part was entirely hand sewn. It’s completely covered in the final dress, but somehow was just fun to do.

The Étamine pattern, by the way, barely even mentions the foundation skirt layer in its terse instructions, except to say it has a four-inch box pleating of the fashion fabric at the hem. They were obviously assuming their reader either had a basic foundation skirt pattern they liked, or would just draft their own like I did.

Because I like the look, I decided to try out stacked pleating at the centre back, covering my placket pleat. I didn’t fuss over it too much. The single layer of fabric definitely made this a less bulky feature than it might have been.

My hem is just a very basic machine hem, again based on the Fashionable Past example, although a little narrower.

I also made a pocket, again very much following the same method I’ve used in the past. However, it somehow turned out too small. So I may need to open up the bottom of it and patch on some more. I also initially sewed it in upside down, because you’re never too experienced to make mistakes.

Pocket fail. The pointy end should go up towards the waistband.

Now, the skirt came out relatively short. This is partly because of fabric limitations and partly because all my Victorian skirts ever have been too long, at least for day wear. I did not want that for this skirt—but I definitely needed to shorten my petticoats.

(This one is still too long though)

I did this by the very inelegant method of adding a 1” tuck just above the bottom ruffles. Because the front and sides are gored (i.e., wider at the bottom than the top) this means that the underside of the tuck needs to be eased to fit. The period manuals talk about basting a gathering stitch along that line and easing it in. I just pressed and hoped. It mostly worked out better than expected, though there are one or two bad spots.

With considerable fussing and measuring, I eventually determined that I did have enough of the border embroidery to do at least the upper two layers of overskirt, although not the tablier front layer. I was content to have my foundation skirt show a tiny bit though. I had enough extra eyelet trim from the making of the bodice to add a vertical piece to the centre fronts of the topmost layer.

There was, however, nothing left for the longer fronts of the middle layer, what the pattern termed “straight breadths.” Never mind any excess for trimming the bodice. I considered for a long, painful while, but I knew what I had to do: make more edging.

You see, as it happened the existing border embroidery was arranged kind of in two rows with a small space between them. This made it possible, with enough patience, to add a scalloped zig-zag in the space between that I could then cut along, instantly doubling the amount of eyelet edge I had available.

I thought the best machine I had for the task would be the Pfaff 360, as its embroidery stitches are customizable to length. However, it has a dodgy tension and hadn’t been out of the carrying case in, um, years.

Eventually, I managed to nerve myself up, pull the Pfaff out, and get to work.

The tension was actually being fairly well behaved, but the embroidery stitches didn’t seem to be engaging, or at least only very randomly. I eventually traced the issue to a series of little levers under the main cover of the machine that are supposed to drop down into slots depending on which stitch option is selected, which were not dropping without manual assistance. So, eventually, I was able to get it to do a scallop the length that I wanted—but there didn’t seem to be a width adjustment available for the scallop setting, and I could only make it do a very narrow zig-zag. I think this is a limitation of the machine, since it has a fairly narrow total stitch width; in the end I went over the automatic scallop with a wider zig-zag freehand, and aside from the tension being a little too low (I had turned it down as that tends to work best for machine embroidery, and it looked great on top and didn’t pucker up the fabric, but it is quite loopy on the back side.) It’s not indistinguishable from the original, but it won’t be noticeable, and I desperately needed that extra length of edging.

I think cutting the strip off the bottom may actually have taken longer than embroidering it. But eventually it was done. Then I remembered I also needed to add three 1” tucks to the “flat breadths” panel before I pieced on the edging at the short ends.

But eventually I got it done. It was easier than the upper layer since the mitered corner was narrower. The removed edging isn’t the same as the remaining piece, but at least their width is similar.

Based on the terse instructions, I actually think the “flat breadths” layer was supposed to be attached directly to the foundation skirt, attaching partway down, even though the illustration doesn’t exactly fit with this idea. But I didn’t want to do it that way, mainly because I feel like I might want to wear the foundation skirt alone for other things. As a result my “straight breadths” are pleated into a twill tape waistband and hike up a bit in the back. If I really wanted I could probably come up with a bit of an upper skirt to mount them to, but at the moment I’m not sure I’ll bother.

At last I could truly play with the upper layer. I was grateful to the pattern for at least clarifying the rough plan for the pleating; I basically used its markers at the front and back edges, and then added some fudging in between to get it to both fit and look how I wanted. I originally tried underlining the fabric with a craft netting to give it more volume, but my smooth fabric didn’t cling to the netting at all so while the netting had big, smooth folds, the fabric just slid over the top. So my folds definitely aren’t as full and thick as in the illustration. (Apparently étamine was a lightweight cotton, loosely-woven, almost mesh like fabric… so I’m not sure how much body it would have had either.) But I think they will do, even if they aren’t quite like what was illustrated.

Arranging the pleats and folds of the upper layer was definitely the longest and most nerve wracking part of this project. Once done, I hand-basted them to the bodice and then carefully hand-stitched from the right side, and then catch-stitched down the seam allowances on the inside. This took forever as I kept having to tackle it in tiny ten minute intervals, but did eventually, and it does make the intricate upper layer very simple to take on and off.

And that’s about that! I’d like to add a big red bow on top of the bustle, and I might just have enough long skinny scraps to add the 4” ruffle the pattern describes to the foundation skirt, if I want to. I’m contemplating some hooks and eyes at the bottom front of the bodice, to keep the various layers all together in the front, since that’s one of the things I like about the original illustration. But on the whole this has been a much bigger project than I had originally envisioned, so I’m happy just to get to wearable!

1 Comment

Filed under Sewing

A Victorian Sundress

So Victorian Sewing Circle is carrying on through the summer this year. Hooray! Except. The one Victorian outfit I have at the moment is, um, fairly heavy wool. This is not going to be fun come July. (Hopefully it’s still July when you’re reading this. )

So, I decided to pull the trigger on a project I’ve been halfway planning for a long time. What I’ve mentally dubbed a “Victorian sundress”

I had picked up this light cotton border embroidery on clearance ages ago when I was working at Fabricland. I actually got several different colours, though previously I have only used a tiny bit of the red to make these dresses for the twins. The most important thing about it though, was that there was something like nine metres of the grey colourway alone. For a bit of interest (and to stretch my fabric as I only had about 9m of the stripe) I decided to pair it with this grey cotton-linen blend, not historically accurate but yummy nonetheless, for the foundation skirt.

I started with the bodice; the skirt will get its own post.

It’s the same pattern I’ve used before, TV 462 although since I’m a very different size than I was in 2016 when I made it the first time, I was basically starting all over again. Which is ok, since I didn’t exactly nail it the first time. I had actually muslined the new size back in the winter. Truly Victorian uses a fairly complicated system of measuring for their bodices where you choose front, back, and sleeve sizes separately and then adjust to make it work. My bust and back were only one size different, so in the end I decided I would make everything the (larger) back size and if I had extra bust room, just pad it out. I still had to narrow the shoulders pretty massively, and I did a lot of vertical length adjustments since these patterns seem to skew long and I have a fairly short torso. I also did my usual preemptive swayback and square shoulder adjustments. When I tried on the muslin I determined that the front was actually pretty darn good, as was the back width across the shoulder area, but there was a lot of extra room in the back waist. I ended up taking 1” out of the side-back piece to get the shape approximately right, which improved the back fit immensely.

Also added width at the side seam below waist. May have overdone it.

One thing I forgot to consider, since there was a bit of a gap between muslining and cutting out my fashion fabric, was the shape of the back hem of my bodice. My pattern is for a tailed bodice, with a non-tailed lining, and to save fabric I had just muslined the lining pieces. At some point between muslin and final fabric, I’d decided on a different overskirt style that didn’t work with a tailed bodice, so I just went ahead and cut the final fabric with the same hem as the lining pieces, without thinking too much about the final shape it would make. If I had it to do over, I would try to draft a slightly longer, more elegant V point in the back. It’s a kind of short, meh shape on its own.

I went for the “closures first” fitting strategy, finishing the front of my bodice with bias tape and then adding the (machine) buttonholes and buttons. This let me try it on without pinning, which makes it a bit easier to fit. I then refined the fit a little, reshaping the side seams (taking in the waist 1/4” on each side and letting out the hips an equal amount.) and also wound up deepening the centremost front darts by about 1/4”. Not unexpected given the size I chose.

I was quite silly about how I positioned the boning in the front darts this time, putting it close to the fold of the dart where it flips around rather than against the stitched edge. But it doesn’t really show in the finished garment.

I added a waist stay, of course, using some of a wide red twill tape I got as a hand-me-down last year. It’s perfect for the job. I was a little worried about show-through on my light fabrics, but it seems to be fine.

I selected the “dinner bodice” neckline again because it’s both my favourite and maybe more cool than a high neck. However, I think I should probably make a high-necked little dickey to go under it, since this is meant to be a day dress.

Once the basic construction was done, it was time to consider embellishments. I had a (very limited) amount of eyelet edging left over from the skirt draperies to contribute to the bodice decoration. After some playing around and an abortive attempt at adding it to the ends of the sleeves, I settled on a strip going down each side of the bodice, coming to a V at the front bottom point. This kind of decorative feature is SUPER common in 1880s illustrations, although usually creating a faux-vest kind of look. I don’t think my variation is beyond reason though. I hand-stitched the trim in place, along the whole length at the straight edge, and tacked down between each scallop on the inner edge. I was a little anxious about getting such a wide flat piece smooth on the rather curvy front of the bodice, but it worked out ok. Did I mention I hand-basted it in place? I did more hand-basting on this project than I’ve done in YEARS.

I had one last tiny bit of trim (the piece I started to attach to the sleeve but didn’t like) so I made that into a small standing collar at the back of the neck. I think it’s cute, but I should probably add a little bit of wire to support the ends.

It turned out that the top layer of the skirt is actually sewn directly to the bodice, creating what the pattern terms a polonaise. I hadn’t planned on doing it that way, but I do like the simplicity of wearing that it gives the resulting dress. There is definitely some extra width in the hips, though I think more in the back—I like where the side-seam falls. I’m unlikely to take it in at this late stage, what with the upper layer of the skirt draperies attached directly to the bodice; I might add some padding to the area to smooth it out.

I also want to add a hint of red, to coordinate more with the hat, which will have a post of its own, too… but for now, at least, it’s wearable!

2 Comments

Filed under Sewing

French (Bonnet) Connection

It’s time. I’ve avoided it for almost a decade of costuming now: Victorian hats.

No Victorian lady’s outfit is complete without a hat. If you left the house, you wore a hat (and gloves, but, one problem at a time). The illusion can never be complete without it. Since I don’t have the right hair anyway, and my illusion was more of an impression, it didn’t seem too urgent. But I’ve dawdled long enough.

There seem to have been a wide variety of women’s hat-styles in the 1880s, from close-fitting frames to “flowerpot” hats to wide brims approaching, though not reaching, Edwardian levels. But in looking for something SPECIFICALLY 1880s (maybe not the wisest choice), you can’t really beat the distinctiveness of the weird peaked-brim style called a “French Bonnet”. (Or “Conquistador hat”)

I spent a bit of time messing around with a simpler, almost fedora, shape, before deciding to bite the bullet and purchase the Truly Victorian pattern. It was nice to have the instructions on construction to follow, since I’ve never done anything even remotely like this before.

I was hoping for some pointers or suggestions on trimming, the real wild card of hattery, but no such luck.

The hat is cut and sewn using buckram and wire, which shouldn’t have posed much of a problem as I have both in stash. Unfortunately I couldn’t find either. Syo was good enough to pick me up some (more) buckram, and I wound up harvesting the wire I had used in the twins’ mushroom capes last year. (It didn’t work super well there and I think plastic boning would probably be a better solution in their capes anyway). The new buckram from Fabricland was pretty floppy so I used a double layer, and I did take advantage of that to sandwich the vertical wires in the crown between the two layers. Otherwise I followed the instructions pretty closely, or regretted when I didn’t. (For example I somehow neglected to have a wire at the CB seam, and there is a bit of an indent in the back portion of the crown because of this. Oops.)

Other than attaching most of the wire by machine, the whole thing is almost entirely hand-sewn. I don’t mind a bit of hand-sewing but i definitely didn’t love trying to hand-sew so many thin layers on a rigid frame. Possibly a curved needle would’ve been helpful?

I tried out layering some quilt batting underneath the top of the crown and I like how it smoothed the look of the hat. The wire frame kind of leaves dints between the wires and this filled that in. However, I also wanted a light summer-weight bonnet, so I didn’t do any more. But if I try this again I will definitely consider it, or at least a flannel underlining or something.

Also, sewing the butted seam at the front of the brim to create the peak was a bit of a trip, and I’m glad I had sewn butted seams before as it’s a completely counterintuitive action.

For the brim, I departed from the instructions slightly and used a straight strip of fabric to line the underside, then pleated it towards the middle, because I’ve always liked this look in bonnets. It didn’t take quite as much pleating as expected.

I was a little stumped about how to put a band on the hat (necessary to cover the hand-stitching that attaches the brim to the crown, at least when following the instructions as written.) The sides of the crown curve down dramatically, making even a flexible bias band impractical. There seemed to be two options—either cutting a shaped band using the same pattern piece as the crown, or using a soft, draped piece of fabric like a sash.

Early test of trimmings. Somehow I didn’t get any pics of just the “hat sash”

I went with the latter, which seems to be what most of the internet has opted for, and I do like the soft, whimsical look for a soft, whimsical bonnet. Somehow, despite the fact that the hat sat around with just the sash on for over a week, I didn’t take any pictures of that stage.

Needs curly bangs.

My mother was kind enough to provide a selection of fake flora to help trim the hat. There is one big rose under the brim and two above it, nestled amongst a bunch of other little floral bits. I’m thinking the back bow may need some floral additions. I’d dearly love to add a feathered bird wing, or entire bird if I could find one that doesn’t look quite as derpy as the little one in the pic where Tris is wearing it. (So far no luck, all the fake birds at Michael’s looked just as derpy.)

I actually kinda hated this thing during most of the construction. The shape is just weird. Very far beyond my comfort zone. And not in a way I expected to find cute. Although I don’t think I can quite convey to you how much Tris loves it, so that’s something. It apparently hits exactly the right vibe for a not-quite-four-year-old obsessed with looking like a princess. However, it has weirdly grown on me, particularly as I got more of the trimmings in place. I’m particularly fond of the flowers under the brim.

I eventually made it to Michael’s to look for ostrich plumes. They had exactly one, however it was bright white and I wasn’t prepared to mess around with trying to dye it. I did find a little spray of coordinating feathers, though, so I got that, and I think it finishes off the hat nicely, at least for now.

I will say, it’s growing on me, weird shape and all. It stays on the head surprisingly firmly, although I suspect a hat-pin or two would still be wise, at least if I had the kind of hair one could anchor stuff to with a hat pin. It will make more sense, I think, if I can ever manage a proper hairpiece, since it should really sit over a chunky braided bun, and have curly 1880s bangs to help fill in the top front. Apparently 1880s bangs have a lot in common with 1980s bangs. Who knew.

Now I just need to get the rest of the outfit to go with it finished!

Comments Off on French (Bonnet) Connection

Filed under Sewing

Pixie’s Blouse

I’ve been needing, of course, a blouse to go with my ten-gore princess skirt. But if I’m going to make an Edwardian blouse, of course I want to make a lingerie blouse version. I doodled these concepts back in the winter, and while they aren’t exactly what I ended up making, I think they convey the idea.

While I won’t say my Victorian Sewing Circle has exactly rocketed to widespread renown, we have accumulated a couple of donations over the years. This blouse pattern was donated by a vivacious lady who goes by Pixie. She’s apparently well known in the local Society for Creative Anachronism, but slummed around with us for a little while. As I recall, she took the pattern from an original she had the opportunity to study while working at a museum in Prince Albert (a smaller city nearby). I had the opportunity to try on her version, so I thought it would roughly fit (give or take needing to add a bit to the waist these days.)

It’s a fairly basic shirtwaist pattern of its era, the main features being a dramatically V-shaped back yoke and some long, tapered cuffs on the full sleeves.

After some digging in the stash I turned up this white cotton with woven-textured stripes. It was a remnant from some other project, but I confess I can’t for the life of me remember what I made with it the first time. It’s perhaps a little heavy for a proper lingerie blouse, but deliciously soft and since I hadn’t remembered it existed, I was prepared to not be too precious about using it.

For the lace, I tested out some cotton lace, but in the end opted to use a not-completely-horrible (and much more sheer) nylon option I had a buttload of in stash. I don’t remember where it came from, but it’s always nice to have plenty to play with when tackling lingerie styles.

I wanted to make the pattern more or less as-is for this first go at least, but I really love the look of a faux-yoke in the front created by stacked lace (see the sketches) and carried on in the tucks beside it.

Now, fitting the entire shirt pattern on my limited fabric was an exercise in and of itself. So I was really excited to be able to add a couple of extra inches to the fronts to add some pintucks. Partly because would it even be an Edwardian blouse without pintucks? And partly because a fabric like this basically measures the tucks for you. And also I thought a couple of extra inches in the front wouldn’t be a bad idea since my bust is, ah, a little larger than when I tried on the original. I did have to cut the inner parts of collar, cuffs, and back yoke from different fabrics, but I’m not exactly short of small bits of white fabric for this.

I wasn’t sure whether to line the back yoke. On the one hand this reduces the overall transparency and delicacy of the lingerie blouse. On the other hand, this is a fairly high-stress part of the blouse. A quick scan through a couple of period texts didn’t cover yoked shirts. In the end, I went and lined it, for the stability.

After adding the lace “yoke” in the front I decided I wanted a fully lace collar. The lace I was using was just perfect for two widths to make the finished width of the collar as drafted. I did run into one or two hiccups though.

Firstly, I needed the collar to be a good couple of inches smaller than drafted. (Perils of skipping a muslin.) I attempted to compensate for this by adding a third tier of lace to the bottom of the collar, carefully eased to fit.

And secondly, I had to decide how to handle the front-buttoning placket. Most of the all-lace collars I’ve seen in originals had back buttons. And while the width of the placket fits nicely with the width of my lace, it’s pretty wide, which seemed a bit heavy-looking on lace alone.

In the end, I decided not to make buttonholes in the collar, but just to pin it in place; tiny snaps would be a good more permanent option.

While the blouse is lovely, I really think it is just a little bit too big all over. The collar is still pretty big, I had to hack a huge amount off the shoulders, the back length seems a bit long, and I think I would like the overall amount of volume if I took a solid couple of inches out from each side and beneath the arm. Partly this is because I’d added that extra volume with the released tucks in the front—but the back also seems oversize. Maybe I am just not good at dealing with puffy things. But that’s what you get when you skip making a muslin, even when using a pattern you had tried on (once many years ago). So the moral of the story is—make a muslin (or at least measure your pattern) even when you think you know.

And yes, I haven’t even managed pictures with my Edwardian skirt, because it’s wintery wool and it is no longer winter. I’ll try and post about it again once I take those pictures… and maybe figure out how to make the fit a bit more what I wanted.

3 Comments

Filed under Sewing

Summer Jammies

It’s summer. It’s hot. We don’t have AC. And the twins are convinced it’s not bedtime without jammies… so we need jammies. All their jammies are, well, winter jammies. long sleeves, long legs.

We were going to buy them. But all the summer weight jammies at the second hand store were, well, underwhelming. A lot of pilled up polyester.

So when I had a couple of unexpected sewing hours this past weekend, I decided to try whipping up a couple of nighties. The twins each selected their favourite fabric from their fabric bin, and for a pattern I pulled out McCall’s M9565, which is apparently in my stash although I have no clue where I got it. My envelope tops out at a size three, which is technically the twins current size. McCall’s kids patterns tend to run big, but on the other hand the twins are almost four and starting to outgrow their RTW size three clothes, especially Tris (who is over 2” taller than River at this point). I also considered Jalie 3245, which would make a great raglan summer nightie in the tunic view, but I didn’t really want to trace and was comfortable just cutting out the size 3 of the McCall’s pattern.

Well, I needn’t have worried about the size. They came out HUGE. Falling off River’s (admittedly narrow) shoulders. Even Tris’s I took in at the side seams 5/8” on each side. For River’s, I had to cut off the original neckband, take each raglan sleeve in 5/8”, and then take in the side seams even more. And it’s still not exactly snug—they’ll be wearing these for a while.

They are also long. You’ll notice the pattern cover shows a ruffle at the bottom. I wasn’t sure about adding it, but when the dresses turned out just shy of ankle-length it became obvious that was not going to happen. Which is fine. River has been on a kick about long dresses lately.

The pattern was for a long-sleeved nightie, but obviously I wanted short sleeves for summer. I picked a fairly arbitrary length that wound up being just above elbow length. River liked this but Tris did not, wanting them extra short. So I modified hers into more of a cap-sleeve style.

There’s not much more to say. They were sewn very quickly on the not-so-good serger, and several times as I sat down I had to readjust all the tension settings because the twins just can’t resist fiddling with that. I hemmed them with the coverstitch and they’re certainly not my tidiest but also whatever—they’re summer sleepwear. At least the twins were excited and happy about them, which is better than those mermaid tails I made them, that they’ve played with all of twice. A new challenge did arise this time: keeping each twin from throwing shade on the other’s choices. Tris didn’t like River’s fabric. River didn’t like the white sleeves on Tris’s (a necessity since we didn’t have much of Tris’s fabric, but I always think contrast sleeves look better on a raglan sleeve). But both are happy with their own dresses, which is the most important part.

Not that I could convince them to pose together.

9 Comments

Filed under Sewing

Ungrateful Mermaids

Sometime around Christmas, Tris became obsessed with being an “Elsa Mermaid.” And, of course, convinced that I could help her with this transformation.

I was… less enthused. Partly because I was worried she expected me to make her a literal mermaid (and probably then provide a suitable ocean to explore). Mostly because I was pretty sure the confinement of the legs inherent to a “real” mermaid tail just wasn’t going to feel great after a max of five minutes.

So I dragged my feet.

River got in on the excitement, requesting a Rainbow Mermaid tail with only slightly less urgency.

After a fair bit of cogitating, I hit upon the (I thought) brilliant idea of a tail made as a wrap-around skirt, allowing the mermaid look while still running and playing. I even drew up a sketch to try to sell the idea to my three-year-old clients.

They were cautiously receptive, at least once I assured them I could make a pocket in the fin so they could also put their feet inside. So I took some measurements, drafted a couple of rough pattern pieces, and dug through the stash for suitable fabrics. Rainbow was easy, as my aunt gave me a couple of pieces of cheap rainbow-printed satin to make stuff for the twins. Ah, the gift of getting to sew one’s least favourite fabric for someone else. I also had some low-stretch slippery knit with an indistinct white and blue and silver pattern that has always reminded me of the Frozen aesthetic. For the tail fin itself, I opted to use the last of a spongy purple polyester sweater fleece that I had made into baby sweatpants at one point. Actually both fabrics featured in other projects on this post here. But I overlaid the fleece with translucent fabrics to get that iridescent fishy feeling.

For the rainbow tail fin, I picked a purple-y tulle with a bit of a silvery fish scale pattern to it, and intermittent clusters of beads. It had been kicking around stash for several years since one of Syo’s friends deconstructed a ball gown in our basement to make a Hallowe’en costume, and left giant swathes of shorn tulle behind. For Tris I chose a blue organza with random silvery dots, also from my aunt. I then quilted these overlays to each side of the tail separately, creating fish-tail rays. This was far and away the most time-consuming and annoying part of the whole thing.

I completed River’s tail first, as I figured she was going to be less devastated if she didn’t like the result than Tris was, and I could perhaps use its example to manage Tris’s expectations.

River was quite excited, and eager to put it on. However, she was completely unwilling to wear it as a skirt, only as a full tail with her feet tucked into the tail fin pocket.

And the frustration of being unable to walk properly like this got to her fairly quickly, so she hasn’t really worn it after the first day it was delivered. (Oh and I still should topstitch around the tail-fin so it holds its shape better, but my motivation is… low.)

Tris was distinctly lukewarm to River’s tail, and I contemplated just making it as a basic step in tail, but the pieces were already cut out and taking up room in the sewing room. So, eventually, I decided to finish sewing it up, if only to move them from the sewing room to the dress-up box.

When I showed it to her, all completed. Tris said, “no thank you, I’m a princess, not a mermaid.”

Anyway, while I take some deep breaths, I’m going to make something for me now.

19 Comments

Filed under Sewing

Black underneath

I obviously needed a petticoat to go with my Edwardian skirt (the 1880s ones just don’t quite work). And I’ve been a bit obsessed with the idea of an all-black set of underthings (hence the black corset, and there’s a black chemise cut out and living in limbo at the moment, too.) So, why not a black petticoat, particularly since I had a nice chunk of black batiste in stash for just such a purpose.

Now, what to use for a pattern? Well, I could have gone with the same as my skirt, maybe just omitting the above-waist extension. And I might still make one like that.

But I ran across the following draft in the “Art of Dressmaking,” copyright 1903 by Madame Marie Boudet, one of an assortment of historical sewing manuals I’ve collected digitally. In particular, I liked that she works in metric (being French), and also that it’s designed to be drafted directly on the fabric. It’s also extremely economical and low-waste, requiring only two skirt-lengths of fabric, and only a few bits are cut away to form the curves at hem and waist.

Now, working out the pattern was not quite as simple as I might have liked—there was a lot of on-the-fly calculation I would rather have worked out beforehand, and her order of describing what to do left a bit to be desired. I also realized partway through that her calculations seem to assume a fabric width of about 32”—not surprising but I had to make some adjustments for my 60” wide fabric. But aside from some issues (mainly losing track of some of my measurements) I still do really like the draft. Even if it does consider 60 cm (23.6”) an “average” waist size. Because of my wider fabric, I had to make my flare a bit more extreme, and I have more gathering at the back waist than is probably intended. On the other hand the draft does mention that a more full petticoat might be desired, requiring three lengths of fabric, so I don’t think my version is beyond the realms of the possible.

I added about a 6” ruffle at the bottom, which was what I planned for, but I really think I do prefer the wider ruffle I used on my earlier petticoat. Although maybe I just need to press it more. I also would’ve liked a nice black lace at the bottom, but I definitely don’t have that much of anything suitable in stash.

For the waist finishing, I used a method from Sew Historically, which I’ve also found described in period sources (isn’t it nice when we’re all reading the same books?). It’s basically two drawstrings anchored at the side backs, that run opposite directions through a casing and emerge from eyelets to get tied together. Although I didn’t follow it quite right and I think I have a lot more gathering at the waist than might be intended due to my overly-wide fabric, so for me it works best to pull the drawstrings around and tie them in the front. Otherwise it looks a bit wonky, as below:

There isn’t much else to say, other than the obligatory complaints about photographing black. So I’ll just let it be that.

1 Comment

Filed under Sewing