Category Archives: Sewing

The jeans of many sizes

Possibly subtitled “the best laid plans…”

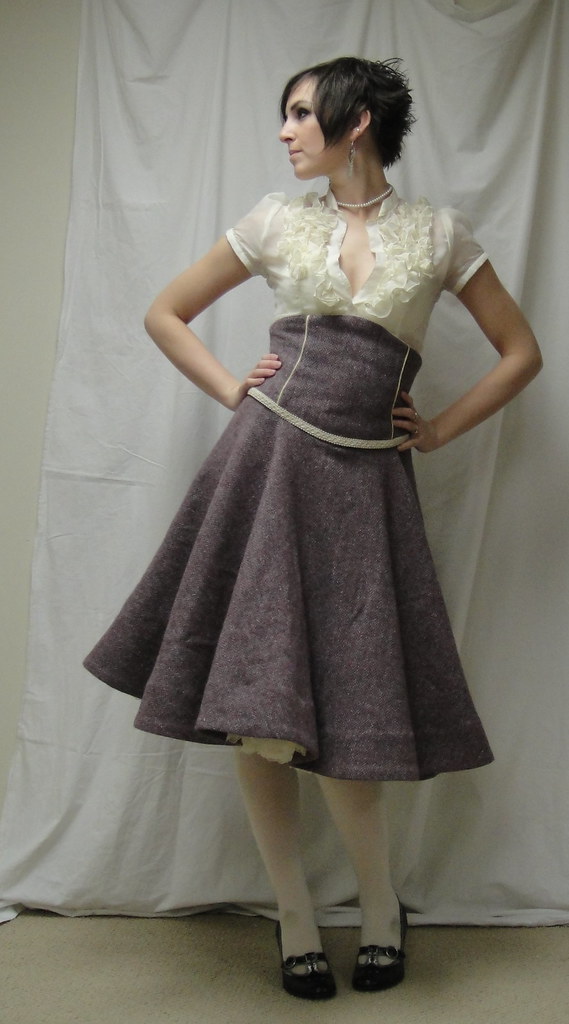
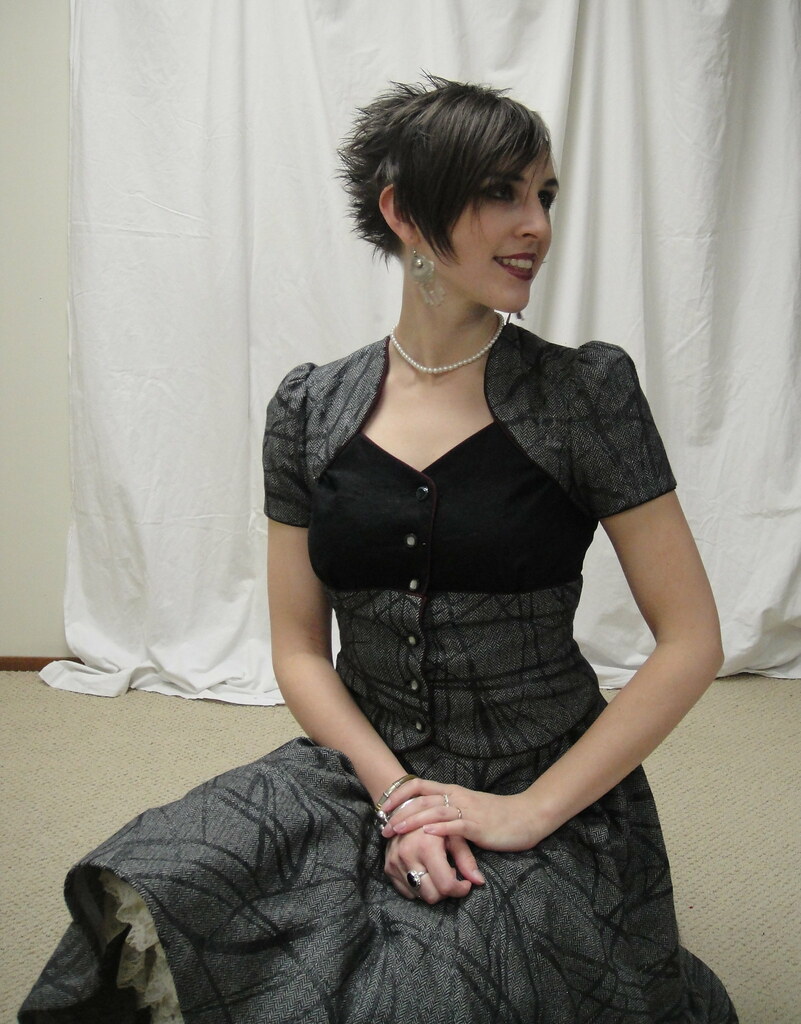
Instructions: "Look cute."

In a fit of obsession yesterday afternoon, Syo and I decided to tackle her jeans. The project was simple; all the materials were on hand: one traced version of Jalie 2908, size K (aka 7); one metre of dark blue stretch denim; gold jeans topstitching thread, and a little metal zipper.

The pattern is the same size I traced out for Tyo’s jeans last spring, which she had outgrown by August. Syo is now wearing these jeans, quite comfortably, so I was feeling pretty confident about the fit. They would probably be a bit long, but otherwise shouldn’t be problematic.

Syo required only one, simple alteration. Tyo’s jeans had been flares, the pattern’s basic shape. Syo’s must be skinny. Yes, my seven-year-old is much more on-trend than my ten-year-old. Which probably says everything you need to know about their respective personalities. So I measured what seemed like a reasonable distance out from the midline of each ankle, drew a line that angled out to the knee, and we folded the pattern in along that line. Just in case Syo wants a pair of flares in the future (not likely, but this is how I roll). Oh, yeah, I double-checked my reduced width with the circumference of her pointed foot, to make sure she could still get her feet through. All seemed good, so we set to cutting it out.

Syo really wants to be able to sew. And cut out fabric. Unfortunately, the fabric shears
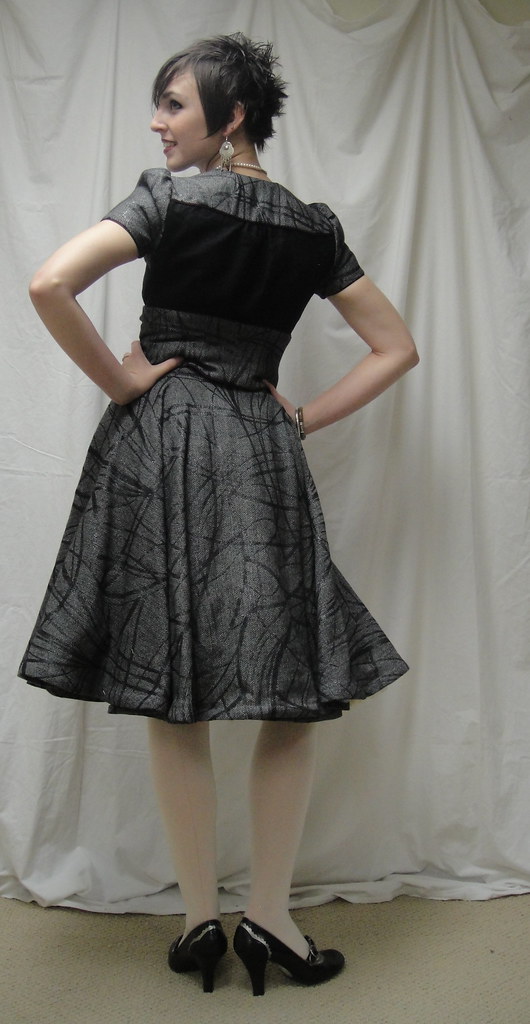
The back

are still too big for her little hands. This didn’t stop her from doing her best with the embroidery scissors on the pocket lining, and she actually did an excellent job, but man, it took forever.

Pocket closeup, with fancy stitching.

After much discussion, we settled on stars for the back pockets. The first pair I made Tyo has stars on the back pockets (stars are nice and easy to embroider on stretchy denim when you don’t have an embroidery machine and are too lazy to stabilize your fabric).

This is the first pair of jeans I’ve made since I got my serger back in order, so it was my first chance to remember to serge seams after sewing, but before  topstitching. I mostly managed this. (Note: this pattern only has 1 cm seam-allowances, so you need to serge without cutting anything off or your second row of topstitching may not catch the seam-allowance.)

I like the Guterman jeans thread; it’s not as heavy as their topstitching thread, so

Side view

doesn’t require dirty tricks to get the upper tension high enough on my machine. Still, I can tell that my newish Janome doesn’t quite have the balls of the Grand Old Dame when it comes to stuff like this. The Dame would eat projects like this for breakfast—the Janome I have to baby along here and there. And this is with really thin denim.

I only hit one hitch in the construction, when I realized I’d cut the size Q back yoke (my size) rather than the size K. I think the size K yoke piece may have evaporated… oops. Another reason why I love tracing my patterns. However, I was pretty sure the outer width of the yoke was pretty close, so I just trimmed the wide, inner portion to fit. If there is any actual difference in the size, it’s well within my usual cutting-inexactitude; the side pieces went together just fine.

Calf detail

Oh, yes, and I added in a detail on the back lower legs ripped off from some RTW skinny jeans owned by one of Tyo’s trendier friends: basically a long, thin topstitched dart with a stud at the top of it, forming a very small amount of shaping below the calf. I keep meaning to do this on jeans for myself, but forgetting as it has to be done quite early in the process. It wasn’t as hard as I thought it might be, though, though I suspect my studs are not perfectly aligned.

With the aid of Debbie Cook’s tutorial, I once again achieved near-perfect fly insertion. I actually had double-sided wonder-tape to use to stick the zipper down this time, and it was very nice indeed, although using pins instead really isn’t that terrible either. I did manage to put it in backwards (so girl-version, as opposed to boy/jeans version), but in my defense this is because I was matching the topstitching direction of the crotch to the one I’d already done on the rear of the pants, and I find it pretty much impossible to think that far ahead. The moral of this story is that I should probably construct the jeans front and fly before the back.

My straight-stitch topstitching is getting so good!

Fly... almost perfect.

My around-pocket and around-fly stitching… not so much. Perhaps I am sloppy because they’re for the kid… I’d like to think I wouldn’t wear such shoddy work.

I can’t promise anything, though. I’m pretty lazy about un-picking.

I sewed up the outer sideseams, and Syo came to try them on…

and they were HUGE.

Now, I don’t want to repeat my mistake with Tyo and make pants she’ll outgrow in three months. But these are supposed to be skinny jeans, not tapered-but-baggy jeans. I took in the side-seams by a cm on each side (so 2cm off each leg).

Better, but not perfect. Take another cm off. Hrrm. Well, maybe that’ll do. Keep in mind this is the same pattern as the other pair she’s wearing that are actually getting a wee bit tight. The only thing I can think of is that the first pair shrunk, which isn’t impossible, but I have a pair of my own out of the exact same “denim” that I’m still wearing just fine, and I promise you I definitely haven’t shrunk.

CB belt loops. Can you spot the booboo?

Putting waistbands on kids jeans is so much more relaxing than putting the waistband on a pair for me. For one thing, I use the pattern’s straight waistband piece, instead of my own contour band (coopted from the Ellen pants, if you must know). I also didn’t bother with interfacing. The only thing to remember was to put in buttons and buttonholes for the attaching of the buttonhole elastic. I did have one problem with the sizing, as my waistband wound up being too short to centre the CB seam on the back and cover the fly-extension. Maybe I’m doing something wrong with the fly extension, although what I end up with seems to be the same as what I see on my storebought jeans, so I don’t know what. Rather than fuss around, I gave in and put the CB seam of the waistband about an inch off of the true CB seam. It’s a problem, but it’s mostly covered by the belt-loops anyway.
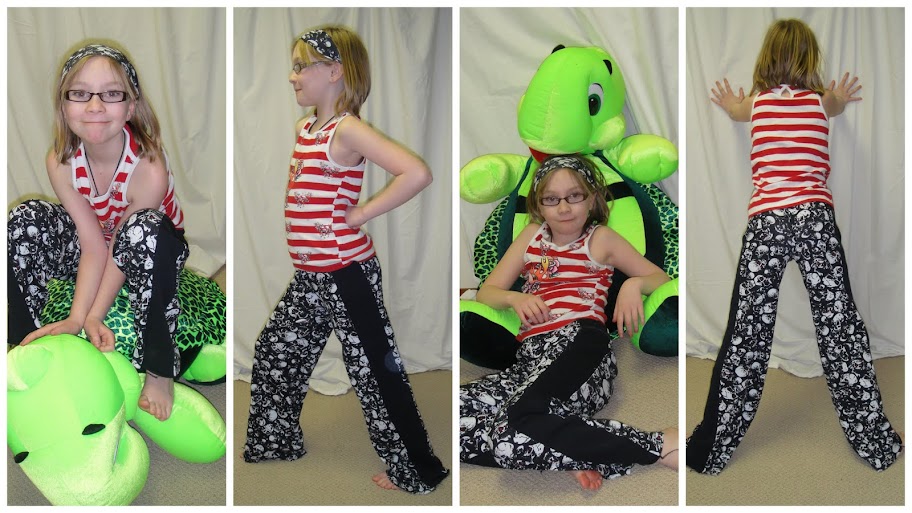
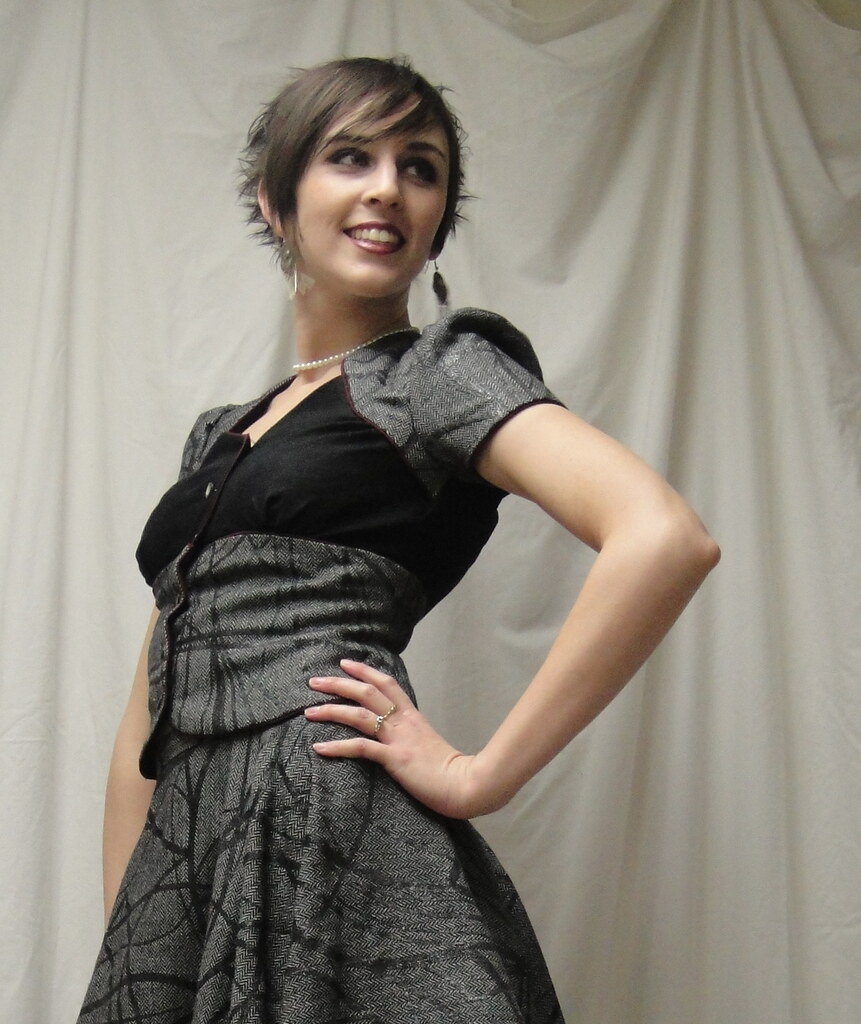
Her coolest pose.

Finally, all that was left was to hem them to an appropriate length. This is always dicey with children, and skinny jeans are even worse than flares in this department. In the end I opted for a length that would be floor-brushing in socks if they weren’t being pulled up by the front of her feet, and just folded the excess 2″ of fabric under, topstitching three times to make sure it’s well in place (this mimics the three rows of topstitching on the top of the pockets, so it’s a design feature, right?). In theory this means that when she hits her next growth spurt and grows three inches by summer, I can let out the excess length. In practice, we know this’ll never happen, but hey, allow me my fantasies, all right?

Also, Syo was very helpful in the hammering of rivets, and only hit my thumb once. And Steph, the awl from your sharp and pointy giveaway kit is divine. How on earth did I live without it?

So that’s one more project down on the “madly off” list. Which leaves, mainly, shirts for my hubby and those skinny cargoes! If I can get the neck alteration figured out for the hubby’s shirt before he abandons me, I can putter away at that until he gets back. And I think I’ll take a stab at the drafting for the cargoes this weekend, if I can find paper I like for it. I’d rather use craft paper than tissue paper for stuff like this.

14 Comments

Filed under Sewing

Oops…

Circle skirt, take two

I did it again.

Yup, despite deadlines and a myriad of other things I should be working on, I finished the corset-waist circle skirt. (Sorry, Liza-Jane… I promise I’ll get to those skinny cargoes soon!)

I used the Ceylon midriff pieces as my basis for the “corset” portion, with, obviously, a fair bit of alteration: I put the centre-front on a fold, added a sinuous side-front seam, and completely forgot to allow for overlap in the back, which is now the opening portion. Fortunately, the amount of ease you need in a blouse is considerably more than what works for corset-style waist panels, so there was plenty of room for overlap. I made my lining piece first, out of a sturdy cotton ex-curtain also used here, adjusted the fit on that, and went from there. I added notches to all the tops of pieces, which made it much easier to keep track of how they should go together.

Side view

I piped the seams on the corset portion, using a narrow off-white piping from one of my thrift store scores. Unfortunately, I only had the one packet of this and, although I measured my seams first, apparently I screwed that up royally because I didn’t have enough left for the bottom seam. So I waffled a bit and ended up adding this home-dec trim from my stash. In the past I’ve always stitched this trim on by hand, but I was lazy and machined it this time. I can’t say that I notice a difference, even from up pretty close, except perhaps that my positioning isn’t quite as exact as it might have been.

I mentioned before, I elected to use snaps as the closure here. Time will tell as to the wisdom (or folly) of this decision. Way back when I was sewing the original circle skirt, I had posted a question on PatternReview about how to insert the zipper. I got great answers, but also the suggestion of a snap-placket as a vintage-style alternative. So I determined I would give it a try on my next circle skirt.

Now, I will say, the snap-placket would have worked better in a thinner fabric. This wool is quite heavy, more of a coat weight than a suit weight, and getting even the most heavy-duty snaps through multiple layers of it was a pain in the ass. And a double-fold bias strip of the wool (so that’s like five layers!) is really, really bulky. That being said, I really like the idea, and will try it again in a more summery fabric. On the up-side, because I was using snaps, when I discovered on first try-on that there was way too much ease in the “corset” portion to hold it in place properly, it was easy to run another row of snaps up further in, instead of having to pick out and adjust piped seams or, worse, a zipper.

Snap placket (top portion). I painted the snaps with matching nail polish.

I don’t know that the snaps are ideal for the “corset” style either, though, as due to the small amount of ease they’re under a lot of strain. For now they seem to be holding—they are heavy duty, after all—but I’m not convinced they’ll make it in the long run. We’ll see. Converting it to a laced closure or something at some point would be a pain in the butt, but not impossible, I guess. (Note to self… hang on to some of those scraps in case you need a modesty panel for behind the lacing…)

As I mentioned before, I opted to pass on boning mostly as I’m too lazy/disorganized to procure any (or cable ties, either, as Ms. Slapdash so smartly pointed out). I used hair-canvas interfacing, hand-basted in place, with the “hairs” running vertically in at least some of the pieces (read: the ones where I remembered). This makes the waist nice and firm, but I can see that I might keep a smoother line longer with boning. Again, not impossible to add later if I feel the need…

So now we come to the hem. I was quite happy with my experiment with horsehair

Hem interfacing... bound and circled

braid last time, but as I mentioned before it’s a bit tricky to source locally and I’m (again) too impatient/disorganized to order online. Not saying I never will, but not for this project. So, since I still have plenty of hair-canvas kicking around, I decided to give bias interfacing a try. I measured and cut three-inch bias strips of the hair canvas. I will say, cutting bias strips out of hair canvas is much less annoying than out of regular fabric—it’s nice and stable and hardly skids around under your pencil at all. I then sewed the pieces together into a long strip (and managed to only sew two pieces on wrong-way round 😉 ) and ironed to “circle” it—just pulled it into a curve while ironing. The stuff goes incredibly soft under the seam-iron, but firms up again perfectly when it cools, which is mostly nice but can be a little tricky. I then stitched some ready-made bias-tape along the inside edge of the “circle”, stretching the bias as I went. I picked this yellow because it was the only colour I had enough of other than red. I love red, but it wouldn’t really go with this project. Cream would’ve been perfect, but I didn’t have any. (if I had, I would’ve turned it into piping for that last corset seam, anyway). And where else am I going to use six yards of yellow bias tape, anyway? (this is another of those thrift-store “scores”)

Finished hem

So now I had my interfacing ready, I basically followed the rest of Gertie’s tutorial for applying horsehair braid. The only trick was to make sure to remember to start with the seams in my bias interfacing facing up, so that when flipped to the inside they’d be hidden. Ironing the hem down once it was flipped was in some ways easier than with the horsehair braid—the hair canvas won’t melt under the iron—but in other ways harder, as the hair canvas gets really soft when ironed and I had to be careful that the seam allowances weren’t getting folded and crunched. Still, with a bit of care and pinning, I got it all folded over and steamed so that the upper and lower seams were about the right circumference.

I opted to hand-stitch the hem this time, rather than topstitching, which worked

Full skirt!

reasonably well and only took two TV shows. I’m sorely tempted to run a band or three of the same trim from the waist around the edge, but that might be a bit over the top and would take a lot more of the trim than I have kicking around. We’ll see, I suppose. 😉

So this project fits with my “spring palette,” which isn’t a formal part of the Colette Spring Palette Challenge, but is in line with a palette that I’ve been playing around with intermittently for a while now. As is demonstrated by the colour scheme of this entire website ;). The main colours are cream or ivory and a muted, dusty blue (sometimes veering towards a pale aqua), but this light, dusty purple fits right in as well. It’s not far off Sunni’s palette of choice, either, although I don’t know that I’ll be incorporating her caterpillar green ;).

Back view

I absolutely love the skirt with this blouse, though I’m thinking I’m a little old for the sheer-blouse-over-bra look. Still, fun for a photo shoot, anyway. I’ve been keeping my eyes open at the thrift store for a perfect pair of ivory shoes to go with this palette, but nothing’s really thrown itself at me yet. Light-colour shoes get banged up and turn drab so quicky, I may need to hunt around new-shoe stores… though I hate to buy new a pair of shoes just for taking photos in… /sigh.

The back closure wound up a bit bunchy, partly because of the incredible thickness of the snap placket in the skirt part, and partly because of the overlap where I readjusted the size (which i why the snaps are closer to the left-hand line of piping, not centred between the two). As I don’t have to look at it, I’m not bothered by it ;).

As to whether heavy wool belongs in a “spring” palette… well, as far as I’m concerned skirts of any kind are spring wear. Heck, anything that isn’t quilted down is spring wear. So there. 😉

Oh, yes, and since some people like to see what they look like without the fluffy petticoat underneath:


Sans petticoat

Here you go. In this particular (heavy) fabric, with the interfaced hem, it’s actually not a striking difference. I have noticed one thing about wearing the petticoat, however—it makes a skirt much warmer, as its fluffiness fills in that air-space between legs and skirt remarkably effectively. Still not as warm as pants, but much better than a skirt without petticoat.

Next up: probably Syo’s skinny jeans. Poor kid seems to have the virus Tyo had last week, although her symptoms are totally different. Those of you with children, do you ever find that? Even when we had swine flu last year, Tyo and their dad had one distinct set of symptoms, while Syo and I had another. Yet I’m sure it was the same virus—their entire school was decimated for about two weeks. Although it would be nice if I could get the alterations figured out on my sweetie’s shirt this weekend, before he goes away… I could then present him with a completed shirt or two when he gets back. (Yes, I’m going to be single-parenting for a full two weeks! Wish me well… I’ve never had to do this before. Usually it’s me bopping off and leaving him with the kids…). Also I should really make another pair of jeans (or those cargoes 😉 ) before March kicks in…

23 Comments

Filed under Sewing

Oi

Life is good. Seriously, it is. Kids mostly healthy again (and shuffled to and from more playdates and parties than anyone should get to pack into a two-day period), had a good hang-out with a girlfriend (and fabric-store trip!), and pre-Valentines dinner and a movie with my sweetie (quite enjoyed The Eagle, despite the complete absence of female characters.) while enjoying a fabulous chinook. Aside from that little looming deadline on Monday and barely having time to breathe, life is awesome.

Sewing… ehm.

Men’s shirt sewalong? zero progress. Jeans for Syo? Zero progress. Skinny cargoes? Zero progress.

What little, incremental progress has been made has been on the next circle skirt, which is slowly (I hope) moving from this:

Circle-skirt, first instar.

Towards this:

Corset-waist circle skirt

I’m actually really excited about how it’s going. But I need to finish off the closure and figure out how to hem it; I don’t have enough horsehair braid left and I pretty much cleaned them out last time I bought it, and I’d really like to try something a bit wider than the 1.5″ braid available locally. I should look into ordering online, but I’m far too impatient for this particular project. I’m thinking I’ll give bias strips of hair-canvas a try, since I have a bunch left over from the Lady Grey coat project.

Speaking of hair canvas, one of the things that had me delay making this particular version of the circle skirt was deciding what to do about the corset-waist panels. I was seriously considering boning them, but I didn’t have any boning and kept forgetting to try and pick some up. So I wound up going with piping (I think I’m officially in love with piping) and some more of that hair-canvas. I think it’s firm enough, although if I decide on boning later I can still open up the lining if I need to. I was terrified during

Hair-canvas interfacing in "corset"

the construction that it would turn out too small, but after I got the full waist-piece to a point where I could try it on, I had to add a second row of snaps (we’ll talk more about the snaps later) to bring it in. Heaven help me if I gain or lose any weight, with all these fitted clothes! Though really aside from pregnancy/nursing fluctuations, my measurements have been pretty steady since I was 18. Muscle tone and skin elasticity… well, that’s another story, but anyway.


12 Comments

Filed under Sewing

Madly off in all directions

The majority of this post was written before I spent the last two days shuffling Tyo around medical centres. Which basically means not only am I still jonesing to sew, I’m even more behind in my regular work. Speaking of Tyo, thank you all for the well-wishes for her. After urine tests, blood tests, and finally an ultrasound, they have ruled out appendicitis, so it’s most likely a virus of some kind. Which really doesn’t make her feel any better, but does mean it’s not likely to kill her. Also, since the post is a bit light on photographs due to being, y’know, pulled out of my ass, I’ve decided to take some inspiration from Karin and throw in some of my drawings for no particular reason. These are (I hope obviously) portraits of my children, sketched around this time last year, and jazzed up a bit after scanning. I miss my drawing tablet terribly whenever I try and work things up digitally these days.

Tyo in blanket

I’m feeling torn.

As usual when I have something else I really need to do (annotated bibliography on the morphologic problem in modern phylogenetics, anyone?), the sewing inspiration is strong.

I need to alter the collar band on the men’s shirt muslin—when I finally did manage to prod him into trying it on, everything else seemed okay but the collar was a good inch too small, which makes sense as his neck is a good inch thicker than the neck measurement suggested by the pattern, but I had tried a tissue-fit of the pattern and thought it might be big enough; I suspect that I “tissue fitted” the collar piece higher on his neck than the actual band sits. Fortunately for me, Tasia made this exact same alteration on the shirt for her sweetie before Christmas, so I’m in good hands (assuming I can get him to put it on again sans collar so I can mark where it needs to be enlarged). Unfortunately he gets more pleasure out of annoying me by refusing to try it on than he does from the prospect of a completed shirt. Yes, some days our relationship does resemble something right out of second grade. If I had pigtails, I have no doubt he’d pull on them, and probably put frogs in my desk.

His response to muslin pictures

Tragically, he has declared there shall be no muslin photos. Not even for purely-fitting, non-blog-disclosure purposes. (See above about how much he enjoys pissing me off. I sulked all Sunday night about this, which I think was the high point of his day.) It’s REALLY HARD to check fitting without a photo, especially when he won’t obligingly stand around modelling for hours on end. I’d complain that he’ll end up with a non-fitting shirt, but the tragic fact is that a)he’s man enough to not notice and b) if he does notice, he’ll probably feel too exposed and that he looks fat (eyeroll). The man has body-issues that make most women’s pale in comparison.

Aargh. (Actually this photo is from last summer when I was trying to get him to let me take pictures of the first shirt I made him. But the response is identical.)

This entire outfit is right up Tyo's alley. So far we've traced off the vest.

And Tyo has decided it’s time to make this vest, from the Patrones kids’ issue I got from Her Selfishness back in the summer. Frankly that whole outfit just screams Tyo. Interestingly, she’s pretty close to a straight size 8 in the Patrones sizing (whereas in the Lekala kids’ sizing she was a 6 on top and a 12 on the bottom). I’m not sure if this means that Spanish children are more pear-shaped than Russian ones, or what. Anyway, I foresee a lot of fun with Google Translate (which Tyo is apparently a master of from school… no wonder she still can’t use her dictionary*!)

But, Tyo got pants just last weekend, so it’s very clear that it’s Syo’s turn for a garment, and she wants skinny jeans. Which really shouldn’t be too bad, as I will just use the same pattern I traced off for the ones I made Tyo last spring—which Tyo outgrew by August and Syo is now wearing quite happily with the aid of a small amount of buttonhole elastic in the waistband. Altering the legs for the requisite skinniness, of course. Both of them grew 2″ last fall alone, and the mass of jeans Syo came home from summer vacation with are all too short. So I just have to decide which of the two pieces of stretch denim I have in stash I want to sacrifice for children’s clothes. Maybe the black, as there’s masses more of it at Fabricland on 2-for-one right now…

Syo portrait

And then there’s the circle skirt I started cutting out on Sunday during my sulk (see above about men). I want it to have a much cooler waistband than the first version I made, which is just a straight band-at-the-waist that does absolutely nothing for me.

Skinny cargoes

And that’s without Amber’s inspiration for knocking off these “skinny cargoes”. Yoshimi did an awesome version a few months ago, too. Amber used the Ellen pattern, which I’ve used before but gives a rather different look as it’s not made for a stretch fabric. I’d like to re-draft my Jalie jeans and try it with a stretch denim. I’d have get rid of the back yoke, add in the front and back seams (what a great opportunity for butt-shaping!), and decide if I need to muslin since there’s really not much option for fitting if you have to sew up the outside seams first (which you would to put the pockets over them, I would think). Also, wouldn’t some teeny little cargo pockets on the butt be the cutest thing ever? (Ok, on my butt, which needs all the help it can get.)

And that’s without talking about the finished versions of the man’s shirt, which I have to do to get him to let me photograph him at all (grr!), or the other Patrones shirt I’d love to make for Tyo, or the second little coat for my younger niece…

must go do real work… must go do real work…

*My kids are educated in French, in case that comment was confusing to anyone. Vive la difference!

8 Comments

Filed under Sewing

I, Tanit-Isis, of Tanit-Isis Sews,


Self-Stitched September

… do solemnly swear I am up to no good…

oh, wait, wrong narrative.

As if you didn’t know, Zoe is starting it again.

I, Tanit-Isis, sign up as a participant of Me-Made-March 2011. I endeavour to wear exclusively self made items (excepting underwear, socks, hat/gloves/scarves, and possibly sweaters) each day for the duration of March, 2011.

I’ve been doing the one-me-made-item-per-day thing pretty much successfully since August, but Self-Stitched September, while successful, was a bit boring and repetitive. I can’t promise completely that this will change this time ’round, especially since most of my recent creations have been pretty, ah, whimsical, and I spent a lot of the fall making coats, which takes a lot of time for comparatively few garments, but I’ll give it a try and it’ll give me a bit more of a prod to wear the circle skirts and 70s dresses out and about, and with luck the weather will even be cooperative for this by then. If I’m smart I’ll whip up another sweater or two before then (maybe even that smaller shrug I was talking about), since I still only have the one wrap, and I accidentally snipped a little hole in it while I was making my last pair of jeans (cry!). But this time around I should have my jacket situation all stitched up, at least.

March will also mark my first blogiversary, believe it or not. I’m kinda amazed by how many of my favourite blogs out there are similarly new (and often wildly more successful, though I’m pretty happy with my little corner here and should thank you all more often for your visits and your delightful comments. Comments are my crack.)… I wonder if it’s a sign of the explosive growth of sewing blogdom, or an indication of the short lifespan of blogs. I’m hoping the former ;).  It seems fitting to pass the month of my blogiversary stretching my “wear my sewing” muscles again :).

… And we just spent five hours in the Urgent Care unit failing to find out if Tyo has appendicitis. Bleargh. They want to see her again in the morning, assuming she doesn’t get sicker overnight, in which case we have strict instructions to hightail it to the Children’s Hospital. So, er, yeah, no sewing happened today…

18 Comments

Filed under Sewing

Oooh, a goodie!

Sew and Save by Madeleine Hunt "The Key Book to Professional and Home Sewing"

My mother, in her assiduous trawling of the charity shops in my home town, stumbled upon this gem of a book, published and distributed by a local sewing school in 1953! It appears to have been the textbook for their course, which was available at least in part by mail as there is a note concerning a charge of $.50 to $1.00 plus return postage for correcting each assignment.

Assignment one included making samplers of tucks, pin-tucks, lapped tucks, gathers, gathered darts, and corded shirring. Assignment two was samplers of a shirt-waist collar, a plain sleeve, a hem with seam-binding, and a zipper at the side of dress. Obviously the target audience was not the novice seamstress, but the home sewist with ambitions of improving her craft.

Topics include fabric and style info (including non-washing-machine methods for pre-shrinking fabrics… apparently only linens and white cottons should be boiled; other cottons should be soaked in warm water, not wrung out, and hung to dry still folded). There’s an extensive section on fit (actually, about four separate sections… the layout is a bit confusing), with a large emphasis on pattern measuring (sensible since muslin-making was impractical and frowned on); at least fifteen different kinds of seams. Also a (short) section on lingerie, and a much longer section on sewing for children, with such highlights as “How to Dress the Stout and Slender Child” and “Styles to Suit a Stout Little Girl”.

I’ll post more once I have more of a chance to go through it, but I couldn’t resist passing on this princess-seam FBA (also suitable for a rounded back), which is a bit more free-wheeling than the Palmer-Pletsch method I’ve usually seen (not that I’m any kind of expert).

FBA, c. 1953

And also, this full-bicep alteration, which I know for a fact I’ve seen out there somewhere, but can’t for the life of me recall where.

Full biceps adjustment

And it begins with this lovely admonishment:

You are judged by your Appearance!

Dontcha just love the fifties?

If I were ambitious and dedicated, I’d do like Gertie or Megan and take up the challenge to sew my way through the course. I don’t think that’s going to happen. Sorry. But I will pass on whatever gems I do find! 🙂

11 Comments

Filed under Sewing

MEN!!1!!!

Butterick 3364 muslin---waiting to be fitted.

I ask you, people, if YOU had your very own personal, dedicated seamstress/sex-slave (oops, did I type that out loud?)  in YOUR house working her poor little fingers to the pin-pricked bone to make you a muslin for a dress shirt with your EXACT FAVOURITE details—band collar, no pockets—fitted to your exact, freakish body, just waiting to be translated into an array of final fabulous fabrics… would you be snoozing on the couch all afternoon while the light fades away? When she actually finished the muslin the NIGHT BEFORE, and you refused to try it on then… and again this morning when you got up… and now it’s almost suppertime and you’re still refusing?!?!

Honestly! Why do I bother again?

… oh, yeah. I’m insanely, madly in love with him. And he’s going to look HAWT in this shirt.

Doesn’t mean I have to like it, though.

I think I’ll go make myself another circle skirt.

Men!

30 Comments

Filed under Sewing

Skully Pants and Sleevy Plackets

Tyo’s pants may now be unveiled! They still need hemming, but taking photos before hemming is practically a tradition around here…

Tyo's Skuly Pants. Poses by Tyo. Guest appearance by Slimer the Turtle.

And, y’know, they turned out ok. Especially considering my various screw ups (the original drafting, and then pinning the two edges of the fronts together instead of front-to-back and not noticing until Tyo had it all sewn up…)

Tyo did all the sewing, on the serger, except for the elastic casing, which I sewed in a stretch stitch on the regular machine. She was really unsure and irregular to begin with but by the last few seams she was getting much more consistent and steady. She threaded the elastic into the casing, too.

May I just say I detest this skull-printed fabric? It’s a thin, stretchy cotton rib-knit with no recovery, and the printed pattern is not as stretchy as the fabric, so it’s already looking worn and crappy anywhere that gets a bit of stretch.

In MPB Sewalong News

Shirt plackets: the ugly truth

I sewed my plackets! Urg. This is the kind of precision sewing I normally resort to hand-sewing to deal with, but obviously that’s not quite appropriate here. I tried using my blind-stitch foot for the topstitching the first time, as it has a keel that theoretically should help guide the stitching. I say theoretically because it’s mounted on a screw and doesn’t stay in place. Ever. Second attempt, I reverted to using my rolled hem foot, of all things. Something about the way the toes of the foot are positioned (not the roll part) works really nicely for guiding the fabric for perfect edgestitching.

Er.

This is me we’re talking about. Perfection and precision are not my strong suits.

I used washable glue-stick to try to hold the triangles in place, which worked better than pins, and might’ve worked better still if I had the patience to let it dry for a few minutes before sewing. I wonder if making a template to press the triangle top around would be worth it…

I made the row of stitches crossing the placket run just above the funny folded part on the inside (bottom right picture), but a quick inspection of my hubby’s RTW shirts shows that they run the stitch about 1/4″ below this. Will keep this in mind for the next version.

Testing my fabric marker

Also, I decided to test out my blue disappears-in-water marker. I’ve heard horror-stories about these before (especially if you press the ink), so I’ve been pretty skeptical about it and haven’t actually used it until now. Well, the fact that it’s a fine-tip and doesn’t really mark most of my fabrics well didn’t help.

Anyway, here you can see on the top, the plain marker, and the bottom which I wrote and then ironed over (with heavy steam on maximum heat, my typical MO as long as the fabric will take it.) Interestingly, even the steam seemed to start to lighten the markings, which could be annoying.

Took the piece to the sink, add water, and—voila!

Just add water!

Anyway, that’s enough for tonight. Tomorrow I will get the yoke sewn up and maybe even rope my hubby into a fitting if I’m extremely-extra-lucky. And Syo is agitating for a project she can help with, so if I’m extra ambitious maybe we’ll start on some skinny jeans for her, as she’s been begging for a pair of those since last summer.

Speaking of Syo, we must keep the post balanced, so I will leave you with:

Syo---yes, she knows exactly how cute she is.

15 Comments

Filed under Sewing

Bits ‘n Bobs

Men's shirt pieces

As usual, the during-week sewing is scant and slow. I did manage to cut out my mens shirt muslin, as the long-awaited MPB sewalong is finally under way. I’ve marked (a lot more than I typically do), with my “allegedly disappears with water” marker, and interfaced half the cuffs and one of the collar bands. I am not going to interface the front button placket, as per discussions with the Sewista Fashionista. I can’t wait to start sewing, but I guess I should keep in step with the sewalong. I’m not doing pockets (today’s post) but maybe I’ll take a stab at the sleeve plackets. Or not, as I’d kind of like to hear what tips the other sewalongers have for them (and if any of the allegedly fabulous Negroni instructions for this area get passed on). I’ve only done continuous lap plackets before. Grum. Maybe I’ll prep the collar band or sew up the yoke (since I now know how to do that!)

I’m still up in the air over whether to bother with flat-felled seams on this one. On the one hand it’s a muslin and if I do need to make fitting changes it’d be much better to not have the seams felled. On the other hand, I could probably use as much practice as I can get my hands on, right? Blargh.

Tyo and her skull-print fabric

Just to keep me on my toes, though, Tyo decided to pull out the skull-print knit she picked out back in the fall. Apparently it needs to become a set of lounge pants. Unfortunately, I haven’t got a pattern for these. Well, how hard can it be to make one up? Just a narrow set of pantaloons, really, right? In a knit, no less.

Er. Well, I should’ve cut them wider. I forgot to add in width for the crotch. I should know better by

Tyo, cutting out her pants.

 now. Sorry, kiddo. The good news is we’ll add in strips up the outside of the legs and they will look just fine. Intentional even. It’s a design feature, dontcha know? The bad news is she managed to cut one of the strips in half while she was cutting it out. Kid’s got talent, I tell ya. Hopefully there’s enough of the insert fabric (we’re using the remnant from my Kimono Lady Grey) to cut another one…

I did make her sew the crotch seam (on the serger, no less) and will be putting gentle pressure on her to do the rest herself as well. Well, as independently as Tyo does anything, anyway. I suspect the hemming and possibly the elastic casing will fall to me.

Can I blame it on the fact that I was trying to measure Tyo and “draft ” the pattern while cooking supper and supervising Syo, who decided she should cut up the chicken for last night’s supper*?

Oops. Too narrow.

Hmm, in hindsight, I think there probably is a kid’s shorts or karate-gi pattern in the basement that would have a basic, unfitted pants-type-pieces.

Aaargh.

*I hate to discourage her, as the only person in the house who seems to actually enjoy cooking. I have visions of my children turning into culinary geniuses who get home from school, throw me out of the kitchen, and emerge two hours later with a three-course sit-down meal. No? Hey, a girl can dream.

11 Comments

Filed under Sewing

The Ceylon Blouse

The Ceylon Blouse

So, before committing to the entire Ceylon dress, I figured I would try and squeeze just the bodice out of various scraps I have lying around. The nice thing about this bodice is it’s in so many little pieces, almost any little scraps will do. I wound up using (some of) the rest of the swirly-print herringbone wool and a bit of black linen I picked up at the thrift store ages ago that was really too small for almost anything. Well, obviously not since I managed to line the entire blouse with it.

Now, I have a bit of a propensity for colour-blocking, and when you combine that with

Ceylon with suitcase. Why? Cuz.

the almost bolero-looking cut of of the Ceylon yoke, well, it was bound to happen. I opted to do the sleeves, yokes, and midriff pieces out of the wool, with the “blousy” pieces in between just out of the black linen. Since I didn’t particularly want the wool against my skin, I decided to line those segments with more of the linen. And, since something about Ceylon almost demands it, I opted to pipe, as well. It adds a nice touch of colour to an otherwise grey-and-black garment.

On the upside, this gave me lots of new techniques to try. Making my own piping (I used dark-red bias binding and some dense wool yarn, both from stash*), and using piping period  (I followed this lovely tutorial). I got to try the “burrito technique” of attaching a double-layered back yoke so the shoulder and bottom yoke seams are all nicely enclosed. Worked like a charm :). I also tried a technique for clean-finishing facings I just read about from Beth of Sunny Gal Studios. which was nifty and makes a super-nice finish; then this morning I get up and discover a recent post by Pam Erny for a very similar finish, but with less bulk at the seam (although hers leaves some of the interfacing showing on the visible side of the facing—which could be undesirable depending on how attractive your interfacing is.) Oh, yes, and a massive, massive amount of seam-grading.

My construction order was a bit haphazard and very different from that given in the pattern, but between the piping and the lining (everything but the mid-back and bust pieces) it’s possibly the most nicely-finished garment I’ve made yet. The piping was actually fun, and a wee bit more forgiving of minor variations in my stitching than I had feared it might be. I did end up hand-stitching the lining of the sleeves to the bodice and the upper seam of the midriff-pieces lining, making for absolutely  ever seam in the piece being enclosed.

I took a crapload of construction pics, but really I think the posts I linked to above cover most of the techniques, so I will just give you a gallery of them to browse through at your leisure. Feel free to ask questions, tell me I’m on crack, etc.

Ceylon Blouse

Buttons are funny things. As construction proceeded to the point where I could start to try on the shirt, I became convinced that it was way too small, that I had completely misled myself into selecting the size 0, abetted by the give of my flannel muslin fabric. The linen, by contrast, had no give at all, and I was sure the resulting blouse was going to be, if not outright ridiculous, at least far too constricting for comfort.

It wasn’t until I had the buttons attached and could try it on normally that I felt at all relieved. It is very snug, and more restrictive than I’d like for everyday, but for an “occasion” dress it’s fine. The sleeves are about as narrow as my arms could comfortably take, but don’t make my hands go numb or anything, and the shoulder width looks good. I’m very glad I tweaked the shape of the front yoke right beside the neck, and lowered the neckline 1/2″.

Ceylon blouse, back

I did manage to remove the wrinkling at the back midriff by flaring out the upper portion of the midriff a bit more (at both CB and side seams). Curving the bottom of the main back piece so it is shorter in the middle worked perfectly to reduce the excess blouseiness (doubtless I took off a bit too much, again, for my different fabric). As to those diagonal wrinkles, well, we’ll see. I think I begin to understand the fix Sherry was suggesting for them, but I’ll have to give it a go on another project.

The bust doesn’t sit particularly nicely, partly because there isn’t enough ease and partly because of the fairly crisp fabric. I would venture to say it fits about as well as in most of the other versions I’ve seen of it, though, which I suppose is good enough. There’s still some gaping on the left side top, which I suspect is the result of my left breast being smaller. It’s not such a big difference that I usually notice, but this style seems to emphasize it. Fortunately I was mostly able to compensate for it by clever positioning of my buttons—the topmost is considerably to the left of the rest of the row but you can’t see that when it’s closed.

And one more time...

So all in all, it was a great learning experience—lots of new techniques and construction to think through. Next version I make I will have to do some serious considering about sizing and my fabric and where I want to wear it—if it’s a crisp, firm fabric and I want to wear the dress every day, I should go up to the size 2 (possibly with SBA, probably with shortening in the upper torso). If it’s a soft fabric with some give, or a stretch woven, I could probably make the 0 again.

I do feel like I should apologize to Sarai, Colette’s designer, though. Everyone raves about her instructions, and they are lovely—I just haven’t ever followed them yet.

More photos in the Flickr Gallery

Whew! That was a lot of sewing for one weekend! And I still have to finish tracing off my pattern for the men’s shirt sewalong…

* Yes, despite the fact that my knitting education was highly truncated and I have never so much as learned to cast on, I have a yarn stash. I have even, as I think I once confessed to Sigrid though I can’t find the comment now, been known to buy souvenir yarn while travelling. In my defense, it’s not a large yarn stash, and some of it has proven useful in dance costuming over the years… but, er, yeah.

47 Comments

Filed under Sewing