
Tyo’s pants may now be unveiled! They still need hemming, but taking photos before hemming is practically a tradition around here…
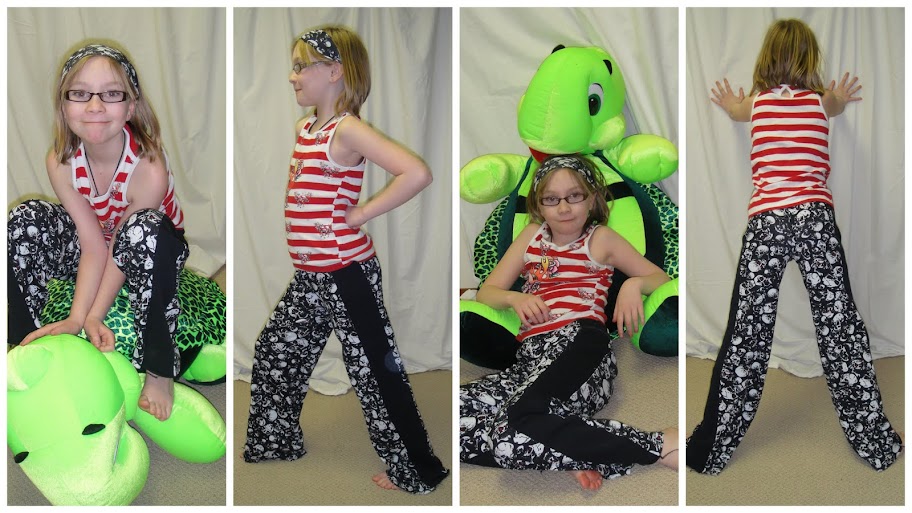
Tyo's Skuly Pants. Poses by Tyo. Guest appearance by Slimer the Turtle.
And, y’know, they turned out ok. Especially considering my various screw ups (the original drafting, and then pinning the two edges of the fronts together instead of front-to-back and not noticing until Tyo had it all sewn up…)
Tyo did all the sewing, on the serger, except for the elastic casing, which I sewed in a stretch stitch on the regular machine. She was really unsure and irregular to begin with but by the last few seams she was getting much more consistent and steady. She threaded the elastic into the casing, too.
May I just say I detest this skull-printed fabric? It’s a thin, stretchy cotton rib-knit with no recovery, and the printed pattern is not as stretchy as the fabric, so it’s already looking worn and crappy anywhere that gets a bit of stretch.
In MPB Sewalong News

Shirt plackets: the ugly truth
I sewed my plackets! Urg. This is the kind of precision sewing I normally resort to hand-sewing to deal with, but obviously that’s not quite appropriate here. I tried using my blind-stitch foot for the topstitching the first time, as it has a keel that theoretically should help guide the stitching. I say theoretically because it’s mounted on a screw and doesn’t stay in place. Ever. Second attempt, I reverted to using my rolled hem foot, of all things. Something about the way the toes of the foot are positioned (not the roll part) works really nicely for guiding the fabric for perfect edgestitching.
Er.
This is me we’re talking about. Perfection and precision are not my strong suits.
I used washable glue-stick to try to hold the triangles in place, which worked better than pins, and might’ve worked better still if I had the patience to let it dry for a few minutes before sewing. I wonder if making a template to press the triangle top around would be worth it…
I made the row of stitches crossing the placket run just above the funny folded part on the inside (bottom right picture), but a quick inspection of my hubby’s RTW shirts shows that they run the stitch about 1/4″ below this. Will keep this in mind for the next version.

Testing my fabric marker
Also, I decided to test out my blue disappears-in-water marker. I’ve heard horror-stories about these before (especially if you press the ink), so I’ve been pretty skeptical about it and haven’t actually used it until now. Well, the fact that it’s a fine-tip and doesn’t really mark most of my fabrics well didn’t help.
Anyway, here you can see on the top, the plain marker, and the bottom which I wrote and then ironed over (with heavy steam on maximum heat, my typical MO as long as the fabric will take it.) Interestingly, even the steam seemed to start to lighten the markings, which could be annoying.
Took the piece to the sink, add water, and—voila!

Just add water!
Anyway, that’s enough for tonight. Tomorrow I will get the yoke sewn up and maybe even rope my hubby into a fitting if I’m extremely-extra-lucky. And Syo is agitating for a project she can help with, so if I’m extra ambitious maybe we’ll start on some skinny jeans for her, as she’s been begging for a pair of those since last summer.
Speaking of Syo, we must keep the post balanced, so I will leave you with:

Syo---yes, she knows exactly how cute she is.


She’s so cute! Awesome photos!
For the sleeve placket, I made my stitch length slightly shorter which helped a little. Also my fabric had stripes, so I sewed along the stripe lines wherever I could, which made the stitch lines straighter. They’re tricky! Your second attempt is looking pretty nice, which only means good things for the 3rd and 4th. 🙂
I agree, your second attempt looks much better and you will continue to improve. Your fabric looks pillowy which is why you’re having problems with those little triangles.
I wouldn’t fuss with all those attachments that aren’t working so great for you. Can you use the inside of your zigzag foot as a guide and eyeball it? That might be easier.
Anyway, those are not bad at all and who’s going to closely inspect your sleeve placket anyway?
The rolled hem foot works the best, oddly. I use it for topstitching on my jeans, too.
Thanks for the tips. You’re right, no one looks! I certainly never had until I started this.
Tyo has the modelling bug! So hilarious and cute. And good save on the lounge pants.
Ugh! Plackets aren’t fun, but they do get easier. You’ll have them mastered in no time though, I’ll bet. 🙂 The kiddos are too cute, and good save on those pants, I bet she wears them out since she sewed them herself. 🙂
If that is only your second placket – it looks great to me! The way I sew these I need to run the stitching above the funny folded inside bit to hold it in place so it doesn’t fray out.
If you ever run out of modelling position ideas, Tyo looks like she has a few up her sleeve! It’s great you are teaching her to sew, and that she wants to learn too.
I think it’s great you are sewing with your daughter-it is a fun way to spend mother daughter time. The pants look great!
I found top stitching the plackets a little tricky as well, only because there’s such a bulk of fabric underneath! But I went very slowly and managed a semi-straight line.
I think I have the same blue marker as you, it’s always worked well for me, never had a problem with the colour washing out.
Kudos to Tyo for sewing her own pants, that’s AWESOME! Hopefully this experience will have a lasting effect. 😀
both your daughters are ADORABLE! good luck teaching them to be culinary geniuses; but if it works, let me know what you did 🙂 the plackets are definitely improving, and as you said, no one looks at the inside 🙂
Well, yesterday they “made” the fries to go with our burgers… Opened the freezer bag, spread them on the pans, put them in the oven (without burning themselves!). Doubtless it will all go out the window as soon as they’re of an age to cook without supervision, sigh….
That topstitching is the hardest bit, for sure! but your second attempt is looking good!
btw, re snipping yarns on planes, I thought I’d let you know a brilliant comment on my post suggested using a dental floss packet, which is pure genius!!
What an excellent idea! Now my brain is at peace 😉
Excellent Tyo sewing. (and excellent way to ensure that not-the-best fabric is completely worn out, must use that tip for the erky camo fabric my mum’s neighbour gave me that the kids think is very cool)
I have made a lot of plackets, and still get the book out every time. There is no getting away from that nasty precision requirement. Not my cup of tea either, and my bloke rolls up his sleeves, so everyone sees the inside, even if they don’t notice it. I think your fabric might be making it a bit harder though, cotton shirting is easier than something with a bit of loft.
I laughed at your comment about the chips. Cooking oven chips is an essential survival skill, ask my teenagers.
I have a few air dry markers as I tend to mark at the last minute so I don’t mind that they disappear overnight. They have the same problem with the fabric sometimes not taking the color well, or the tip is not full of ink. I too am leary of the water markers as they work, work, work and then on one piece of fabric they will stain. I’ve taken to testing each time I use one. I’ve yet to see a pattern behind their fickle performance.
Pingback: An edgy little vest | Tanit-Isis Sews