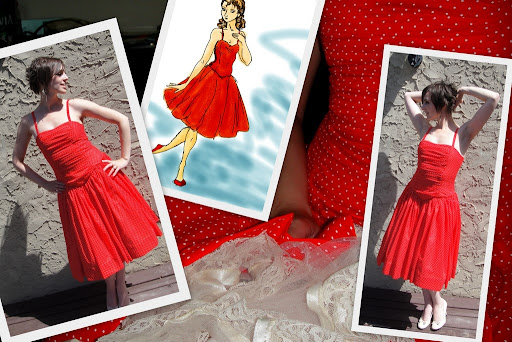
Category Archives: Sewing

McCall’s 3415: Pride, fall, yadda, yadda

McCall's 3415

I am feeling summery-dressy.  What better way to move on to my next sundress triumph than to finally get around to the lovely McCall’s 3415? I love this pattern so much—the sleek line, empire waist, CF seam. The high, round-neck version is my favourite. And I just happened to have this fabric perfectly matching view C on the pattern envelope. I pulled out the pieces, did some quick tracing, pin-fitting, and even made up the bodice-lining as a kind of muslin to check the fit. Everything looked good.

What could go wrong?

Those of you with keen eyes may have noticed that this pattern is Misses’ size 10. Most of the 70s patterns I’ve made up to now have been a size 12.

Now technically both my bust and hip measurements are in between these two sizes, and I’ve read advice that when choosing a size from the big 4, if you’re between sizes, go with the smaller one. And with the few modern Big 4 patterns I’ve made for myself (hmm, that might actually only be one) I’ve ended up with the 10. But 12 seems to be a more common size in the single-size vintage patterns that have thrown themselves in my way, so I’ve often gone with that, and, at least for Simplicity, have my alterations pretty much worked out. The addition of a padded bra to bring my bust up to the official size-12 range, and I’m good to go.

I’m not nearly so clear for McCall’s patterns, having only made up one for myself, and that one being basically unfitted. And a size 12.

Pockets

Still, when you’re using $2/metre thrift store fabric, you can’t really justify much in the way of muslining. So off I went. I liked where the under-bust seam was falling, so I didn’t petite the bodice. I did do a small swayback alteration in the back, but that was all. I blithely added side-seam pockets, even remembering to interface the front side seam allowance (a tip from the Marcy Tilton book) so they don’t bag out. The bodice is intended to lined, with lining and shell cut from the same pattern piece. This is of course just asking for the lining edges to roll out, especially as it would be pretty near impossible to understitch those narrow parts around the neck, and I wasn’t feeling up to painstakingly making a lining piece taking into account turn of cloth, so I went with my old standby: piping. Yay! Is it possible for a wardrobe to have too much piping? We shall see…

Piping and button-loops

The pattern instructs you to use hooks and eyes for the non-overlapping closure at the back of the neck. I’m not a fan of hooks and eyes generally, and this definitely seemed a little flimsy (not to mention Becky Home-Ecky), so I made little tiny spaghettie strap button loops. I cut them on the bias, used the bobby-pin method to turn them, steamed and stretched and ironed the crap out of them until they were as skinny as I could get them, and I think I’m in love. I’m also a little astonished I was able to find a bobby-pin in my house, but anyway. The cute little buttons are from the stash, and probably are of a similar vintage to the pattern, if not older.

Zip

And then I got it all stitched up, minorly flubbing the invisible zip because I was too lazy in the zone to re-read Sherry’s tutorial. It’s okay, not great, and I did have to rip to re-position the waist seams so they matched.

And then I made my worst mistake yet. I tried it on.

hmm

Oops. Ok, so it’s not totally, totally awful. The bodice is pretty much perfect, barring a small amount of gaping at the sides that probably has more to do with my poor fabric-handling technique than anything else. But that is, ah, a wee bit MAJORLY tight through the hips. And there’s the wrinkling in the back. And a bit of gaping over the pockets, probably to do with the tightness in the hips (the Marcy Tilton book also discusses the amount of ease you need to have side-seam pockets in a skirt, and I’m pretty sure I don’t have it here. Also the side-seam swings back, suggesting I need a bit more booty room. This is, shall we say, a bit unusual for me.Hmm.So, depending on how you squint your eyes, I did one of two (possibly three things wrong. Arguably I should have shortened the upper part of the skirt to accommodate my short waist, which would basically bring up the wider part lower down to where the width is needed. Alternatively, slashing and spreading to widen the skirt from waist down would’ve done much the same thing. For fun, I took a tuck with a bunch of pins.

Pin-tucked

I didn’t do as good a job pinning up the back (it’s tricky with the zipper) but I think that’s a definitely improvement in the front. The side-seams are still pulling back a bit, though, which I think means that more booty-ease is still needed in the back.

All of which is fascinating, but doesn’t help me save the dress’s current incarnation. At this point I’m considering removing the pockets and just making the side-seam as small as I can, but since I already serged the seam this won’t increase it by much. Maybe enough to at least lose the worst of that stuffed-sausage look, though… Alternatively I could try an add a godet at each side-seam, but that seems risky, too…

19 Comments

Filed under Sewing

More thrift-store fun

Thrift-Store Pattern Fun

I’ve had a little bit of luck at the thrift stores in the last little bit I thought I’d share, for lack of sewing since I currently have no kids at home to keep me from spending LONG days at the office.

While home last weekend I went shopping at Value Village with my Stylish Sister-in-Law. (I have two sisters-in-law, the stylish one and the crafty one. I have hopes of getting both of them sewing, although it’s a bit tricky at this remove.)

While Stylish scoped out the summery dresses, I did my requisite scope of the fabrics, but (fortunately) found little to tempt me. There was a piece of what I think must be someone’s home attempt at shibori. Sadly, though, it was very narrow and, frankly, looked kinda like what I think shibori would look like if I tried to do it at home in my kitchen—the basic technique was definitely there (the silk was still wrinkled where the threads had been releashed), but the overall pattern was uneven and generally meh. And it was expensive (by thrift store standards, not by shibori standards), so I left it. I also walked away from a fairly comprehensive-looking Simplicity sewing book, chanting to myself: “someone else needs it more… someone else needs it more.”

I did not fare quite so well in the old-patterns section. I walked away with the above bunch, probably none of which I really need. But they are so cute…

"New" desk for sewing machines.

On returning home and setting up my featherweight, I realized that the compromise of setting my machines on the end of the cutting table, which was barely adequate for two machines, was not going to be at all functional for three. So I had a mission. I needed a desk for my machies, preferably with plenty of drawers. I generally don’t like shopping at Value Village for furniture, as most of what they have in that department is pretty depressing, but for something that just needs to be functional and inexpensive, I figured it was a good place to start. After all, it’s going to be keeping company with my alley-salvage cutting table.

Happily, I found this blue desk. It’s real wood construction, quite sturdy, and has big drawers. It’s pretty nicked and beat-up, but I think it will serve its purpose nicely. Also all those drawers have considerably relieved the pressure on the stand of drawers holding my notions. I still need something more for the patterns, though.

While I was thrift-trawling, though, I couldn’t quite resist a couple more sewing books, one by Sandra Betzina, another by Marcy Tilton, whose name I think I’ve heard before.

No Time to Sew---Sandra Betzina

I have to admit, on closer inspection I’m not super thrilled with the Betzina book. It’s basically a wardrobe/style guide with sewing suggestions. There’s probably some good techniques and suggestions buried in there, but let’s just say that my idea of a stylish wardrobe and Sandra Betzina’s idea don’t have much in common beyond both being made of fabric. Exactly the wrong kind of dated.

Easy Guide to Sewing Skirts---Marcy Tilton

I’m much more excited by the Tilton book. It’s about making skirts. I know, you never would’ve guessed. There’s lots of detail, from beginner tips on fabric to a fairly comprehensive fitting section to some more couture finishes, and a lot of discussion of which techniques are suited to which fabric types, which I like. Not all the techniques are exactly what I would use, but then I don’t know everything so maybe I should give them a try. Lots of tips on the finer points of finishing waistbands and vents and things (although not on lining a vent!)

Oh, and the Featherweight is fixed. Or rather, I am even more astonishingly clueless than I thought I was. Oona nailed it—when I replaced the needle after the break, I put the flat side to the right instead of the left. Apparently, like threading from right to left, this is a Big Deal for Feather.

*headdesk*

Well, colour me embarrassed. Especially since I had swapped in and out several needles BEFORE the one I broke, making sure the Singer ones were the same as my regular ones. Apparently all those times, I managed to put it back in properly by pure accident, while this time, when I was actually paying attention, I got it wrong. Five or six or ten times.

ANYWAY. She’s working happily again, albeit somewhat dripping in oil from all my attention. I’ll get her figured out yet…

19 Comments

Filed under Sewing

Cream Spice Capris

Cream Capris

I love that I was able to take these photos at 10:00 pm at night, outside, without a flash. Now if that doesn’t scream summer, what does? (This is where someone who’s from the real “up north” chimes in with a comment about the midnight sun. /envy.)

Superfluous shot

So, the capris are done. And they are fun, although as usual there are a couple of issues (beyond my indifferent topstitching). The biggest one is simply the fabric—although a lovely and stretchy cream denim colour, and heavier than some of the jeans I’ve made, the fabric is a bit thin for jeans. Meaning while it stretches nicely to fit, it, ah, hugs all the lumps and bumps rather than smoothing them. When you add portions like the pocket and the rear yoke, that don’t stretch nearly as much, it also creates a few lumps and bumps that wouldn’t be there all on their own. Tucking in tops CAREFULLY and choosing the right pair of underwear are also going to be important (VPL in jeans, who knew?)

Other than that and the Featherweight Tragedy, I’m pretty happy. The piping is nice, the wonky topstitching is fading from memory (fortunately it’s on the butt where I don’t need to look at it), and I finally remembered to make my belt-loops wide enough for all my belts (although it’s the narrow one I’m wearing in the photos).

Rear View

If I were to do it again I would place the pockets higher or make them a little taller. The dip between the petals in the top eats up a surprising amount of space, both visually and practically.

Front view

I like it with the cuffs turned up. Although, the non-stretch lining of the cuffs doesn’t interact especially well with the stretch denim when putting these on. we’ll see how that goes.

Centre-Back belt loop

I put a lot of strain on my belt loops, especially at the centre back, so I like to elaborate them in some way. Often I use three instead of just one at the CB. This time, I made one giant one with piping on both sides. I just piped both edges and topstitched to keep the bias on the inside. Super easy, and a nice finish to boot.

Belt-loop and button

For the other belt-loops, I wanted them more narrow, so I put piping on only one side and just folded the other side under and topstitched.

Vintage buttonholer buttonhole!

This is the first truly successful jeans buttonhole I’ve done—made with the vintage buttonholer and one of my new templates, the short keyhole. It’s the perfect size for the jeans buttons I have (which are admittedly a little wimpy. One of these days I’ll order some genuine good all-metal ones. /sigh.) I will note I find it quite odd that when sewing straight lines on the Janome with heavier thread, I have to turn the tension way up (and often do some other jiggery pokery) but then when zig-zagging I have to turn the tension way down.

You can just about see my neat feature on the fly where I had the two lines of topstitching criss-cross halfway down. This has nothing to do with the fact that my zipper was placed a little too far out from the centre front and couldn’t make the stitch line right where I wanted. Nothing at all… (I find it interesting that some people, who are following the exact same tutorials I do for fly zipper insertion, find that their zipper is still too close to the CF line and tends to gape. I have the opposite problem, with my zippers ending up tucked too far under the fly and often interfering with my ideal topstitching line (the Jalie pattern doesn’t leave you much room for error in this, either, as there’s not a huge fly extension).

Fun pants!

This pink thread is Coats & Clack Heavy Duty XP Dual Duty, or something like that, not the super-fat Guterman topstitching thread. Janome actually likes it fairly well, meaning all I have to do it turn the tension way up, not some of the other finnicky workarounds I’ve come up with for the topstitching thread. But for some reason it all goes whack when zig-zagging—whether with the buttonholer (in which the machine is still set on straight) or the zig-zag stitch. Featherweight handled either flawlessly, although she needed a bit of a tension boost too.

Featherweight afficionados, I have a question: I have generally been advised to use regular thread in the bobbin with my topstitching thread up top. Despite the annoyance of winding extra bobbins, there are times when it would be nice to have topstitching thread on both sides (turn up cuffs, come to the front of the class). Also I can’t help but think it might be sturdier (I have had a fair bit of topstitching failure on some of my earlier jeans where the bottom thread has broken). Can the Featherweight handle this? Any particular pros and cons?

My favourite feature is the piping, I think. I may have to add that to more jeans in the future. But then, piping is kinda addictive at the best of times…

Other things to try in the future:

  • change up the front pockets. The Jalie pocket line manages to be both distinctive and boring. I love the double pockets on Patty’s pair (pattythesnugbug.com is transitioning platforms while I write this so I can’t do a direct link, but looks up her pants posts, she has lots of great musing on fitting and styling)
  • something with lots of rivets. Lots and lots of rivets. I love hardware as much as the next crypto-Goth.
  • distressing. I generally like my jeans fairly crisp and dark wash (obviously these are not dark, but you know what I mean). I lost my taste for buying pre-worn-looking denim right around the time I had to start paying for my own clothing. When you have a $90/pair jeans habit and are on welfare home with a small baby*, you need your jeans to LAST, because you’re probably not getting another pair for a long time. That being said, since I’m making my own, it would be ok to have some more casual pairs with a more RTW look. Just no pre-made holes and paint splatters, please.
  • I have had fun messing with the back pockets on these last few pairs, too. It’s the little details that really make (and distinguish) jeans.
  • draft and make a pair for my husband. Yes, I’m a sucker for punishment. I’m also seriously considering using a women’s draft for him (don’t tell him) as he really fits the women’s measurements considerably better than I do (don’t tell him that either). Boy got back. Which is where Tyo gets it, of course.
*This situation lasted precisely one year. I am profoundly grateful for the social safety net, even gutted as it was after the 90s, as my hubby and I would not have been able to make it through the transition from goofy teenagers to responsible parents without this government aid.** And I would rather shoot myself in the foot than go on welfare again. It SUCKED.
**and considerable support from both our families. I don’t once regret having my children when I did (especially as my field, like most academic ones, doesn’t really put you in a good position to have a family often until your late thirties), but it was HARD. I suspect it’s always hard, but I know we couldn’t have done it—certainly not nearly as well—without our extended families. So on the off chance of any of them reading this

34 Comments

Filed under Sewing

Tulips and Tears

Tulip Pockets

When I could finally pull myself away from stitching random scraps on my new Featherweight, I settled down to start work on my cream capris. Same old pattern (Jalie 2908), hopefully a few new details.  I was SO excited to be able to thread the Featherweight up with topstitching thread and a) not have to re-thread every other seam and b) not have to jolly my Janome along (she will sew topstitching thread… with some careful finagling).

These pants are inspired by a couple of pairs of my kids’ jeans (kids’ jeans get the best little touches!), with piping and what, for lack of a better term, I’ll call tulip pockets. Using some of my japonesque-print fabric for the piping and pocket lining.

While I maintain that the idea is sound, the execution could use a little tweaking. In particular there’s three layers of denim and four layers of cotton at the bottom of the pockets, making folding and topstitching a little, ah, haphazard. I may have to go back and redo some of the topstitching. Bleh. That’s what I get for trying to cram everything in to an evening.

Three pocket pieces

Anyway, aside from the piping, I used three pieces for the pockets—well, two pattern pieces. The overall shape is based on the shield-shaped pocket I used in the bellbottoms; I traced it off, drew in the curve to make a half-piece, and used a slightly shortened version of the original piece for the backing. I was originally going to just overlap the two “petal” pieces and topstitch them together, as in the inspiration pants, but unlike my children I tend to actually stick stuff in my back pockets, and I wanted to make sure it would stay there, so I added the third piece (rightmost in the photo). Really I should just have used a tiny triangle to fill in the top of the tulip a bit, but the full backing piece was really nice for getting the overlap of the tulips (sorta) symmetrical. I say sorta because I think I inverted two of the pieces by accident when I was piping so the curves aren’t identical. Fortunately, I was able to make the two slightly asymmetrical pockets mirror each other, so it worked out.

Stitch in the ditch

I stitched in the ditch at the edge of the piping to attach the various pocket pieces together, using washable glue-stick to hold things in place. I used the adjustable zipper-foot on my Janome set up as a straight-stitch foot (with the needle going down the middle), so I could see the “ditch” to stitch in it. This helps a lot. Although the feed-dogs on the Janome are definitely not well-positioned for use with a foot this narrow when it’s centred.

Swapping machines during the same project is a new experience to me (the serger doesn’t count, that’s an entirely different beast). The Featherweight is so slow (actually a good thing, especially for topstitching!) and quiet, the Janome is much louder and sews much faster. Also it’s taking some adjusting to remember which hand to use to raise the presser foot. As a lefty, I loved the back position of the presser-foot lever on the Grand Old Dame, and it took quite a while when I got the Janome to get used to lifting the presser foot with my right hand, as the lever is tucked on the inside under the harp. Now, of course, it feels weird to use my left again. You can of course reach under the harp and lift the back lever with your right, but my battered inner lefty is determined not to give in to the right-dominated world in this one small thing (I already use scissors and a computer mouse with my right hand, dammit)

Cuffs

I also made little cuffs for the bottom of the jeans, lined with the japonesque fabric, and hopefully they will look cute turned up or down. I picked the pink topstitching thread as it matched some of the pink in the print, but I’m wondering now (of course, too late) if the somewhat darker blue I was also considering would’ve been better (to make the piping seem a little less stark.)

You can see in the very first photo that I piped the outer seam on the leg. This took some deep breathing on my part, as that’s the place I like to twiddle with the fit, which varies from pair to pair based on the stretch of the fabric. With piping, there is no fit twiddling. But it seems to have worked out, anyway.

My poor baby!

Readers, I have sinned. It has been… two days since my last confession, I guess. Tragedy struck while I was topstitching the fly with the Featherweight. I very carefully marked my curve so I would miss the bottom of the zipper underneath. In my (not undeserved) paranoia, I even hand-cranked through that area. Then, being safely past the bottom of the zip, I went to finish the last inch of the topstitching and—I broke the needle. My guess is I was pulling on the fabric and pulled it off centre with the needle in it, hitting the edge of the needle plate instead of its nice little hole. And after I replaced the needle, it wouldn’t stitch! Or, it’ll stitch once or twice, and then skip five, and then catch one… and… and…

I have a feeling I’m going to be stalking the Featherweight forums this weekend.

Forgive me, Sewing Gods! I have damaged my beautiful, new, vintage machine.

In penance, I shall do five pieces of mending and one full unselfish garment.

I guess that’s one upside of new machines. I wouldn’t be nearly so distressed if I had screwed up my Janome. Of course, I’ve broken probably a dozen needles in her in the exact same way. She puts up with my crap marvelously. Obviously I need to be a little more careful of the Featherweight. She is even older than my mother, after all.

And to make things worse, I have to finish the pants ALL on the Janome.

I’m going to go cry now. And put some belt-loops on the capris.

But mostly cry.

34 Comments

Filed under Sewing

How to thread a Featherweight (and other adventures)

The Little Lady

I didn’t get a chance to try out my new machine before I left. Not looking a gift sewing machine in the bobbin-case, as the case may be. Anyway, naturally the first thing I had to do once I got in the door (after kissing my husband, anyway) was run downstairs to play with my new toy.

First order of business: threading.

Threading

Now, there’s a vast amount of material out there on the internet concerning Featherweights. Probably everything you could ever want to know. But really, I learned on a vintage machine, albeit not quite this calibre  of vintage, and I could already see that the basic threading was pretty familiar. Nothing like my mother-in-law’s drop-in bobbin, sideways-spool-holding Janome that made my brain fall out.

Bobbin

The bobbin orientation, which is 90 degrees to the left of what I’m used to, was a little odd, but everything else about the bobbin casing and the bobbins was familiar enough. Fortunately or not, the machine came with its bobbins still wound with a small rainbow of thread (glad to know I’m not the only one who does that!) so I didn’t have to figure out how to wind a bobbin right off the bat. I love how easy-access the bobbin is—just lift up the folding platform at the left and it’s right there.

Bobbin rainbows.

So, I loaded up a bobbin, got the thread up to the top, inserted a scrap of fabric under the foot, and…

The engine whirred, the feed dogs moved, the needle sailed up and down,a nd within about three stitches I had a hopeless tangle and the thread fouling on the bobbin casing had sliced through itself.

Trying not to panic, I removed the bobbin from its case, put it in the other way, re-threaded, tried again.

And again.

And again.

So pretty

After ten or so tries (thinking all the while about that definition of insanity as repeating the same action expecting a different result) I reluctantly came upstairs to google “how to thread a featherweight”. But no great surprises revealed themselves. I had had the bobbin inserted properly the first time; the top thread ran through its  hooks, holes, and tension assembly just as I had thought. My stomach sank. Was something (ulp) wrong with my machine? Was the timing off? (My serger acted similarly when its timing was thoroughly blown, everything moving but somehow the stitches just not forming properly) Was something even more dire amis?

Then I reached the last, the very end, of the threading instructions.

The one major difference between the Featherweight and the other machines I have used before now. The needle (like the bobbin) is oriented at 90 degrees to the front. Instead of the eye of the needle going from front to back, it passes from right to left.*

As I’m a lefty and it was easier to get at, I had without any particular thought threaded the needle with the thread entering from the left and exiting from the right. It never would have occurred to me in a million years that THIS was the one tiny thing that could throw the entire stitch off. But there it was, in the instructions, scanned from some original manual. Thread the needle from right to left.

I rushed downstairs and switched my thread.

She sews!

And lo, she stitched. With a minor tension adjustment, she stitched beautifully. She stitched with top-stitch thread. She stitched with the buttonholer attachment. She stitched layer upon layer of denim.

Stitch-length lever. Lift to stitch backwards.

Eventually, I figured out how to backstitch (move the stitch-length lever all the way to the top). I haven’t quite wrapped my mind around not having to hold on to something to keep it stitching backwards.

Some fun details:

My mom purchased this machine through the antique shop where she works, in my home town. The machine belonged to the mother-in-law of the woman who lived next door to us when I was little.

1951

A plaque on the front of the machine declares 100 years of Singer excellence. This makes me think the machine was probably made in 1951. The serial number begins with EF, which this website suggests means that it was manufactured in the UK (Scotland, to be precise) in 1949. The motor, on the other hand, says it was made in Canada and has some notation that includes “AU 61” which makes me think August, ’61. Obviously the motor could have been replaced… anyway. I’m inclined to go with 1951 for the year, at least.

The motor

It came with neither attachments nor manual, but it did have a few cute extras in the box:

Vintage Singer needles

Several packets of needles.

Un-cleaning set

The original cleaning set. I don’t think any of these will be getting too close to the machine. That’s an impressive amount of rust, especially when there’s none at all visible on the machine itself.

Repairs

Receipts for repairs done in 1980. There’s some notes about earlier repairs stapled to the back.

Also in my home town, my mom found another Greist buttonholder at Value Village for $1.99. This one had a box of additional templates tucked in with it. She’s keeping the buttonholer, but let me have the extra templates. A shorter keyhole (yay!) but no eyelet.

More buttonhole templates! (yes, they fit)

So in short, I’m ready for my next project!

Next project! Summery capris

*Those of you who know Featherweights probably all know what I was doing wrong by now. Hush, don’t spoil it for the rest.

20 Comments

Filed under Sewing

My birthday came early.

20110702-084826.jpg

28 Comments

Filed under Sewing

The Red Polkadot Dress

Lady in a Red Dress

Some people can wear cinched waistbands. Some people can wear big shoulder-puffs. Some people can wear dirndl skirts.

Generally speaking, these people are not me. This is really too bad, as I like many of these looks on other people. And I’ve tried them on myself time and again over the years, only to go “ah, yes, that’s why I don’t wear this.” (with the possible exception of pouffy shoulders, which I like enough that I tend to ignore the linebacker effect.)

I really like the idea of dirndl skirts. They’re both ridiculously simple (gathered rectangle—can’t get any more basic than that) and economical of fabric, unlike my preferred circle skirts. But they generally sit right at the waist (not a good spot for me) and add a lot of visual bulk in that area.

With the shrug. There’s a bit of pooching out of the ruching at the bottom of the front panel, where the outer fabric is looser than the lining. Presumably I goofed my seam allowances slightly or something.

However, as I’ve observed before, something magical happens when I slide the “waist” of my garment up or down a few inches. I can wear empire waists or dropped waists until the cows come home. Now, I believe another term for “empire-waist dirndl” is “maternity wear”, but what about a dropped waist dirndl?

Well, apparently that’s just fine.

I wrote a bit here about the bodice construction and my fitting challenges process. Having largely taken care of that, I came to the next stage in construction. The skirt.

Easy, right?

I had initially planned to do a gathered circle-skirt, like the original Katjusha pattern that was my inspiration. But on examining the amount of fabric I had left after I finished the bodice, it seemed like to get the gathering I wanted at the waist (er, hip) I was going to end up with an extremely SHORT skirt.  Whereas if I went with a dirndl style, there would be plenty of fabric for whatever length I opted for. Some quick and dirty measuring (aka holding the fabric up to my hips), and I was happily ripping away. Four panels of full-width (45″) fabric, a little below knee length plus a bit for hemming.

Red Dress

Confessions of a lazy seamstress: I didn’t even trim off the selvedges. I just tucked them inside the french seams I used to join the four widths. When they pucker up and throw the whole skirt off after the first washing, you can all laugh and point.So, I had settled on my width for the outer skirt, but my voile (or whatever this fabric is) definitely needed a lining. Back to my white cotton (yes, the stuff with the laceworked panel. Don’t worry, I’m moving from the opposite end of the length and there’s a ton of it.For my lining width, I used the width of the shirred back-panel, stretched out. It would’ve been smarter to determine this width before I did all the shirring, but I wasn’t sure it was going to shirr up the right amount at that point. Shirrly* you understand my quandary? Anyway, I decided to use this width for both the front and the back of the lining. I would gather the front to the bodice front, and sew the back flat to the stretched-out bodice back. But, you really want something underneath to give a dirndl (or any full skirt, really, IMO) a little oomph. I decided to make my lining skirt tiered. So I cut it approximately half the length I wanted, and then cut four more pieces of similar length for the bottom tier, and broke out the gathering foot.

Now, this is not my ruffler, with whom I have a passionate love-hate relationship. I wasn’t willing to deal with his idiosyncracies for four measly widths of lining. (If that sounds like a lot of gathering to you, please understand that I got the ruffler foot in the first place to make tiered skirts for tribal bellydance. The first such I made had 32 fabric widths in the bottom tier. And nine tiers, although I think only seven of them ended up being ruffled. So from my rather warped perspective, this is hardly any gathering at all

Red Dress

So I decided to play with my new, inexpensive, and untested gathering foot (Here’s a post contrasting the two). I popped it on, measured some 10″ lengths on scraps of the cotton, played with my stitch-length and tension settings, and after about three tries managed to get a gathering ratio approximating 2:1. Good enough. I began gathering.

I think I’m not going to become a huge fan of the gathering foot. It’s not awful. In fact, compared to some of the shit fits my ruffler has thrown, it was possitively easy to use. But the resulting gathering is not particularly even; it’s highly susceptible to the slightest difference in how I hold the fabric in front of the foot (crowding the needle vs. letting the fabric lie flat). The main thing I like about mechanical gathering with the ruffler over my preferred semi-manual technique (where you zig-zag over a supplementary thread… the zig-zag acts as a casing for the thread drawstring which you can pull up later) is that you don’t have to futz over the gathering being even, even if it may not be the exact ratio you wanted it to be. The gathering foot didn’t seem to have this evenness, and even worse it was pretty tricky to try to re-distribute the gathers after the fact. For the lining, I didn’t care, but I wasn’t enthused about using it for something that will actually be seen. It did turn out about the right length overall, so that’s good anyway, and it was quite fast.

I did give myself one further complication, which is that I had designed the bottom front of the bodice to dip down to a V. I love this feature a ridiculous amount, but it takes a bit of mental gymnastics to figure out how to reflect this on the gathered side of the skirt. At least, without sitting down and making an actual pattern and spreading it the required amount, which sounds suspiciously too much like work. Instead, I roughly measured the depth of the “V” (minus seam allowance) down from the top of skirt centre front, and free-handed an arch going from the skirt CF to side-seam. Good enough for government work, as my mother says.

For the outer skirt, I used my preferred semi-manual gathering method, mentioned above. I use this for “moderate” amounts of gathering, or larger amounts (like this) where I value precision of the resulting dimension over precision of every little gather. I gathered the over-skirt to match the width of the underskirt, and stitched them together. Really, fairly easy peasy.

Twirling

Then, I did something I haven’t done since Tyo was a baby. I hand gathered the entire skirt front (both layers, and hand-basted it to the bodice. WTF? you are asking. I agree. But we were watching Sucker Punch with the kids last night and I could do the gathering and basting by hand without totally ditching the rest of the family. Normally I’d prefer to be hemming in such a situation, but I wasn’t quite sure of the finished length so I didn’t want to get ahead of myself and hand-hem four widths of fabric to the wrong length. I wound up shortening it by several inches, so it’s just as well I didn’t try this.

Possibly I should also have hand-basted the back to the shirring, as that was a beast to do accurately and took a couple of goes. But, water under the bridge. Man, I’m just full of platitudes today. If I can throw “a stitch in time saves nine,” in before the end of the post, I’ll be flying. Well, except that that’s one I rarely follow. It’s still good advice, though.

Red Dress

I am a little concerned that the combination of the front ruching with the full skirt have pushed this past “sundress” territory into the hinterlands of “something to wear to a summer wedding.” Since I don’t expect to be attending any weddings this summer, this would be unfortunate. I may just have to suck it up and be ridiculously overdressed (after all, it wouldn’t be the first time).I wasn’t actively going for a “vintage” look when I made this dress. Although maybe that’s an inevitable reference for any full-skirted, tight-bodiced dress these days. Anyway, pairing it with the shrug just turns the “vintage” look up to eleven. It goes, though, doesn’t it? This shrug is ridiculously versatile. Seriously, I wear it with EVERYTHING. I need about five more.All that gathering in the skirt interacts a bit oddly with the back bodice, despite my best efforts to reinforce the bottom of the shirring with some sturdier elastic, but it’s probably not something most people would notice (dazzled as they will be by the swishy, full skirt, right?)Incidentally, the length is only sightly below my knee. Tyo was standing on the picnic table to take the photos, so they’re from more of a downward angle than usual. I’m wearing the fluffy petticoat as well as the tiered lining.And obviously I need some red heels.

Final project and inspiration. I think I need a fluffier petticoat.

*I normally try very hard to resist the obvious sewing puns. I have never intentionally substitued “sew” for “so”. This one slipped through. I humbly apologize.

48 Comments

Filed under Sewing

Some detours and a teaser

Immersion Works!

The rambling bit:

Today is the last day of school for my children. Syo wrote this touching little goodbye note to her beloved teacher this past weekend, amid a not inconsiderable number of tears. I may (or may not) have mentioned before that my children are educated in the French Immersion system here in Canada. Established in the late 70s or early 80s (I think as an effort to reduce tensions between the Two Solitudes, aka English Canada and French Canada), what it means is that in most areas of Canada, as part of the public school system, you can opt to have your children educated in French.  Incidentally, I went through nine years of the system myself, and although I wouldn’t currently call myself fluent I’m pretty sure I could become so in fairly short order if the opportunity arose. An interesting side-effect of learning French in school, however, is that the French you learn has rather more to do with “proper” French (i.e. as it’s spoken in France) than colloquial Québecois French, or any of the much smaller regional Canadian French dialects. I do much better comprehending TV programs from France than from Québec (although best of all, natch, is other non-native speakers who actually take their time with the words), and was once told I had a “Parisian” accent (although she may just have been flattering me…)

What Tyo meant to write above was “Au revoir, Mme G. Bonne fin de semaine. Je t’aime.” (“Good bye Mrs. G. Have a good weekend! I love you.”) What she actually wrote would translate, to the extent that you can translate words this mangled, as “Gurdlebee Mrs. G.  Good hungry week. I you love.” How did I listen to her speaking all year and not realize she was putting an “L” in “au revoir”? (Hopefully you won’t judge the French Immersion teaching quality too badly by my children’s ability.  My family seems to specialize in late-blooming, academically. I went from nearly flunking Gr. 3 to having an off-the scale reading level by Gr. 6.)

The sewing bit:

… anyway. I do actually have sewing to report. For those of you who are bored by the family-blogging, I apologize, I’ll be kidless for most of the next month so it should be all me-sewing, all the time (unless I break down and make something for the hubby). The little zippered pouches are done (whew!)  and have been sent off to their well-deserving teachers. All that remains kid-project-wise now are the little dresses for my nieces.

Red sundress bodice

So of course, instead of working on them I started on my red polkadot sundress. It’s based very, very loosely on the Katjusha pattern off Burdastyle. Although the shirred back piece theoretically makes fitting a snap, I did not find this to be the case. Although I’m pretty much a Burda size 36 (or possibly 18 with monkey-arms and giraffe legs), I am not exactly the typical shape. A quick muslin of the front pieces showed that I needed to reduce the bust curve substantially. Fortunately I’d omitted the darts in the side-front pieces (I’m not sure why it has both darts and princess-seams, but happily leaving the darts out meant that the waist was actually large enough). I also reduced the arching of the top of the front. I should’ve omitted it entirely; although I like this feature in theory, as you can see in my inspiration sketch below, I always find the shape or proportions are off, at least for my figure, when I try it in practice. I lengthened the bodice below the waist, too, so that the skirt will begin down on the hip. Then , having achieved something approximating fit, I (rather unscientifically) doubled the length of the centre front panel so that it could be gathered to form a ruched front. Because Amber got me thinking about them with her swimsuit post and, well, despite the fact that more bulk through the midriff is the last thing I need, I like the look. More importantly, I like the look on my actual body, not just on my theoretical bombshell body.

Shirring!

Then I shirred the back, which is a simple double-thickness rectangle. This takes forever, but is pleasantly mindless while listening to a good podcast. It took about three bobbins full of elastic thread, and seems to have majorly thrown off my bobbin tension (oops!), but other than that worked quite well. I’ve never had a problem shirring on my Janome. Although it does some odd things to the polkadots!

I got the back shirred panel attached, tried it on, and realized that even the reduced arch of the front was totally wrong for me. So I flipped it back inside out and tried to straighten out the stitching, ruining my careful understitching in the process, but at least it’s closer to straight-across now. I also should have shortened the waist (gee, big surprise). Foolish me, I figured on a dress like this I would just tug the dress higher, but it’s not just the position of the waist, it’s the angle. As a part of being short-waisted, my waist indentation (such as it is) is quite abrupt; the waist curve on the pattern is much longer and more sinuous; sort of the difference between < and c, if you see what I mean. Lesson learned.

My inspiration sketch again. Of course, the dress is obviously different from this already...

I forgot to make and attach the straps to the front before I stitched front and lining/facing together. Oops. They will have to be tacked on after, now. The shirring ensures it stays up fairly well even without straps, but experience has taught me that I’m never very comfortable in strapless tops. Too much fussing and worrying.

Now, I need to tackle the skirt. I was thinking circle, but with an extra-wide waist so it could be gathered, but the amount of fabric left seemed minimal for achieving this look. So I am going with a dirndl. I may regret this.

The Me-Made June Bit:

June 28

Today is slated to be the hottest day of the year yet, with a high of 28C (oddly predicted to be reached at 8 pm tonight, I think the weather people are smoking some crack but we’ll see.). In celebration I have busted out my most summery of summeries, this 70s-pattern maxi I made up last summer. You know how some things you put on and think “this looks home-made”? Well, this is one of them. Which isn’t to say that I don’t like it or that I did a poor job of sewing it (although there are a couple of oopses), but something about the narrow elastic and the gathered back just look homey to me. On the up-side, it’s the perfect pool-side pretty (to steal Ali’s phrase), as far as I’m concerned. I have promised myself at least five minutes this afternoon sitting in the sun in the back yard with some iced tea. If I close my eyes, I can pretend there’s a pool around somewhere.

Even more making up for the home-made feeling is the fact that last summer someone stopped me on the street while I was wearing this dress and asked where I had bought it. When I told her I had made it, she asked if I sold them.

So I guess it’s not all bad.

11 Comments

Filed under Sewing

Happy Birthday to Syo!

Syo's dress, by Tyo.

Technically, I guess today she should become Eyo (the Eight-Year-Old). But for the sake of continuity, not to mention because Tyo will become the Eleven-Year-Old in another month, I’m going to stick with the nicknames as is.

Relatively little has been cleaned up from the birthdays (to my husband’s dismay), but sewing has happened! Tyo put the final touches on Syo’s present and we wrapped it up.

The kids have also been stitching madly away at these:

Pouches!

They are almost done. Whew! It would’ve been so much simpler to do them all on my own. But that would be defeating the point, etc. etc. Syo decided she wanted the blue and pink flannel fabric (top left) for the outside of hers; it’s lining the others.

What, Syo modelling her dress? Well, if you insist!

A well-dressed child

The fringe along the bottom is a length that appeared in one of the Value Village baggies. I stitched it on for Tyo… it was just less of a headache that way.

I am disappointed to report that she is less than thrilled with the dress. The reason? “It’s not tight enough. Tight is cute.”

Ah, yes. I had forgotten that.

Erm, she may have picked up that perception from me. Ooops.

Anyway, I think the dress is adorable.

In Me-Made June news:

June 27

Yup. Still lounging amid the remnants of the kids’ birthday party on the weekend.

I was (perhaps overly) excited about the weather forecast today and dressed for SUMMER. Of course, I spent most of the day in the chilly indoors freezing my legs off. My bad.

70s Tunic
Lekala sailor shorts Which you can’t actually see, but I promise you they’re there.

6 Comments

Filed under Sewing

I am tired (and other reminiscences)

Still breathing! (MMJ 26)

But victorious. Children arrived, milled around, played, ran, jumped on the trampoline, scraped elbows and knees, bumped each other jumping, got splinters, roasted hot-dogs, opened presents, lined up (!) for ice-cream cake, and  eventually were reclaimed by their parents (even the ones who slept over and were claimed this morning). I am SO thankful for the two friends who stuck by me through it all, and as a bonus the hubbykins was able to get off work a bit early so arrived in time to oversee the present-opening and cake-eating. The sun was warm although the air was cooler (high of 18C); water-balloons were tossed around but I managed to fend off the suggestion that the sprinkler should be put on under the trampoline.  Oh, and Tyo got a hedgehog.

Forgive the poor scan and indifferent photoshopping.

Tomorrow is Syo’s actual birthday. Which means that the photo above was taken eight years ago today. I was having teeny-tiny contractions at ten-minute intervals all through the photo-shoot, and remember wondering if that meant real labour was imminent or if it would just go away on its own. It was still a good ten days before my due-date, but that’s longer than I was pregnant with Tyo. I made the purple choli (cropped shirt) I am wearing and the belt, although you can’t see much of that but the tassles. One very artistic friend drew the designs on my belly in eyeliner and lip pencil.

Purple choli (back view)

My sewing back then was what I’d call “costume grade”—functional, occasionally fancy, but largely devoid of seam-finishes and other fine-touches.

Unfinished seams, showing sideseam including underarm gusset. I did a decent job on the bottom ties/binding, though.

The pattern I used for this was essentially an early version of the one now available from Folkwear, although my A/B cup version lacks the bottom triangles, relying on the magic of bias stretch to fit around the bust. In more recent iterations I adapted it into a full princess-seam in the front, but this version has a straight  over-bust seam. This wasn’t the first choli I made, but it might be the second or third; I had learned (the hard way) to be careful of the bias-stretch on the front neckline and to double-fold my hems at neck and sleeve. I think the fabric was left over from a project I helped my cousin make; the rest of the remnants had become a self-drafted jumper-dress for Tyo, which included a facing (I had never done a facing before).

Earrings

I thought I’d show you a better photo of the earrings I wore the last couple of days, as they’re hand- made (by my mother, granted, not me). The little man is an antique ivory figurine my mother had kicking around forever (I wonder if he originally had something decorative in his navel… the hole in his belly-button is quite deep, but doesn’t go all the way through.) Then in the late eighties or early nineties some family friends returned from Zaire and gave my mom the malachite elephant. This was around the time when everyone was making beaded jewelry (I’ve commented on my mom’s serial crafting before),  so it seemed only natural to hunt down a couple of other beads and create our African earrings. I remember discussing with my mother how the long bone and the round malachite bead echoed the  respective shapes of the two pendants. I miss bouncing design ideas around with her—we used to do it about everything, from clothing to jewelry to the arrangement of furniture in the house. I hope I can have those kinds of conversations with my own daughters soon enough.

Anyway, I should now return to cleaning my house, so that Syo and I can make biscuits (scones for the British readers) and maybe even get started on the teachers’ presents. My kids have between them five teachers who need presents. They’re all wonderful ladies, but it still seems a bit excessive to me. It’s not like they’re middle-schoolers with a teacher for every subject.

11 Comments

Filed under Sewing