Monthly Archives: December 2010

A little goes a long way…

A small lengthening adjustment

I took Steph (and several other peoples’) advice and lengthened the CF by rotating the bottom of the bust piece down 1/2″. (thanks for your thoughts, everyone!)

This seemingly-insignificant alteration had some major consequences. On the up-side, it achieved its intended goal of allowing the midriff piece to sit a little lower, bringing the seam-line down to the vicinity of my waist. On the downside, now the bust feels a little too full and wide (odd since if anything the piece is narrower than before). I assume this is because it’s under less vertical tension or something. Also the neck feels a bit gapy—always a risk in a V-neck like this, the correction for which is the exact opposite of the alteration I just made :P. I’m hoping that the weight of the skirt

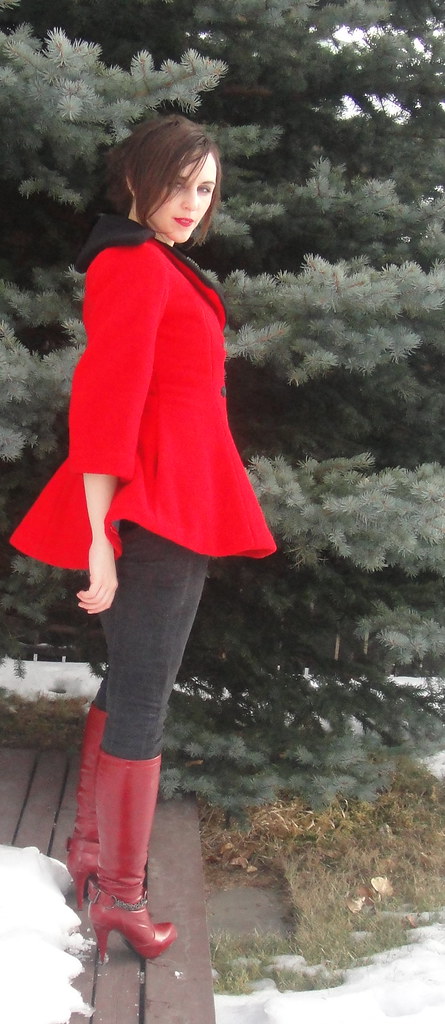
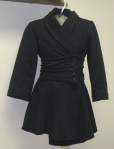
Simplicity 5728, v. 2, with sleeves!

keeping the bodice in place will keep this from being a problem. In today’s photos I’m wearing the Bullet Proof Bra, which brings my bust measurement up in line with the pattern’s intended 34″; it succeeds in filling in most of the extra fullness, but it still feels a little bulky/loose under the arm.

(To bra or not to bra… that is the question. On a daily basis I tend to go without—a knit top offers enough support to get me through my daily routines, and indeed most exercise except for jogging. On the other hand, a bit of support is nice for when I’m wearing wovens, and if I must wear an annoying band around my ribs, I might as well get some, ah, enhancement, from it, which is where the Bullet Proof Bra comes in. Which will I be more likely to wear with this dress? Well, whichever ends up fitting under it better, I guess…)

Arm-lift---uh oh

Then, of course, I added the sleeves.

Can I just say that woven sleeves are a pain in the arse? These particular ones have a little pouf at the top, which is achieved by lengthening, rather than widening, the sleeve cap. So they look gorgeous with my arms down, but ride up mightily the moment I lift my arms. Now, I’m not expecting to be able to do jumping jacks, but it would be nice to able to put my hands on my hips without the entire bodice pulling up around my ears. And then the neckline goes totally wonky, too. Grr.

Side view, arm raised.

On the up side, I’m no longer wondering if the armscye is too high. With the sleeve on, it feels not nearly high enough.

Incidentally, I lengthened the sleeve pattern by a full two inches to bring it to this point, which is about where I’d like a finished sleeve to end. I’m not totally sure if I want the fold-back cuffs that came with the pattern or not (do they make sense without the collar?) so I’ll have to think on that. Maybe I don’t want long sleeves at all (but I’m having a hard time thinking about anything short sleeved right now, as I’ve said).
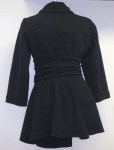
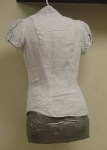
Back, with sleeves

But, the back looks pretty good with the sleeves—I wouldn’t want to take any ease out of it, I think.

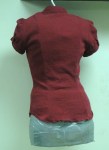
Back with arms raised

It handles the arm-raising much better than the front.

I think I’m satisfied with the bodice for now—side seam ease is something I can

Side view, with sleeves

always tweak in my final fabric (whatever that may be), so the issue that remains is the sleeve. What do you think? Keep with restrictions? Attempt to alter the cap (I seem to recall the Sewista Fashionista taking a stab at something similar not that long ago…)? Swap in a different sleeve I like better? (I haven’t done a long-sleeve in a woven for me yet, so I don’t really have any candidates. I could do a short sleeve—I’d probably like a short cap sleeve better than a puff anyway, or there’s always the lure of a pleated sleeve cap. Again, though, I don’t have a preferred pattern for any of these.

This is my first elbow dart, by the way. it does make for a nice fit.

So what do you think? Short sleeve or long? This sleeve or other? I have a feeling I’m going to go with the long skirt option. Cuz, well, I love me a long skirt.

The pattern girls, to remind you

13 Comments

Filed under Sewing

Whimsy

It’s Steph’s fault.

I should be making up another long-sleeve knit top, or at most cutting out another pair of jeans. But she left the sweetest little invitation to join in the Vintage Sewalong 2011 in her comment on my last post. So of course I had to go check it out.

Simplicity 5728, on the right

And the next thing I know, it’s 10:00 pm (we’re staying up late these days with the kids out of school and my hubby not starting work until 9:30 in the morning) and I’m pulling out the pieces of Simplicity 5728, doing a bit of tissue fitting on my duct-tape me (I suppose I should dignify her with a name…), and finally decided to make my first muslin as-is. I did trace out the bodice pieces first, however, since I was anticipating fairly extensive lengthening alterations. This is, after all, a pattern drafted for someone a good half a foot shorter than me. (I have, however mentioned that most of my height is in my legs. The pattern’s back neck-to-waist measure is 15″, which is the same as mine.) So I pulled out my trusty blue flannel ex-duvet (what will I do when it runs out?) and cut out the pieces. Then, bright ‘n early (okay, not early—you saw the bit about tracing this out at 10pm last night—and not bright as it’s snowing once again) this morning I popped out of bed and threw the thing together.

Oh, god. This means I need to show you…

fitting pictures.

ugh.

Simplicity 5728, Muslin 1: front

Well, it is a little bit short, at least in the front. The empire seam in the front could come down about 1/2″. The bottom of the front is almost exactly at my waist (and of course it needs to be about 5/8″ lower).

Simplicity 5728, back

The back is… well, practically perfect, length-wise. There are a couple of drag lines under the arms (if someone can enlighten me as to what they mean I’d be super-delighted… is is that the armscye is too high? it is high, although not uncomfortably so…), but they pretty much disappear if I cross my arms so I suspect I should just leave them (?).

Simplicity 5728, back, with arms crossed

The back hem could probably come up at bit at the CB, which I guess would be a swayback alteration? I’ve never done a swayback alteration where I had a waist seam to play with, so I’m not quite sure what the procedure is—I’ve heard some people rail that the hem must be kept on grain, and others say that you can just take a bit off it. I will have to do some research 🙂

Simplicity 5728, side view

There’s some tweaking to be done around the shoulders/back neck where I removed the collar—it won’t be a problem. The armscye is high but I think will be comfortable—I have pretty scrawny arms. The side-seams seem to be in the right place.

So… any suggestions on lengthening the front but not the back? Maybe I could just increase the curve at the gathered part to build that extra length in there, without having to mess with any of the other seams at all? Or add the 1/2″ to the CF neckline and curve that out. On the other hand I don’t really have the bust to fill in too much more gathering in that area, though I can always wear the bullet-proof bra, I suppose.

I eagerly await your thoughts and suggestions!

14 Comments

Filed under Sewing

Joining the Lady (Grey) in Red Club

Red Lady

Since I’m still suffering from PCSD (Post-Coat Stress Disorder) and can’t quite look at my sewing machine yet, I’m going to throw in a bit of blog padding :). To start with, I wanted to talk about the Lady (Grey) In Red Club. (And yes, I am shamelessly stealing the name from Ali.)

Did you know this club existed? You do now. I made it up myself. And if you made your Lady Grey in red, you’re a member! Isn’t that exciting? 😉 Membership benefits include, well, having an awesome red statement coat.

The Lady Grey really is a statement coat—not for the faint of heart, nor for the shrinking violet. It thus really deserves a statement colour (although there’s some lovely more restrained versions, too). And while there’s some terribly striking versions in teal and mustard (AKA blue and yellow, the other primary colours 😉 ), I have to say, when it comes to a statement colour, for me red takes the cake. And probably the ice-cream and the sprinkles, too.

As of this moment, other people who’ve agreed with me on the awesomeness of red members of the L(G)IRC (okay, not the catchiest acronym, I know)  I’m aware of include:

Liza Jane
Ali
Li’l Miss Muffet
The Sew Convert
Erika Jeane
Affienia

If you made one and I’ve missed you, or know of another one out there, let me know! Now it’s conceivable that some of you will argue that we’re being trendy (or just terribly obvious) in our colour choice, but really—there are not many colours out there more awesome than red. Seriously.

My first day of school... I remember picking out the outfit so carefully.

Okay, I’m not dissing on the other colours of the rainbow, I’m really not. There are fabulous Lady Greys in plenty of other colours, as I said above. I don’t think less of any of these coats for their colour, and many of them are probably more original than red.

It’s just, none of them would feel quite as much me.

My fondness for red goes back for as long as I’ve had the power to choose my own clothing. The picture at right is from my first day of school, way back in 1985 (behind the big yellow bag you can just see bits of the red skirt and socks. Probably knee-highs). Back in early Uni I gloried in my original HBC blanket coat. I love red for its intensity; I love the ambiguity of its symbolism—blood and sex; violence and passion; left-wing and right.

My old HBC blanket coat, c. 1999

Do you have a signature colour (or palette?) One of my friends is all brown and teal, all the way. My mom thrives on the classic autumn palette. When I’m feeling summery I toy with cream and pale blue, as in the blog theme (but it was a bit of a wrench to change it away from the old reddish theme), and other colours catch my fancy again and again, but I always come back to red.

20 Comments

Filed under Sewing

The Christmas Coat

The Christmas Lady

Day-Glo Red

It’s (mostly) done!

This was technically my Hudson’s Bay Blanket Homage Coat, but given the timing and the colour, I’m probably wishing if I think I can make it something other than the Christmas Coat.

The Christmas Lady

Holy peplum, Batman!

Tyo pried herself away from her new PSP long enough to take these photos for me, saving me the hassle of trying to set up the tripod in the snow. Although as you can see, it’s not quite the winter wonderland it was a month or so ago when I finished Tyo’s Coat. We actually had wonderful weather for Christmas—it was +6 C on Christmas day! My dad and I took the girls to the local playground and they ran around without their coats on. Amazing what feels like tank-top weather once you’re inured to -20 ;).

The Christmas Lady

Lining---needs letting out

I think nearly everything that needs to be said about this coat has been already. One of the buttons is missing in action, having disappeared prior to being sewn on somewhere in the dozens of rounds of “clean up” that have swept through my house more or less continually since last weekend (without creating a notable overall improvement, I’ll add). If it doesn’t show up in a day or two I’ll have to go buy another. Also, the two inch hem I took in the lining wound up being a bit too much, so I should really let it out a wee bit. At least I have that luxury, having cut my lining to the full length of the shell.

The Christmas Lady

Coat front

I only took a 1″ hem, but as you can see my fabric has plenty of body.

Christmas itself was lovely but hectic. We hosted my father, my hubby’s father, and my hubby’s father’s girlfriend. I was pretty spoiled my first seven or so years of marriage—I never once had to make a turkey on my own (or even in my own kitchen). It really is much more fun doing all the culinary craziness with three or four or five other people helping out. Fortunately my Dad, of all people, came to my rescue, peeling potatoes, washing innumerable dishes, and helping stuff the turkey. I fear I was a touch crabby, but hopefully it wasn’t too bad. I really was happy to have everyone there.

I did get one bit of sewing paraphernalia for Christmas, from my mommy. Look: pinking shears! My mind is racing about what I can pink. Or it would be, if I weren’t thoroughly sluggish from chocolate overdose.

Pinking Shears!

At any rate, I hope your Christmas (or seasonal equivalent 😉 ) was as merry as mine. I expect I’ll start thinking about sewing again in a day or two. For now, I’m going to go read one of the books I got for Christmas (The latest Terry Pratchett—oh, the joy!) and listen to my husband and children murder things on their various video game systems.

You can see all these photos and more on the Flickr Slideshow

All the posts on this coat can be found here. And this has been a (very belated) contribution to Gertie’s Lady Grey Sewalong.

29 Comments

Filed under Sewing

Details, details

… and an unexpected benefit


Buttons!

A lot of little things got done yesterday. I made it to Fabricland to pick up thread and got my buttons (By the way, photographing black, carved buttons is a bit of a trick. Oblique lighting for the win!). I picked up some bias hem-facing strips but then, on a whim, grabbed a couple of metres of red grosgrain ribbon to try.

Ribbon as hem facing

Now, proper grosgrain ribbon has bumpy edges and actually eases around curves a bit, so would be perfect for a hem facing.

This ribbon was not that kind, however it did have those attractive little decorative white stitches at the edges.

Which, it turns out, also make perfect gathering stitches. WOOT! (This didn’t actually occur to me until after I had the ribbon sewn in place, by the way.) I sewed the bottom end to the hem itself, easing the shell fabric to the ribbon, and then gently tightened the upper row of white stitching to ease the upper edge of the ribbon in. Then I stitched it to the underlining. I actually started catch-stitching between the underlining and the ribbon, as Gertie describes, but it was lame and annoying, so I ended up doing something more like a slip-stitch. The final look may not be quite as soft, but it’s more secure and, more importantly, didn’t make me crazy. I generally enjoy

Hanging loop

hand-stitching (especially to the dulcet and soothing soundtrack of my husband’s latest video game) but the catch-stitching inside the hem drove me nuts.

So the hem is hemmed and the lining assembled. I remembered (after forgetting in my last two coats) to add a hanging-loop, too, just some bias tape folded in half and stitched. Not the prettiest thing ever—perhaps I should’ve made one out of the lining fabric—but it will be functional. The collar is also sewn up and basted in place (as per Gertie), but I’m going to save those pics for the big reveal ;). I will say that the padstitching really does make a difference in how the collar sits (or rather, how it stands rather than lying down), although I bet you could skip the outer padstitching and just do the seamline and maybe the below-the-roll padstitching and get much the same effect.

Anyway, To do:

  • insert shoulder pads
  • hem lining
  • attach lining
  • bag lining inside sleeves
  • finish inside of buttonholes
  • attach buttons
  • take fabulous photos, preferably in the snow

Hmm, I’ve probably forgotten something on that list.

Oh yeah, and clean the whole darned house because my father’s arriving today, not tomorrow, and the children have been running rampant for almost a week.

2 Comments

Filed under Sewing

Bit by bit by bit

Sleeves!

Maybe it was Laurwyn’s Coat Marathon, or maybe it was Liza Jane finishing her gorgeous red Lady Grey, but MAN I want this coat done! I want to flounce around in it, to whatever extent I can given the weather, and whip up a bunch of quick knit tops and maybe another pair of jeans (funny how jeans are something to whip up—they’re not exactly the least involved of projects, but are easily doable over a weekend).  I want to be there—not getting there.

But I am getting there, impatience aside. I got the lining cut, which was a major mental hurdle—then I was stymied by promptly running out of black thread. Oops.

I never did find the rest of the pattern, so cutting the lining took a bit of

Back neck facing and CB pleat

improvising. I added an inch to the CB  seam to turn into a back pleat. I decided I couldn’t be bothered to re-draft the front facing, so I just cut the facing the same as the full front, which will work better with the buttonholes anyway. I should probably think about grading it for roll, but I’ll get there. The back neck facing I will topstitch into place on top of the lining.

It occurs to me that I’ve completely forgotten a back stay. Again. D’oh.

Pockets---catchstitched to underlining so as not to droop

Unable to progress with the lining, I went back to fussing with the shell. I did the pockets, which I also had to re-draft. Fortunately, it’s almost easier to draft a pocket than it is to pin and cut out around the pattern piece. I had the length and position from the notches on main pattern, so I measured them, and then made a generous shape out from that that would accommodate my hand. A lot of people had trouble with the pocket drooping below the hem (the pocket is really located only a couple of inches above the hem) so I catch-stitched mine to the underlining and will make sure that the bottom is caught in the hem, too.

Speaking of the hem, I’m working on doing it properly, too. I am taking a fairly

Lady Grey with sleeves---back

narrow hem (1″) to preserve length and make the easing in of the top easier. I followed Gertie’s video on this, running a gathering-stitch along the edge and tightening at intervals, then steaming/pressing to shrink the fullness. It’s basted in place but still needs seam binding and to lose a few pins, hence the lumpiness in the photos. I also cut my linings to the full length of the pattern, since a lot of people found their linings came out a bit short as well.

Sleeves!

Oh, yeah. I put the sleeves on, too. Again using Gertie’s tutorial, although I substituted strips of my own knit coat fabric for the bias pieces. It worked, although I’m not sure how you gauge or control how much easing you get from it. Also that makes for a TONNE of layers for sewing around the sleeve. I had to swap out to a denim-weight needle after snapping my first one clean off. With the sleeves on, I think the back ease is just right.

Now I just have to decide on shoulder pads.

My construction order has been all over the place for this coat. Ah well—as long as I don’t try to attach the lining before I sew on the collar or anything.

… so close…

16 Comments

Filed under Sewing

Happy Solstice!!!!

You know what that means???? The days are getting longer!!!!!!!! It means that eventually, winter’s cruel grip will weaken, warmth will return, and freedom will be restored.

These photos are from last year. We are staying home this year so there will be a distinct lack of old red barns and donkey rides. Oh, well. As long as there are presents, turkey, and most of all, family, all will be well.

… Now, back to those Christmas cards.

10 Comments

Filed under Sewing

Almost me?

My best friend is in town for a day or two before Christmas, so not much sewing has been going on (although I did get the Lady Grey collar padstitched).

However, one (actually two) really exciting things have happened. The first is that she wants me to teach her to sew! Soooo exciting!!!! Of course it’s going to be a bit difficult what with her living two time-zones away… but if we can ever manage to be in the same city for more than 48 hrs we’ll take a whack at it. In the meantime I gave her the Singer  Reference Library “Sewing Essentials” volume, which has lots of pictures, and she’s going to see if she can procure a sewing machine, either her mother’s old one or a second hand one (if she can’t find a nice second-hand machine in Toronto then I don’t know where you can)

Duct-tape me

But the other, more immediately exciting thing was that she and the girls helped me make my duct-tape double!  Tyo and I had tried previously with some paper tape, but it was wax-backed and didn’t stick to itself and was pretty much a disaster. This time we used regular old duct-tape and it went much better.

It’s still not perfect, and certainly not particularly attractive, and I think I didn’t get the stuffing quite even in the hips or the shoulders, but she does fit my clothes more or less the way I do, and the measurements all match. Currently there’s a hanger in the shoulders, but I’m not sure how long that’s going to last as the weight of the whole thing comes pretty close to breaking

Flesh-and-Bone me.

the hook already. It has a cardboard base that it stands fairly well on, too, although I think lying down on padding to support her swayback is the best way to store her. At the moment that’s not a problem but if I ever clean up the disaster that is my “sewing room” it might take a bit more thinking.

Anyway, this does open the door for all sorts of fitting adventures… Ceylon, I’m thinking of you…. 😉

14 Comments

Filed under Sewing

Side seams

Lady Grey---all seamed up

What with (not) finishing Christmas cards, kids’ Christmas Concert, and general craziness, not a lot of sewing has gotten done this week (shocker, I know). However, I did manage to find a few moments (and I do mean few) to sew the side-seams and shoulder-seams of the coat together.

I think this is one of the most magical moments in garment-making—when you go from two or three flat pieces of cloth into something you can actually try on. Setting in the sleeves is a close second, but I still think sewing the shoulder and side-seams tops it. So here we go with some (ulp) fitting shots—unglamorous, no makeup, bed-head, and all.

The first thing I noticed was that the full hair canvas of the front and front side

Lady Grey---Front

pieces (as per Gertie’s sewalong instructions) was way too stiff. I don’t know if it’s just because my coat fabric is quite stiff to begin with, but it looked wooden, and was forcing the side-seam of the peplum back and making the excess flare at the back even worse. So I cut it out—everything below the waist on the front side piece, and curving down into a narrow front panel on the front piece. This helped a lot, though it’s still a bit stiffer in the front, as you can see (all these photos are from after I took it out).

Lady Grey---Side

Raising the roll line really does reduce the lapel, doesn’t it? I think I kind of miss the big, from-the-waist look, but we’ll see. It’s too late to change now, anyway. (The anti-droop alteration I made probably reduced the lapels as well, although I tried to add it back when I re-drew them.)

The side—there’s that swayback! It’s still loose, as in the fabric is not actually following the curve of my back, but it’s not pooling and puddling, so I guess we’ll call that wearing ease. There’s still a lot of fullness at the rear. I added a full two inches to the hem at the centre back, which I thought would be too much but it actually looks about even, although faintly like I’m wearing  a bustle. Perhaps I just need an Edwardian skirt to go underneath? 😉

Lady Grey---Back

In the back view, you can see the gorgeous smoothness of the lower back, and still a bit of excess between the shoulder blades. Does this mean I have a narrow back (?!?) or just reflect the fact that I used a size larger pattern? No idea, although I guess next time I tackle a Colette, I’ll make the 0 and just do whatever brutal, soul-destroying alterations I’ll need to the waist. I’m not sure if I want to bother fixing it or not—I think I’ll wait until I get the sleeves on and some shoulder pads in to decide. The main thing holding me back is that I already catchstitched down the seam-allowances in this area.

From the rear it looks like there might be a little extra length at the back hem, although I’ll have to trim it smooth (joys of a knit) and then check again.

Can you guess what I forgot to do when I stitched up the side seams?

Got it one—pockets! *headdesk*

Now where’s that seam-ripper…

20 Comments

Filed under Sewing

We interrupt your regularly scheduled coat sewing…

First Family Xmas card cover, from 2007

…to bring you the Annual Tanit-Isis Family Christmas Cards

I think I outsmarted myself.

You see, we’ve always sent out photos with the Christmas cards. When Tyo was a baby, I just bought the cheapest box of cards I could find. Then, I realized it would be nice to be able to fit the 5×7 photos inside the cards, instead of wrapping separately. So I bought the cheapest box of big cards.

But if you’re going to send people cards in lieu of real presents (sorry, Grandma), eventually you start to think about quality. About… y’know… meaning.

And then one year it occurred to me to try and take my own photos (I think that was the year Sears stopped giving great coupons for family sittings before Christmas). And once I was taking my own photos, well, I might as well mess with them in photoshop, throw in a few cheesy filters for good measure, and the next thing you know I’m trotting off to Michael’s, picking up a pack of blank cards, and spending far more time than it really ought to take to figure out how to format the damn things so the writing inside and the picture outside come out on the right ends, right ways up.

And it’s served me well, the last several years. One year we had my two nieces in the picture as well. Usually it’s been both Tyo and Syo.

But this year, apparently, something came loose in my brain.

A passle of complex Christmas cards

Because instead of just picking up another pack of ivory cards, I grabbed black ones. Which, of course, you can’t print on.  But you can print on other papers, cut them out (with fancy scissors), and paste them on!

And then you can add stamps! Yes, Christmas stamps! And embossing powder…

Perhaps a bit of backstory is in order here. My mother, bless her heart, is a serial crafter. (Sorry, Mom, you know it’s true.) She has probably dabbled in just about every hobby you can think of in the past forty years , from stained-glass to needlepoint to beaded jewelry to fabric-covered boxes to… well, stamping.

I won’t even mention the basic “crafts” like sewing, knitting, and crochet. Oh, there was tatting, too. Tatted lace

Secret stamp in every card!

is really pretty. And painting stencils on the walls was fun. To her credit, she never quite succumbed to the scrapbooking. I think by the time it really caught on, she was overwhelmed with other things. Although I think stamping could certainly be a gateway to scrapbooking. And she did her own photography and darkroom-work, too, back in the day, which again would go great with scrapbooking…

Anyway. The stamping was quite the thing in the 90s, as I recall. There was even a whole stamping store in my hometown, which only happens when a fad is in full swing because it’s really not that big of a city (well, nowhere in Saskatchewan is). She made the most gorgeous home-made cards and even sold a few of them, with fancy papers, many coloured inks, and, of course, embossing powder.

For those of you not in the crafty know, embossing powder works like this: you make a stamp, often with a special clear “glue” ink, then sprinkle the very fine embossing powder on it. It sticks to the stamp, falls away from everywhere else. Apply heat—we initially used the iron (no contact though) but she eventually acquired a special heat-gun-type tool for it—and the powder melts, fusing to the paper and forming shiny, raised lines.

(If glitter is the herpes of the craft world, surely embossing powder is the chlamydia.)

Anyway, as these things go, the fad passed, my mom’s interest moved on, and several Rubbermaid tubs full of stamping supplies languished in her basement, until last summer when I had the bright idea that I would see if I could liberate them. I was pretty sure Tyo and Syo would have a  blast. So when we were home last summer I snagged the works—stamps, ink-pads, embossing powders, and even the weird heat-gun-thingy.

They had a blast. I was fully expecting all the stamp pads to be thoroughly dry (they were last used when I was in high-school, after all), but most are in good working order.

… and now I’ve covered the kitchen with stamps, scraps of paper, and a fine layer of silver embossing powder, yelled at the kids for smushing stamps every which way, and had better do some quick cleaning before bed or my husband may not speak to me again this year. If ever.

Red Boots!

In other news, Tyo is fast developing into an enabler. She talked me into buying these at Value Village today (in between hunting down knick-knacks to give to her friends. Knick-knacks at VV are sooo vastly overpriced. Anyway. Blaming them on her makes it all right, right? She said I should wear them to a Christmas party as part of a Mrs. Claus costume.

Unfortunately, they’re too dark to match with the Lady Grey coat.

I guess that means I need to watch out for a bright red pair, right?

26 Comments

Filed under Sewing