

That is all.
I wrote 15,000 words today, to make 50,000 in the month of November.
Let’s not do that again, kay?
And now, off to bed.
That is all.
I wrote 15,000 words today, to make 50,000 in the month of November.
Let’s not do that again, kay?
And now, off to bed.
Filed under Sewing

Fantasy jacket, side view
If I may steal a phrase from Elizabeth.
My goal this weekend is to see if I can, somehow, catch up on my much-neglected NaNoWriMo novel (if you scroll down to the bottom of my sidebar, you will see on my widget that I am sorely behind, while the month is nearly done. I blame this squarely on sewing. In my non-sewing (or at least, non-sewing-obsessively-except-when-thinking-about-sewing-obsessively) days I had no trouble pumping out my 2k words a day. This year, it’s been a struggle. Grr. Not helped by the fact that my main character has two small kids and over the course of the story so far has acquired a third, and getting your character to do anything with three kids under the age of five is almost as hard as actually doing anything yourself with that many small children. Who knew? Anyway. So I’m trying to not sew this weekend. Despite that, my brain is fluttering with things I’d like to make. In particular, this jacket-cum-sweater thing. I’ve been thinking that I love the idea of a blazer for everyday wear, but in practice I find them restrictive and end up reaching for my bunnyhug (hoodie to those of you who don’t hail from central Saskatchewan). It’s the bastard lovechild of the Lady Grey and the Kimono-Style Bunnyhug on Burdastyle. In particular, I want to make it out of sweatshirt-material,

front view
with a shawl collar. Which will require—yes, you guessed it—drafting. Ulp. So naturaly, I spent a chunk of time yesterday when I should’ve been writing, looking up how to draft shawl collars. And then working up these sketches. And now, when I should be writing, I’m making a blog post. *headdesk*
I’ll get to it right away, I promise. No tea until I start writing. Ok, no more tea.
Also, my sketching is sooo out of practice. Not surprising—I’ve done very little figure drawing, none of it life-drawing, since Tyo was born—but painful, still. The side view above is decent but the front view is indifferent at best. Bleh. I always did like profiles (you don’t have to get both sides symmetrical! 😉 ). I’ve done scientific illustrations out the wazoo the last several years, but those don’t really use the same skill-set. I love drawing fabric, though. I love drawing clothes. I always have. My main annoyance with most of the figure-drawing I did in early Uni was that it was all nudes. Which are interesting in their own way—once you add clothes you are no longer drawing “a person” but drawing a particular kind of person; the figure acquires layers of connotation that were absent from the nude—but I wanted to practice drawing clothes as they fit around a person.
Anyway, I’m obviously stalling. Off to write!
Filed under Sewing

Ellen Pants, with button and belt-loops
I pretty much finished the Businesswoman Pants back in October, shortly before I embarked on the coat for Tyo. And I was pretty happy, but after a day of wearing them two things were obvious. First, the little metal pants-hook and bar I had sewed were not in any way, shape, or form sturdy enough to keep these pants up (in fact, by the end of the day the metal bar was a twisted remnant of its former self). Second, the lack of belt-loops was driving me nuts, because they kept sliding down (increasing the strain on the hook and bar). I don’t know if this is a side-effect of the dropped waist or the slippery lining or just the generally rectangular shape of my hips, but it was still annoying.
Anyway, it was clear that the pants needed a button and belt-loops. And today,

Rear, with belt-loops
while I waited for my laptop to defrag and otherwise soothe its booboos (it’s been cranky lately), I decided to tackle these minor finishes. So I made a button hole (successfully, by machine!!!! … on the third try. Fortunately this wool is highly forgiving of needle-holes), and cut, interfaced, ironed, and topstitched (as subtly as possible) the belt loops. I didn’t want to topstitch the belt-loops in place, either, so that took a bit more thinking. You can do this without too much trouble, I think, if you apply the belt-loops while you’re constructing the waistband, but once it’s done it takes a bit more finagling.
I ended up sewing the bottom ends, folding them up and over to the inside of the waistband, and hand-stitching there. Me and my hand-stitching, I know. Also, figuring out how to distribute your belt loops when none of your seams line up is a pain in the ass.

Fancy button
I was going to attach one of my usual jeans buttons, but (perhaps fortunately) I couldn’t find the little doohickey for hammering them on, so I went through my buttons and found this black plastic shank button with a rather battered “jewel,” that arrived in a small and generally unremarkable baggie of buttons from the thrift store a few weeks back. I’m not convinced that the plastic shank will be tough enough either, but it’s not as if it’s an overly precious button. But it’s cute, and where else am I going to use a rather tacky plastic-gemstone unique button? It will get scratched up and hidden by belts, but it’s already rather battered, so whatever :).
I’m not convinced that I totally love these pants—my hips definitely benefit from the pocket and yoke detail on jeans—but they’re warm (which sounds really good right now) and will definitely come in handy when, y’know, I don’t want to look like a total schlub.
Filed under Sewing
First of all, before I forget, thanks everyone who said they liked the new theme! I finally found one I can customize the way I like, and I get a header! yay!. Though I’m still getting used to the new colour scheme. I’ve been in such a “red and black” mode lately, the blue and cream feels odd.

Lekala raglan tee pattern illustration
So this past weekend, in between madly sewing jeans and bullying Tyo into posing for pictures in her coat, I spent some time sniffing around the Lekala website. In particular, I discovered their “knittings” section. There are some pretty groovy patterns there. Importantly, they have a link to a sample PDF of the patterns (conveniently tiled for home printing, albeit for an A4 size paper. I wonder if I could find A4 paper here if I looked?). EVEN more importantly, that PDF pattern is in a small adult size, for someone with an 84cm bust and 92 cm hips. Which happens to be about as close to my actual measurements as any non-custom pattern ever is (we’ll ignore the 64cm waist, AKA 25″ waist. Haven’t had one of those since I was 14.)
Anyhoo, I cheerfully went along downloading every pattern that caught my fancy, and decided in a fit of mad bravery to sew up my single remaining remnant of white cotton knit into this pattern (#5672, about halfway down the page). Don’t you love their foxy artist illustrations? I especially like that a lot of them are plus-sized (though not this one, obviously)
This is the line-drawing:

Lekala raglan top 5672 line drawing
which shows what it is a little more plainly: a simple raglan-sleeved top with a gathered drawstring placket in the front.
I’ve been wanting to try a raglan-sleeved basic tee for awhile. Well, basically since this one appeared on Burdastyle. Obviously there’s some differences (no underbust seam here), but the basic shape’s the same, both have bust gathers, and this one is free!
I printed the pieces out and compared them to my much-laboured-over Lydia pattern. Almost a perfect match, aside from some subtle differences in the waist curve—the sizing was spot on, as was the sleeve length. The bodice of the Lekala top was quite short, as you can see in the pattern illustration, so I extended it by a good 10cm; as I no longer have the firmness of tummy the model does, I try to avoid that sliver of low-belly nowadays. I also added my usual extension to the arm as well.

Lekala raglan tee, V. 1, front
And I got sewing. Since the knit I had on hand was white and a bit sheer, I tried out Sherry’s double-layer, folded hem, enclosed seam technique. This worked really well, though I wasn’t quite clever enough to get the sleeve seam enclosed between the two bodice layers. Next time. Only downside—it’s awkward to take in after construction. Which is why Sherry made a muslin. I didn’t bother, despite remembering clearly that the white Lydia I made from this same fabric needed to be taken in, as the fabric has little to no recovery. So the bodice wound up a bit looser and bulkier than I might have liked… but still wearable. It also looses length significantly as it stretches in width; I should’ve added more length to the sleeves.
I had the most trouble with the neckline. I was quite worried about it stretching out of

Lekala raglan-sleeve tee, slightly better shot of the body
shape (see above about the recovery of this fabric). Initially I went to bind it with a a strip of self fabric cut on the lengthwise grain (as I’ve done with all my Lydias; the technique is the same as Sherry uses in her tank-top post, minus the serged edge and precision). However, I remembered (as I was sewing it on) that this fabric has no lengthwise stretch. The resulting binding looked great and didn’t sag, but when worn it pulled the neckline very high, making the whole shirt very tight through the armpits, but most importantly not providing that lovely almost-off-the-shoulder sweep of skin. So I cut it all off, went back, and sewed 1/4 clear elastic along the wrongside, and then just folded this under and topstitched. I started out the topstitching with a double needle, but one of the needles snapped within the first four inches of topstitching (first time using that needle, too… #$$%#%$@#@$), so I did two rows of single stretch straight stitching. Grrr. Well, it looks all right from a distance, anyway. In hindsight I could’ve been a little more aggressive snugging up the clear elastic; it flares out a bit more than necessary especially right at the sleeve seams.
The pattern called for a drawstring placket to make the gathers at the bust. I had no idea how to do this, the

Lekala raglan-sleeve T
instructions were less than edifying (I’ve never applied a surface placket like this before), and I didn’t have anything I thought I’d want to make drawstrings out of anyway, so I used the same method I did on my blue tank top and sewed a stretched elastic on the inside. I could’ve made it a bit longer, but on the whole the detail worked.
I definitely want to repeat this in a nicer fabric (this isn’t an awful knit, it’s reasonably stable to cut and sew, but the lack of recovery, lack of vertical stretch, and boring colour irritate me). And maybe stick a big floppy collar like the Manequim Cowl on top.
I wish all the nice knits at Fabricland weren’t so frickin’ expensive. I know, I know, buy online… /sigh.
Here ends part 2 of my Lekala odyssey. I’m pretty sure there will be more in the future…
Filed under Sewing

My first sewing text.
I’ve mentioned before I’m a self-taught sewist. For a long time I figured that anything I couldn’t sort out on my own, I’d ask my mom. This worked well when I lived in my home town, but started to become problematic when I moved out of province. Especially about a year ago, when I was starting to entertain notions of learning how to sew well. One thing I did was do some quick internet surveys of recommended texts on sewing. The idea of actually studying sewing had never occurred to me before, but since I’m a researcher by trade it really was a natural progression. And then, one day around last Christmas, I stumbled on a copy of the “Reader’s Digest Complete Guide to Sewing” at the thrift store.
This was on the short list of recommended texts. I snaffled it up, read through voraciously, and went on to make my daughters some coats. Then I discovered the world of sewing blogs, and the forums on PR, and Burdastyle.com, and, well, I was off.
Well, a few weeks ago, a number of volumes of the Singer Sewing Reference Library showed up at my local Value Village. And I resisted. Probably most of the information was already in my Complete Guide. Probably it was all super-dated, anyway.
And then Cidell went and reviewed one of the volumes. Interestingly, Carolyn also listed the series among her favourite sewing books, but none of the volumes she has are ones that were available to me. And there’s a whole one on tailoring, apparently. D’oh!

My new sewing reference library!
Anyway, yesterday I was feeling a little foolishly flush, and they were still there and, well, they’re only three bucks each, and it’s five for the price of four, and… well, I came home with five of the set.
I did not buy the home dec volumes. Sorry. Maybe I will be more interested in home-dec sewing when I a) don’t live in a bleak rental house decorated in a scintillating palate of cream, ivory, and ecru. And b) can afford to decorate with the kinds of sumptuous fabrics my imagination demands. In the meantime, home-dec sewing = meh (which hasn’t stopped me from sewing my own curtains, or curtains and bed-drapes for my kids, but I’m not going to spend money learning to do it.)
So… Cidell talked about the Activewear volume already. Sewing Essentials seems to cover the basics, which I think I mostly have down when push comes to shove but hey, pictures are always great. Sewing Specialty Fabrics has to be good to have on hand, and covers everything from silk to bouclé to gabardine to lace to fur (fun or otherwise). The Perfect Fit is considerably more detailed than the five or so pages on fit in the Complete Guide, and has a small bit on swayback alteration, although it’s in the pants section, which isn’t was usually gives me the most trouble. I was a bit concerned over Sewing for Style (which style? 80s?), but it’s got a large chunk on tailoring, so I decided to go for it (but see above about the actual tailoring volume). I’d still like to get a real tailoring book at some point, but every little bit helps.
And, there was about 2 yards (just shy of 2m) of this lovely wool tweed. Isn’t that a great heathery-grey-mauve colour? At least half the nice fabric I’ve ever found at Value Village has been lovely wools. I hypothesize that people buy them and then are too intimidated/lazy to actually make the coat, and they end up in the thrift store alongside the godawful polyester and that “what was I thinking?” print. I wish there was enough to make this my Lady Grey Fabric, but even if I used something else for the facings, collar, and belt, I think not. Maybe a nice little blazer instead.
Me and my fantasy blazers. /sigh.

Syo's Pillows
In other news, Syo has been working hard on her hand sewing. She has now learnt to cut her own thread, thread her own needle, and even carefully marks out her stitches on the fabric beforehand. She has been putting these skills to good use creating an assortment of little pillows for the toys of the house.
Her knots, however, leave a little to be desired, as you can see.
We also (sigh) bought Tyo a “play coat” at the thrift store. It’s big, poofy, ugly, water- and wind-resistant, and most importantly easy to move in. Well, easier. There’s always going to be a certain amount of restriction when you look like a marshmallow. Ah, well. At least this way the Princess coat won’t be coming home soaked with muddy slush when the chinooks hit.
Filed under Sewing
Or, The trouble with photographing black jeans indoors.

Jalie Jeans, v. 4
Most of the following pictures are lightened. Severely lightened. The jeans in reality are a dusty black , although the ones I made last summer, of the same material, have faded, not unexpectedly, to a dark grey.
First up, I have apparently gotten fat. Well, rather, when I first went to try them on (before attaching the waistband), I could get

Jalie jeans, v. 4: front
them on but couldn’t get the fly closed. Keeping in mind that I have made this pattern in this size three previous times, including once in this *exact* fabric. WTF? I went and narrowed the seam allowances just at the hips—letting it out about .5 cm (they are only 1cm seam allowances, after all) for an added 2cm around the hips. Phew, now I can close the fly. Also keeping in mind that the first pair in this fabric mysteriously grew about 2cm around after I washed them the first time and I had to take them in. So I’m kinda hoping these ones do that and then I can at least restore the seam allowances to where they should be. But jeez.

Pockets and belt-loops
Otherwise, there’s not too much to say. I was quite happy with the wash-away stabilizer on the pockets. My topstitching is not nearly as porn-worthy as Peter’s. The fly topstitching sucks. The nice thing about using the same thread top and bottom is that you can do the pocket embroidery from the wrong side, and so draw your design right on the pockets. I free-handed this particular one, and had a bit too much fun with the smocking stitch, which is the only decorative stitch my machine does that I actually like.
I decided to go a bit wild with the belt-loops. They’re

Belt-loop closeup
extra wide, with extra fancy stitching. Hopefully this will mean they’re extra sturdy, too, especially the three at the back (I’m really liking a triple-loop at the back, although maybe not as much for these wide ones. Oh, well).
The leg length is okay but I could probably still lengthen it a little. If these were flares, they’d be driving me nuts with their shortness, and I’d still kinda like that “slouchy around the ankle” look. Something to think about for next time. Or maybe next time I should do real skinnies… I could even stretch myself and attempt an exposed zip in the lower leg. Wouldn’t that be fun?
In other news, we re-watched the Teen Wolf movies last night (gotta share the eighties with the next generation, after all) and I was struck by how tight all the girls’ jeans are. About as tight as mine, really… without the benefit of lycra content. It makes me wince just looking at them. Although if I’d been a teen in the eighties, I’m sure I’d have been wearing them that tight. And wondering how to get rid of the big flapping wings and the hips. And why the waistbands were so flipping tight.
… anyway. One more pair of pants for the rotation, check :).
Now, do I have the energy to put gussets in Tyo’s coat…
Filed under Sewing

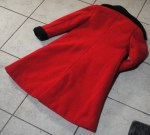
Girl in a red coat
Full Disclosure Edition
Seems to me like a Russian Princess coat, anyway. Or Madeline, as celkalee said.

Walking
The coat was finished, and not a moment too soon (actually a little late), as winter arrived on Monday with about six inches of snow (and another six on Tuesday, and again Wednesday and Thursday. Friday and today have been snow-light; more is forecast for tomorrow). Also, of course, providing the perfect backdrop for this coat. Snow and spruce trees for the win.
Even after four coats, I still haven’t really got that “facing/hem” thing figured out. I know there’s a way to make it happen really neatly (I’ve read two or three different sets of instructions on it, even), but somehow my pieces never quite line up and I end up fudging and hand-stitching to make it work. Ah, well. If some future couturier in distant decades dissects this coat, they’ll find plenty of other construction quirks to puzzle over (like, oh, how I padstitched the collar after sewing it… yeah, yeah.

Vent being pulled wonky by ining
The only bit I’m really not happy with (other than the sleeves still being uncomfortably tight) is the rear vent. I used the Cupcake Goddess’s instructions and while the basic principal is sound, I can’t figure out how to do it without creating and offset in the lining so you have a seam allowance (or making the cut-out side shorter). This, added to the difference in the length of the lining vs. the length of the back, meant that my vent-extensions lined up really poorly, and while they lie flat when worn, the lining is a bit short and makes the coat hike up if anything goes off of plum. Also the whole thing requires a degree of precision I find difficult to achieve at the best of times, much less when wrestling five pounds of wool coat around my sewing machine.

The rear view
All in all the pattern went together fairly well. My only serious objection with it is the narroweness of the sleeves. I added 2cm in sleeve width after the second muslin, but they are still really snug—it makes an attractively slim line, but not a comfortable coat, and it’s pretty impossible for Tyo to put a sweater under it at the moment. Thanks everyone for their suggestions on this problem, by the way… I’ll probably be tackling it in the next week or so. Or, y’know, tomorrow if I’m a good mom.
Next up: jeans and a stab at Lekala patterns!

Click to go to slideshow!
Filed under Sewing
Despite my inclination to plunge headlong into another coat—my long-neglected Lady Grey, say (I bought hair canvas! I bought hair canvas!)—I need to do some practical sewing. My favourite pair of Jalie jeans has developed some issues (mostly due to my own shoddy construction decisions… the sort of thing, it appears, I have to learn for myself, because no amount of good advice seems to get through my thick skull), rendering them currently unwearable, though a bit of mending should get them back in the rotation. Am I the only one who’d rather make a whole new pair of pants than sew a belt-loop back on? Well, that and the pockets (which I made out of cotton from an old duvet I’d retired because of all the holes it was developing… stupid, stupid) are full of holes, which is causing stress in the pocket topstitching, which has broken some of the topstitching threads… so yeah, they are in some trouble. Not to the point of being unwearable (at least once I get the belt loop sewn back on… this is why you attach them with zigzag bars, not just straight stitch). For those of you who weren’t around back in the summer when I began my Great Jeans Odyssey, my pattern of choice is the infamous Jalie 2908, altered based on becca a’s instructions into a low-rise, straight-legged jean and tweaked for maximal skinniness.

Embryonic jeans
Anyway, yesterday I laid out my remaining length of black stretch denim. Apparently I had enough left for two pairs of pants, instead of just the one I’d thought. 3 pairs of pants from 4m of fabric, not bad. If, y’know, I needed three pairs of black jeans… but anyway. I cut merrily away, even remembering to undo my disastrous alteration of last summer.

Pocket closeup
I made some construction breakthroughs. I “fused” washaway stabilizer to the wrong sides of the pockets so they wouldn’t stretch out when I did the embroidery on them. I’m really happy about this… not only does it keep the pocket stable, when you fold the sides under and press them, it melts just enough to really grip the edges in place, so they don’t pop up! And unlike the interfacing I’ve used before, they’ll wash away so that when I finally wear my pants the pockets can stretch with the rest of them! And it didn’t even stick to the iron, which was my main fear.
I remembered to sew the yoke pieces on in the back before the centre seam. I did my topstitching in a regular red thread, using my triple-stitch (the straight stretch stitch) like I did in Tyo’s jeans. It looks great! So much more relaxing than wrestling with the topstitching thread, and I can use the same thread for constructing the seams, plus it slows the machine right down, which is good for topstitching (my Janome does not like to go slow, normally)
And then… I realized… I had sewn the yoke pieces on the wrong sides. The narrow ends were in the CB, the wide ends at the sides.
I had to pick out… two rows of stretch topstitching, the regular stitching, AND my triple-zig-zag seam finish. Yes, I was being all fancy and finishing my seams for once!
This kinda set me back.
then, having recovered from that, I went merrily on my way starting the fly construction…
And forgot that I need to attach the front pockets, first, since I’ve drafted pocket extensions that run into the fly. This makes for a nice, smooth finish on the front of the jeans and helps stabilize the fly… but only works if I actually remember to do it *before* I sew up the CF. So now I’m on the fence whether to rip that (probably only the basting where the fly opening will be, and a single bit of topstitching, need to come out) or just cut off the pocket extensions. Grrr.
This is why we follow instructions, /sigh.
Tyo’s coat continues to elude photography, mostly because with the grey weather we’ve been having, by the time she gets home from school the light’s already going. Hopefully we can get some good ones on the weekend. The sleeves are a real problem, though. With a sweater underneath, she can’t even bend her arms enough to button the thing closed. I’m going to have to open it up and pull out a layer or two in there. *headdesk*
On the up-side, it was -20 this morning and my coat performed adequately, at least for walking the kids to the bus stop. I was getting a mite cold by the time I got home, but nothing that long-johns and a proper hat (I just had my sweater hood up, silly me) wouldn’t’ve fixed. So I think it will be adequate, at least. The next test, of course, will have to be wind chill.
I still want a winter coat that’s both stylish and -50C-worthy. I have a feeling it’s going to take a) a less fitted style, b) a lot of research into materials, and c)more money. Not that this one was cheap, by the way.
In other news, I splurged and took my long-ailing serger in to get serviced (finally… it’s been about two years). The guy at the sewing-machine place confirmed my thought that the problem is the timing, and hopefully nothing else is wrong with it. It still runs fine… the loops just don’t form.
So in a couple of weeks I may have a serger again! Yay!
Filed under Sewing

A finished coat... missing only one ten-year-old girl
… is a finished garment and no good photos to show it off. Nature has graced us with the perfect backdrop for the coat (six or eight inches of snow in the last two days), but by the time the buttons were on this evening the light was gone, so pictures will have to wait until tomorrow at the earliest. However, since I’m dying to show off just a little bit, here’s some flat shots and details, not that most of my details are worth ogling ;).


I’ll do a full write up with the last of my construction woes when I get some decent pictures… by which time I’m sure you’ll be as sick of this thing as I am (if you aren’t already 😉 )
And now the big question: will she actually be able to wear it “for everyday” or will this become the dreaded fancy coat? It’s supposed to be -21C here tomorrow (about five below zero F… somehow that sounds warmer 😉 ), which will be a big test for my winter coat, as well.
Filed under Sewing
at the progress from the weekend.

Coat, left; lining, right
The sleeves are attached (and still dangerously narrow 😦 ); the lining and facing is sewn (this is the first time I’ve done a lining with a facing at the back of the neck. It was not particularly difficult. I drafted fold-over cuffs for the end of the sleeve… we’ll see how those go on; I used the same idea as the ones for Syo’s coat.
I did some thing to the roll of the collar that I will describe as pad-stitching’s bastard cousin, which did succeed in giving it some shape (at least so far), and only shows a little.
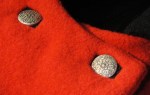
Tyo picked out some silver metal buttons. They’re lovely, although silver buttons really wasn’t what I was envisioning for this coat. She likes them, though.

Label!
But most importantly, I remembered to sew the label to the neck facing already, so I don’t have to hand-stitch it on at the end! 🙂
Filed under Sewing
Sewing is what I do when I'm cheating on all my other hobbies...


