Tag Archives: finished projects

Birthday Princesses

Once upon a time, long, long ago, back around the beginning of summer, the twins stumbled on McCall’s M6141 in my collection. Why did I show it to them? I’m not at all sure. I think I had just watched Angela Clayton’s video about a “historically accurate Rapunzel” outfit and thought they might enjoy it, as that is one of their favourite princesses, after Elsa and Anna of course.

At any rate, the demands were instant. Tris wanted the pink version and River wanted the blue. They haven’t really figured out that pattern envelopes are just a jumping-off point. Anyway.

By some miracle, we found fabric more-or-less appropriate for each look, from a variety of remnants and ends in stash. Note: despite the small size and contrast elements, this is not a remnant-friendly pattern. The skirt is large and sweeping and so are those sleeves. River’s fabric was a couple of different cottons with embroidery (why I picked up those pieces when I never wear those colours, I couldn’t tell you). For Tris, I pulled the last of the fabric from this costume of Ebi’s for the contrast, and then cried a little as I cut into an assortment of pink satin remnants for the main fabric, because man I hate sewing with satin. (Please note:: most of these remnants were actually pieces given to me, which I had hemmed and kept in the twins’ dress up box, where they served any number of impromptu functions. I do not stash pink satin if I can avoid it.) I used white broadcloth for the lining, because I have a ton of it purchased for just such uses.

I set to work tracing out the pattern, since I needed the smallest size. Except. Have I mentioned how much I hate Big 4 costume patterns? I generally hate all their costume patterns. Not for the designs, obviously, but for the shortcuts they almost always take in their drafting. Halfway through my dutiful tracing out I realized that the shortcut the company had made with this pattern was to completely bypass grading the skirt and the larger pattern pieces of the sleeves, relying instead on the gathering to have the same size pieces fit from a kids size 3 to 8. Not even “cut here” lines for separate lengths—just instructions to use the lengthen/shorten lines to get the right length.

Not impressed, McCall’s.

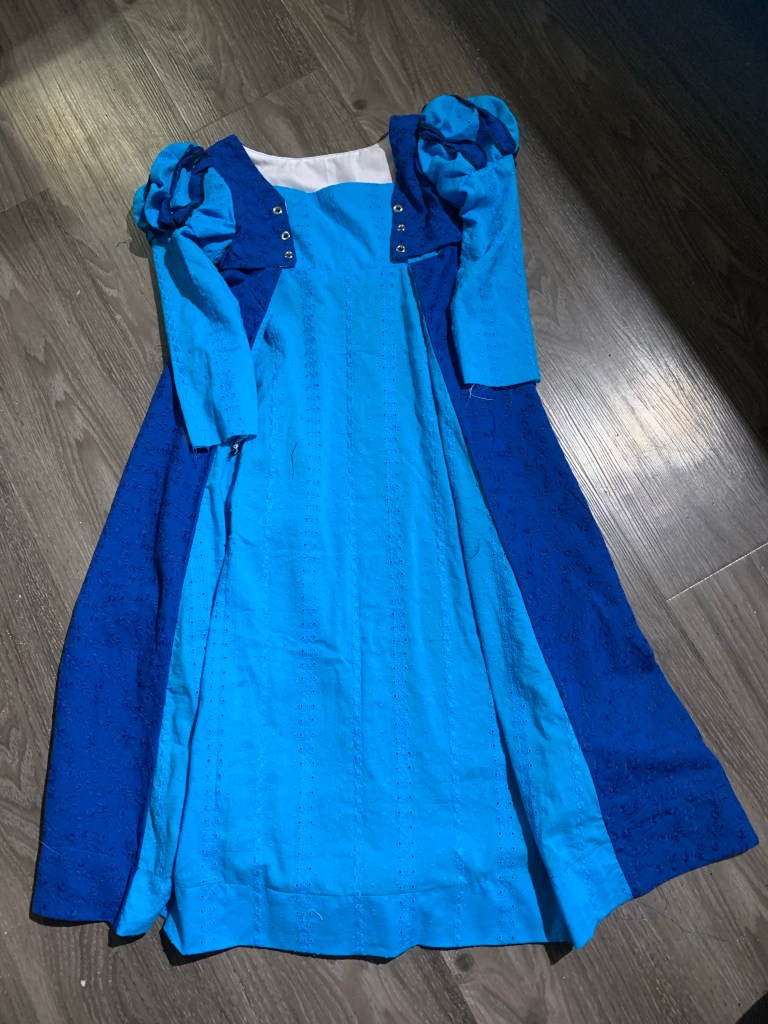
Anyway, once my irritation had passed, I moved on to cutting out. I wanted to make the dress considerably more adjustable than intended, so I modified the front quite a bit. Instead of cutting the princess seams, I made the side front piece into an over-layer with grommets for lacing at the front, and then Frankensteined a single-piece under layer from the contrast fabric.

I ran into some hard limitations on fabric for River’s and had to omit one of the back panels of the skirt. Thanks to the fact that the skirt was drafted in a size 8, though, this worked just fine, though she doesn’t have much gathering in the back. I did take up a little bit of fullness by adding a pleat where the contrast fabric joins the regular fabric, to hopefully add to that over layer/underlayer illusion.

The rest of the construction didn’t irk me too much. The pattern calls for lacing up the back. I was not going to do that. So they are pull on at the moment but may get back zippers added at some point. The puff sleeve was constructed pretty much as expected, though I did modify the length of the “ribbons” to make them a little shorter than the layer they are on top of.

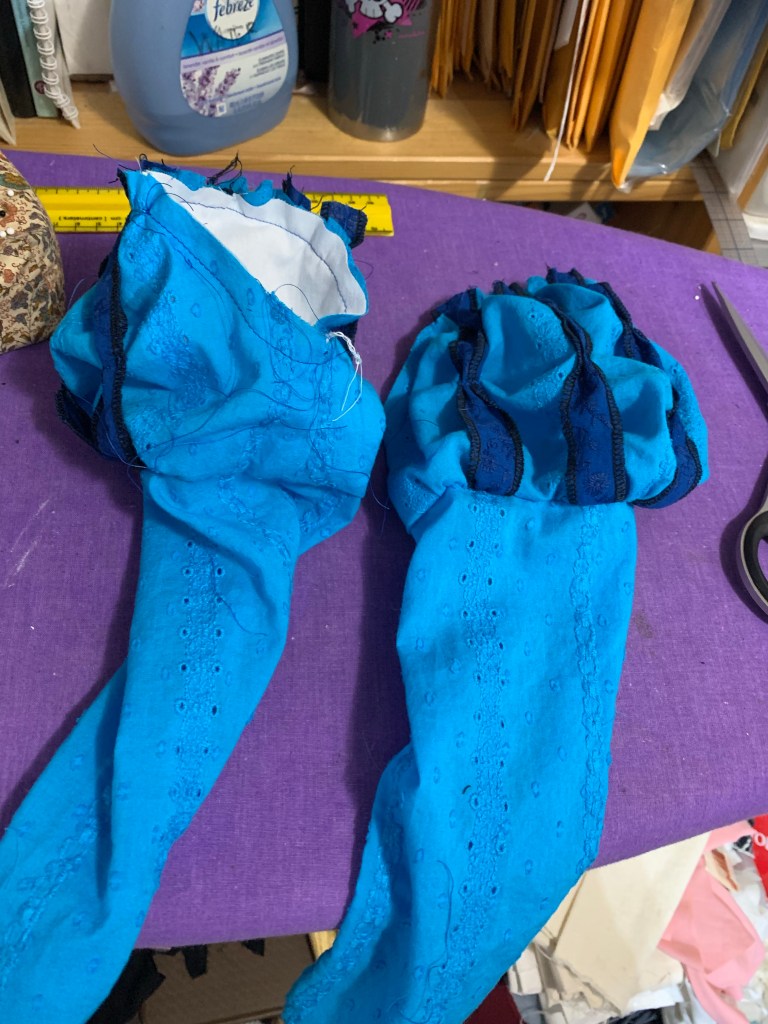
The puff also made setting in the sleeve easy. I also skipped lining the lower sleeve. Due to fabric limitations I had to cut the sleeves from the “contrast” fabric, but I think the look works fine this way.

Tris’s dress was all the same except on hard mode: slippery satin (some of which is terrible quality) that frays at the slightest touch.

I had a remnant of pink jacquard with this black and gold pattern in stash—only enough for the bodice, however. The skirt is cut from two different satin pieces, one of which was a pretty decent crepe back satin but the other one (the back of the skirt) is that crappy and terrible Hallowe’en satin that makes me want to cry. Maybe I’ll replace it someday. (Not likely)

I had hopes of finishing these in time for their birthday at the end of summer, and I came close, but then the day of their birthday we took them to Costco and they saw the princess dresses there and were super excited and their dad is a pushover and bought them four. And despite all being made of nasty polyester they are actually really intricate and well made, and I’m pretty angry on behalf of whatever skilled seamstresses (because it’s almost certainly women) who were paid a pittance so that Costco could sell the dresses for $40. But anyway, that’s a different rant. I was a bit annoyed that the purchase basically undercut my hard work on their dresses, but also I’m not sure what the theoretical maximum number of princess dresses the twins would wear if they could is… it’s definitely higher than six. I did, however, give myself permission to not push to get the dresses finished. So it took until, um, not quite Hallowe’em. Except not really because River’s dress is still lacking trim, but I think she’s forgotten that’s a problem so I’m not going to bring it up.

Anyway, they are pretty happy with the dresses, though I doubt they’ll fully displace the beloved Elsa and Anna dresses. I, of course, prefer River’s since it isn’t polyester, but they each seem to like theirs best which is always the hope now that they don’t like wearing the same thing.

I was not about to do back lacing as the pattern called for, but I probably should have added a back zipper. Because they were pretty oversized (even cutting the size 3 for my four year olds), I just made them pull on and then tighten with the lacing, but it takes some wiggling. Tris’s is “zipper ready” in that it has a back seam I finished and just zig-zagged up. River’s, though, due to my fabric shortage is cut on the fold. But that’s problem for future Tanit.

I also didn’t hem River’s dress quite as ridiculously deep. I cut the full length as drafted in the pattern, which as I mentioned didn’t grade the skirt length, figuring it would be better to be able to lengthen the hem as they grow. Which is true, in the theoretical case where I actually do it. We’ll see how that plays out. Anyway.

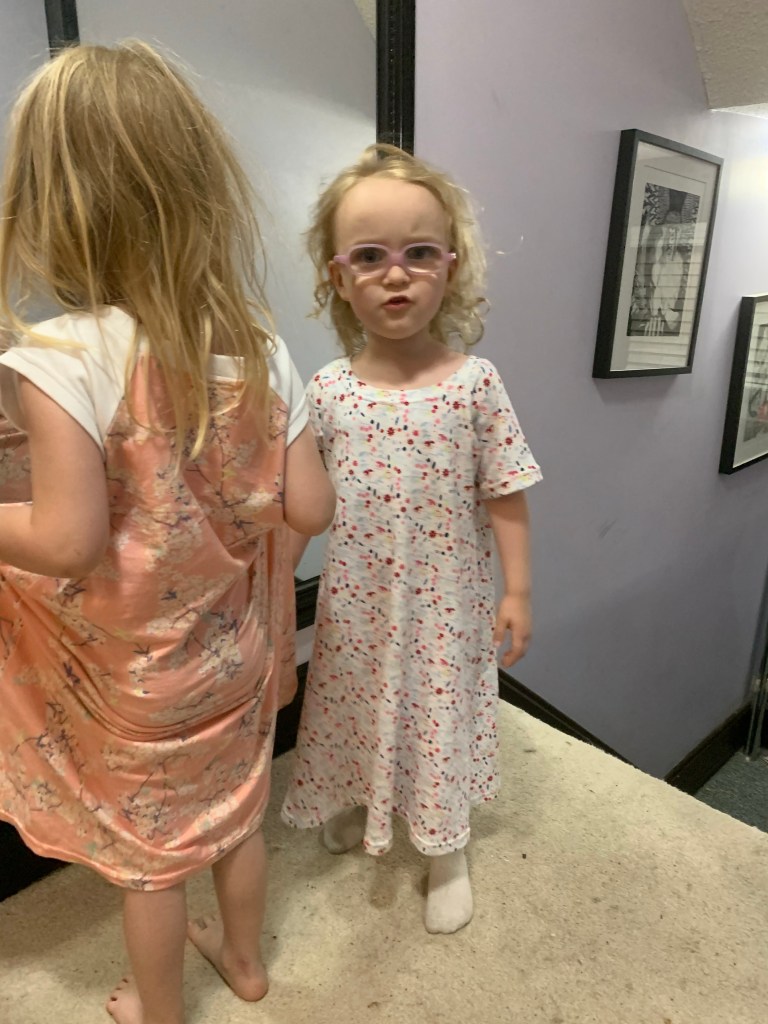
I am definitely glad I added the front lacing, as it makes the fit so much nicer and more adjustable, though it doesn’t really play well with the necklines of the under-layer. You can see some of the size difference between Tris and River, even in bone structure, in the fact that Tris has a nice wide gap in her lacing, while River’s still laces closed.

So, were they worth it? I’m glad to have used some scraps from stash, especially the pink brocade. They were a LOT of work, to still end up less fancy than the ones from the store. But I’m also glad we purchased the other dresses. Because I really don’t want to create a whole wardrobe of princess dresses.

Well, not for the twins. Maybe for me…

6 Comments

Filed under Sewing

Fantastical Fantail

I didn’t technically NEED to make the Scroop Patterns Fantail skirt.

I mean, let’s not get too deep into the definition of “need,” especially when discussing costuming.

The Fantail is an 1890s-1900s five gored skirt pattern. Which is also totally wearable as an everyday skirt… at least if, like me, you’ve strayed far down the garden path of “WTF is she wearing?”

So wearable, in fact, that I have several others almost exactly like it. The Edwardian Walking Skirt (Folkwear pattern) that my mom made back in the 80s or early 90s, for one. (And yes, i still have the tissue pattern she traced off the original she borrowed from the library.) The grey gored skirt I made a couple of years ago that I wore like crazy last winter, for another. And three or four more long, gored skirts of various iterations.

But it is also a skirt style I wore constantly last winter and, well, winter is coming. And I had purchased the Fantail back in the spring when Scroop had a big sale to raise money for some unexpected expenses. And then one of my Victorian Sewing buddies was destashing some this gorgeous twill “denim” (not really denim, it’s fairly loosely woven and very soft. But it does have a twill weave, and white threads in one direction.) And it just really needed to be this kind of skirt.

So, just before my birthday, I got the pattern printed out. I didn’t actually get to work on it for my birthday, but not too long after I started poking away at the project.

This kind of skirt is really, really simple, and it went together quite quickly. As per the instructions, I graded between my hip size and the waist size I wanted, and I’m glad I did as it meant I didn’t have to fuss with adjusting the perfect pleats to fit a different waist size

The fabric wasn’t overly wide, and I wanted to use it as efficiently as possible. This style of skirt straddles the evolution of grainlines from the gored skirts of the 1880s where it was standard to have one edge of the gore on the straight grain and one on the bias, to something closer to a modern, centred grainline, to allow the fabric to hang better. Maybe I should care more about the hang of my skirts, but as the pattern says, grainlines are suggestions. So I angled my side and back gores so that they fitted best on the un-folded fabric. No regrets so far. It’s not zero waste, but the amount of waste is minimal.

Back placket, two sides.

It took me a bit to figure out the instructions for the back placket, and I did manage to cut one of the facings wrong way round (though it’s on the inside so I didn’t bother to recut it). It isn’t hard, or even unclear, particularly, but everything is very side specific and there are some acronyms in the instructions that aren’t instantly comprehensible. Once I understood what they were getting at it was fine.

Other than that? Easy peasy. And those back pleats? To die for.

Pinned closed at not quite the right angle in this pic. Still gorgeous pleats.

I did use some very modern construction shortcuts: overlocked seams, machine blind-stitched hem, leaving the selvedge exposed on the inside of the waistband.

We were (are) in the process of moving the whole sewing room, so I didn’t have a lot of bandwidth for authentic detailing.

I also couldn’t find the heavy-duty hooks and bars I bought specifically so I would have them around next time I made a skirt like this, but hopefully these two traditional (and vintage) hook & eyes will do the job. I was waffling a bit about adding a touch of topstitching to the skirt, just as a nod to the denim look of the fabric, so when I realized that topstitching was an integral part of the placket, I just went with it, a little line along each vertical seam (except the centre back.)

To hem, I used my favourite trick (when I don’t feel the need to be historical) and cranked up the differential feed on the serger while finishing the bottom edge. This gathers in the lower edge for you, which makes folding up and easing in the hem super easy. Unfortunately (?) I was doing it on the new-to-me serger handed down from an amazing reader, and the differential feed on this machine is a lot more effective than the one on my old serger, so it wound up gathered in a bit too much, which took some massaging. But it made the machine-blind-stitched hem super easy!

One thing the pattern lacks is a pocket. I’m honestly not sure how common they were in this period, with the narrower skirts clinging over the hips, but there’s still room to tuck one under the pleats in the back, so I did. I used the same method I always do, which comes from an 1887 sewing manual—so potentially a bit dated for this skirt’s era but not unreasonable. I didn’t manage the tidiest insertion (particularly when trying to topstitch along that seam) but it’s tucked around back where I don’t have to look at it so it doesn’t bother me at all.

I did forget a couple of little touches I wanted, including the tape that is supposed to go from the top of the pocket to the waistband, and hanging loops under the waistband. So I will have to go back and add those.

I serged off about 1/4” in length and then did a 2” hem, and I’d say the length is an excellent walking length for me, though I perhaps wouldn’t mind an extra inch if I were going for a more formal historical look.

While I was intending this skirt to fit over a corset, it turns out I can also still wear it without, though it doesn’t lay quite so nice and smoothly over the hips. It does mean it’s another thing I can and will wear to work this winter, though, which has me thrilled to bits.

6 Comments

Filed under Sewing

Summer Mesh Corset (in time for Fall)

Inspiration:

Original mesh corset at the V&A museum

I’ve been in love with the idea of doing a summer, mesh corset for a WHILE. I picked up a chunk of Aida cloth for the exact purpose back circa 2015. And when I made my Victorian Sundress (better pictures still pending) it occurred to me that this might also be the perfect time to make a light, aerated summery corset. So I set to work… and then summer blazed past in a blur of everything-but-sewing, and here it is just in time for the weather to turn chilly.

But back to the inspiration: I swear I saw one in a corset book somewhere, but damned if I could find it when I looked recently. This one from the Victoria & Albert shows the features I was interested in, though: solid bits, mesh panels, “waist belt” piece.

Now, Aida cloth (the stuff for cross-stitching) is nowhere near as open as the mesh used in the inspiration corset, nor is it, frankly, particularly stable. It made this an interesting project, and I’m not at all sure how long-lived the results will be.

Auditioning materials

Materials: aside from the Aida cloth, I went with some fairly beefy white denim for the details. I liked the white and cream contrast. Probably coutil would’ve been better for those parts but I was hesitant to sacrifice good coutil when the main fabric was a bit dodgy. I also decided to use my last spoon busk, just to make my life harder; the inspiration piece doesn’t have a spoon busk but it is right for the time period I’m roughly going for. I used 1/4” spring steel boning but given that my boning channels are single and not the double ones I’m used to (and the rather shifty Aida cloth) I’m thinking maybe a slightly wider, more stable boning might have been preferable.

The pattern is a veritable saga of its own. The kernel, as with most of the corsets I’ve ever made, is Butterick 4254 view C, a basic six-panel corset. but over the years I’ve altered, traced off, and re-altered the pattern so much I couldn’t even tell you how much it resembles the original. I still wear my old white corset from this pattern regularly (despite it being technically far too small and, more recently, badly stained with bright blue after an incident involving a gel ice pack and a cat), and the shape is pretty much perfect for me, but I wanted to make sure that the various layers of alteration I’ve added to it over the years were reflected in the pattern I used, while re-sizing to be closer to my current measurements. This involved adding quite a bit of width to the front, and substantially re-shaping the side seam to mimic the effects of a hip gusset I had added to the white corset at some point, as well as an inch or so of height to the top. I had shortened the corset pattern initially, as I’m short waisted, and the top had always been a hair low, but somehow as my bust has gotten larger the last few years this problem got worse (even though I’m pretty sure my bust point is lower than it was). So this latest version aimed to incorporate the added width and side-seam shaping, while adding the missing height to the top.

I don’t think I’ve quite nailed my revamped pattern (and a test in real coutil, or at least ticking, is probably needed to really tell), but I do think it’s a step in the right direction. The bust height is great; the side-seam needs a little more refinement in the shape of the hip flare (which I accomplished in this piece by playing with the seam allowance), and I had to take out some excess width in the back, though I’m not sure if that’s just due to stretching. I might try to adjust the fall of the side seam above the waist forward a little; below the waist it’s perfect.

Construction

  • Original has solid outer on top of mesh inner at corset front/back
  • Overlay solid portions over mesh around busk, lacing panels, and bust area, plus shaped waist belt
  • Seams to the outside, covered by bone casings
  • Cording on bust solid parts (in hindsight the original may just have been quilted)
  • Waist belt added after main seams but before adding busk and lacing panel coverings
  • One bone per seam, in bone casing, applied to the exterior
  • Extra bone just beside the busk for added support (not necessary for spoon busk)

The trickiest part about this project was coming up with the order of operations. (Spoiler: I messed this up, more than once.) I added the “bust cover” patches first, with cording. Then sewed the panels together. Next I should’ve added the waist-stay panel, but instead I did the back lacing area so I could test the fit before I stitched over all those seams. It’s good I did—I had to take the back portion in significantly, and tweak the hip curve at the side seam. I’m not sure if I had added too much or if the Aida cloth just stretched; it definitely wasn’t as stable as would be ideal. But it also meant I had to unpick a portion of the back lacing panel to tuck the waist stay under it.

Cording the bust area wasn’t hard, though it was a tad tedious. I was pretty sure within the first few lines that I should’ve used a thinner cord, as my channels are VERY raised. Looking back at the inspiration piece, they may actually have just been quilted, not actually corded at all. Oh well. If I were to do it again I’d move the entire corded section higher by a good inch, as it mainly sits below my bust. But that was pretty much impossible to determine in advance.

The trickiest part of the construction was wrapping the busk covering panel close around the busk pieces, but still with enough room to edgestitch it down, without breaking a needle. Especially while getting the busk in place over the bulk of the corded patches. I used a fairly thick string for the cording and in hindsight I wish I’d used a thinner one. Those parts are VERY thick and were really hard to sew over, even for my Pfaff 360, and I’m a little worried all the trimming I had to do may have left these seams vulnerable to fraying.

(Laced a little too tight at the upper back. More comfortable when laced more straight.)

Even with the width I removed, the corset is not really “tight”… I can lace it very nearly closed, although I wouldn’t want to wear it like that all day. If it stretches any more with wear it might still become too big. Although, I’ve also lost a little bit of weight this summer; if that reverses come winter I may be glad of a little extra room!

Maximum lacing tightness

I had planned to use the same white denim for my binding, but at the last moment decided to go for a lighter-weight cream twill, for less bulk at the edges of the corset. No regrets, although the texture of the heavier denim would’ve been nice.

I also remembered to add drawstrings in the upper binding, using more of my 1/4” stay tape. Which is possibly my favourite notion at the moment and I may need to just bite the bullet and buy it in bulk.

Anyway, I’m cautiously thrilled with the results, imperfect and experimental though they are in many ways. The shape is very much what I wanted. The bust height is so much better than previous versions. The size is a pleasant change from nearly-too-small corsets. I love the solidity of the spoon busk. How will it be as it breaks in? Don’t know. Will it self-destruct after a few hours of wearing? Could be! Will it be fun to sew? Definitely.

And now… to the fall sewing!

5 Comments

Filed under Sewing

Linen Repeat

Having finally completed, more or less, my Victorian Sundress, I promptly started a corset. Then I realized summer is slipping away distressingly quickly, and I hadn’t even made anything for me to actually wear on the everyday.

So I pulled out some linen I got last year from Pure Linen Envy, spent some time paging through my pattern database, and finally, on a rare full sewing day* during my vacation, got to work.

* fully sewing by hopping between my own project and two different projects for the twins, plus cleaning off the dining room table so I could cut out said projects, oh, and trying to keep said twins entertained, too.

My inspiration was this linen sundress I made back in 2016. Which has turned into a sturdy summer staple, even as the always-dodgy bust fit got worse and worse over the years. So I was excited to give it a companion, but, um, not with that same pattern.

However, perhaps ironically, I went with another McCall’s pattern, M8177. I have a much more successful history with this pattern, though: my blue big-sleeve dress from last year. I have always wanted to make the sundress version, and this seemed like a great chance to do that. Except. I had only three metres of my linen, and according to the pattern the long version called for 4.5.

Now, the long version includes both short, puffy sleeves and a self-fabric belt, so I was pretty sure I could get away with less, but the only way to find out for sure was a fun game of pattern Tetris. Since my linen wasn’t directional, I folded it cross-wise, as this can really help maximize fabric usage for flared-skirt patterns like this. Things weren’t looking good, until I realized that the back piece actually ISN’T meant to be cut on the fold. Suddenly I had enough room even for the facings.

There is a cat under my skirt.

What I didn’t have quite enough room for was the pockets. This pattern comes with inseam pockets, which I thoroughly enjoy on my first version, but either I lost the pattern piece or it’s folded up in with the sleeve pieces I didn’t use this time. Either way, I forgot about it when I was first cutting out, and I didn’t have quite enough fabric left for them anyway (although the nice thing about inseam pockets is you can always substitute something else.)

I did, however, have just enough left for two patch pockets big enough to hold my phone, so I went with that option.

After some contemplation I went with a selection of more-or-less matching vintage shell buttons from stash. It was either that or similar-looking plastic ones, but I’m pretty sure I’ll enjoy the shell more.

I thought the shell buttons gave it a bit of a shabby-chic look, so I pulled out some lace appliqués I’ve been stashing since Fabricland closed and started to play around. I gave them a quick tea dip to take the edge off the bright white, and eventually went with an asymmetrical arrangement on the front.

And that’s about it. Linen is easy to sew. I don’t super-love the process of attaching the facing on this pattern. I think I should probably sew the underarm portion of one seam, then line the straps up against that and stitch them down. But that’s my own issue with the style, not an issue with the pattern.

When I made the first dress I was annoyed that the back facing had a CB seam, as that kind of just adds unnecessary bulk, but given my fabric limitations this time I actually needed that seam, so win?

The straps are as drafted on the pattern (shortened about 1/2”, not surprising for me). They are a sturdy, bra-covering width, but I must admit I’d probably make them a touch narrower next time.

After wearing the linen has stretched out a bit, so I may take it in a touch more. And the front facings do flop around below the buttons so I should really stitch them down before I catch a toe. This linen is a lighter weight, which is delicious but may not be quite the indestructible workhorse that my black linen is. But I absolutely love the feel and colour, and the shell buttons and lace add a slightly shabby elegance that I’m all in for.

Now to just wear it as many times as I can get away with before the weather changes.

1 Comment

Filed under Sewing

French (Bonnet) Connection

It’s time. I’ve avoided it for almost a decade of costuming now: Victorian hats.

No Victorian lady’s outfit is complete without a hat. If you left the house, you wore a hat (and gloves, but, one problem at a time). The illusion can never be complete without it. Since I don’t have the right hair anyway, and my illusion was more of an impression, it didn’t seem too urgent. But I’ve dawdled long enough.

There seem to have been a wide variety of women’s hat-styles in the 1880s, from close-fitting frames to “flowerpot” hats to wide brims approaching, though not reaching, Edwardian levels. But in looking for something SPECIFICALLY 1880s (maybe not the wisest choice), you can’t really beat the distinctiveness of the weird peaked-brim style called a “French Bonnet”. (Or “Conquistador hat”)

I spent a bit of time messing around with a simpler, almost fedora, shape, before deciding to bite the bullet and purchase the Truly Victorian pattern. It was nice to have the instructions on construction to follow, since I’ve never done anything even remotely like this before.

I was hoping for some pointers or suggestions on trimming, the real wild card of hattery, but no such luck.

The hat is cut and sewn using buckram and wire, which shouldn’t have posed much of a problem as I have both in stash. Unfortunately I couldn’t find either. Syo was good enough to pick me up some (more) buckram, and I wound up harvesting the wire I had used in the twins’ mushroom capes last year. (It didn’t work super well there and I think plastic boning would probably be a better solution in their capes anyway). The new buckram from Fabricland was pretty floppy so I used a double layer, and I did take advantage of that to sandwich the vertical wires in the crown between the two layers. Otherwise I followed the instructions pretty closely, or regretted when I didn’t. (For example I somehow neglected to have a wire at the CB seam, and there is a bit of an indent in the back portion of the crown because of this. Oops.)

Other than attaching most of the wire by machine, the whole thing is almost entirely hand-sewn. I don’t mind a bit of hand-sewing but i definitely didn’t love trying to hand-sew so many thin layers on a rigid frame. Possibly a curved needle would’ve been helpful?

I tried out layering some quilt batting underneath the top of the crown and I like how it smoothed the look of the hat. The wire frame kind of leaves dints between the wires and this filled that in. However, I also wanted a light summer-weight bonnet, so I didn’t do any more. But if I try this again I will definitely consider it, or at least a flannel underlining or something.

Also, sewing the butted seam at the front of the brim to create the peak was a bit of a trip, and I’m glad I had sewn butted seams before as it’s a completely counterintuitive action.

For the brim, I departed from the instructions slightly and used a straight strip of fabric to line the underside, then pleated it towards the middle, because I’ve always liked this look in bonnets. It didn’t take quite as much pleating as expected.

I was a little stumped about how to put a band on the hat (necessary to cover the hand-stitching that attaches the brim to the crown, at least when following the instructions as written.) The sides of the crown curve down dramatically, making even a flexible bias band impractical. There seemed to be two options—either cutting a shaped band using the same pattern piece as the crown, or using a soft, draped piece of fabric like a sash.

Early test of trimmings. Somehow I didn’t get any pics of just the “hat sash”

I went with the latter, which seems to be what most of the internet has opted for, and I do like the soft, whimsical look for a soft, whimsical bonnet. Somehow, despite the fact that the hat sat around with just the sash on for over a week, I didn’t take any pictures of that stage.

Needs curly bangs.

My mother was kind enough to provide a selection of fake flora to help trim the hat. There is one big rose under the brim and two above it, nestled amongst a bunch of other little floral bits. I’m thinking the back bow may need some floral additions. I’d dearly love to add a feathered bird wing, or entire bird if I could find one that doesn’t look quite as derpy as the little one in the pic where Tris is wearing it. (So far no luck, all the fake birds at Michael’s looked just as derpy.)

I actually kinda hated this thing during most of the construction. The shape is just weird. Very far beyond my comfort zone. And not in a way I expected to find cute. Although I don’t think I can quite convey to you how much Tris loves it, so that’s something. It apparently hits exactly the right vibe for a not-quite-four-year-old obsessed with looking like a princess. However, it has weirdly grown on me, particularly as I got more of the trimmings in place. I’m particularly fond of the flowers under the brim.

I eventually made it to Michael’s to look for ostrich plumes. They had exactly one, however it was bright white and I wasn’t prepared to mess around with trying to dye it. I did find a little spray of coordinating feathers, though, so I got that, and I think it finishes off the hat nicely, at least for now.

I will say, it’s growing on me, weird shape and all. It stays on the head surprisingly firmly, although I suspect a hat-pin or two would still be wise, at least if I had the kind of hair one could anchor stuff to with a hat pin. It will make more sense, I think, if I can ever manage a proper hairpiece, since it should really sit over a chunky braided bun, and have curly 1880s bangs to help fill in the top front. Apparently 1880s bangs have a lot in common with 1980s bangs. Who knew.

Now I just need to get the rest of the outfit to go with it finished!

Comments Off on French (Bonnet) Connection

Filed under Sewing

Summer Jammies

It’s summer. It’s hot. We don’t have AC. And the twins are convinced it’s not bedtime without jammies… so we need jammies. All their jammies are, well, winter jammies. long sleeves, long legs.

We were going to buy them. But all the summer weight jammies at the second hand store were, well, underwhelming. A lot of pilled up polyester.

So when I had a couple of unexpected sewing hours this past weekend, I decided to try whipping up a couple of nighties. The twins each selected their favourite fabric from their fabric bin, and for a pattern I pulled out McCall’s M9565, which is apparently in my stash although I have no clue where I got it. My envelope tops out at a size three, which is technically the twins current size. McCall’s kids patterns tend to run big, but on the other hand the twins are almost four and starting to outgrow their RTW size three clothes, especially Tris (who is over 2” taller than River at this point). I also considered Jalie 3245, which would make a great raglan summer nightie in the tunic view, but I didn’t really want to trace and was comfortable just cutting out the size 3 of the McCall’s pattern.

Well, I needn’t have worried about the size. They came out HUGE. Falling off River’s (admittedly narrow) shoulders. Even Tris’s I took in at the side seams 5/8” on each side. For River’s, I had to cut off the original neckband, take each raglan sleeve in 5/8”, and then take in the side seams even more. And it’s still not exactly snug—they’ll be wearing these for a while.

They are also long. You’ll notice the pattern cover shows a ruffle at the bottom. I wasn’t sure about adding it, but when the dresses turned out just shy of ankle-length it became obvious that was not going to happen. Which is fine. River has been on a kick about long dresses lately.

The pattern was for a long-sleeved nightie, but obviously I wanted short sleeves for summer. I picked a fairly arbitrary length that wound up being just above elbow length. River liked this but Tris did not, wanting them extra short. So I modified hers into more of a cap-sleeve style.

There’s not much more to say. They were sewn very quickly on the not-so-good serger, and several times as I sat down I had to readjust all the tension settings because the twins just can’t resist fiddling with that. I hemmed them with the coverstitch and they’re certainly not my tidiest but also whatever—they’re summer sleepwear. At least the twins were excited and happy about them, which is better than those mermaid tails I made them, that they’ve played with all of twice. A new challenge did arise this time: keeping each twin from throwing shade on the other’s choices. Tris didn’t like River’s fabric. River didn’t like the white sleeves on Tris’s (a necessity since we didn’t have much of Tris’s fabric, but I always think contrast sleeves look better on a raglan sleeve). But both are happy with their own dresses, which is the most important part.

Not that I could convince them to pose together.

9 Comments

Filed under Sewing

Ungrateful Mermaids

Sometime around Christmas, Tris became obsessed with being an “Elsa Mermaid.” And, of course, convinced that I could help her with this transformation.

I was… less enthused. Partly because I was worried she expected me to make her a literal mermaid (and probably then provide a suitable ocean to explore). Mostly because I was pretty sure the confinement of the legs inherent to a “real” mermaid tail just wasn’t going to feel great after a max of five minutes.

So I dragged my feet.

River got in on the excitement, requesting a Rainbow Mermaid tail with only slightly less urgency.

After a fair bit of cogitating, I hit upon the (I thought) brilliant idea of a tail made as a wrap-around skirt, allowing the mermaid look while still running and playing. I even drew up a sketch to try to sell the idea to my three-year-old clients.

They were cautiously receptive, at least once I assured them I could make a pocket in the fin so they could also put their feet inside. So I took some measurements, drafted a couple of rough pattern pieces, and dug through the stash for suitable fabrics. Rainbow was easy, as my aunt gave me a couple of pieces of cheap rainbow-printed satin to make stuff for the twins. Ah, the gift of getting to sew one’s least favourite fabric for someone else. I also had some low-stretch slippery knit with an indistinct white and blue and silver pattern that has always reminded me of the Frozen aesthetic. For the tail fin itself, I opted to use the last of a spongy purple polyester sweater fleece that I had made into baby sweatpants at one point. Actually both fabrics featured in other projects on this post here. But I overlaid the fleece with translucent fabrics to get that iridescent fishy feeling.

For the rainbow tail fin, I picked a purple-y tulle with a bit of a silvery fish scale pattern to it, and intermittent clusters of beads. It had been kicking around stash for several years since one of Syo’s friends deconstructed a ball gown in our basement to make a Hallowe’en costume, and left giant swathes of shorn tulle behind. For Tris I chose a blue organza with random silvery dots, also from my aunt. I then quilted these overlays to each side of the tail separately, creating fish-tail rays. This was far and away the most time-consuming and annoying part of the whole thing.

I completed River’s tail first, as I figured she was going to be less devastated if she didn’t like the result than Tris was, and I could perhaps use its example to manage Tris’s expectations.

River was quite excited, and eager to put it on. However, she was completely unwilling to wear it as a skirt, only as a full tail with her feet tucked into the tail fin pocket.

And the frustration of being unable to walk properly like this got to her fairly quickly, so she hasn’t really worn it after the first day it was delivered. (Oh and I still should topstitch around the tail-fin so it holds its shape better, but my motivation is… low.)

Tris was distinctly lukewarm to River’s tail, and I contemplated just making it as a basic step in tail, but the pieces were already cut out and taking up room in the sewing room. So, eventually, I decided to finish sewing it up, if only to move them from the sewing room to the dress-up box.

When I showed it to her, all completed. Tris said, “no thank you, I’m a princess, not a mermaid.”

Anyway, while I take some deep breaths, I’m going to make something for me now.

19 Comments

Filed under Sewing

Black underneath

I obviously needed a petticoat to go with my Edwardian skirt (the 1880s ones just don’t quite work). And I’ve been a bit obsessed with the idea of an all-black set of underthings (hence the black corset, and there’s a black chemise cut out and living in limbo at the moment, too.) So, why not a black petticoat, particularly since I had a nice chunk of black batiste in stash for just such a purpose.

Now, what to use for a pattern? Well, I could have gone with the same as my skirt, maybe just omitting the above-waist extension. And I might still make one like that.

But I ran across the following draft in the “Art of Dressmaking,” copyright 1903 by Madame Marie Boudet, one of an assortment of historical sewing manuals I’ve collected digitally. In particular, I liked that she works in metric (being French), and also that it’s designed to be drafted directly on the fabric. It’s also extremely economical and low-waste, requiring only two skirt-lengths of fabric, and only a few bits are cut away to form the curves at hem and waist.

Now, working out the pattern was not quite as simple as I might have liked—there was a lot of on-the-fly calculation I would rather have worked out beforehand, and her order of describing what to do left a bit to be desired. I also realized partway through that her calculations seem to assume a fabric width of about 32”—not surprising but I had to make some adjustments for my 60” wide fabric. But aside from some issues (mainly losing track of some of my measurements) I still do really like the draft. Even if it does consider 60 cm (23.6”) an “average” waist size. Because of my wider fabric, I had to make my flare a bit more extreme, and I have more gathering at the back waist than is probably intended. On the other hand the draft does mention that a more full petticoat might be desired, requiring three lengths of fabric, so I don’t think my version is beyond the realms of the possible.

I added about a 6” ruffle at the bottom, which was what I planned for, but I really think I do prefer the wider ruffle I used on my earlier petticoat. Although maybe I just need to press it more. I also would’ve liked a nice black lace at the bottom, but I definitely don’t have that much of anything suitable in stash.

For the waist finishing, I used a method from Sew Historically, which I’ve also found described in period sources (isn’t it nice when we’re all reading the same books?). It’s basically two drawstrings anchored at the side backs, that run opposite directions through a casing and emerge from eyelets to get tied together. Although I didn’t follow it quite right and I think I have a lot more gathering at the waist than might be intended due to my overly-wide fabric, so for me it works best to pull the drawstrings around and tie them in the front. Otherwise it looks a bit wonky, as below:

There isn’t much else to say, other than the obligatory complaints about photographing black. So I’ll just let it be that.

1 Comment

Filed under Sewing

Fluffy up front

So now that I have an Edwardian skirt, obviously I need a proper blouse to go with it. You know the kind—the ones that are mostly lace. But those are, y’know, notably sheer, and my current corset is, y’know, black, so a corset cover is kind of in order.

Now, ever since I started the Victorian Sewing Circle I’ve been collecting “resources” for attendees. Mainly some reproduction catalogues and a couple of original sewing manuals, some older Folkwear patterns my mom had kicking around, and of course the relevant Janet Arnold book. But we’ve received a few donations as well of odds and ends people have collected—including an Edwardian corset-cover pattern someone had painstakingly hand-traced from a magazine article, and photocopied the instructions, I’m guessing in the 90s if not 80s, allegedly based on a 19-aughts original. It’s also, by the way, the exact opposite of size-inclusive. I sewed up the largest size, which was intended for a 40-42” bust.

Inspiration: Random Pinterest photo with a broken source link.

So since I had that on hand, I used it. But, the pattern is designed for vertical pintucks and lace insertion as decoration, and I wanted the horizontal lace ruffle (bust improving) version.

TVE02

If I were buying a pattern, this Truly Victorian one would be the one. View A, right there.

My pattern is a little different as it goes below the waist and has gathering at the neckline as well, but the ruffle layout was the same.

I also wanted to take this opportunity, because I’m kind of messing around here, and the result won’t be visible, to use up some of the massive stash of questionable lace I’ve somehow accumulated.

Now, on digging through one of the bins of random white fabrics, I settled on a piece of stretch cotton sateen. The stretch is a bit unfortunate, but I already knew I wasn’t going for high historical accuracy here. It’s also a bit on the heavy side, but I figured that would be a bonus for the bust-volumizing I was going for. But most importantly, it was a tiny remnant that was just exactly big enough for a sleeveless pattern like this.

Of course, I didn’t begin diving through the lace stash until after I had cut out the main body pieces. Turns out the wider, ruffled laces I remembered were all beige, rather than white. And I really did not feel like gathering up a flat, nasty polyester lace for this purpose.

So, I wound up going with the nicest, and lightest coloured, of the off-white pre-ruffled lace. And this one is very pretty, not too nasty-feeling, and there was enough for the two ruffles I wanted, with very little left over. It’s a weird lace, with a ruffled top and bottom joined to a flat kind of connecting piece, but I think it will serve its purpose. And if I want to run ribbons through the joining I can.

If I had realized I would end up using the off-white lace before I had cut out the main fabric, I would probably have tried tea-dying the fabric to be a closer match. I might still try with the whole thing, after I test how the lace reacts to a tea dye. (Polyester won’t be affected but if it’s nylon it will take up the tea stain too and might end up even darker). But, I’ll survive either way. The binding I used for the neckline and armscye, and the drawstring casing at the waist, are all ivory, so the whole thing has a tone-on-tone vibe, in theory.

I REALLY wanted beading lace (the flat kind you thread a ribbon through) to finish off the neckline. However, that’s the one kind of lace I do not have in stash, and I just couldn’t make myself spring for the polyester stuff at Fabricland, even if the ruffled lace is already polyester. So I bound the neckline, then realized I had JUST enough lace left to do a third tier right at the neckline. Which solved the issue nicely.

A lil bit goofy all on its own.

Now, on looking at the finished creation, I think my lace might be just a little bit too wide. The ruffles are VERY full-bodied, even allowing for the part where the original inspirations are a little compressed after over a century.

In an attempt to tone them down a bit, I shortened the bottom row of lace, so that doesn’t reach all the way around to the side seam, as it just seemed to make the whole thing look huge.

I kept the pintucks in the back, but I think maybe they should have been 1/8” instead of 1/4” tucks. Also this is the only photo I got of the back, because obviously this piece is all about the front. This is the first time in a long time that I was working with a pattern with pre-marked tucks (as opposed to making the tucks before cutting out the pattern piece, or just doing some calculations and I have decided I much prefer marking my folds one at a time and measuring from each fold to the next. But also this fabric was a bit heavy for all those tucks.

I’m not 100% sure I’m in love with the below-the-waist ruffle created by the drawstring as it’s pretty pronounced in my heavy fabric, but I guess if I hate it I can cut it off later. It was on the pattern, and would be good to have if your skirt didn’t have an above-the-waist portion like mine.

While I’m not so sure I love the piece itself, I THINK I do like it with my skirt, and that it will work well for it’s intended bust-improving purpose. Part of me wants to take the entire bottom row of lace off, but I’ll leave it at least for now.

Because now I can make a blouse!

(Or. Y’know, make the twins that “Elsa mermaid” costume they’ve been desperate for since before Christmas.)

2 Comments

Filed under Sewing

Truly Edwardian

K I’m on a bit of a costuming binge, though a lot of it hasn’t hit the blog due to waiting for pictures (never a smart thing for me to do). Maybe I just like wearing corsets right now, maybe I’m just not feeling mainstream sewing fashion, maybe I actually have enough clothes… anyway. I bought the Truly Victorian 1906 Ten Gore Princess Skirt back in the fall, probably like everyone else who watched Bernadette Banner’s video around that time. I finally got it printed in early December, and over the holidays began very, very slowly poking away at it.

The process began with an epic hunt through the fabric stash. I had a feeling, not even a memory really, that I should have an appropriate length of black suiting somewhere in stash. My (arguably excessive) stash these days lives in a series of clear plastic bins stacked along one wall of my sewing room, and while this isn’t an ideal setup by any means it’s space efficient and protects the fabric from at least some of the hazards of a basement storage space. I usually have a rough idea of where most things are, but in this case I wasn’t even sure that the fabric I was looking for existed.

Anyway, my quest wound up taking me through approximately three quarters of my bins. I (re)discovered a half-forgotten length of black linen, several suiting pieces that would’ve been appropriate except for size, a VERY large length of brocade I had completely forgotten about that wants to become a tea gown of some kind, and several other pieces that would make nice skirts. But then finally, after a couple of hours and creating an impressive amount of mess, I reached the bottom of the last stack of bins (well, technically there were two other stacks, but no way I was tackling them that day)—and there it was. Five metres of soft wool twill suiting, light and drapey and utterly perfect. I can’t describe my exultation.

Anyway, once the fabric was located (and at least some of the mess tidied) the work could begin. I steamed the wool in the dryer. I muslined the lining/corselet pieces for the upper skirt, after doing a small swayback adjustment on the back and side back pieces, and determined (as I expected from the pattern measurements) that I needed to go down a size in the waist. In hindsight I wish I’d gone up a size in the hips, too, because it’s quite fitted over the hips and I always like more room there, but I should probably just let the hip seams out a bit anyway. A small adjustment gets you a fair bit of room when there are ten seams. A slightly larger swayback adjustment might be in order for the next version.

Centre back section with satin lining and hooks applied.

Like most of my sewing this fall (or the last few years) construction has proceeded in incremental fits and starts. I spent a lot of time researching my construction via a number of original sewing manuals, both electronic and paper. Not that there’s anything wrong with the methods the pattern describes, they are historically accurate and in the end my deviations were quite minor.

My biggest curiosity was on how to do the lining. I’ve sort of had it drummed into my head that historical (Western-style) clothes were flat-lined (aka underlined.) This is how Bernadette Banner constructed her lovely version of the skirt. However, that’s not the directions for the pattern, and I was curious about the disparity.

It turns out that in the 1890s, a new method of lining skirts started to gain popularity—the “drop skirt.” This is made by sewing the lining (and materials like taffeta and “lining material” are mentioned rather than cotton) entirely separate as its own skirt/petticoat, or sewing separately then sewing both skirts into the same waistband—aka a modern, free-hanging lining. By the early 1900s, the separate lining is considered the preferred method with flatlining being distinctly old-fashioned, and my 1908 copy of the American System of Dressmaking states the following:

Anyway, eventually I settled on an unlined (except for the waist area) skirt, and hopefully I will make the appropriate “drop skirt” eventually.

To line the waist/hip area I used a heavy crepe-backed satin. A lightweight coutil or heavy cotton might have been better—I thought the black denim I used for my corset was too heavy, and most of the other black fabrics I had around seemed too light. We’ll see how it wears, I guess. On the other hand, having a slippery surface on the inside may come in handy since it’s pretty hard to hook up the back placket behind myself so I often end up turning the skirt around backwards to put it on. I added a tiny red tag to the inside of the front to make it a bit easier to make sure I end up with the right seam in the right place.

I considered binding the seam allowances, as would have been period appropriate. Then I serged them. I didn’t make a lot of concessions to speed in this project, but I feel like I’d still be binding seams if I had take that route. Sometimes speed is just what you need.

I added piping to the top edge as I thought that would be a nice touch, and it is, except for the part where it’s almost invisible since it’s black and this will probably mostly be worn with blousy tops that will cover it anyway. There is a narrow bias facing sewn on the inside of that to finish the top. Potentially it might have been easier and less bulky to just use a wider bias tape for the piping and use that for the facing, but having a bit more structure at the top of the skirt also doesn’t hurt. It is VERY bulky right around the top hook, though, despite some very aggressive trimming of the seam allowances in that area.

I added a piece of spiral steel boning to each seam, more or less the length of the inner corselet/waist lining. This keeps the portion of the skirt above the waist from folding down, and smooths over the upper hips, but it did also cause the skirt to stand out from my corseted waist in a way that the un-boned skirt hadn’t. I added a waist stay to combat this effect, but I’m thinking that either the waist shaping wasn’t an adequate match to the corset or my fabric + lining combo still has too much give. On the other hand it means that even though the skirt was cut with corset-wearing in mind, I can wear it uncorseted as well.

The pattern calls for a bias hem for the facing, made out of self fabric. I wanted to add a velveteen binding to the bottom of my skirt. long story, but basically velveteen seems to have been a material of choice for this purpose. Or braid. I do actually have a length of vintage braid that I think must be similar, but it is only about 3m long and the skirt requires over 5m, so that won’t work. But I did have a lovely little remnant of black velveteen, that turned out to be just enough for what I needed.

Most of the descriptions I read of the velveteen have you apply it after creating the hem, faced or otherwise, but one from 1903 mentioned how the velveteen could serve as a facing. Since the pattern calls for facing the hem anyway, that’s what I went with. And also I’m a lazy 21st century person disinclined to hand stitch around a hem like this three times, which seemed to be what most of the descriptions called for. I will say, intentionally rolling a facing out so that 1/16” of velveteen showed at the bottom of the skirt felt VERY unnatural, and there are definitely places where it doesn’t show as much as it probably should. Will I go back and fix that? I’d like to say yes but, um, probably not.

I wasn’t sure how to finish the top of the velveteen, but eventually decided I didn’t want the bulk of folding over the hem. I didn’t have 6 yards of black seam binding in stash, but I did find a rather lovely red vintage rayon seam binding, so I went with that. It did NOT like being sewn to the velveteen, and stretched it out terribly, despite my best efforts, so it’s incredibly wrinkly and gathered in the final skirt, but I don’t hate the effect.

So the pattern is drafted to have a finished length of 41” at the front, from the waist down. My measurement was 42”, so I added 1” to the skirt length all around when cutting. Now I’m not sure if it’s just that my soft wool fabric is prone to stretching, but when it came time to hem I wound up turning up close to 2”… so I could most likely have saved myself that added effort and fabric. Oh well.

Anyway, I’m super happy to have this in my wardrobe, hopefully bridging the (ever diminishing) gap between costume and everyday wear. Before the twins I had a black wool gored skirt made from a 1970s Burda pattern that was an absolute workhorse, and I have missed it sorely. The only thing this skirt is lacking is pockets, which I may yet decide to add… I don’t want to interfere with the gorgeous line of the hips, but I really, really like to have pockets at work. Next: definitely need to start planning a lacy blouse to go with.

10 Comments

Filed under Sewing