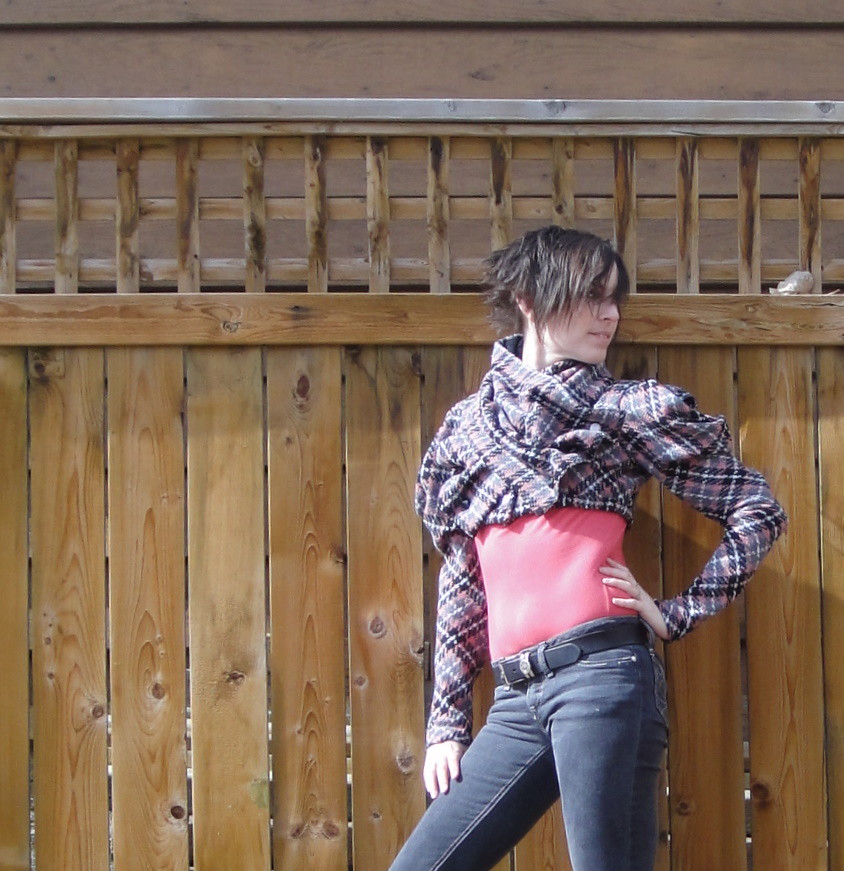
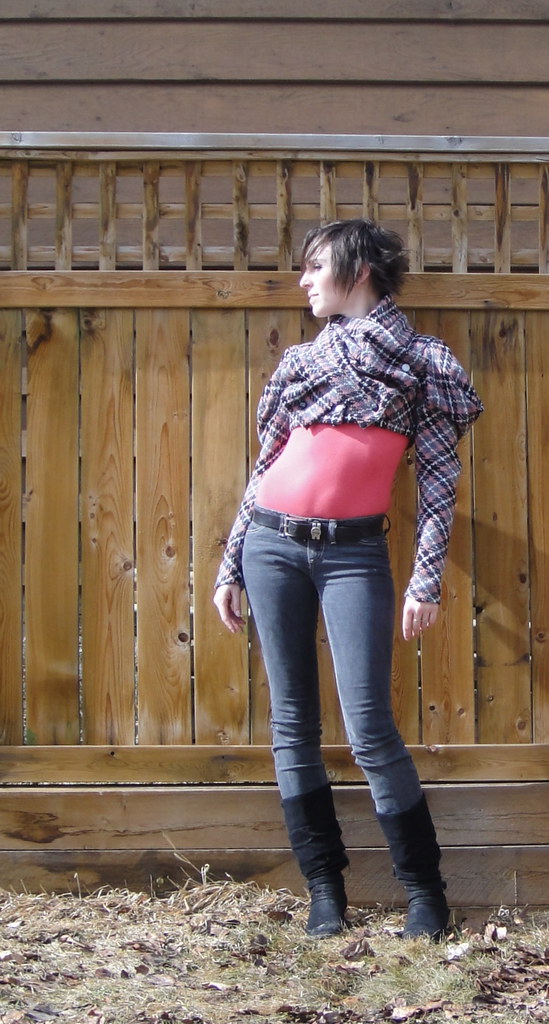
Jacket!
Someday I’ll make something original. Sooner or later the universe is bound to get tired of throwing other peoples’ really cool ideas at me, right?
Hmm.
So, I feel a teensy bit guilty about this knockoff, because it’s inspired by this EvaDress pattern, and I really feel like I ought to support her and buy the pattern. But, I’m also a starving student… and I wanted to try some kind of jacket with my new basic princess-seam pattern… and, well, here I am. I’ll buy it someday, I promise. In my own defense, the actual construction of my jacket is almost completely different—the original is a cut-on kimono sleeve, as far as I can tell, while mine is a standard princess-seam jacket, cropped to underbust length, with a set-in sleeve.

Drapey 30s jacket
Debi’s made a great version of this jacket. (And here she shows more of the construction, which highlights the many differences between the “real” version and mine). If I’m not mistaken, it’s also the one pictured on this Threads article, which I’ve been lusting after since this time last year. Can we say, yum?
It’s really a very basic idea—a scrunched, buttoned-on scarf over a basic cropped jacket, with cowl sleeves. Lauriana featured a version of the sleeves here, and there’s a description in Modern Pattern Drafting of how to draft it—really simple, actually. I kept my cowl fairly small, partly because I like the close-fitted sleeve and partly because I didn’t have a lot of fabric.
Really, hardly any fabric, barely a metre. I had wanted to make a circle skirt out of this fabric (I’ve been cherishing it, waiting for the perfect project, since last summer some time) but didn’t have enough.

Without scarf
To avoid trying to match plaids (across princess seams, no less!), I cut the side pieces on the bias, then interfaced. The interfacing is probably a bit heavier than would have been ideal on this very light, soft, loosely-woven plaid, but hopefully it won’t be a problem in this location. I do wish I’d been a little more precise matching up the plaid across my CF, as it’s a hair off, but ah well. Not visible behind the scarf anyway.
The jacket has no collar (just the scarf), which was fortunate given the fabric shortage and the need to reserve a fair bit for the scarf. The underside of the scarf is made of flannel, as well.
The Built by Wendy book suggests using 1/2″ seam allowances on straighter seams and 1/4″ on highly curved ones (like the princess seams and the neckline and armscye). I followed the advice, and I like it, but I wonder if for this fabric I shouldn’t’ve used wider ones, as it’s pretty loosely-woven and ravelly. Time will tell, I suppose.

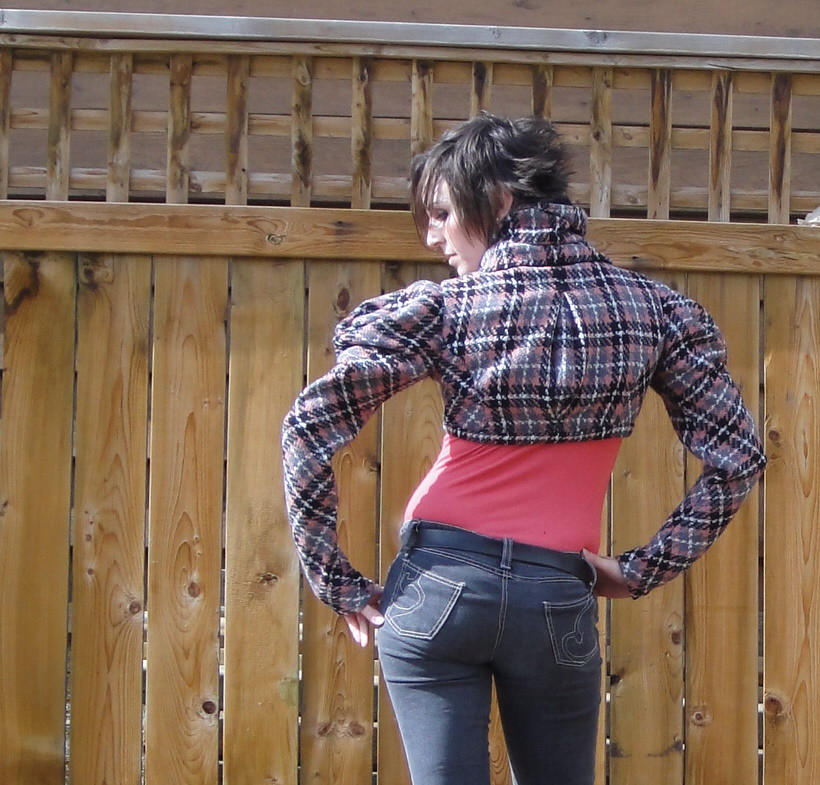
Back view, with pleat
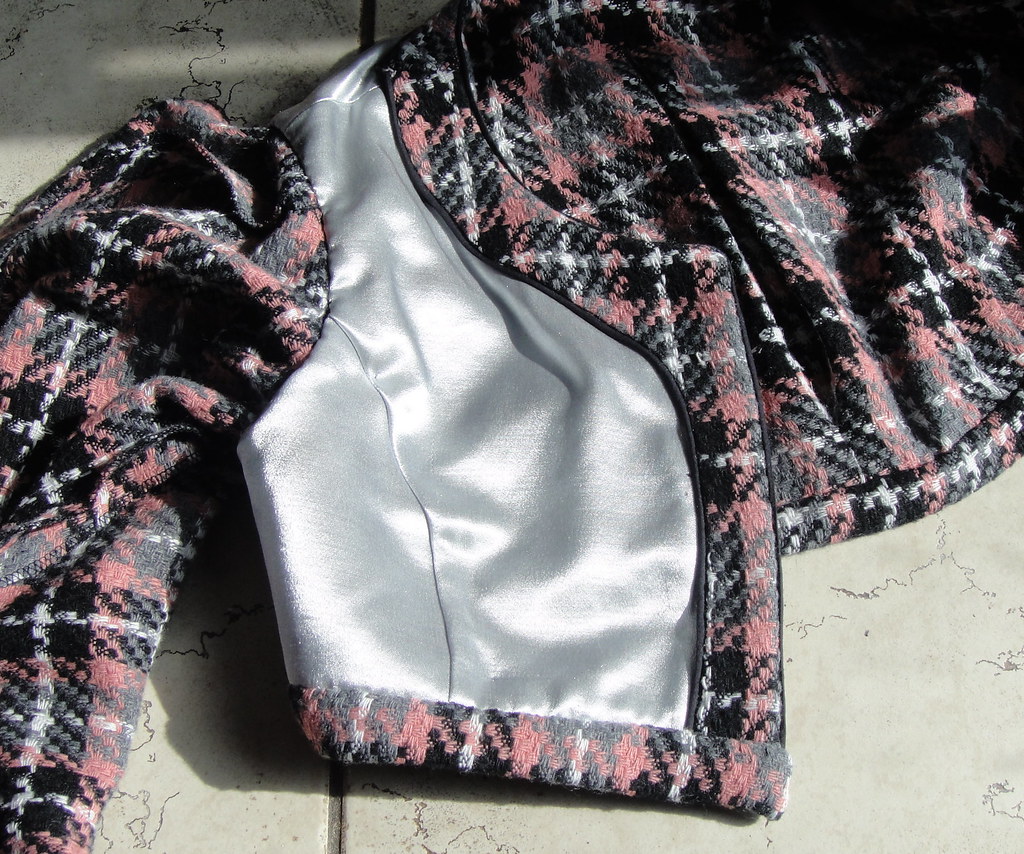
The bias sleeves are interesting. They tend to stretch and narrow, which works well with the style but could make getting a long-sleeved shirt on under them tricky. I also didn’t line the sleeves, as I was concerned with messing up the drape. The bodice is lined with some more bits of leftover silver Kasha from my Winter Coat. Someday I’ll run out of that… I’ve still got nearly a metre left, though!
I’m not 100% sure I handled the back pleat the best way possible. I made similar pleats in the lining and fashion fabric, meaning they’re both kind of occupying the same space. I wonder if it wouldn’t’ve been better to try to wrap the interior box pleat “around” the exterior one so they were folding the same way… anyway, it’s not too terrible, I think.

Scarf, lining, really bad buttonholes.
Nitty gritty details: the scarf is lined in black flannelette, as I didn’t have enough to make a wide enough scarf just out of the fashion fabric. As it is, I could’ve made it a bit narrower, and probably an inch or two longer… ah well. It’s pretty hard to get more than a general sense of this until the buttonholes are already in place, so such is life.
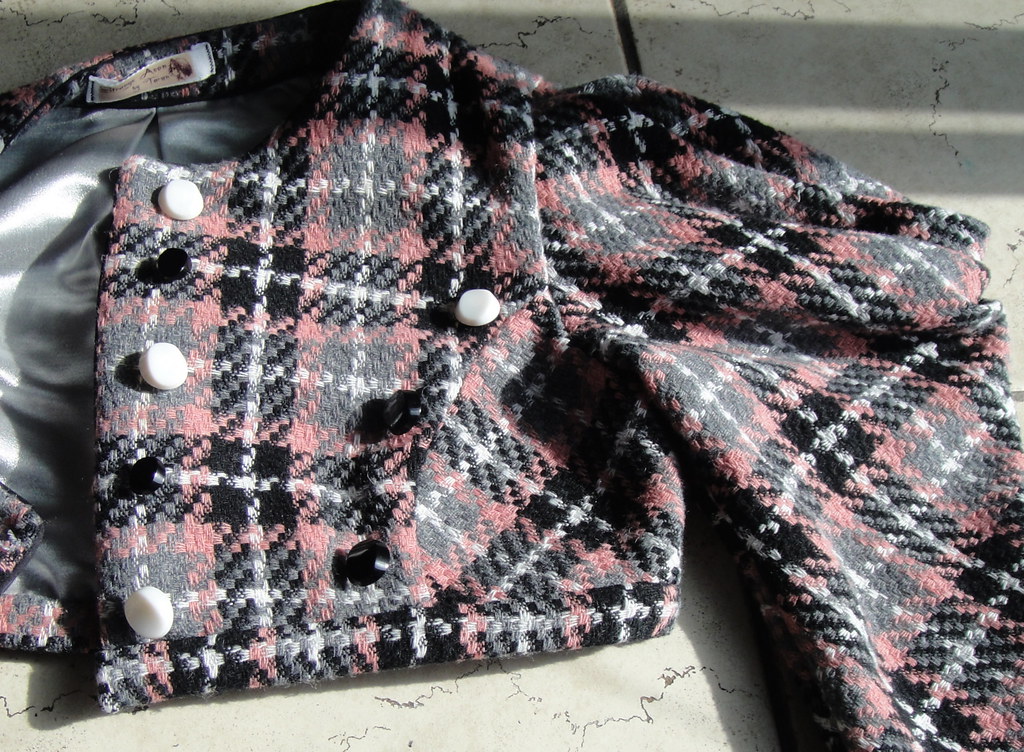
I piped both the inside of the facings and the neckline and front openings of the jacket. I like the piping around the facings, but perhaps a softer cord would be better next time… anyway, as is typical with coats and my sewing machine, the facings were too thick to work automatic buttonholes in, so the resulting buttonholes are as attrocious as you might expect. Ugh. The buttonholes on the scarf, on the other hand, worked out just fine… so look at those ones instead 😉

Piped facings
The facings were squeezed out of scraps (I didn’t actually think I’d have enough fabric for them) so are pretty narrow but worked out well enough. Note to self: remember to remove the back pleat when drafting the facings. And here I was trying to figure out how my neckline had stretched out so much…
Cowl sleeves: Bias sleeves are, well, interesting. They tend to grow (which is a good thing from my point of view) but also shrink width-wise. I will admit I took a couple of loose, surreptitious stitches inside the drape part to keep the folds in place. The cowl edge is finished with a fold-back facing, and the seams in the sleeves are finished with serging. I’m glad I didn’t try to line the sleeves, as it would’ve messed with the drape thoroughly, I think (at least with my lining and this particular fabric)

Button front
There are a LOT of buttons on this jacket. Well, eleven, in fact, and I have some extra little ones I might put on the sleeves, just for decoration. I had an assortment of black, white, and grey buttons of this same shape, in a couple of different sizes, from a thrift-store button baggie picked up a while back. The arrangement I went with colour and size-wise is probably not optimal, but it was the best I could come up with given the limitations I had. They’re not overly visible when it’s worn, anyway. I’m actually really glad I was able to use them all together, and I like their shape—plain but distinctive—with this style.

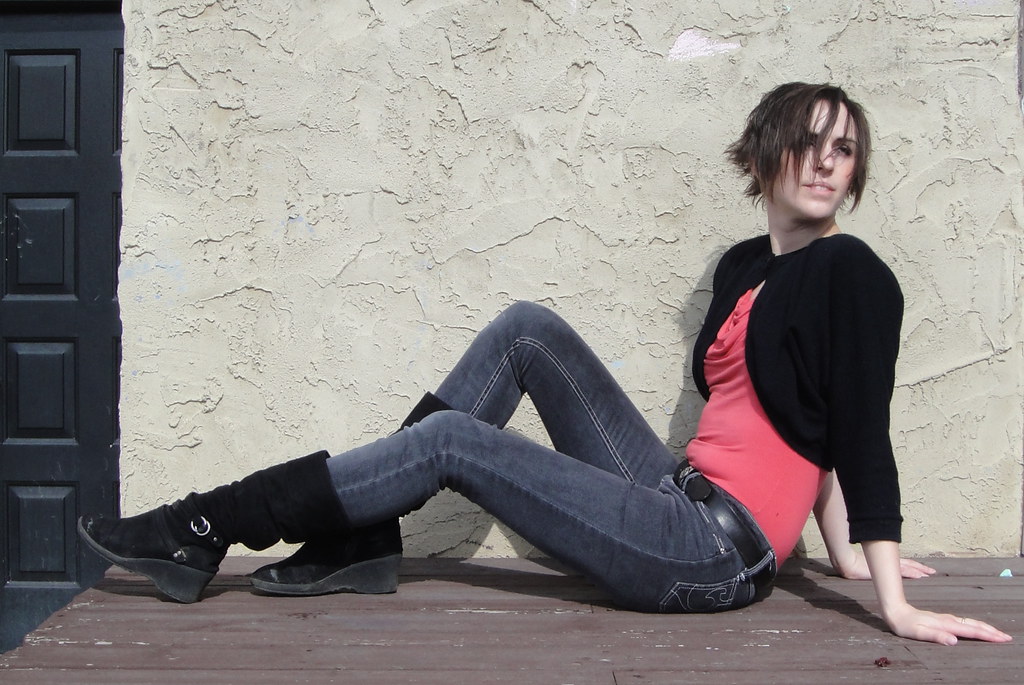
Semi-glamour
This jacket really deserves a much more glamorous photo shoot, but this is the best I was able to muster up today, as I’m still sick (have been all weekend). It looks killer with the 70s dress, actually. I had been hoping it would work with my circle skirts, but I’m not loving the combination—too much going on both top and bottom; instead of the hourglass look I was hoping for, it just looks busy. This jacket really seems to stand out with a slim, sleek bottom half—coincidentally just like the dress it was originally paired with.
I think I am officially satisfied with my fitting of the cropped bodice version of the “Built By Wendy Fitted Jacket”. Next up—sleeves and collar :). I’m thinking I might try a little cropped jean-jacket to test out a two-piece sleeve.
Warning: I have a deep and long-suppressed passion for boleros and severely cropped jackets. You may get sick of this look… soon.
I don’t know if I’ll ever actually do any of the particular projects in the Built by Wendy Coats & Jackets book (well, maybe one or two…), but I am loving having the basic pattern blocks to play with. So many possibilities! I may not be quite up to drafting my own patterns from scratch, but I love messing the heck out of an existing one :).
Oh, and you can see the full Flickr set, with even more photos, here.
In Me-Made March news,
I did actually manage a picture today! (I promise I’ve been wearing my usual me-mades, but being sick just drains me of the energy to run around, get cute pictures, and then do the little followups like making links for the construction posts. Bleh.
At least the inch of snow that was covering the deck this morning is gone…

Me-Made March, day 20
Is the equinox today or tomorrow? Either way, the days will soon be longer than the nights! Hooray!