
… did not one stitch of sewing today.
😦

1948 hat-making book, complete with patterns!
When I was home the other weekend, my mom gave me this vintage 1948 book: “How to Make and Trim Your Own HATS”. It contains plenty of info on everything from refurbishing old hats to making new ones from scratch—and of course lots about style. And patterns!
I don’t really see myself getting into hat-making (too much stuff to buy, and much as I love hats in theory I don’t wear them often), but it’s quite a fun read. At some point I’ll go through it more thoroughly and post highlights. However, one pattern in particular did stick out at me, the pattern piece for the crown of a six-piece brim. As far as I can tell, this piece would be perfect for Burdastyle’s Summer Sunhat tutorial. The grid is supposed to be 1″; I scanned it at 300 dpi, if that helps anyone print it out better.

Pattern piece for a six-piece hat crown.
Disclaimer: I have not tried this piece. The book suggests using 1/3″ seams for a 22 1/2″ crown circumference, and 1/2″ seams for a 21 1/2″ hat.
Incidentally, the shirt is done except for buttons. He won’t let me take pictures until it has buttons on, however… so I have to go pick up buttons tomorrow.
Comments Off on Something random
Filed under Sewing

Men's shirt in (not quite) a day
Was flunked. Maybe if I’d started first thing in the morning… maybe if I hadn’t had to go with The Boy to the doctor’s in the afternoon, or “make” (aka heat up) supper. Maybe if I hadn’t had to go out to the store for a new iron (yes, my venerable Value Village iron went to that great laundry room in the sky yesterday… it shall never spot rusty water onto a crisp white fabric again). But as it was, at bedtime I was sewing the first sleeve in, and there was no way it was going to get done without staying up ridiculously late (never good for sewing).

Back gathering
I’m glad I didn’t try to rough it out—tonight I can face the challenge of altering it, since it is still *huge*

mandarin collar
I may or may not have mentioned that the pattern, which I picked up at Value Village for a buck and had never been cut, contained only two sizes: XL and XXL. My sweetie is many things, but an XXL he is not. However, his chest measurement (40″) indicated that he should be a L—so I figured I would try my hand at grading down the pattern, since I was tracing it anyway. Yes, this was all yesterday morning.
I used my vague recollection of the Selfish Seamstress’s tutorial on resizing a pattern to shrink it down. Despite my misgivings this worked remarkably well—aside from a couple of length issues (how did I grade half the sleeve differently from the other half?) which I mostly caught at the pattern stage, everything fit together about as well as patterns usually do, given my limited cutting skills (read: patience). Better than some of the Burda 9610 pieces, actually.
So he tried it on before bed last night (one sleeve only) and… it’s huge. Sleeves too long, shoulders too wide. Actually, one or the other… the sleeve length would be fine if the shoulders weren’t so wide, and vice versa. The yoke is designed to droop over the shoulder… but not, I think, that much. None of this, of course, was obvious until I had finished all the interior seams and attached the sleeve. Grr. So I’m thinking of hacking off about an inch on each side of the body (have to check how this would affect the gathers). This should make the shirt itself less ridiculously bag-like, and shorten the sleeve up a bit, too. If I’m particularly clever, I’ll even remember to do a french seam on the sideseams this time around, too… On the other hand, the neck is perfect.

Cuff & sleeve placket; a little Becky Home-Ecky.
I didn’t really pay much attention to the instructions, but they seem to be very thorough and aimed at beginning sewists. This may explain the ridiculous amount of ease in the shirt (aren’t “beginner” patterns usually humongous?). The gathers are actually quite soft and subtle—not nearly as ridiculously pouffy as I thought they might be. The cotton voile is a brat to iron but a dream to sew with—I was event able to edgestitch the cuffs and front placket down without it looking totally ridiculous on the other side (Fortunately there’s lots left over. The pattern called for up to 4 m of fabric, but I don’t think I used more than 2). The cuff and sleeve placket are fairly “home-sewn-ish”; the cuff’s a bit too narrow and the continuous-lap placket is not quite right for a men’s dress shirt. I will maybe try to change that next time. Yes, there will be a next time. He still wants the shirt out of knit. (shudders)
On the up side, he says he’ll never complain about paying $50 for a shirt again after seeing how much work goes in to one…
Filed under Sewing

McCall's 7123
The Boy (aka Hubby, aka Sweetums, aka Pookie, aka Pain In My Butt) wants his shirt by the end of the day. This after barely mentioning the idea of me making him a shirt at all.
So far the fabric is washed and partly ironed and the pattern is traced and hopefully re-sized properly.
Making the blue and/or white version (gathery with a round collar and no doofy panel in the front) in a white crinkle cotton voile. Though, I didn’t realize from the illustrations, the shirt is not a full button-up. I will be making it into one, however. Wish me luck!

Burda 9610 jacket
On Burda 9610.
Have the body and sleeves mostly constructed; just need to add cuffs, attach sleeves, add the waistband, and of course get a bunch of snaps, since I’ve decided to go with snaps. The trickiest part so far was figuring out how to insert the pockets, as the pattern itself

Inside---showing pocket inserts and Hong Kong bindings on seams
doesn’t have any. However, they are in, mostly correctly. I’m using Gigi’s tutorial on Hong Kong seam bindings to finish the inside seams. I’m not as good at it as she is. I think part of my problem is that I don’t cut my bias strips wide enough. Anyway, Hong Kong binding + topstitching means each seam in this jacket (and there are a lot!) is stitched 4 times! Crazy. I found myself trying to adjust the construction process to minimize number of times I had to re-thread the sewing machine. Oh, I also figured out a workaround to increase my machine’s tension so the topstitching thread isn’t (or is less) loopy on the inside. You know how when you’re winding a bobbin the thread goes from the spool around that little doohickey on the top before it goes to the bobbinator? Well, (at least on my machine) that doohickey has a bit of a spring on it for catching the thread and adding some tension. I found that by winding my thread around that thing before threading it through the rest of the machine, I got a LOT more tension. No more

Front side pocket. On examining my RTW jean jacket, these pocket linigns are cut as part of the jacket pieces, folded to the inside. Not a bad idea. Ah, well---next time.
loopiness underneath! Unfortunately, I didn’t think to try this until I was about two-thirds of the way along, so there’s a lot of loopy topstitching. Ah well. Live and learn. I couldn’t decide whether I wanted to use the darker (right) side of the fabric or the lighter, shinier (wrong) side. So I used both! Keeping track of which was which was a bit of a pain, though.

Sleeve seams and bindings
Here’s a few more of the fully finished jeans. I wound up hemming them the full length; the physical inseam measures just over 33″. It would be perfect for a boot-cut with flats, too short for a boot cut with heels, and is maybe a teeny bit long for skinnies.


Filed under Sewing

Jalie jeans #2: Black and silver
Almost done! Just need rivets and hemming (which will wait until at least one more wash, I think.
I don’t know why I can’t stand to wait until after I’ve hemmed these to take pictures and post. It’s like my subconscious considers hemming superfluous.
Anyway, here they are: black jeans with bright silver topstitching, Eye-popping. Maybe not the best choice considering my mediocre topstitching skillz. Ah well. I shall be more restrained for my next pair. I just loved the contrast.
You already heard about the issues with the waistband. All fixed. It still came out narrower than the first

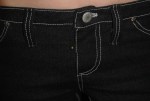
Jalie jeans front: no fly gapage!
waistband, a little too narrow in my opinion. Not sure how that works except that maybe the turn of cloth ate up more width in this pair? Anyway, next time I will either widen the pattern piece or use 1/4″ seam allowances. The narrower SA’s are probably not a bad idea for the waistband, anyway (reducing bulk, yadda yadda)
Getting pictures of these sucked, especially without a handy slave child around to take the pictures. My sweetie would probably do it but he would make fun of me in the process ;). I wish I could find my tripod… I tidied up a few weeks ago and have no idea where I stuffed it.
Other than the too-narrow waistband and the usual issues with my topstitching, I’m pretty happy with these. They feel right. For the next pair, I am going to try lengthening the centre back seam for a bit more rear coverage.

Full length jeans
This fabric was actually a 20% stretch, and I still wound up taking in the size Q about a cm on each side, so I think I should probably just narrow the pattern by that amount, as well. I’m a little torn about the length. If they were a boot cut, the length would actually be perfect. Skinnies, on the other hand, don’t need to be quite as long. And these mostly behave as skinnies, although

Doesn't show the jeans very well, but I liked the pose. So Nyah!
they’re actually straight-legged from the knee. I used someone’s suggestion (I forget where I read it, sorry) to extend the pocket lining pieces to the centre front to form the fly interfacing. I’m really happy with how this worked—keeps the front nice and smooth and no fly puckering! I still can’t insert a fly properly to save my life. It looks so simple when Sandra Betzina does it! But at least no one else will see.
So anyway, one more item down (yes, yes, except for the hemming) on my list for Self-Stitched September. Now, time to work on the kids’ jean jackets!
Filed under Sewing

Coat Materials: (clockwise from left) fashionf abric, foiled underlining, plain underlining, Kasha lining right side, Kasha lining wrong side
It always strikes right AFTER I’ve spent my (non-existent) fun money. But, this time I bit the bullet. I got the remainder of my coat materials (lining and interlining… even at 50% off, 5m of Kasha lining still adds up). I got a metre each of two different kinds of insulating underlining, one with a fancy silvery side to reflect heat, one which is just plain white. Neither is very thick; they’re not at all drapy, but I think they’ll be fine in the bodice and maybe sleeves. I’m thinking the reflective one for the bodice and maybe the plain white for the sleeves if I think they need it/can take it. And I gave in and got the grey Kasha. They didn’t have black, and I didn’t like the two possible colours, a dull dark blue and a very orangey red, that they did have. I love red, but I like my reds deep and possibly leaning towards maroon. Not orangey. So pale grey it is… though I will probably regret it when it gets incredibly dirty after a few weeks of wear. Anyway—excited to have progress (however expensive) on that front!

Cottons for unselfish sewing: (clockwise from upper left) print poplin, white crinkle voile, pink poplin solid, yellow stripe "seersucker"
I also picked up some lightweight cottons for my unselfish-sewing. Ugh. A pink solid and pink print of cotton poplin (somehow I thought poplin was heavier, but this is what the bolts said), for the one niece, and a nice yellow striped seersucker-looking thing from the bargain centre for the other (who doesn’t have to live in pink all the time). I would’ve liked a cool, edgier print… maybe little skulls with bows or something—but this was what they had (and lots of other, even more nauseating, prints). The white is a crinkle cotton voile I will use for the hubby’s flowy overshirt.
I resisted the denims staunchly.
Crappity crapola. Excuse my language.
In an effort to avoid sewing for my children, I cut out my second pair of Jalie jeans. The waistband on the first pair still felt a little flabby, so I figured I would put some twill tape in it this time (I meant to but chickened out last time). I tacked one piece along the top of the waistband (I used a curved waistband from another pattern) and another around the top of the jeans themselves (to be enclosed by the waistband once it was sewn on. I even tried them on to make sure I could still get into them with the stay tape eliminating the stretch in the jeans themselves. Snug, but doable. So I sewed the waistband on. It wound up being about an inch too long (it is from another pattern, after all), so I trimmed it down, turned it, and slipstitched the inside closed. Tried on again.
I could still get into them. No WAY that waistband was going to close. The extra inch that got trimmed off woulda done it, I’m sure.
/cry.
So, I guess I am running into a conflict between my desire for stretch jeans but a non-stretch waistband. I don’t know how it works in my RTW jeans… the waistbands still have some stretch, but it’s like 10% rather than 30% (yes, I’ve been testing these things). I don’t think they’re interfaced or anything, I think it’s just an effect of the heavier denim. Anyway, I guess if I really want a stretch-free waistband, I need to stretch the jeans as I sew them to the waistband (eww) so that I don’t have that extra inch. Otherwise, bite the bullet and deal with a stretchy waistband.
For now, I guess I’ll open up the waistband and see if taking off the stay tapes helps. If not… new waistband time.
Crap.
Update: removing the tapes seems to have done the trick. They are still snug, but no harder to wriggle into than my favourite ready-to-wear, and will definitely close. Tomorrow I’ll hammer them and hopefully pick up more topstitching thread so I can finish them off.

Patch pockets for black jeans
My topstitching still sucks.
That is all.
Sewing is what I do when I'm cheating on all my other hobbies...


