

Domestic. Army.
(I promise more sewing posts, fewer machine posts, in the future!)
The Domestic Special—AKA the Army Machine
In breaking news, she sews! Yay! And my gawd, what a beautiful stitch it is, too. Nothing like the wannabe zig-zag of the White*. And fast. The only limit to the power is that the motor turns a rubber wheel which turns the flywheel, and this rubber wheel is old and hard and a bit worn down, so sometimes you need to give the flywheel a nudge to get it started. Presumably it’s possible to replace the little rubber wheel at some point. (Incidentally, the belt on my Featherweight slips similarly, so it should be adjusted or possibly replaced as well. Someday when I’m a little more secure about this vintage machine thing ;).)
Fortunately, she uses a standard needle, that goes in sideways, exactly the same as my Featherweight.
Except that the Featherweight threads right to left, and this one threads left to right. Which was a bit of a WTF moment, but we got past it.
In terms of functionality, it’s similar to the Featherweight. There’s a lever for the stitch-length/reverse, just like on the Featherweight (this one’s very stiff, though. I need to figure out if it’s possible to oil it.) The tension/threading apparatus is quite different, though—it has a lever, too, and there’s no disc to wrap it around. I figured it out, though! The system of threading is fairly sketchy—there’s a lot of places the thread is kinda left to do its own thing, and it rubs against the case of the machine in a number of places. On the other hand, the up-and-down-arm-part (the manual calls this the take-up) has a hole with a covered slot you can kind of floss the thread into, rather than just a plain hole like most vintage machines (of my acquaintance, which is admittedly limited). (My new Janome has kind of a slot in this as well, but the way the slot opens occasionally the thread slips out of it which can be a pain in the butt.)
I want to thank both Peter and Claire for suggestions of manuals and comparable machines. I actually tracked down a teensy bit of information about Domestic sewing machines here, and they have three different manuals. This is the one closest to my machine, although I think it’s a slightly newer (or perhaps just more expensive) version than mine as it has a tension dial rather than lever, and a slightly more advanced-looking stitch length mechanism. There’s no date on the manual, but the font looks sort of 50s to me (I know, so precise). I’m guessing late 40s or 50s for this machine—I’d be surprised if it was as late as 60s (but then, they were still making Featherweights through the 60s). Vintage aficionados care to weigh in?
Also, just because I’m obsessive that way, here’s more photos (in no particular order) of the various feet and attachments than you can shake a stick at. Be afraid. Be very afraid. Fortunately, most of these are covered in the manual…
-
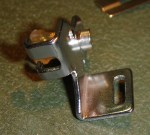
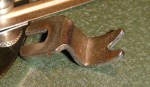
- This foot (if it is a foot) does not fit the machine. It looks like a standard low-shank attachment. Other than that, I am confused.
-

- Combination Tucker, Edgestitcher, and Top-Braider. I am scared. And very glad for the manual.
-
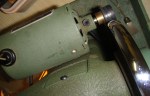
- Motor. Rather than having a belt, the motor spins this rubber bit which spins the flywheel. However, the rubber’s a bit stiff and worn and sometimes skips or doesn’t start stitching. And the flywheel turns backwards to stitch forwards, which is breaking my little brain.
-
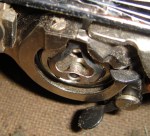
- Bobbin case and housing. Tyo had it out, re-threaded the bobbin case, and put it back in. I shall have to get her to show me how, because I can’t figure it out. (Or read the manual, of course…)
-

- Another view of the ruffler.
-

- The ruffler will gather ever 1, 6, or 12 stitches.
-

- The Ruffler. The ultimate scary sewing attachment. Pretty stoked about how well this one works for both ruffles and tucks. Although heavier fabric did not work well at all.
-

- Tension control lever
-
- Shirring plate and shirring(gathering) foot. Oddly, the manual does not illustrate the two being used together.
-
- Quilting foot.

-

- Built-in thread-cutter
-

- Hemmers. Only the narrow rolled-hemmer on the right doesn’t work—the needle is a little off-centre in its hole and misses the fold. The others all worked surprisingly well, although the widest one was pretty tricky to get started.
-

- Binder foot. This one’s going to take some work. I know there’s tutorials out there for using them… (I found directions for doing some REALLY NEAT bound buttonholes with these… I want to try them!
-
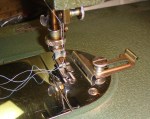
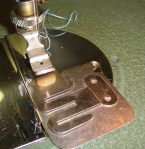
- Straight stitch foot and seam-guide. I finally figured out what those weird metal plates with the slits are! 🙂
-

- Tension apparatus. Weird to thread.
-

- Samples. Hemmers (two sizes), and ruffles and tucks. I’ve never been able to get tucks out of my modern ruffler on the Janome.
-

- Quilting guide-bar. There’s a hole in the presser-foot shank itself to hold this guide-bar. I have just the end inserted, there’s a screw in the back that you have to loosen to actually get it all the way in.
*Toodling around on the yahoo wefixit group led me to this post about sewing machine stitch formation, which basically advocates stitch acceptance. I still think something’s up with the White, though, as the stitch is WAY more zig-looking than my other machines, even with the straight-stitch needle plate in place. That being said, it does a mean zigzag, so I’m not really complaining.


I have 2 dead sewing machines. I don’t have the patience or knowledge to fix them. 😦
And I think taking them in to get fixed would cost as much as buying one new.
I love how your machine looks. All those attachments scare the heck out of me!!!
Like KC says, it depends on how old they are and what’s wrong. If they’re pre-1980s, they might be worth it if it’s something simple you can fix yourself. If it’s more complicated—a tune-up costs about $100. You can get a new machine for that much… but not a very good one.
I’ve got a lot of similar attachments for my 301, but I’ve not really used them. You’re inspiring me to get it together and try them already!
Attachments are fun! (And puzzling. And very nifty to figure out!)
I just can’t get enough of these old machines and their wonderful attachments! Yours is beautiful!
@sparkleanddoom (love your name!) if your machines are old like the one described here they may well be easy and cheap to fix. If the machines are newer and mostly plastic, or computerized, however, you’re probably right.
The attachments were what really put it over the top for me. Here’s hoping I’m done for the moment, though… 😉
Funny enough, learning more about my industrial machine has been on my mind lately, so I love this post and you amaze me with your how-to on this machine! Bravo! Now get sewing, he he!
Oooh, an industrial machine! I don’t have one of those yet… 😉
Wow, there is a lot of fun attachments to play with!!
yes, yes there are.
I have all those attachments for my Singer 404 and I LOVE them!
you might want to get this book, check out this post I did a while ago, to see a photo of The Sewing Machine Attachment Handbook by Charlene Phillips, she also has a website and is really helpful.
http://sunnygalstudio.blogspot.com/2010/04/tulle-time-party-dress-for-lia.html
You will be ruffling like crazy! I must contain myself from putting unnecessary ruffles, but it is so fun.
Yeah, I was ogling that on Amazon the other day… it’s on the wishlist, we’ll see if it shows up in my stocking (although I think it might just make my attachment impulses worse…)
Aaaah, all those lovely presser feet! I love posts about old sewing machines. 🙂
Oh, good. I worry that they’ll get boring… 🙂
What a haul! I’m sure you’ll be able to oil the reverse mechanism. The comment stream on this post has reassured me that, when I took my 30-year-old Montgomery Ward basic machine to the dumpster rather than try, one more time, to repair it, I did the right thing. It would not have made a good boat anchor, as it was not heavy.
Don’t trust any machine under 30!
… hmm, I think something’s gibbled there…
Ooohhh, soooo many accessories!! What fun! I’ve never seen anything like that tucker/edge stitcher/top-braider before.
Me either! I think it’s slightly bent, so I’m not sure when/if I’ll have the eggs to actually try it out…
I think I am developing a case of sewing machine feet envy. I am not sure I could get used to the flywheel going backward though. The best thing though is that it makes a great stitch. I bet Cindy Peter at this store would have a new rubber drive for your friction motor. http://stores.ebay.com/Stitches-in-Time. I am not sure I could get used to the flywheel going backward.
Ooh, thanks for the link! Yeah, the flywheel is a bit of a head-trip. Vive la difference? 🙂
I WANT a gathering/ruffler foot! My machines are all too new to have that feature (the serger can gather, but it’s more like an ease-stitch than proper gathering). I hate gathering using threads with a passion, would love to have something that did the work for me….
The biggest challenge with multiple machines is storage. Even with your big basement, I imagine you’ll end up shuffling them around until you figure out your favorites. Unless you have a long wall, a lot of tables, and unlimited power outlets?
Lazydubculturalgirl, you can have a ruffler – I have bought a lot from this place: http://stores.ebay.com/Gone-Sewing-Company/_i.html?_fsub=20&_sc=1&_sop=10 (Only one ruffler, though…)
And a gathering foot? Yes, Ma’am: http://stores.ebay.com/Gone-Sewing-Company/_i.html?_nkw=shirring&submit=Search&_sid=34514602
Yeah, you can totally get them aftermarket. The one I got for my Janome when my mom bought it (she bought the ruffler, too, to be clear) was about $30. It’s mechanically pretty much identical to this old one. It’s never worked as well as the vintage one I grew up with, but that might be the machine as much as anything. And the little gathering feet are dead cheap, too.
That being said, they’re not really a complete substitute for hand-gathering. Sure, if you’re making a tiered petticoat or princess costume they come in handy, but if you need precision and just a small amount of gathering, it’s not worth the trouble.
Nice find, sounds like a fun machine to use! Is the first foot a gathering foot?
The Sewing Machine Attachment book collects all the presser foot tutorials into one place. For me it’s great to have next to my machine. Just need to move a printer off my vintage sewing table so I can get at it… lol
it is, although still not entirely “comfortable”, y’know?
… all I need now is a nice vintage machine cabinet… (tells self firmly: NO!)
Wow, look at those attachments! How fun to have machines in the house. And think of what you can sew with the goodies! I’m usually too lazy to thread the one I have, but I did have quite a bit of fun when my serger tension went lazy and I took the whole darn thing apart. Go, go! 🙂
Wow, you’re brave taking your serger tension apart!
isis, o isis!
have i got a post find coming for you! nowhere near as fancy color-wise, but i’m in love…
Oooh, ooo, now I’m excited! Get posting, you tease! 😀
Pingback: The Rolled Hem Foot—Devil or Divine? | Tanit-Isis Sews
Pingback: Children, magazines | Tanit-Isis Sews
Pingback: Prezzies (2) | Tanit-Isis Sews
Pingback: Doodads | Tanit-Isis Sews
Pingback: Enablers Everywhere | Tanit-Isis Sews