Tag Archives: white skirt

The Very Boring Petticoat

Petticoat!

Petticoat!

I made a third petticoat. This was always the plan, though I wasn’t quite expecting to do it, um, this weekend, since there’s about four other higher-priotity projects in the queue… But, I had a couple of metres of muslin lying around after another project, and when I got home from work Friday night it was whispering and, well, that was that.*

A Very Boring Petticoat

It was pretty obvious when I finished my fancy, flouncy petticoat that it needed another layer underneath, to smooth over the ridges and lines of the bustle and corset. Possibly my flannel petticoat would serve that purpose as well, but certainly not in the summer (which is what we are gearing up to here, at long last.)
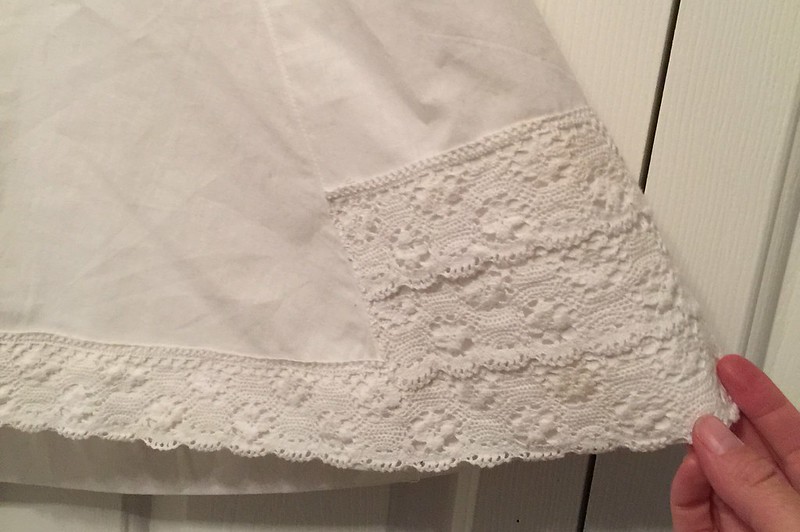
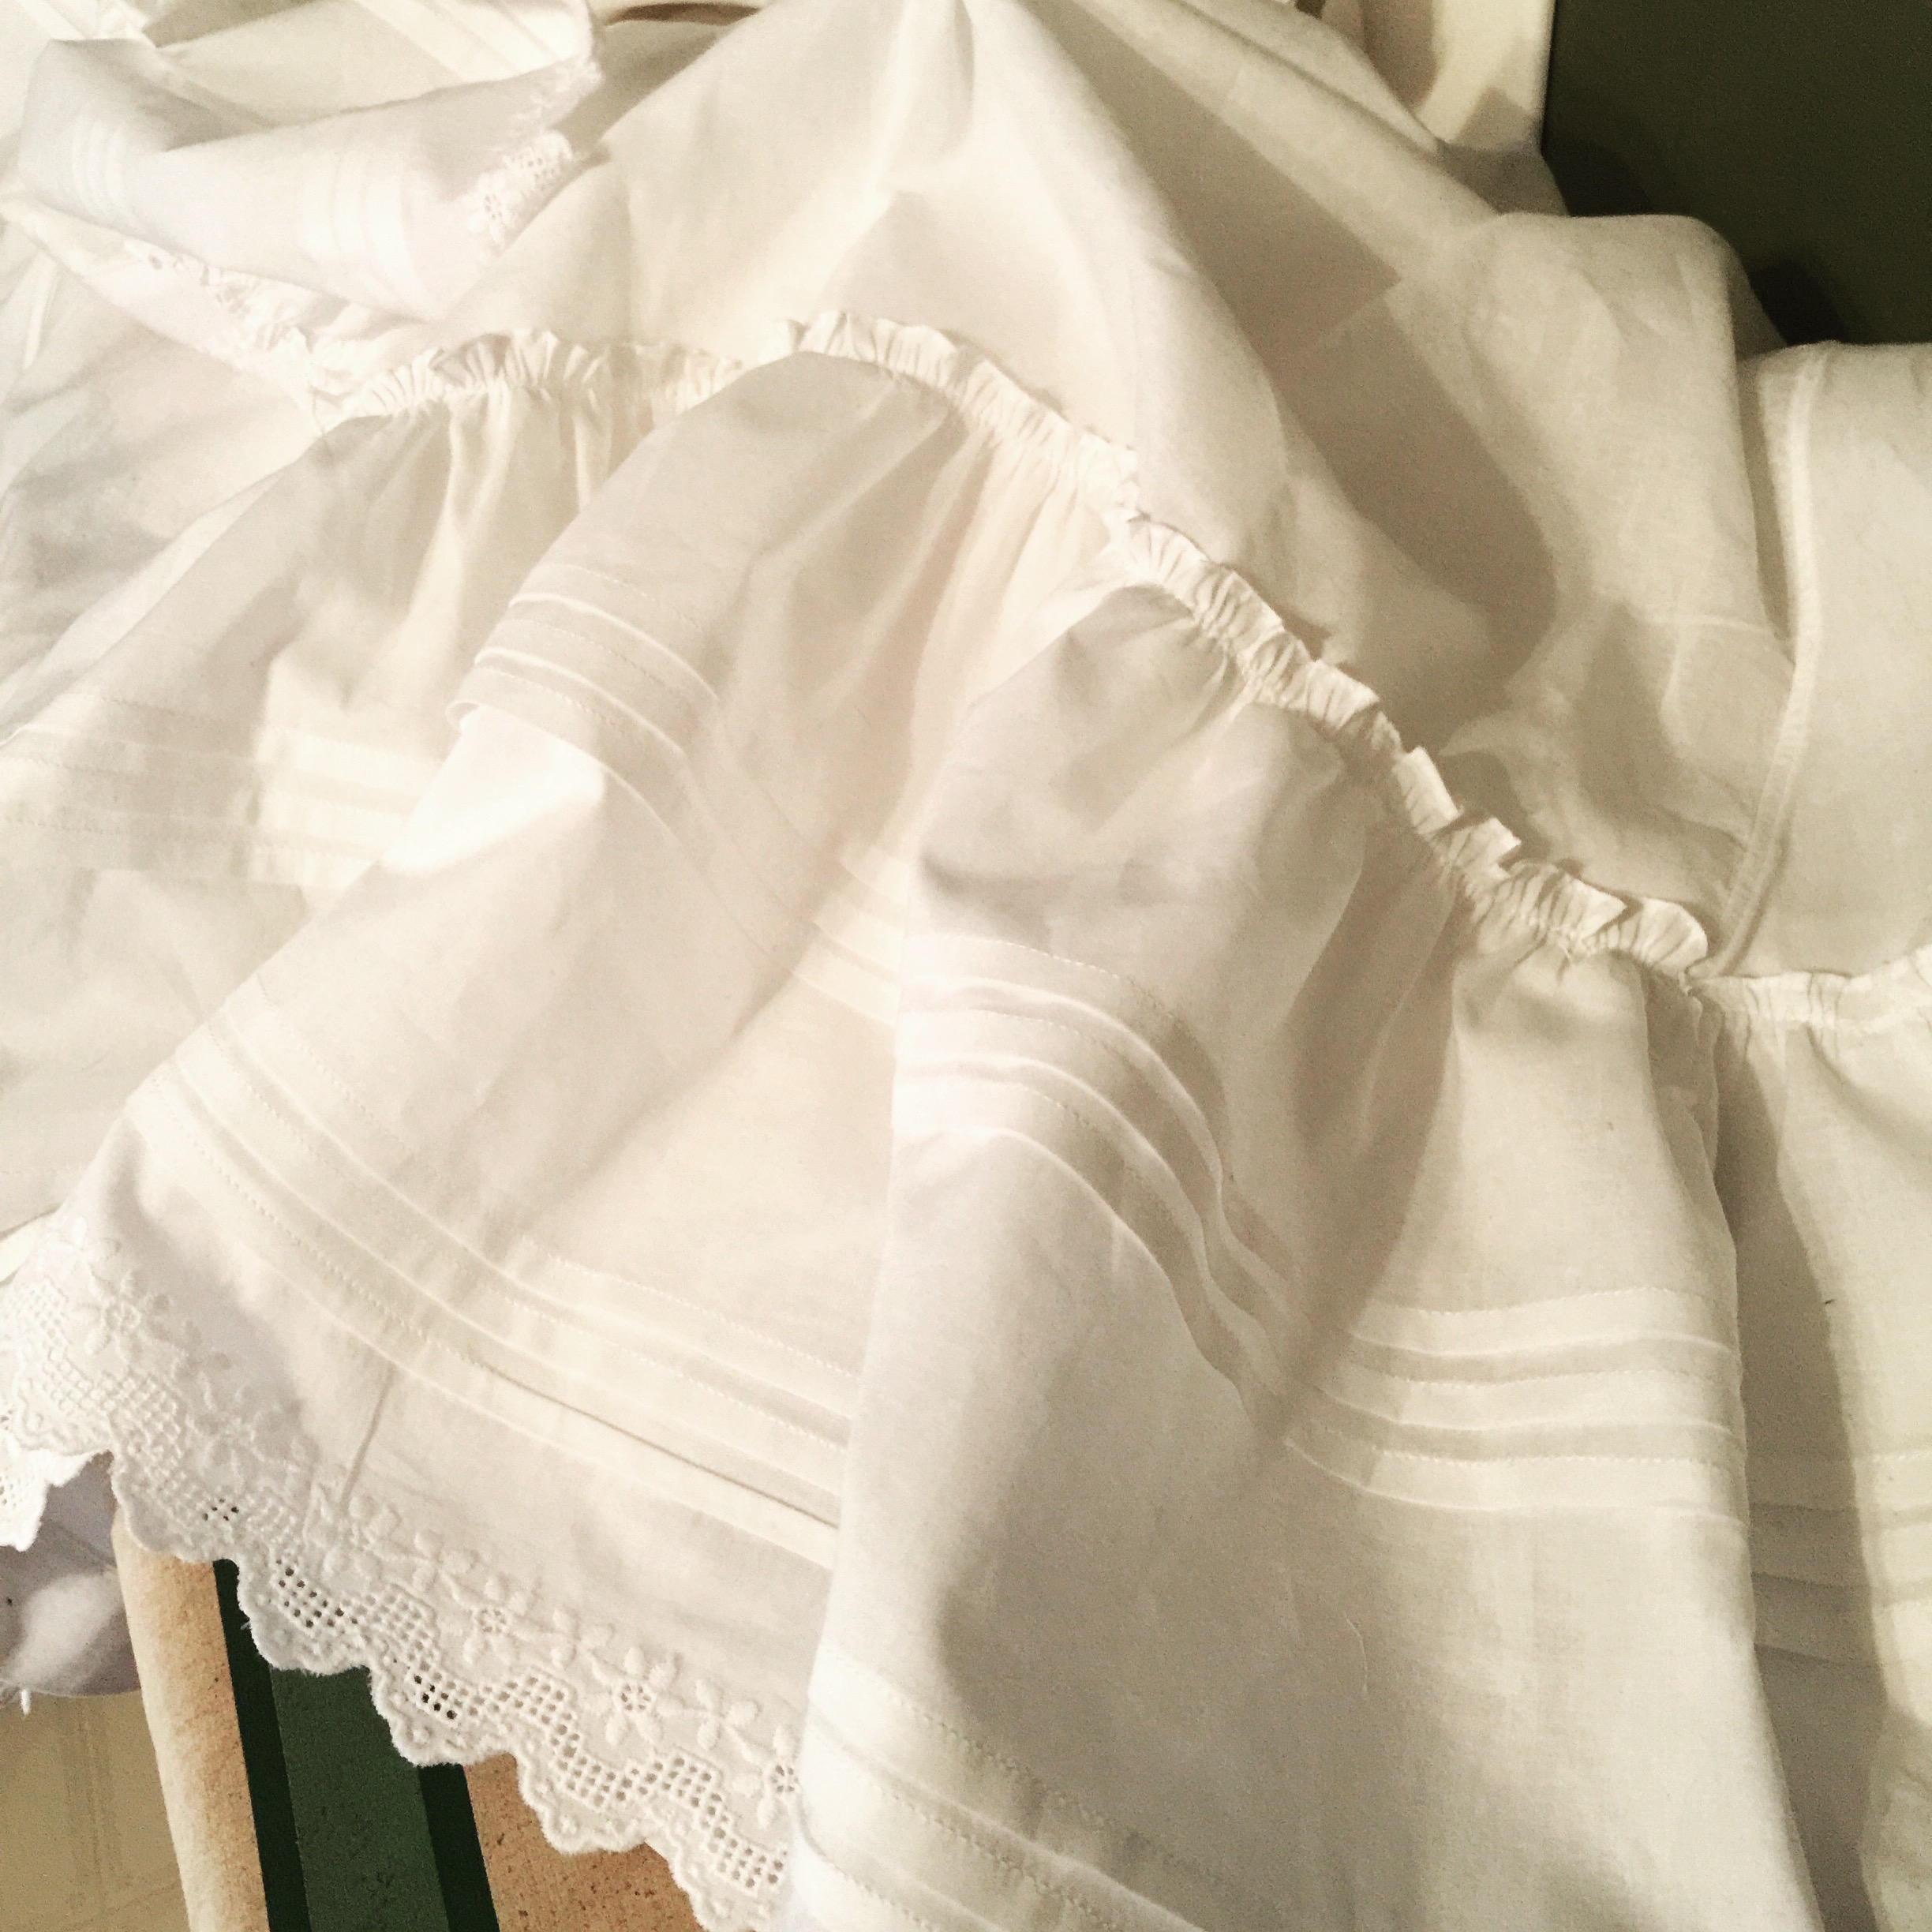
Lace on Hem

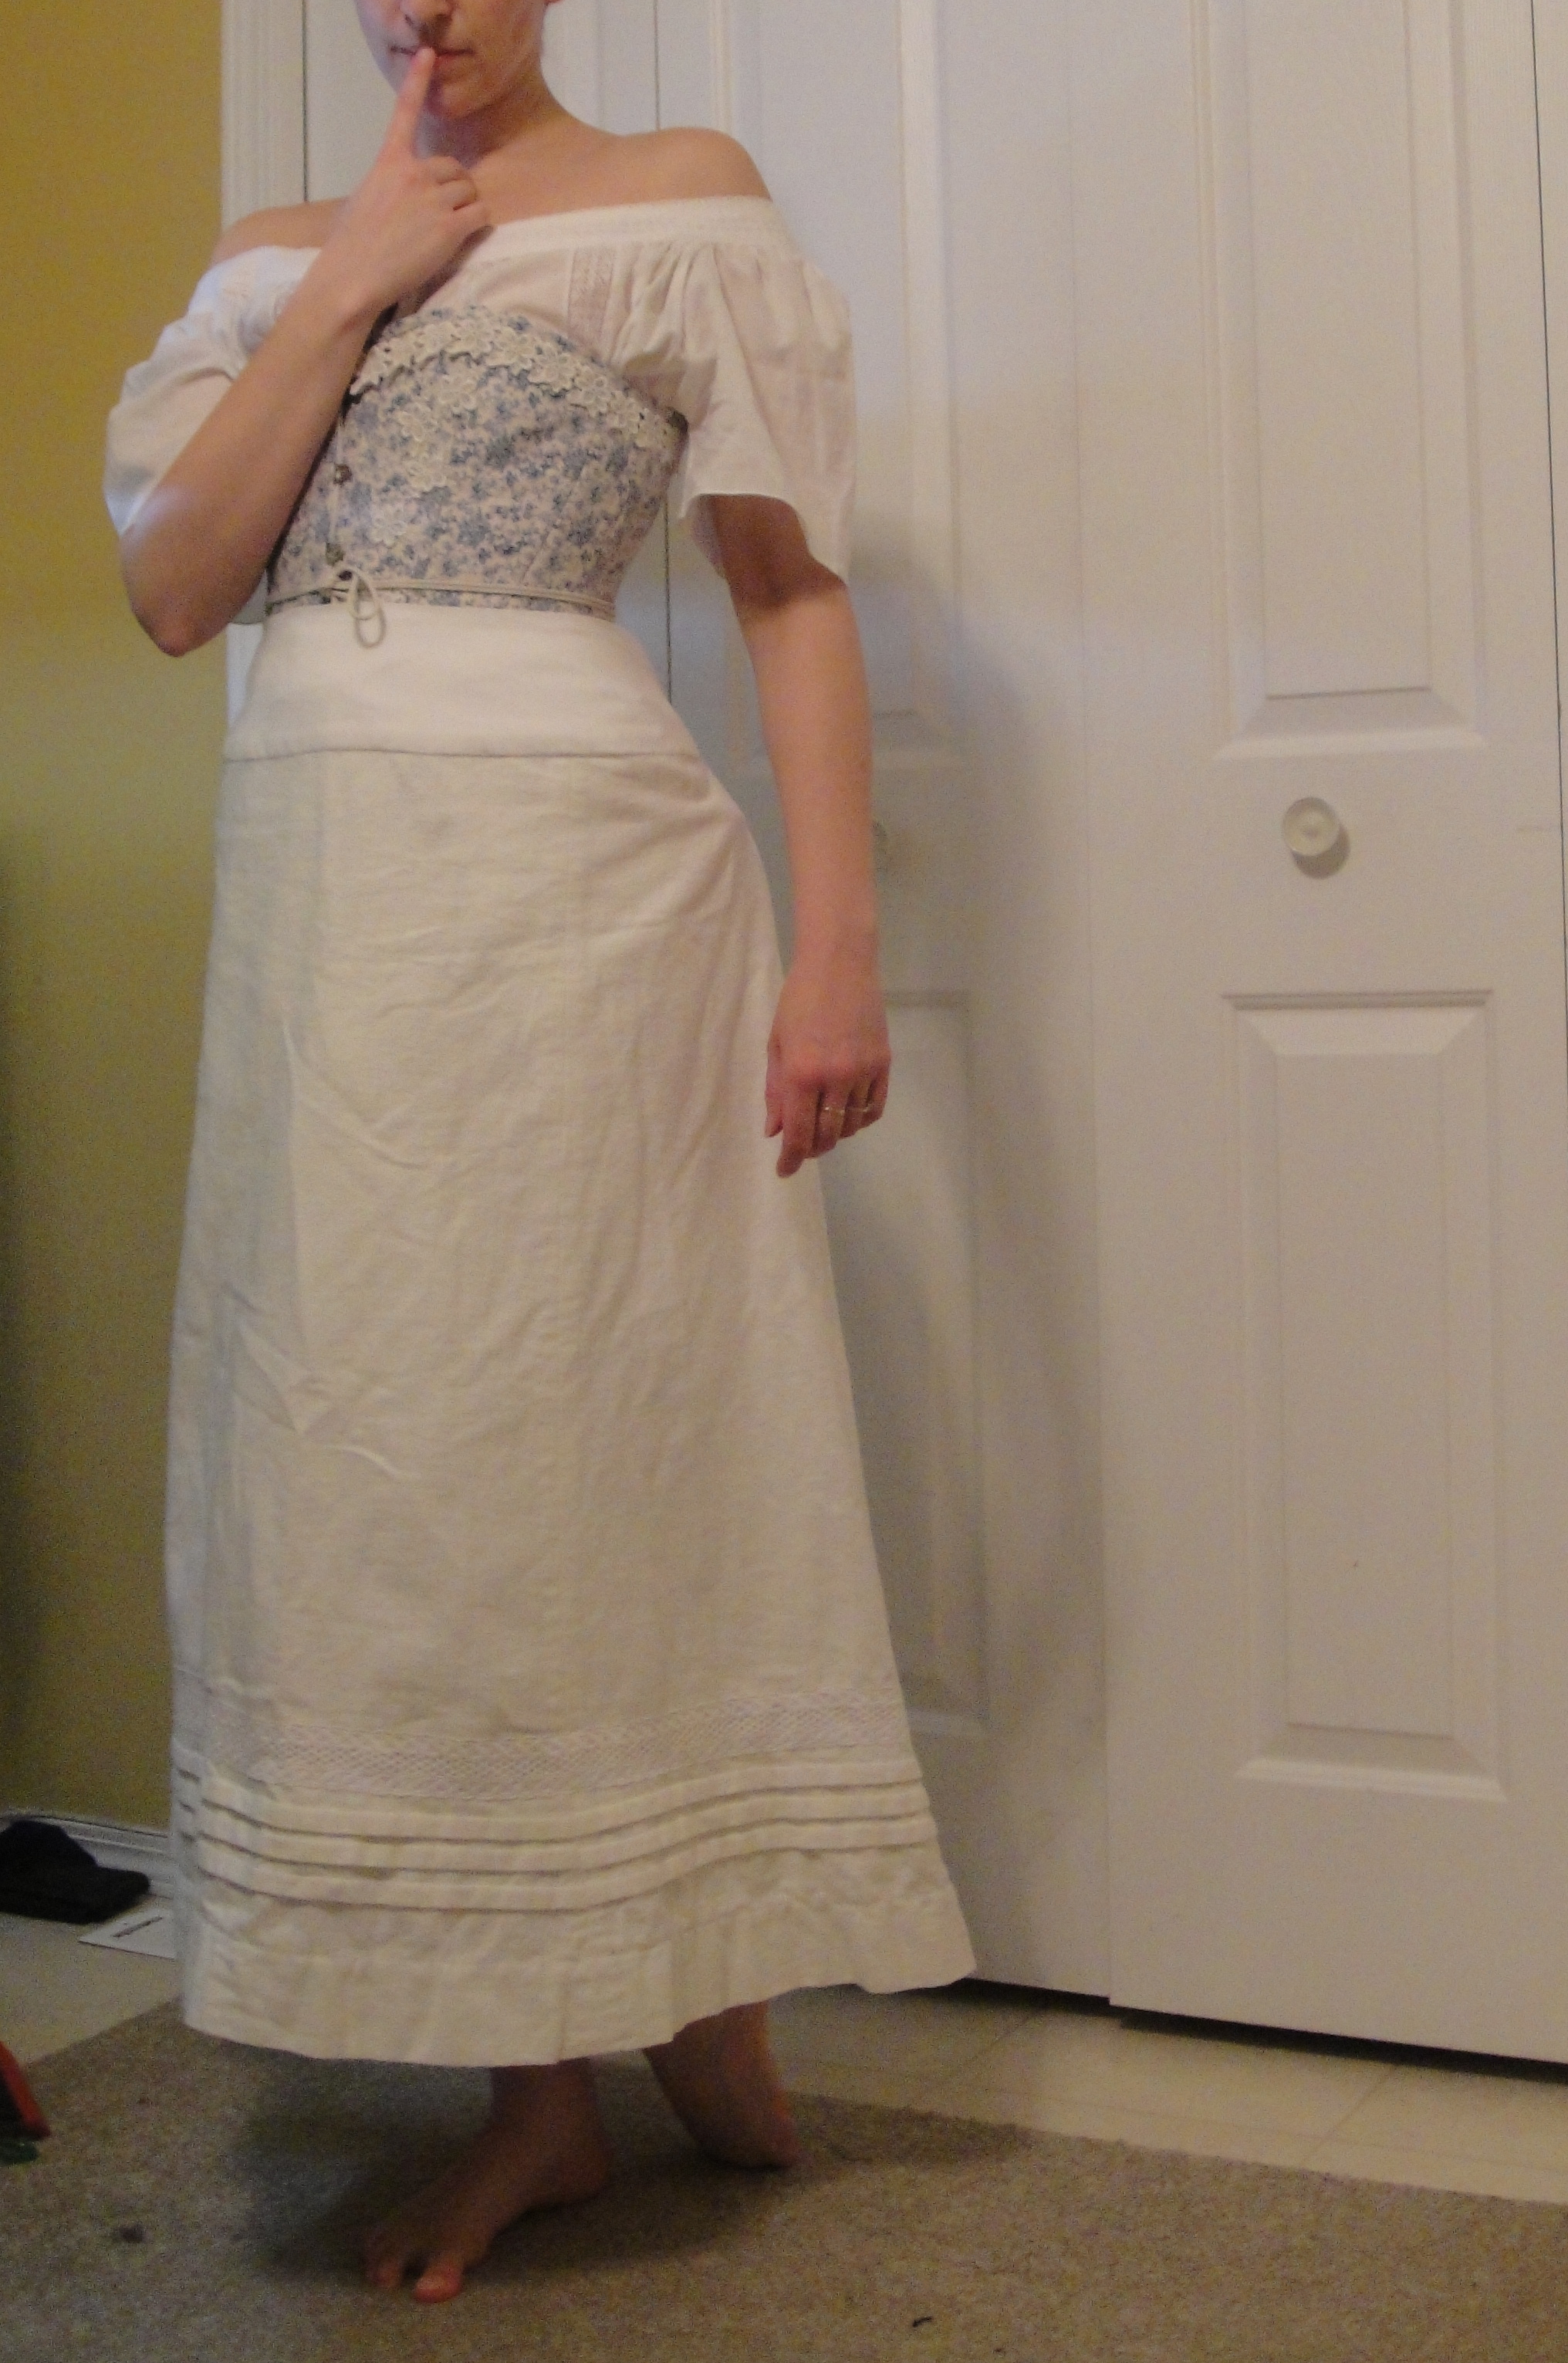
When I first started cutting the muslin, I meant to make it a completely plain white skirt, but, in true Victorian fashion, I couldn’t leave well enough alone, and several metres of lace found their way onto the hem. Still, after all the tucking and gathering and more gathering of the last one, it was a pretty quick and dirty affair.

Felled seams

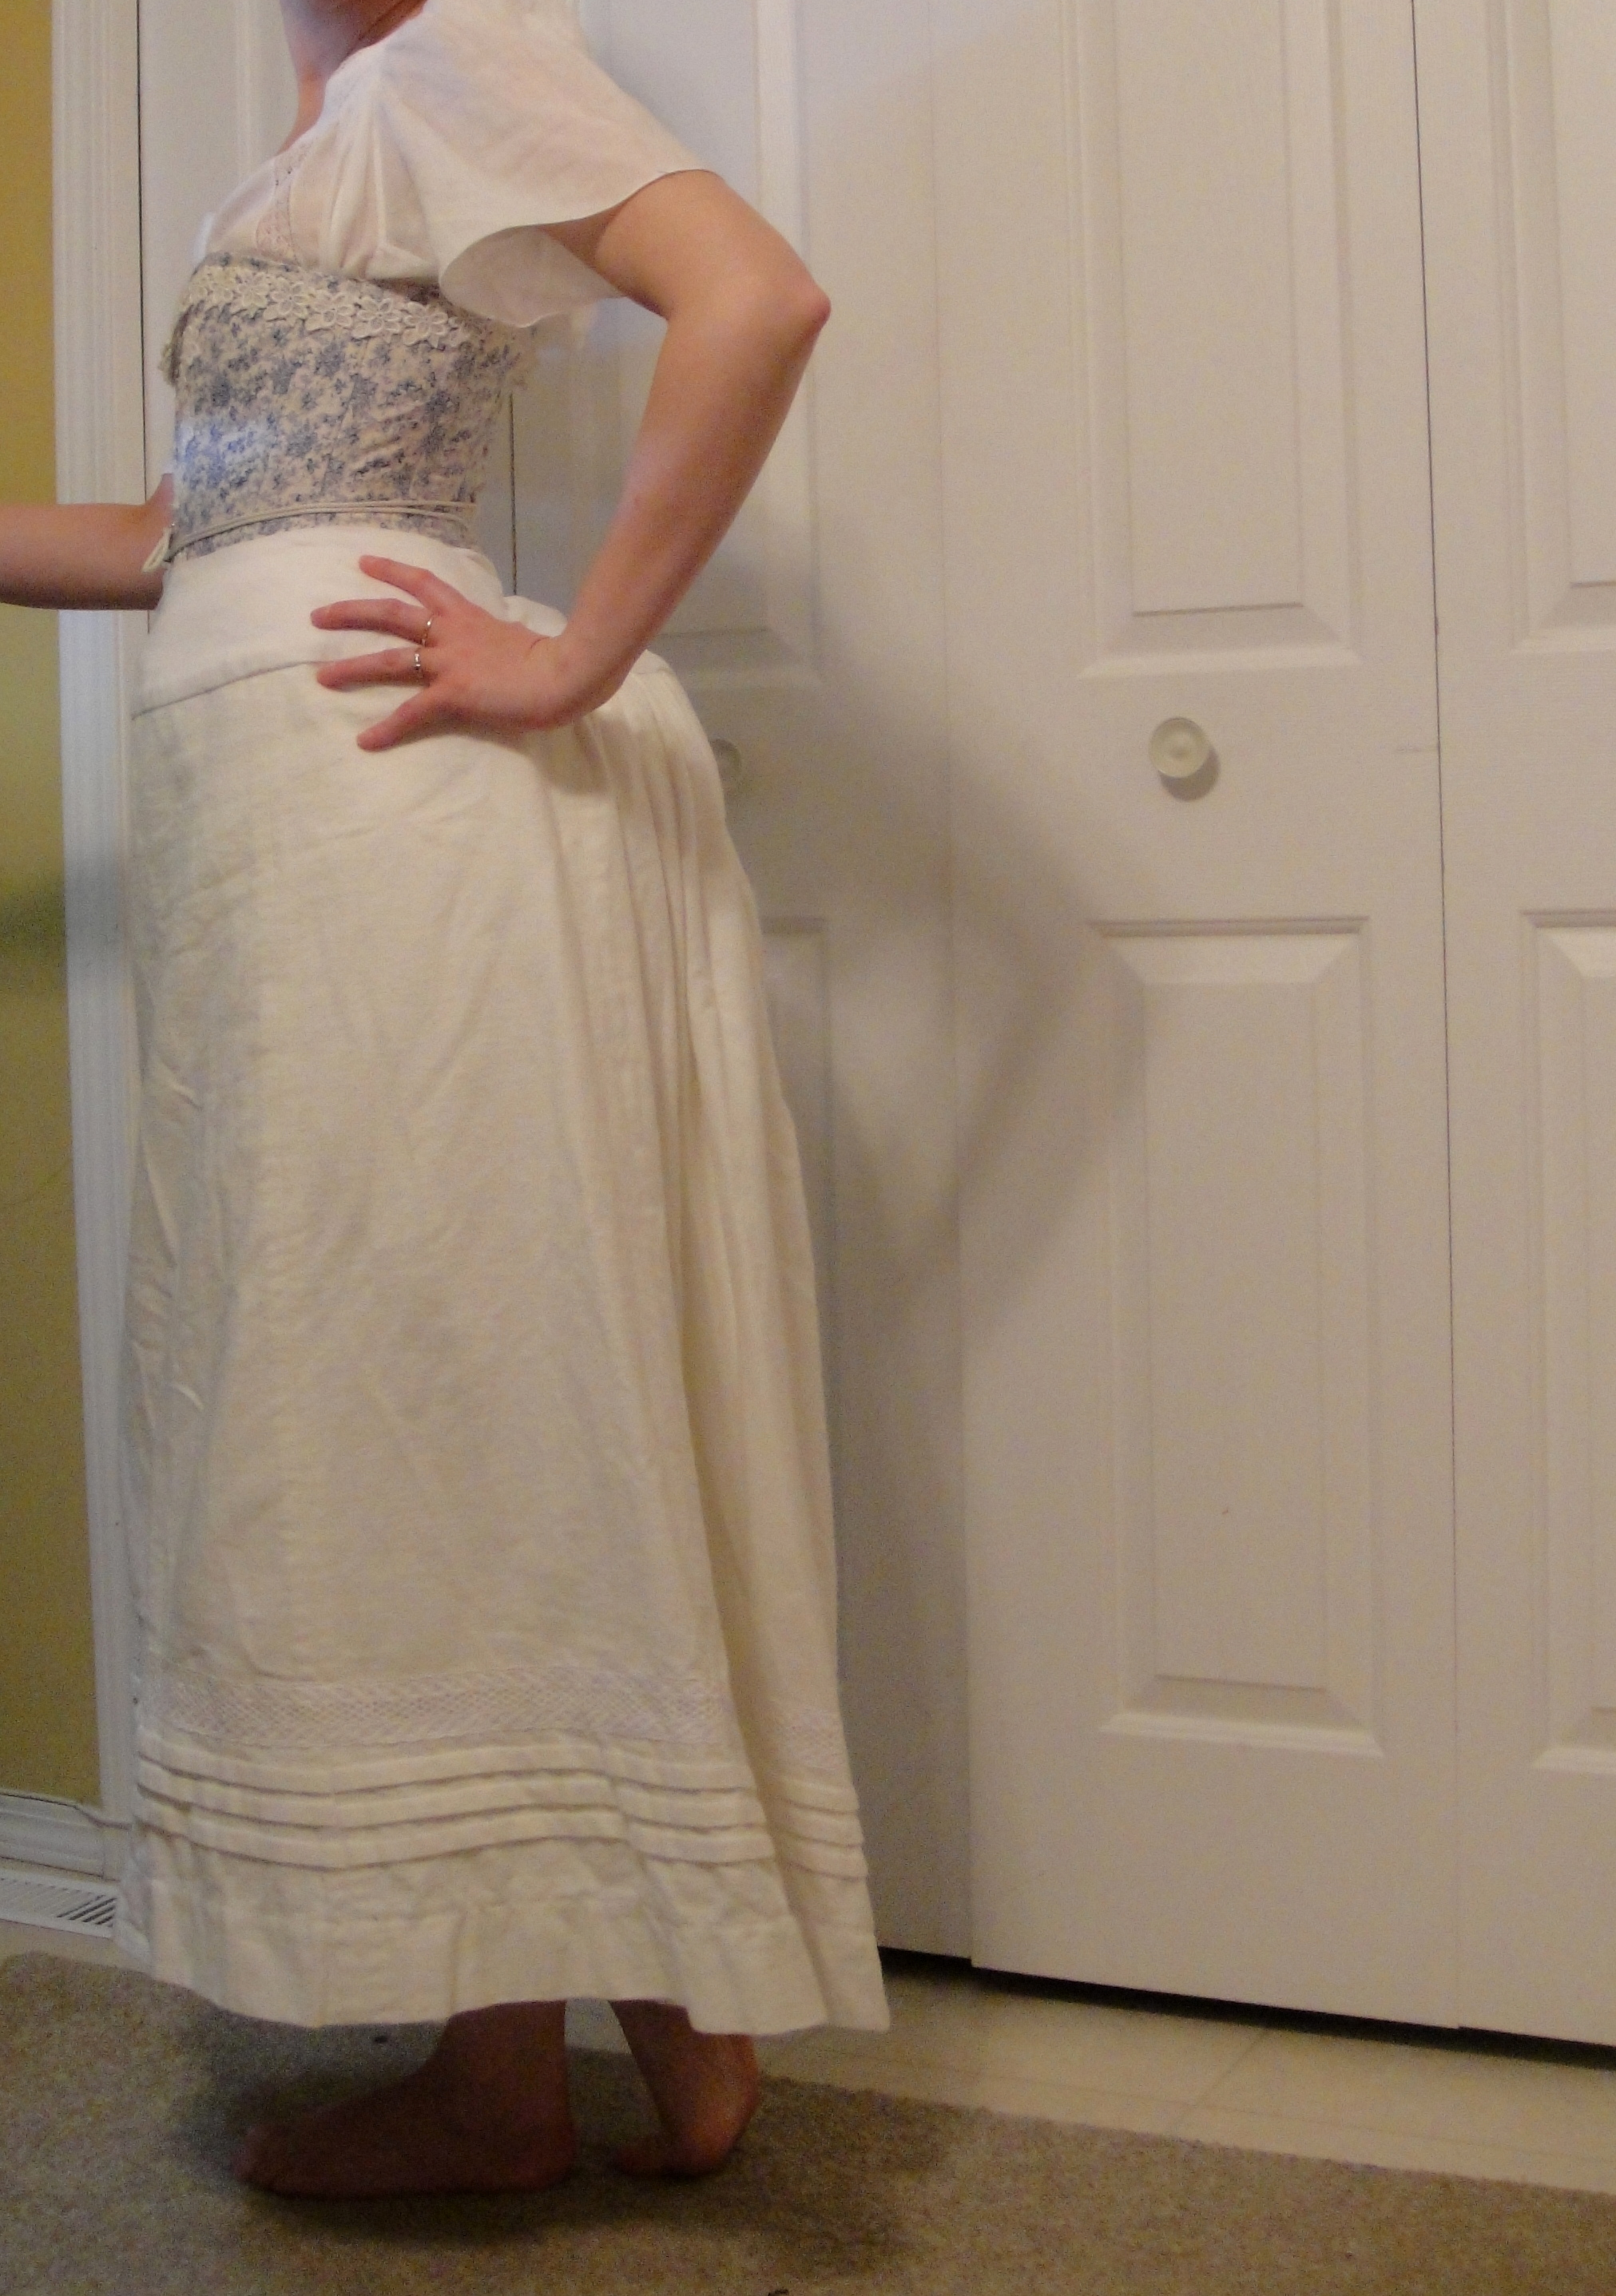
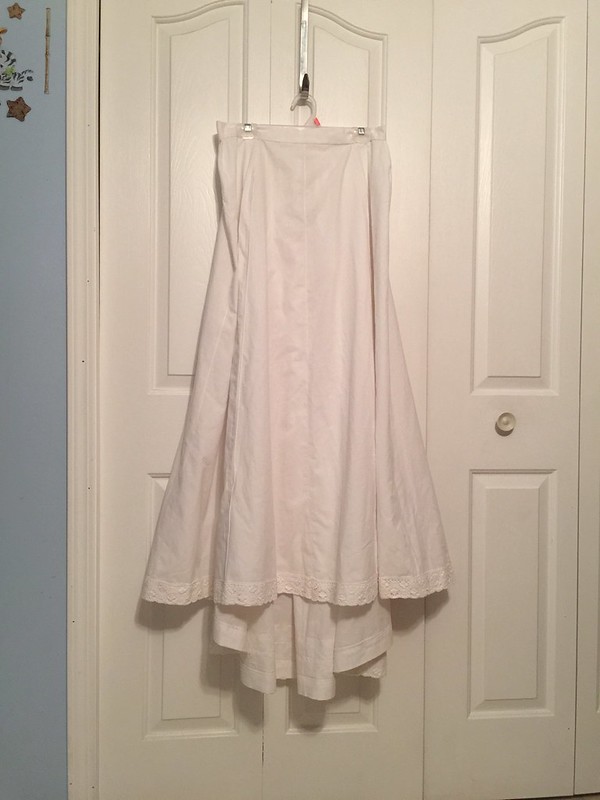
I used my flat-fell foot to fell the vertical seams, and I felt a lot more successful this time, if only because the muslin is like the best-behaved fabric in the universe. The main thing (aside from actually reading up on how to use the foot) is to use the right seam-allowances—1/4″ on the bottom 1/8″ on the top. Still not flawless, but mostly good, and no one’ll see the booboos anyway. 😉 Half my fells are on the inside, however, and half on the outside—after I screwed it up on the second seam I decided I didn’t care and just did whichever side was most convenient. Not the tidiest ever. BUT NO ONE WILL SEE. (Except everyone I show it to because I’m all like LOOK I MADE A PETTICOAT!) I used a total of three skirt-lengths of 44″ wide muslin. To reduce fabric waste, I added a centre front seam to the front gore. Initially I was going to use only two skirt lengths, but it would’ve been a really scrawny petticoat, so I scrounged around and turned up another piece of the same fabric, just long enough for another set of gores.
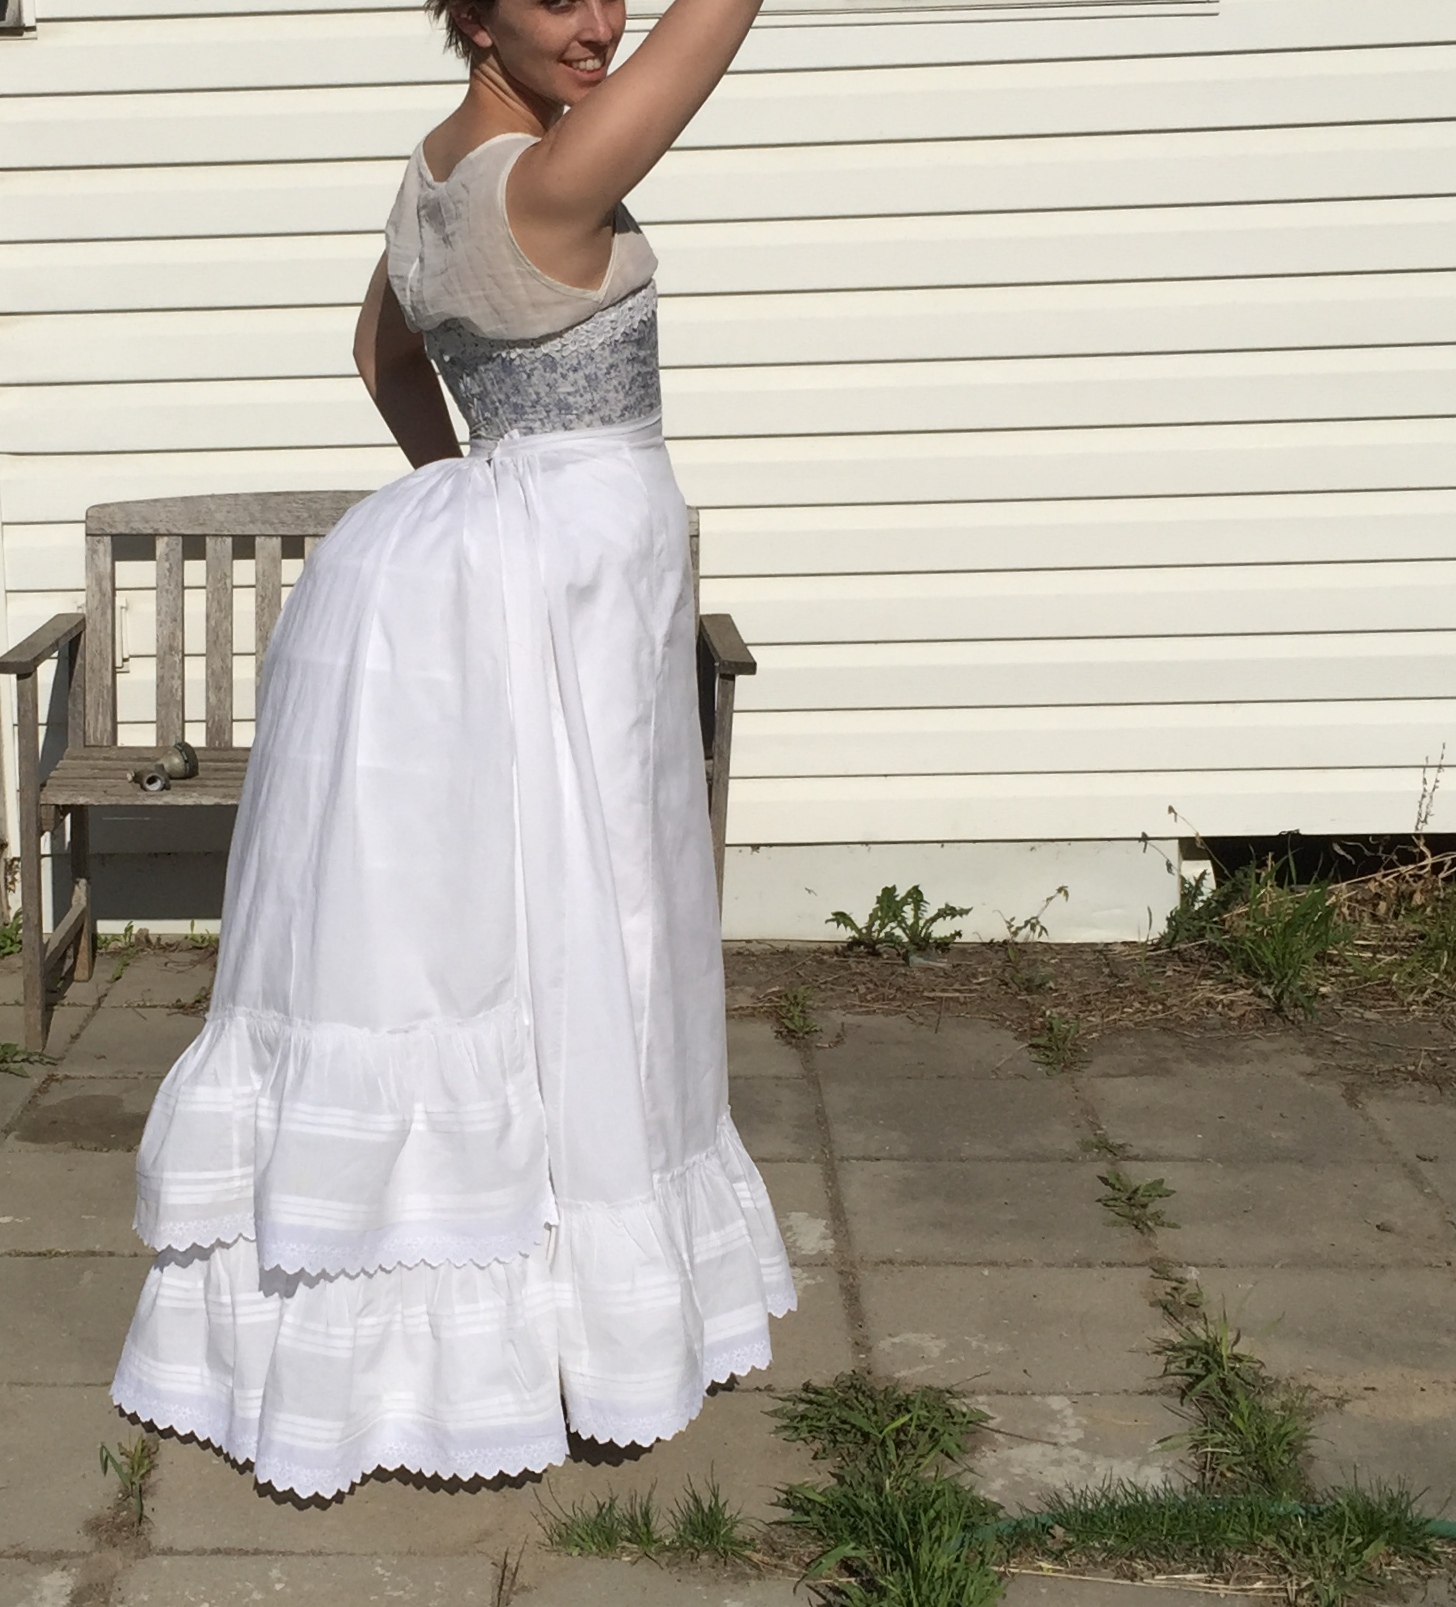
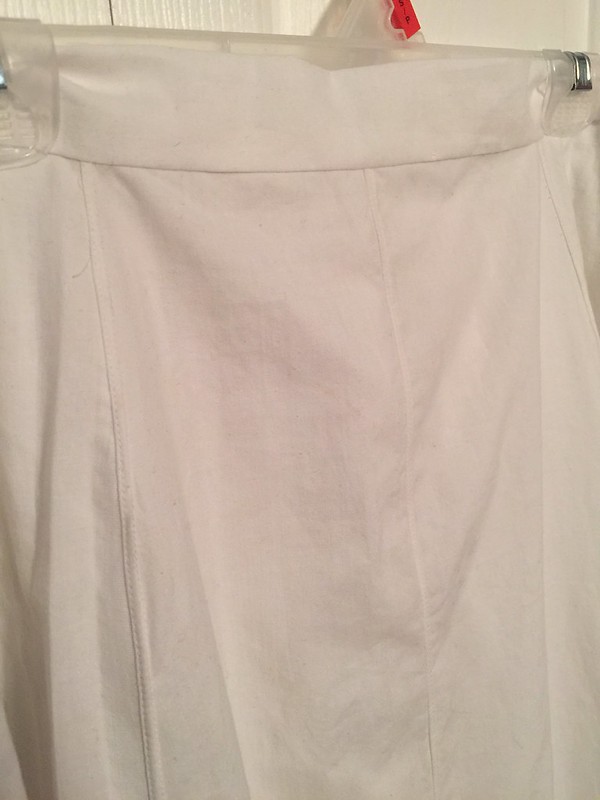
Long back.

Long back.

It’s more trained (long in back)  than my previous petticoats, because one of the sets of gores I made was cut from a full 44″ width of fabric, not a half-width. This was not my best idea ever since I don’t particularly want a trained petticoat. Oops. I also cut the waistband little large, thinking it could sit a bit lower on my waist (and also not wanting another overly-tight waistband), but this doesn’t seem to work overly well for these skirts—the bustle gets in the way, I suppose. It looks kinda like one of those “look at my old pants!” weight-loss commercials. https://instagram.com/p/2zyEWwr0Mu/?taken-by=tanitisis   Like the flannel petticoat, I made a folded placket in the CB. This time I put the narrow edge of the placket on top and the wide one beneath—this seems to work much better with all the gathering that is going on in a sort like this, although it’s pretty much opposite of the instructions. Untitled As I was trying to throw this together quickly, I was in no mood to try some stroked gathers (pity because I think I might’ve done better counting threads and things on the muslin)—I went with two well-spaced rows of machine gathering, although I tried a little extra-hard to make sure the stitches were as synchronized between the two rows as I could manage. I’m not too bothered, anyway.
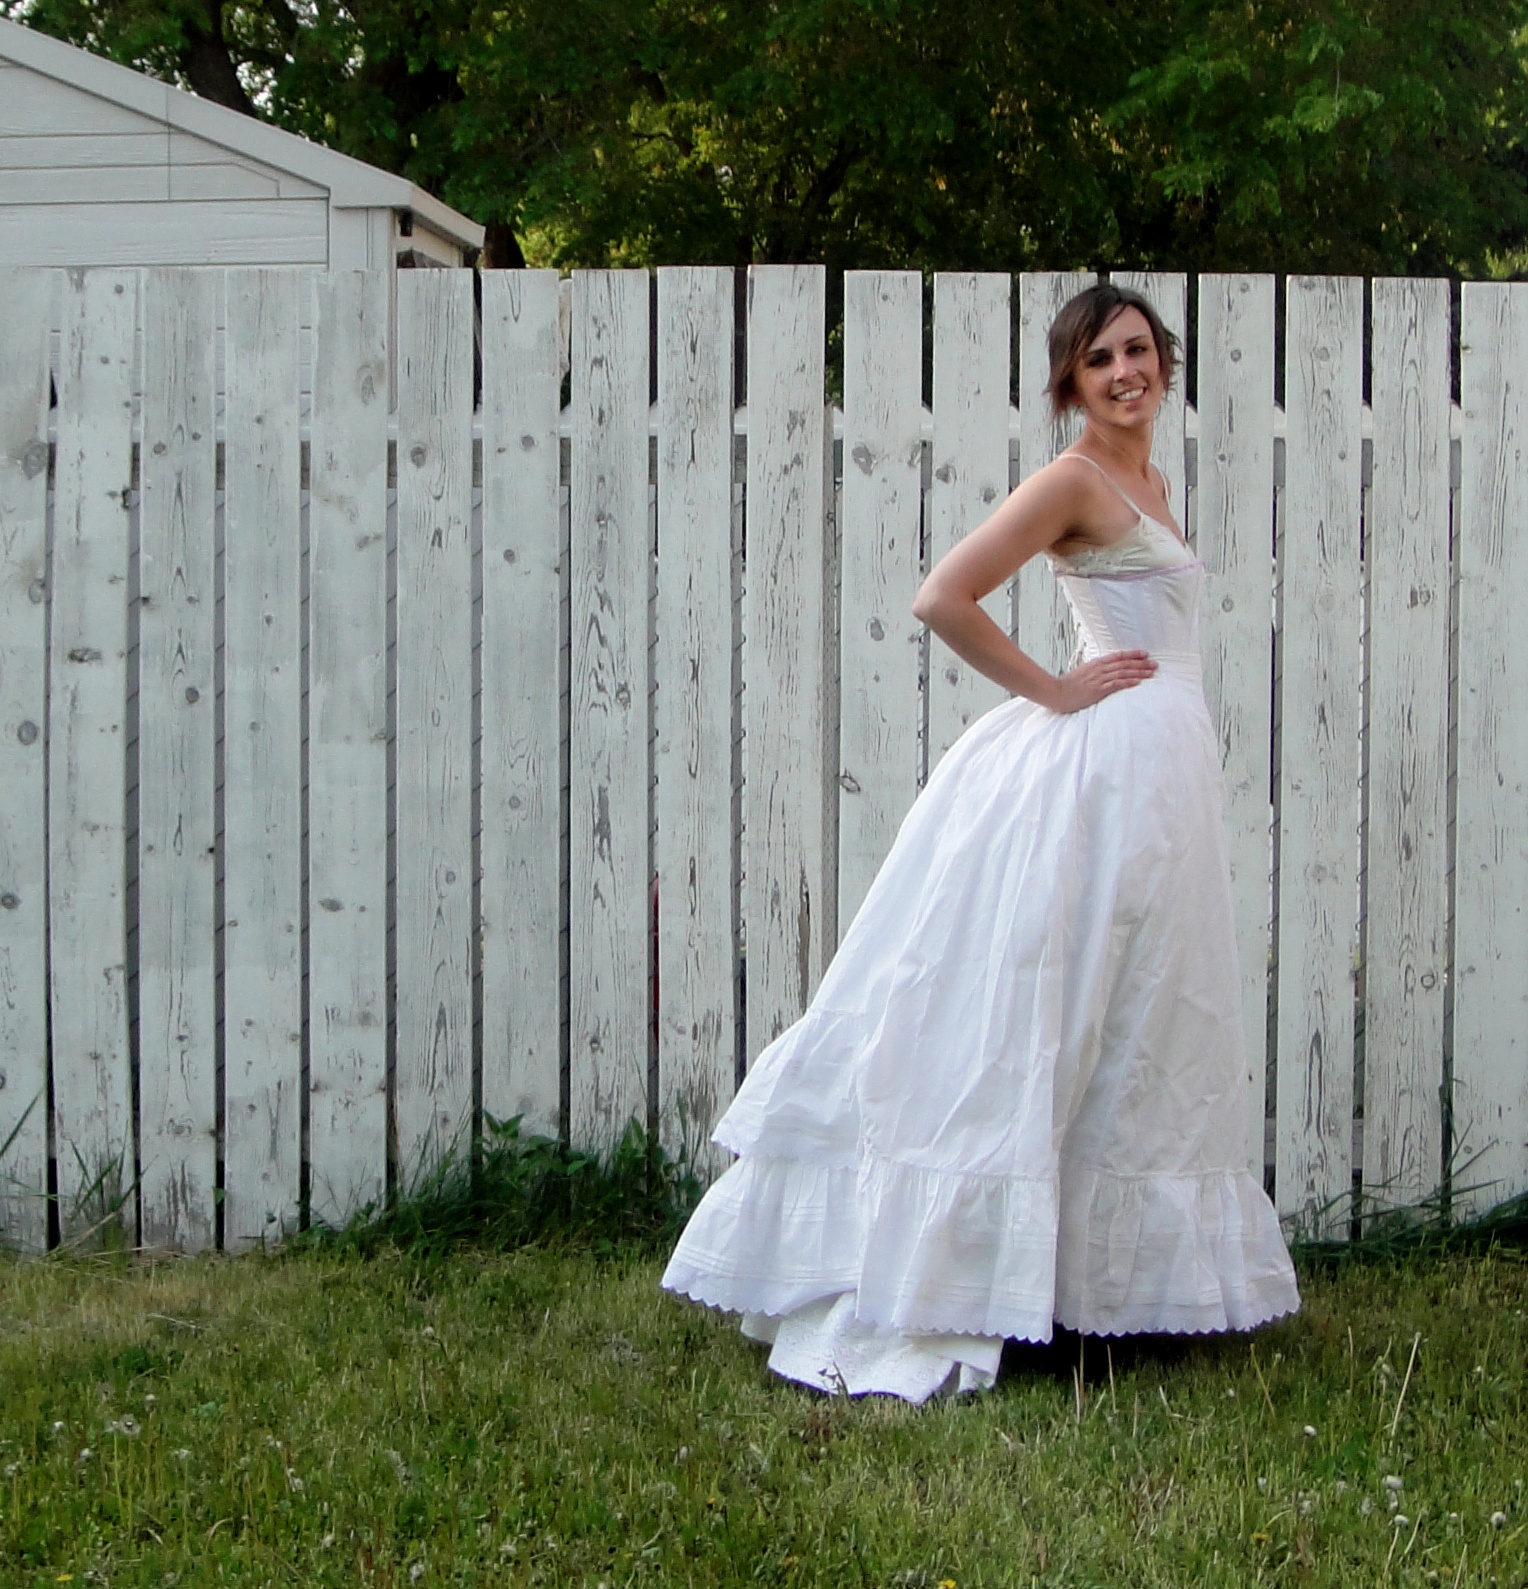
Two petticoats!

Two petticoats!

Aside from the waistband, I’m pretty happy with it, and it serves its purpose admirably.
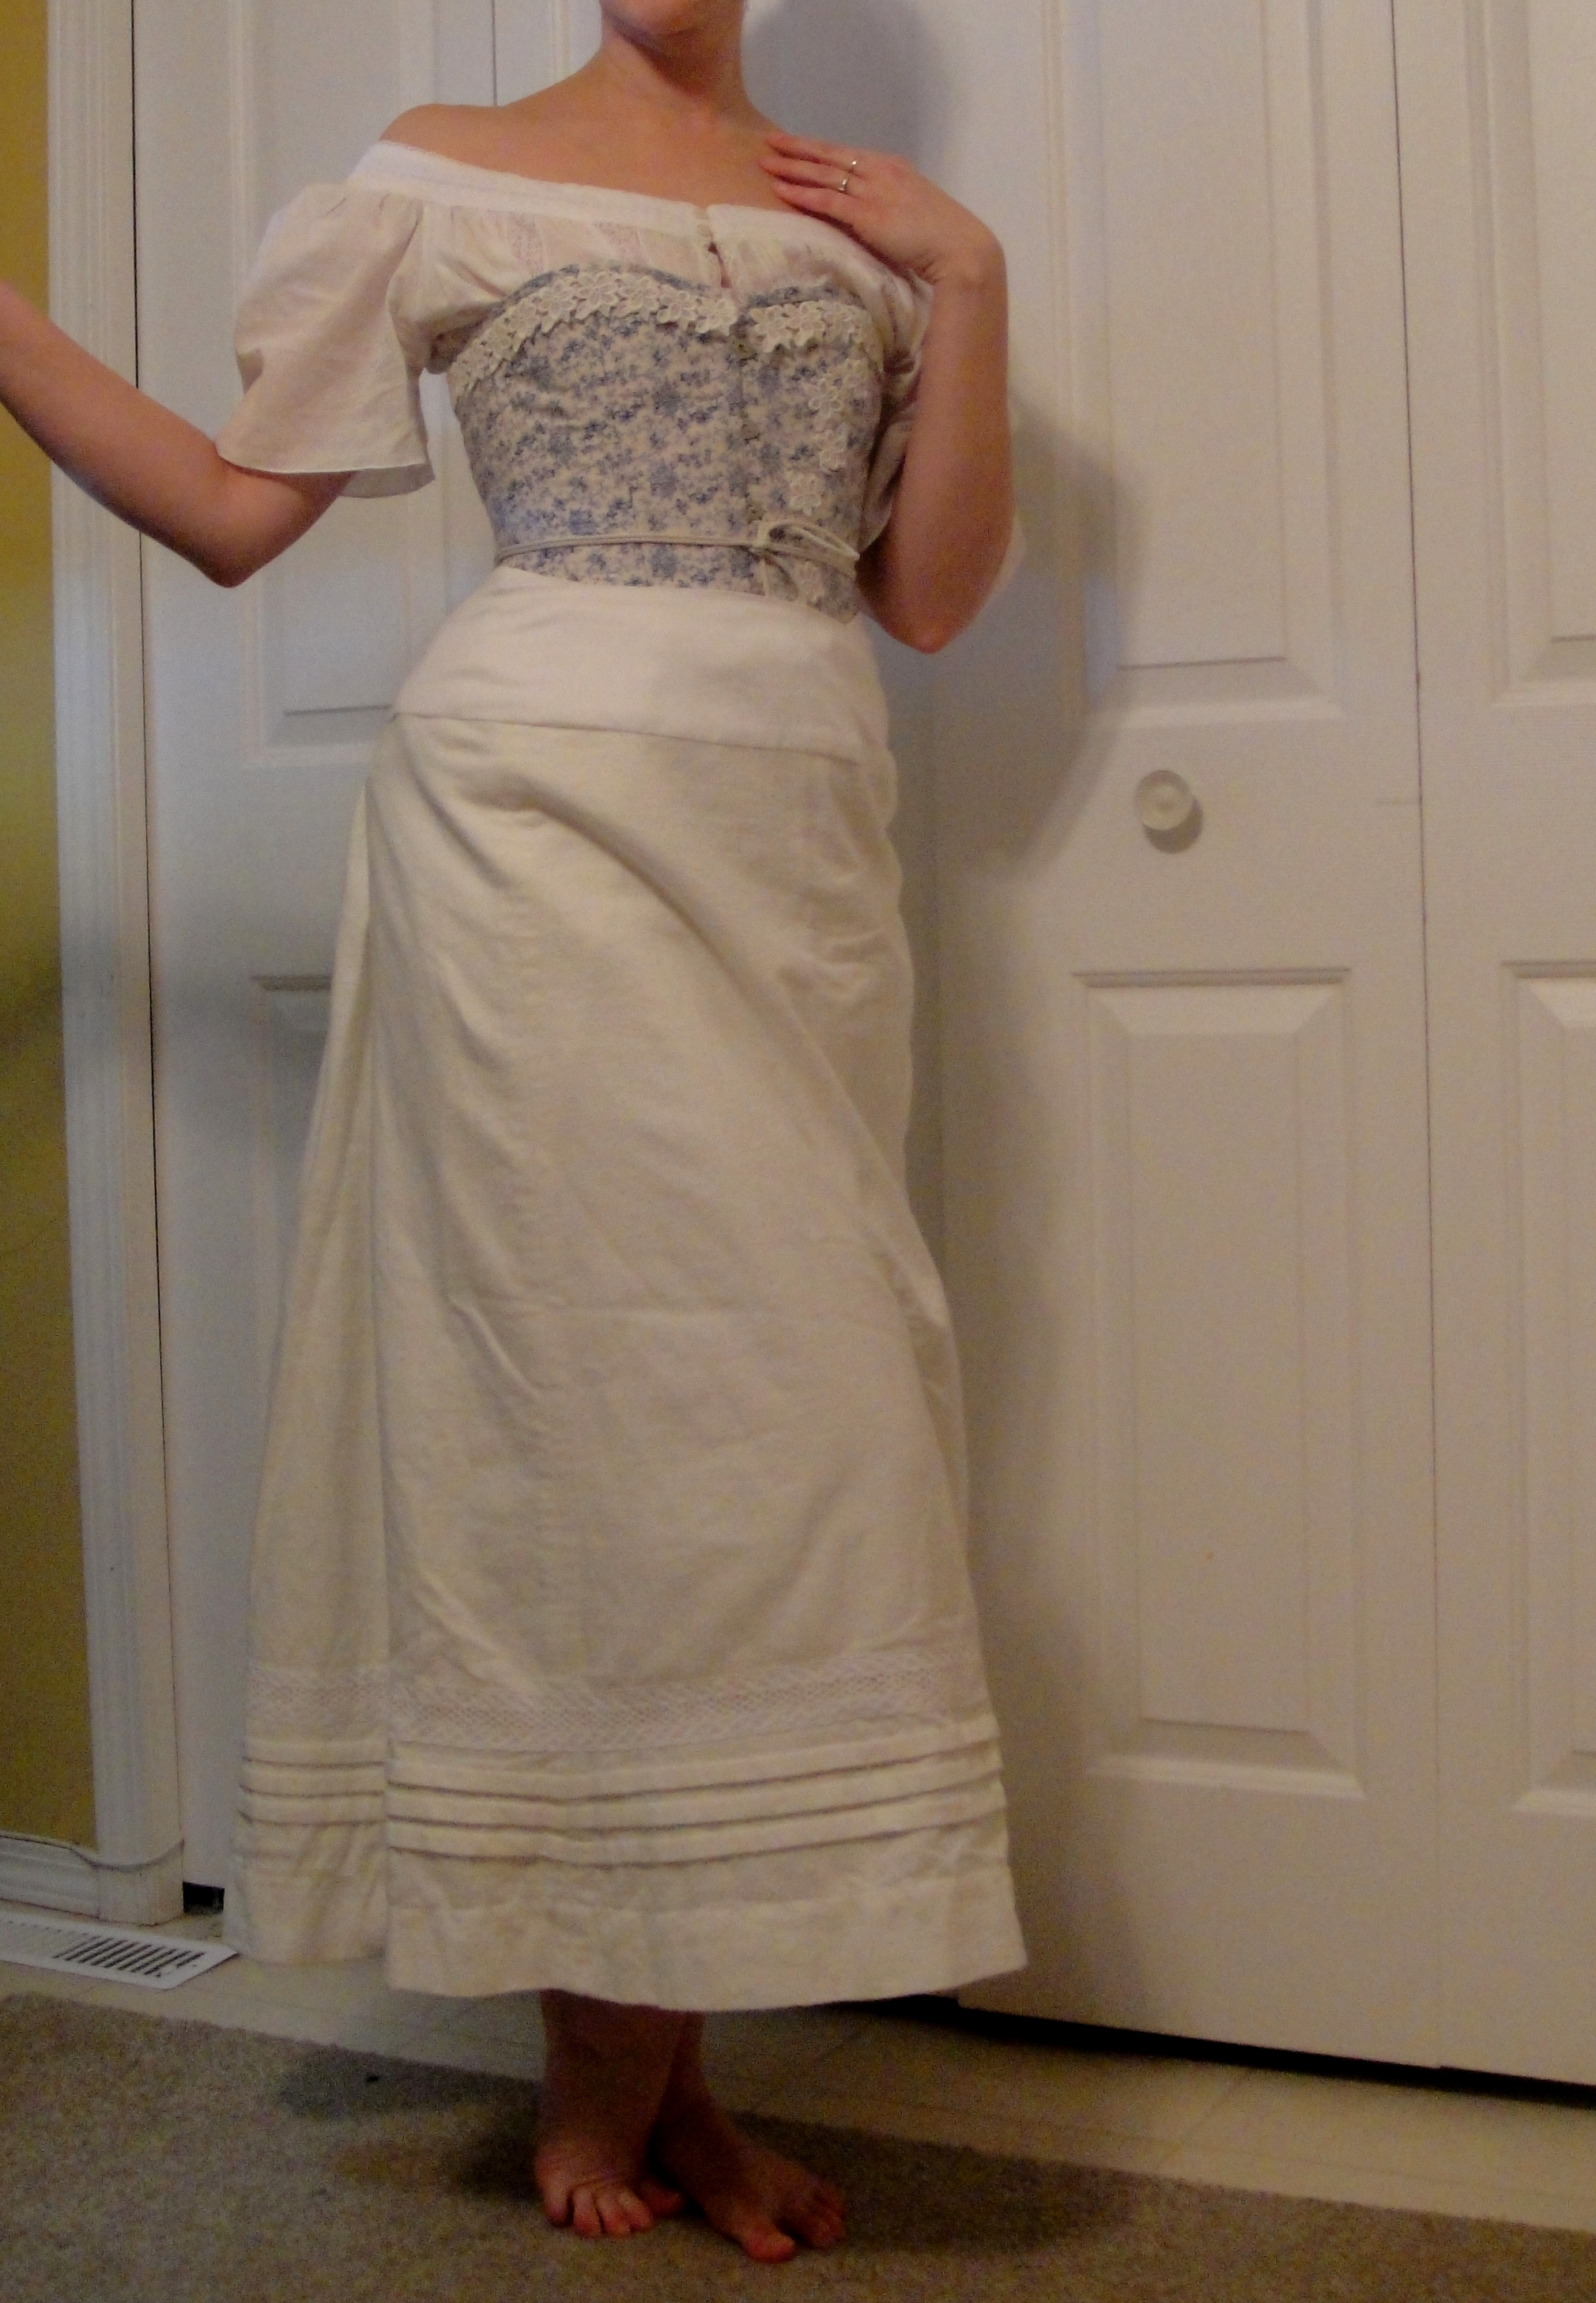
One petticoat vs. 2

One petticoat vs. 2

The hard bustle bone ridges you could see with just one petticoat are much better hidden this time.

Skirts appears a little more full, I think.

Skirts appears a little more full, I think.

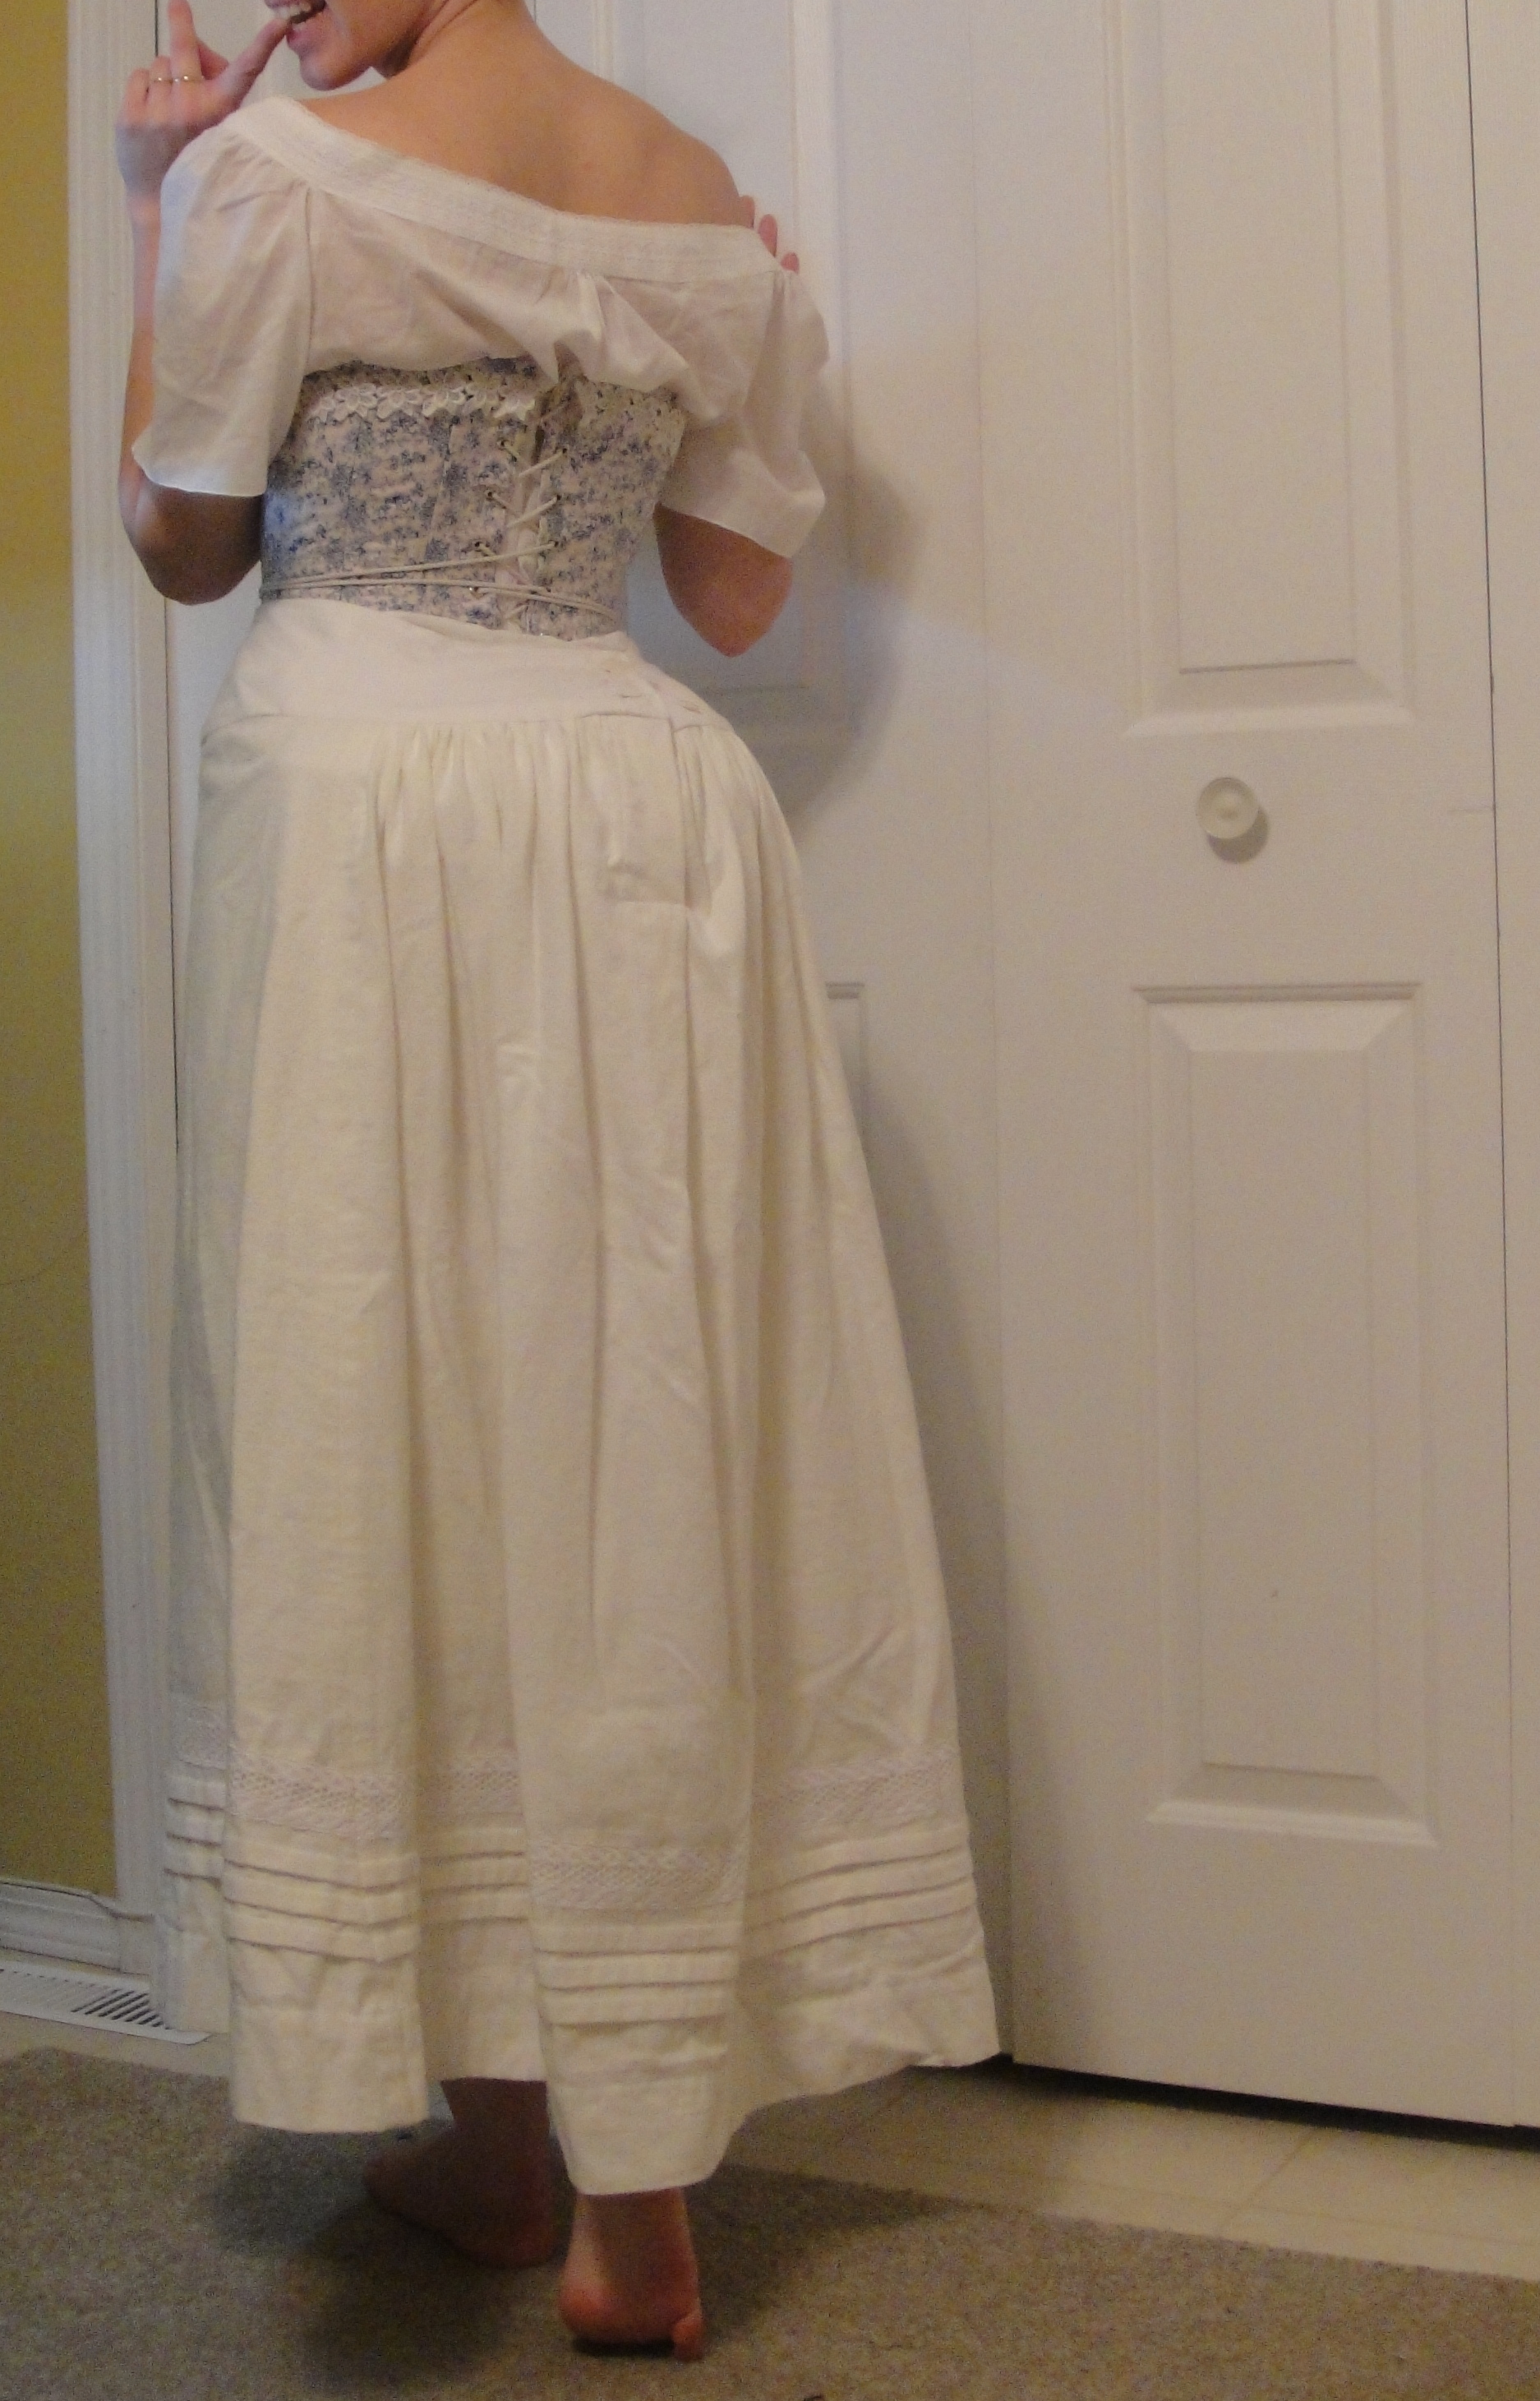
Although I’m noticing more “skirt spread” now, angling out of the front part of the skirt. Not quite the 1880s fashion-plate look, although pretty common in actual period photographs. The solution, according to Mrs Church and others, is ties or elastics that run across the inside of the skirt, from one side to the other behind the knees, pulling everything in. This would require adding little slit-type openings to all the petticoat layers for the ties to pass through… We’ll see.

Teehee!

Teehee!

It then occurred to me that I’m taking photos in my back yard in my underwear. Teehee! Alas, my attempts to vamp it up Victorian-style mostly came out looking more “axe murderer” than “come hither” (a problem I often have…), so you’ll have to settle for a peek of ankle. *Yes, as you may have noticed, I have also made another corset. It, like the petticoat, is very boring. I will blog it as soon as I get the chance, I promise.

Advertisement

6 Comments

Filed under Sewing

The Second Petticoat

I finished my second petticoat! FINALLY. If I thought the first one took forever… (though, I did NOT hand-stitch the hem this time.)

Petticoat # 2

Petticoat # 2

Anyway, as with the flannel petticoat, I largely followed the directions from The Home Needle, with a bit of supplementation from the various diagrams of Patterns of Fashion 2, which really drive home that yes, they are describing what you think they’re describing to make those “gores” and yes, it is as weird as it seems, sewing off-grain bias edges to on-grain straight edges, in violation of all guidelines for good drape.

Skirt diagram

Skirt diagram (for this pattern, I used two “side” gores per side.)

I guess when you have that much fabric going on drape is kinda irrelevant? Hard to say. On the other hand, it’s a very, very low-waste method—I used probably about six metres of fabric, mind you (it’s a pretty full petticoat, also, RUFFLES), and the only waste was the narrow triangles cut off the sides of the symmetrical front gore. If you wanted to add a front seam, even that could be eliminated. Because I wasn’t using a yoke this time, I did add a bit more shaping to the top of the front gore, plus eyeballed in some narrow darts to give it a wee bit of tummy room, since Mrs. Church commented that one of the chief problems with the hang of skirts came of them being put in too tightly at the front. Or something like that.

As per Mrs. Church’s instructions, I made my vertical seams flat-felled, but really I would’ve been better off using French seams—either way, though, I was struggling with a lot of puckering on my really freakin’ light-weight cotton (voile or batiste or something of that sort.) So I switched the cotton thread. Upside: no puckering, presses like a dream. Downside: not nearly so strong. So if this petticoat is disintegrating in a year, you’ll know why. Also, right in the middle of the process, Jennifer Rossbrugh of Historical Sewing posted about starching your petticoats. I had been dreading the idea of pintucks in my soft fabric, so I had to jump on the bandwagon. This was a ridiculously-simple process involving mixing a small amount of cornstarch with a slightly larger amount of water, heating until the mixture went clear, adding more water, and then dropping in the petticoat until all was soaked in starchy water, and hanging dry. Then ironing, lots and lots of ironing, but ironing starched stuff is actually pretty darn pleasant as it looks so great. And it made sewing all the 1/4″ tucks in the ruffle far less hellish than it would’ve been otherwise.

Perusal of the page of petticoats (“White Skirts” in both the Home Needle and my mother’s 1886 Bloomingdales Catalogue reprint) suggested that ALL the petticoats seemed to be largely plain but with a deep ruffle along the bottom. Or at least, if they had anything else, the advertisers weren’t advertising it.

The ruffle (pre-ruffling)

The ruffle (pre-ruffling)

So, I cried a little and resigned myself to a ruffle. I still wish I had pleated it, but, meh. I picked my ruffle depth by the highly scientific method of tearing my leftover fabric after making the main portion of the petticoat into eight equal strips. I had already decided I wanted 1/4″ tucks, so then I added those in, three in each panel, starting with a fold right at the middle. Once I had those tucks made, I joined seven of the eight panels (measuring my lace having determined that I wouldn’t have enough to go along the eight panel anyway.) I attached the lace at the bottom using a tuck—basically, sewing a french seam on the outside surface. I thought it looked lonely, though, so I added two more 1/4″ tucks above it. I like the overall look, but I was definitely more precise (which is still a long way from perfect) on the first set of tucks. Eh. I finished the top edge with my narrowest-of-narrow-hemmers, and ran the whole mess through the ruffler on what was supposed to be a roughly 2:1 gathering ratio.

Two ruffles in the back

Two ruffles in the back

Whether due to the weight of the fabric, or my ruffler being loose at times, or me just being a tool, what I wound up with was rather more gathered length than I expected, so I added the second ruffle across just the bustle/back of the skirt. Except that it goes up one gore seam further on one side than the other. HEADDESK. I am not going to change it. Quit looking!

Buttonhole and stroked gathering.

Buttonhole and stroked gathering.

My other big booboo (as opposed to the myriad little booboos in the seams and the tucks and whatnot) came when gathering the waistband. I had measured my waist plus and inch or two for overlap, but I couldn’t quite wrap my head around the side-back opening as it related to the necessary gathering. Basically, my waistband wound up lop-sided, and I was extremely loathe to unpick the whole thing and re-arrange my painstakingly stroked hand-gathering. Instead, I unpicked the other end, where I didn’t have enough gathering, and tightened that way up, essentially shortening my waistband by about three inches.

It is, um, snug. Maybe my next corset with be more waist-reducing, though.

That hand-worked buttonhole isn’t particularly pretty, now, (and it is worked on the wrong side, oopsie.) But it’s entirely serviceable and only took about ten minutes to put in. So there’s that.

Closeup.

Closeup.

The whole thing is pretty delightfully frothy, once you wriggle into it.

Ruffle.

Ruffle.

The fabric is pretty thin, and you can see the under-structure pretty clearly. Obviously another petticoat is required, maybe a more plain one, to go under this.

Happy bum

Happy bum

The under-structure, by the way, is my lobster-tail bustle, based pretty much exactly on the American Duchess tutorial, though I did vary the angle of my boning at the top a bit, and I added lacing to hold it closed on the inside, not just ties. This wasn’t quite as brilliant as I had thought it might be, as the lacing tends to pull the whole thing up a little bit, but it works just fine and I think if I added a ruffle to the bottom the pull up would largely be neutralized. Although now that I’ve seen it under the petticoat, and worn it a bit, I don’t actually think I care.

My American Duchess Bustle

My American Duchess Bustle

It’s boned entirely with 1/4″ spring steel from Farthingales Corset Making, which is my favourite corset-supply site, at least partly because it’s Canadian so the shipping is fast and the prices don’t mysteriously skyrocket between my cart and my bank account. Frick I hate having the dollar low again. No complaints, though, about Farthingales. Reasonable prices, quick shipping, arrives promptly. A lot of people seem to use 10mm steels or even wider on these support garments, and while I’m sure that’s strong, I feel like most of the originals I look at had more bones of a narrower width… anyway. The 1/4″ seems more than sufficient for the bustle. I took it with me to my last Marr Residence Historical Clothing thingy, and lots of people had fun trying it on and then practicing sitting down. 😀

Side view

Side view

Of course, now it’s finished and I’m struck by the crushing dissatisfaction that I find accompanies most costume sewing—it’s finished and it’s awesome and I DON”T GET TO WEAR IT ANYWHERE. I mean, I’m already known for pushing the wardrobe bounds at work with my fluffy dresses. I don’t think even I’m going to move into full Victorian mode, though. Even for my final wardrobe workshop,* coming at the end of the month, I probably won’t actually wear it as I will want to have it out for people to look at. /sigh.

Anyway, it’s done and it was a fun process, so we’ll call that a win! Edging ever closer towards… uh oh… OUTER GARMENTS!!!!!)

*Must blog those. They were awesome. To the cool people I met (I know at least one or two of you have buzzed the blog), THANK YOU!!!!!

19 Comments

Filed under Sewing

The Never-Ending Petticoat

A flannel petticoat

A flannel petticoat

This petticoat felt like it took forever. Really, I guess it was only a couple of weeks, and much of that was the hem. God, the hem. >_< We’ll get to that.

So in a bid to bring our brutal winter* to an early end, I started work on a flannel petticoat. Maybe it was the delirious speed at which the corset came together, but I was not feeling patient. That was probably a big part of the problem.

Anyway, this petticoat is based pretty much entirely on the instructions in The Home Needle, (p. 37-38). She is mostly describing a regular muslin petticoat (Er, “white skirt,”), but does give a nod to flannel petticoats:

“A flannel skirt is made shorter and scanter, and has a muslin yoke. For this, three yards, or even less, will suffice. The seams, after being run evenly together, are pressed open on the wrong side, and fastened down with the stitch known as herring-bone or cat-stitch. The bottom of the skirt is often finished with elaborate embroidery in silk ; but a neat hem, headed with a row of chain stitching, either in silk or linen floss, is sufficient for ordinary purposes.” (The Home Needle, p. 38)

I managed the shorter, I think not so much the “scanter,” since I pretty much followed her instructions (later in the book) for cutting out a regular skirt, and didn’t down-scale my fullness much/at all. Though I only did one set of side-gores for the skirt, not two. This petticoat will pretty much work over a bustle, whereas I get the impression that most flannel petticoats were for wearing under the bustle, to keep the legs warm. Not 100% sure, though.

A yoke. (rear view.)

A yoke. (rear view.)

So, phase one: I winged a yoke. According to Mrs. Church, a yoke should have the straight grain at the front and be cut in a single piece with the bias at the back—I, however, added a side-seam, because cutting a curved yoke in a single piece like that seems like it wastes a lot of fabric. My yoke still wound up rather over-size, so I wound up taking it in a lot at the back opening. I stabilized the waist seam with some ratty old rayon stay-tape from stash—not period, but non-bulky and thrifty, so I’ll take a half point for that. 😉

My flannel was 54″, and Mrs. Church’s instructions mostly assume a fabric around 27″ wide, so I basically cut it into skirt-lengths and then sliced those in half lengthwise. Maybe not the best way to maximize my fabric usage, but anyway. 😉

Skirt diagram

Skirt diagram

The skirt consists of three gored panels plus a rectangle for the back; the front I cut on the fold, angling from what seemed like a good width at the top out to the full width at the bottom. As per Mrs. Church’s instructions, I cut the side pieces from one length, with an angled line to make two identical pieces, wider a one end, narrow at the other.  The back is just a long rectangle of my fabric “width” (artificially narrowed) x skirt length.

Tucks & lace

Tucks & lace

Since I was going for a shorter petticoat, I didn’t add to the length to accommodate my tucks. I measured, marked the folds, and stitched them in place on the individual lengths before sewing (or should I say, running) the lengths together. Incidentally, just in case I forget this, the formula for the distance between tuck folds is y=3x+b, where y is the distance between folds on the flat fabric, x=the width of the finished tucks, and b=the space you want between tucks. (Tyo is doing linear equations in math right now. 😉 )

Cat-stitched seams

Cat-stitched seams

Once I had the skirt panels run together, I catch-stitched (which I am assuming is the same as cat-stitched) all the seam allowances open. This was the first part that seemed to take FOREVER. They do look nice now, however.

According to Mrs. Church, petticoats which have yoke & buttons (which are better than drawstrings as there is less bulk at the waist) invariably fasten at the back. The only problem with this is that there isn’t any back seam in my petticoat (since I used a single back width). Now, maybe Mrs. Church didn’t mean at the centre back exactly, but I don’t know. However, while Mrs. Church doesn’t cover it, Plain Sewing and Amateur Dressmaking (1887, p. 11) has a brief passage covering how to make a slash placket, which basically involves adding a pleat at the bottom to give you the overlap. I think. It’s possible I am completely not understanding what they described; I did my best to follow along, anyway. I turned one edge of the slash under twice, narrowly, and then make a big pleat at the other edge to cover the gap. It feels pretty much like a cheater’s solution, but it works.

Buttons & placket

Buttons & placket

I put the front of the petticoat onto the yoke smoothly (no gathering), relying on the back gathering to get everything to fit. I kinda really like this method of skirt fitting. One of these days I will work on those crazy Victorian gathering techniques that all seem to involve making multiple lines of perfectly-even stitches and then stroking each of the resulting pleats to maximum perfection before meticulously stitching each one down. For now, though, I just gathered.

Back View

Back View

Because my yoke is pretty wide, I went with three buttons on the back. The buttonholes are hand-worked, not that my hand-worked buttonholes have any degree of grace or beauty; I also worked them backwards, so the edge that the buttons pull against is probably the wrong one. Oops. They are functional, however. They, also, took forever, as did digging through my massive garage-sale-button-stash (thank you, Mom) for the perfect plain white glass buttons.

And now, we come to the albatross, the Waterloo—the hem. Ugh. Scroll up a bit and re-read Mrs. Church’s words: “… a neat hem, headed with a row of chain stitching, either in silk or linen floss, is suficient for ordinary purposes.”

Chain-stitched hem. Started bad, got only slightly better.

Chain-stitched hem. Started bad, got only slightly better.

So, of course, I had to look up chain-stitching, Fortunately, she had a diagram. OK, I can do this. It’s pretty simple. It also pretty much only looks good if the stitches are teeny-tiny short (the fact that I was using cotton thread, not linen or silk floss, might be a part of this), and teeny-tiny-short-stitches were really hard to get through all the thick layers of my flannel. Not to mention proceeding at even more of a snail’s pace. I also (eventually) figured out that the only way I could keep the chainstitch even was to mark its position with wash-away pen… there is some meandering before I hit that desperate point. No, I’m not going back to fix it.

The hardest part, mentally, aside from the not-terribly-decorative nature of my “decorative hem”, was that it’s not an invisible hem. I hand stitch my hems invisibly all the freaking time, and it’s not a problem, but doing this visible hem (and having it not look AWESOME) made me want to stab my eyes out with the needle. Or just run over to the sewing machine and SEW THE FRICKING THING BY MACHINE. Because then it would be done, in five seconds, and LOOK BETTER.

Ahem. But this is supposed to be about the process, right? If I just want to whip up a costume that’s a whole different beast… this is trying to reproduce, or at least experiment with, period techniques.

It's hard to get a good picture of bustle-bum.

It’s hard to get a good picture of bustle-bum.

Anyway, I did eventually get it finished. And I like how it looks, although it doesn’t look particularly like what comes up when I google “Victorian flannel petticoat.” Two more minor things remain: I would like to add an elastic across the inside to pull in the back (as Mrs. Church recommends), and/or some slits in the side so the ties for pulling in the outer skirts in the same way can pass through.

I’m excited, though, to make a light-weight version next, with ruffles on the butt. And a proper bustle, of course. And after that… (ulp!) after that, I have to begin thinking about the dress! O_o

Petticoat!

Petticoat!

*OK, February and the first week of March were brutal. Before and after, the weather has been lovely.

10 Comments

Filed under Sewing