Tag Archives: tops

Using up the Blue

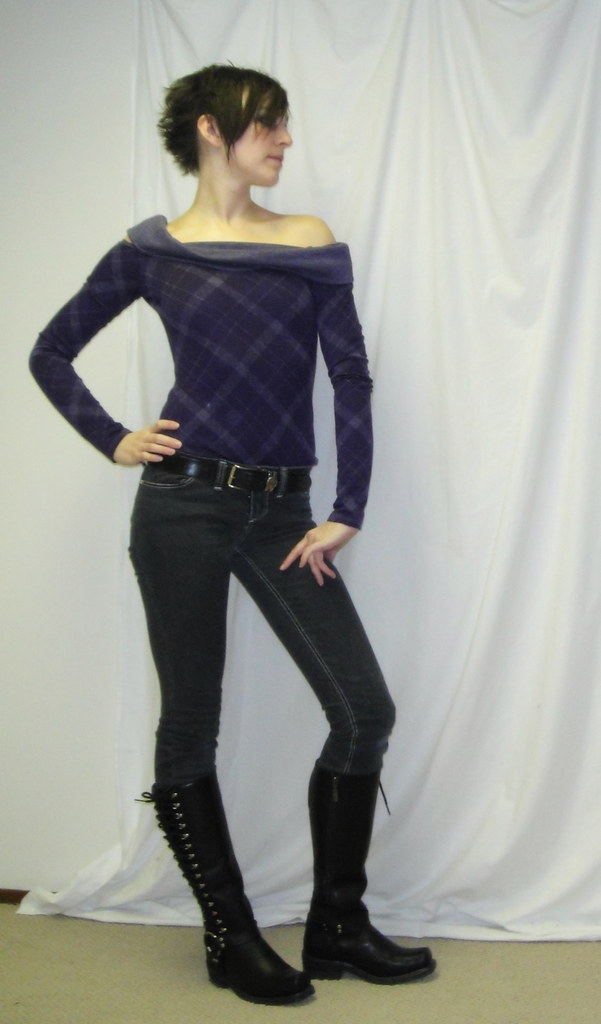
Blue raglan-sleeve top. See below for the reason I look so irate.

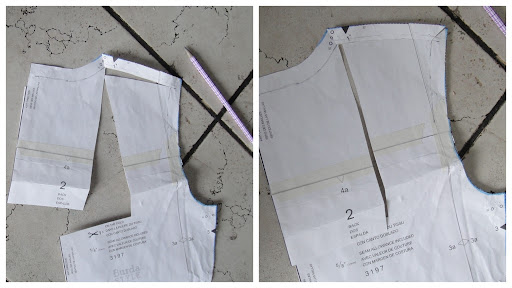
After the stegosaurus shirt, I had just under 90 cm (one yard) of fabric left. Possibly I should’ve made it into something for one of the kids, since it’s a bit of a distinctive colour, but for whatever reason, I was determined to get one more long-sleeved shirt for me out of it. Wiggle as I might, I couldn’t quite get the Pattern Formerly Known as Lydia onto the available amount of fabric. I didn’t want to cop out and go with short sleeves, as this is a warm, wintry knit.

Fortunately, Lekala patterns came to my rescue once again; the raglan top pattern that I made before just fit, helped out by the fact that the pattern pieces are full-width, not to be cut on the fold. This was annoying when it was eating up all my printer paper, but with careful jiggling I was able to get it all in place.

So, I have another raglan top. As this is a much more stable knit (though without any redeeming factors like cotton, as far as I can tell), it fits considerably more, ah, sleekly, than the white version. Thus far I haven’t bothered with the ruching on the front; I kinda like the round neck (though it is pretty similar to the stegosaurus neckline, isn’t it?). We’ll see how boring I find the top after wearing it today.

Aww... no back ruffle. Plenty of wrinkles, though, as usual...

Really nothing to say about the construction. I did the seams all on the serger, which is really easy for the raglan construction, and twin-needled the sleeve and bottom hems. The top edge is just folded under around a narrow clear elastic and twin-needled as well. I have a Schmetz twin needle right now and I can’t tell if it’s just in my head but it really seems to me like the Schmetz needles (especially the twins) break a lot less readily than the Klasse (the other brand I have ready access to…) Oh, and you may have noticed you’re getting a glimpse of something other than my usual, draped-sheet photo background. This is the brightest corner of my kitchen (at least at 8:00 in the morning), and you are being “treated” to it because my darling children trashed the basement yesterday and my sheet is now in a limp little pile on the carpet, buried under an avalanche of… not even toys. Just stuff. Urg. I love my children. I love my children. I love my children. I…

Versatile Blogger Award

oh, yes, and before I forget, the amazing Magda passed on this “Versatile Blogger” award to me, and then the equally mind-blowing Oona Baloona did as well. And I want to thank them both very much, but I think I’m running out of interesting things to reveal, so I’m going to bail on spreading the meme and just point y’all to my previous exposees: Stylish Blogger and Beautiful Blogger.

8 Comments

Filed under Sewing

The Stegosaurus Ruffle strikes again.

Blue long-sleeve top

Nothing like a me-made month to get me off the fluffies and back on track making practical clothing. Today’s version being rather more successful than yesterday’s.

I made a couple more tweaks to my ever-evolving “Pattern formerly known as Lydia“. Since at this point I’ve altered the waist curve, the shoulder angle, the sleeve-cap, sleeve length, sleeve shape, and the neckline, I should probably give up on calling it a “Lydia“, and just call it my “Knit top TNT” or something equally generic. This time, I tweaked the sleeve-cap again, removing a bit more height, and attempted a seam-free swayback alteration, which creates much the same change in the angle of the back shoulders as Sherry’s method, except that… well, I dunno, I like the funky pivot-and-slide stuff. I then decided, on a whim (actually to optimize my pattern layout) to cut the back on a seam, so I took the opportunity there to add a teeny bit of shaping as well. If I decide to make the CB seam a regular feature, I can do a much more thorough swayback fix in the future.

No-seam swayback alteration. Yes, it affects only the shoulder.

Anyway.

My previous Lydias have been scoop-necked and plain. I didn’t want to just make another version in blue, so I decided to try a boatneck and a back ruffle, a nifty little feature I am blatantly stealing from Heather of Feathertysews. Thanks! I was a little hesitant about trying it in such a heavy fabric, but it actually worked out really well. Yay!

Flatlocked seam (open)

So, back to that CB seam. I didn’t really have enough room to add a seam-allowance, so I decided to try flatlocking the seam. This is a trick you can do with a serger, where you basically turn the needle thread tension way down. That way, after you serge the seam, you can basically pull it open so the ends of the fabric butt up right against each other. One side looks “serged,” the other side has these horizontal loops of thread—actually quite decorative; I have a RTW tee that features it (and I thought it was a super-cool feature when I bought it). It works best with a fairly beefy fabric, and I gather is used a lot in active wear, for butting fleeces and things like that. Here’s a better overview than mine… Since my knit is a fairly sturdy athletic/winter knit, I thought it would work, and after a certain amount of messing around (my serger’s tension settings are wonky at the best of times) I got it to work. I wasn’t too concerned with it being super-even, as my next step was to cover it with my little stegosaurus ruffle.

Ruffle closeup

I cut a piece of clear elastic just a little bit longer than my shirt back, and a strip of

my fabric about twice as long. I was originally planning to be quite scientific and match my ends, halves, quarters, etc., but it seemed like that would require too much stretching of the elastic, not to mention require more precision than I’m truly capable of. So I just held the elastic as taut as was comfortable, and slowly let it out as I stitched (a narrow zigzag) along the middle of the fabric strip, though both elastic and fabric. The result is that the strip isn’t gathered as evenly as it could be, but it doesn’t really show (and even if it does, I can’t see it 😉 ). Then, using the same narrow zig-zag, I stitched the ruffle overtop of my flat-locked seam.

Stegosaurus ruffle!

I used Sherry’s binding method here for the neck, which I attached in a C (that is , after sewing one shoulder but with the other one still open). It’s a wee bit gapy but I’m hoping that will go away in the wash. I didn’t include any clear elastic this time as the fabric is already fairly bulky… we’ll see if I regret that in the long run.

You can see that, although an improvement, my swayback alteration attempt was not enough to remove folding at the small of my back (the fact that the shirt is riding up on my belt isn’t helping, but I promise even when tugged down the problem persists). I’m happy to say the change in shoulder-angle doesn’t seem to create a problem, which I was worried about. If I try a CB seam again, I’ll do a real swayback tuck.

The further reduction of the sleeve cap seems to have hit a sweet spot (finally!); it went in (flat) essentially flawlessly, even on the serger.

I have to say, beefy, stable knits are such a dream to work with. I twin-needled the hems without needing to stabilize, with no problem at all.

Whew, I needed that after yesterday’s fiasco.

These posts will also double as my Me-Made March day 6 🙂

23 Comments

Filed under Sewing

I meant to do that…

Mini-cowl

Bleh.

I’ve been saving the rest of the fabric from this top, trying to find just the right project. I love this fabric so much. Eventually, I decided that it needed to be a drapy pattern—a cowl neck, maybe.

Last night, I decided that a reprise of this super-quick cowl neck top by Ichigogirl on Burdastyle would be perfect.

But. It’s still about -20C around here. I wanted to add sleeves.

I pulled out the pattern-pieces for Ichigogirl’s cowl-neck, and my “trusty” (aka much altered) Lydia pattern to compare. Armscyes were about the same size, as far as I could tell, but a radically different shape. I thought it seemed simpler to try to draft a cowl neck onto the Lydia than to try to fit sleeves to the odd-shaped armscyes of the sleeveless cowl pattern.

Of course, it was 8:00 at night and I was far too impatient to read up on cowl

Inner folded facing of cowl neck sewn over rear of shoulders, to enclose the shoulder seam.

drafting… I had the pattern pieces right in front of me. It’s not like I’m a stranger to frankenpatterning.

Ehm. I had actually wanted a little bit shallower of a cowl than on the original pattern, which is a bit, ah, risque if you bend over.

But, not quite this shallow. Urgh.

Rear view. Meh.

I was very proud of myself for figuring out a neat way to attach the inner fold of the cowl-neck to the shoulder so it neatly encloses the shoulder seam. I’m not sure if the picture will make any sense at all, but you’re looking at the back of the shirt, inside-out. I folded the facing portion of the shoulder-seam around to the back, enclosing the entire shoulder-seam between shirt front and facing. This makes for a lovely finish on the inside.

I then proceeded to do an impatient bodge-job of setting in the shoulders (I think I

still need to remove a bit of ease from the Lydia sleeve-cap, and add a shoulder-point notch). Didn’t do such a good job on the back-neck binding, either.

Bleh. Can I just pretend I meant for it to be this way?

In Me-Made March news:

Here’s today’s outfit, which is my first one this week not to feature some (or entirely) items I didn’t have last September. It feels a little boring because of that, but on the other hand these are some of my absolute FAVE pieces so far, so… yeah!

Classic pose

Funky dancing pose

Frankenpatterned top
More self-stitched jeans

Also my new, awesome, but hyper-uncomfortable boots. They will be great once they’re broken in.

I was wondering how long it would take me to break out the goofy poses this time around…

10 Comments

Filed under Sewing

SFOs (Semi-Finished Objects)

Zena of Blood, Sweatshop, & Tears once commented that “wearable is climax. Done is denouement.”

She is so right.

Lekala twist-top, v. 2

In that spirit, I give you my second take on the Lekala 5675, a.k.a. the twist top. The hems are serged but not completely finished, and it’s been like this most of the week. I am disinclined to fuss with trying to stabilize them for topstitching. Bleh. This red knit is wiggly, super-stretchy, and much more like the kind of fabric I imagine the shirt was designed for than my last attempt. It’s also an amazing example of the difference fabric choice can make for the exact same pattern (only difference is I added perhaps an inch more extra length to the red version, just in case, bringing the total increase to about 3-4″ in the sleeves and 4-5″ at the hem. The first version was roomy and sweater-like, with a surprisingly perfect fit in the shoulders. This version is second-skin tight and the shoulders look really narrow. Although about the same as they look in the pattern illustration, actually.. The twist still doesn’t pull naturally into the kind of tight twist the illustration suggested. This might be a drafting problem (maybe they should just have widened the upper front piece a bit so that a full twist was required), or it might just be that my doubling of the front (makes the finishing easier and never a bad idea in a thin knit) gives it a bit too much body. I think in my head the slit below the twist should be wider, but again it’s actually quite comparable to the illustration. Some day I shall use Sherry’s post to attempt to reduce a swayback in a knit. Someday.

Simplicity 5728

Simplicity 5728

In a similar vein, my (wearable muslin?) version of Simplicity 5728 is at a try-on-able phase in construction. Yay!

This is such a peculiar fabric. I would’ve sworn it

Simplicity 5728, side view

was a diagonally-ribbed knit, but it frays like a woven. It’s stretchy, very slightly in length, significantly in cross-grain, but fairly stable. It does have that cling-to-every-lump-and-bump quality of a knit.

In the stretchy (whatever the heck it is), I should probably have used the original bust-length, as the extra length doesn’t seem to be necessary. I had narrowed the bodice sides 1/4″ on the pattern, since it seemed a bit roomy under the arm,

Back (lightened to show lack of swayback wrinkles!)

tapering to nothing at the waist, and I took it in another 1/4″ here after trying it on (adding up to a substantial 2″ reduction in the total bodice width). I did a swayback alteration as per Sherry’s instructions (sooo easy when you have both waist and CB seams), taking off about 1/2″ (12mm) both above and below the waist seam. I gave the CB seam of the skirt a bit of an S-curve to it as my swayback seems to be rather below my waist in this area. And then I cut, inserted zipper, and hoped. And—well, look!

Can we say, happy customer?

Also, like what I did with the back neck? I did a brutal job of finishing the top of

Simplicity 5728, full back

the zipper, but otherwise it’s snazzy! Er, and yeah, the zipper’s pink. I thought it coordinated/contrasted nicely with the muted purple of the fabric, but probably it’s just too light. But the only other zipper I had of suitable length was white, and an invisible one, which I don’t actually know how to install. It’s vintage and metal, though, so it’s cute enough to deserve to be looked at.

Simplicity 5728, front closeup

You will recall that I received excellent advice from Kay and others on my sleeved muslin to raise the bottom of the armscye to improve my sleeve mobility. So I raised it a full 2cm, on the principle that it’s easy enough to lower it after the fact if I need to.

(It occurs to me that I probably annoy nearly everyone with my flitting back and forth between metric and imperial measurements. Can I call it a Canadian thing? I prefer to do my seam-allowances in metric because the metric markings are at the front of my sewing-machine face-place, making them easier to see than the imperial markings, which are at the back. On the other hand the width of the regular foot is definitely 1/4″, so I tend to do things like small alterations in this increment. It also depends on which ruler or measuring tape comes to hand first…)

I should also mention that I added 5″ (and we’re back to the imperial) to the hem of the skirt to get it to this luxuriously long length. That’s supposed to include 2 1/4″ of hem, which would bring it to a perfectly respectable heel-length, I think, although I’m not convinced a 2″ hem will be desirable in this fabric. I’m wearing a 3″ heel in the photos. I love these crazy-long 70s skirts.

Coming soon: the great sleeve adventure!

19 Comments

Filed under Sewing

More fun with Lekala Patterns

Or, The Unfortunate Effects of Poor Fabric Selection

Lekala knit top 5675

I got this fabric (bottom right in the photo) from the thrift store a month or two ago. It’s a light sweater-weight rib knit, very stretchy but not very drapey. I thought it would be ok for a cardigan-type top, a more fitted one rather than something drapey like the Simplicity one.

So why on earth did I think it would be good for taking a shot at this Lekala pattern? Can I plead temporary insanity?

I don’t know if I’ve mentioned before, but I’m a sucker for peekaboo clothing. Peekaboo backs in dresses, peekaboo shoulders; slit skirts… so yes, this top (scroll down) tickled my fancy right off the back: cute peekaboo detail, not too much skin showing since I’m attempting to be more demure in my old age, still warm for winter.

Twisty pattern piece

I printed it out, compared with my Lydia pattern, and again the only modifications I made were lengthening the bodice and the sleeves. The shoulders are more square than on the Lydia and the armscye and waist are much shorter (shorter even than my altered Lydia, where I shortened the armscye and raised the waist). Of course if you actually ordered the pattern it would be to your own length measurements, so probably most of this won’t be helpful. I added to the bodice only at the hem, and likewise to the sleeves.

It took me a couple of tries to figure out how I

Twist top... sweater version

wanted to finish the front; I double-layered it to simplify the finishing. If you look at the picture of the pattern piece, I sewed the two layers of the piece together along the red lines; I did the same with the middle portion of the lower bodice. Then I sewed the blue lines to the outer portions of the top of the lower bodice, so that all the seams are enclosed.  Despite my best efforts (and liberal use of clear elastic) it wound up quite stretched out, but that reflects on my fabric choice rather than the pattern, I think. I had to turn the bottom of the peekaboo-opening under and tack it on the inside, creating a bit of a “U”, because it was stretched out too badly. It looks okay, but not ideal.

I had to take in the shoulders a bit, again I think due to the spreading tendency of this fabric. I could probably take a bit more width in in front of the armscye, but again more due to the fabric than the pattern.

Oooh, the swayback!

After the trouble I had with the fabric spreading in the upper bodice and shoulders, I didn’t even want to contemplate doing a hem. So I did a rough ‘n ready lettuce hem on the serger on both bodice and sleeves (basically I just ran it through as usual but stretched while I did it). This means that the sleeves are extra-

Front view

gooey-long (which I love). Oddly, I didn’t have to take them in for width, which I’ve had to do before when using “growing” fabric.

I put the shoulders in flat, and they went in very nicely, which is always a plus.

I also took in the side seams after construction, curving in by a good 3/4″ at the waist. Again, due to the growing fabric.

On the plus side, after its initial sagging it doesn’t seem to be growing too much more, and it is quite warm. In the photos it doesn’t look half bad (if I do say so myself), though I feel like the fairly stiff fabric folds oddly as I move. I will definitely have to give this pattern a try in something a little more slinky in the future.

16 Comments

Filed under Sewing

A loud little shirt

I think my eyes are bleeding...

Well, Syo’s request is complete, though I think I’ll be seeing after-images of this print for days. Overall, it went fairly well. Unsurprisingly, the shirt pattern I used as a base had way too much ease. It was designed for wovens, so I did go down a size, but evidently that wasn’t enough. So I took out about an inch of excess from each side and under the arm to get it to a fit she would approve. Fortunately with this design I didn’t need to worry much about what that would do to the armscye.

There were the usual technical glitches that crop up when I wing it. I decided in

Can you spot what's wrong here?

advance that I would sandwich the front of the straps in between the drape and the shirt bodice, so that it would be firmly and neatly attached with the end hidden inside the double-layer drape (I didn’t want to attempt to do the back of the straps this way as I was pretty sure I would mess the length up). However, my first attempt at this fabric sandwich resulted in the picture at the right. That’s the straps peeking out from underneath the drape. Not going to work. So I had to pick them out (which took forever) and re-position.

It turned out that the way things rolled, the under-layer of the drape needed to be shorter than the outer, so I had to trim it off, after.

A satisfied cutie

Then, my first attempt to sew the lower edges of the drape together to make a nice, enclosed piece (except for a small opening that had to be hand-finished) failed, leaving me with a mobius-strip-like wad of fabric that couldn’t be unravelled. So I cut off the seam on that (no way was I unpicking that much), which cost the drape some width. Ah, well.

My next attempt, fortunately, did work. I tried to take a picture of what I did to show it but it made no sense to me looking at it after, so I’ll leave it to your imaginations. Unfortunately, pinning wasn’t really an option for this method, so combined with the somewhat irregular trimming and cutting, the drape didn’t end up all going together as flat and smooth as it might. Ah, well. The look’s not bad (perhaps I should’ve rotated it all an inch, that way the pulling would look more intentional?)

The hems were kind of my waterloo. I used my latest double-needle. Can we say

Side view

“tunneling”? My usual trick of ironing wash-away stabilizer into the hem before sewing failed because the stabilizer would not stick to this slippery swimsuit-feeling fabric. To make matters worse, the serged edge I put on the bottom of the shirt (to neaten the inside of the hem) kept squishing up between the two needles, making the tunneling between them even worse. And while this wasn’t the wiggliest knit I’ve ever worked with, it is the wiggliest slippery knit. So don’t look too close at the hems… it ain’t pretty.

And no, I didn’t make her a matching skirt. That’s Tyo’s contribution so far, turning the remnant of the fabric into a wrap skirt.

Also I couldn’t find my twill tape for putting in the tag, so I substituted a bit of pink seam-binding from one of the vintage sewing notion scores. It seems to be working, though we’ll see how the transfer adheres after washing (I find it sticks better to the textured twill-tape than to the satiny ribbon I’ve sometimes used).

Straps and a cute little label

Now Tyo can’t decide if she wants a shirt like this, or a sweater like my Kimono Lady Grey (which she’s been stealing on me, by the way). I told her I’m not making her any sweaters unless she agrees to hand down some of the myriad of bunnyhugs (hoodies to the rest of the world) she’s been hoarding for the last few years—y’know, the ones that don’t cover more than half her forearm but she somehow can’t quite give up?

The construction is a mix of the old stretch stitches on my regular machine and the serger; mostly depending on how much control I needed at any given point. Perhaps someday I’ll be able to construct things entirely on the serger, but not yet.

Next up: more fun with Lekala patterns (and unfortunate fabric choices… sigh…)

13 Comments

Filed under Sewing

Knit Tops: the Raglan Experiment

First of all, before I forget, thanks everyone who said they liked the new theme! I finally found one I can customize the way I like, and I get a header! yay!. Though I’m still getting used to the new colour scheme. I’ve been in such a “red and black” mode lately, the blue and cream feels odd.

Lekala raglan tee pattern illustration

So this past weekend, in between madly sewing jeans and bullying Tyo into posing for pictures in her coat, I spent some time sniffing around the Lekala website. In particular, I discovered their “knittings” section. There are some pretty groovy patterns there. Importantly, they have a link to a sample PDF of the patterns (conveniently tiled for home printing, albeit for an A4 size paper. I wonder if I could find A4 paper here if I looked?). EVEN more importantly, that PDF pattern is in a small adult size, for someone with an 84cm bust and 92 cm hips. Which happens to be about as close to my actual measurements as any non-custom pattern ever is (we’ll ignore the 64cm waist, AKA 25″ waist. Haven’t had one of those since I was 14.)

Anyhoo, I cheerfully went along downloading every pattern that caught my fancy, and decided in a fit of mad bravery to sew up my single remaining remnant of white cotton knit into this pattern (#5672, about halfway down the page). Don’t you love their foxy artist illustrations? I especially like that a lot of them are plus-sized (though not this one, obviously)

This is the line-drawing:

Lekala raglan top 5672 line drawing

Lekala raglan top 5672 line drawing

which shows what it is a little more plainly: a simple raglan-sleeved top with a gathered drawstring placket in the front.

I’ve been wanting to try a raglan-sleeved basic tee for awhile. Well, basically since this one appeared on Burdastyle. Obviously there’s some differences (no underbust seam here), but the basic shape’s the same, both have bust gathers, and this one is free!

I printed the pieces out and compared them to my much-laboured-over Lydia pattern. Almost a perfect match, aside from some subtle differences in the waist curve—the sizing was spot on, as was the sleeve length. The bodice of the Lekala top was quite short, as you can see in the pattern illustration, so I extended it by a good 10cm; as I no longer have the firmness of tummy the model does, I try to avoid that sliver of low-belly nowadays. I also added my usual extension to the arm as well.

Lekala raglan tee, V. 1, front

And I got sewing. Since the knit I had on hand was white and a bit sheer, I tried out Sherry’s double-layer, folded hem, enclosed seam technique. This worked really well, though I wasn’t quite clever enough to get the sleeve seam enclosed between the two bodice layers. Next time. Only downside—it’s awkward to take in after construction. Which is why Sherry made a muslin. I didn’t bother, despite remembering clearly that the white Lydia I made from this same fabric needed to be taken in, as the fabric has little to no recovery. So the bodice wound up a bit looser and bulkier than I might have liked… but still wearable. It also looses length significantly as it stretches in width; I should’ve added more length to the sleeves.

I had the most trouble with the neckline. I was quite worried about it stretching out of

Lekala raglan-sleeve tee, slightly better shot of the body

shape (see above about the recovery of this fabric). Initially I went to bind it with a a strip of self fabric cut on the lengthwise grain (as I’ve done with all my Lydias; the technique is the same as Sherry uses in her tank-top post, minus the serged edge and precision). However, I remembered (as I was sewing it on) that this fabric has no lengthwise stretch. The resulting binding looked great and didn’t sag, but when worn it pulled the neckline very high, making the whole shirt very tight through the armpits, but most importantly not providing that lovely almost-off-the-shoulder sweep of skin. So I cut it all off, went back, and sewed 1/4 clear elastic along the wrongside, and then just folded this under and topstitched. I started out the topstitching with a double needle, but one of the needles snapped within the first four inches of topstitching (first time using that needle, too… #$$%#%$@#@$), so I did two rows of single stretch straight stitching. Grrr. Well, it looks all right from a distance, anyway. In hindsight I could’ve been a little more aggressive snugging up the clear elastic; it flares out a bit more than necessary especially right at the sleeve seams.

The pattern called for a drawstring placket to make the gathers at the bust. I had no idea how to do this, the

Lekala raglan-sleeve T

instructions were less than edifying (I’ve never applied a surface placket like this before), and I didn’t have anything  I thought I’d want to make drawstrings out of anyway, so I used the same method I did on my blue tank top and sewed a stretched elastic on the inside. I could’ve made it a bit longer, but on the whole the detail worked.

I definitely want to repeat this in a nicer fabric (this isn’t an awful knit, it’s reasonably stable to cut and sew, but the lack of recovery, lack of vertical stretch, and boring colour irritate me). And maybe stick a big floppy collar like the Manequim Cowl on top.

I wish all the nice knits at Fabricland weren’t so frickin’ expensive. I know, I know, buy online… /sigh.

Here ends part 2 of my Lekala odyssey. I’m pretty sure there will be more in the future…

23 Comments

Filed under Sewing

Lydia FAIL

Drunk on the success of my first tank top, I was eager to press ahead and try a knit shirt with set-in sleeves! Bravely I downloaded the Lydia pattern from Burdastyle (my first paid download from there, by the way. I know, $1, big spender). I was a little surprised to find that the pieces for this close-fitting top were each more than an inch wider than my pattern for my tank top (even in a size 32… and I’m normally a size 36). I set out to narrow these pieces by the required amounts, figuring I would just move the folded edge over and adjust the necklines. I also compared the length of the sleeve to the length of my arm; it appeared that it might actually be long enough.

This may have been my first mistake.

Adjustments made, I laid out my pattern pieces; had a brief panic when it appeared there wouldn’t be room for the sleeve, but managed, through the miracle of tube-knit, to fit it in with the narrow end between my bodice pieces. Hooray for a length of fabric with no edges!

I googled and blog-trawled and researched tutorials on various knit neckline bands. Finally settled on one method, cut my binding, stitched down, added clear elastic, folded over, twin-needled it in place. Tried on the bodice—fit looked good. Neckband was firm but didn’t appear overly stretched-out. The back was a little high, but nothing unwearable.

Sewed the sleeves up and examined their attachment points. Oddly, the fuller part of the sleeve was cut to the front. I thought the fuller part usually went to the back. Perhaps I had my markings wrong (it wouldn’t be the first time).

So I sewed them in on the opposite sides. This was my second mistake. But they went in nicely (knits are so nice to ease in!), and I was getting very good at feeding the clear elastic through as I sewed, giving it just enough tension to hold firm without puckering the finished seam. I am so awesome.

And then, I went to try it on again. I could have puked. I didn’t take pictures—I couldn’t bear to. I went to try and fix it as quickly as possible… of course, there was no way.

The shoulders are WAY too narrow. Like an inch too narrow. Possibly that same inch I took off? It never even occurred to me that narrowing the shoulders along with the rest of the bodice would be a problem. Which shows what an idiot I can be, I suppose. I know I have broad shoulders. I know this. What on earth would possess me to narrow the shoulder of a pattern, regardless of what I was doing to the bodice?

Beyond this, my reversal of the sleeve created a big bulge at the back shoulder seam. Presumably this is caused by some combination of the too-narrow shoulders and, I think, the pattern shoulders being too sloped for me. Broad, square shoulders. So I attempted to stitch that down.

And, for some reason a huge hump of fabric had developed at the back of my neck. I literally took a 1/2″ tuck just below the band from shoulder tip to shoulder tip. And then another one just across the shoulders.

I would call this the billiard-ball method of fitting adjustment: bouncing randomly in various directions in response to the problem presented, rather than pausing to analyze its source. The Boy does something similar when he gets lost while driving, taking random turns without ever stopping to figure out where we went wrong or how to get back on course. It’s not very helpful while driving, either.

At this point, I don’t think there’s much to do. My ridiculous tucks got it into a parody of fitting, but nothing actually wearable. Taking stitches out of knit is pretty much impossible. At best, I suppose I can cut the sleeves off and turn it into another tank-top, maybe a racerback style. This at least would let me salvage the neck banding. Alternatively, I could chop the whole top off and  make another tank-top just like my first one.

Ugh. I will take this as a sign to stop sewing for today. Tomorrow I’ll sew up a tank-top in the blue knit to redeem myself. And then I’ll have to bite the bullet and buy more practice knit, and try another Lydia. 😦

3 Comments

Filed under Sewing

JJ the third

Newest JJ... still slight puddling at the back.

Almost done with this pattern? Well, almost. Sorta. I still haven’t *nailed* it yet, although this version was a lot closer. At least in terms of construction.

Black JJ with silver buttons.

I added 1 cm to each centre front piece this time, in an attempt to avoid the bust gape and get the front princess seam falling in a slightly better place (it tended to fall inside my bust point, which is not quite right). This accomplished my aim, but at the expense of some fit; the side seams were edging back and the whole thing was quite big when I tried it on, and the side-seams were riding a little far back. I took the side-seams in (curving from very little at top and bottom to 1.5 cm at thewaist, and I could have taken it in more… there’s probably still about 2 cm of extra ease. Apparently what I needed wasn’t extra room along the whole front, but just at the bust. So I guess I should take 1 cm off the side front (to match the 1 cm I added to the front) and then do a small full bust adjustment (!!! me!!!). Who’d’a thunk? And probably shorten the waist a cm or 2, which I think would get rid of the last of the back puddling.

Black JJ---Back

Construction-wise, however, this shirt is a thing of beauty. The fabric is 100% cotton with a subtle woven-in stripe that looks like cross-stich up close (I adore it… and I have lots more!) and it was delightful to work with. I actually got the collar attached properly (meeting, not overlapping) at the centre front) and neatly. I made one more slight alteration to the ruffles, tapering them at the ends, and I like the effect very much. I think I could still narrow them slightly… they seemed perfect on the sheer blouse, but a little big still on this one, maybe because the fabric is heavier? I bit the bullet and hand-finished the inside of the collar and sleeve cuffs, and hand-rolled the bottom hem, and if I get really ambitious I’ll overcast the raw edges on the inside. The machine did manage to make a disaster of the bottom buttonhole, but the others are perfect. I adore my little silver buttons.

Work it, work it!

I could spend a lot more time dissecting the shirt,but really, I’m pretty darn happy with it. I can still see myself making one more version of this shirt (in opaque white)… but maybe I’ll have to change it up with the ruffles or something. And then figure out a long-sleeved version for winter…

(An interesting aside… as a smaller-busted girl, I have spent the last ten years or so largely braless aside from nursing and athletics, once I got over the excitement of actually getting to wear a bra and realized that most of them didn’t fit very well and weren’t comfy. This doesn’t bother me in the least… but with the addition of a couple of non-stretch JJ blouses to my wardrobe, I realized something. My usual staple tops are snug knits. These actually provide a bit of support in and of themselves. Not much, but enough to feel… comfortable. Without that, in these woven blouses… well, a bra just feels welcome. Interesting. no?)

Low camera angles courtesy of my mini-tabletop tripod.

1 Comment

Filed under Sewing

An oldie… Kids’ choli

My daughter showing off

This is a dance shirt I made three or four years ago now for my older daughter. The idea is loosely based on an Indian choli, a kind of cropped, sometimes backless blouse worn with skirt or sari or whatever (depending on the region). They’re popular in tribal bellydance, and a little more modest than the traditional bellydance bra top. I have about a zillion of my own, made to various patterns, which maybe I will talk about at some point, but this one seemed like it would make for a nice quick post.

I drafted the pattern for this shirt based on her measurements; kids’ patterns are SO nice to draft because you don’t have to worry about bust shaping. There’s a theme or principal in “folk” clothing where you try to be as economical with the fabric as possible—most pieces will be rectangles, triangles, or trapezoids. This makes sense if you have to spin and weave your own fabric—you don’t want to waste ANY of it. It comes at the

a choli (a kind of backless top popular in bellydance) designed by my daughter

expense of fit, of course… but that’s the nature of the beast. The other upside, however, is it makes the patterns dead easy to draft. My daughter chose the kimono-inspired sleeves for this shirt (and made up her own pose). Since you can’t see it too well in the photo, here’s a rough technical drawing of the shirt: as you can see, nary a curve in sight. The triangles under the arms are actually square gussets.

1 Comment

Filed under Sewing