
The 80s wasn’t my favourite fashion decade even when I was growing up in it. But every once in a while, an 80s pattern sneaks its way into my head, and that was definitely true of Butterick 3864.
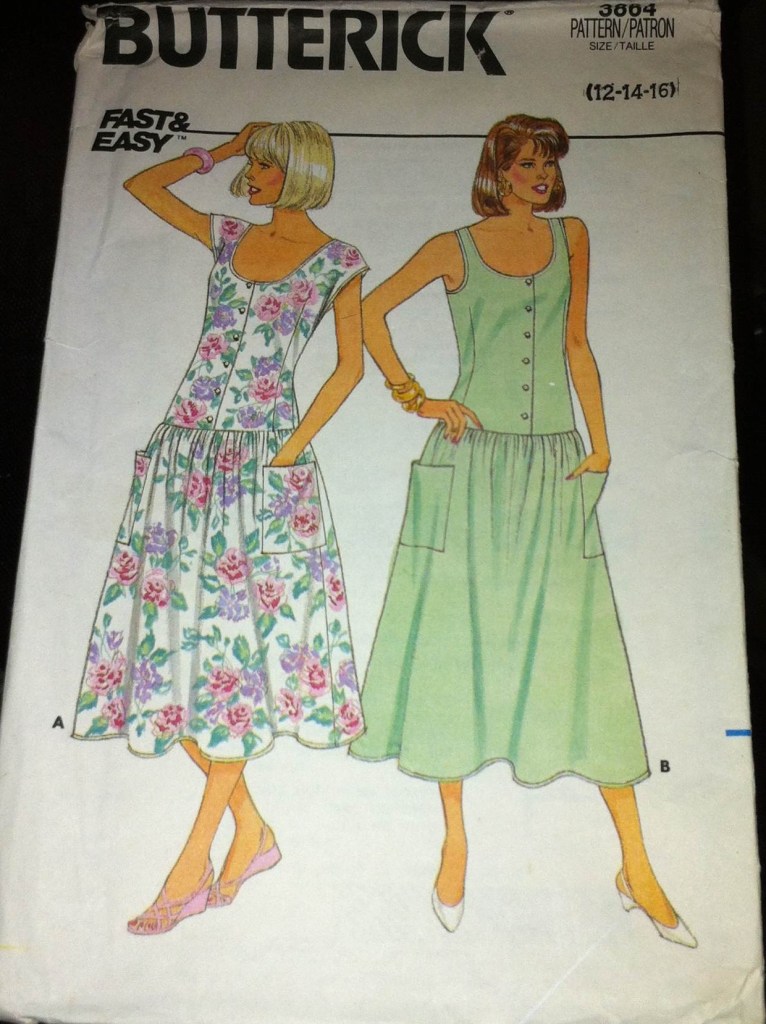
The dropped waist of the pattern, Butterick 3864, has always appealed to me, and for once (at least in the illustration) the 80s seemed to have hit the perfect balance of body-skimming ease without looking like a sack. I was particularly fond of the cut-on sleeves of view A, and it’s been kicking around my “maybe make this soon” piles for literally years now.
Well, I haven’t had much time to sew (or do any of the things that feed my soul) lately, which does result in a crabby and emotionally unstable Tanit, but last week I came home from work to the following sign on the door:
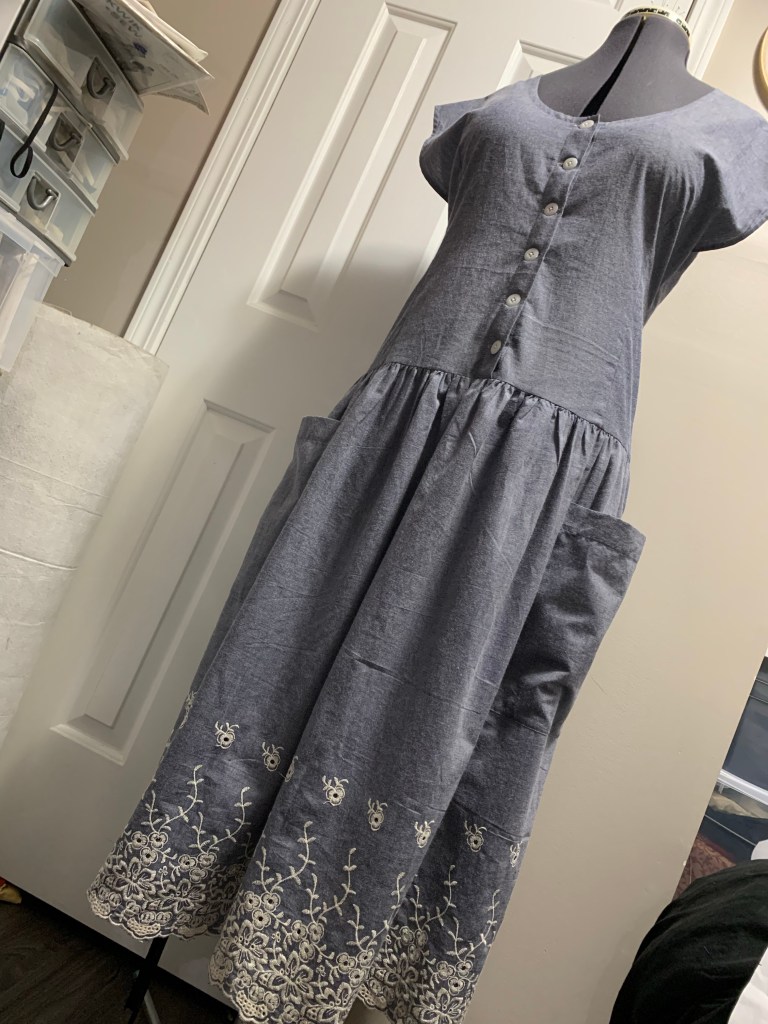
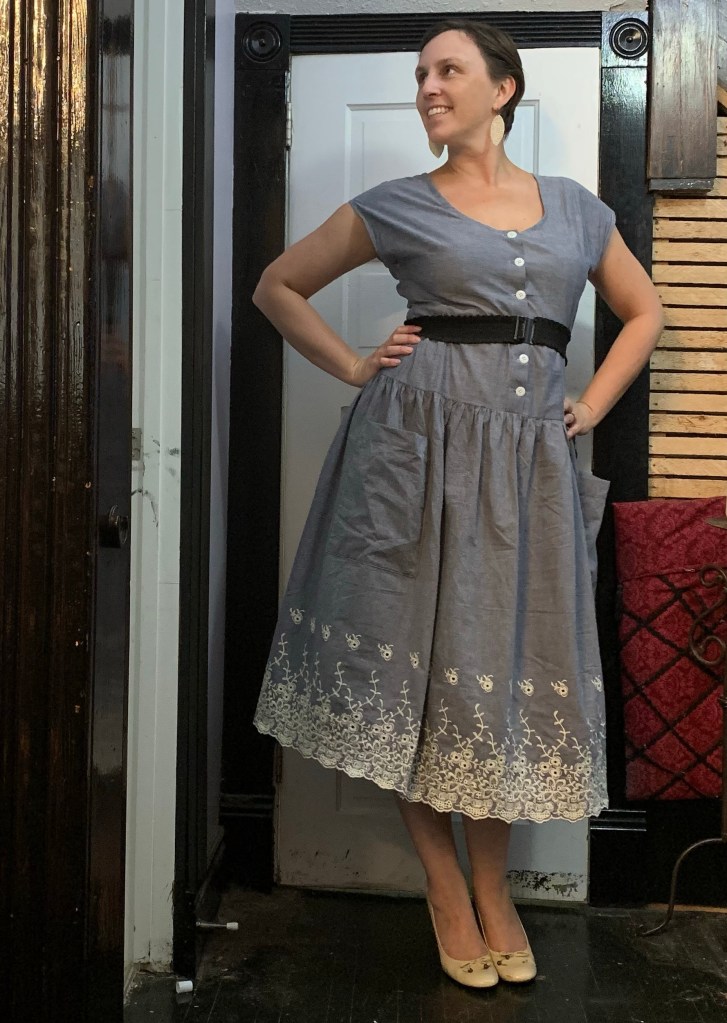
The house was empty and clean. The pattern was easily found, and this light-weight blue/grey border embroidered fabric was out and waiting. It was time to seize the day.
The pattern inside had been cut to the size 14, which seemed pretty much perfect, especially once I looked at the finished bust measurements given. The skirt pieces were rectangles, which absolutely cemented my choice of the border embroidery, although rather than use the actual pieces I just took the measurements and cut/tore a rectangle of appropriate size from the embroidered portion of the fabric. The only pattern piece missing was the pockets. By adding a back seam (which I wanted to anyway to facilitate a swayback adjustment) I was able to fit the bodice pieces onto the strip left from tearing the skirt, and then I cut rectangles for the pockets and bias strips for the neckline finish from the bit remaining. Not quite a zero-waste pattern, but pretty darn close.
The instructions are printed on a single not-very-large sheet, and while this isn’t a complicated dress, I’d say they are an example of everything that made people frustrated with sewing patterns. No mention of interfacing for the button band, or stay-stitching the neckline. Not a whisper about seam finishing. Purchased bias tape was called for for the neckline. (Obviously I made my own. This fabric is the perfect lightweight, crisp weight and hand for bias tape.)

Also, given the half-inch bias tape called for, I’m not sure how you are supposed to get a neckline topstitched at the same distance from the edge as the sleeve hems, as the pattern images show… I guess technically someone might turn 1/8” of an inch under to topstitch a 1/2” hem from a 5/8” seam allowance, but I can’t. I don’t mind the different widths, but the drawings definitely suggest more similarity.

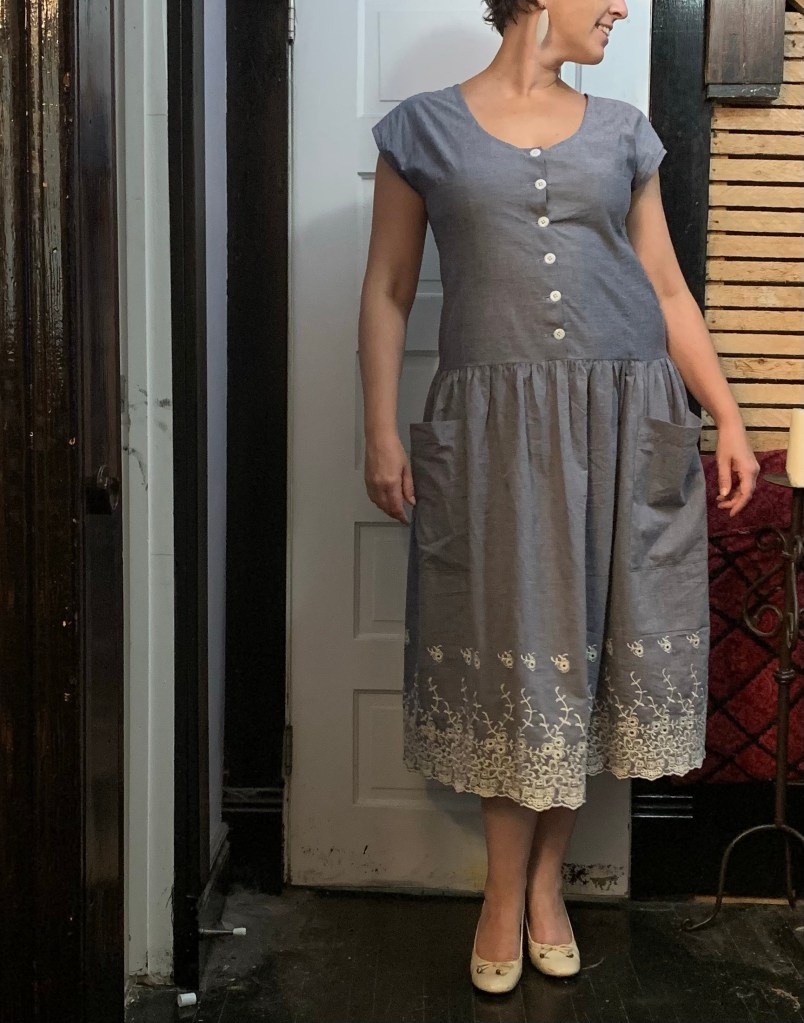
I looked at the skirt pattern pieces for pocket placement marks in the hopes of finding out the size of the intended pockets, but was unable to make sense of the few cryptic markings. (I could probably have tried harder, admittedly.) Looking at the picture now, I think my size and placement is reasonable but probably slightly further forward than intended. The pockets in the picture seem to overlap the side seam by an inch or two; I aligned mine so the back edge is right where the side seam would’ve been. The tops are a bit floppy, as happens with rectangular pockets on gathered skirts, but they function just fine.
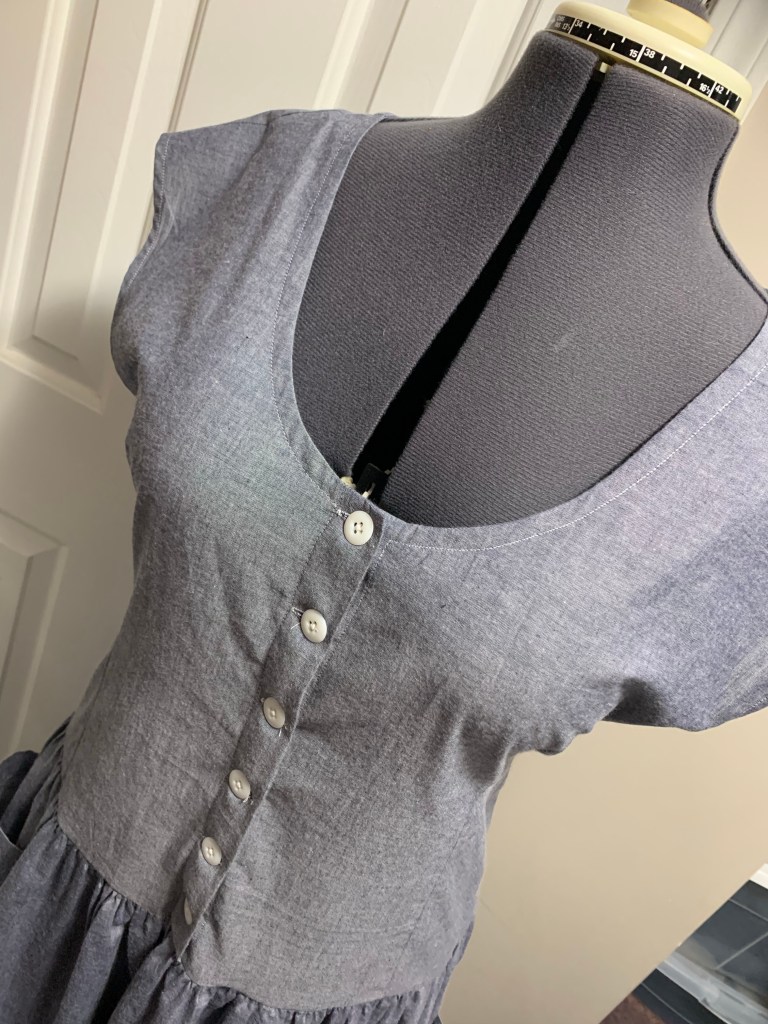
Fortunately for my rusty sewing brain, the placket and neckline finishing method used was the exact same as for the Robin dress I just finished, so I really didn’t need much from the instructions. I did opt to stay stitch the neckline.
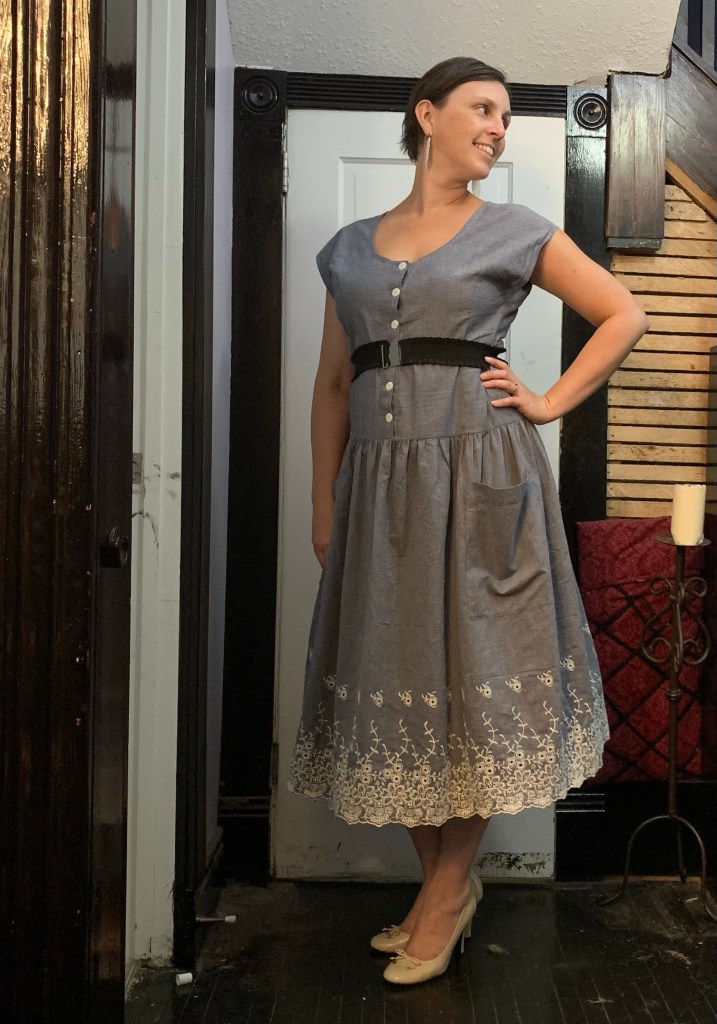
Upon try-on, it became clear that while the bust ease may have been ample, the ease at the high hip, which was not indicated on the pattern, was not. (I did not help myself when, cutting the back pattern piece not on the fold, I forgot to add the seam allowance. I sewed with the smallest seam allowance I could, but still. I could’ve had an extra half inch of ease.)
I let out the side seams below the waist as much as I could, and re-sewed the back darts to take out nothing at the seam line, (as indicated on the pattern they would each eat up about 1/2” at this point.) On trying on the final dress, I then went back in and took in from waist to underbust.
I would’ve liked a touch of narrow lace or something at the neckline to echo the fancy-ness of the embroidered hem. But, all the cotton lace I have is bright white, not the distinct ivory of the embroidery.
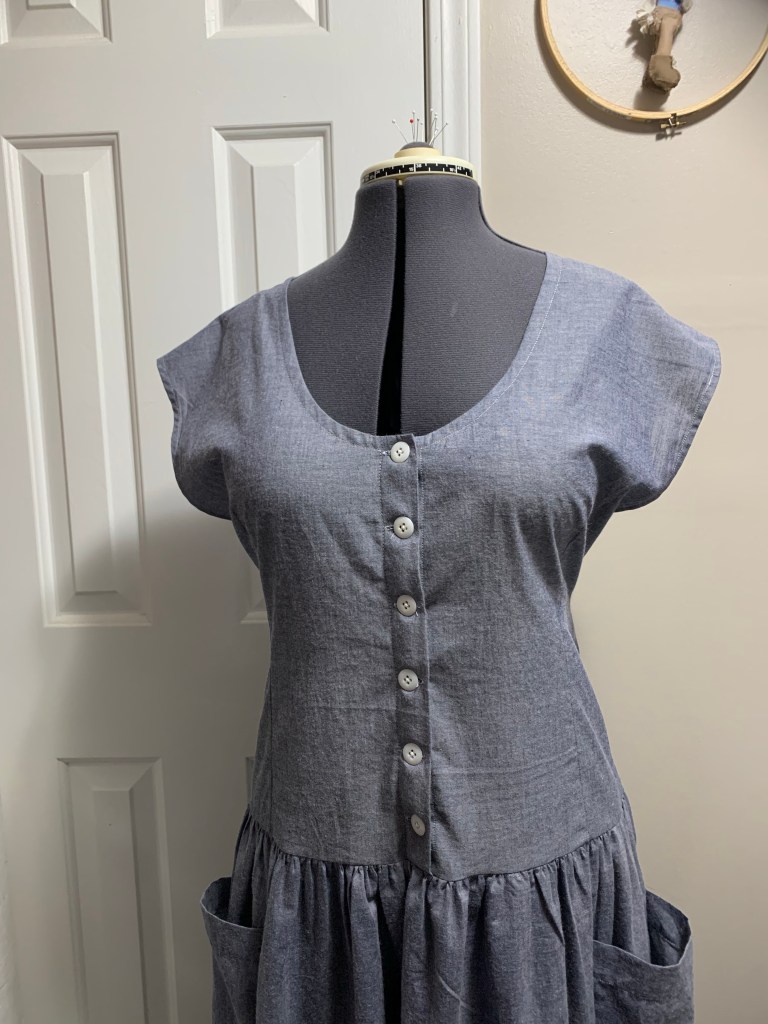
On wearing, the bust darts are set quite far out, which is odd. I almost wondered if it were a grading error, but the darts in the pattern pic are very far out, too, so I suppose it’s a design choice. They’re also a little tall on me, but, well, the ladies aren’t as perky as they were before the twins came along so we won’t blame the pattern for that. I did do my usual square-shoulder adjustment, just by taking off about 1 cm along the neckline tapering to nothing at the outer edge.

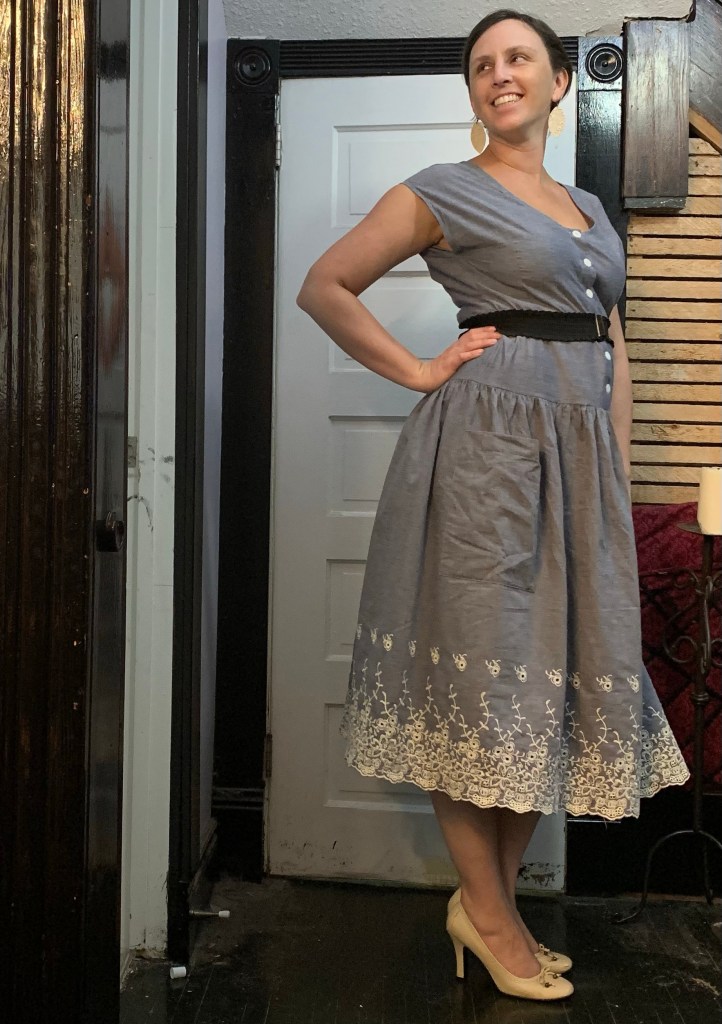
I’m a little more “meh” about the finished dress than I hoped I would be, honestly. I kind of wish the skirt were a little more full. It feels fairly rectangular, whereas I was hoping for more dramatic swoosh given the length of the skirt. Maybe I’d like it better with a slightly shorter skirt? Maybe the dropped waist is a little too dropped for my taste? In most of these pictures I’m wearing it over one of my smaller petticoats, to give the skirt a bit of oomph, and I do like that. I also like how it looks with a belt, although I don’t own any that would be properly 80s-narrow.
I find the silhouette rather fascinating, though. The pattern pieces remind me very much of a 50s house-dress. The final silhouette almost feels early 1920s (well, without the belt). And, at the least, it’s a wearable addition to my work wardrobe, which has been feeling pretty stale.


I think a narrow cream colored belt would be just the ticket. I remember this style very well!
Yes! Alas not in my current wardrobe. I’ll keep an eye open.
This dress was a blast from the past for me – I sewed and wore that pattern a few times in the late 80s/early 90s! Love your use of the border.
That’s awesome! It was obviously a winner then!
I thought you’d like to see a (badly photographed) dress that I made from the same fabric: http://sew646.blogspot.com/2020/01/one-piece-two-piece.html . Good ol’ Fabricland! Yours turned out very well. I can see that a light belt or something at the neckline would balance the light embroidery though.
Thank you for sharing that! I love how you used the embroidery on the collar(s). Too bad the fabric hasn’t held up well, although I suppose not surprising. I had a similar relationship with this fabric, petting it regularly in store until it finally went on deep enough clearance. 😂