
 Because I’m a
 glutton for punishment ambitious, I decided at the last moment to take out a Valentines project from the shop. A slinky, sexy slip. Or two, since the fabric wasn’t expensive and there was room in the project budget.

Vogue 9015
The pattern is Vogue 9015. There aren’t a lot of slip options in the ButtMcVogue line (and I’ve already made Gertie’s slip and love it and wear it to death.) Now, Vogue 9015 is an absolutely gorgeous pattern, but a lot of that hangs on the lace being used. Fabricland’s lace is, um, a little underwhelming. I mean, the stuff I used was far and away the best in the store for this purpose… But it ain’t a patch on what the envelope is using. And having had the odd chance to play with really incredible lace, it’s hard to go back.
View E might be my favourite, but for project purposes I stuck to the simpler views C and D.

View D
Well, this is one of those things that seemed like a good idea (and maybe will turn out to be a good idea…) but I really hate working with slinky fabric. Neither of my versions is anything like as well finished as I would like, and my attempts to try out different methods of applying the bias binding/”facings” were not stellar.

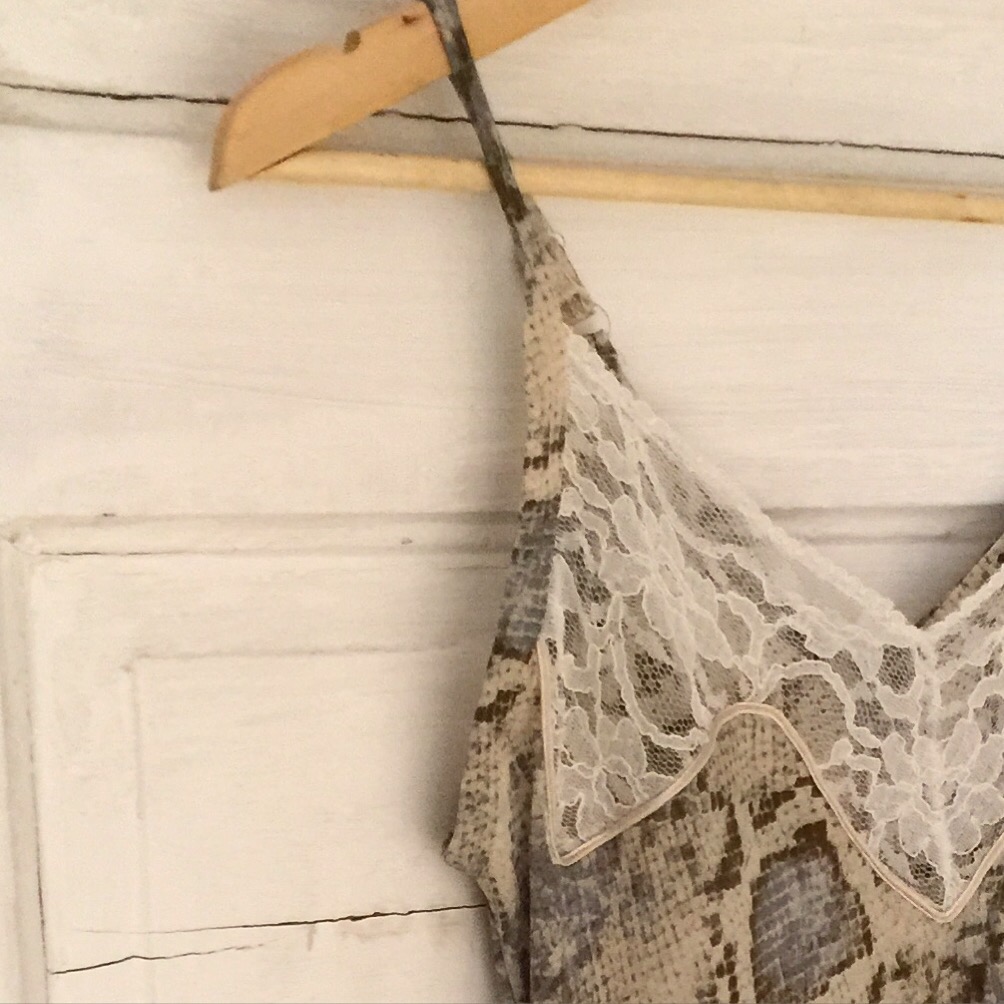
Front Detail
For my first version, I followed the pattern instructions for shaping the neckline inset and while it’s not terrible I would’ve preferred, in hindsight, to “listen to the lace” more and curve my seams around the lace elements to avoid that seam down the middle. Frankly, I’d much rather have been working with the gorgeous scalloped-edge lace on the pattern envelope. 😉

Side stripes… kinda matched at the top, not at all at the bottom.
Because my lace was fabric and I cut it to shape to match the shape given on the pattern (as per instructions) the shaped seam along the lower edge wasn’t terribly nicely finished, so I added the ivory rayon soutache to cover it, which it does nicely. I actually only had stark white soutache on hand, but fortunately I had just brewed a fresh pot of tea, so a quick tea dye and my soutache was just the right colour.

Back chevron: SUCCESS!
I cut a size 10 and made no alterations whatsoever; I did try to match the broad repeat of the snakeskin stripes, although I didn’t have much luck at the sides. I love the chevroning in the back, though. I’m not sure if the length is perfect or if an inch or two more would have been better (or at least more romantic. 😉 )
I had just about forgotten what a nightmare trying to sew all the binding pieces in place was, but looking at the photos it’s all coming back. The pattern actually has eighty million binding pattern pieces (they call them facings) but they were all basically bias cut rectangles with the odd notch here and there, so I ignored them and just cut some long bias pieces to what seemed like a good width.

Romantic pose.
At the last moment I decided to add strap sliders to the straps to make them adjustable. This was a great idea except that my round spaghetti straps don’t really fit the rectangular sliders very well; and to start I had made the straps too long, and then I shortened them and now I basically wear it with them fully lengthened. And I am short through the upper body.
It’s quite high cut in front (at least at the strap length I ended up with), which doesn’t matter for nightie purposes but could throw a wrench into any actually-wearing-as-a-slip possibilities. The pattern calls for a “front facing” (aka bias binding) that turns into the straps, but I didn’t want to put a solid strip of fabric behind my sheer lace, so I ran my straps from the side binding and just backed the front edge with a wee bit of clear elastic zig-zagged in place, to keep them from sagging.

Lace piecing in progress
For the purple, luxe version I resolved to let the lace lead, and had great fun matching the motifs to make the corner at the neckline, and adding some extra motifs partway along to give the lace more of a scalloped shape at the neckline. Alas that was pretty much where the fun ended.
In the snakeskin version, I attached my straps/binding basically as double-fold bias binding. Not the easiest in a slinky polyester. For the second version, I resolved to try the method suggested by the pattern, which is basically the same pieces but instead of the binding wrapping around, it’s stitched on the outside and folded to the inside and top stitched down. Which I’ve seen many a blogger do beautifully, I will add, to the point where maybe I assumed it wouldn’t be hard. Well, doing it on bias poly charmeuse was very hard indeed, and only partly because the seam allowance widths change so dramatically depending on your tension.

Lace, attached.
The pattern calls for having the ends of the binding transition seamlessly into the straps in a technique that looked beautifully clever on paper and turned out to be a bit fiendish in practice, since I didn’t have the snip-to-the-seam-line that this requires in quite the right place. I ended up cutting them off and just stitching the straps in place, distinctly not the best look
After attaching the bodice lace, I had a serious crisis of conscience with the purple version, convinced that this guipure lace was way too heavy for my soft satin and even for the pattern in general. Trying it on told me two things—firstly, the length was perfect, so I didn’t want the lace to add to it, and secondly, egads, the static cling! I was basically sure the damn thing would never be wearable. Anyway, this was a store project, and The Project Must Hang, so I soldiered on. I was concerned that my wide lace would both stiffen the hem and sit awkwardly since it wouldn’t curve or flare around the curved hem. So I attempted to gently gather it in along the top edge, first with a gathering foot and then, when that failed, just by cranking up the tension on my machine. On the heavy lace, this worked really well, and gave it just enough ease (I hoped) to follow the curve nicely. I used a single length of lace around the hem, fudging the length slightly to get the motifs to line up perfectly. Fortunately the bias fabric was forgiving and happily stretched half an inch or so to accommodate this. The top of the lace looks a bit irregular in places from the gathering, but it’s not obviously ruffled and it seems to flow with the curve of the hem, so I’ll take it.
 Unfortunately, I got no modeled snapshots of the second slip before it had to go hang. I don’t think I even tried it on. I was just happy the lace at the bottom didn’t stick out like a hula-hoop when I was done. So instead I’ll leave you with one last view of the snakeskin version, just in time for Jungle January. The slips are hanging now, and looking gorgeous on the mannequins, so maybe by the time I get them back I will have forgiven their flaws. Maybe.

A slip for Jungle January
PS, I can’t believe this is my fourth post this month! Thanks mostly to drafts written over the Christmas holidays, but anyway, I’ll take it. Even better, I still have a couple more in the drafts bin. 😀


They both look perfect. I hear you on sewing slippery fabrics. They are beautiful fabrics that you chose.
Oooh, slinky indeed! Something like this is definitely on my list 🙂
Very pretty! slinky fabrics are such a pain sometimes but your perseverance paid off with two pretty nighties. The chevron look you achieved in the snakeskin print is perfect!