
Tis the season, after all.

Around this time last year I started puttering gently, barely consciously, toward a mental image—-a romantic, layered, quasi-Victorian-undress look executed in all black. I made my black corset, and then a black petticoat. In between, I also started a black shift, from the same Simplicity 2890 as the corset. Alas, the very first seam I went to sew on the shift, I sewed the yoke piece on upside down. I folded everything up, tucked it in a plastic zip-lock bag, and didn’t look at it again for, well, another year.

But at our Victorian Sewing Circle in September, I finally pulled it out and unpicked the seam, and the damn thing finally started to come together. It’s got a very lovely, shapely yoke, once you finally get the right edges sewed together.

I leaned into the hand-finishing techniques for this piece, if only because the slightly loose-woven fabric has a lovely textured feel to it. I hand-stitched down the underarm facings, and the inner face of the yoke as well. I hand rolled the sleeve hems, and hand-felled the side seams, and hand-stitched a wide bottom hem. I wanted to add lace to the yoke, but had trouble finding one that would follow the elegant curves. Maybe I should just try embroidery.

I find it pretty odd how differently I feel about different hand-stitching processes. Rolling the little hems on the sleeves made me want to kill myself. Hand-felling the (much longer) side seams and bottom hem felt more like an exercise in meditation. And it’s practically the same stitch? Similarly, I can hand-sew the binding of a quilt without a blink, but sewing the binding on a corset fees like torture.

This chemise pattern is geared towards 1860s, and it’s a very off-the-shoulder style. Which I knew, having read several reviews, but still didn’t adjust for. Silly past Tanit. So it’s, um, WAY off the shoulders. I think I may go in and take 4” or so out of the back so it will sit a little better.
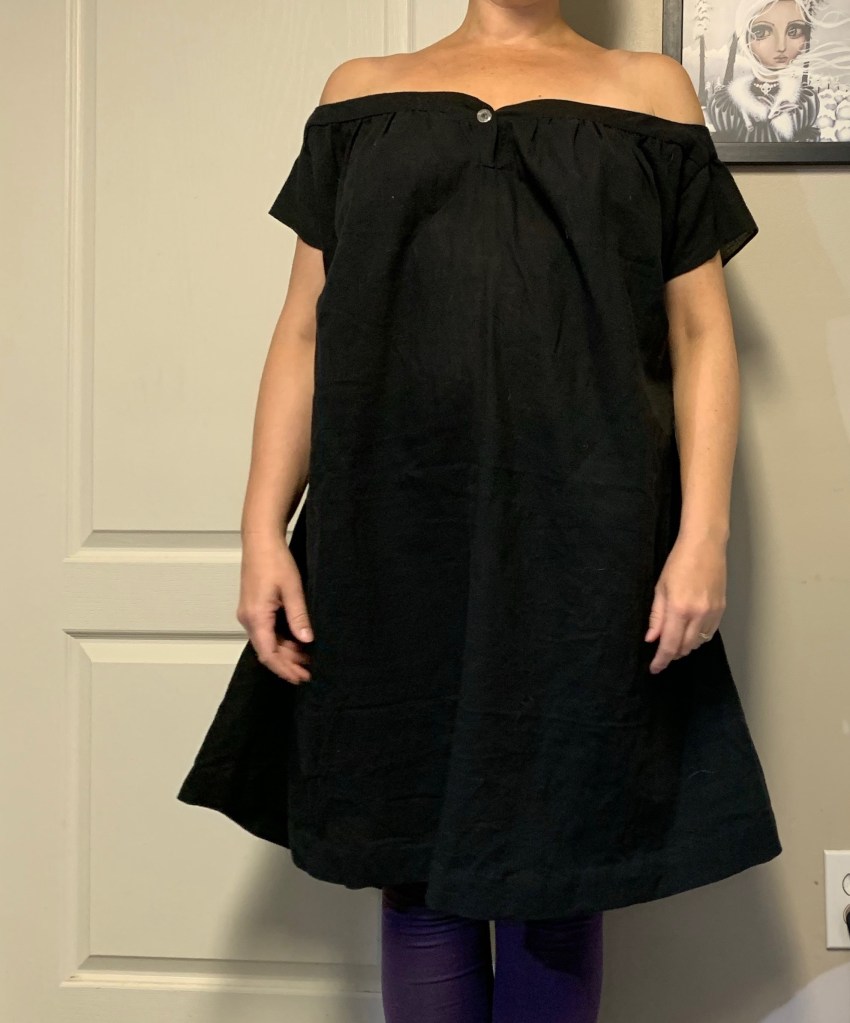
I added a button a little higher up than maybe designed for, in the hopes of keeping it SLIGHTLY in place. (I may go back and change the button, though, this one is glass but it just looks white which wasn’t what I wanted. Now I just need to find my black corset, which has been mysteriously AWOL for several months, so I can model it properly. Though I suppose this too-small costume one will work in a pinch

But no whimsical Hallowe’en ensemble would be complete without…
A cloak.
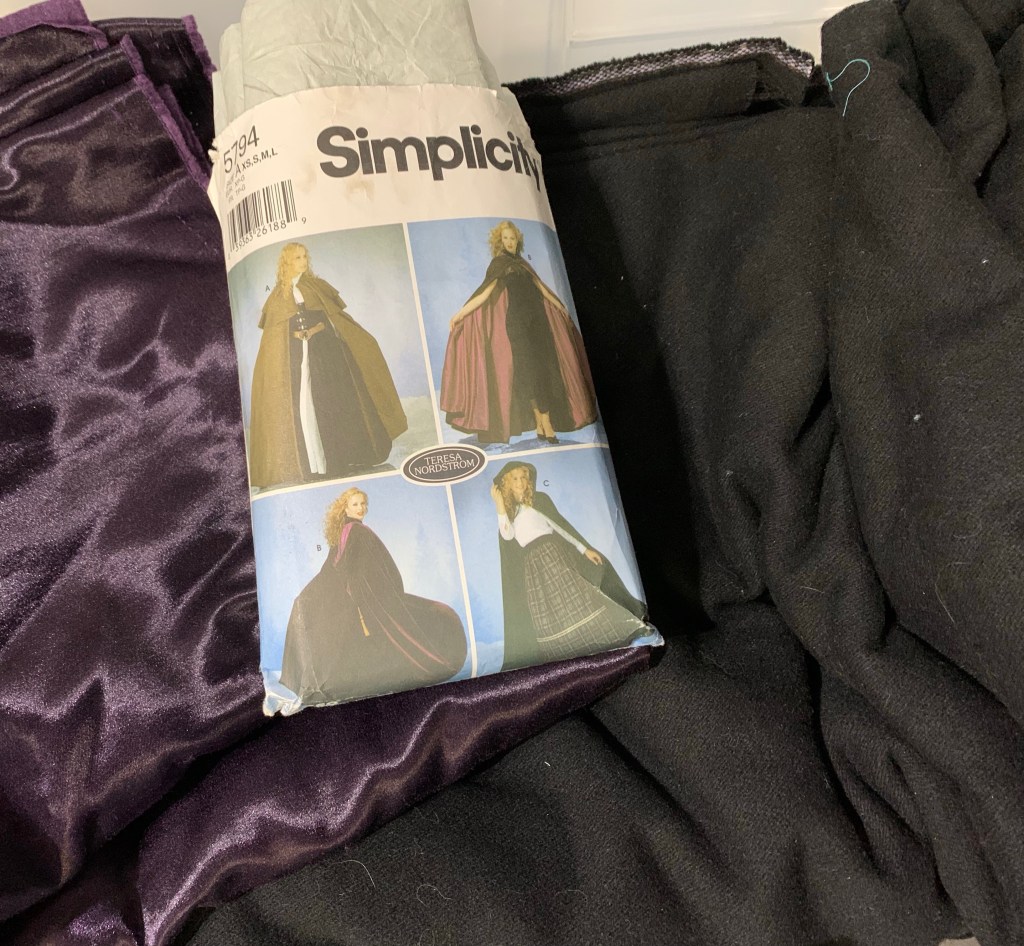
And not just any cloak. This is Simplicity 5794, the pattern Rachel Maksy used in her cloak video, ages ago. It also had pretty good reviews on Patternreview.com.

I’m honestly not sure when or where I acquired this pattern. I am quite sure I didn’t purchase it. But it looks like good solid fun.
It is, um, a little quirky.
The first glitch came with the cutting layout, where the pattern instructions show it being cut out on the lengthwise fold. These gigantic pattern pieces are not being cut on the fold for any normal-width (by which I mean 60”) fabric. Incidentally, the best idea wound up being to fold my (non-directional, thankfully) fabric in half crosswise, and arrange the two main cloak pieces going in opposite directions, then cut the hood from the remnants. I wound up with around a metre extra for the outer fabric, and the merest scraps of my purple lining.

There are three views, each with its own hood. One has a square back forming a small point, one an exaggerated point with a tassel, and the third is… unlike any hood pattern I have ever seen. It’s shaped more like the petal of a flower. I can only imagine it is meant to create a wide, fluttering kind of hood. I might even try it out sometime. Just not for this one.
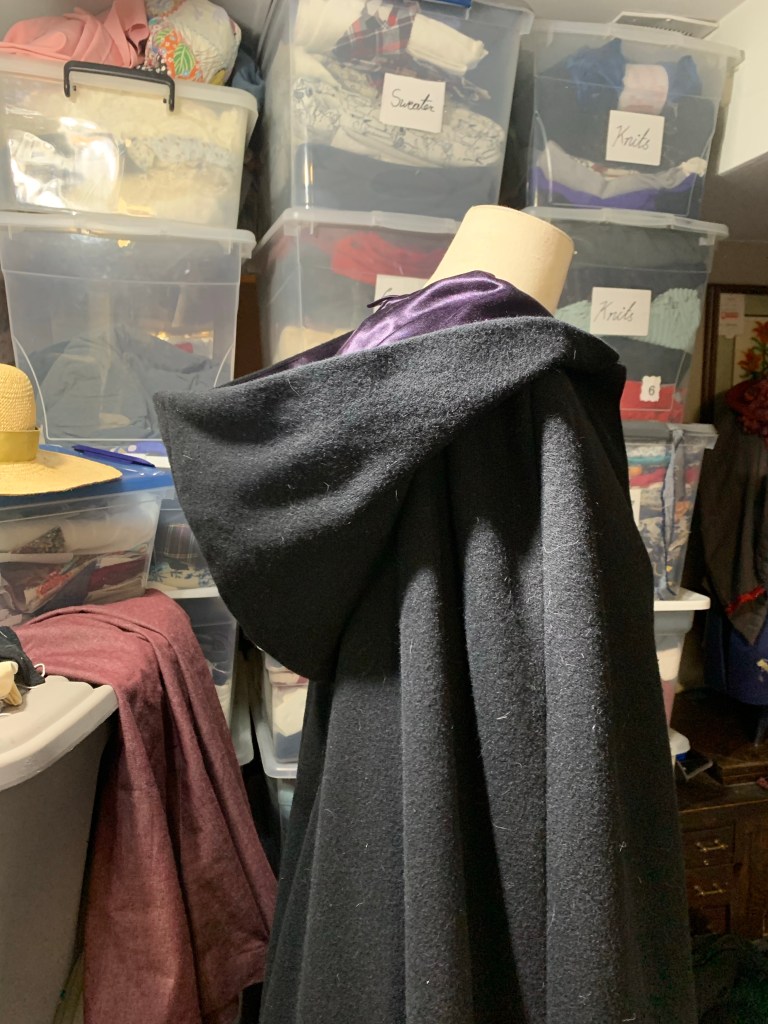
I wasn’t super into the square back hood of View A, but I figured I would just round off the little point into a smooth curve and all would be fine. Which it is, but really I should just have pulled out the hood for McCall’s M6800, because that is my favourite hood of all time, and this one ended up being just a little bit short of it. They’re very similar, with a pleat to tuck the extra fullness into the neckline, but the Simplicity hood is just a little less voluminous. It’s fine, just not quite as extra. Which is odd considering this is a costume pattern and McCall’s 6800 is an everyday kind of coat pattern. I do love the body the combination of coating and Kasha lining has.
Oh and I noticed as I was putting away the pattern pieces that the hood I used (view A, again) was actually supposed to be cut on the bias. Weird, but again I can’t help wondering exactly what difference that would’ve made. Something to try in the future, perhaps.

There isn’t much to say about the rest of the cloak construction—it’s a lot of long, straight seams. The shoulders are a wee bit wide but then I was cutting the XL size since it was already cut out and I always hate to lose the larger sizes but also there’s no way I was tracing out those giant pattern pieces. I figured I would narrow them if I felt it was a problem (which wouldn’t be hard) but honestly if I wasn’t looking for the problem I don’t think I would have noticed.

The length is GENEROUS. The envelope pictures show a cloak trailing artistically on the ground and they are not wrong. I’m more likely to be adding at least 2” in length to stuff, and it still trails on the ground on me; I’m wearing 2” heels in these photos and took a roughly 3” hem and it still brushes the ground.

I decided to use some purple bias binding from stash to cover the edge of the hem, since what else am I going to use it for? It’s a lot brighter than the lining, though. I tugged on the binding and eased the wool underneath as I sewed it on by machine, so it gathers my curved hem in nicely (maybe a little too much? My tension wasn’t terribly even, either). Then I took a deep breath and hand-stitched a good 4m of hem. Ouch! I machine stitched the lining about 1/2” shorter than the outer hem, and if I am a good girl I will make some little thread chains to connect the two at the seams, but I haven’t done it yet. I didn’t even look at the pattern instructions for hemming; I opted for separate lining hems as this is what I use in coats with wide, flowing hems and I think it lets the fabrics move the best.

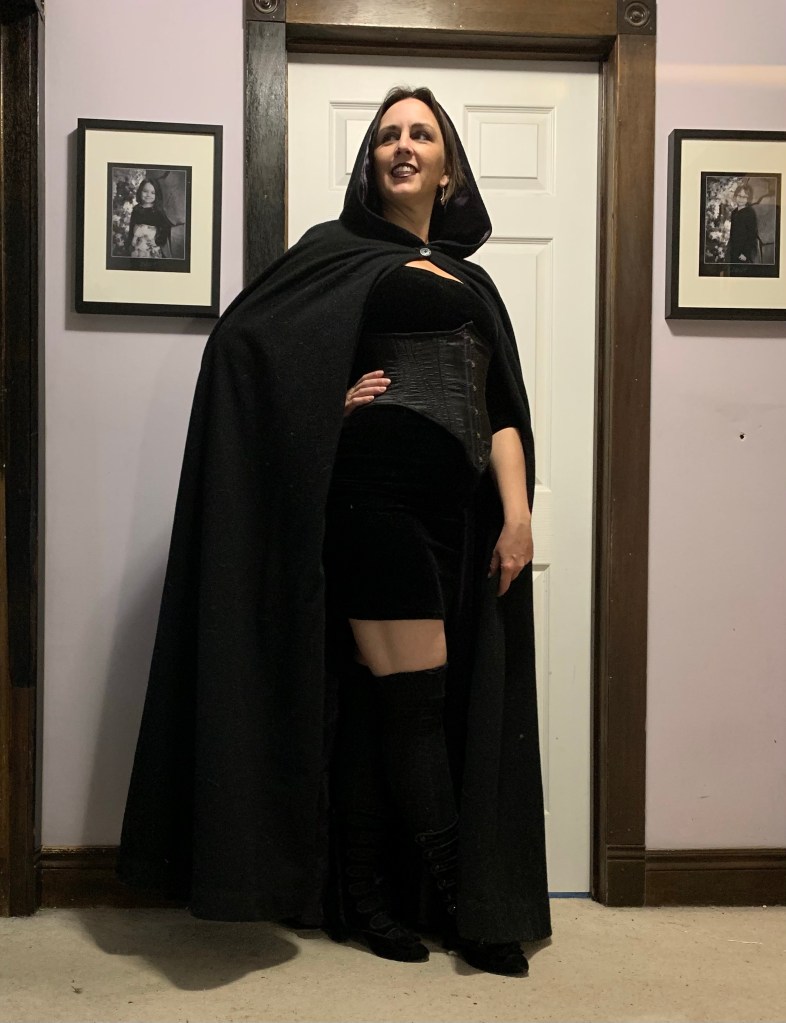
After much waffling, I decided to close it with a button and buttonhole; I didn’t want to do the ties the pattern calls for. I would’ve loved a metal sew-on clasp but didn’t have one on hand, and some kind of tab and button seemed a bit overworked.

I’m more used to sewing coats than cloaks (I say as I haven’t sewn a fullblown coat in at least five or six years) so some parts of the construction felt weird, like the lack of interfacing and facings. I’m glad this pattern didn’t have facings, as it’s a huge fabric hog already, but it still felt weird to be understitching the lining right at the edge of the cloak. Yes, it will peek out. Yes, that’s ok.

It’s not a very full cloak, actually, despite being a massive fabric hog It’s a half-circle, actually. I don’t even want to think about how much fabric a full circle this size would take). You can’t put your hands on your hips without it gaping open. However, it does hang nicely closed with arms at sides. And looks best thrown back over the shoulders anyway, I discovered.

And now that it’s done it might be making me the happiest I’ve been in a very long time.

The black corset showed up at the last possible second, after I had turned most of the house upside down looking for it, in a place I had checked several times before. So here’s a quick peek at the final look, or something like it:
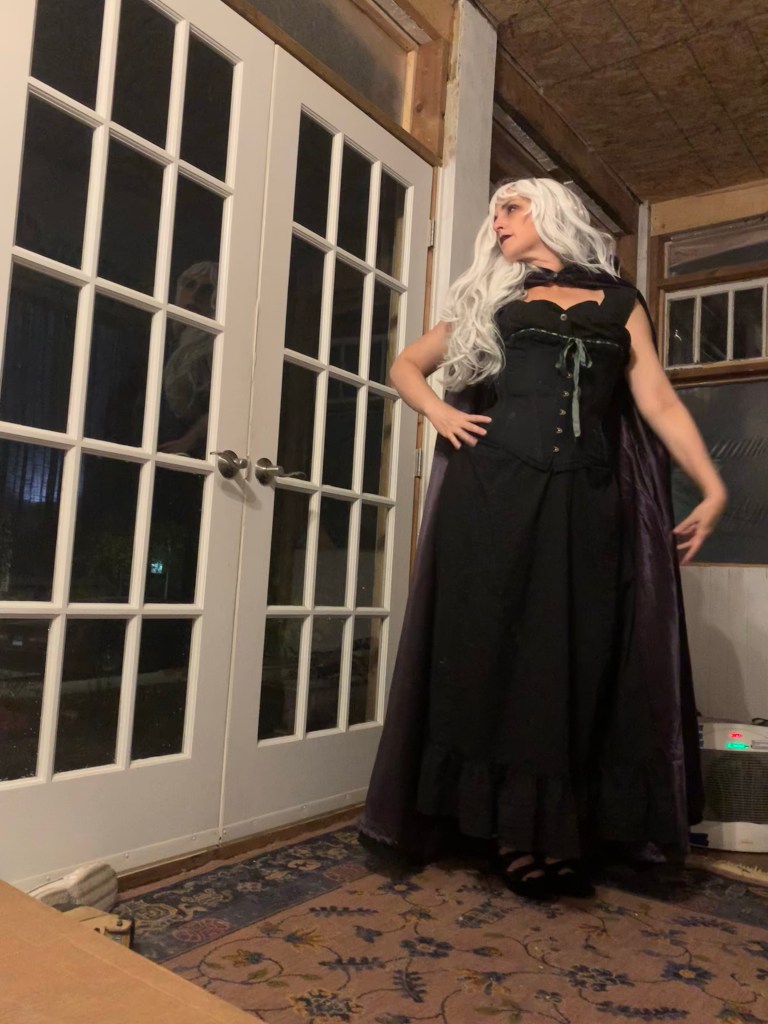
Still need to decide if I want to add witchy hat or vampire fangs.
And also figure out how to be so extra I can wear this cape in everyday life.


I can honestly say I would never go to this much bother for Halloween! But I would be happy to borrow a costume like that!! 🤣
😂😂😂
So fun!
Pingback: An epic in (slow) motion | Tanit-Isis Sews