
Inspiration:

I’ve been in love with the idea of doing a summer, mesh corset for a WHILE. I picked up a chunk of Aida cloth for the exact purpose back circa 2015. And when I made my Victorian Sundress (better pictures still pending) it occurred to me that this might also be the perfect time to make a light, aerated summery corset. So I set to work… and then summer blazed past in a blur of everything-but-sewing, and here it is just in time for the weather to turn chilly.
But back to the inspiration: I swear I saw one in a corset book somewhere, but damned if I could find it when I looked recently. This one from the Victoria & Albert shows the features I was interested in, though: solid bits, mesh panels, “waist belt” piece.
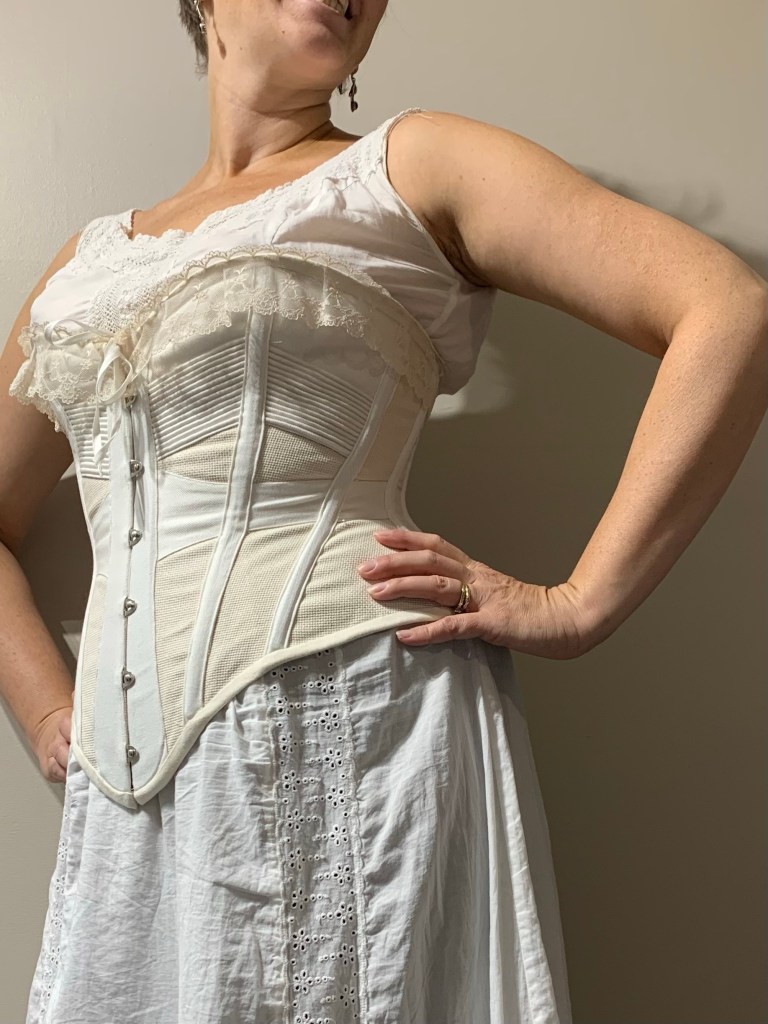
Now, Aida cloth (the stuff for cross-stitching) is nowhere near as open as the mesh used in the inspiration corset, nor is it, frankly, particularly stable. It made this an interesting project, and I’m not at all sure how long-lived the results will be.

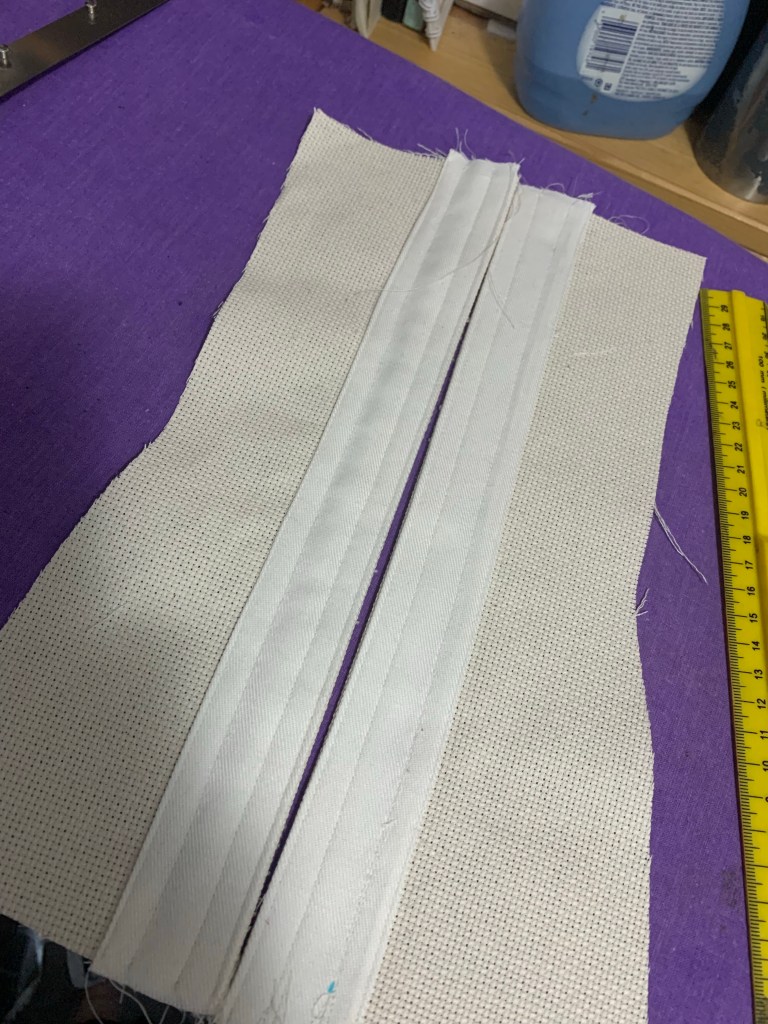
Materials: aside from the Aida cloth, I went with some fairly beefy white denim for the details. I liked the white and cream contrast. Probably coutil would’ve been better for those parts but I was hesitant to sacrifice good coutil when the main fabric was a bit dodgy. I also decided to use my last spoon busk, just to make my life harder; the inspiration piece doesn’t have a spoon busk but it is right for the time period I’m roughly going for. I used 1/4” spring steel boning but given that my boning channels are single and not the double ones I’m used to (and the rather shifty Aida cloth) I’m thinking maybe a slightly wider, more stable boning might have been preferable.

The pattern is a veritable saga of its own. The kernel, as with most of the corsets I’ve ever made, is Butterick 4254 view C, a basic six-panel corset. but over the years I’ve altered, traced off, and re-altered the pattern so much I couldn’t even tell you how much it resembles the original. I still wear my old white corset from this pattern regularly (despite it being technically far too small and, more recently, badly stained with bright blue after an incident involving a gel ice pack and a cat), and the shape is pretty much perfect for me, but I wanted to make sure that the various layers of alteration I’ve added to it over the years were reflected in the pattern I used, while re-sizing to be closer to my current measurements. This involved adding quite a bit of width to the front, and substantially re-shaping the side seam to mimic the effects of a hip gusset I had added to the white corset at some point, as well as an inch or so of height to the top. I had shortened the corset pattern initially, as I’m short waisted, and the top had always been a hair low, but somehow as my bust has gotten larger the last few years this problem got worse (even though I’m pretty sure my bust point is lower than it was). So this latest version aimed to incorporate the added width and side-seam shaping, while adding the missing height to the top.
I don’t think I’ve quite nailed my revamped pattern (and a test in real coutil, or at least ticking, is probably needed to really tell), but I do think it’s a step in the right direction. The bust height is great; the side-seam needs a little more refinement in the shape of the hip flare (which I accomplished in this piece by playing with the seam allowance), and I had to take out some excess width in the back, though I’m not sure if that’s just due to stretching. I might try to adjust the fall of the side seam above the waist forward a little; below the waist it’s perfect.
Construction

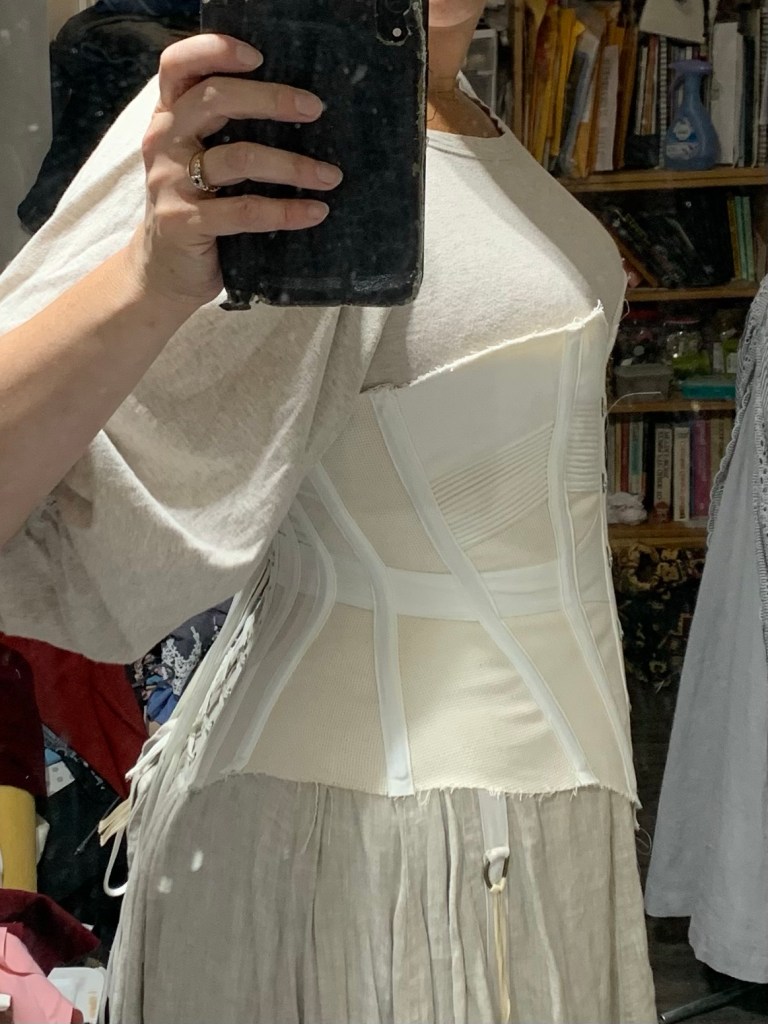
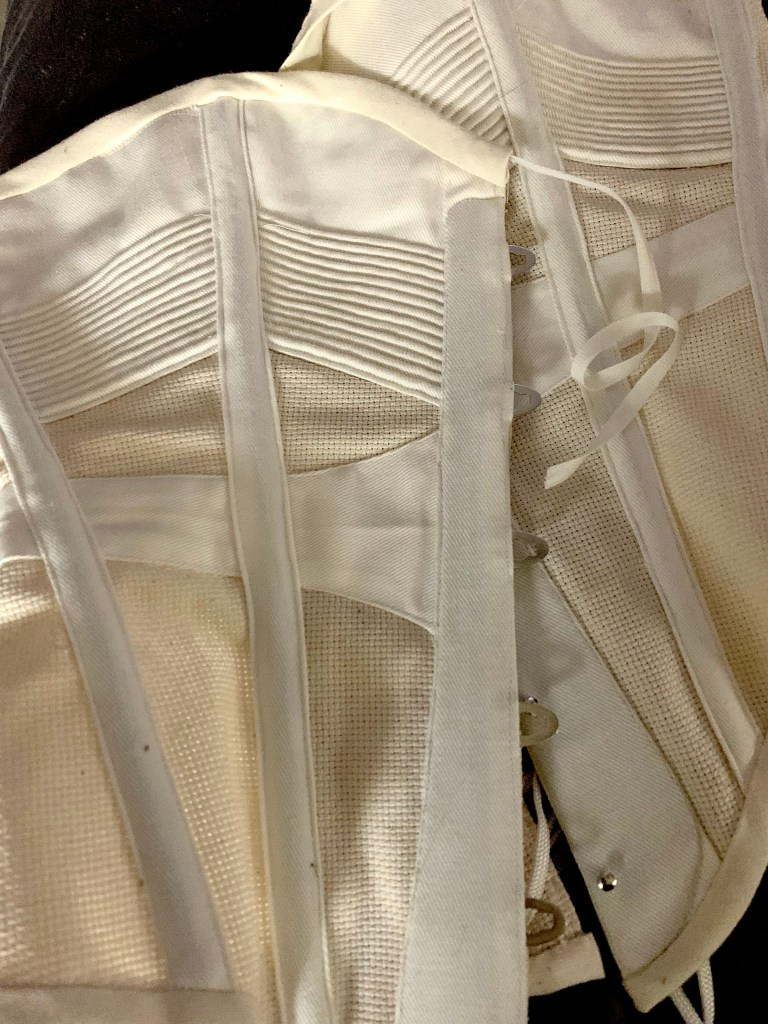
- Original has solid outer on top of mesh inner at corset front/back
- Overlay solid portions over mesh around busk, lacing panels, and bust area, plus shaped waist belt
- Seams to the outside, covered by bone casings
- Cording on bust solid parts (in hindsight the original may just have been quilted)
- Waist belt added after main seams but before adding busk and lacing panel coverings
- One bone per seam, in bone casing, applied to the exterior
- Extra bone just beside the busk for added support (not necessary for spoon busk)
The trickiest part about this project was coming up with the order of operations. (Spoiler: I messed this up, more than once.) I added the “bust cover” patches first, with cording. Then sewed the panels together. Next I should’ve added the waist-stay panel, but instead I did the back lacing area so I could test the fit before I stitched over all those seams. It’s good I did—I had to take the back portion in significantly, and tweak the hip curve at the side seam. I’m not sure if I had added too much or if the Aida cloth just stretched; it definitely wasn’t as stable as would be ideal. But it also meant I had to unpick a portion of the back lacing panel to tuck the waist stay under it.
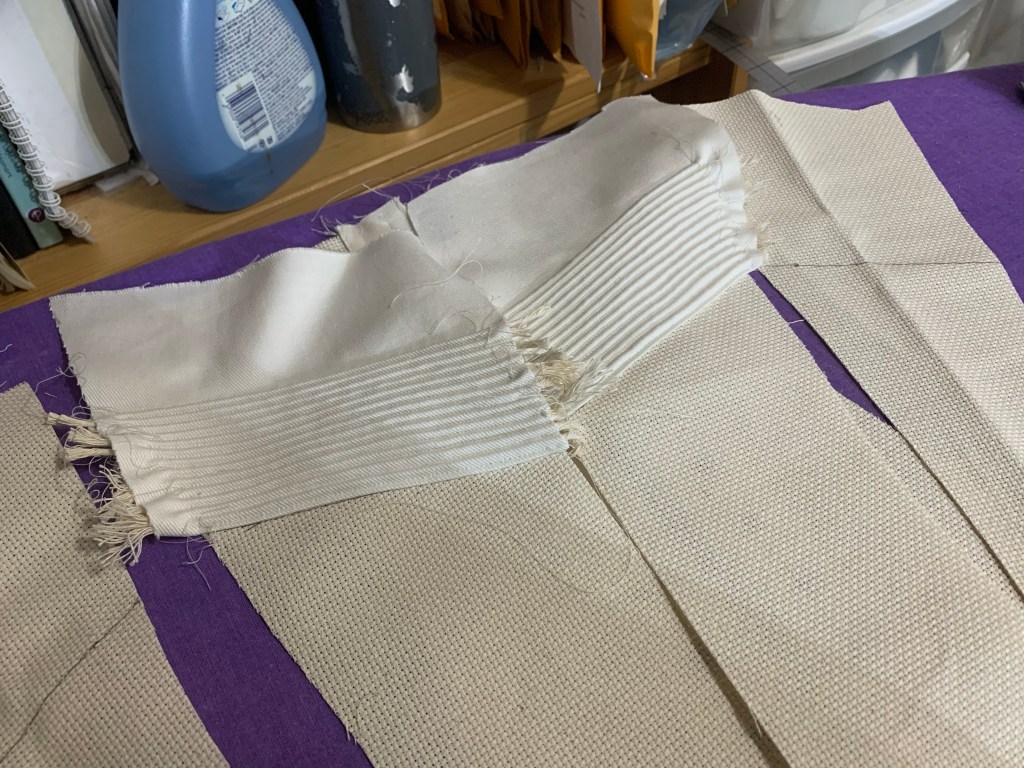
Cording the bust area wasn’t hard, though it was a tad tedious. I was pretty sure within the first few lines that I should’ve used a thinner cord, as my channels are VERY raised. Looking back at the inspiration piece, they may actually have just been quilted, not actually corded at all. Oh well. If I were to do it again I’d move the entire corded section higher by a good inch, as it mainly sits below my bust. But that was pretty much impossible to determine in advance.


The trickiest part of the construction was wrapping the busk covering panel close around the busk pieces, but still with enough room to edgestitch it down, without breaking a needle. Especially while getting the busk in place over the bulk of the corded patches. I used a fairly thick string for the cording and in hindsight I wish I’d used a thinner one. Those parts are VERY thick and were really hard to sew over, even for my Pfaff 360, and I’m a little worried all the trimming I had to do may have left these seams vulnerable to fraying.
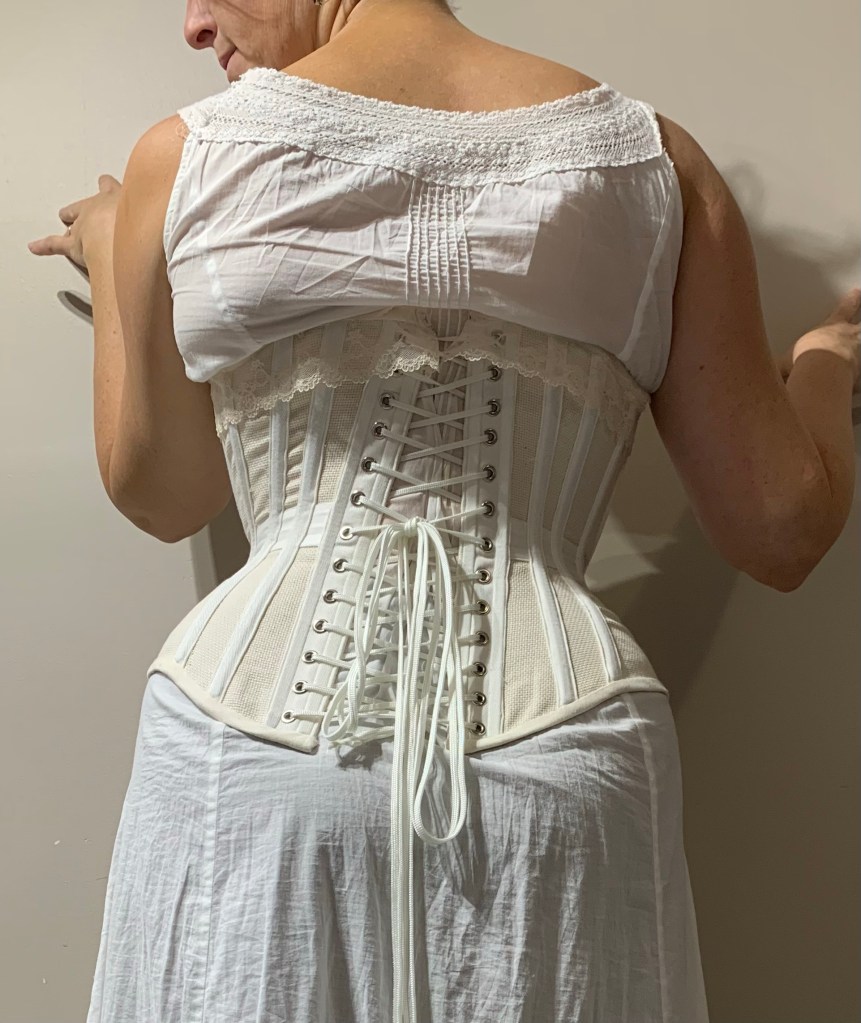
Even with the width I removed, the corset is not really “tight”… I can lace it very nearly closed, although I wouldn’t want to wear it like that all day. If it stretches any more with wear it might still become too big. Although, I’ve also lost a little bit of weight this summer; if that reverses come winter I may be glad of a little extra room!
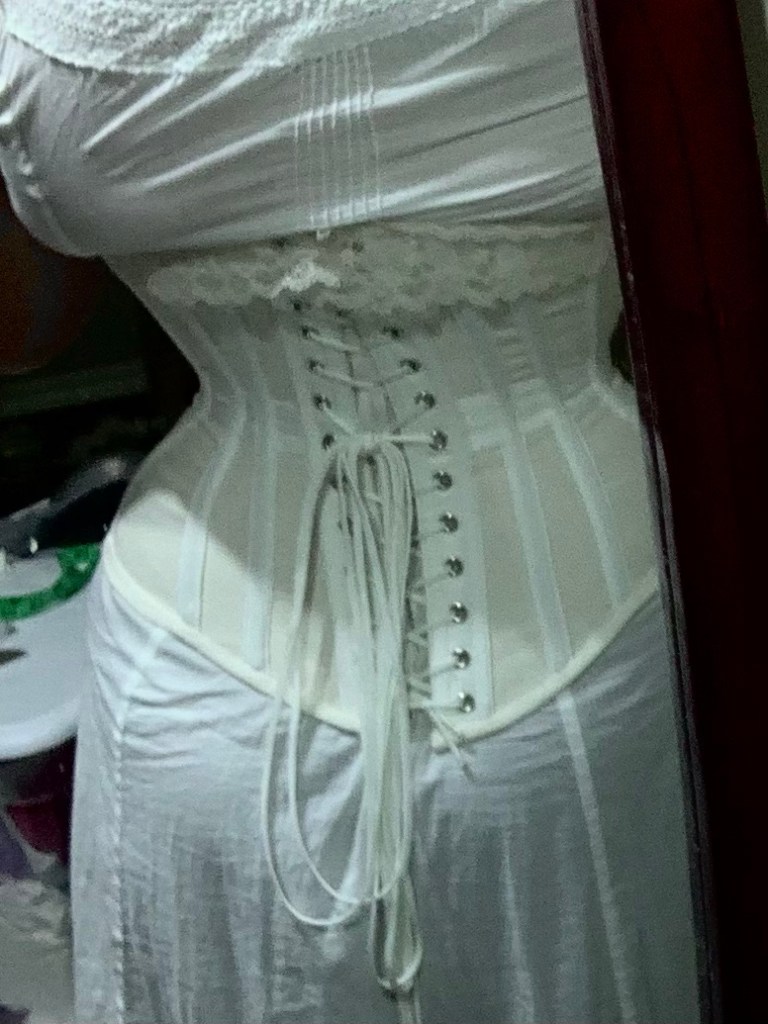
I had planned to use the same white denim for my binding, but at the last moment decided to go for a lighter-weight cream twill, for less bulk at the edges of the corset. No regrets, although the texture of the heavier denim would’ve been nice.
I also remembered to add drawstrings in the upper binding, using more of my 1/4” stay tape. Which is possibly my favourite notion at the moment and I may need to just bite the bullet and buy it in bulk.

Anyway, I’m cautiously thrilled with the results, imperfect and experimental though they are in many ways. The shape is very much what I wanted. The bust height is so much better than previous versions. The size is a pleasant change from nearly-too-small corsets. I love the solidity of the spoon busk. How will it be as it breaks in? Don’t know. Will it self-destruct after a few hours of wearing? Could be! Will it be fun to sew? Definitely.
And now… to the fall sewing!


Hey, out of season sewing is much preferable to unfinished sewing, or even completely undone 😁
Isn’t that the truth! Anything finished these days is great!
You don’t choose easy projects do you!! Well done for making the time and pushing through. Would suck if it doesn’t last to wear often. Bernie
So far it’s really comfy! Here’s hoping it holds up. 🤞
Pingback: Another Very Boring Corset | Tanit-Isis Sews