Monthly Archives: September 2022

The Black Corset

Of all my wardrobe “needs,” one could, very reasonably, argue that another corset should not be at the top of the list. My one pair of jeans has a rip in the knee and recently blew the topstitching around the fly (something I’ve never experienced before, by the way). My underwear drawer is just, well, sad. I have almost no leggings left.

But no, we’re resuming (after a three year hiatus!) the Victorian Sewing Circle, and my old corset is Too Small. I mean, so is the rest of my 1885 outfit, and I will have to restart the bodice I’d been working on for the “new” outfit to make a bigger size (and not accidentally use ticking for the lining. Ticking is great for many things, because it is very stable. It is not great for lining clothing that you need to move in.) But one must begin with the corset.

Black grommets, because apparently I ordered a 10-pack of antique brass busks but no matching grommets?!?

I have quite a few corset patterns roughly suited to the period, although most of my previous versions were based on Butterick 4254, which maybe isn’t the best starting point but that’s where I started and once I had it fitting well you might as well go on with it. Until it isn’t well fitting, of course.

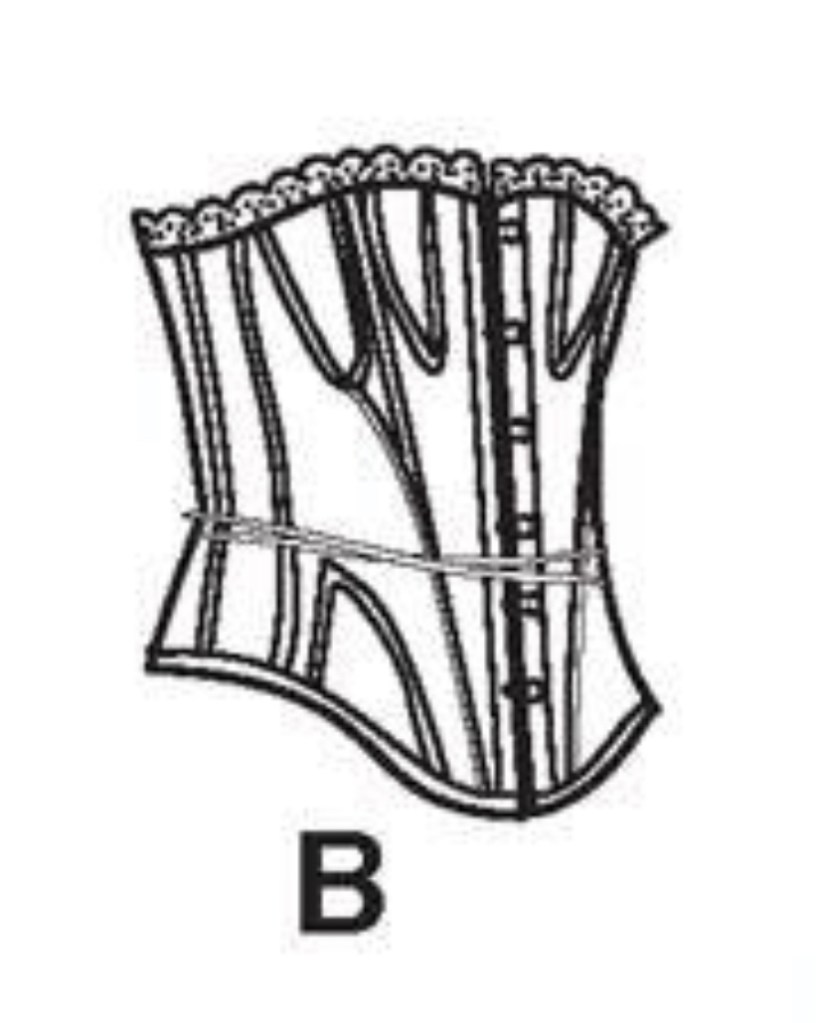
All the “Victorian” corsets I’ve made have been paneled, but I enjoyed the gussets in the two regency style corsets I’ve made and was curious to try a later gusseted pattern. Especially as they’re a handy way to adjust the sizing very specifically.

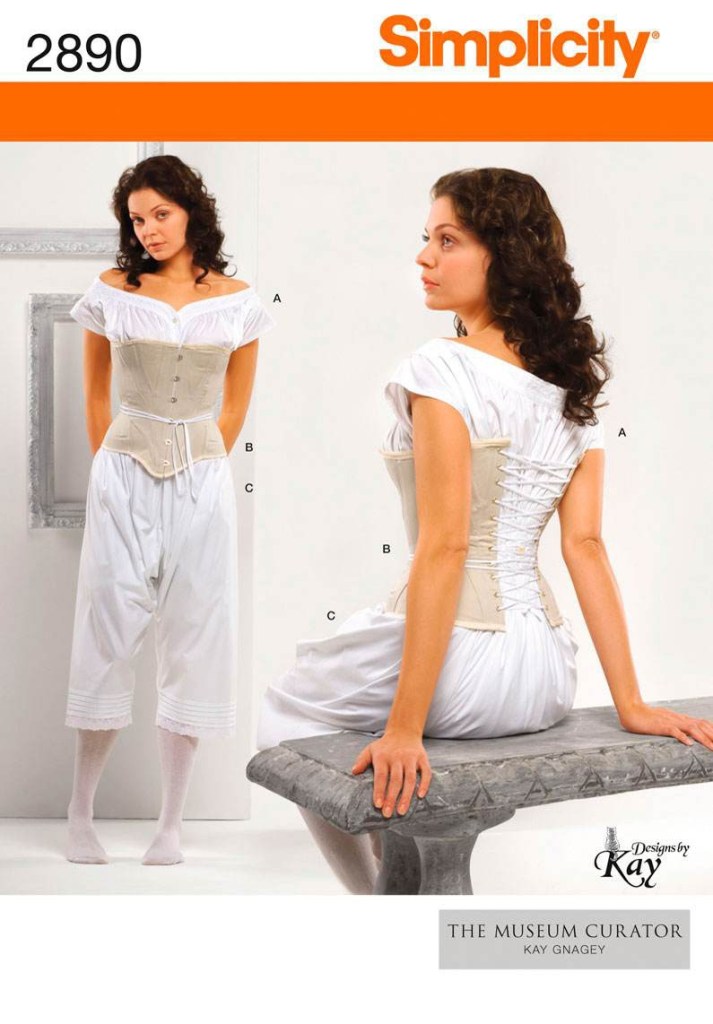
Which brought me to Simplicity 2890.

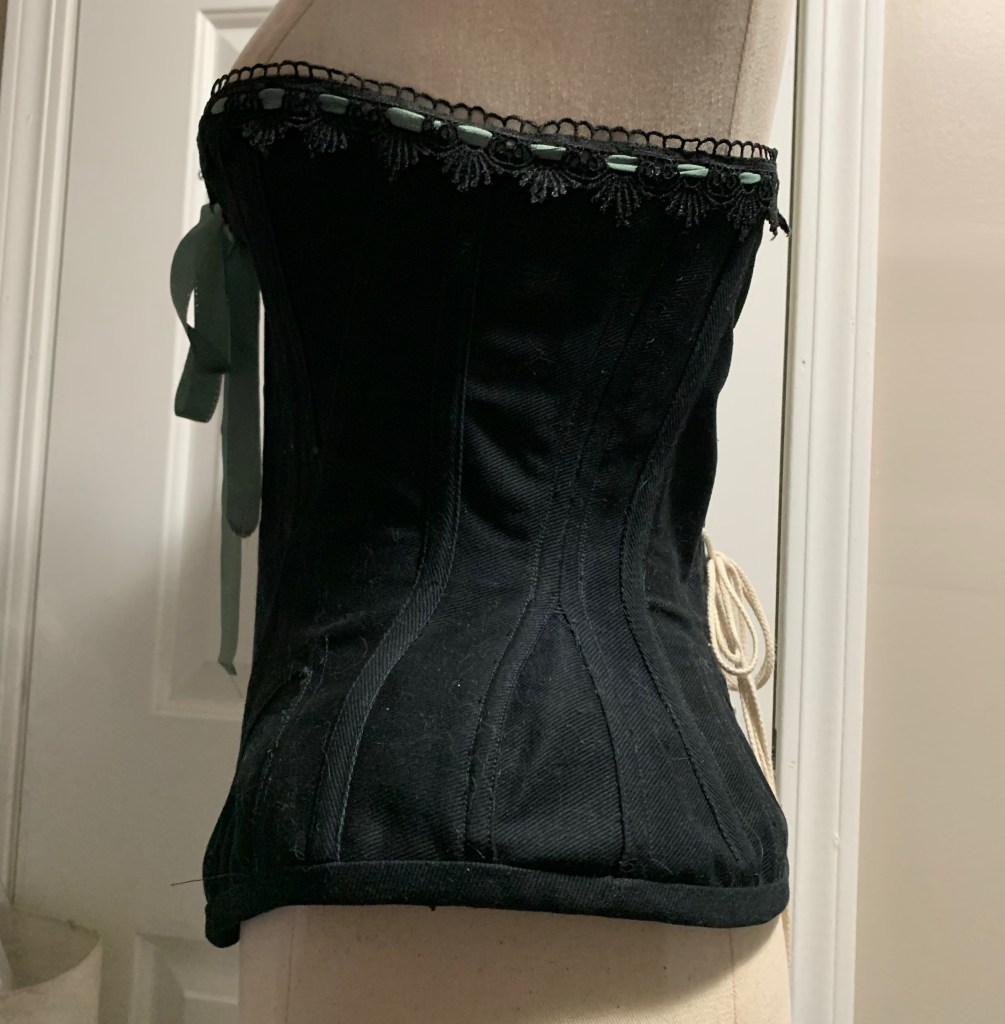
The envelope pic isn’t terribly promising, but it did have gussets. Some internet searching (aka reading the reviews on Patternreview.com) revealed that it is in fact based on an original historical corset pattern from 1872 (despite the more 1860s vibe of the chemise.) This blog has a nice discussion of it. The internet also agreed that the pattern was lightly boned, short-waisted, and ran small.

Tech drawing, poor resolution.
Back view of technical drawing. Possibly even worse resolution.

Short waisted was fine by me. Lightly boned, I wasn’t too concerned about, as I’m looking for a comfortable rather than tight-lacing corset.i added 1/2” to each side-seam to hopefully make up for the “runs small” part (not adequate, by the way), and dove in.

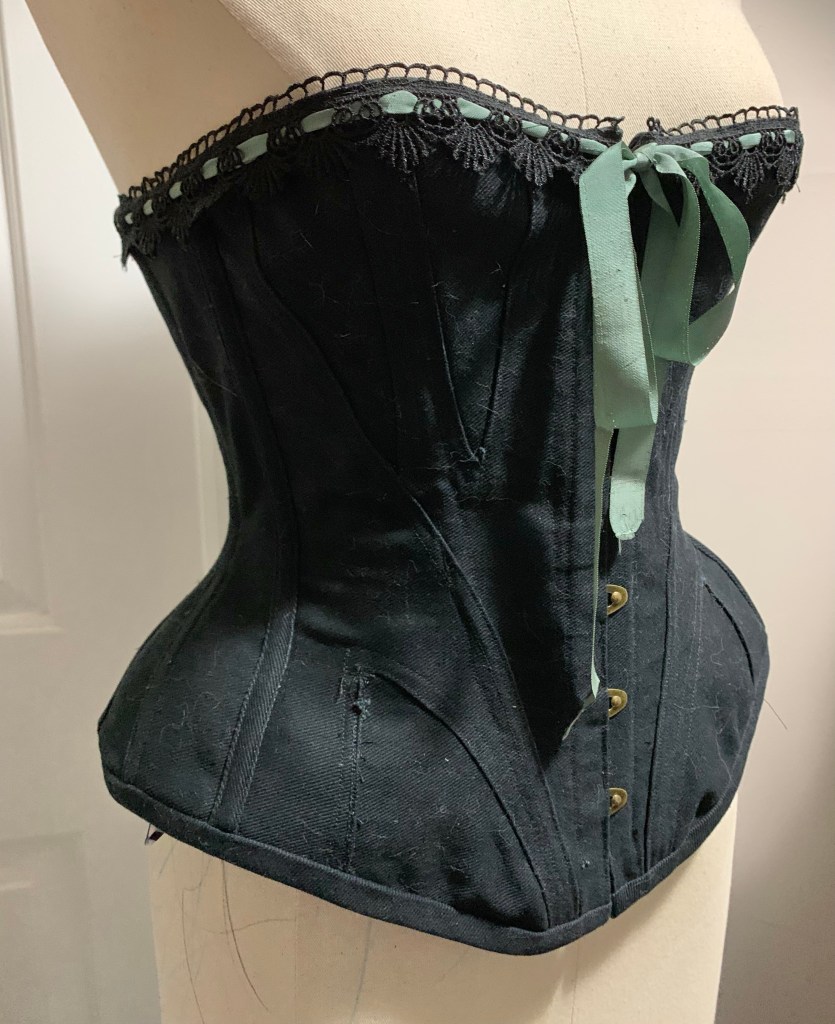
My mock-up seemed promising, but some extra room in the hip would be helpful. However, I didn’t fully appreciate the issues of my mock-up fabric (which really wasn’t stable enough) and the fact that it wasn’t fully boned. When I tried it on, it seemed like opening up the front hip gusset gave me the extra hip spring I needed. But this was actually my too-flexible fabric “borrowing” the width from the front—-where I needed the width was right at the side seam. Since I didn’t realize this until my “final fabric,” version, I wound up doing most of my fit-futzing on the final version, removing a lot of the width I had added to the front hip gusset, and ripping out the side-seam to insert a gusset in the hip there.

Hip gusset in side seam. It looks thrown to the back here because the dress form is very small—on me it is indeed at the side.

This greatly improved the hip shaping, so I proceeded with construction.

I will say, I definitely prefer to topstitch my gussets in place as opposed to constructing them “normally” as the pattern instructed. There’s a fair bit of fraying around my gussets already from futzing with the seams to get them smooth with the “regular” method, which I will have to zig-zag over at some point.

So let’s talk about this pattern. What a weird, weird pattern.

First, it’s only two main pieces; almost all the shaping comes from gussets. This made the only other preemptive fit change I would’ve made, a swayback adjustment, impossible as without a side-back seam to absorb the angle change it would leave the CB line not straight.

Can you see how the bone casing stitching crosses the weird front seam line?

The single weirdest thing is that curved seam in the front. It isn’t a seam—it’s a tuck. A long, curved, narrow tuck. Why is it there? Does it add shaping? No. It does make it slightly easier to sew the gusset that emerges from it, but the other bust gusset doesn’t have one.

It does create a very attractive curving line across the corset front, which may be the only point of its existence, but then the bone casing runs straight up the front, crossing it, and at least partly diminishing its effect. Weird.

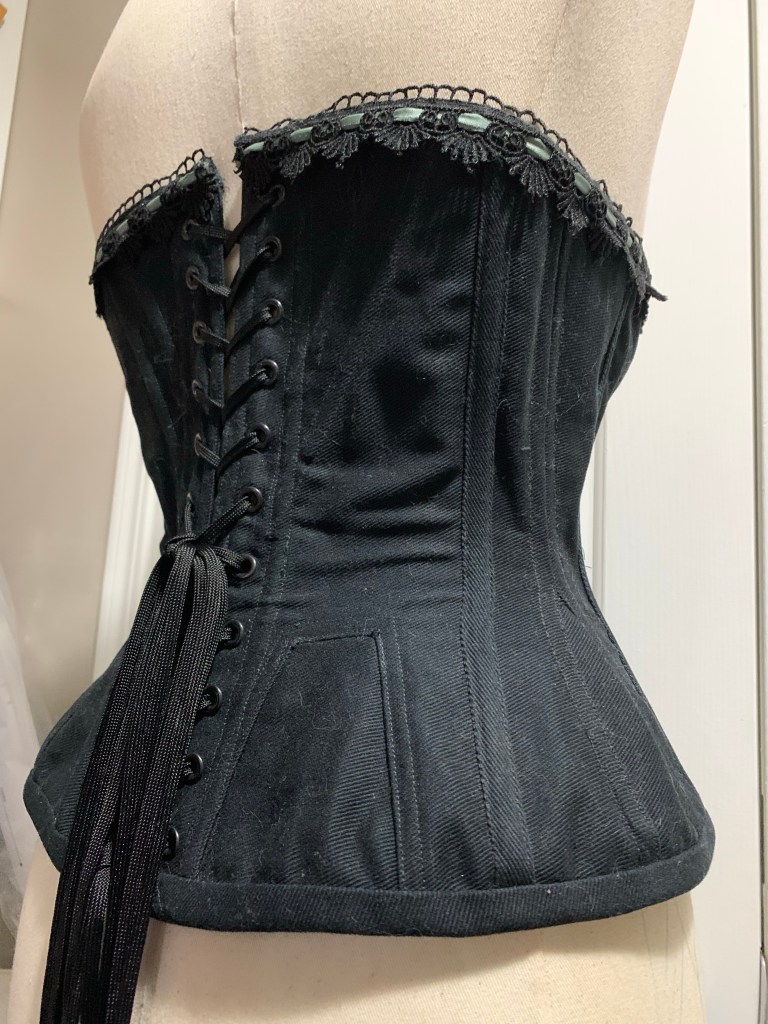
The other oddities may be effects of grading—I didn’t love how close the back hip gore is to the back boning, for example.

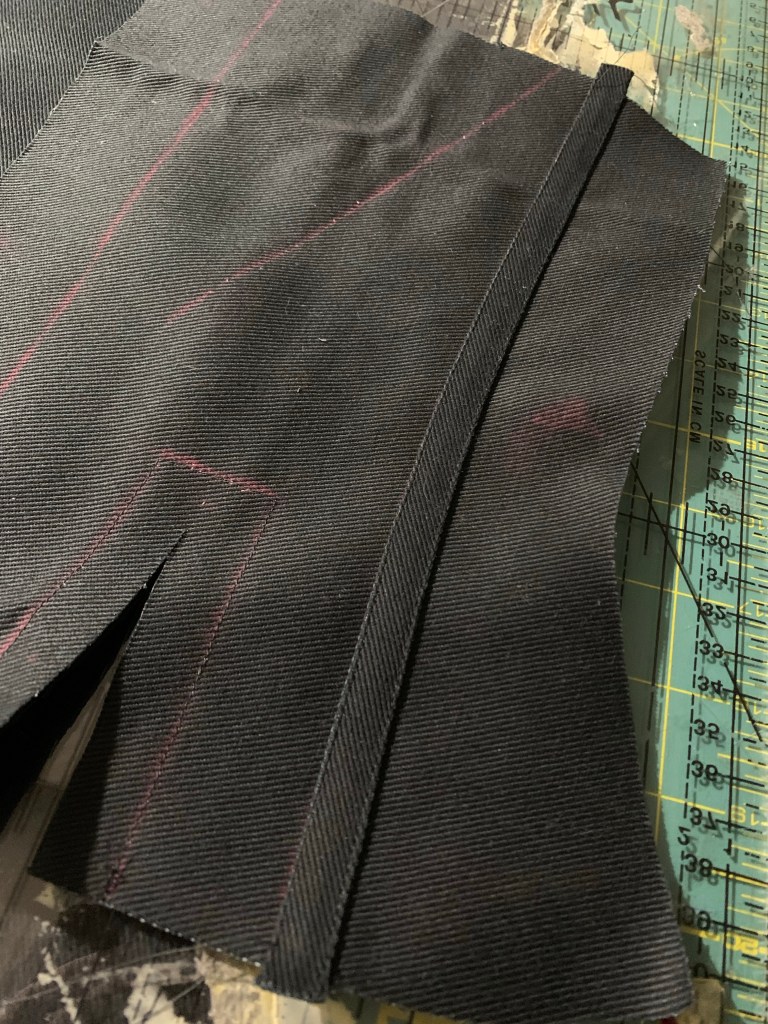
This was my first time, believe it or not, doing applied boning casings—Butterick 4254 uses the seam allowances for all its boning casings. I just cut 2.5 cm strips of my fabric (a bull denim, not a proper coutil as the sewing room gnomes have absconded with my coutil) and then ran the strips through my bias-tape maker and pressed. They are meant to be applied on the inside but I accidentally stitched the first one on the outside and I really liked the look. However, you can’t really apply ALL of them on the outside, as the end of the angled casing on the back is covered by the facing folding to the back, and the front boning casing crosses over that decorative front tuck so if you stitched it on the outside it would obscure that feature even more.

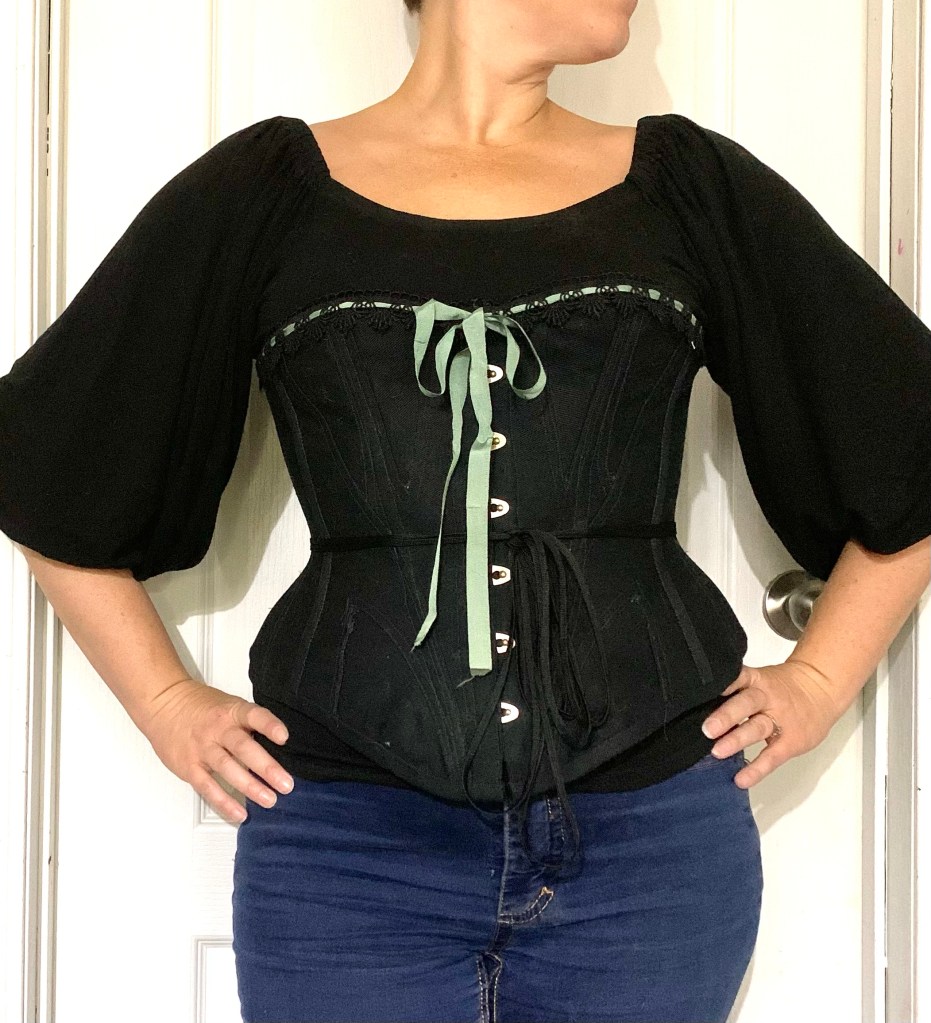
The pattern doesn’t call for a waist stay, but I added one, and I’m very glad I did as I think the waist shaping would be a lot mushier without it, especially in my not-coutil fabric.

Lacing gap is still wider than ideal.

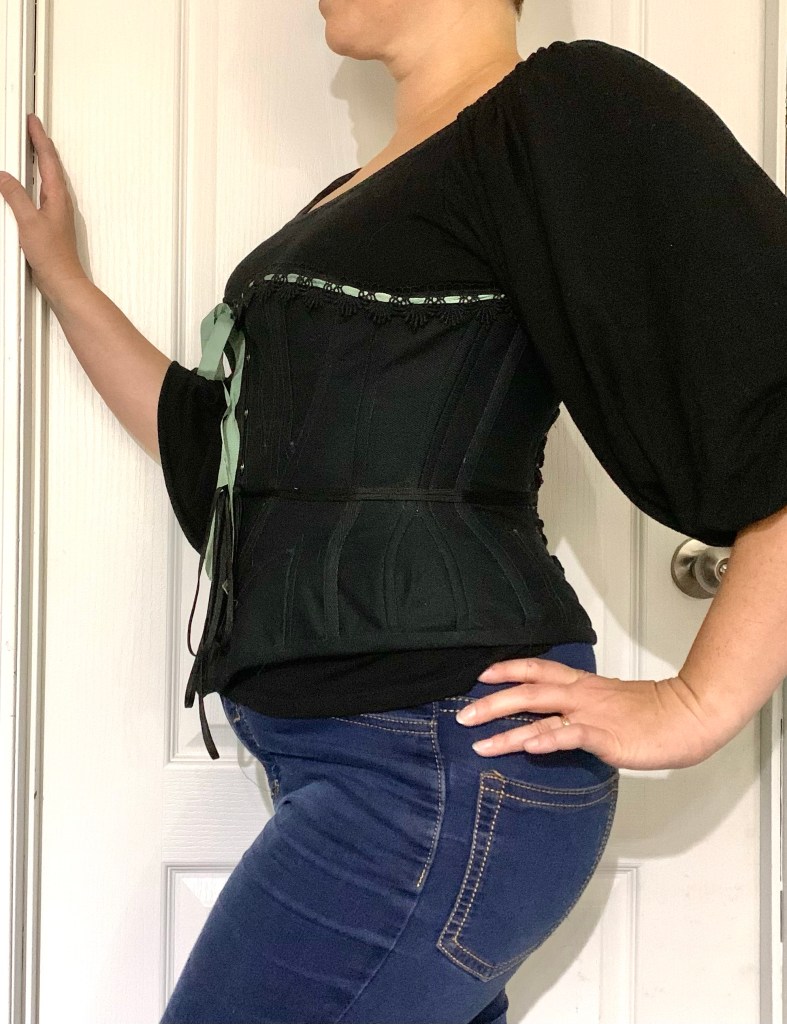
While it gives a stronger shape than indicated by the cover model, it’s not a particularly extreme corset. The hip-spring before I added the gussets there was very gentle. I could probably have enlarged the bust gores a wee bit, too—I did sew them with narrower seam allowances to add a bit more room. The light boning gives it a less cylindrical, more organic shape than my other corsets. At least when it’s on me—not so much on the dress form.

I didn’t have to put much thought into the lace and ribbon selection as I only had two pieces of non-stretch black lace, but I love it. The lace is just a guipure from Fabricland. The “ribbon” is a rather battered chunk of vintage rayon seam binding that came from inherited deep stash—I should probably tidy up the ends, but it was the perfect addition, I think, to relieve the sheer black.

On the whole it was a fun experiment, anyway. It may not hold up very well, not being coutil, but I don’t exactly wear my corsets heavily either. And if it does fall apart, well, with any luck by then the sewing room gnomes will have returned my coutil and we’ll just call this version the mock-up.

6 Comments

Filed under Sewing

Happy Homemaker Cosplay

Since the twins were born, a large chunk of my previous wardrobe has been inaccessible—either not fitting any more or not compatible with breastfeeding. (At least one of those will resolve itself… eventually) And I’ve missed it. In particular, the fluffy vintage fifties style dresses and skirts have been almost completely cut out.

Disclaimer: skirt is worn with a moderate crinoline in these photos. A circle skirt is always improved by the addition of a crinoline.

I made two versions of Vogue V8882 as Fabricland projects back in the day, and they remain some of my favourites, or would if I could still wear them (ok, I can usually still get into the plaid version, at least in the morning). There’s something about the circle skirt silhouette, with those additional little tucks fancying it up just the tiniest bit… anyway.

And when I splurged back in August and ordered myself a bunch of linen from Pure Linen Envy, the icy-blue heavier piece obviously wanted to be a skirt or bottom of some kind.

So really, it was a match just waiting to be.

As with my plaid version, I added some length beyond the original pattern, to get that sweeping midi length. I had ordered 3m, which allowed me to add 4.5” to the length, and to preserve as much of that length as possible I did a tiny 1/2” hem, and hand-stitched it, at least in part because my brother had been visiting from Australia the last couple of weeks and it’s much easier to visit while doing handwork. I would’ve done a bias-faced hem if I’d had enough scraps left over, but there was no way, and I was too in love with this scrumptious fabric to introduce a different fabric to the project (although in hindsight I definitely have some lighter weight cottons in an almost identical colour and texture that would’ve worked…)

I made the size 14, and the waistband is comfortably snug—but be sure to check because my waist is SIGNIFICANTLY larger these days than the 28” the size 14 officially lists.

The waistband of the pattern is a simple rectangle, and quite wide. This works ok for me, with my cylindrical torso, but if you have a rib cage that actually tapers to your waist a shaped band would be better. I wanted to make sure this waistband didn’t end up a crumpled mess like the waistband of my Adventure Skirt has, so I added two layers of (admittedly lightweight) armoweft interfacing, and stitched little casings to the inner part of the sides for small plastic bones. I would’ve used hair canvas and steel bones, but I wanted the skirt to be more or less washable. So here’s hoping that my efforts are enough; it’s doing fairly well through the initial couple of wears anyway.

The small hooks and eyes I had lying around definitely aren’t perfect, though, letting the back gape, but if I manage to pick up some proper bar hooks I can add those on later. I’m prone to one of two mistakes with closures like these—either putting the hook too far in so that the edge curls out or, as in this case, putting the hooks right at the edge (so it can’t curl out) but then the eyes/bars underneath show. Oops.

The lapped zipper in the back was the first I’ve done in ages, and would probably have benefited from reviewing the method—it wound up pretty wide, and I had to add a facing piece on the fly. It looks ok, but is definitely more in jeans-fly territory than “delicate vintage style closure.”

Also like my plaid version, I added pockets to the side seams, although these ones are much roomier so I don’t have to fight to get my phone in.

I’ve been guilty of skipping the hanging stage when making circle skirts in the past, but I’m definitely glad I didn’t try with this fabric, as it grew a good couple of inches in some places. I’m not convinced my results are particularly even, but I’m calling it good enough.

In the end, I’m super excited to have another skirt for my fall wardrobe. Though if I’m going to use this for actual homemaker cosplay (aka cooking), I had better make myself an actual apron, too…

2 Comments

Filed under Sewing

White and whimsical

I’m not sure I can capture the train of thought that led to these little dresses. The pattern is the free Peasant Dress pattern from Scattered Thoughts of a Crafty Mom, which I acquired and printed out a while back after the twins got some hand-me-down dresses made from it by a friend who also sews. It’s been sitting waiting for a while while I fussed around with other things.

I wanted to make white shifts to go under their little regency dresses from last year… but then I wound up pulling out this wonderful textured white cotton (left over from a shirt I made my huband eons ago) and just went with it, except it was far too thick to fit under those little regency dresses, not to mention the neckline would have been wrong. But somehow I decided to go ahead and make up little white dresses anyway.

I cut the size three dress, which is different from the size two only in having an inch or so more length. They’re a bit long but our sundress season is coming rapidly to a close and I wanted to be sure they’d still fit next year.

The twins had a lot of fun wandering the house with their lanterns looking like little lost ghost girls.

There’s really nothing to these dresses, except for the time it takes to thread the elastic through the casings at neck and sleeve. I added some vintage ribbon to make little bows at the neck, but they were still quite plain and nightshirt-y.

Not creepy at all. Nope.

So to spruce them up, I pulled out some lino blocks and acrylic fabric paint and fabric medium (that you mix with the paint to turn regular acrylic paint into fabric paint) and played around until I got a result I liked.

And yes, the uneven, “home printed” look was intentional. And yes, I did geek out a bit and put my Rebel Alliance block front and centre.

So now my just-turned three year olds have, not only more white dresses, but white Star Wars dresses.

So yeah, now I want to block print everything. We’ll see. (And as usual I wish I had better pictures of the dresses being worn, but getting two three-year-olds to pose for anything but the goofiest pictures is pretty near impossible so, it is what it is.)

Comments Off on White and whimsical

Filed under Sewing